Add your Signature
Signatures are cryptographic codes embedded into the document, to prove the identity of the actual signer of a document and whether or not the document was changed since signing. In SigningHub each user signs with their own PKI signing key so that each signature uniquely identifies the signing entity. To perform signatures having AES, QES or AATL as level of assurance applied to the signature field, you must have a SigningHub account.
Add your Signature
- Open the pending document.
- Click the "Start" pointer (highlighted in screenshot) to begin adding your signature. The cursor will start blinking in the (yellow-orange color) signature field assigned to you.
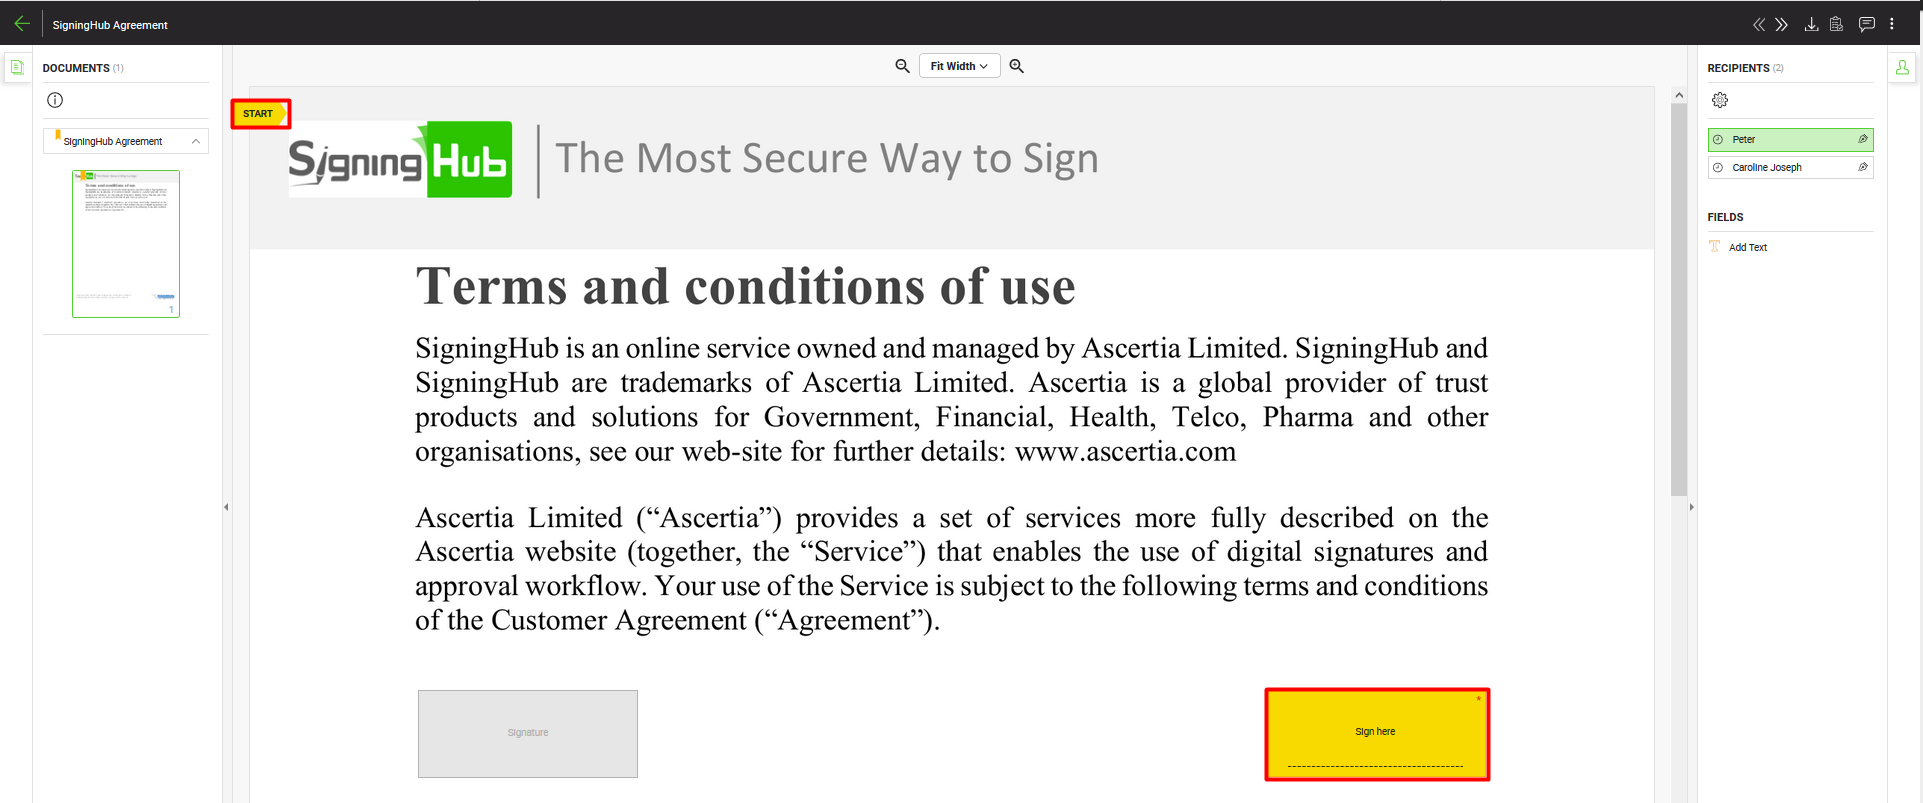
- Click the Signature field.
- SigningHub will prompt you to agree to the legal notice (if it is configured for you).
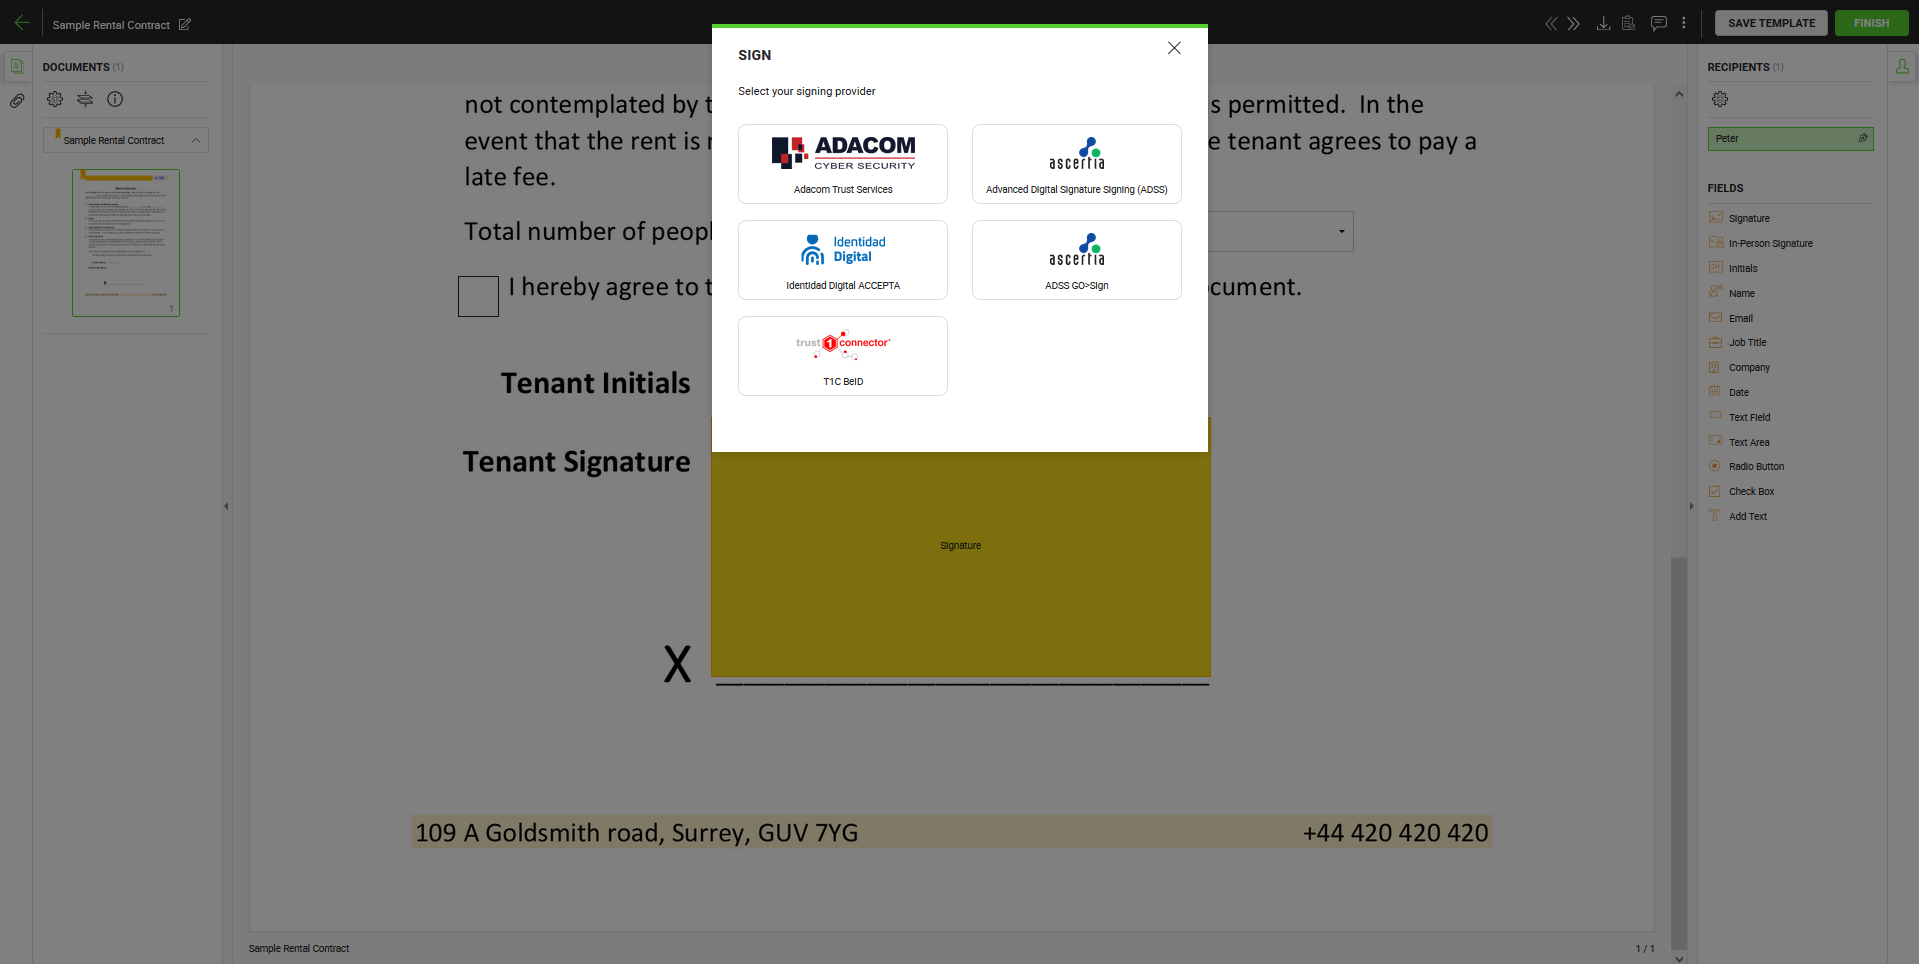
- The Signing servers dialog window will appear and display multiple signing servers which can be selected, based on the level of assurance set by the document owner on that signature field and the level of assurance that are configured in your role.
- Signing servers are based on service plan configurations, and will display the signing server for server side and client side signing both.
- Select one of the signing servers to perform the signature.
|
|
|

- Select a visible signature type i.e., Text, Draw, or Upload which you wish to use in your signature. In case of uploading a signature image, the white color in the image background will be auto converted to transparent.
- For Text based signature type, the name of the recipient will be auto filled and cannot be changed if it's restricted from enterprise roles signature appearance settings.
- Select a desired Signing Capacity for your signature (if it is configured for you to sign in different positions in your organisation). The options available in the "Signing Capacity" drop-down list are those that are allowed in your enterprise user role. All signing capacities will group together based on level of assurance.
- Choose a desired appearance for your signature. The options being populated in the "Signature Appearance Design" field are the allowed appearances to your enterprise user role. You can also see this list in your personal Signature Appearance.
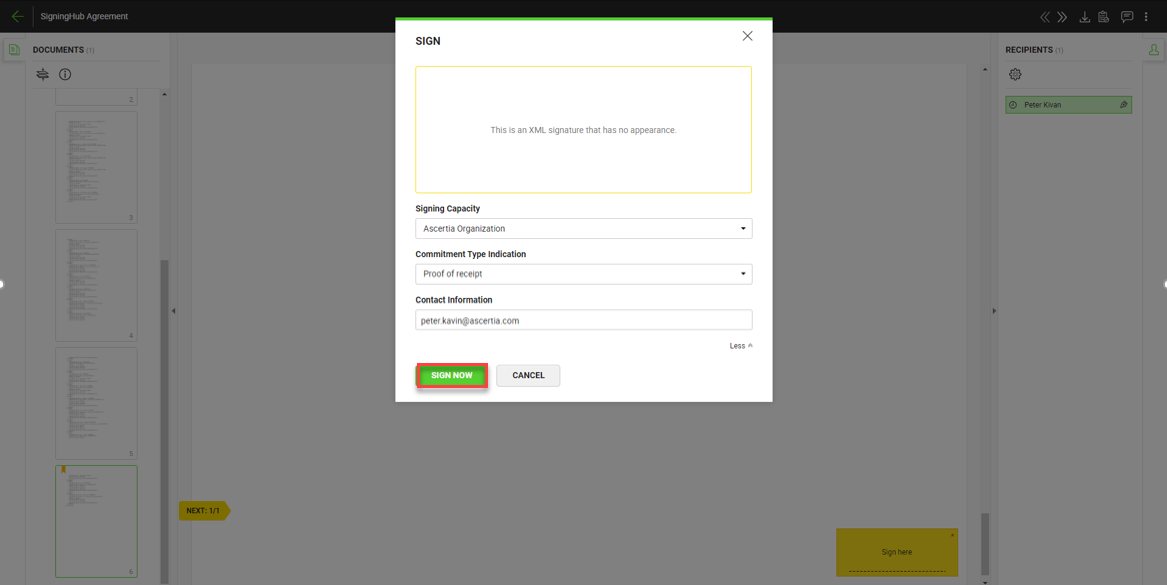
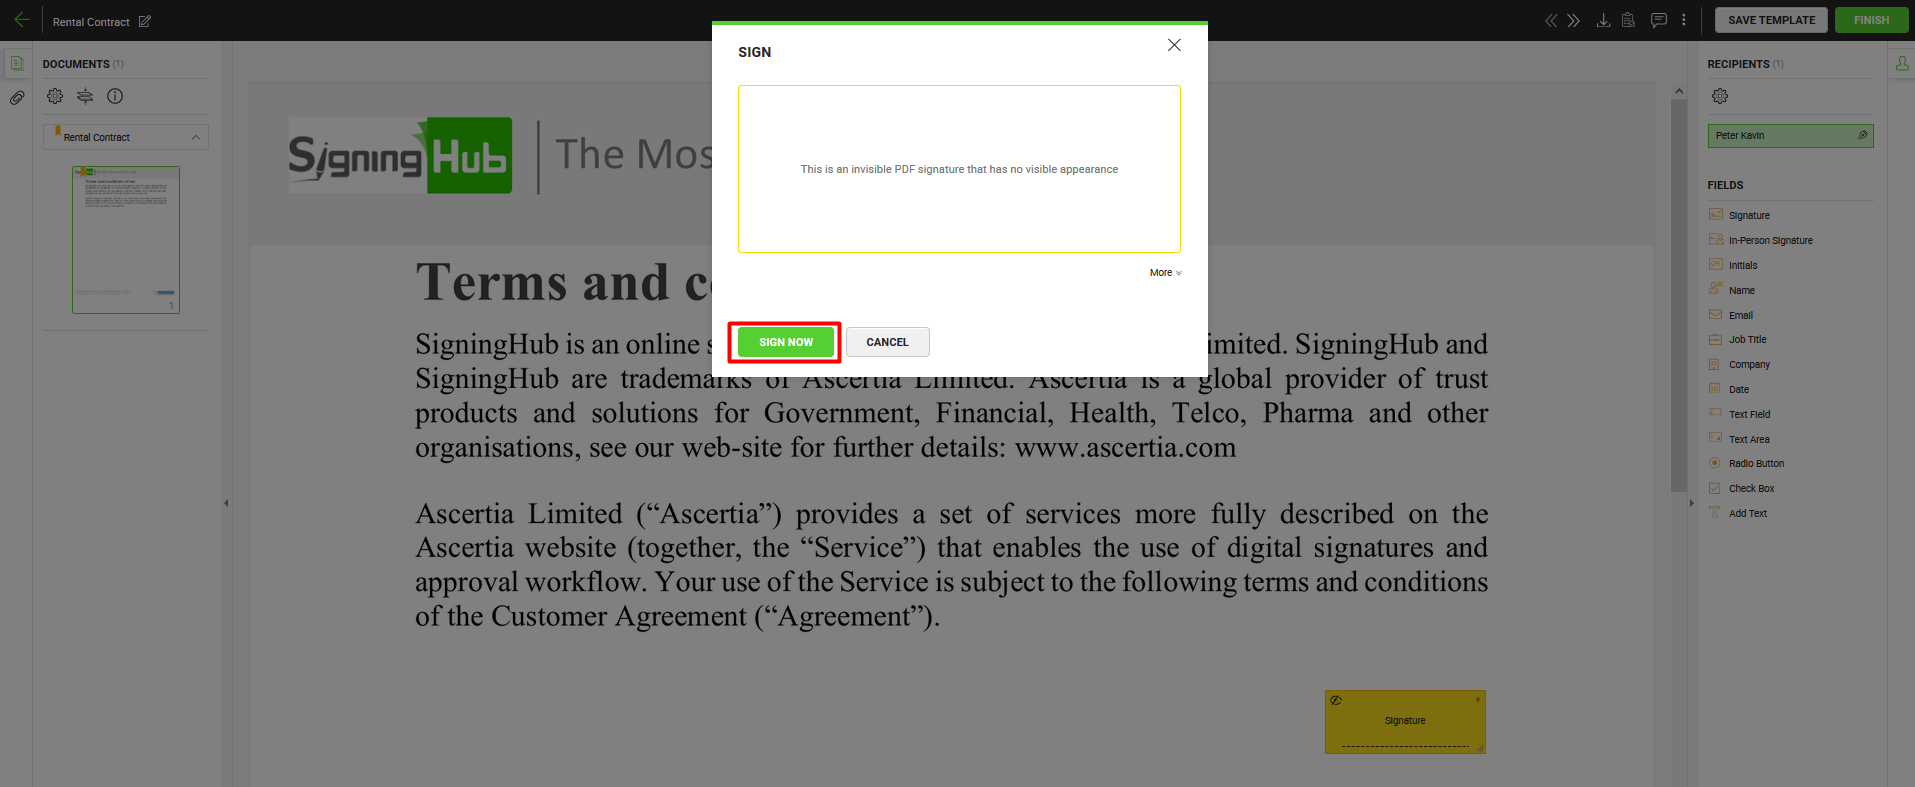
- Click on the SIGN NOW button to proceed with signing.

- Upon clicking the SIGN NOW button, either no dialog window appears (if No Authentication is set for the selected signing capacity), or a dialog window appears depending upon the authentications that is configured for the selected signing capacity under enterprise roles>signing servers>authentications.
|
|
If you have selected CSC Signing Server to perform signature, then on click SIGN NOW button it will show you one of the options additionally, depending upon authorisation settings configured at your CSC Server:
There could be a possibility that both the options of OTP and PIN number are configured as a signing time authentication by your CSC Server. In case the Level of Assurance of a "Signature" field is set to "Electronic Signature", then only Document Signing Authentication will work. |

- In case of signing of XML document, optionally you may also specify "Commitment Type Indication". SigningHub populates values of this field in editable mode from your Personal Signing Details. When specified they will become a permanent part of your XML signature.
- In case of an invisible signature, there will be no appearance preferences on the "Sign" dialog. Just click the "SIGN NOW" button to proceed to the authentication method.
- Based on your Signature Settings, the authentication method may change. For details regarding the authentication methods, see the details below.
- Optionally you may also specify "Signing Reason", "Contact Information" and "Location". SigningHub populates values of these fields in editable mode from your Personal Signing Details. When specified they will become a permanent part of your PDF signature.

- Click the "OK" button, if there is an authentication, a dialog window appears. In case of 'No Authentication', no further dialog window appears, once you click on the SIGN NOW button.
- The document is now signed, and your signature will be displayed in the same area of your document as per the selected signature appearance.
- The document status will be changed from "Pending" to "Signed".
- The system will notify the respective document owner about your signing through an email.
- An intimation email will also be sent from the document owner to the next configured recipient (if any), with the request to respond to the document workflow accordingly. The recipient can then follow the document link from the email to collaborate in the workflow.
- If CSP Provisioning is allowed in your service plan, then your certificate will be automatically registered in the CSP Service against your (user) ID which was created at the time of login.
- If Remote Authorised Signing (RAS) is allowed in your role, then your certificate will be auto registered in the SAM service against your (user) ID which was created at the time of login.
- If CSP Provisioning is allowed in your service plan and Remote Authorised Signing (RAS) is allowed in your role, then your certificate will be auto registered in the SAM and CSP services against your (user) ID which was created at the time of login.
- In case authentication via OTP is required, user can have the option to choose to receive OTP via Text Message or Email depending on the service plan.

Once OTP is received enter it in the text field. In case OTP not receive you may select the option to resend it. You can also opt the other method for OTP by selecting 'Switch Method'.
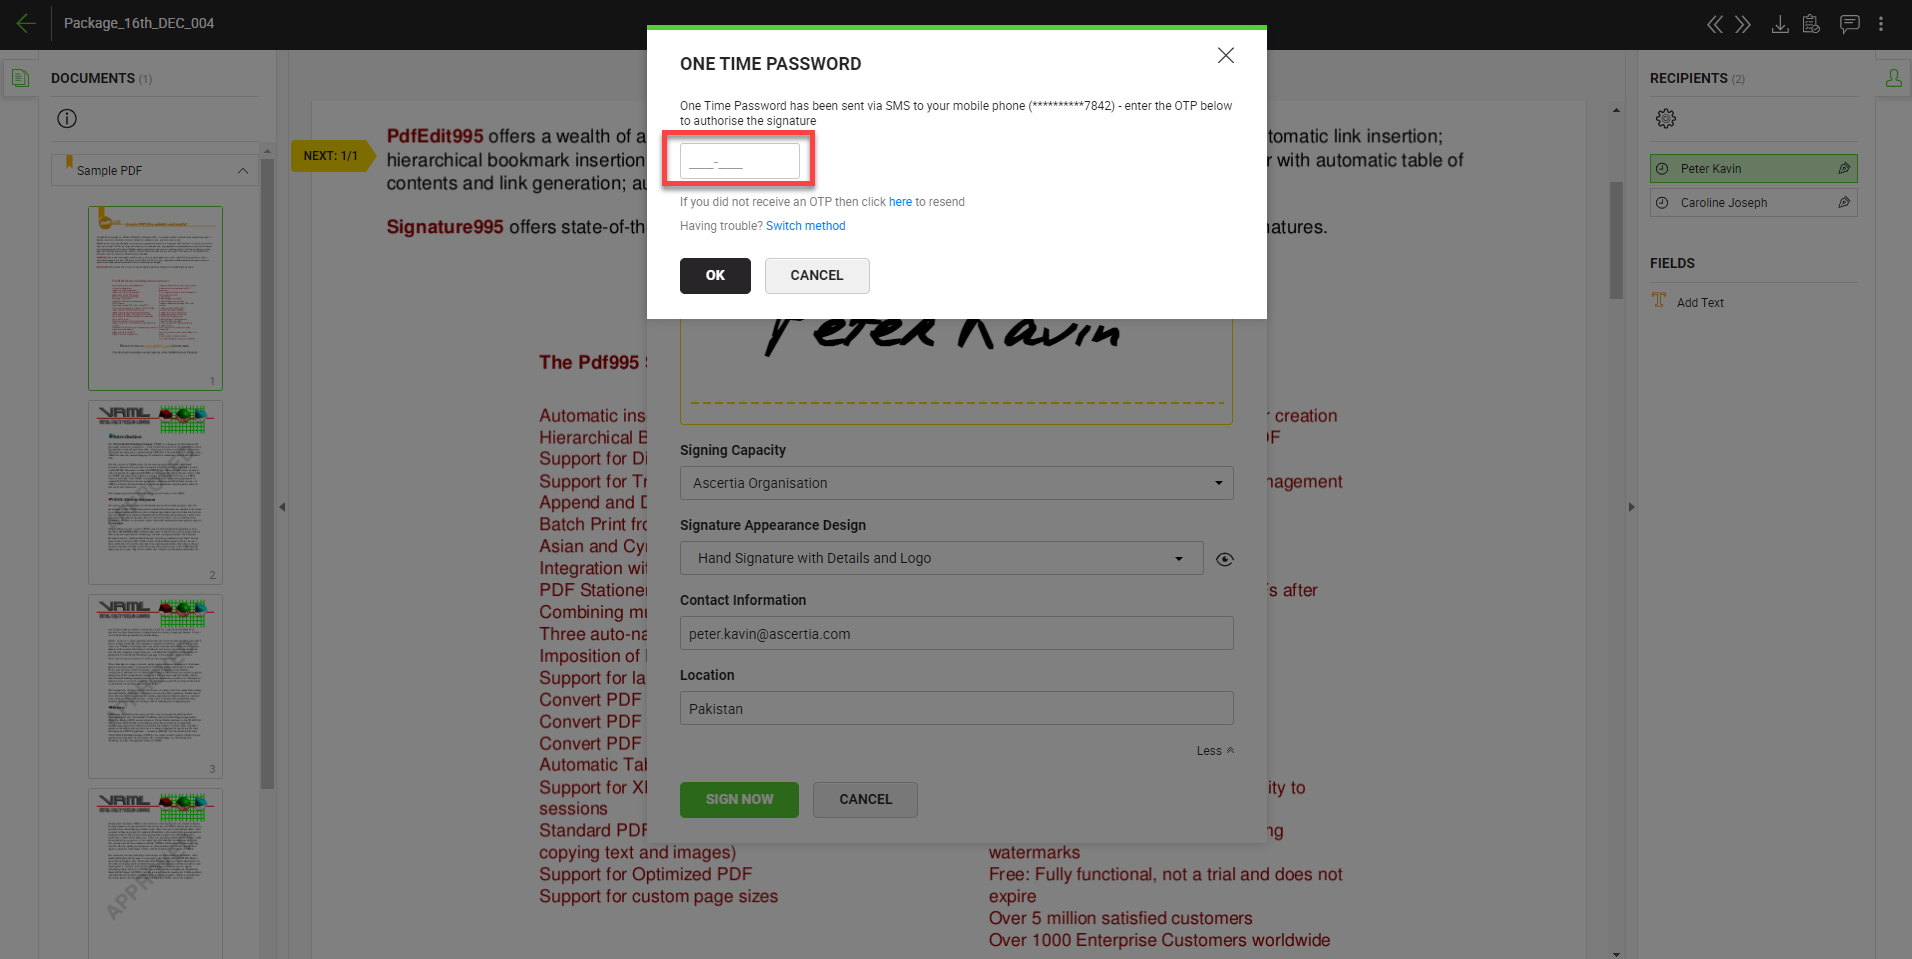
7. Enter the OTP code and then click 'Ok' button.
|
|
|
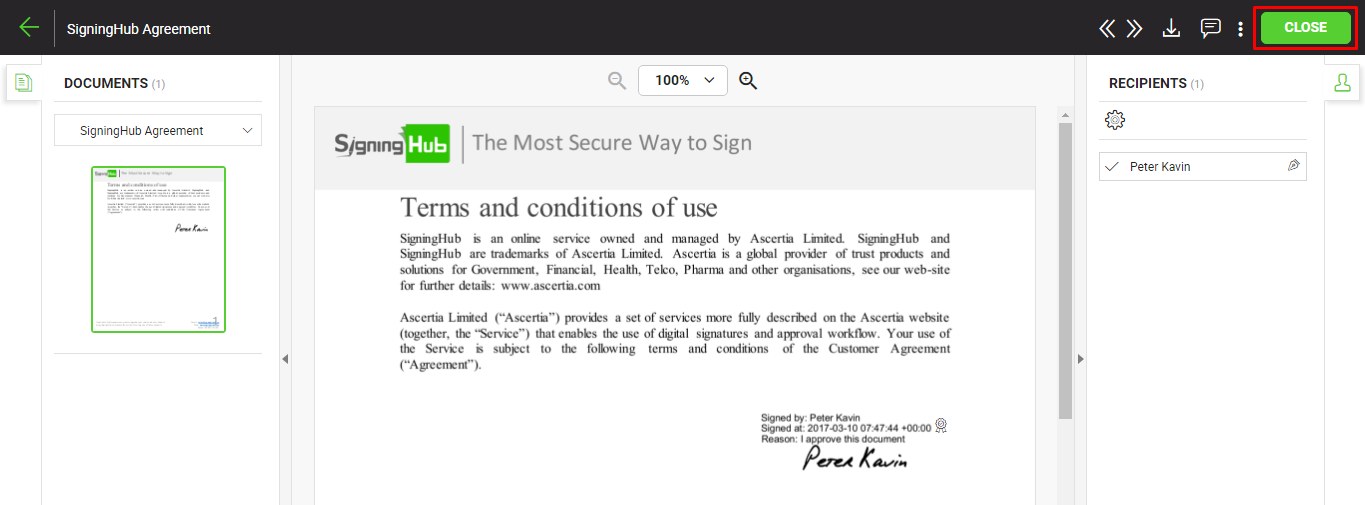
8. Click the "Close" button.
In case the "Automatically proceed with workflow upon completion of mandatory actions by signer" option is turned off in your enterprise user role, then the "Finish" button will be displayed to conclude the signing process.
Client Side (Local) Signing using T1C or ADSS (Go>Sign Desktop)
When a signing server is configured in your Signature Settings for local hed keys and you select that signing server, the signing certificate residing in your local keystore or inside the crypto device (token/smartcard) will be used. In other words, the signing activity is performed locally on your machine. For this, ensure the Go>Sign Desktop app is installed and running on your system as a back end utility.
However if Trust1Connector (T1C) is configured as a signing server to perform local signing, then make sure the T1C app is installed on your local machine and the related HSM is attached with it while signing. Also you should have full rights on the Trust1Connector service running on your machine. SigningHub will prompt you if any of the above mentioned prerequisite is missing.
At the time of local signing, your browser will interact with Go>Sign Desktop or T1C app to complete your signing process. The app is capable to access your keys and certificates via MSCAPI and PKCS#11 on Windows platform.
When you click the signature field to sign a document, the signing server dialog will appear. Select the signing server that you have configured to perform client side signing and click NEXT button:
- If your signing key is inside a crypto device, attach the device and specify your device pin.
- If your signing certificate is inside your local key store and protection has been enabled for it, then select the required certificate from the list and provide your certificate password.
- Click the "SIGN NOW" button. The document is signed.
Local Signing through Microsoft Edge browser
If you are using the Microsoft Edge browser for local signing, then you need to perform an additional configuration on your machine to run Go>Sign Desktop, i.e.:
- Close the Microsoft Edge browser if already launched.
- Launch the command prompt by using "Run as administrator".
- Run this command: CheckNetIsolation.exe LoopbackExempt -a -n=Microsoft.MicrosoftEdge_8wekyb3d8bbwe
- Launch the Microsoft Edge browser and run your application again to test Go>Sign Desktop.
Server Side Signing using ADSS or CSC
When a signing server is configured in your Signature Settings for server hed keys and you select that signing server, the signing certificate residing on the server will be used. In other words, the signing activity is performed on the server but not on your machine.
Signing Servers that appears on signing dialog are subject to your service plan and user's role settings. It shows both types of servers for Server Side Signing including ADSS and CSC, based upon level of assurance set by the document owner on signature field.
Based on the Authentication Method set under your enterprise role, SigningHub supports multiple types of authentication methods for server side signing, which are as follows:
- No Authentication
- SigningHub ID
- Salesforce
- Microsoft Active Directory
- Microsoft ADFS
- Microsoft Office 365
- Microsoft Azure Active Directory
- Freja Mobile
- Freja eID
- Bank ID
- itsme
- Authorisation via Mobile App
To use Remote Authorisation Signing (RAS) as authentication method, you must use signing capacity having QES (Qualified Electronic Signature) as a level of assurance that is configured under your enterprise roles > signing servers.
|
|
For the RAS enabled signing capacities Authorisation via Mobile App will appear as the only authentication method and cannot be changed. |

You can additionally setup Secondary Authentication Method, at signing time. The following two options can only be set:
- No Authentication
- OTP via SMS
|
|
To setup OTP via SMS as the only option at signing time, you can select 'No Authentication' under authentication method and 'SMS via OTP' under secondary authentication method. |

No Authentication
In this type of server side signing authentication, SigningHub will use the same authentication method through which you have logged into your SigningHub account, without requiring any password.
When you click the signature field to sign a document:
- Click the "Sign Now" button.
The document is signed without requiring any password or OTP.
OTP via SMS
SigningHub also allows two-factor authentication for the server side signing. In this case, an OTP (one time password) is sent on your (signer) configured mobile number through an SMS. This OTP is used in addition to the account password to sign a document. However, the OTP feature and its length are subject to your subscribed service plan, so the SMS service is chargeable accordingly. SigningHub currently supports 4, 6, and 9 digits OTP.
When you click the signature field to sign a document:
- Specify your account password, and click the "SIGN NOW" button.
An OTP will be sent on your configured mobile number. - Specify the OTP in the next appearing screen.
- Click the "OK" button. The document is signed.
|
|
The following rules will be followed for the OTP via SMS authentication:
|

SigningHub ID
In this type of authentication, when you click the signature field to sign a document:
- Click the "SIGN NOW" button, and specify your SigningHub account password in the next appearing screen.
- Click the "OK" button. The document is signed.
|
|
|

Salesforce
In this type of authentication, when you click the signature field to sign a document:
- Click the "SIGN NOW" button, and then click the NEXT" button.
- The Salesforce popup will appear. Specify your Salesforce credentials (ID and password). The document is signed.
Please note, if you are already logged into SigningHub through your Salesforce account, then this step will be skipped.
|
|
|

Microsoft Active Directory
In this type of authentication, when you click the signature field to sign a document:
- Click the "SIGN NOW" button, and then click the NEXT" button.
- Specify your user ID (registered in Active Directory) and domain password. The document is signed.
|
|
|

Microsoft ADFS
In this type of authentication, when you click the signature field to sign a document:
- Click the "SIGN NOW" button, and then click the "NEXT" button.
- Specify your ADFS credentials (user ID and domain password). The document is signed.
|
|
|

Microsoft Office 365
In this type of authentication, when you click the signature field to sign a document:
- Click the "SIGN NOW" button, and then click the "NEXT" button.
- The Microsoft Office 365 popup will appear. Specify your Office 365 credentials (ID and password). The document is signed.
Please note, if you are already logged into SigningHub through your Office 365 credentials, then this step will be skipped. - The document will be signed.
|
|
|

Microsoft Azure Active Directory
In this type of authentication, when you click the signature field to sign a document:
- Click the "SIGN NOW" button, and then click the "NEXT" button.
- The Microsoft Azure Directory popup will appear. Specify your Azure Directory credentials (Email and password). The document is signed.
Please note, if you are already logged into SigningHub through your Azure Active Directory credentials, then this step will be skipped. - The document will be signed.
|
|
|

Freja Mobile
In this type of authentication, when you click the signature field to sign a document:
- Click the "SIGN NOW" button, and then click the "NEXT" button.
A signing request will be sent to your mobile device running the Freja Mobile app. - Approve it from the Freja Mobile app. The document is signed.
|
|
|

Freja eID
In this type of authentication, when you click the signature field to sign a document:
- Click the "SIGN NOW" button, and then click the "NEXT" button.
A signing request will be sent to your mobile device running the Freja eID app. - Approve it from the Freja eID app. The document is signed.
|
|
|

Bank ID
In this type of authentication, when you click the signature field to sign a document:
- Click the "SIGN NOW" button, and then click the "NEXT" button.
- The Bank ID popup will appear. Specify your Bank ID credentials (ID, OTP, and password). The document is signed.
|
|
|

itsme
In this type of authentication, when you click the signature field to sign a document:
- Click the "SIGN NOW" button, and then click the "NEXT" button.
- A popup will appear. Specify your mobile number that is registered with itsme and click the "Submit" button.
- Run the "itsme" app on your mobile device and approve the signing request from there. The document is signed.
|
|
|

LinkedIn
In this type of authentication, when you click the signature field to sign a document:
- Click the "SIGN NOW" button, and then click the "NEXT" button.
- The LinkedIn popup will appear. Specify your LinkedIn credentials (ID and password). The document is signed.
Please note, if you are already logged into SigningHub through your LinkedIn account, then this step will be skipped.
|
|
|

In this type of authentication, when you click the signature field to sign a document:
- Click the "SIGN NOW" button, and then click the "NEXT" button.
- The Google popup will appear. Specify your Google credentials (ID and password). The document is signed.
Please note, if you are already logged into SigningHub through your Google account, then this step will be skipped.
|
|
|

OAuth2
In this type of authentication, when you click the signature field to sign a document:
- Click the "SIGN NOW" button, and then click the "NEXT" button.
- Authentication popup for configured third party server will appear(e.g. Azure, LinkedIn, Google or any other authentication server that support OAuth2 protocol). Specify your credentials (ID and password). The document is signed.
Please note, if you are already logged into SigningHub through same third party account, then this step will be skipped.
|
|
1. User has the flexibility to use different email addresses while authenticating at logging and signing time. In case you have logged in through email/password authentication (i.e. SigningHub ID), you can authenticate using your IDP credentials (OAuth2 supported protocol) at the time of signing having a different email address and vice versa. |
OIDC
In this type of authentication, when you click the signature field to sign a document:
- Click the "SIGN NOW" button, and then click the "NEXT" button.
- Authentication popup for configured third party server will appear(e.g. Azure, LinkedIn, Google or any other authentication server that support OIDC protocol). Specify your credentials (ID and password). The document is signed.
Please note, if you are already logged into SigningHub through same third party account, then this step will be skipped.
|
|
1. User has the flexibility to use different email addresses while authenticating at logging and signing time. In case you have logged in through email/password authentication (i.e. SigningHub ID), you can authenticate using your IDP credentials (OIDC supported protocol) at the time of signing having a different email address and vice versa. |
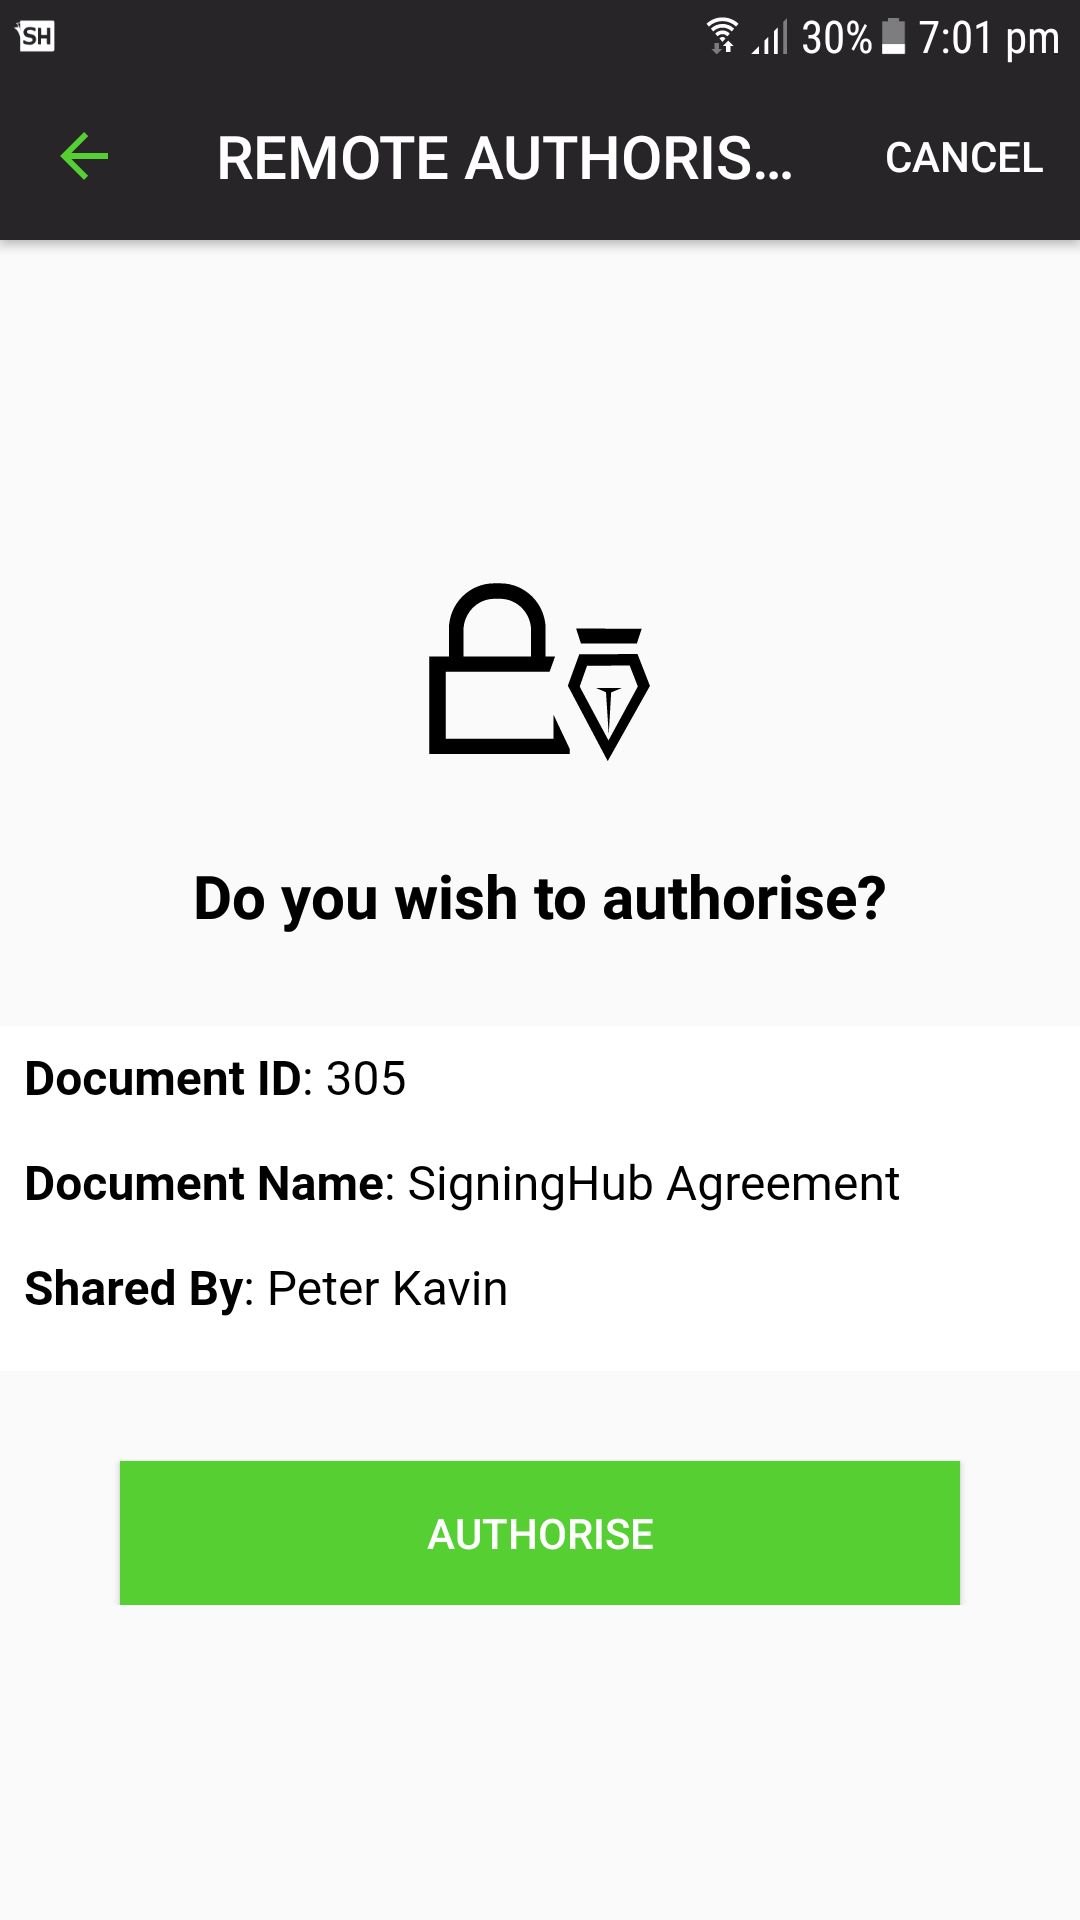
Remote Authorisation Signing (RAS)
In this type of authentication, when your mobile device is registered and you select a signing capacity having QES as a level of assurance to sign a document:
- Click the "NEXT" button and then click on the "SIGN NOW" button.
An authentication request will be sent to your registered mobile device for remote authorisation.
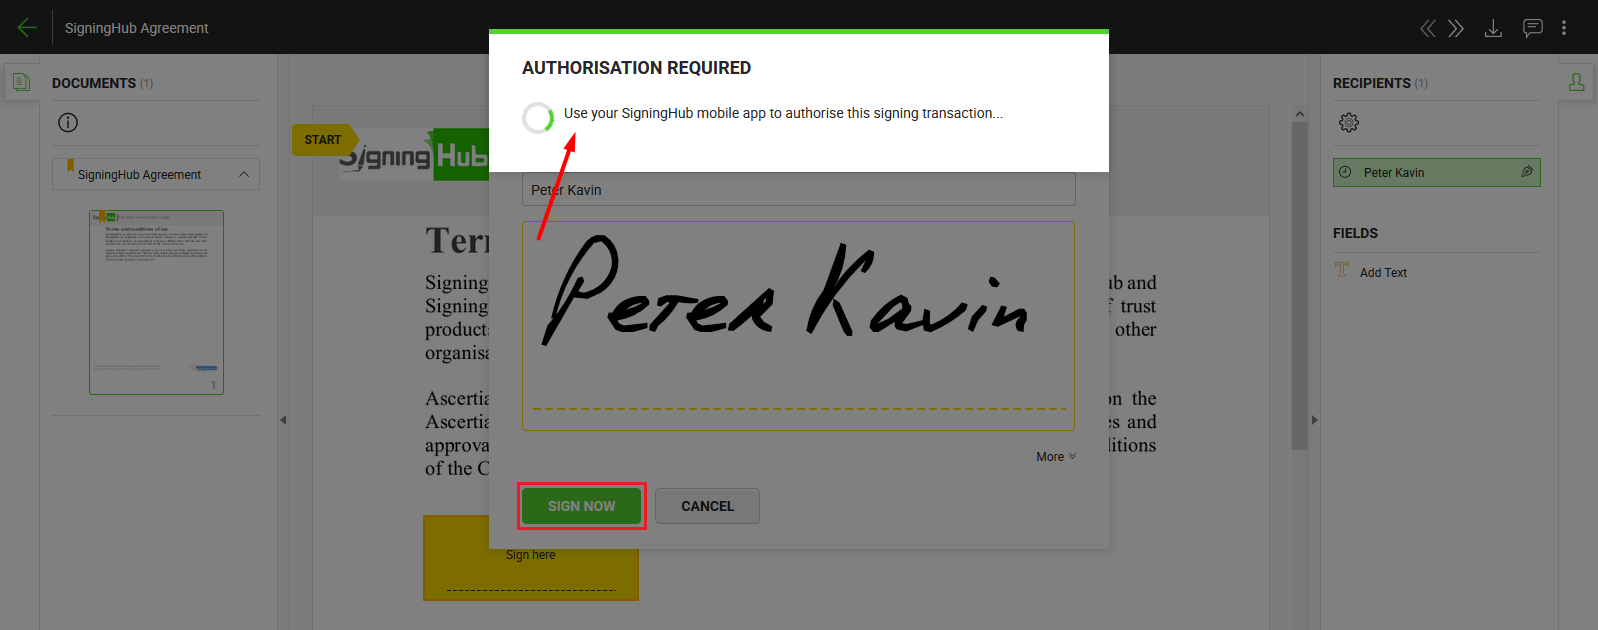
- Run SigningHub app (Android or iOS) on your mobile device and login with the same account credentials through which you have logged in from SigningHub web.
- A popup will appear on your mobile device to authorise your signature through touchID or PIN. Upon authorisation, the document is signed.
|
|
|

See Also
- Open a pending document
- Add/ download attachments
- Merge other pdf files
- Document permissions
- Fill in your form components
- Fill in your form fields
- Add your initials
- Add your In-Person Signature
- Agree to the legal notice
- Add signing comments
- Review a document
- Update a document
- Host in-person signing
- Decline a document
- View verification details
- Change a recipient/ placeholder
- Delegate your signing authority in a workflow
- QR Code Scanning