Configure Signature Settings
Signature settings are all about configuring the allowed signing methods (i.e., Server-side Signing, Client-side (Local) Signing, and/or Mobile Signing), authentication methods (i.e., No Authentication, OTP via SMS, SigningHub ID, Microsoft Active Directory, Salesforce, Freja eID etc.) and signing capacities in a role. You can separately configure these settings for web browsers and mobile apps, and choose a default signing method for each case.
You can also configure Remote Authorised Signing here, which allows a user to authorise a remote signature (done on server) using their registered mobile device. The device will have its user authentication built-in (touchID or PIN), so in a way they can also configure two-factor authentication.
Furthermore, this section lets you manage signing reasons, which are used in the Signature Appearance, and becomes a permanent part of a PDF signature. The signing reasons can optionally be displayed in the signed PDF document.
Configure Signature Settings in a Role
- Login with your enterprise admin credentials.
- Click on your profile drop down menu (available at the top right corner).
- Choose the "Enterprise Settings" option.
- Choose the "Roles" option from the left menu.

- Search and select the role to edit and click the edit icon
 adjacent to it. The "Edit Role" screen will appear for re-configurations.

- Click the "Signature Settings" tab.
- Click the "Save" button after selecting the desired signing method as default.
|
Signature Settings |
|||||
|
Fields |
Description |
||||
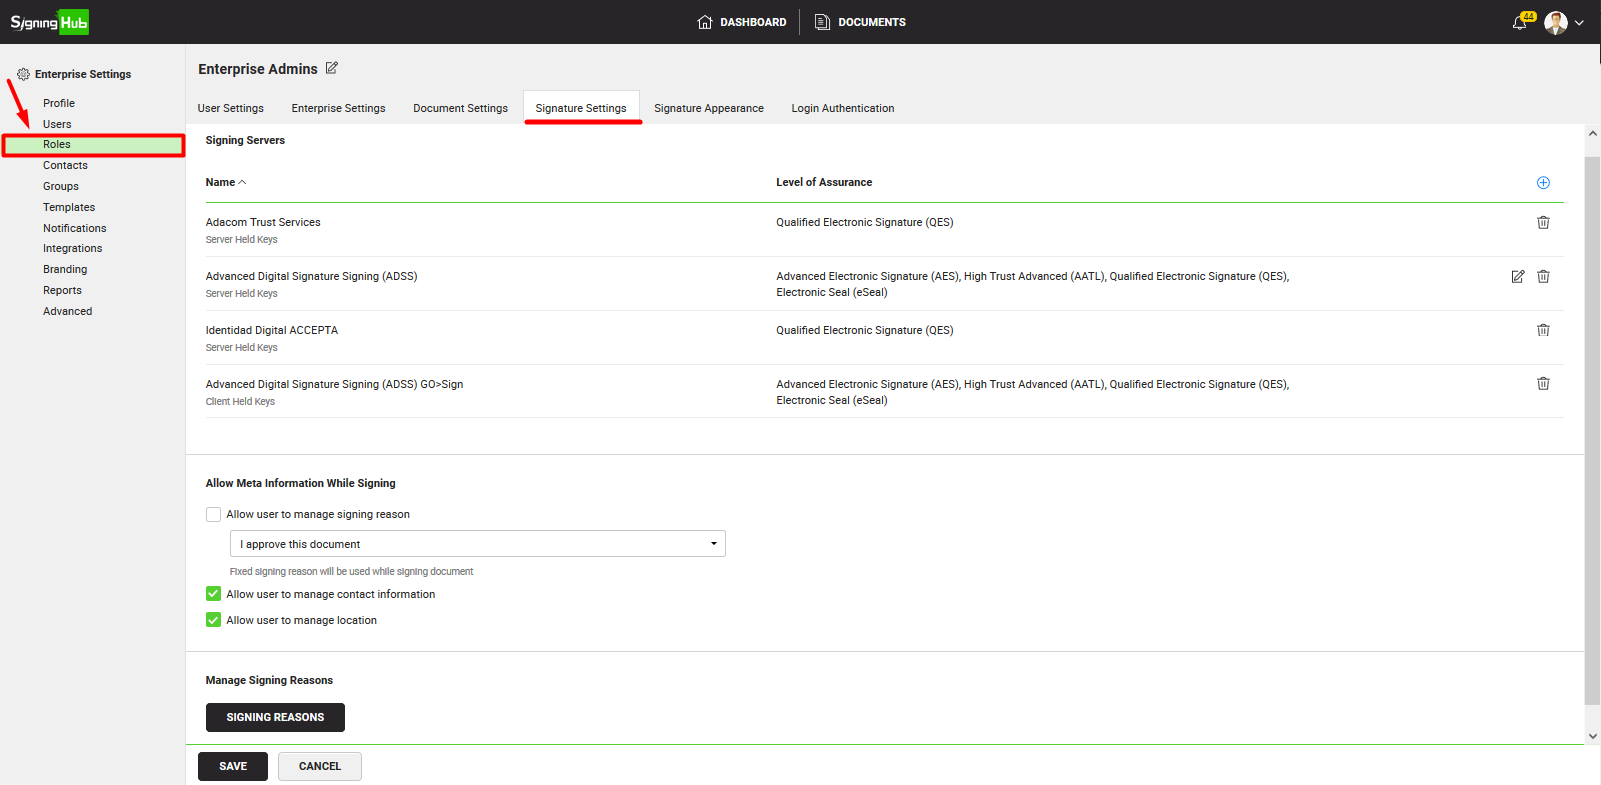
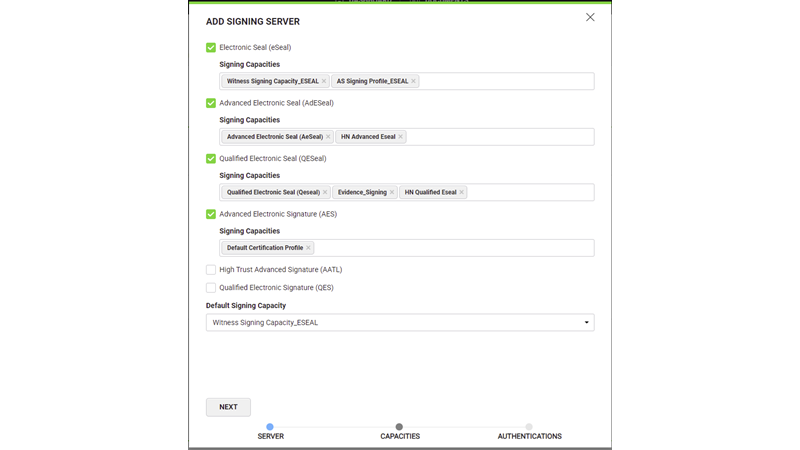
|
Signing Servers |
|||||
|
Signing Server |
Click on the
SERVER
In case of configuring Remote Authorised Signing (RAS), configure signing capacities for RAS in your Service Plan and "Authorisation via Mobile App" option will appear as Authentication Method for those capacities under 'Signing Capacities for Remote Authorisation (Owned by User).
|
||||
|
Allow Meta Information While Signing |
|||||
|
Allow user to manage signing reason . |
Select this option to allow the users (belonging to this role) to view the "Signing Reason" field in the signing dialog of signature and set its value as required before signing.
If you keep it deselected, this field will not be displayed to the users in the signing dialog. In this case, the default set value will automatically be picked from the user's role upon signing, as highlighted below.
See My Settings> Signing Details> Additional Signature Information for details. |
||||
|
Allow user to manage contact information |
Select this option to allow the enterprise users (belonging to this role) to view the "Contact Information" field on the signing dialog of signature, and set its value as required before signing. |
||||
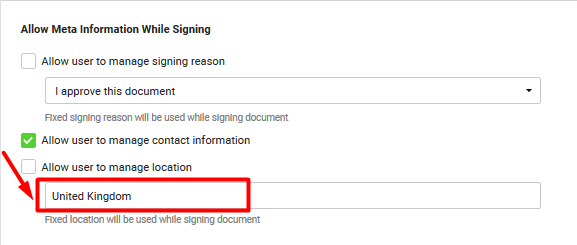
|
Allow user to manage location |
Select this option to allow the enterprise users (belonging to this role) to view the "Location" field on the signing dialog of signature, and set its value as required before signing. |
||||
|
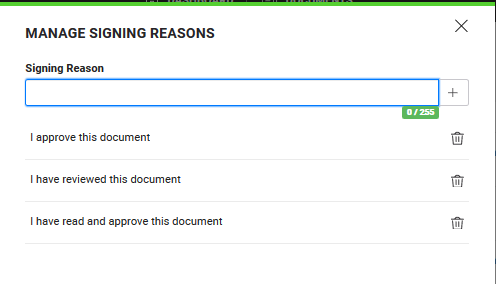
Manage Signing Reasons |
|||||
|
Manage Signing Reasons |
Click the "Signing Reasons" button to manage (add and delete) signing reasons. The specified reasons will then be available in the "Predefined" and "Fixed" fields for selection. When used in the Signature Appearance, Signing reason becomes a permanent part of the PDF signature and can optionally be displayed in the signed PDF document. |
||||


*Authentication Methods:
When the "Key Protection Option" option is set to 'System Password' (i.e., Sole Control is off) in certification profiles under SigningHub Admin configurations, SigningHub gives you the provision to choose a third-party authentication option for your enterprise users. You may select any of the following 15 options; through which your enterprise users can authenticate themselves for server-side signing.
- No Authentication:
Select this option to let your enterprise users sign their documents directly without any authentication. In this case, their server based certificate will be used for signing but system will not prompt for any password or OTP.
- OTP via SMS:
Select this option to let your enterprise users, use their SigningHub account password along with an OTP to sign their documents. Whenever your enterprise user attempts to sign a document, an OTP will be sent on their mobile device that must be entered for signing.
- SigningHub ID:
Select this option to allow enterprise users to use their SigningHub account password to sign their documents.
- Microsoft Active Directory:
Select this option to allow enterprise users to use their Active Directory credentials to sign their documents. SigningHub will require their user ID (as registered in the organisational Active Directory) and domain password for the signing activity. In case your enterprise user has logged in through SigningHub ID and want to sign in using the Microsoft Active Directory credentials, then the user's SigningHub ID (email address) and Active Directory ID (email address) must be the same.
- Microsoft ADFS:
Select this option to allow enterprise users to use their ADFS credentials to sign their documents. SigningHub will require their user ID (as registered in cloud ADFS) and domain password for the signing activity. In case your enterprise user has logged in through SigningHub ID and want to sign through Microsoft ADFS credentials, then their SigningHub ID (email address) and ADFS ID (email address) must be the same.
- Microsoft Office 365:
Select this option to allow enterprise users to use their Microsoft Office 365 credentials to sign their documents. SigningHub will require their Office 365 credentials (ID and password) for the signing activity. In case your enterprise user has logged in through SigningHub ID and want to sign through Microsoft Office 365 credentials, then their SigningHub ID (email address) and Office 365 ID (email address) must be the same.
- Salesforce:
Select this option to allow enterprise users to use their Salesforce credentials to sign their documents. SigningHub will require their Salesforce credentials (ID and password) for the signing activity. In case your enterprise user has logged in through SigningHub ID and want to sign through Salesforce credentials, then their SigningHub ID (email address) and Salesforce (email address) must be the same.
- LinkedIn:
Select this option to allow enterprise users to use their LinkedIn credentials to sign their documents. SigningHub will require their LinkedIn credentials (ID and password) for the signing activity. In case your enterprise user has logged in through SigningHub ID and want to sign through LinkedIn credentials, then their SigningHub ID (email address) and LinkedIn (email address) must be the same.
- Google:
Select this option to allow enterprise users to use their Google credentials to sign their documents. SigningHub will require their Google credentials (ID and password) for the signing activity. In case your enterprise user has logged in through SigningHub ID and want to sign through Google credentials, then their SigningHub ID (email address) and Google (email address) must be the same.
- Freja Mobile:
Select this option to allow your enterprise users to use their Freja Mobile authentication to sign their documents. Whenever, your enterprise user attempts to sign a document, a signing request will be sent to their mobile device running the Freja Mobile app. Upon confirmation from the Freja Mobile app, the document will be signed.
- Freja eID:
Select this option to allow your enterprise users to use their Freja eID authentication to sign their documents. Whenever, your enterprise user attempts to sign a document, a signing request will be sent to their mobile device running the Freja eID app. Upon confirmation from the Freja eID app, the document will be signed.
- Authorisation via Mobile App:
Select this option as the Authentication Method to allow your enterprise users to use remote authorised signing provision. This option will only appear for the capacities that has Qualified Electronic Signature (QES) configured as the level of assurance and appears under 'Signing Capacities for Remote Authorization (Owned by User)' category.
- Bank ID
Select this option to allow your enterprise users to use their Bank ID to sign their documents.
SigningHub will require their Bank ID credentials (i.e., Bank ID, OTP, and Personal Password) for the signing activity. Upon providing all three authentication factors correctly, the document will be signed.
- itsme
Select this option to allow your enterprise users to use their itsme authentication to sign their documents.
Whenever, your enterprise user attempts to sign a document, a signing request will be sent to their mobile device running the itsme app. Upon approval from the itsme app, the document will be signed.
|
|
|
