How to Integrate Power BI
- Introduction
- How it works?
- Prerequisite
- Create the Report in Power BI Desktop
- Upload the Report to Power BI Service
- Create the Power BI App in Azure Active Directory
- Configure Developer Settings in Power BI Service
- Configure the Advanced Reports in SigningHub Admin
- View the Advanced Reports in SigningHub Admin
- Assign the Advanced Reports to an Enterprise
- Configure the Advanced Reports in SigningHub Web
- View the Advanced Reports in SigningHub Web
Microsoft Power BI is a business intelligence (BI) platform that provides nontechnical business users with tools for aggregating, analyzing, visualizing and sharing data. Microsoft Power BI is used to find insights within an organization's data. Power BI can help connect disparate data sets, transform and clean the data into a data model and create charts or graphs to provide visuals of the data. All of this can be shared with other Power BI users within the organization.
- Prerequisite
- Create the Report in Power BI Desktop.
- Upload the Report to Power BI Service.
- Configure the Power BI App in Azure Active Directory.
- Configure the Developer setting in Power BI Service.
- Configure the Advanced Reports in SigningHub Admin.
- View the Advanced Reports in SigningHub Admin.
- Assign the Advanced Reports to Enterprise..
- Configure the Advanced Reports in SigningHub Web.
- View the Advanced Reports in SigningHub Web.
This section will focus on the process of setting up a Power BI Gateway in Power BI Service, which allows a dataset to access data sources. Setting up a Power BI Gateway is essential when your data source is on-premises (not in the cloud). It involves downloading and installing the gateway software, saving credentials, signing in with the appropriate account, and mapping the dataset to the gateway to enable data access. The specific type of gateway required in case of local server data sources is "On-Premises Gateway".
|
|
|

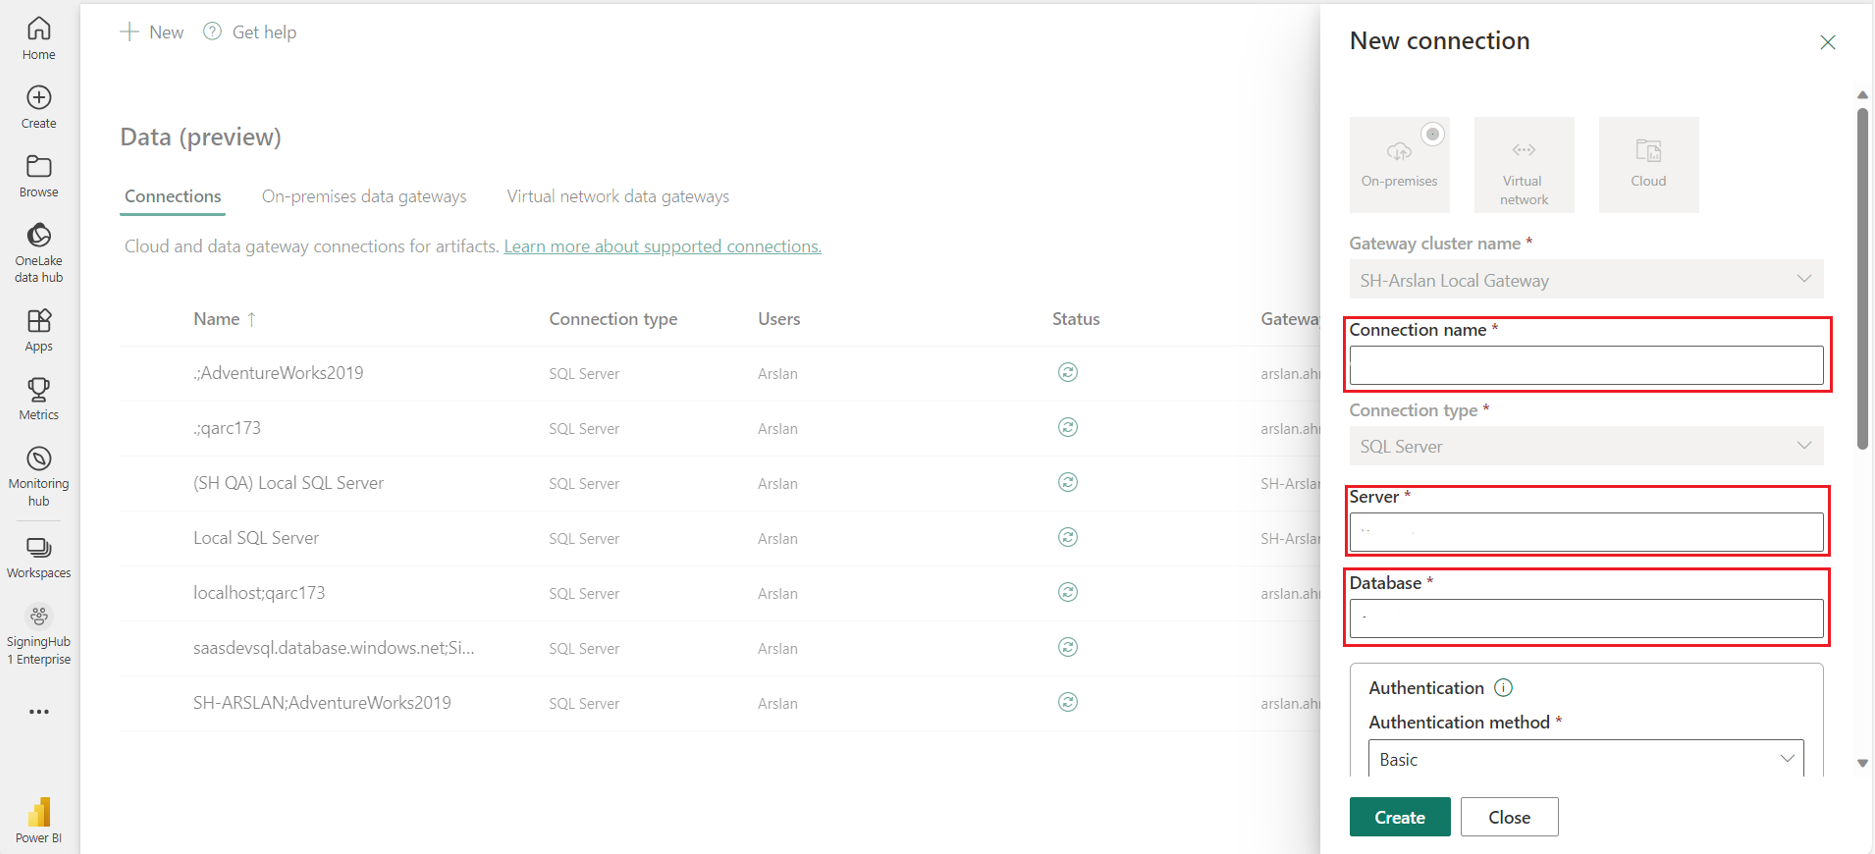
- For first-time users, it's necessary to configure a Power BI Gateway in the Power BI Service. This gateway is required to enable datasets to connect to data sources.
- If the data source is hosted in the cloud (e.g., Azure SQL Database), you can skip this setup process. However, if the data source is on a local server, you need to download and install the Power BI Gateway software on that local server.
- Download the standard gateway.

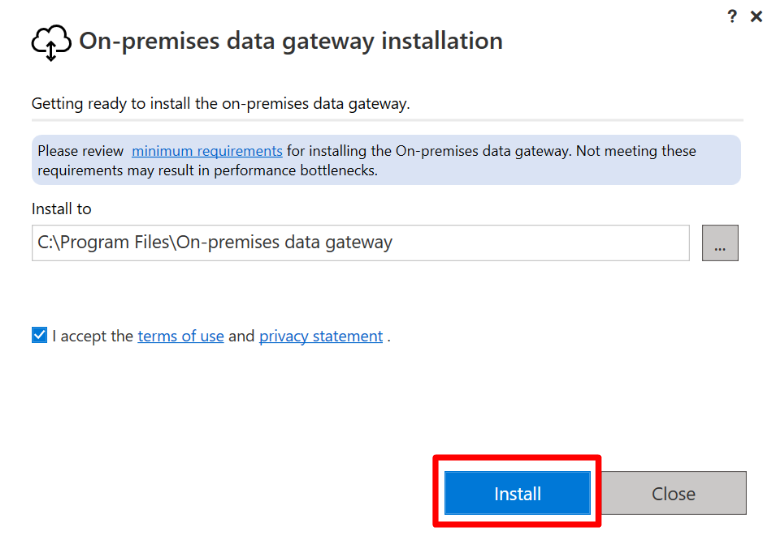
- In the gateway installer, keep the default installation path, accept the terms of use, and then click "Install".
- Enter the email address for your Office 365 organization account, and then click "Sign in". You are now signed in to your account.

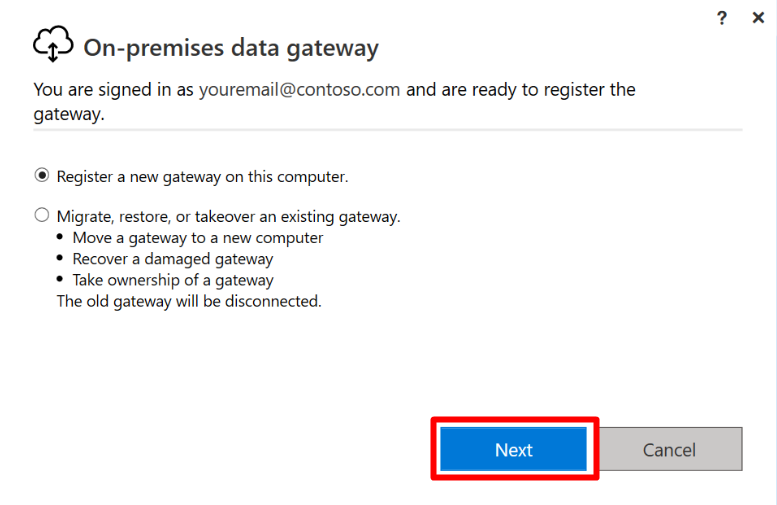
- Select "Register a new gateway on this computer" and then click on "Next".
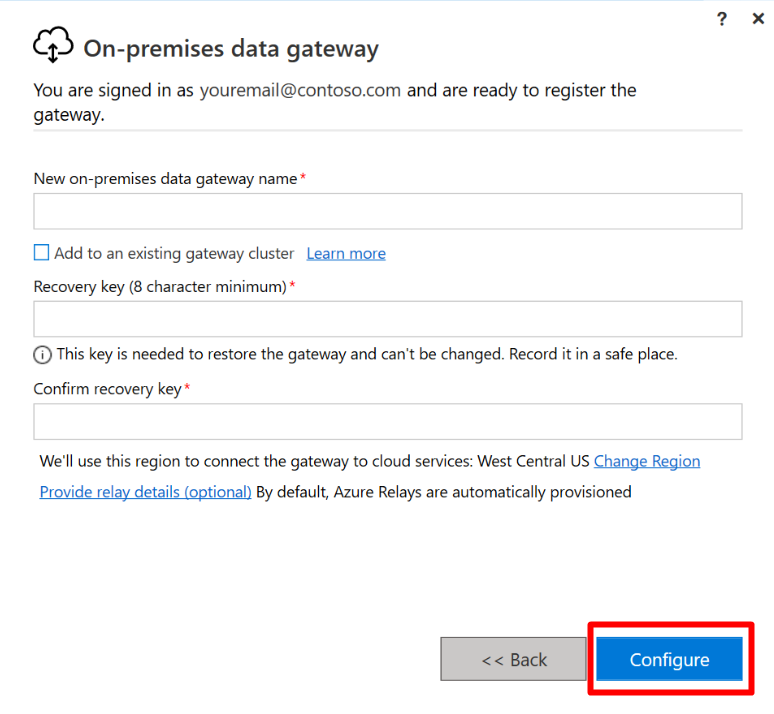
- Enter a name for the gateway. The name must be unique across the tenant. Also enter a recovery key. You'll need this key if you ever want to recover or move your gateway. Once done, click on "Configure".
|
|
|
- Review the information in the final window. Because this example uses the same account for Power BI, Power Apps, and Power Automate, the gateway is available for all three services.
- Click on "Close".

- Now that you've installed a gateway, you can add another gateway to create a cluster.
|
|
|

- You need to sign in to Power BI Gateway using the same account that you use for Power BI Service or Power BI Desktop. This ensures proper authentication and access to the data sources.
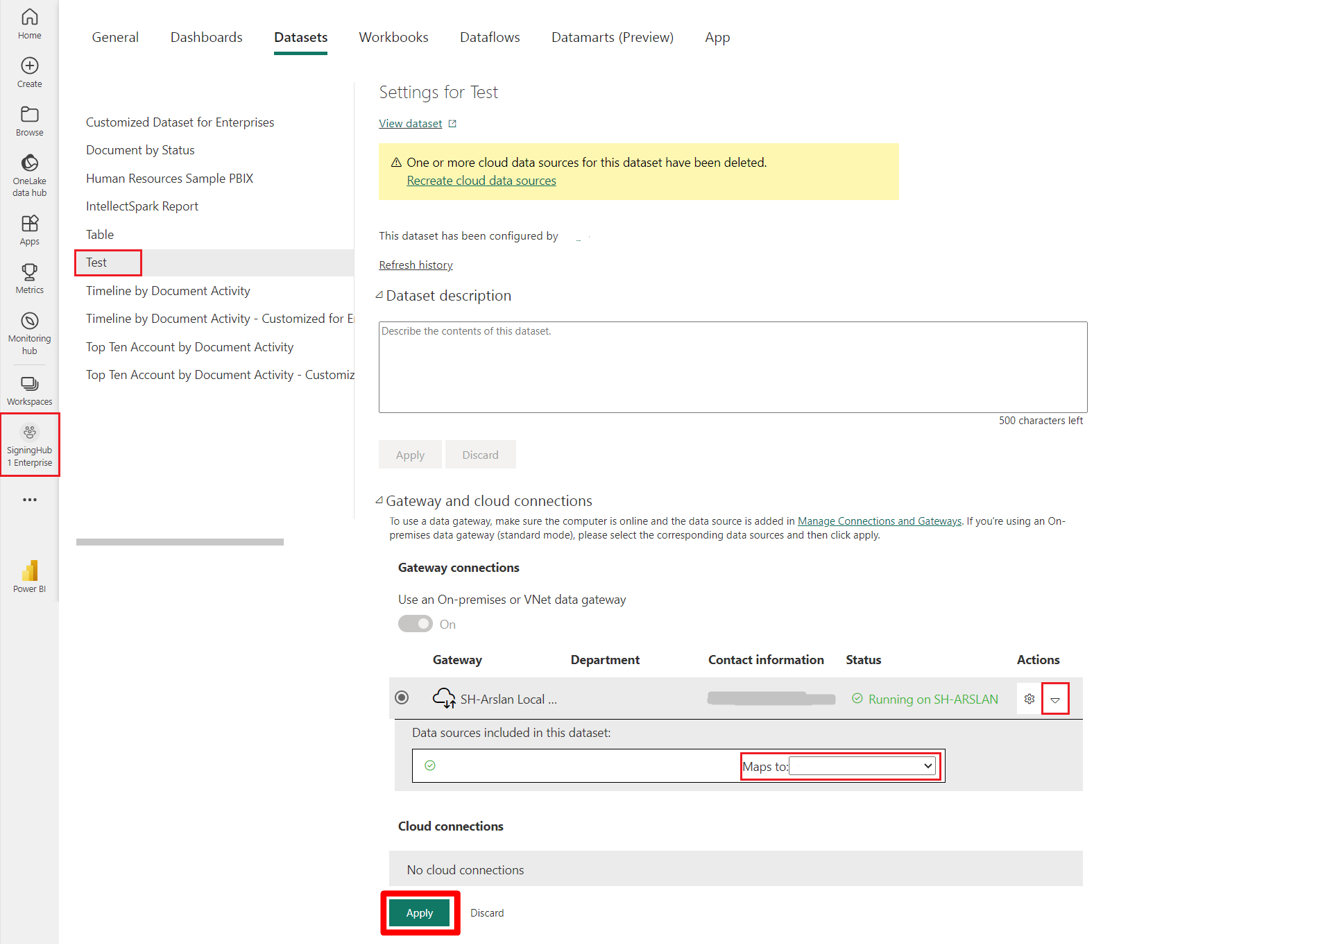
- Once you sign in, the Data Gateway becomes available in the Power BI Service's Datasets page.
- From the Datasets page in Power BI Service, you can select the Data Gateway you've set up, and then the dataset will be mapped to this gateway. This mapping allows the dataset to use the gateway for accessing data.
Create the Report in Power BI Desktop
This section will focus on the process of creating a report using Power BI Desktop, from connecting to your data source to designing and customizing your visualizations.
- If you haven't already, download and install Power BI Desktop. Open the application.
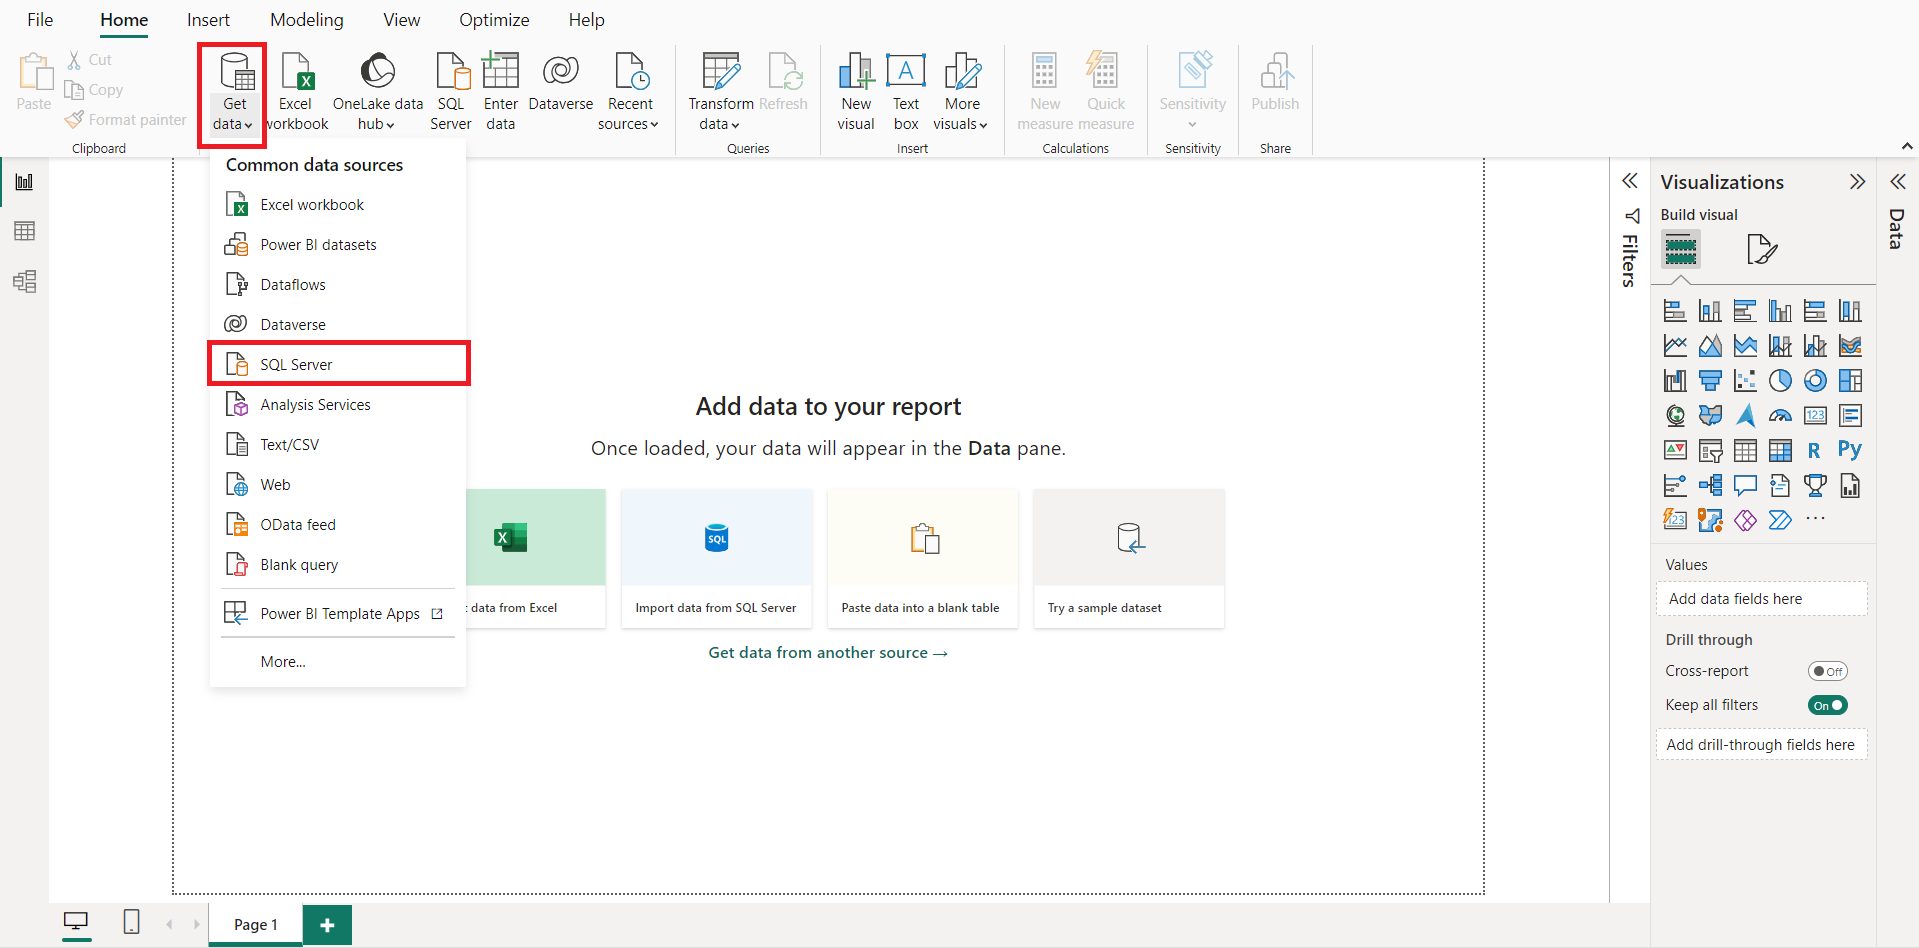
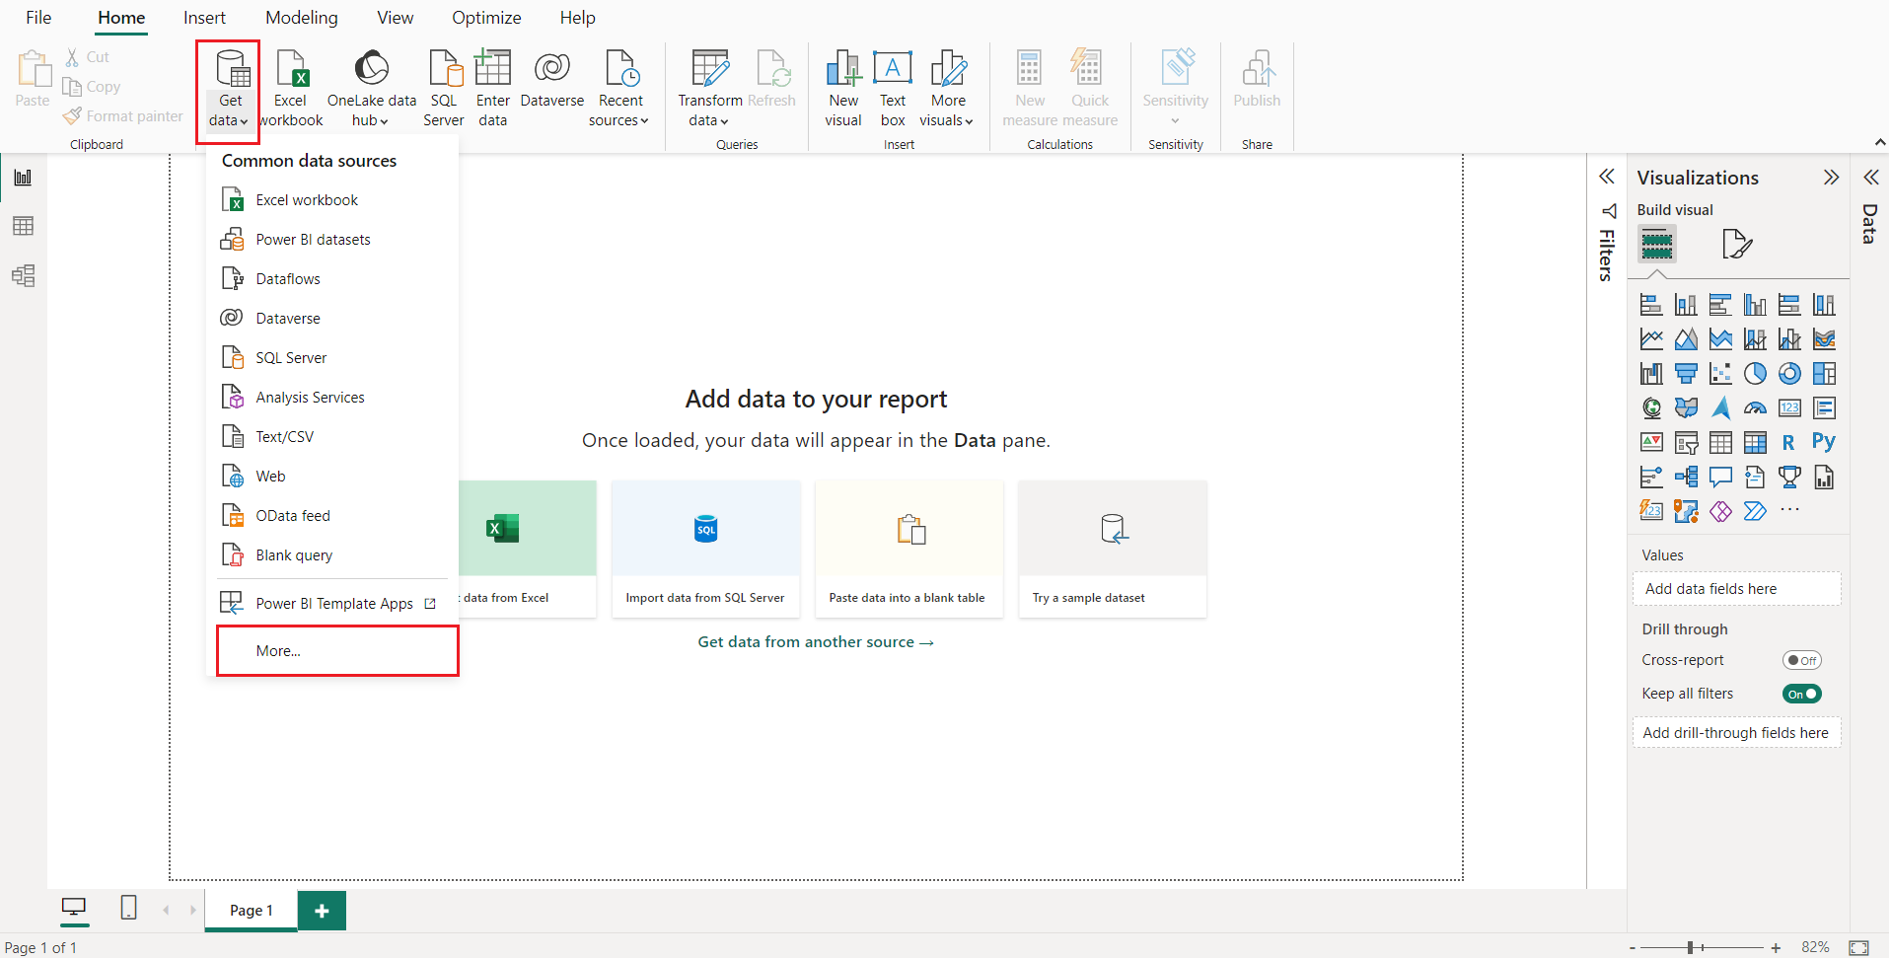
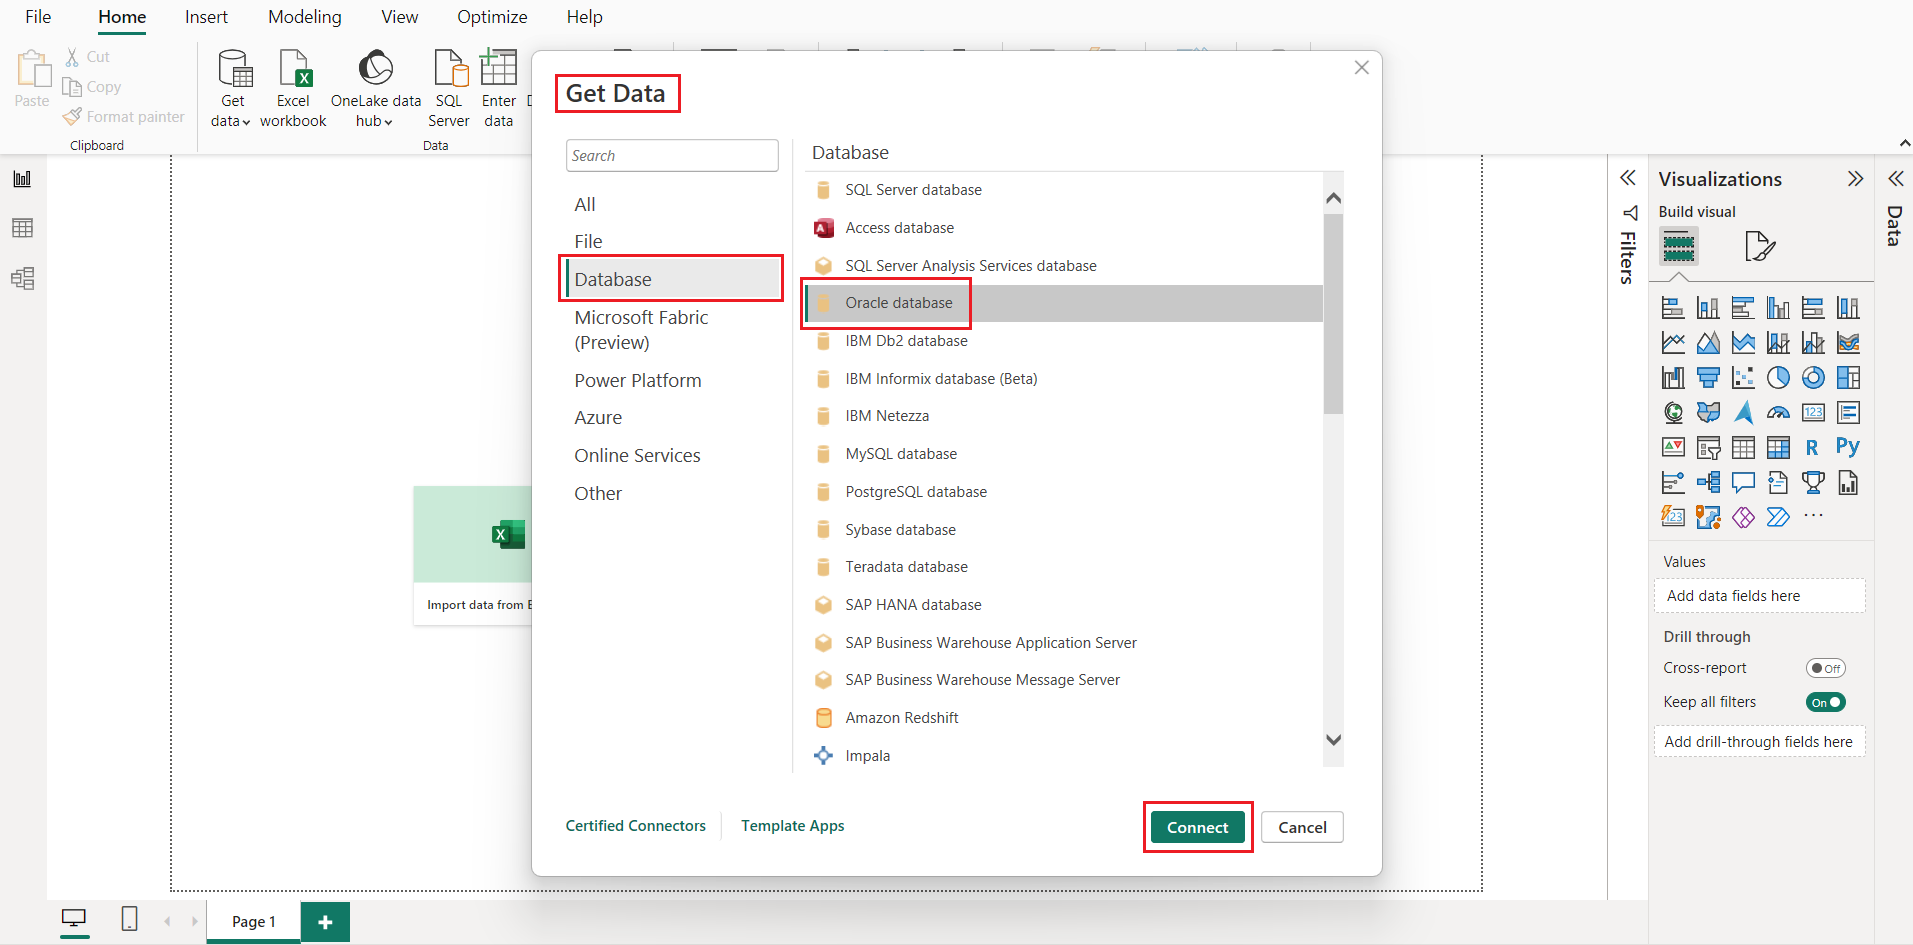
- Click on "Get Data" to connect to your data source and load the data into Power BI Desktop.
- Choose the "SQL Server" as the data source, and load the data into Power BI Desktop.
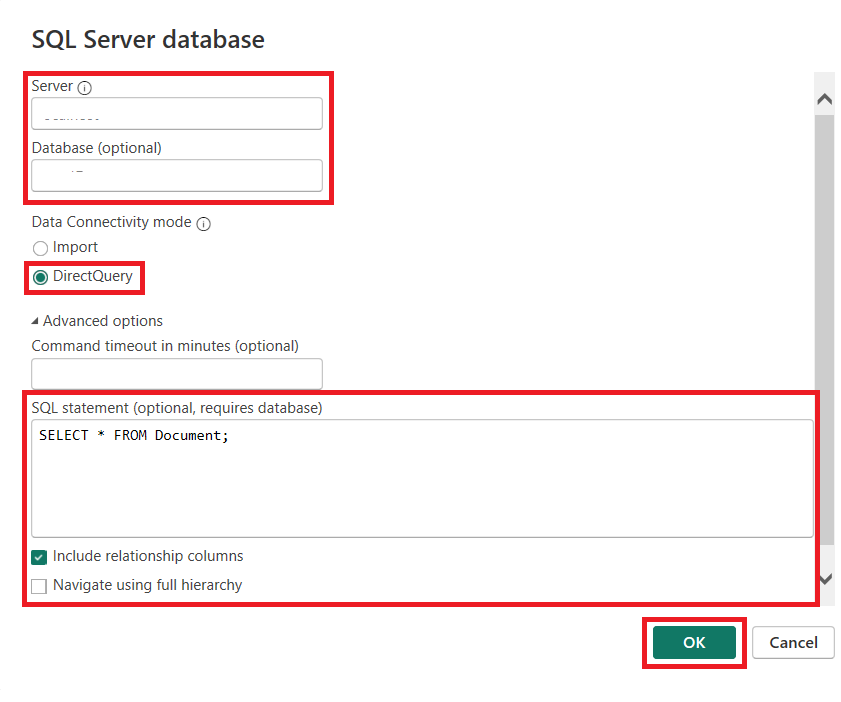
- In the dialog box, provide the "Server", "Database", "Data Connectivity Mode", and the "SQL statement" information, and click on "OK".
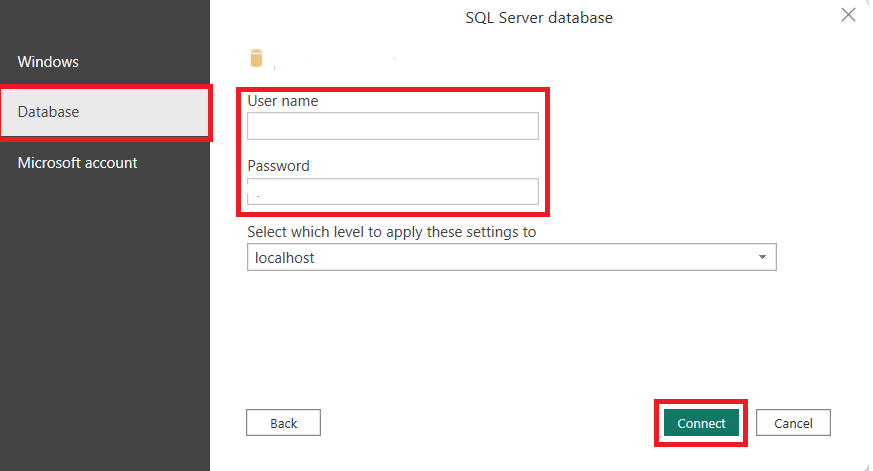
- Provide a Username, Password, and then click on "Connect".
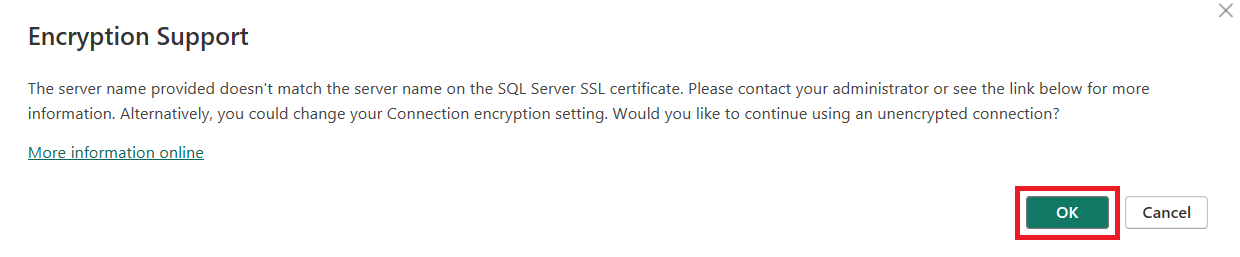
- From the "Encryption Support" dialog, click the "Ok" button.
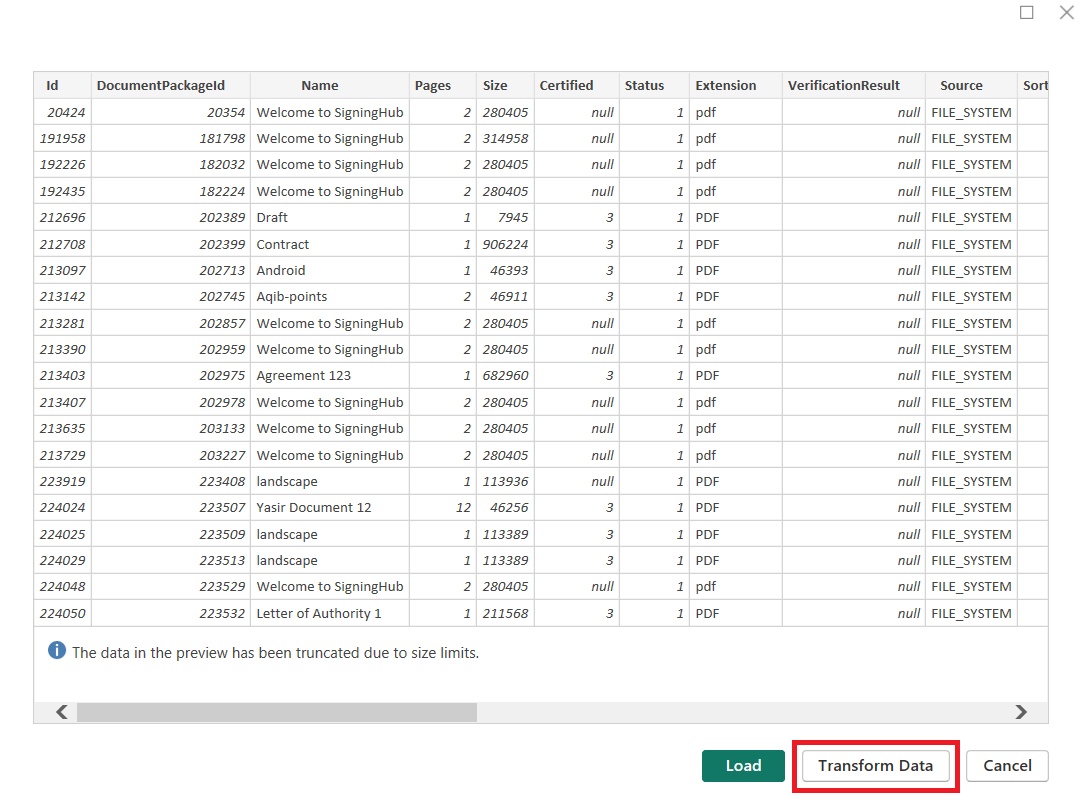
- The Power Query Editor will be used to transform and shape the data as needed. Click on the "Transform Data" button.
- Perform data filtration, and aggregations to group and summarize data to make it more manageable and useful. Click on the "Close and Apply" button.

- Build your visualizations by selecting fields and dragging them onto the report canvas. Customize and format your visualizations as necessary.
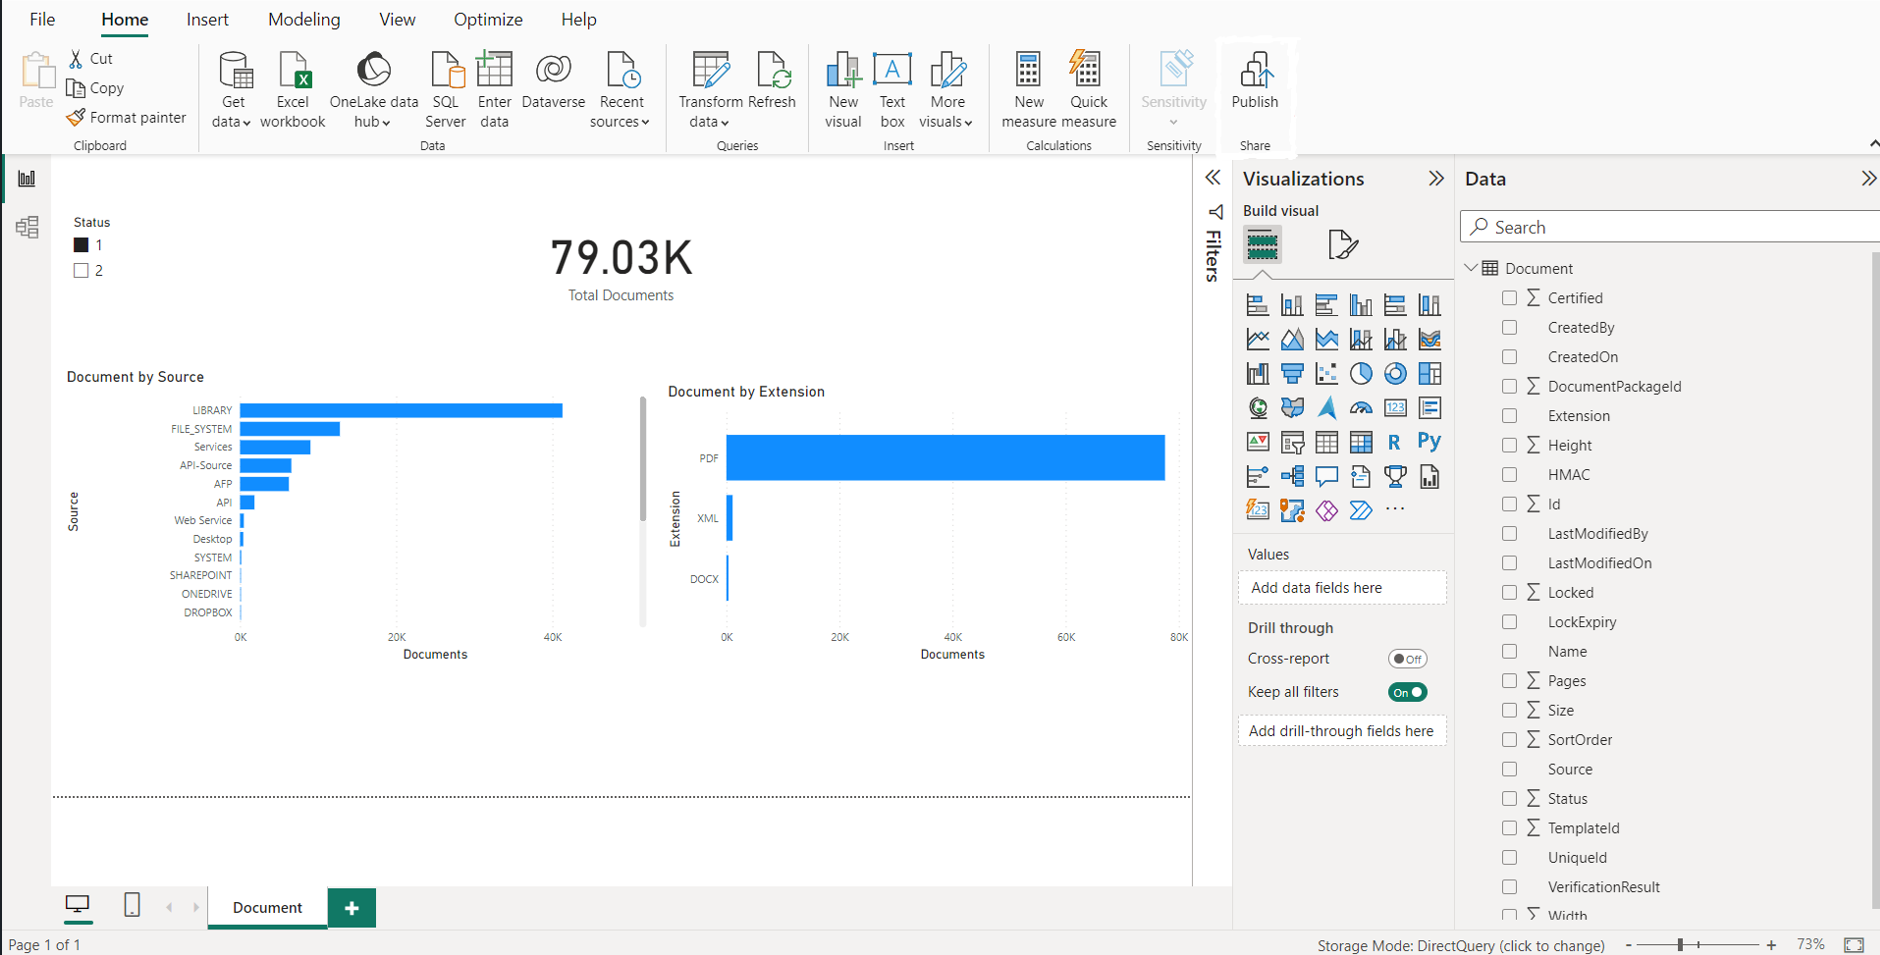
- Design the report layout by adding pages, text boxes, images, and other elements to provide context and explanations.
- Click on "Publish" and select an enterprise to which you want to publish the report to.

|
|
|


Upload the Report in Power BI Service
This section will focus on the transition from Power BI Desktop to the Power BI Service to publish and share your report, enabling collaboration and access for others in your organization.
- Click on "Publish" in Power BI Desktop. Sign in with your Power BI account if prompted. Choose a workspace in the Power BI Service where you want to publish the report.

- Open a web browser and go to the Power BI Service (https://app.powerbi.com). Sign in with your Power BI account credentials.
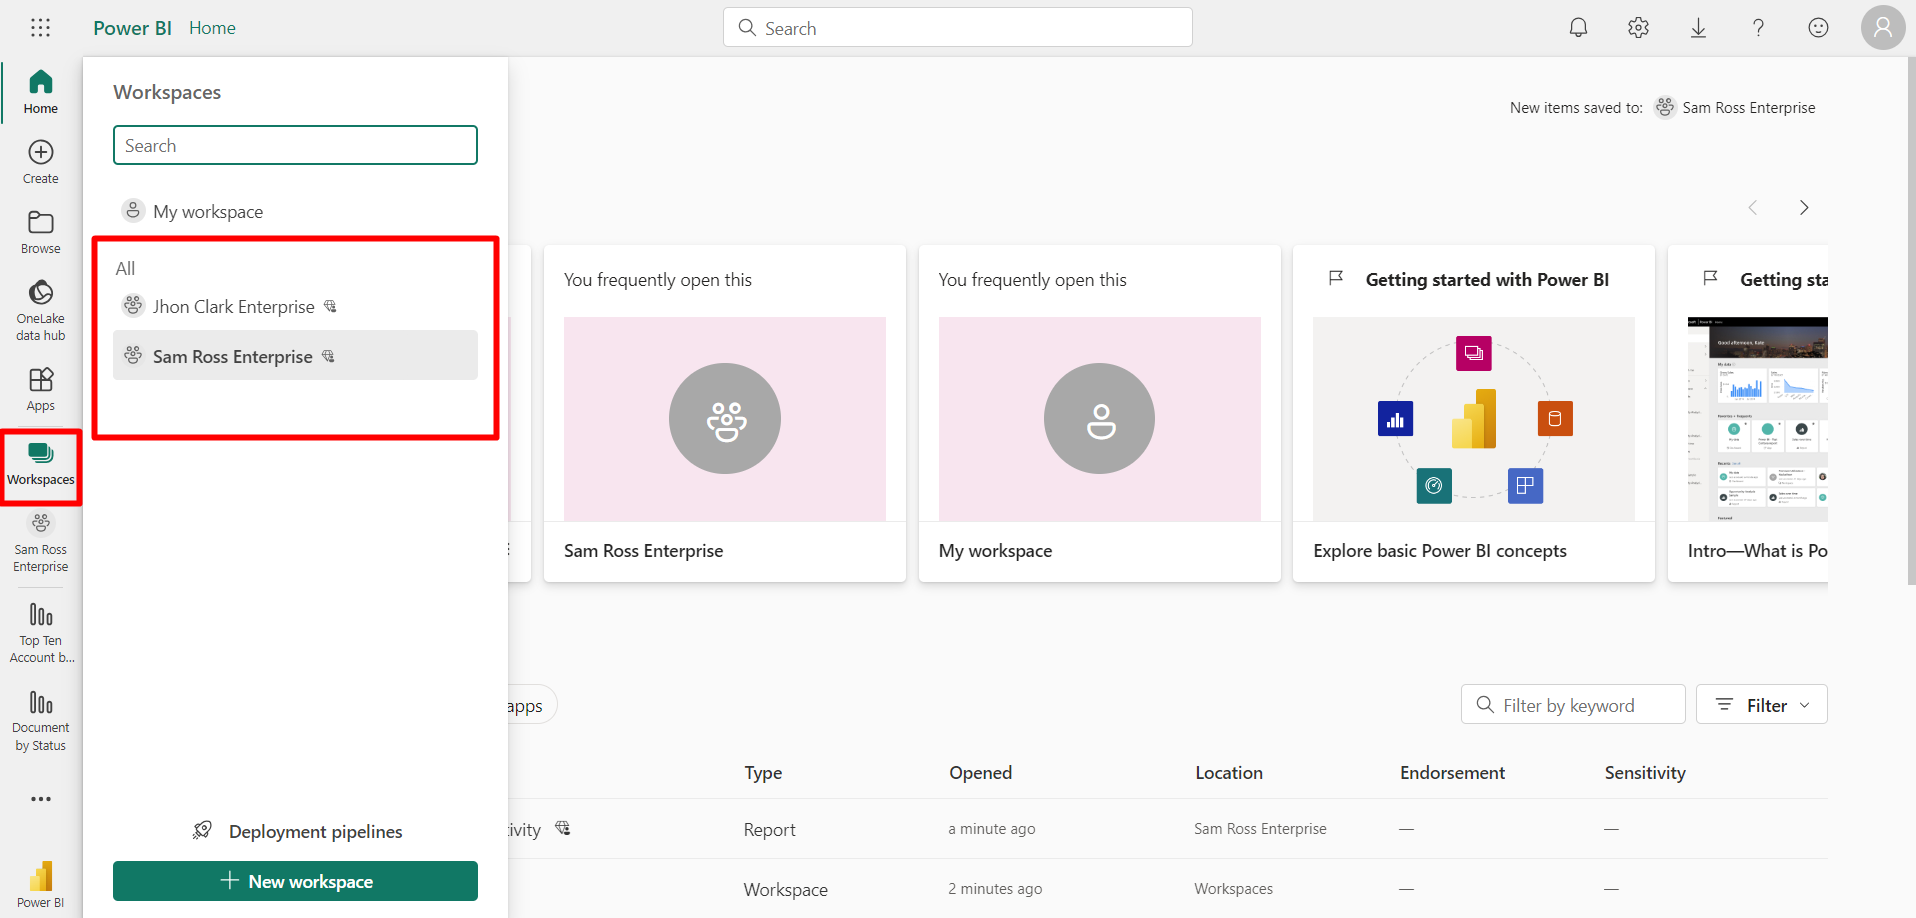
- On the left-hand side of the Power BI Service interface, you'll see the navigation pane. Click on "Workspaces" to access your workspaces.
- To create a new workspace:
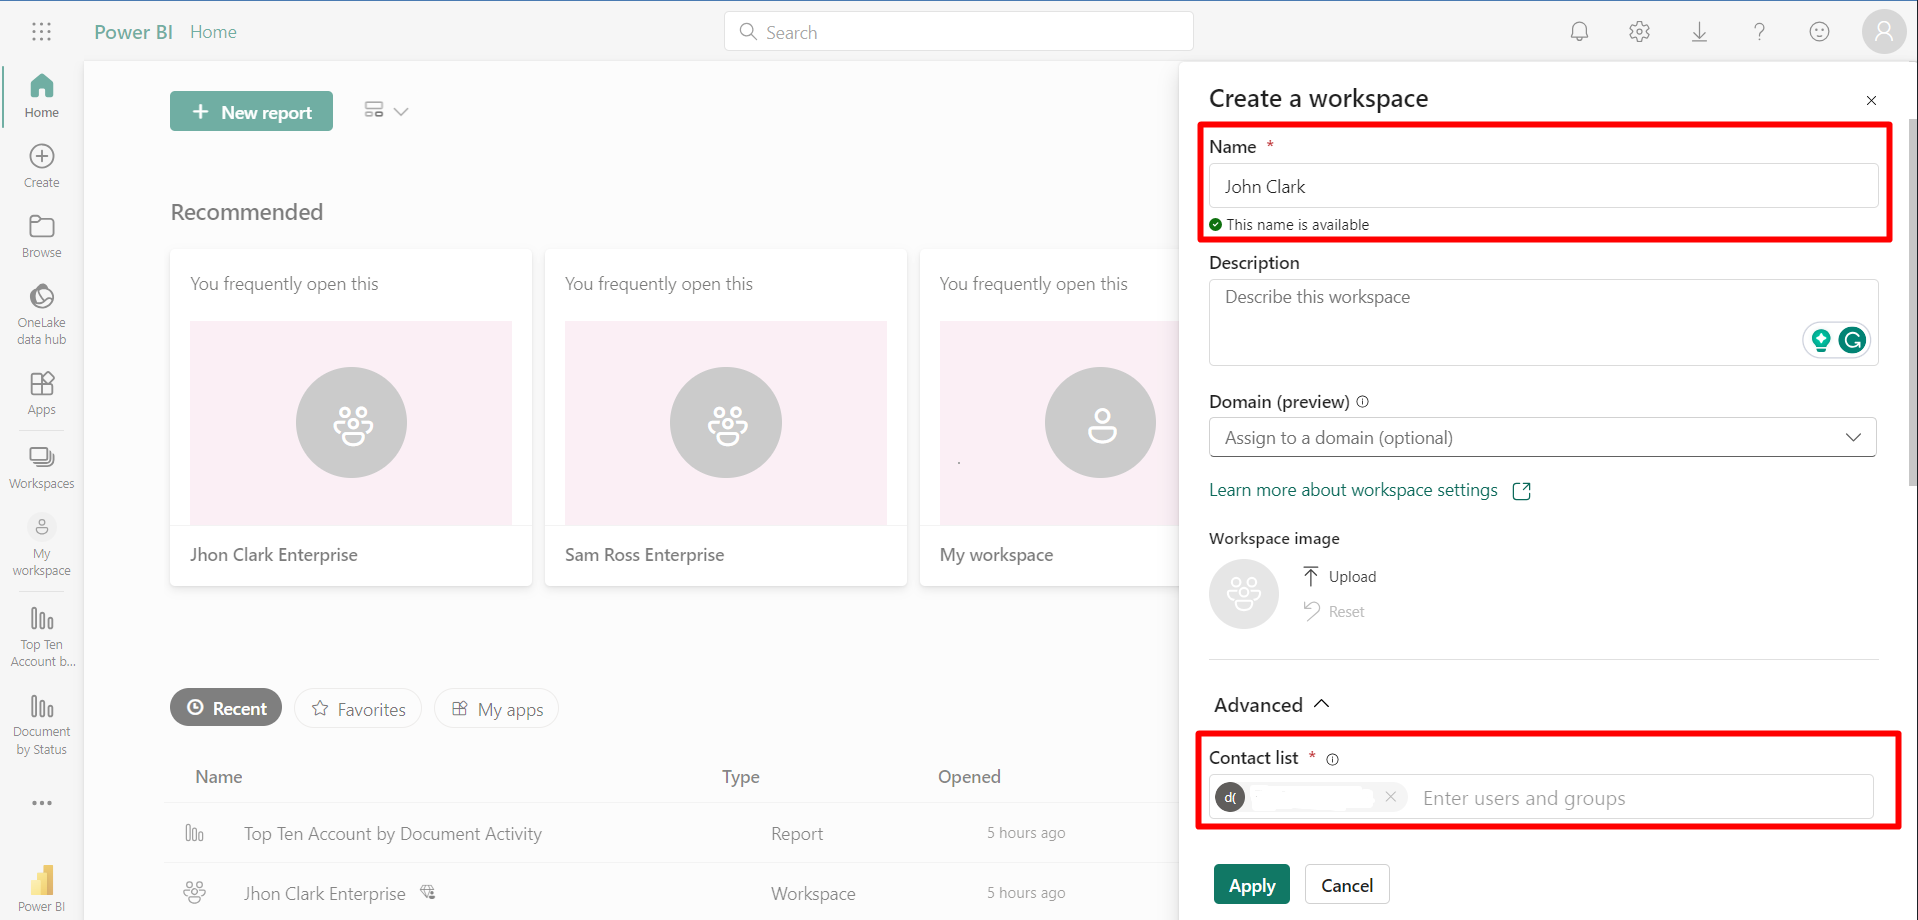
- Click on "Workspaces" to access your workspaces. Click on the "New workspace" button.

- Provide the name, contacts list, and license. Click on the "Apply" button to create the workspace..

- For an existing workspace:
- Click on "Workspaces" to access your workspaces.
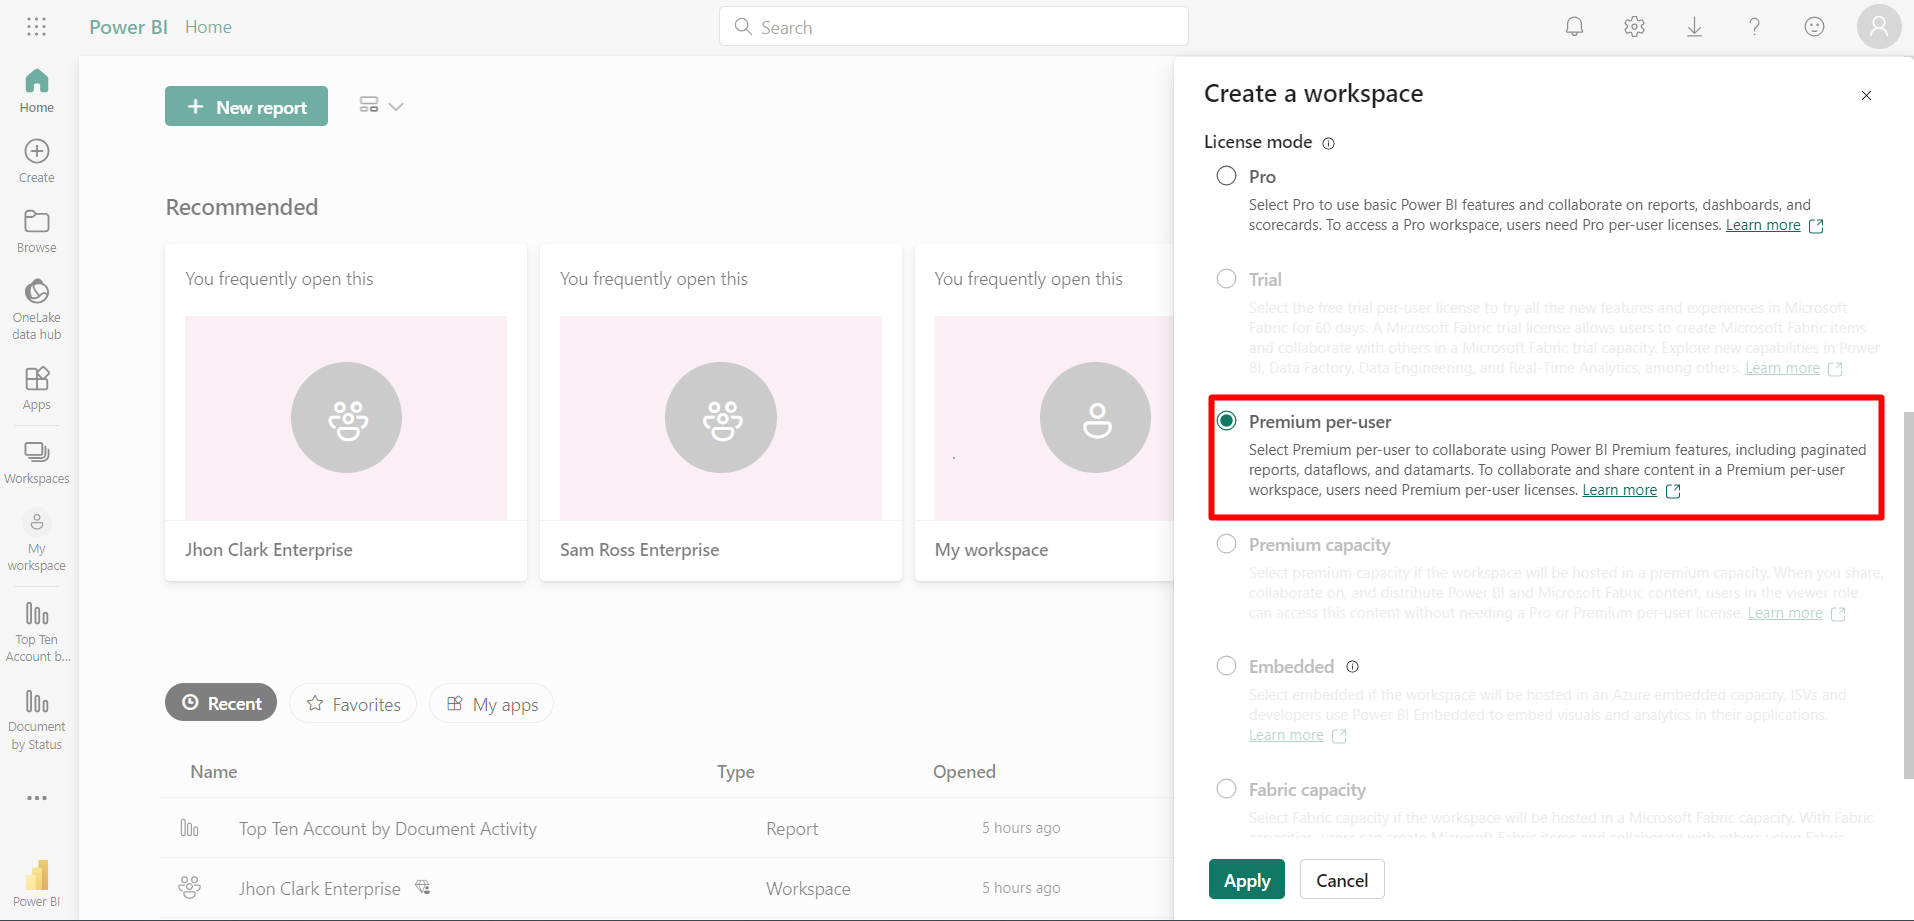
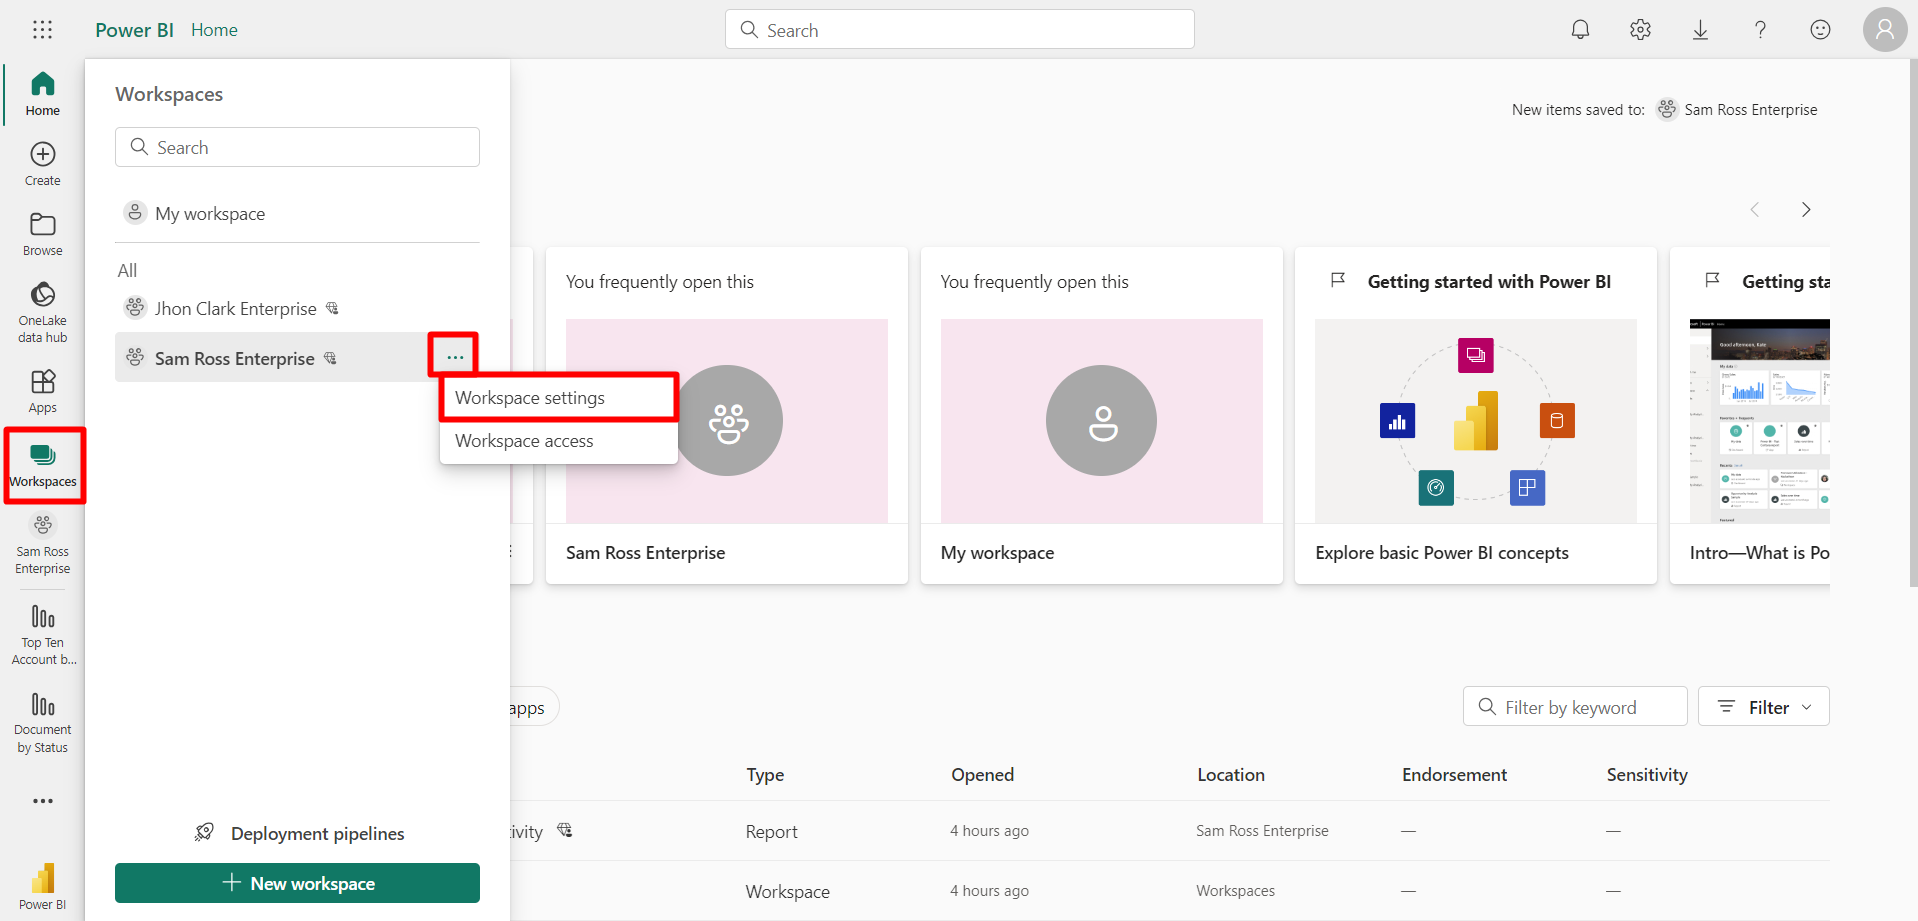
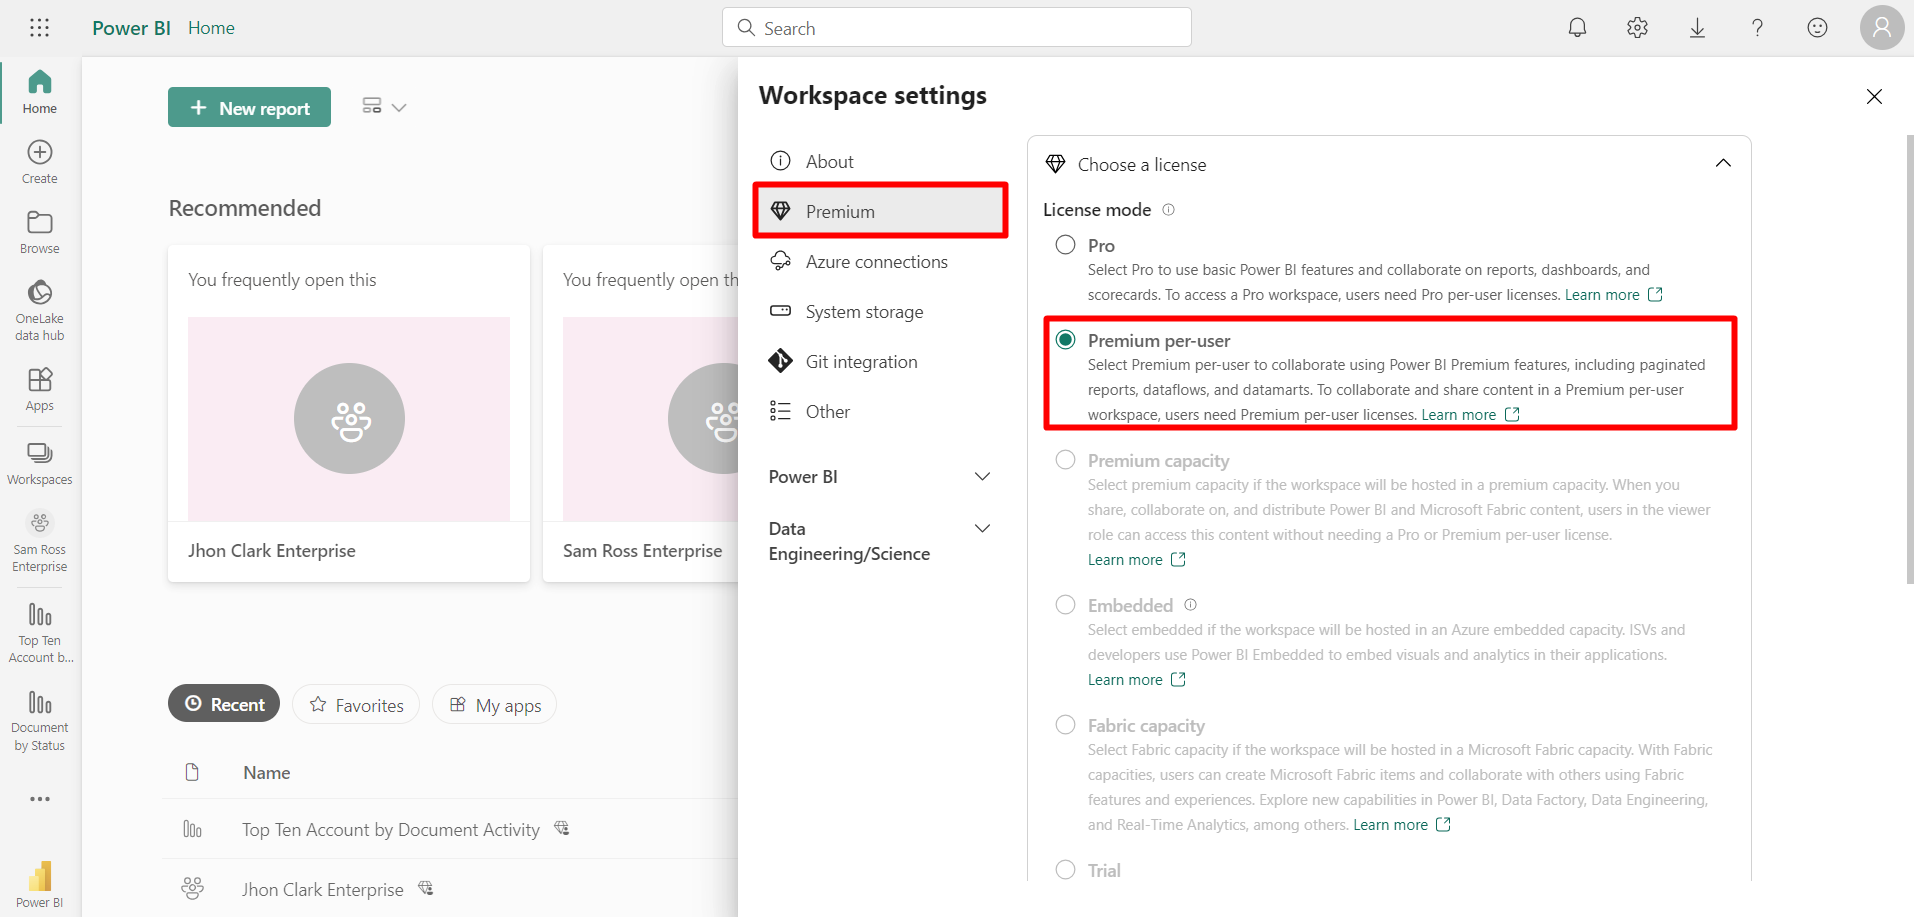
- Allow the "Premium per-user" license against a workspace, click on the "More Options" button against the workspace name, and select "Workspace Settings".
- From the Premium tab, select the "Premium per-user" license
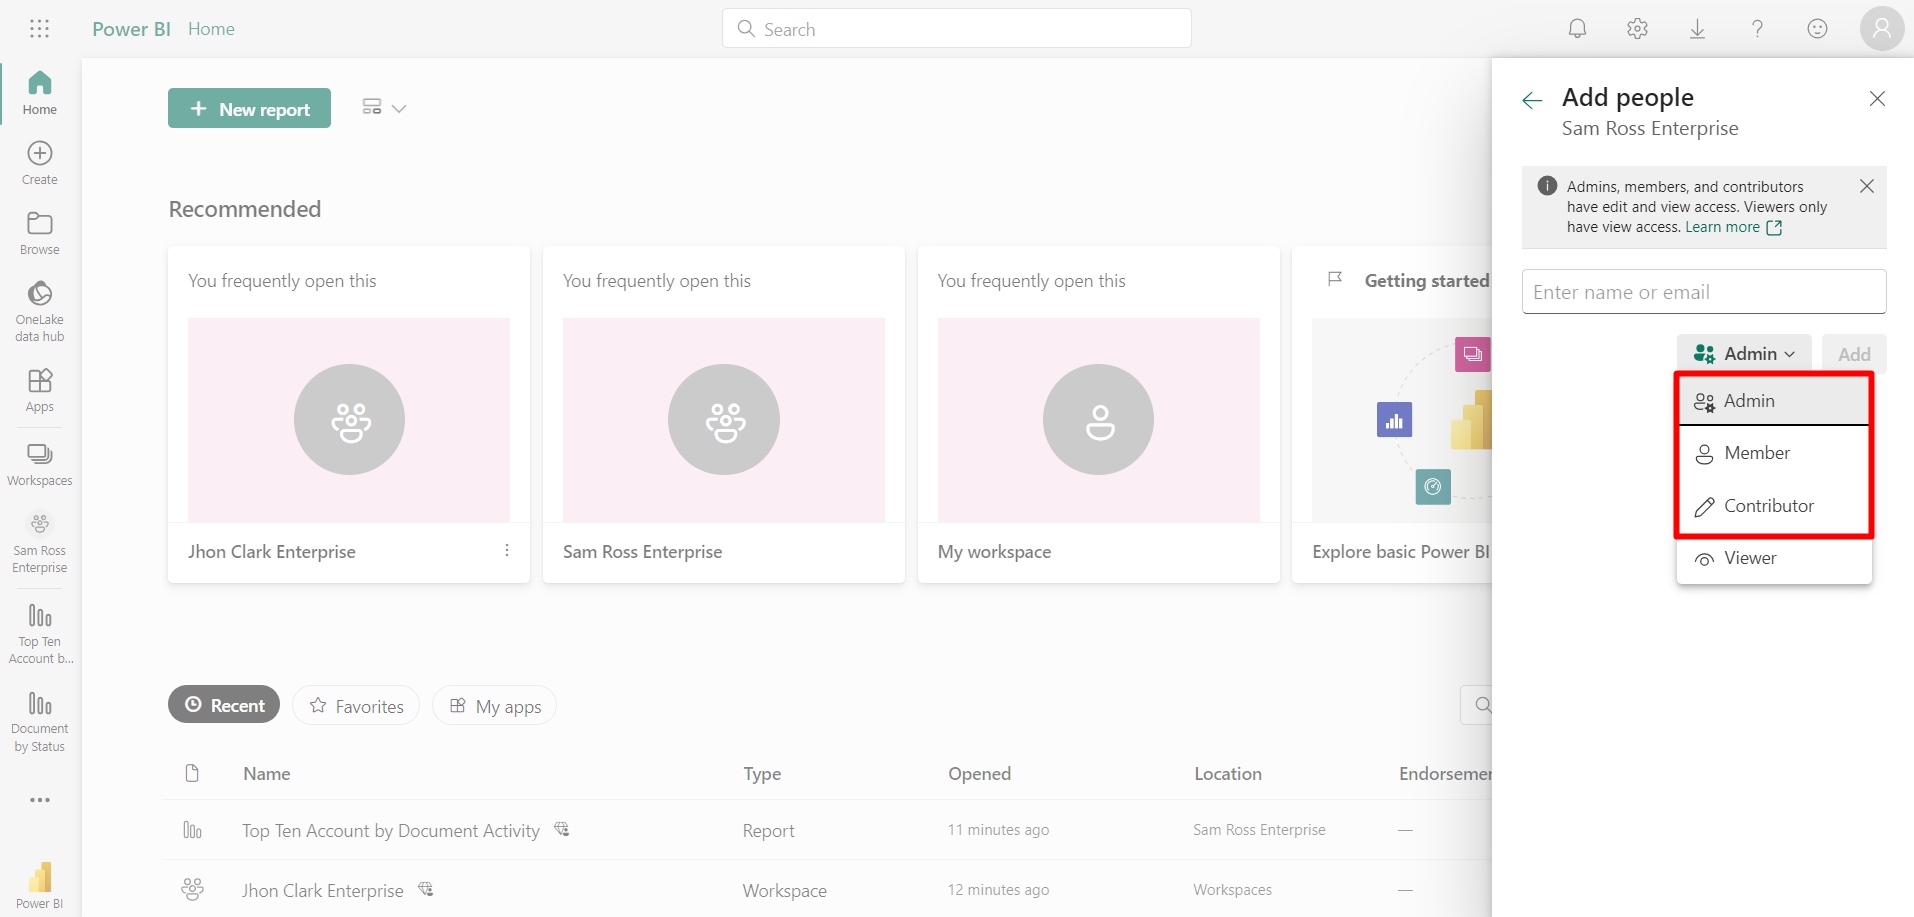
- To allow collaborators to access the workspace, click on the "More Options" button against the workspace name, and select "Workspace Access".
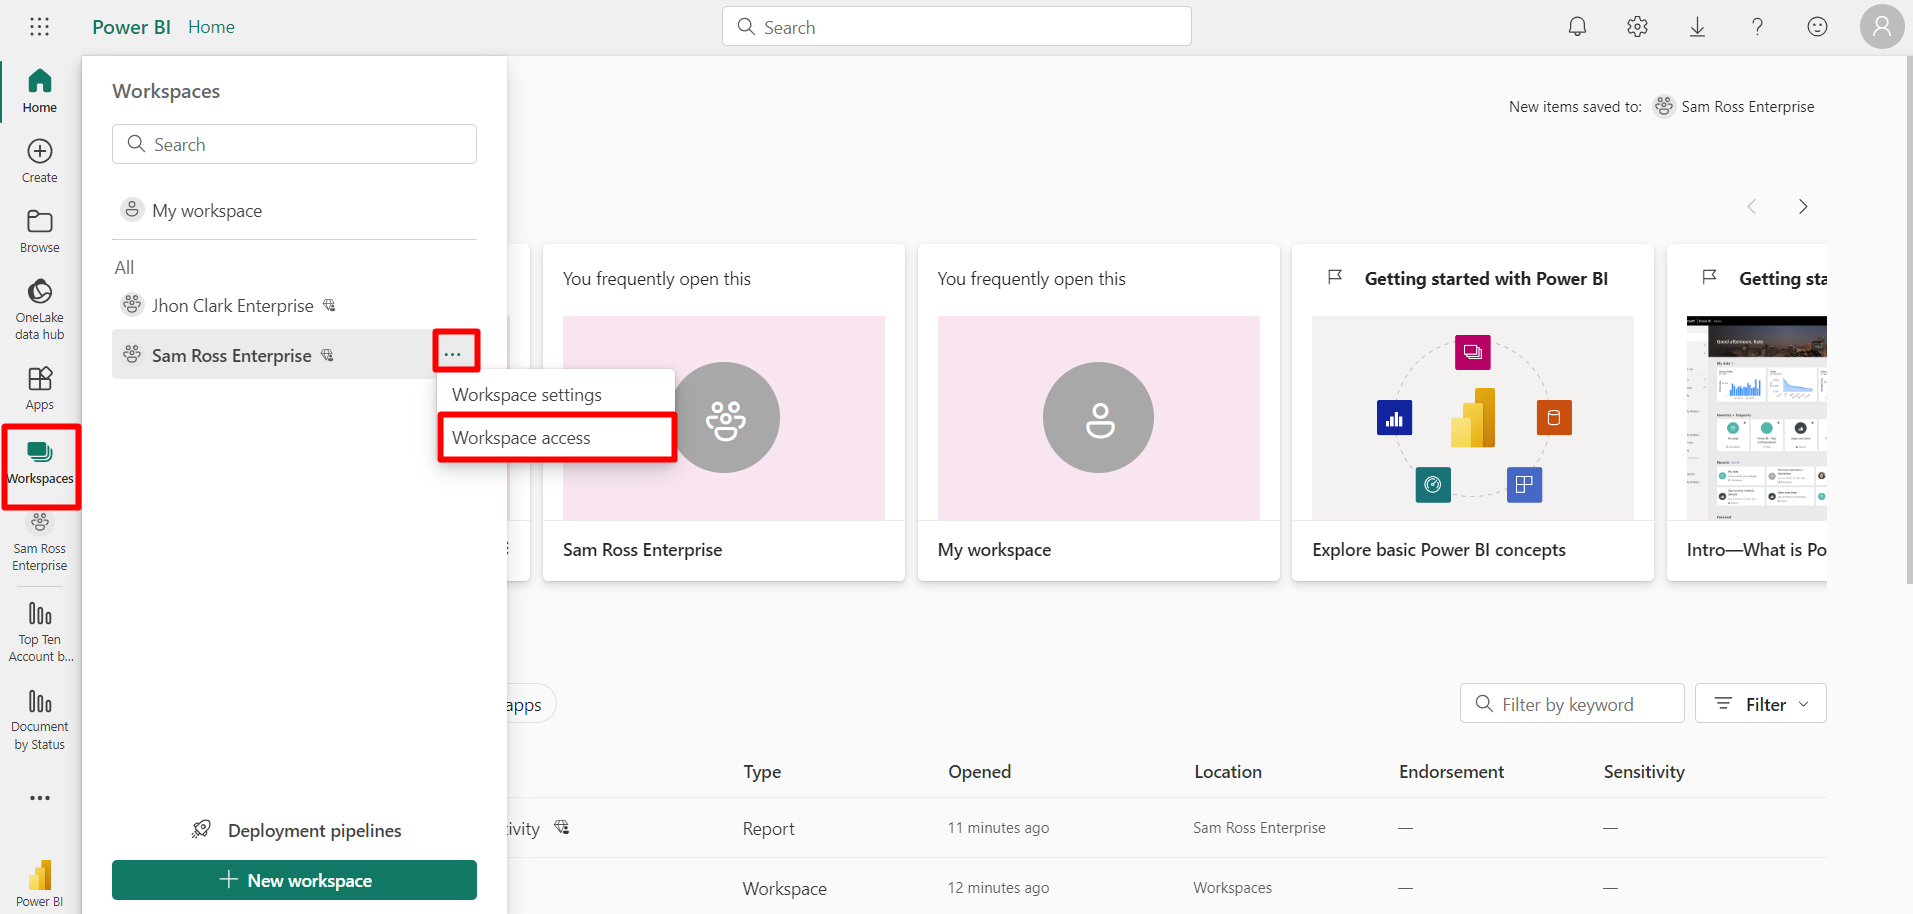
- Click the "Add people or groups" button. Enter the email addresses of the collaborators you want to invite, or provide the name of the Power BI application that you have registered in Azure Active Directory (this is covered in the next step). Assign either an Admin, Member. or a Contributor role, based on your requirements.
|
|
|
Create the Power BI App in Azure Active Directory
This section will focus on the creation of the Power BI app in the Microsoft Azure Active Directory. The Power BI app in the Microsoft Azure Active Directory establishes permissions for Power BI REST resources and enables access to the Power BI REST APIs; otherwise, we cannot use Power BI resources.
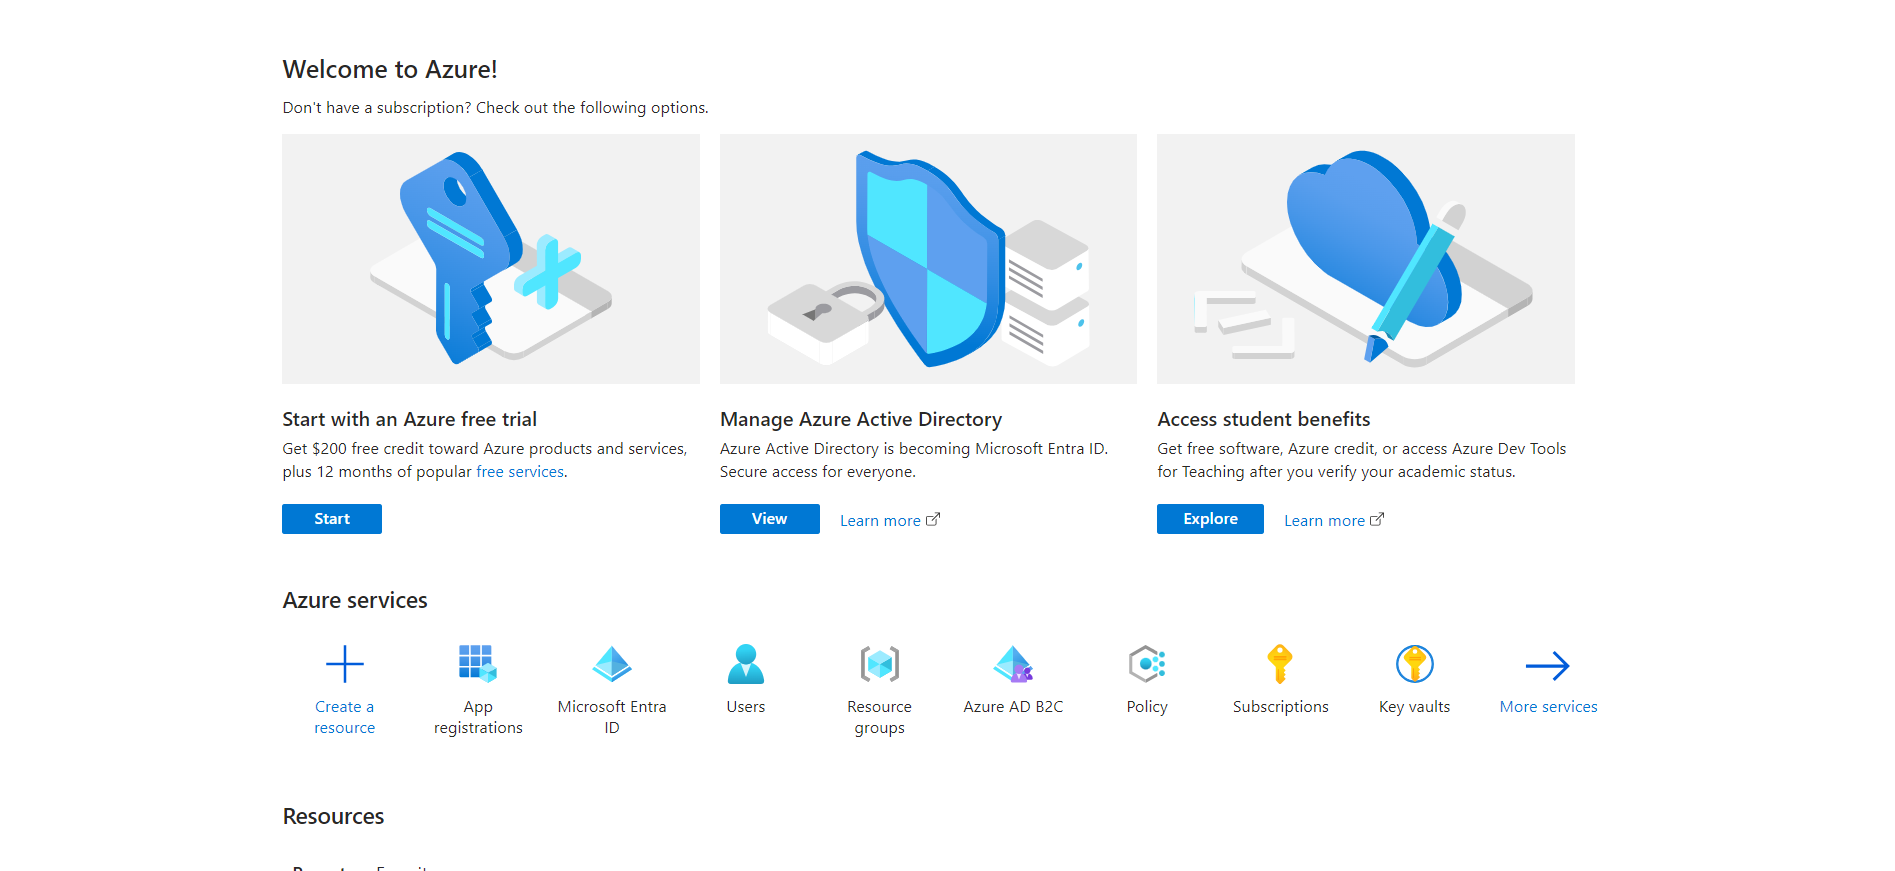
- Sign in to the Azure portal using your Azure Active Directory administrator account.
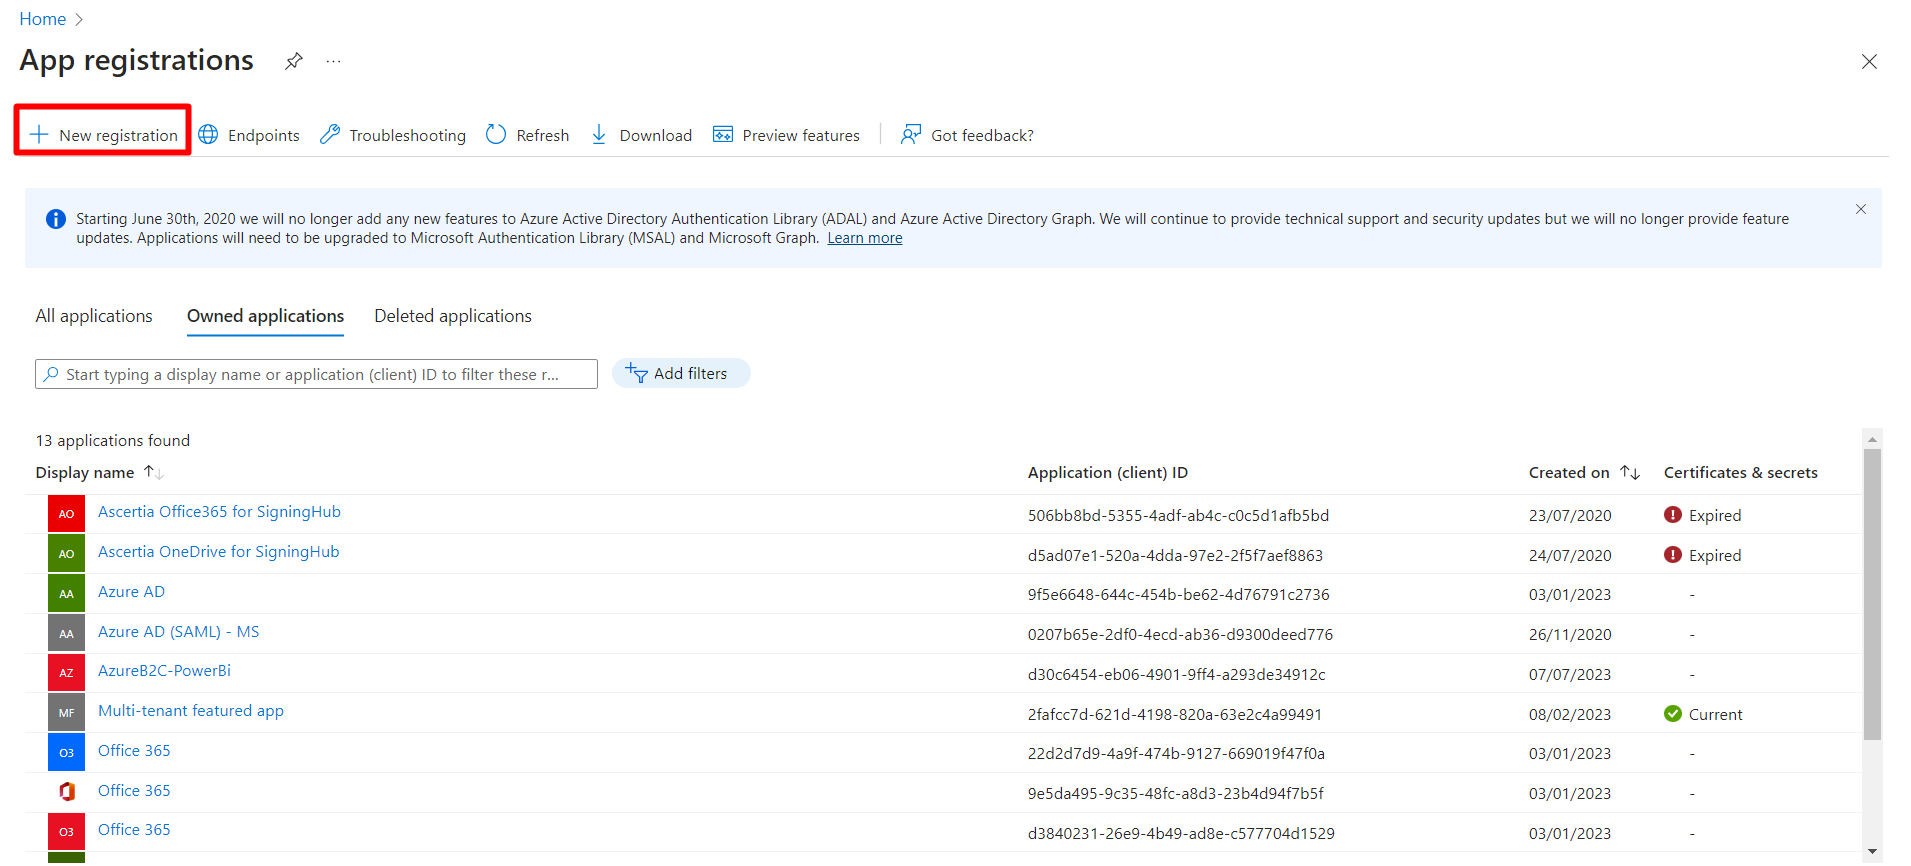
- Click on the "App Registrations" button from the Azure services section.

- Click on the "New application" button.
- Enter the name for the app, and select the "Supported account types". Click on the "Register" button.

- You will be taken to the app overview screen. Select "API permissions" from the left tab
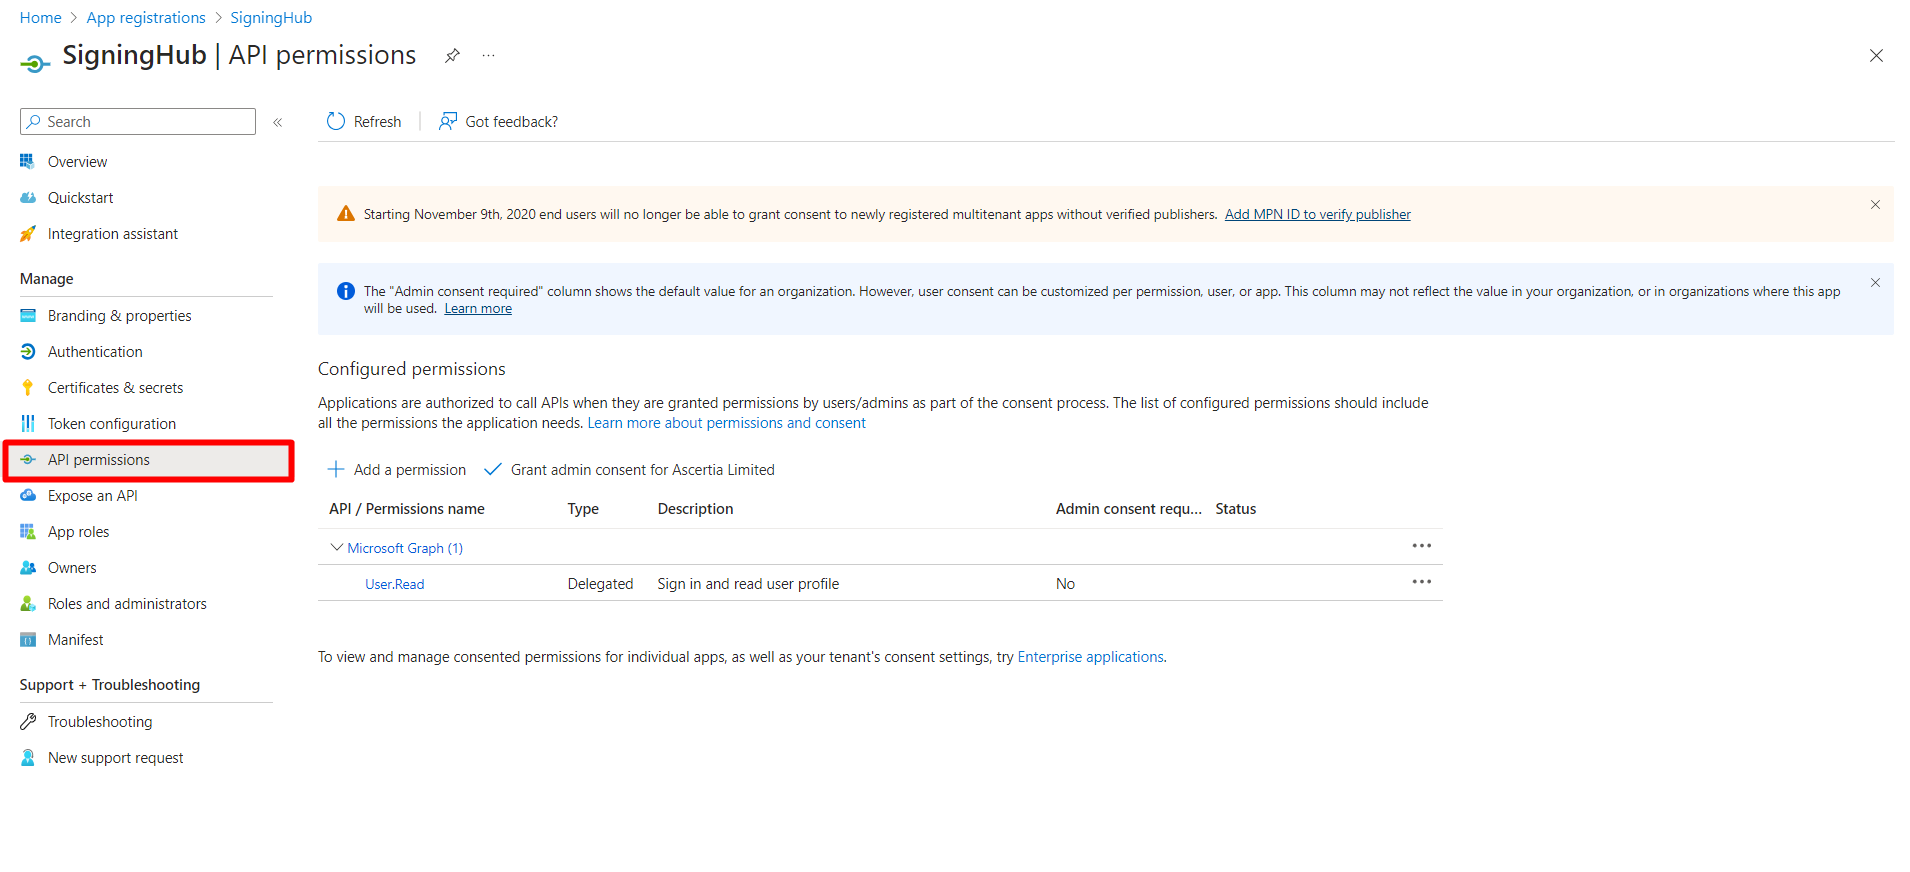
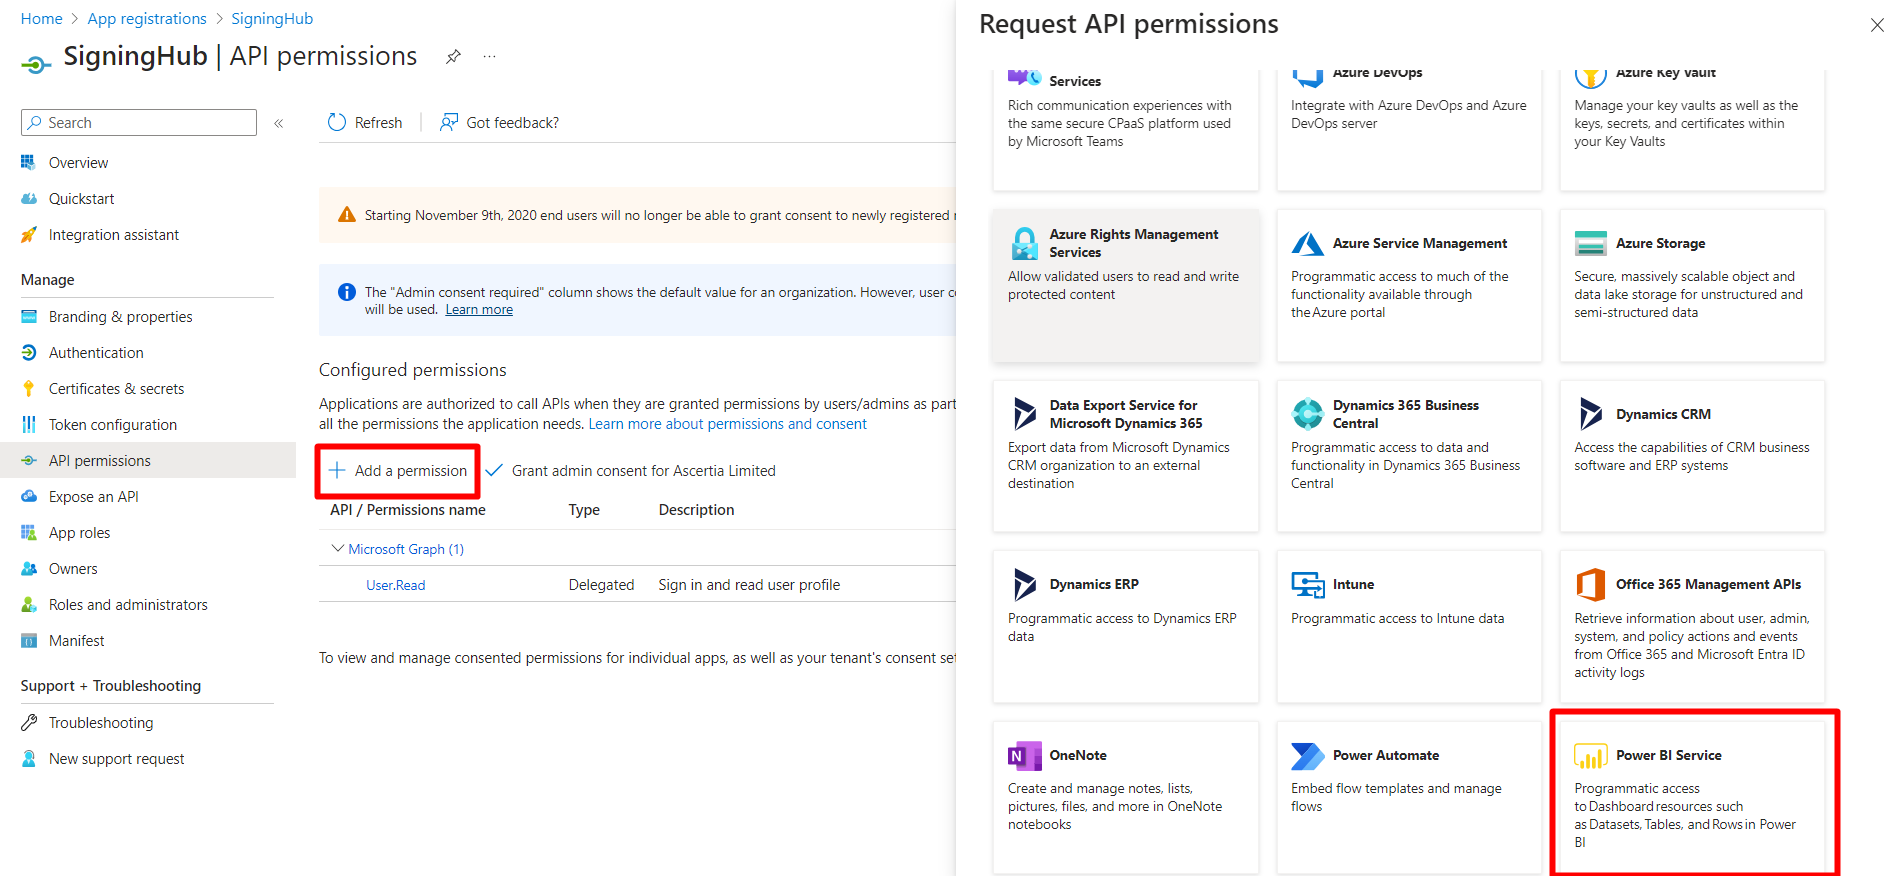
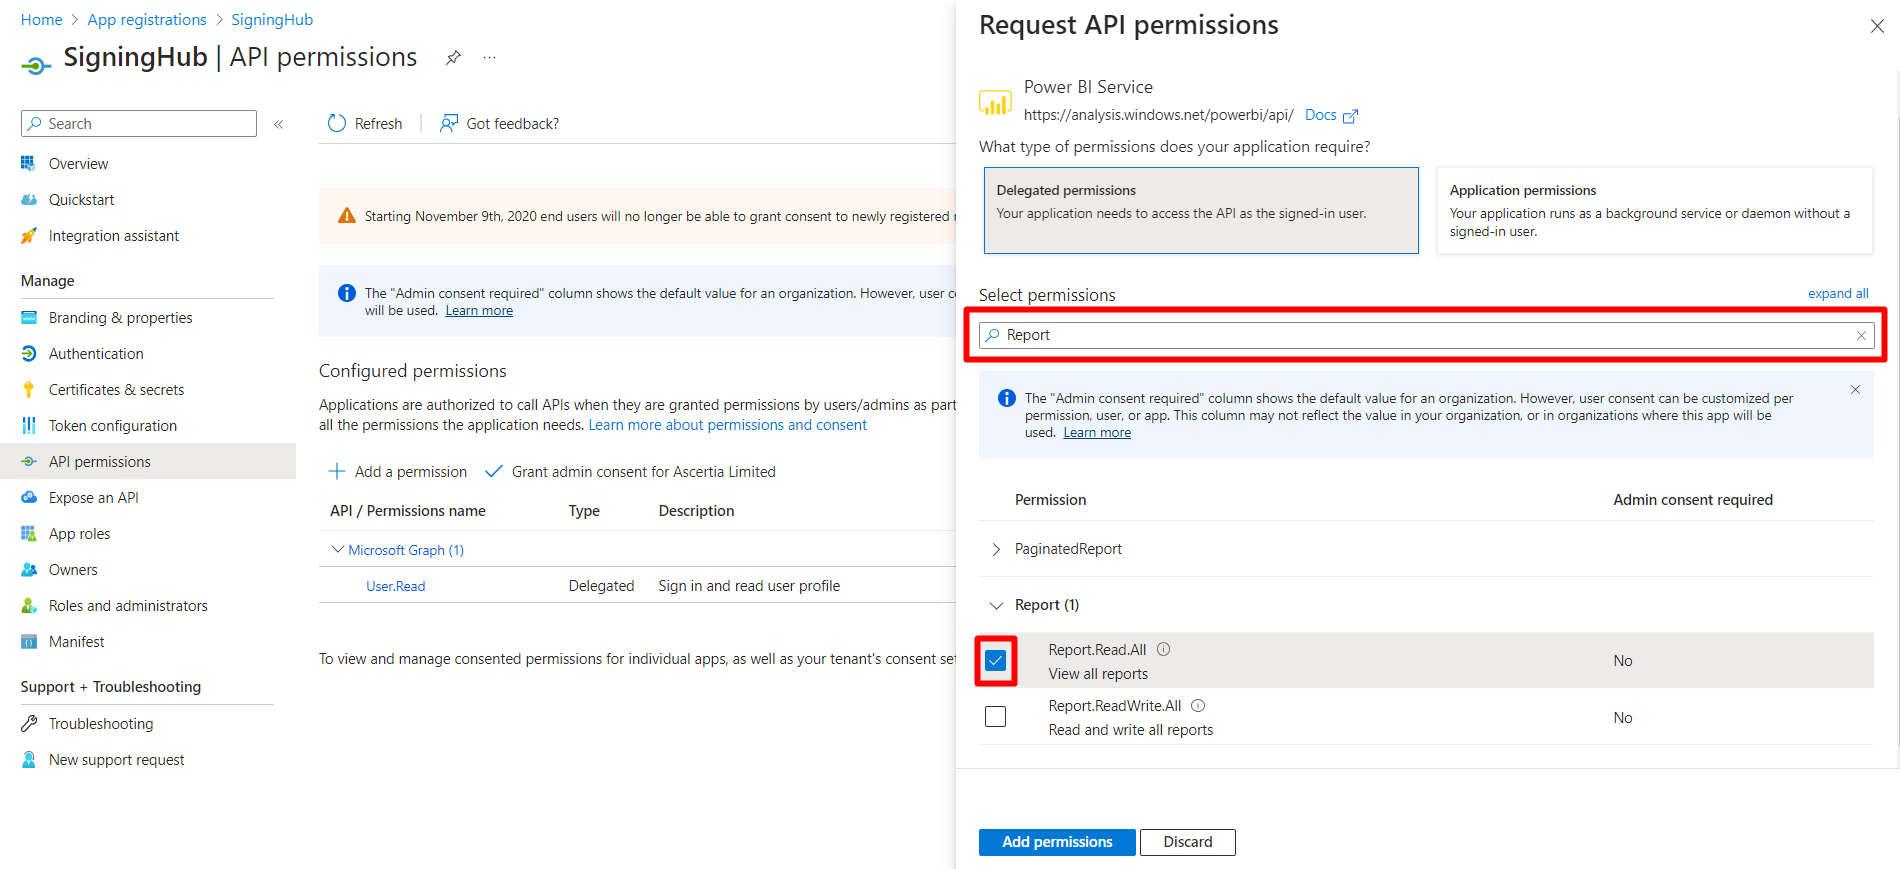
- From the "API permissions" screen, click on "Add a permission" button. From the "Request API permissions" tab, scroll down and click on "Power BI Service".
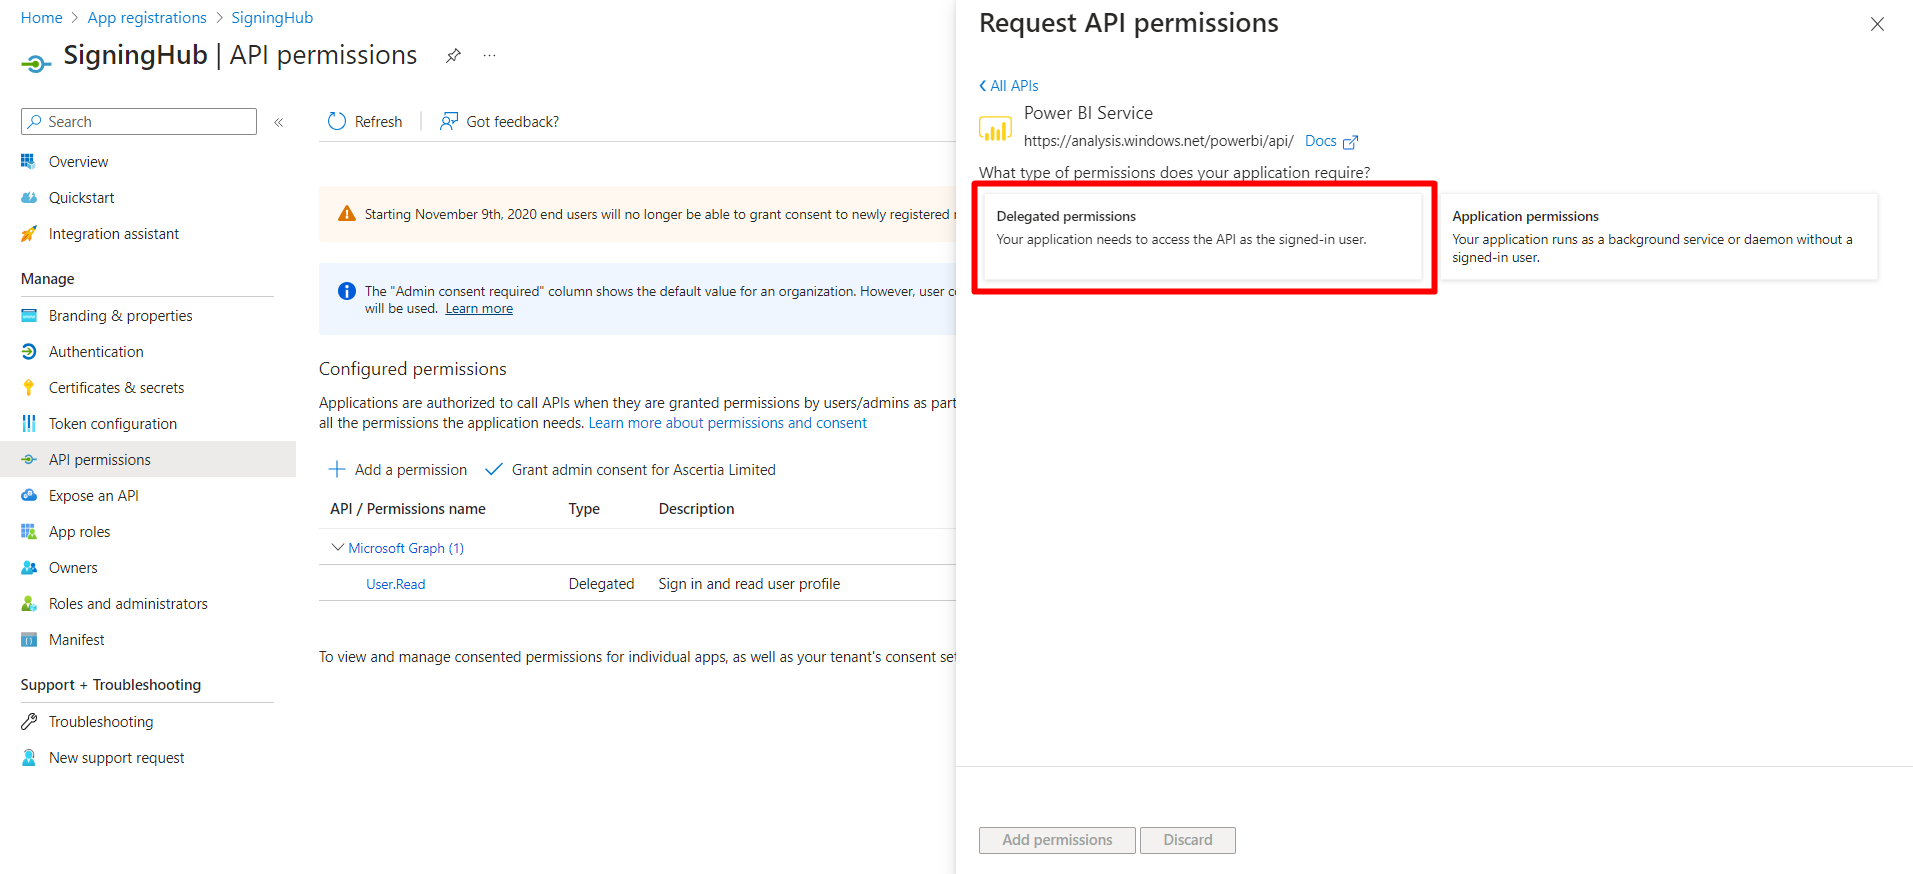
- Click on "Delegated Permissions".
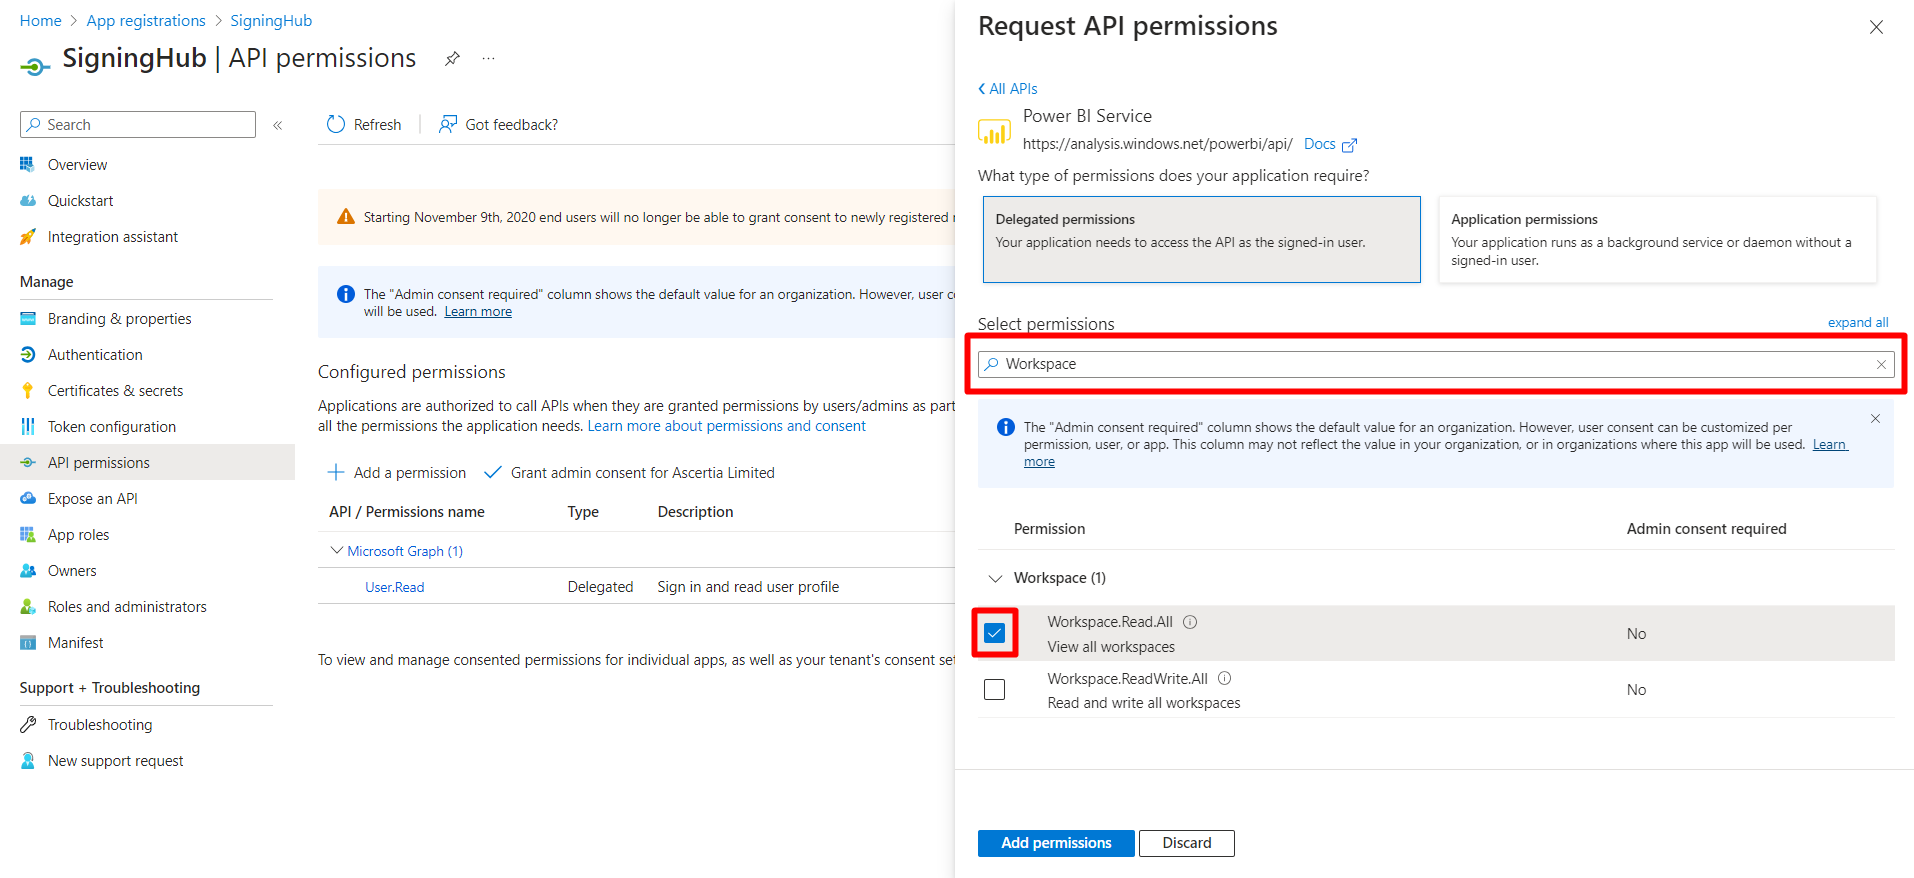
- Search for and select "Workspace". Select the "Workspace.Read.All" permission.
- Search for and select "Report". Select the "Report.Read.All" permission.
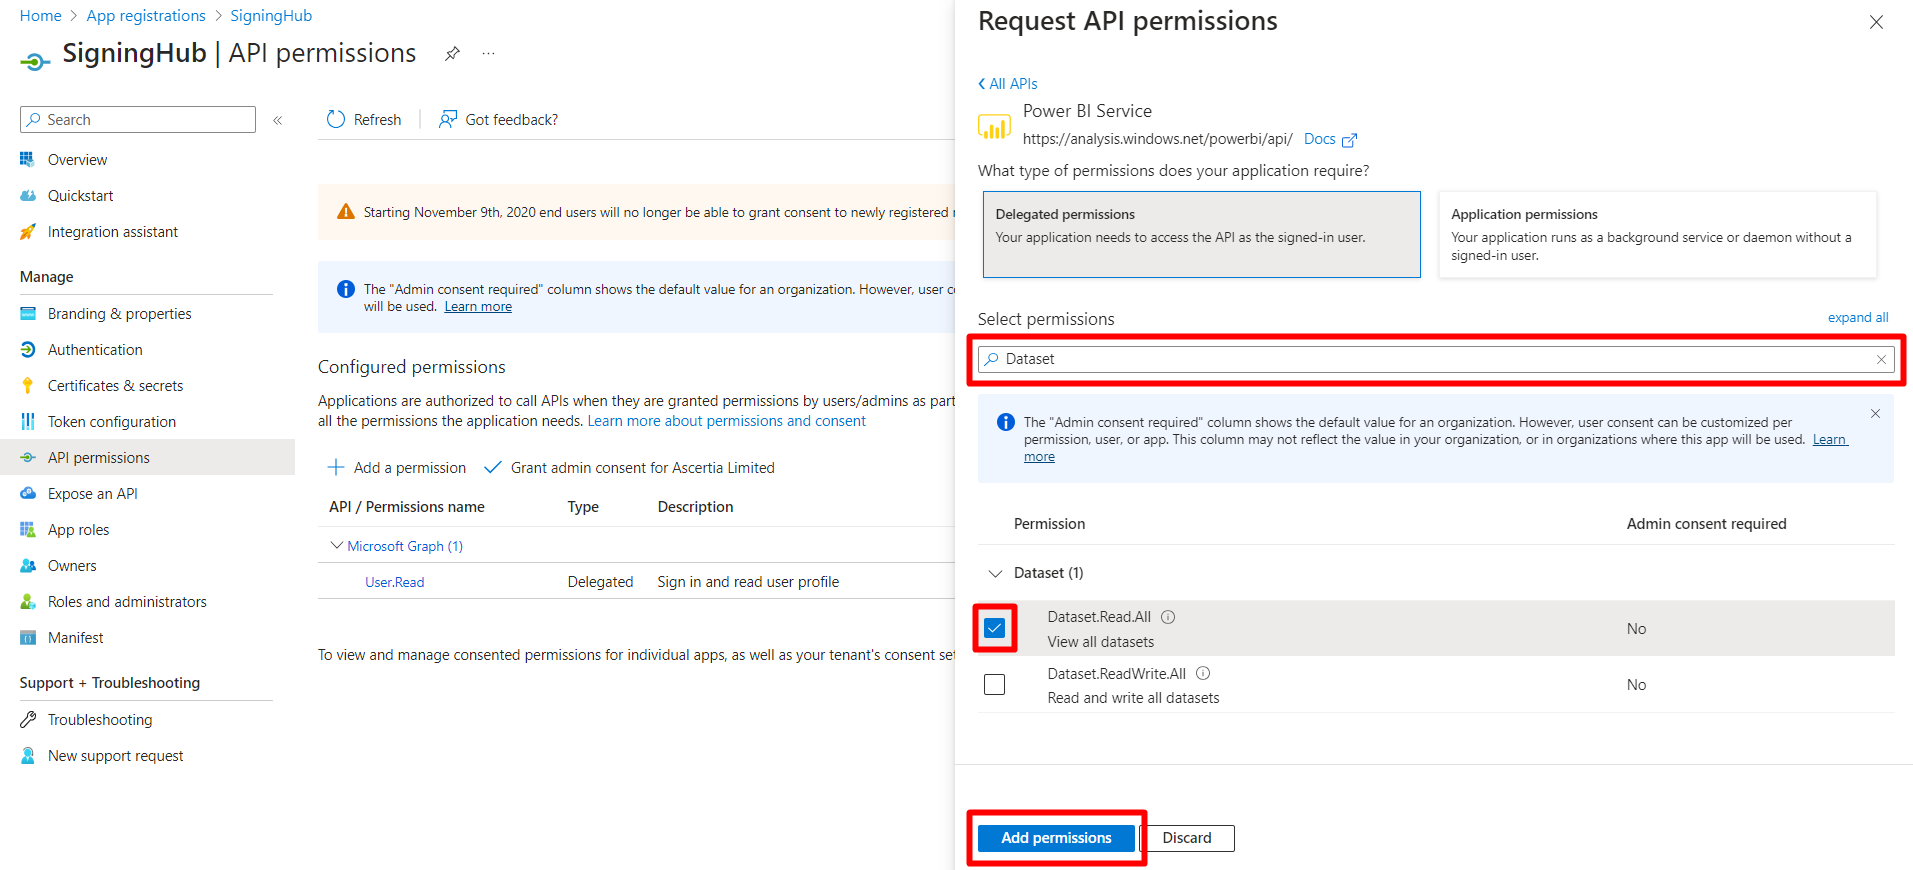
- Search for and select "Dataset". Select the "Dataset.Read.All" permission. Click on the "Add permissions" button.
- Click on the "Grant admin consent for [Directory Name]" button and from the pop-up, select "Yes".

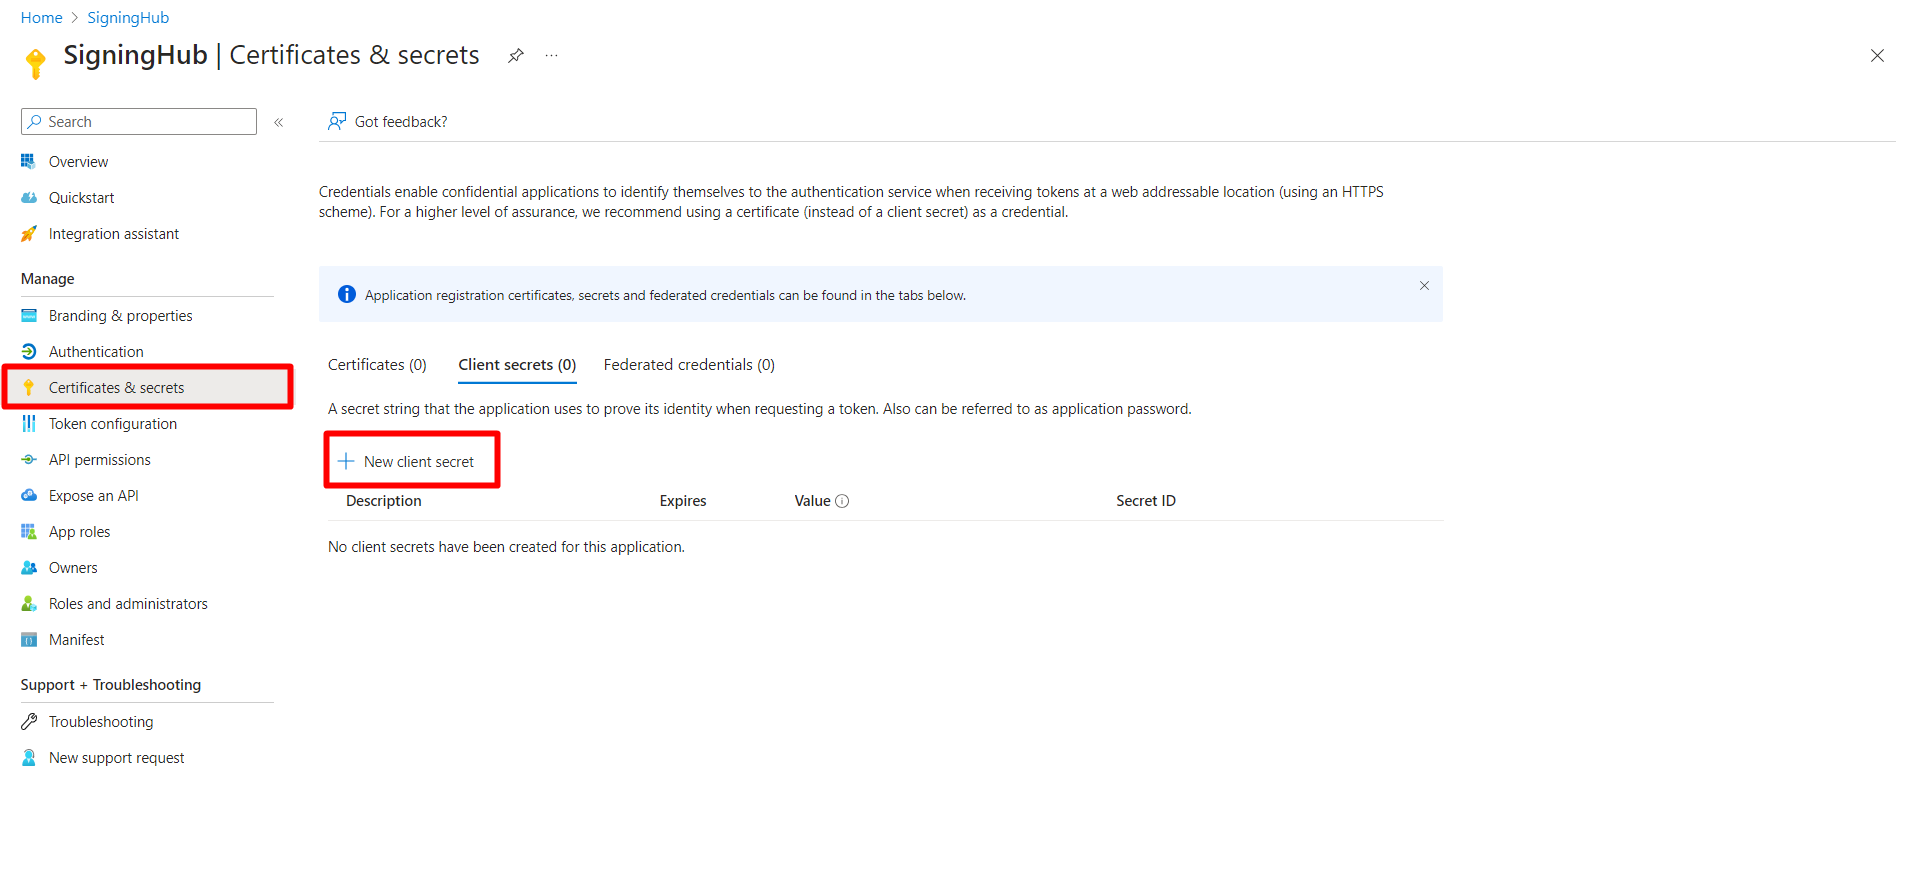
- Select “Certificates & secrets” from the left tab. Create a new client secret by clicking on the “New client secret” button. Save the client secret for use in the SigningHub Admin.
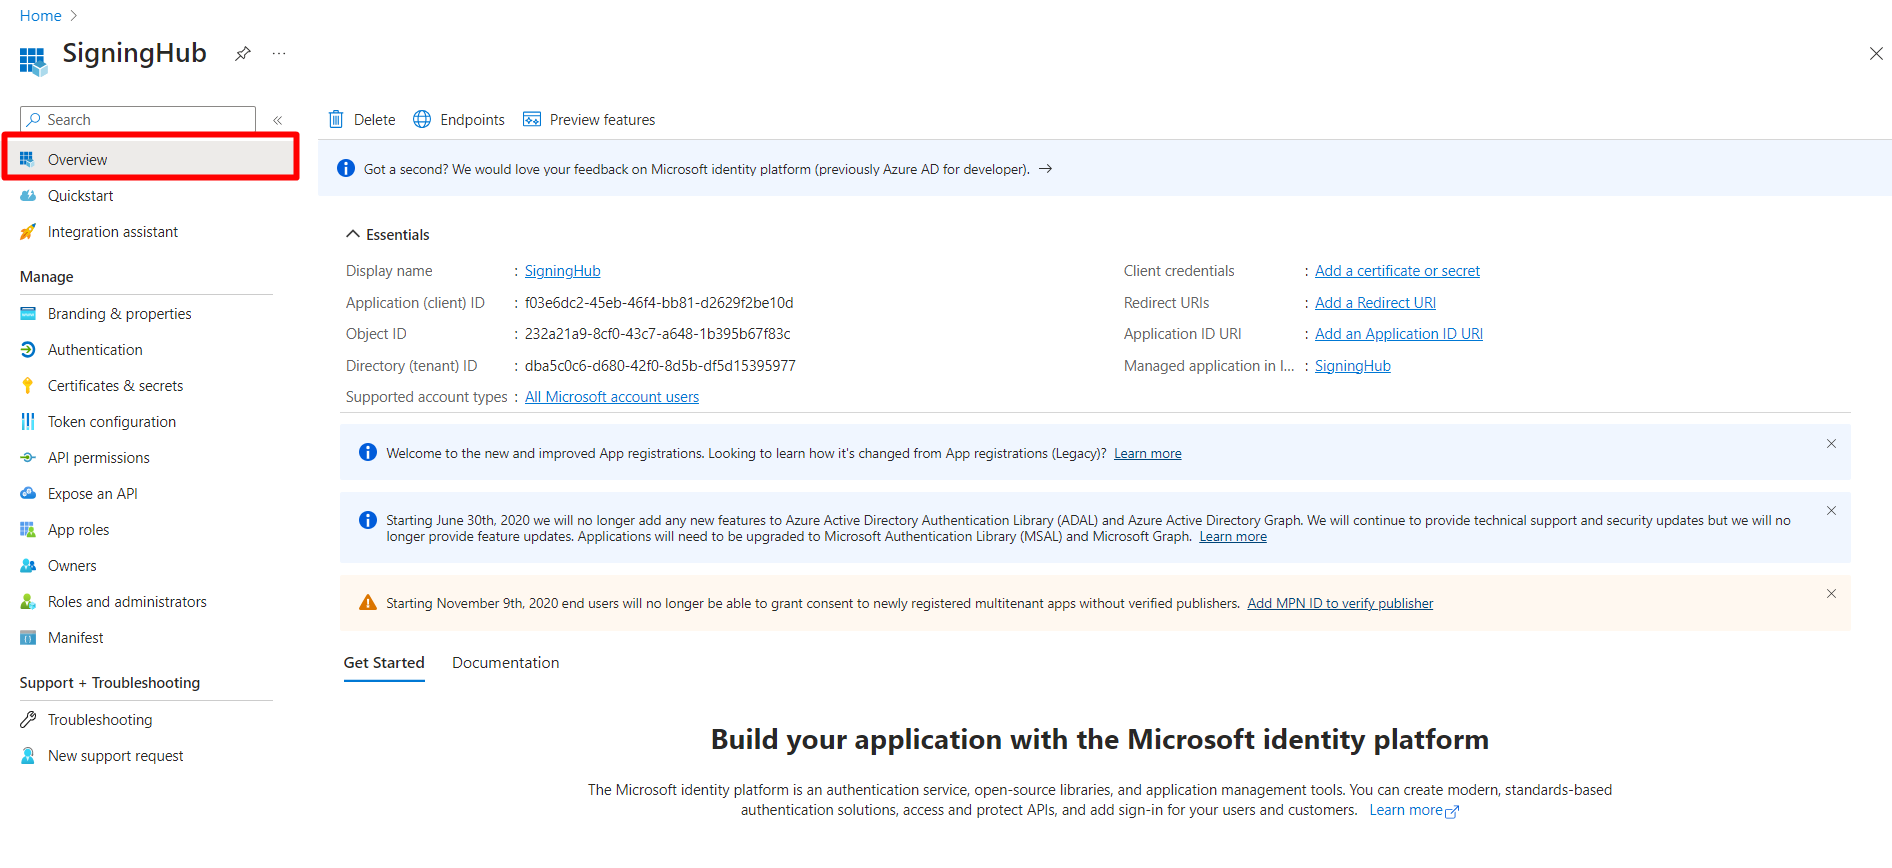
- Get the Application (client) ID, and Directory (tenant) ID from “Overview”, for use in the SigningHub Admin.
Configure Developer Settings in Power BI Service
This section will focus on the developer settings that need to be enabled in the Power BI Service.
- Go to the Power BI Service (https://app.powerbi.com). Sign in with your Power BI account credentials.
- Click on the Settings Icon from the header, and then select the "Admin portal".
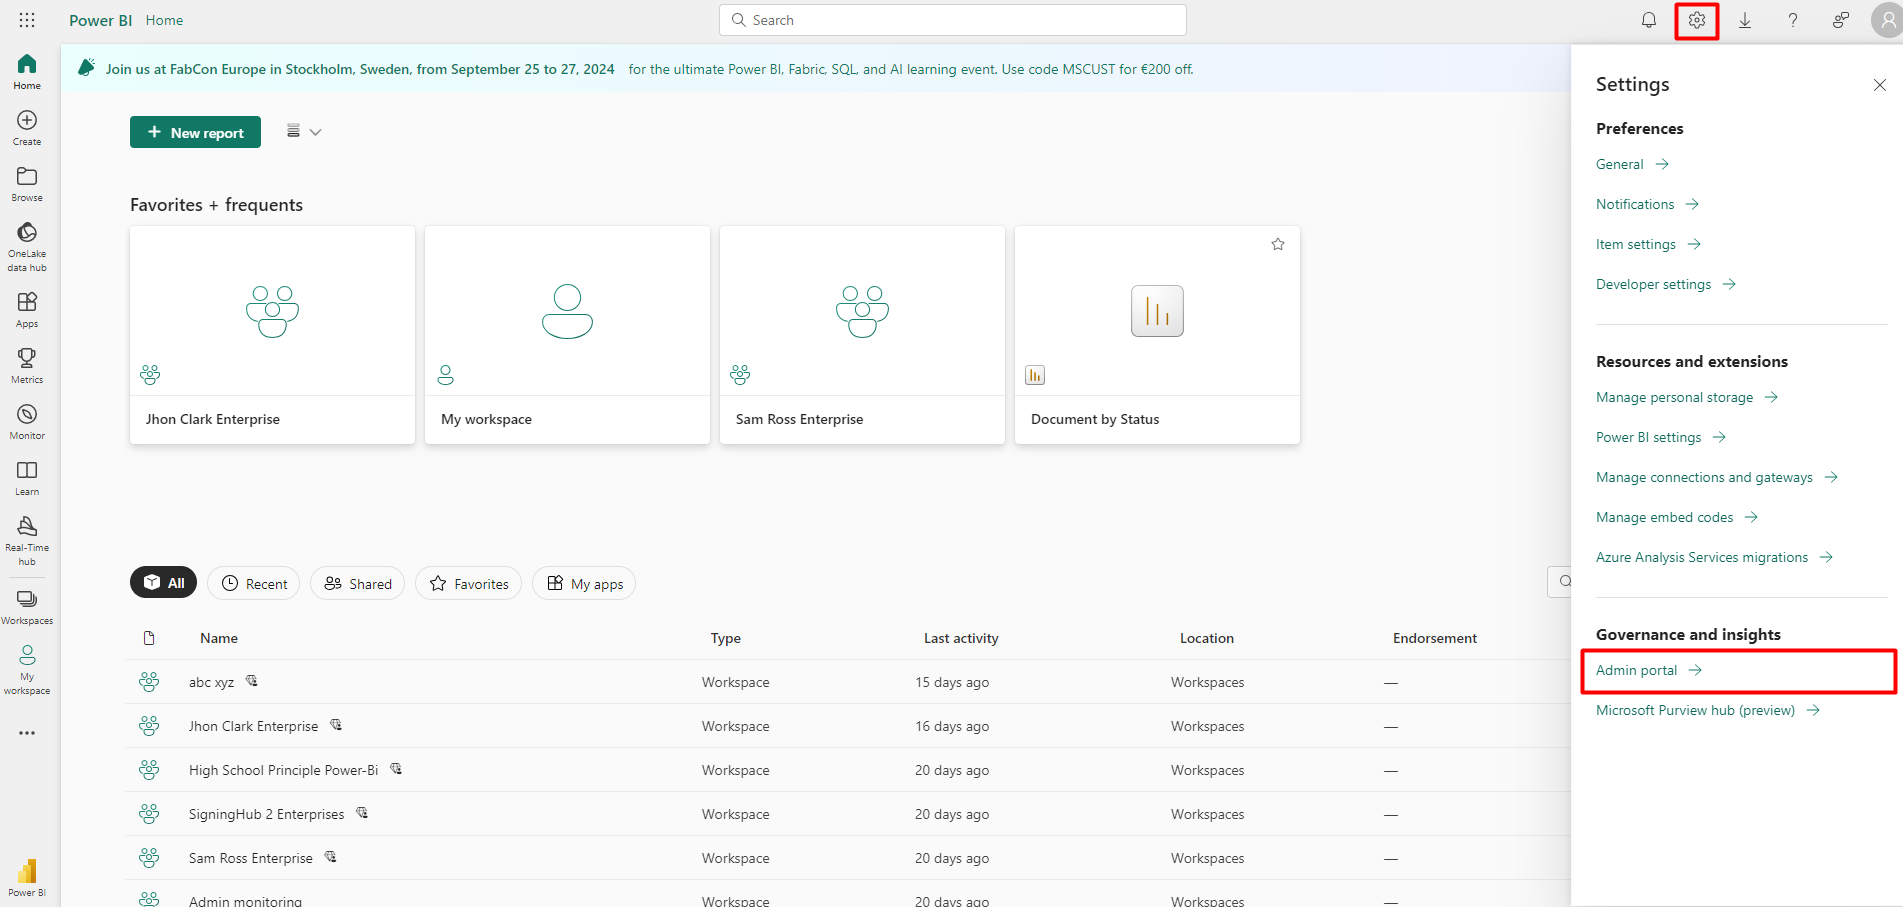
- Scroll down to "Developer settings".
- Click on the "Embed content in apps" option. Enable the radio button, and then select the "The entire organization" option.
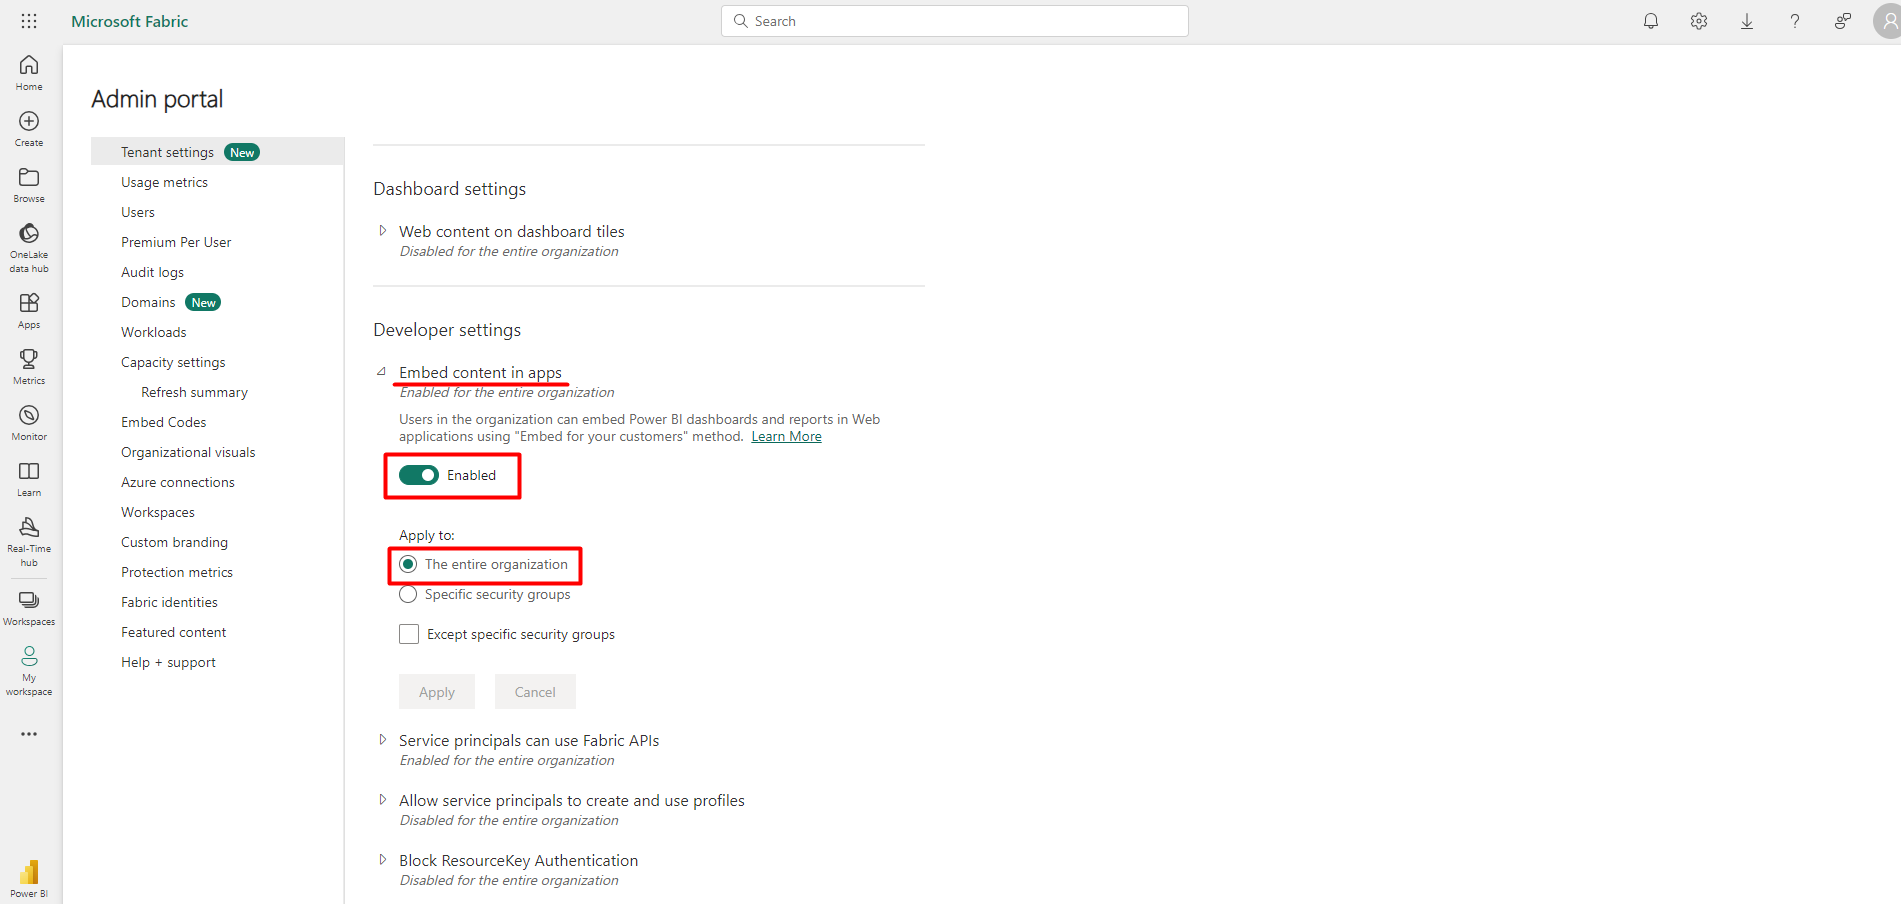
- Click on "Apply" to save the changes.
- Click on the "Service principals can use Fabric APIs" option. Enable the radio button, and then select the "The entire organization" option.
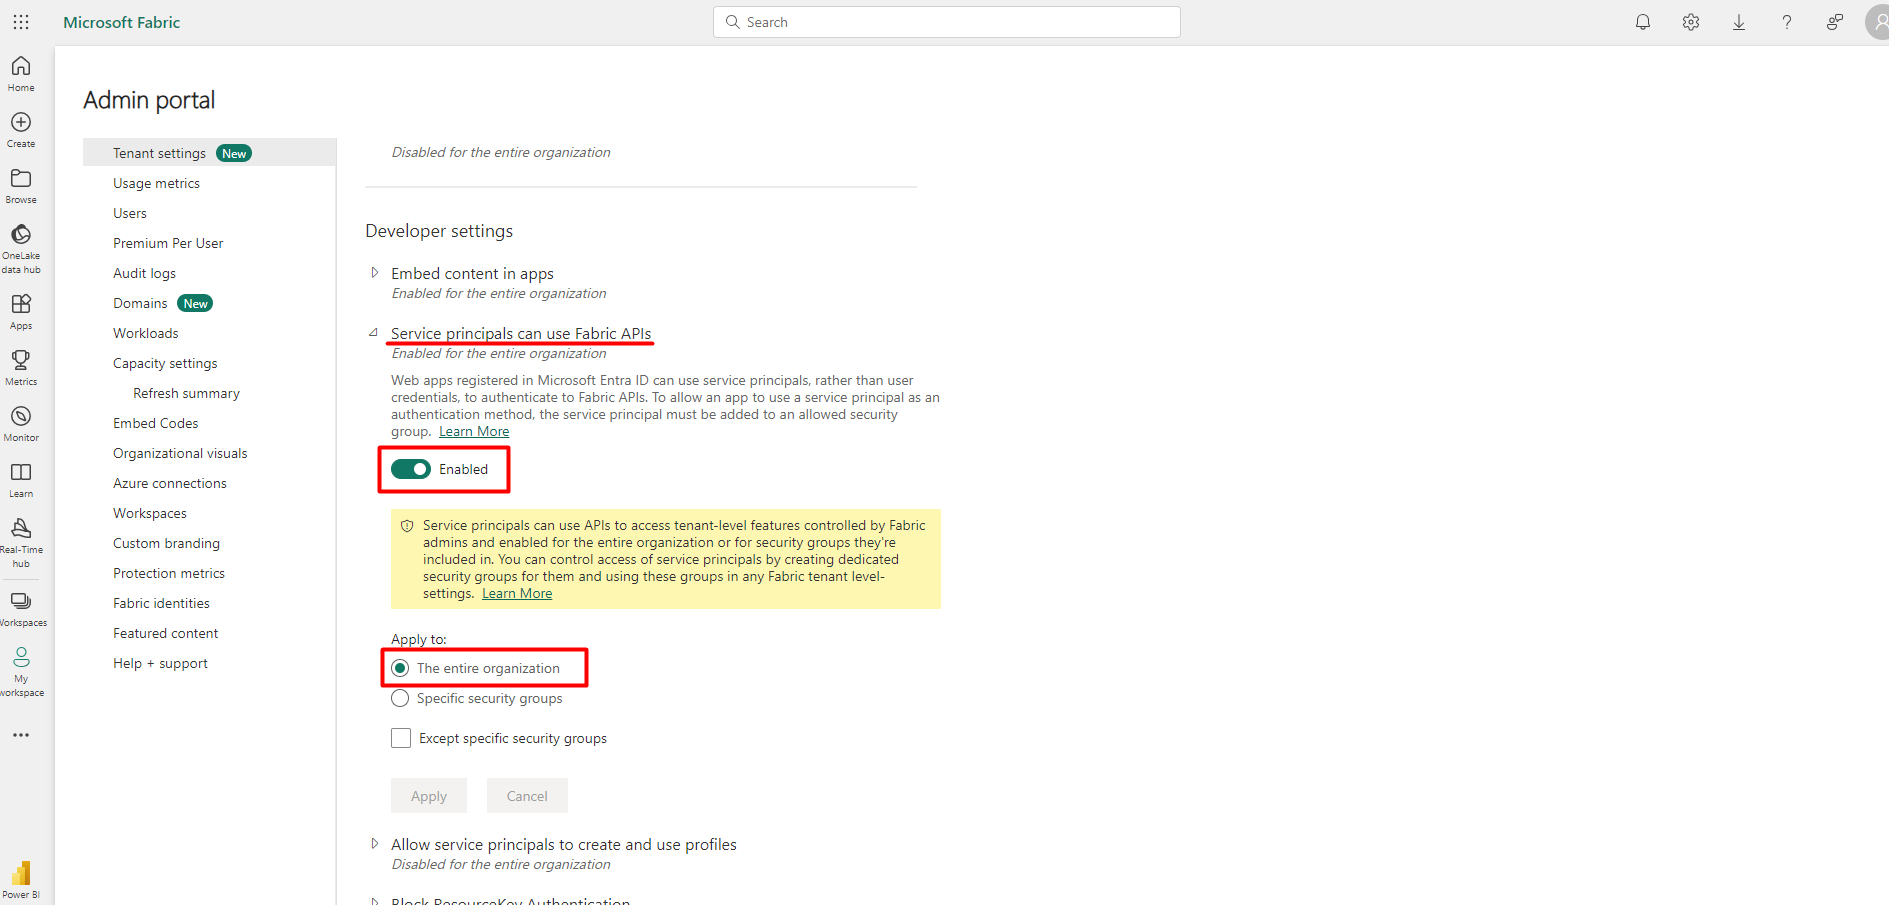
- Click on "Apply" to save the changes.
Configure the Advanced Reports in SigningHub Admin
This section will focus on the configuration of the Advanced Reports in the SigningHub Admin.
- Access the SigningHub Admin portal.
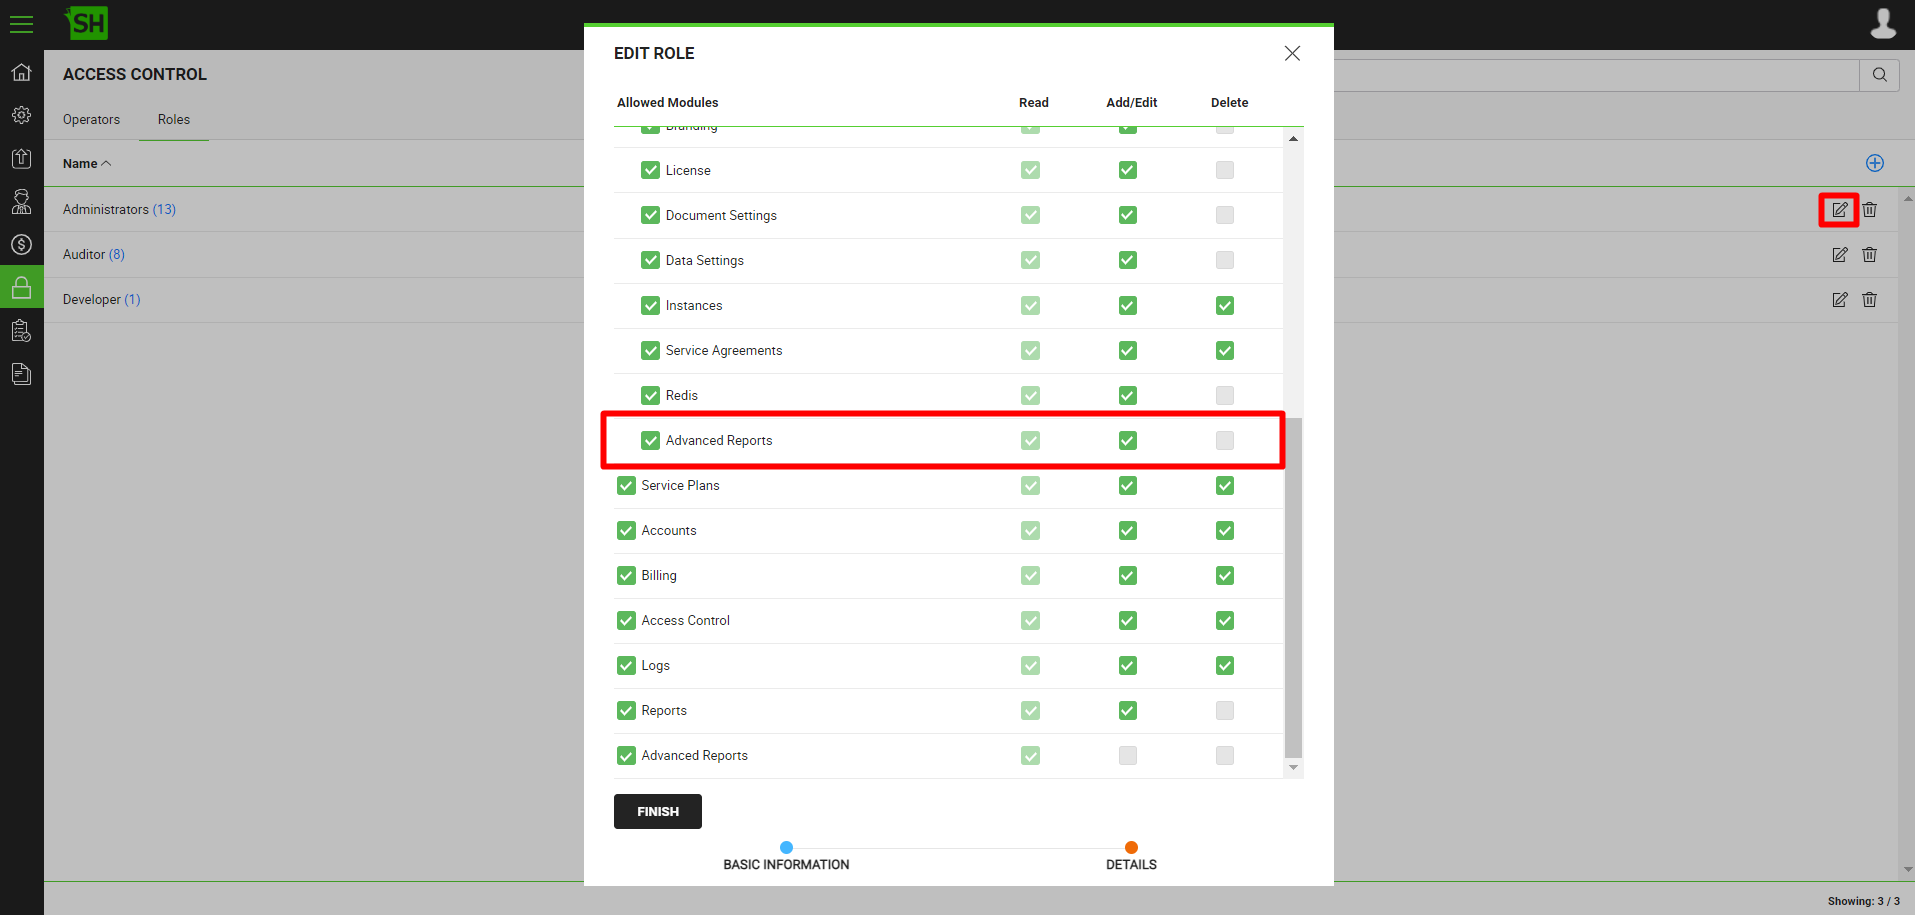
- Click the "Access Control" section from the left menu and click on the "Roles" tab.
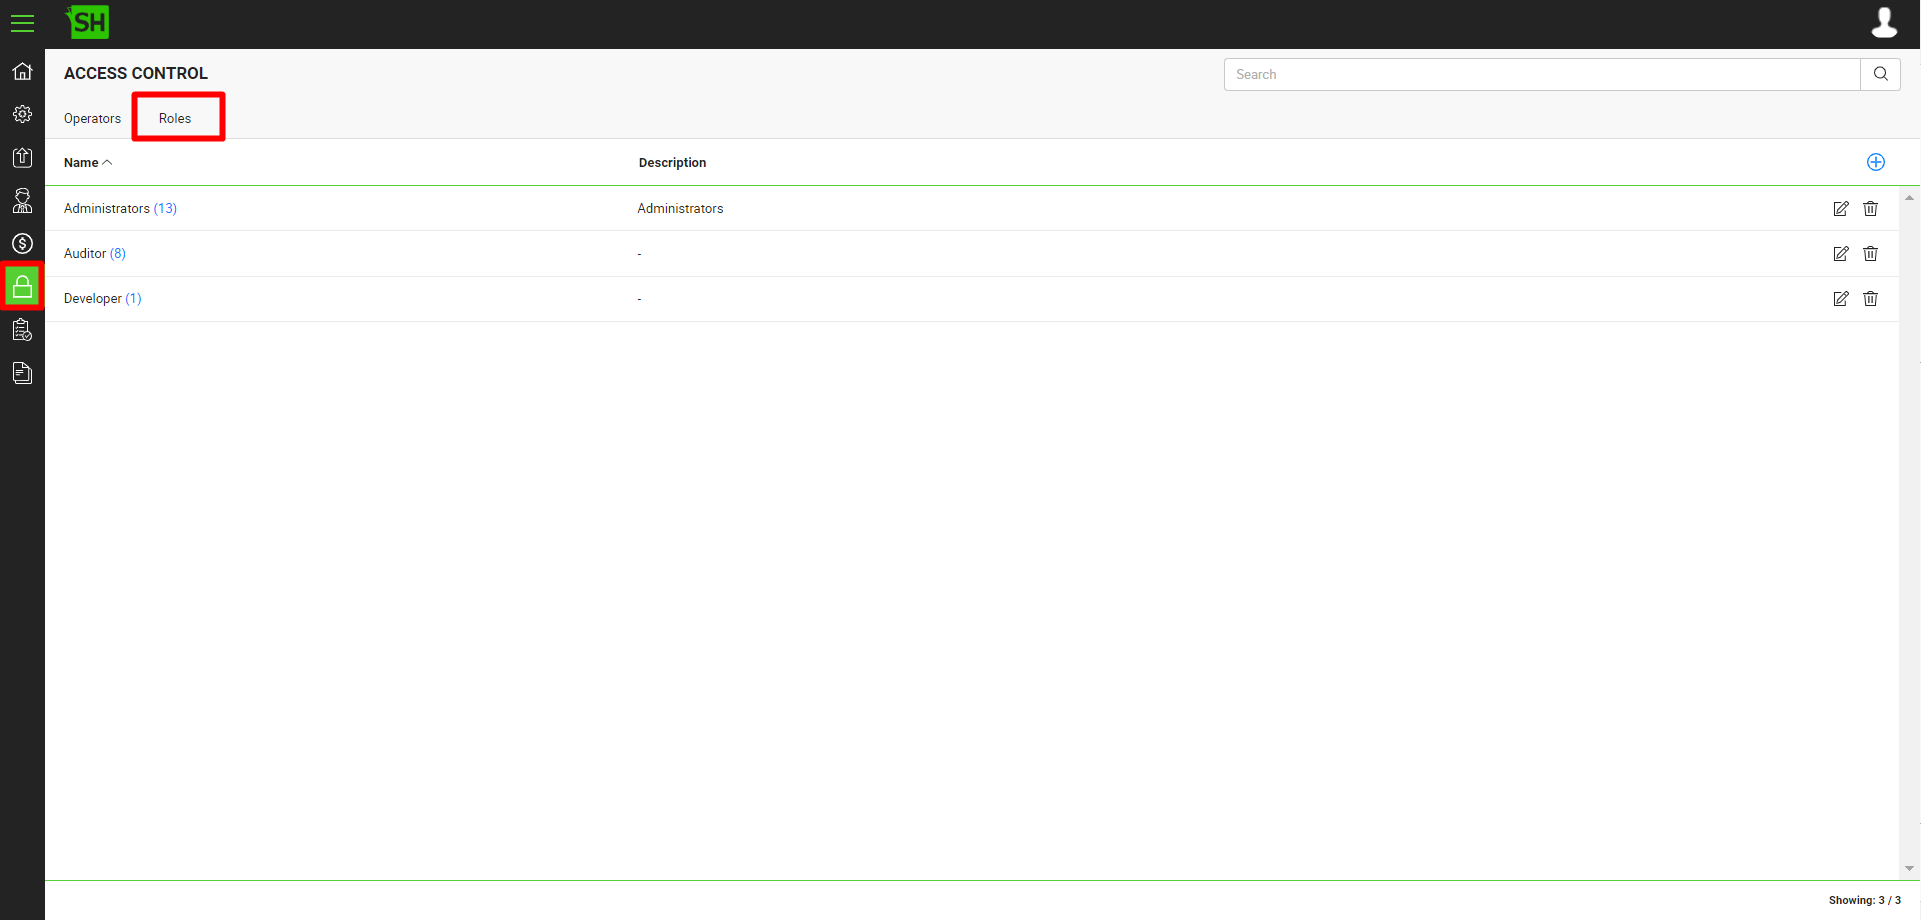
- Edit the role, go to the "Details" section, and check the "Advanced Reports" checkbox. Click on the "Finish" button.
- Click the "Configurations" section from the left menu and click on the "Advanced Reports" tab.
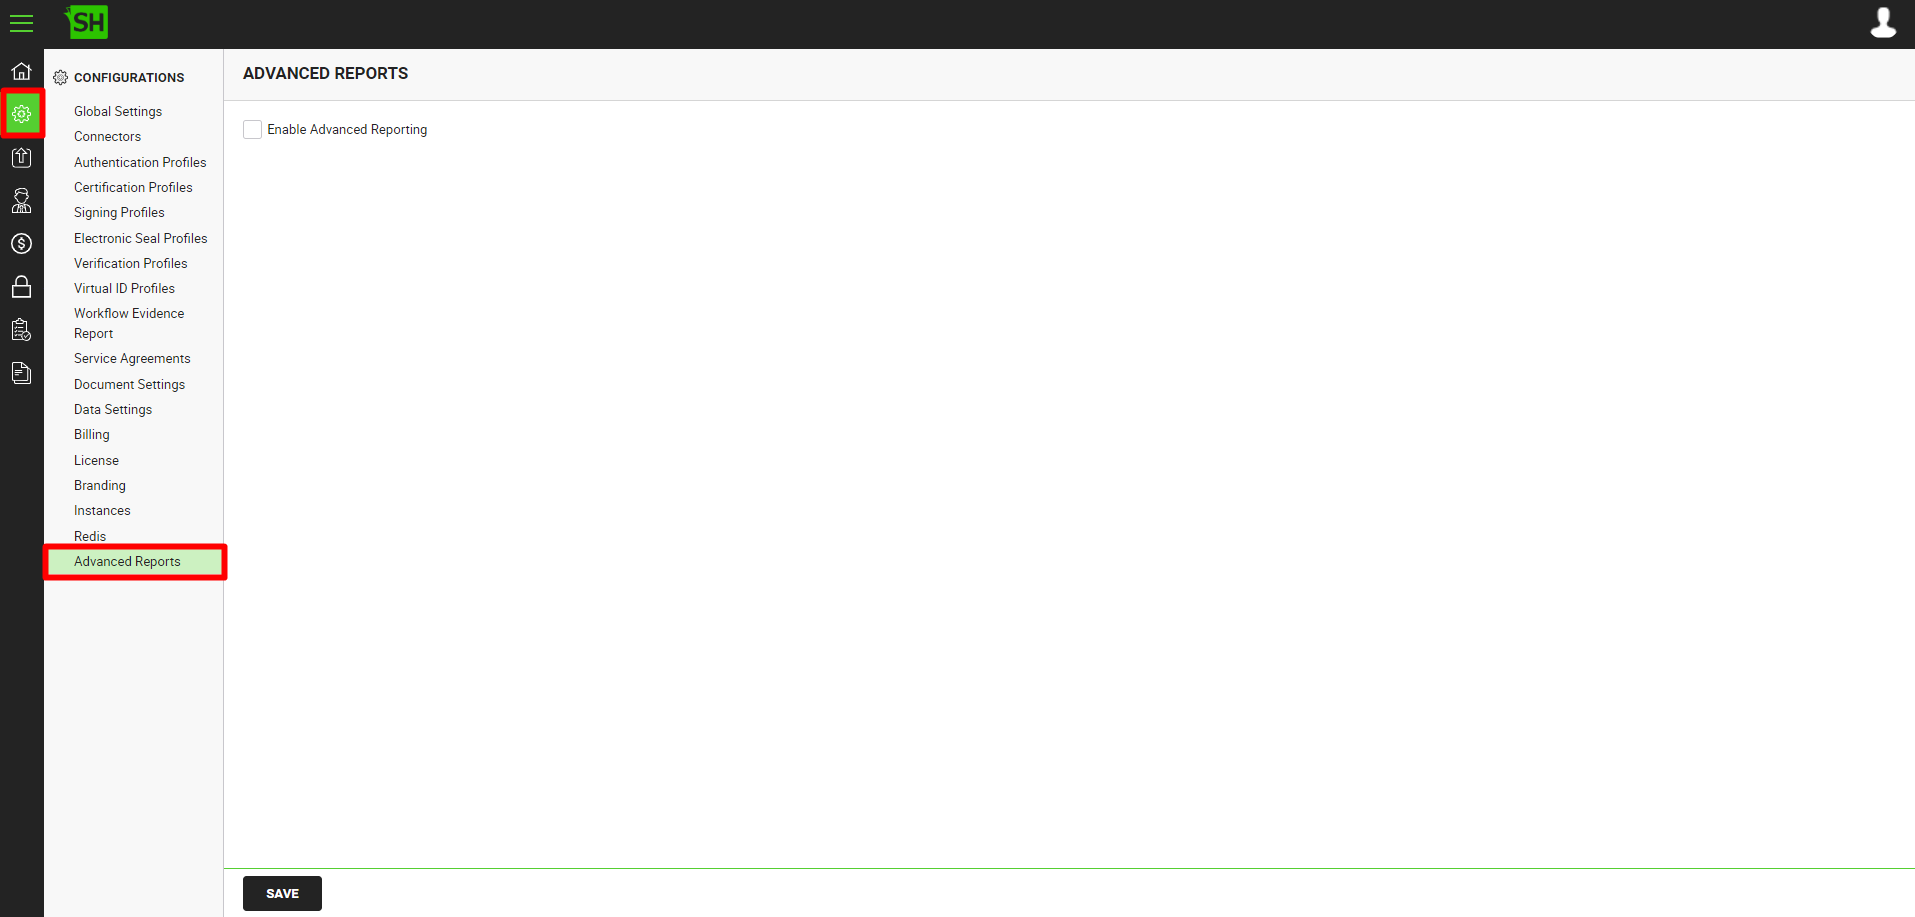
- Check the "Enable Advanced Reporting" check box and enter the details. Use the information from step 12 and 13 of the Create the Power BI App in Azure Active Directory.
- Specify the details accordingly and click the "Save" button. See the below table for the description of the fields.
|
Advanced Reports Configuration |
|
|
Fields |
Description |
|
Enable Advanced Reporting |
Tick this check box to enable the advanced reports functionality for your SigningHub deployment. When this check box is checked, the Advanced Reports Section will become visible in the SigningHub Admin. By default, this checkbox is unchecked. |
|
Specify the registered client ID that has been provided by Azure Active Directory during account configuration, e.g. "d6920aa5-258b-a520-b0gh-870503xv8b4d". |
|
|
Client Secret |
Specify the client secret that has been provided by Azure Active Directory during account configuration, e.g. "hniZYHqPEcKy6H25-LjzSX0Q". |
|
Tenant ID |
Specify the tenant ID as provided by Microsoft Azure at the time of app registration. |
|
|
|
View the Advanced Reports in SigningHub Admin
This section will focus on viewing the Advanced Reports in the SigningHub Admin.
- Click the "Advanced Reports" option from the left menu.
- Select an available workspace from the "Workspace" drop down and select an available report from the "Report" drop down.

- Click on the "Load Report" button. And the selected report will load up.

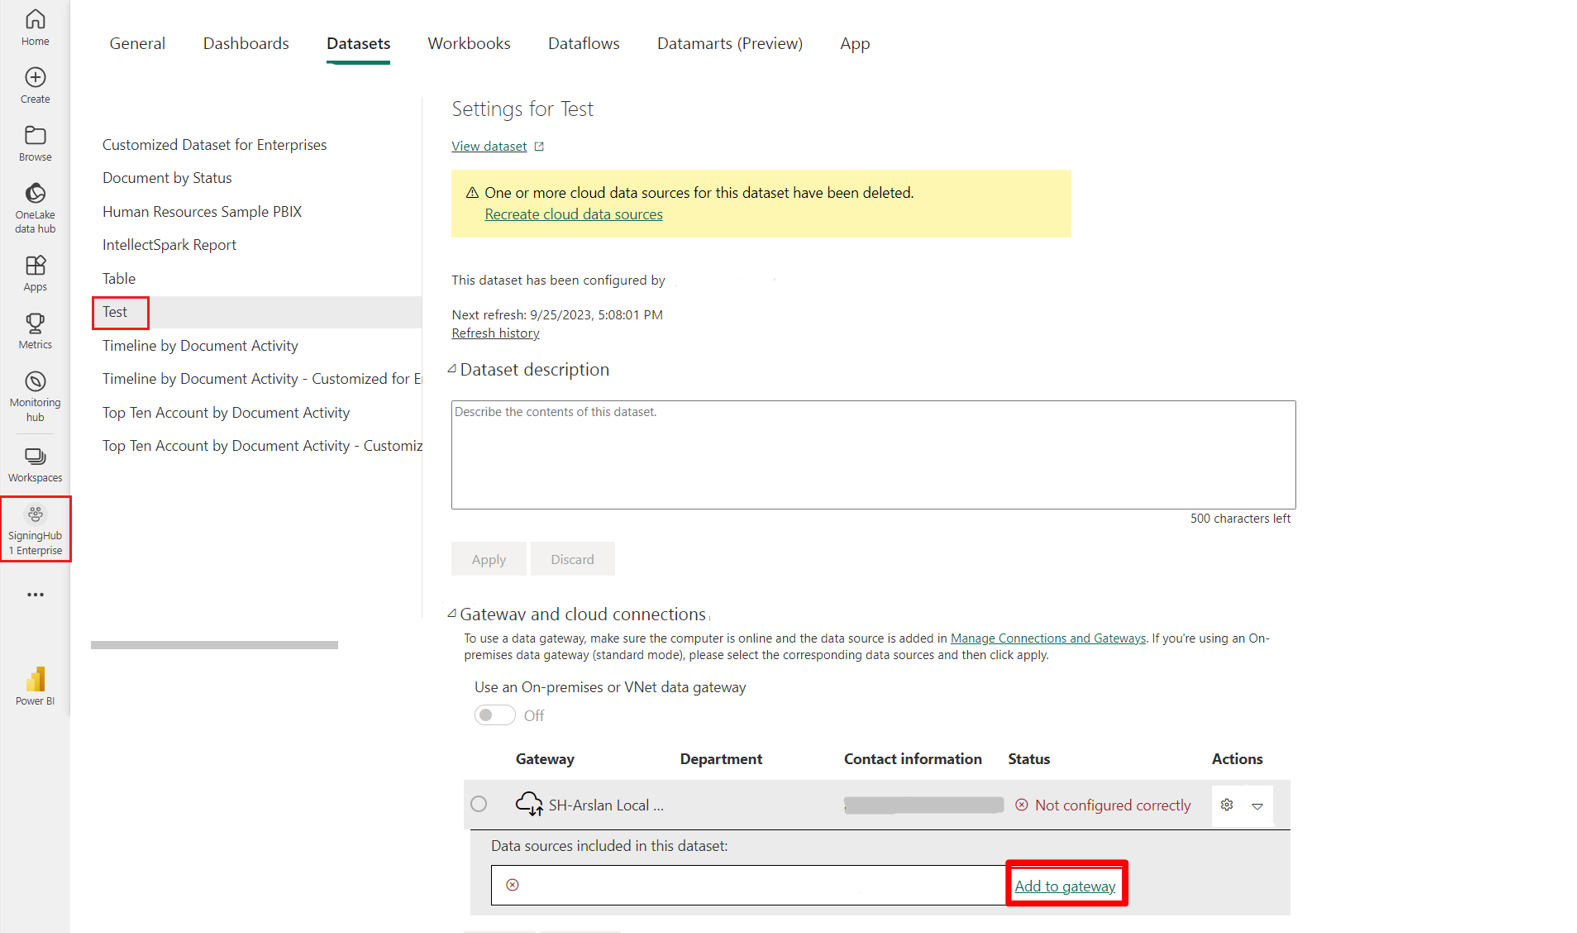
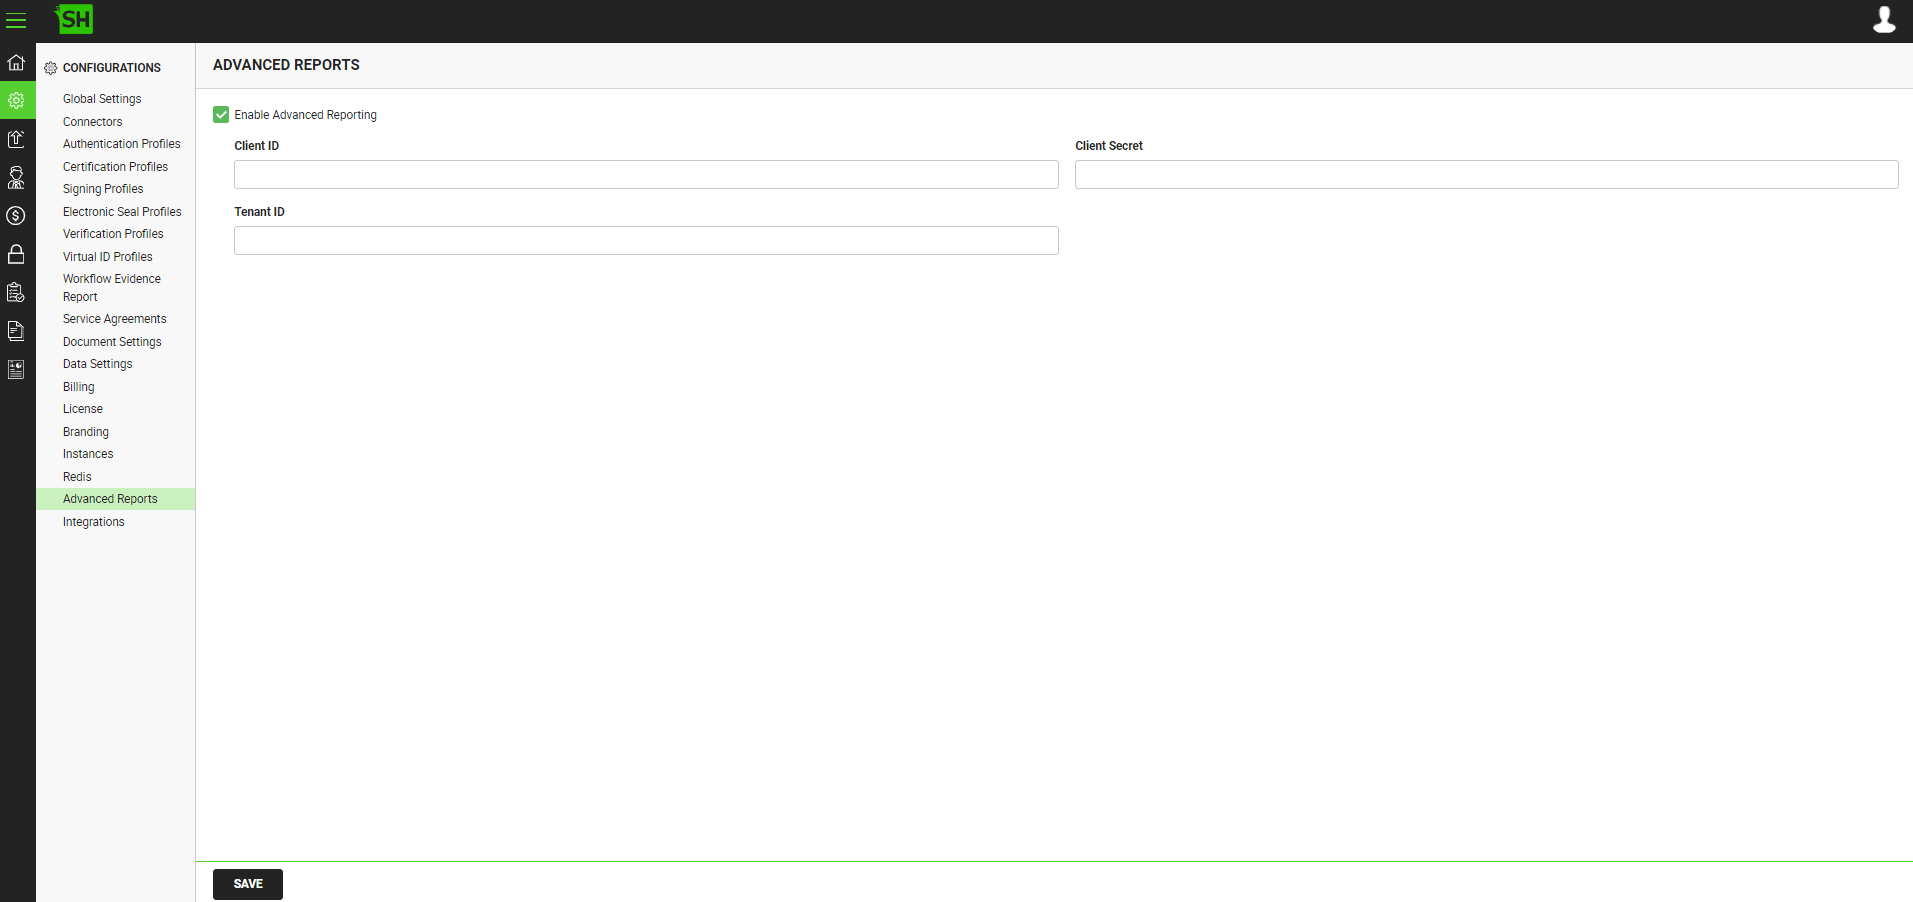
Assign the Advanced Reports to an Enterprise
This section will focus on assigning the Advanced Reports to an Enterprise Owner so that they could view the Advanced Reports related to the assigned enterprise.
- Click the "Accounts" option from the left menu.
- Search the "Enterprise Owner" whom you want to allow the Advanced Reports. Now click
 adjacent to it, and then select the "Advanced Reports" option.
- The "Advanced Report Settings" dialog will appear. Select the "Workspace ID" from the drop down, for which you want the advanced reports to be visible to the Enterprise Owner. Click on the "Save" button.

|
|
|
Configure the Advanced Reports in SigningHub Web
This section will focus on the configuration of the Advanced Reports in the SigningHub Web.
- Log into SigningHub Web with your enterprise owner credentials.
- Click your profile drop down menu (available at the top right corner).
- Click the "Enterprise Settings" option.
- Click the "Roles" option from the left menu.

- Click on the
 icon adjacent to the role which you want to edit. The "Edit Role" screen will appear.
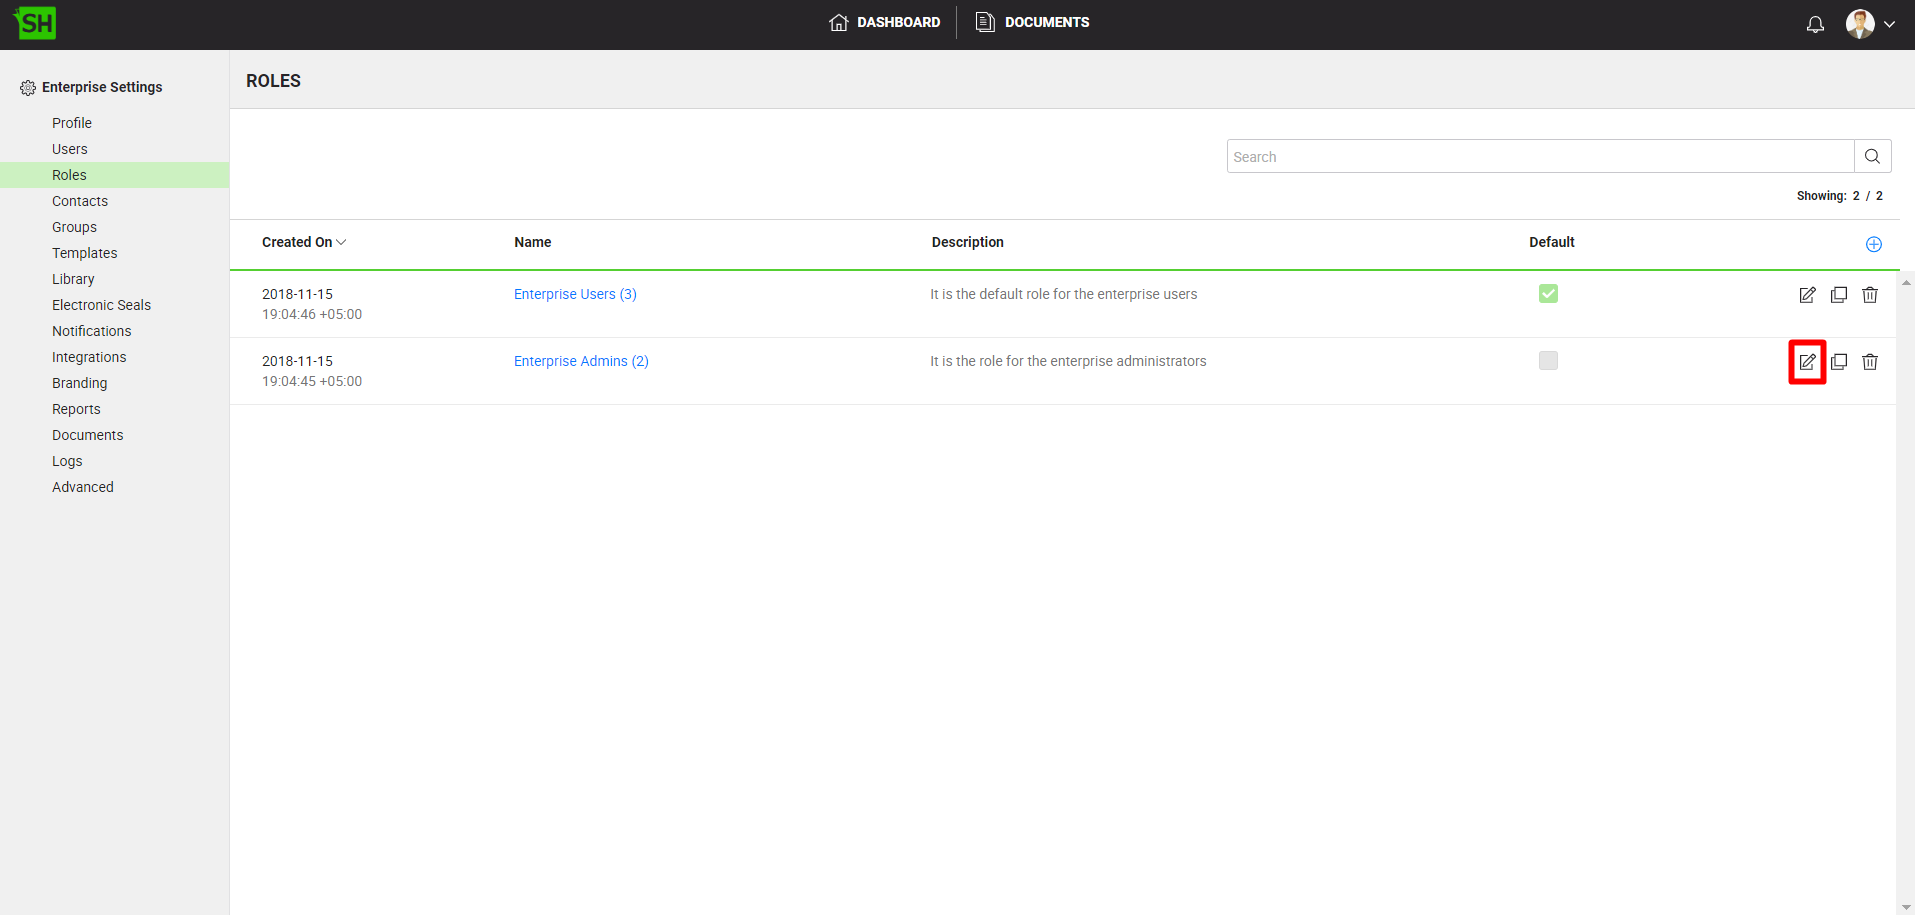
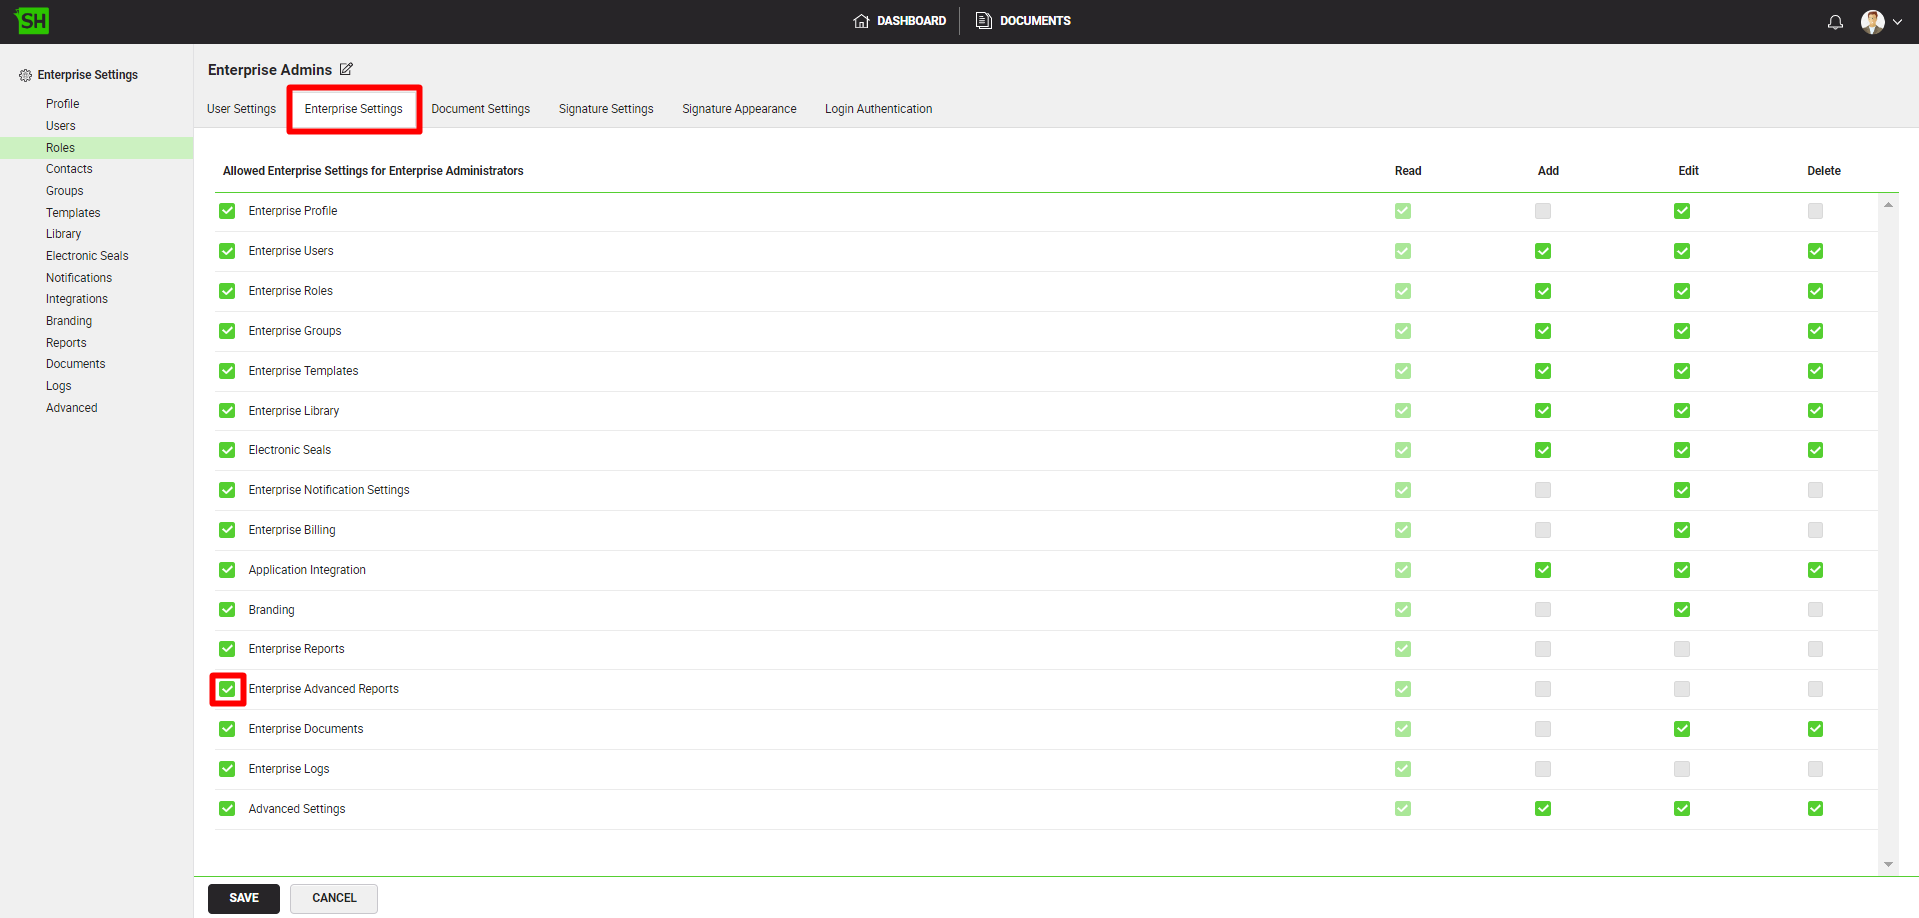
- Click the "Enterprise Settings" tab. Select the check box against the "Enterprise Advanced Reports". Click on "Save". For the changes to take effect, log in to SigningHub Web again.
|
|
|
View the Advanced Reports in SigningHub Web
This section will focus on viewing the Advanced Reports in the SigningHub Web.
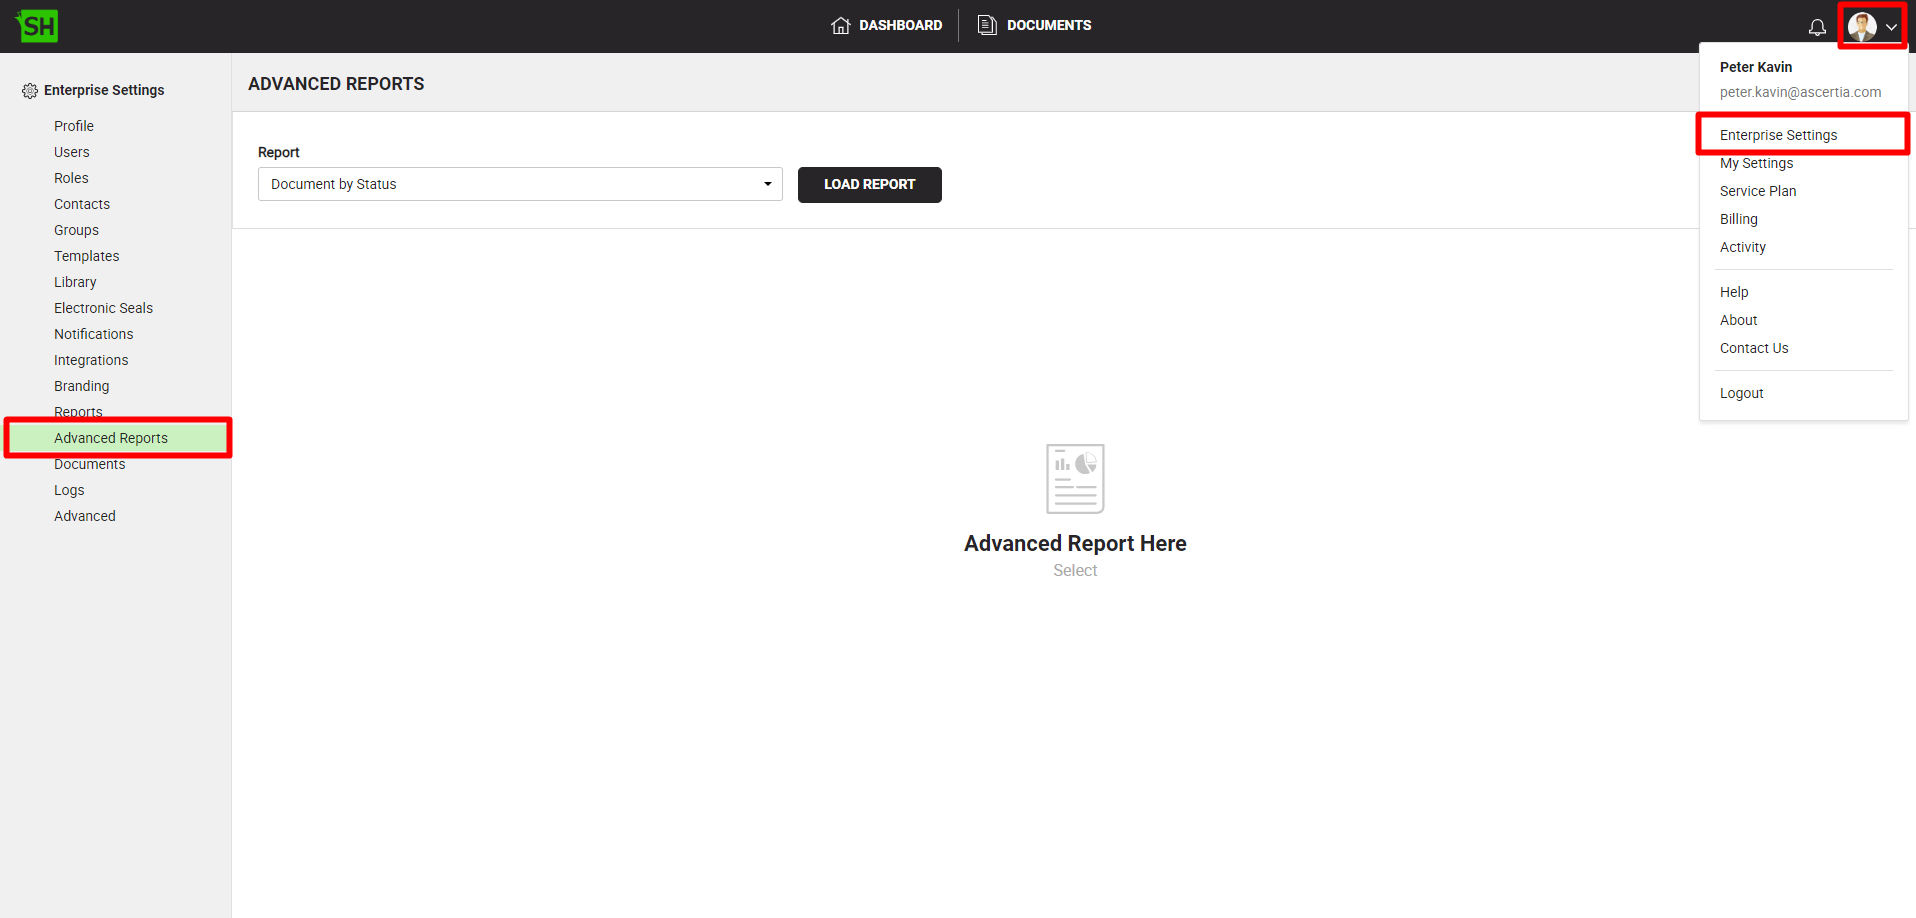
- Click your profile drop down menu (available at the top right corner).
- Click the "Enterprise Settings" option.
- Click the "Advanced Reports" option from the left menu.
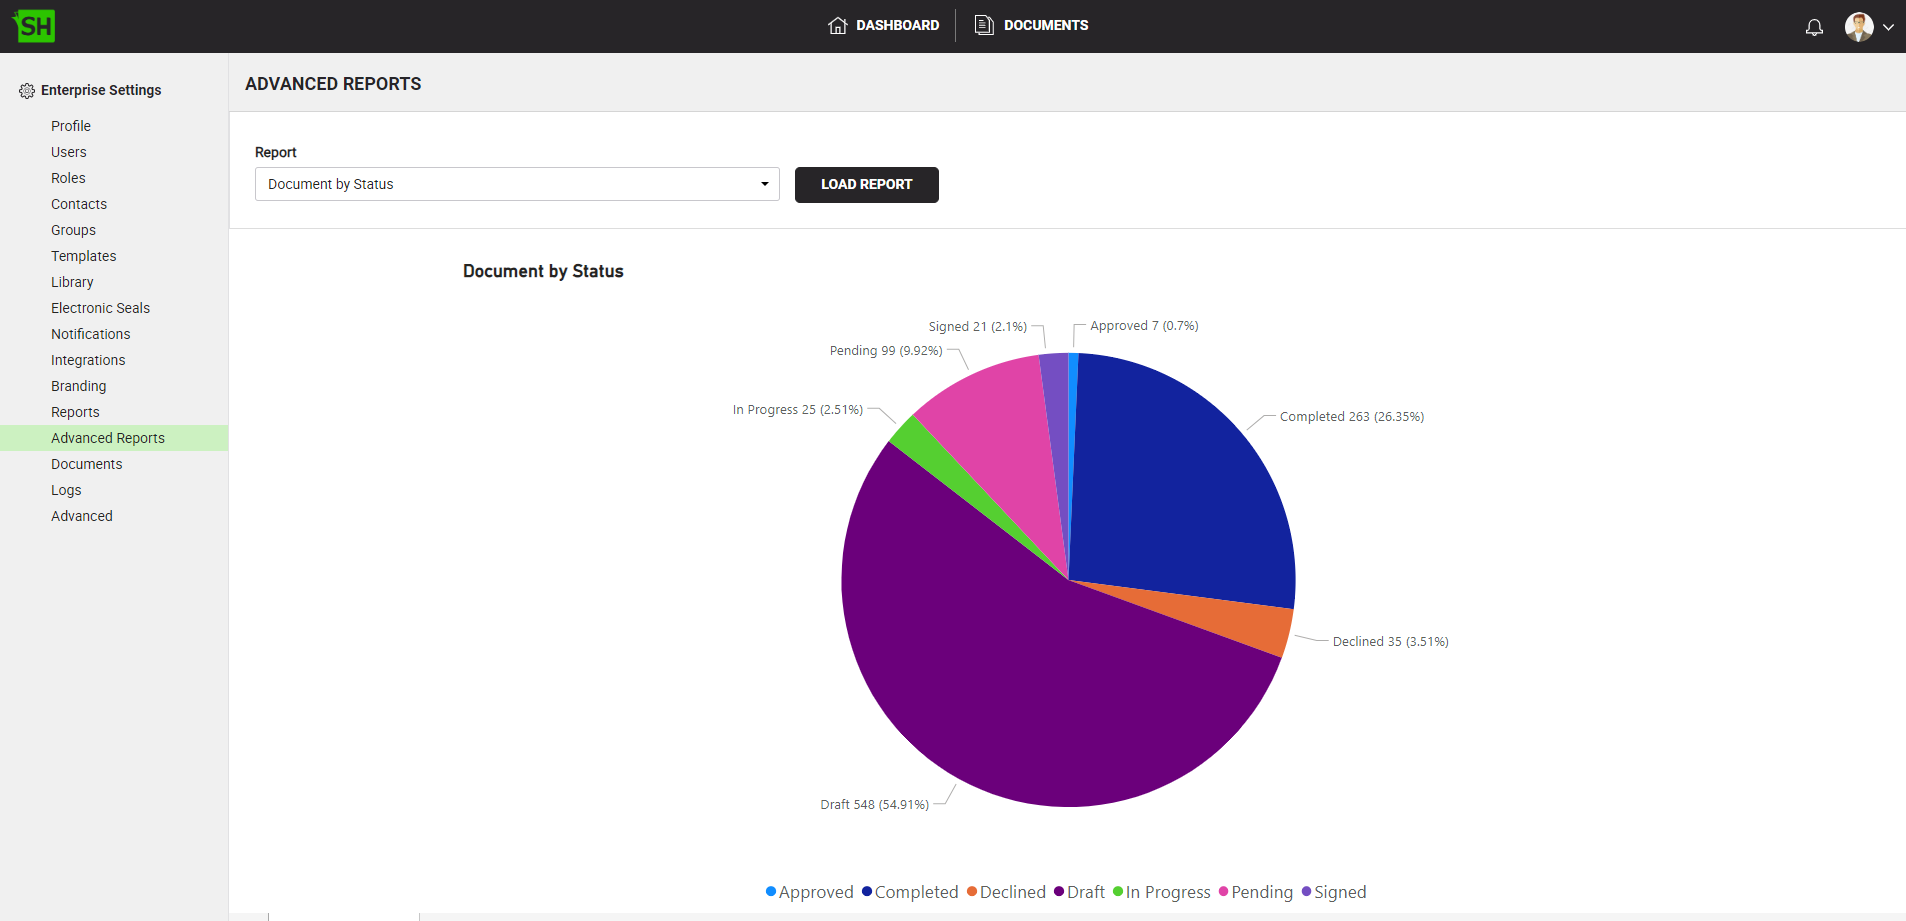
- Select an available report from the "Report" drop down.

- Click on the "Load Report" button. And the selected report will load up.
See Also
- How to Obtain Firebase Integration Key
- How to Obtain the Azure AD Integration Key
- How to Obtain the Office 365 Integration Key
- How to Obtain a Salesforce Consumer Key
- How to Obtain the Dropbox Integration Key
- How to Obtain the Google Drive Integration Key
- How to Obtain the OneDrive Integration Key
- How to Obtain the HubSpot Integration Key