How to Obtain a Salesforce Consumer Key
- Introduction
- How it works?
- Create a Salesforce Connected App
- Create a Salesforce connector
- Create a Salesforce authentication profile
Salesforce is a cloud-based CRM platform at the forefront of revolutionizing customer relationship management for businesses. Established in 1999, it offers a comprehensive suite of applications and tools designed to centralize and optimize processes related to sales, marketing, and customer service. Salesforce's Sales Cloud empowers sales teams with features for lead and opportunity management, while the Service Cloud focuses on enhancing customer support and engagement. The Marketing Cloud facilitates targeted marketing campaigns, and Commerce Cloud provides a robust platform for e-commerce operations. Salesforce's commitment to innovation is evident in its analytics and reporting tools, empowering organizations to derive meaningful insights from their data. With Community Cloud, businesses can foster collaboration with customers and partners. AppExchange further extends the platform's capabilities by offering a marketplace for integrating third-party applications. Recognized for its scalability and flexibility, Salesforce continues to be a leading choice for businesses seeking to elevate their customer relationships and drive overall growth. A Salesforce connector can be configured in SigningHub Admin by providing the consumer key of the Salesforce app.
https://feedback.uservoice.com/knowledgebase/articles/235661-get-your-key-and-secret-from-salesforce
- Create a Salesforce Connected App.
- Create a Salesforce connector in SigningHub Admin.
- Create a Salesforce authentication profile in SigningHub Admin.
Create a Salesforce Connected App
- Login to your Salesforce account.
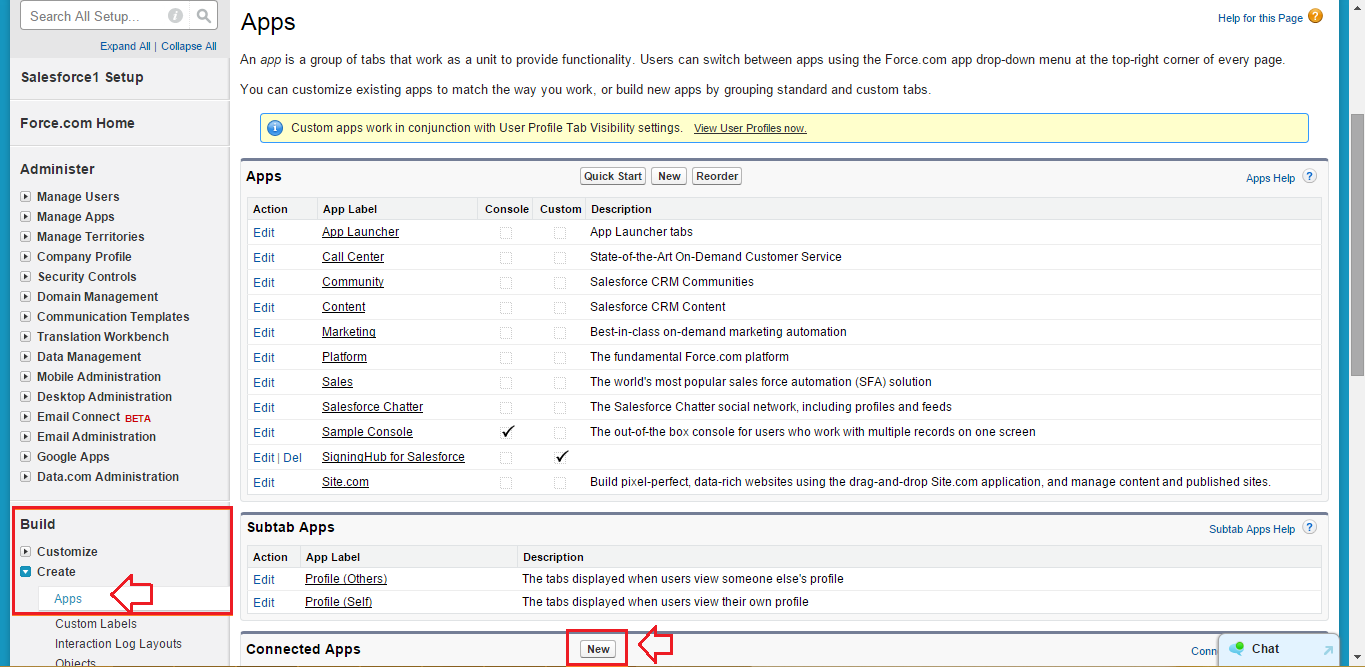
- Expand the "Create" option and click the "Apps" option, under the "Build" menu, as marked with an arrow on the image below.
- Click the "New" button from the "Connected Apps" section, as marked with an arrow on the image below.
- Specify the mandatory parameters as marked with the arrows on the image below, i.e.
Specify the Connected App Name, API Name and Contact Email in the provided fields.
Tick the "Enable OAuth Settings" check box and specify your SigningHub web host address and append "/OAuth/SFCallBack" in the "Callback URL" field, i.e. "https://web.signinghub.com/OAuth/SFCallBack".
Select the "Access your basic information (id, profile, email, address, phone)" option from the "Selected OAuth Scopes" field and add it to the right pane (i.e. Selected OAuth Scopes). Click the "Save" button to proceed further.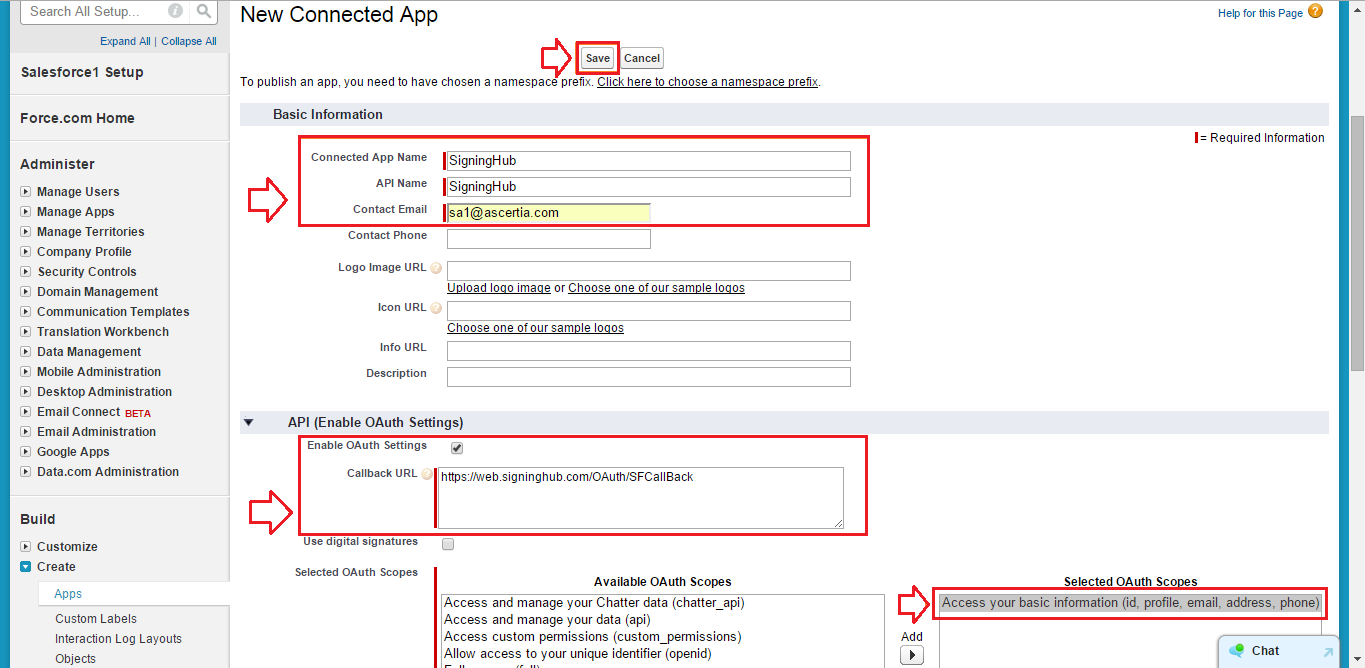
- From the next appearing screen, click the "Continue" button as marked with an arrow on the image below.

- The API consumer key will be displayed, as marked with an arrow on the image below.
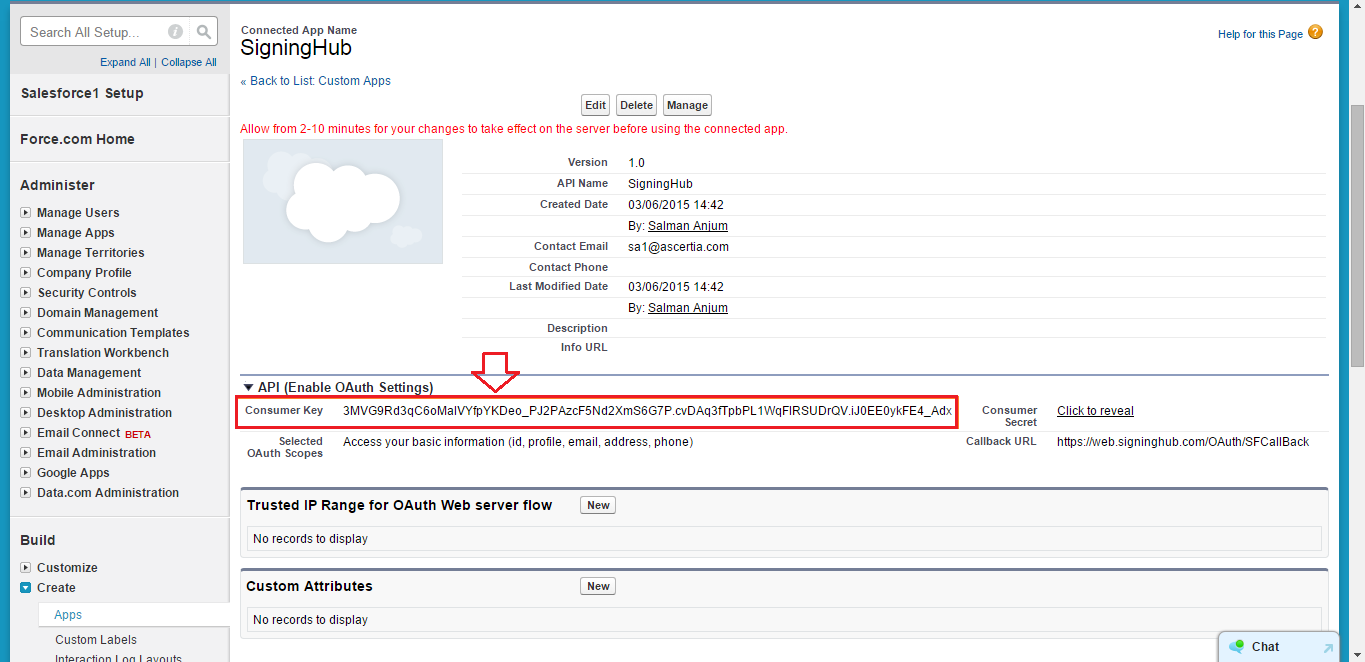
- Create a Salesforce Connector and specify this API consumer key.
- Access the SigningHub Admin portal.
- Click the "Configurations"section from the left menu.
- Click the "Connectors" tab. The "Connectors" screen will appear.
- Click
 from the grid header.
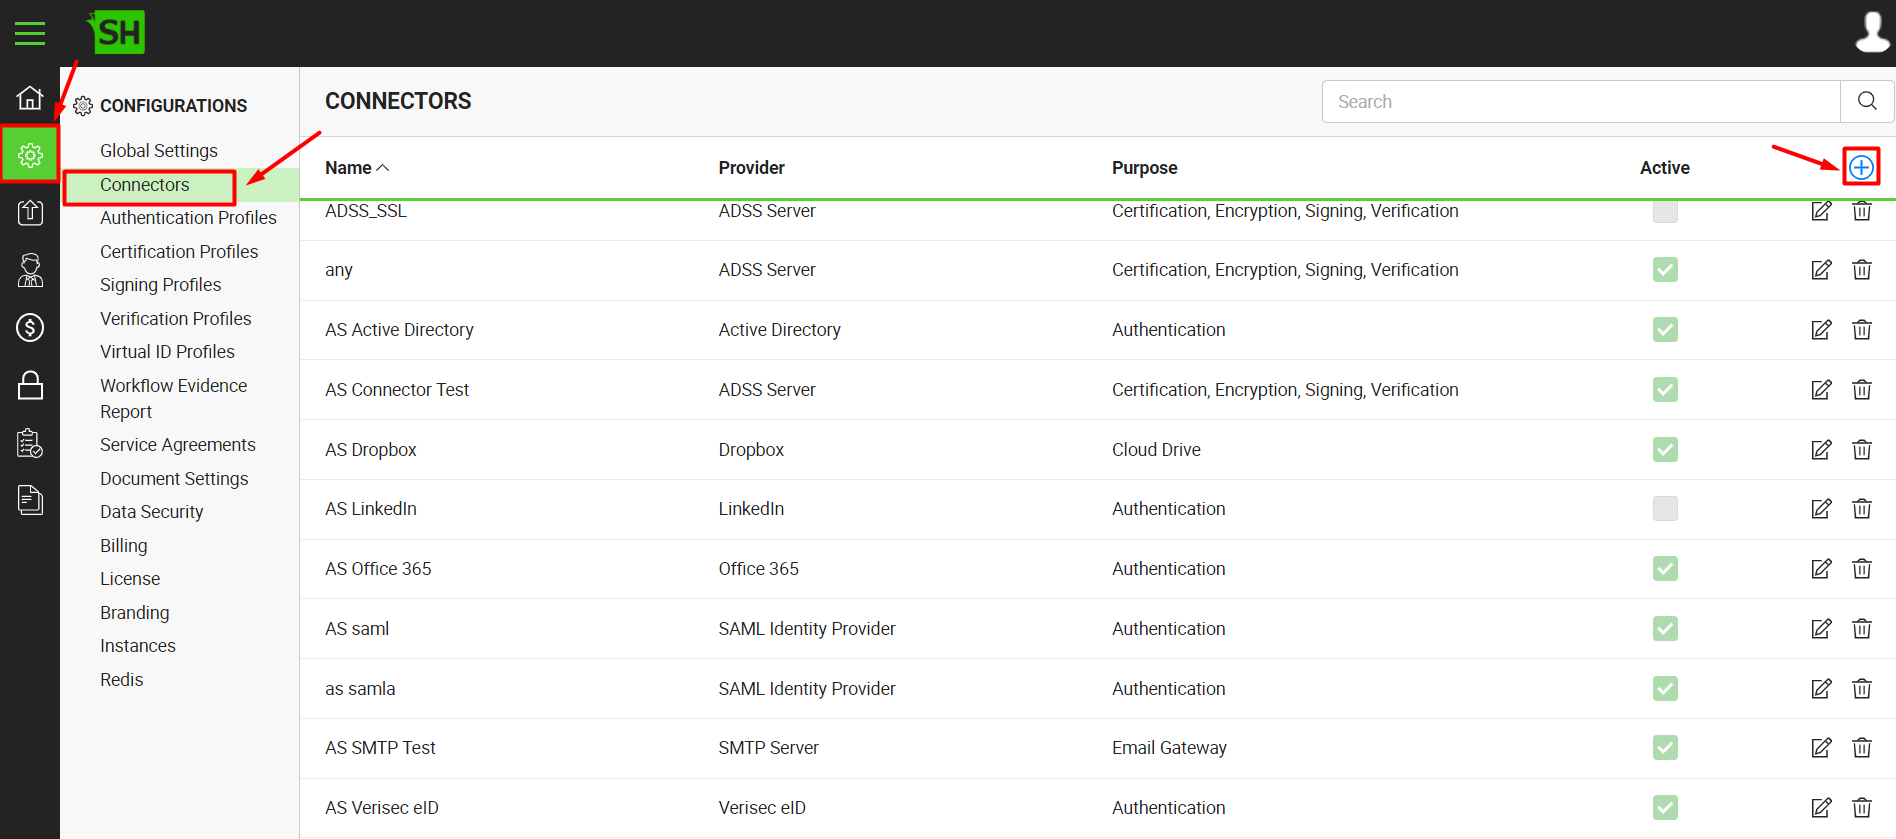
- A dialog will appear to add the connector details. The connector dialog is comprised of two screens, i.e. Basic Information and Details. Specify the basic information and click the "Next" button to provide the respective connector details. See the below table for fields description.
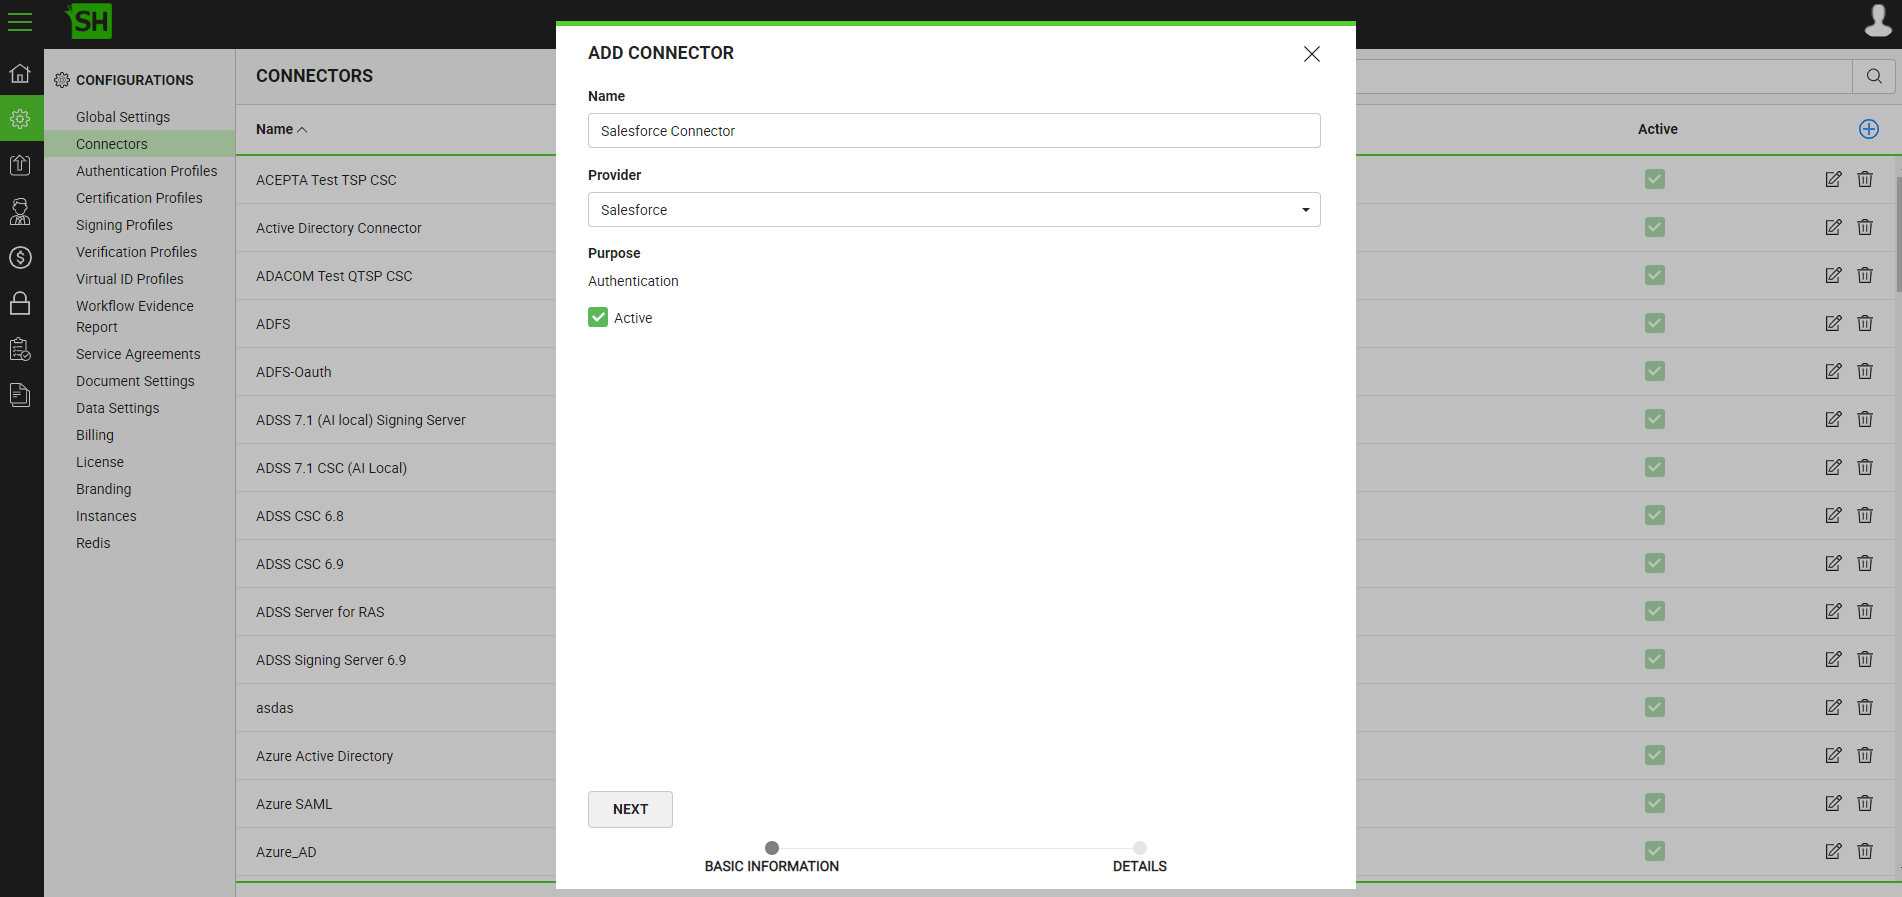
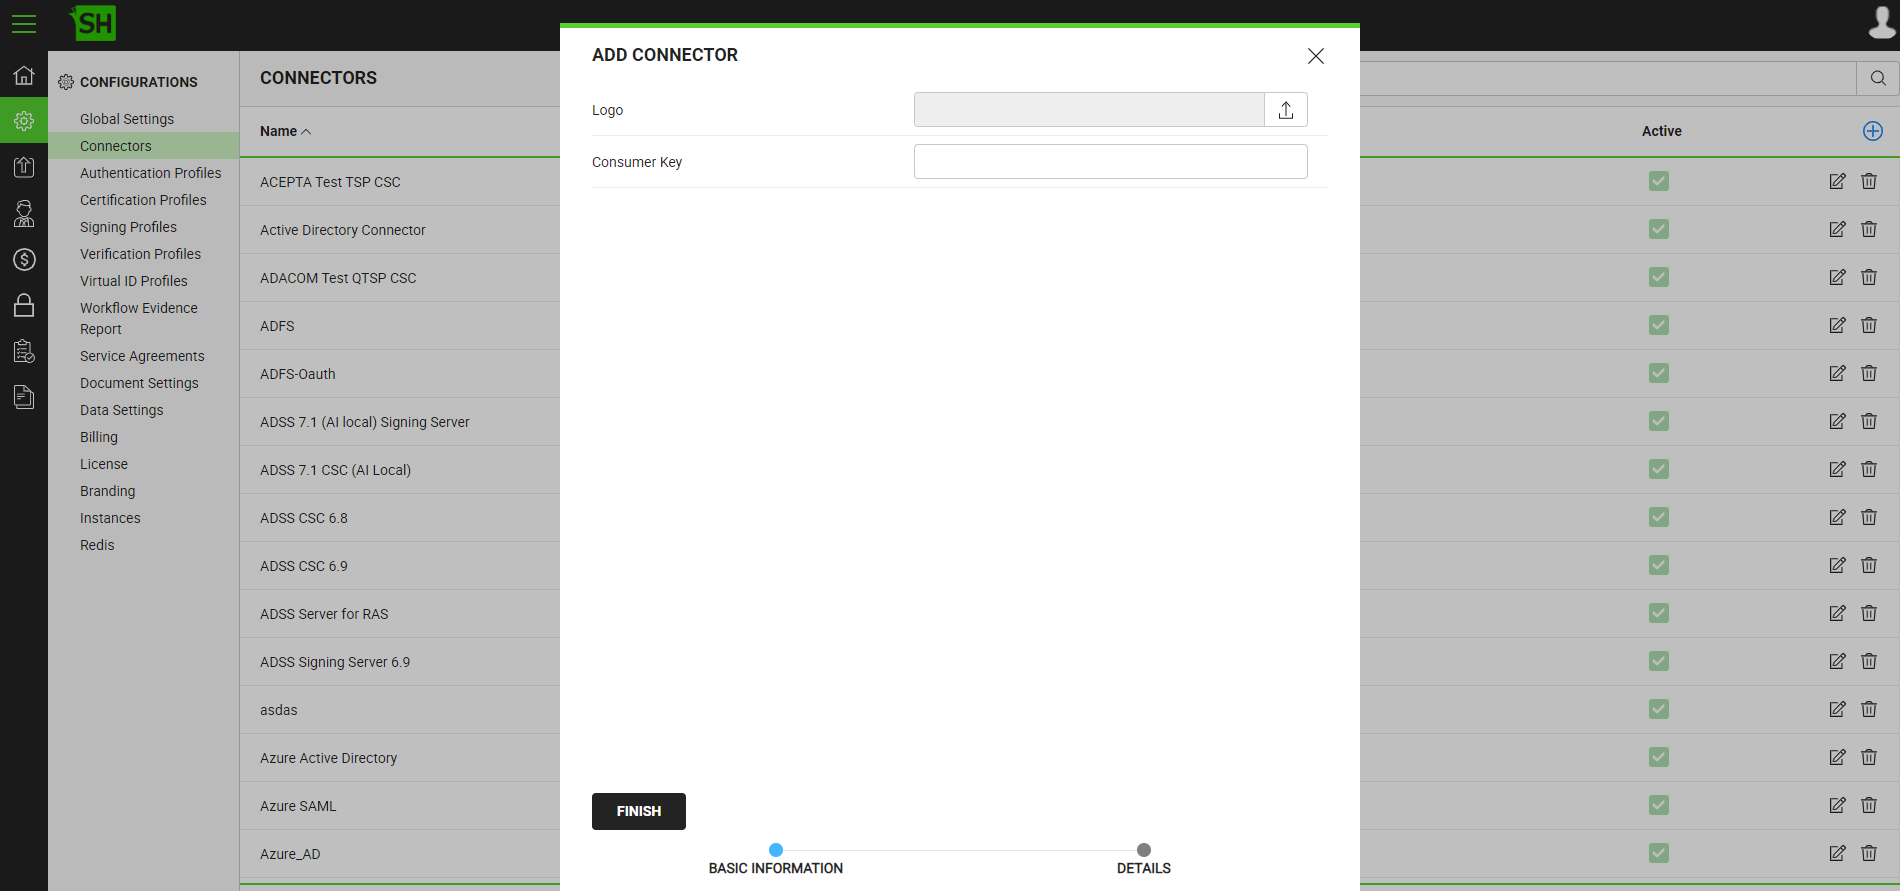
- Click the "Finish" button. A new connector will be saved and displayed in the list.
|
Basic Information |
|
|
Fields |
Description |
|
Name |
Specify a unique name for this connector, i.e. My Salesforce. This connector will be used in the configuration of Authentication Profiles. |
|
Provider |
Select the provider for this connector, i.e. "Salesforce". |
|
Purpose |
This field will display the purpose of the selected provider above, i.e. the purpose of "Salesforce" is "Authentication". |
|
Active |
Tick this check box to make this connector active. Inactive connectors cannot be configured in the Authentication Profiles. |
|
Details |
|
|
Fields |
Description |
|
Logo |
Select an appropriate image in the jpeg, jpg, gif or png format for the connector's logo that will be displayed on the login screen. |
|
Consumer Key |
Specify the registered consumer key that has been provided by Salesforce to connect to the Salesforce server, i.e. "PyIE9KFm068PbsRf0fKaNJS6GwKzP6OIqH2Ek9b53sYySh". |
Create a Salesforce authentication profile
- Access the SigningHub Admin portal.
- Click the "Configurations" option from the left menu.
- Click the "Authentication Profiles" option. The "Authentication Profiles" screen will appear.
- Click
 from the grid header.

- A dialog will appear to configure the authentication profile details.

- Specify the details accordingly and click the "Save" button. A new authentication profile will be saved and displayed in the list. See the below table for fields description.
|
Authentication Profile |
|
|
Fields |
Description |
|
Name |
Specify a unique name for this authentication profile, i.e. My Salesforce Authentication. This name will be displayed at the login screen of SigningHub Desktop Web. |
|
Description |
Specify any description related to this authentication profile for your record. |
|
Method |
Select the authentication method (i.e. Salesforce Authentication) for this profile. |
|
Connector |
This field will appear to select the related connector, when you select any third-party authentication method above. Select the Salesforce Connector. Click |
|
Active |
Tick this check box to make this authentication profile active. Only the active profiles are available to the end users on their Login screen and Integration screen of SigningHub Desktop Web for authentication. |
|
Tick this check box to mark this authentication profile as private. A private profile will not be available to the (public) end users on their Login screen and Integration screen of SigningHub Desktop Web. |
|
|
|
|
See Also
- How to Integrate Power BI
- How to Obtain Firebase Integration Key
- How to Obtain the Azure AD Integration Key
- How to Obtain the Office 365 Integration Key
- How to Obtain the Dropbox Integration Key
- How to Obtain the Google Drive Integration Key
- How to Obtain the OneDrive Integration Key
- How to Obtain the HubSpot Integration Key


