How to Obtain the OneDrive Integration Key
- Introduction
- How it works?
- Create the OneDrive App in Azure Active Directory
- Create a OneDrive connector
- Configure the OneDrive Connector as Default in the SigningHub Global Settings
- Enable your cloud drives
OneDrive is Microsoft's cloud-based file hosting service, designed to facilitate seamless file storage, synchronization, and collaboration across various devices. Users can securely store documents, photos, and videos in the cloud, accessing them from Windows and Mac computers, as well as iOS and Android devices. Integrated with Microsoft 365, OneDrive enables real-time collaboration on Office documents, allowing multiple users to edit files simultaneously. The service offers versioning, ensuring the ability to revert to previous document states, and incorporates robust security features like file encryption and two-factor authentication. With its cross-platform accessibility and integration with Microsoft's suite of productivity tools, OneDrive provides a versatile and efficient solution for individuals and organizations seeking a centralized and collaborative approach to cloud-based file management. A OneDrive connector can be configured in SigningHub Admin by providing two integration keys, i.e. Application ID and Application Secret.
- Create the OneDrive App in Azure Active Directory.
- Create a OneDrive connector in SigningHub Admin.
- Configure the OneDrive Connector as Default in SigningHub Admin.
- Enable your cloud drives in SigningHub Web.
Create the OneDrive App in Azure Active Directory
- Sign in to the Azure portal using your Azure Active Directory administrator account.

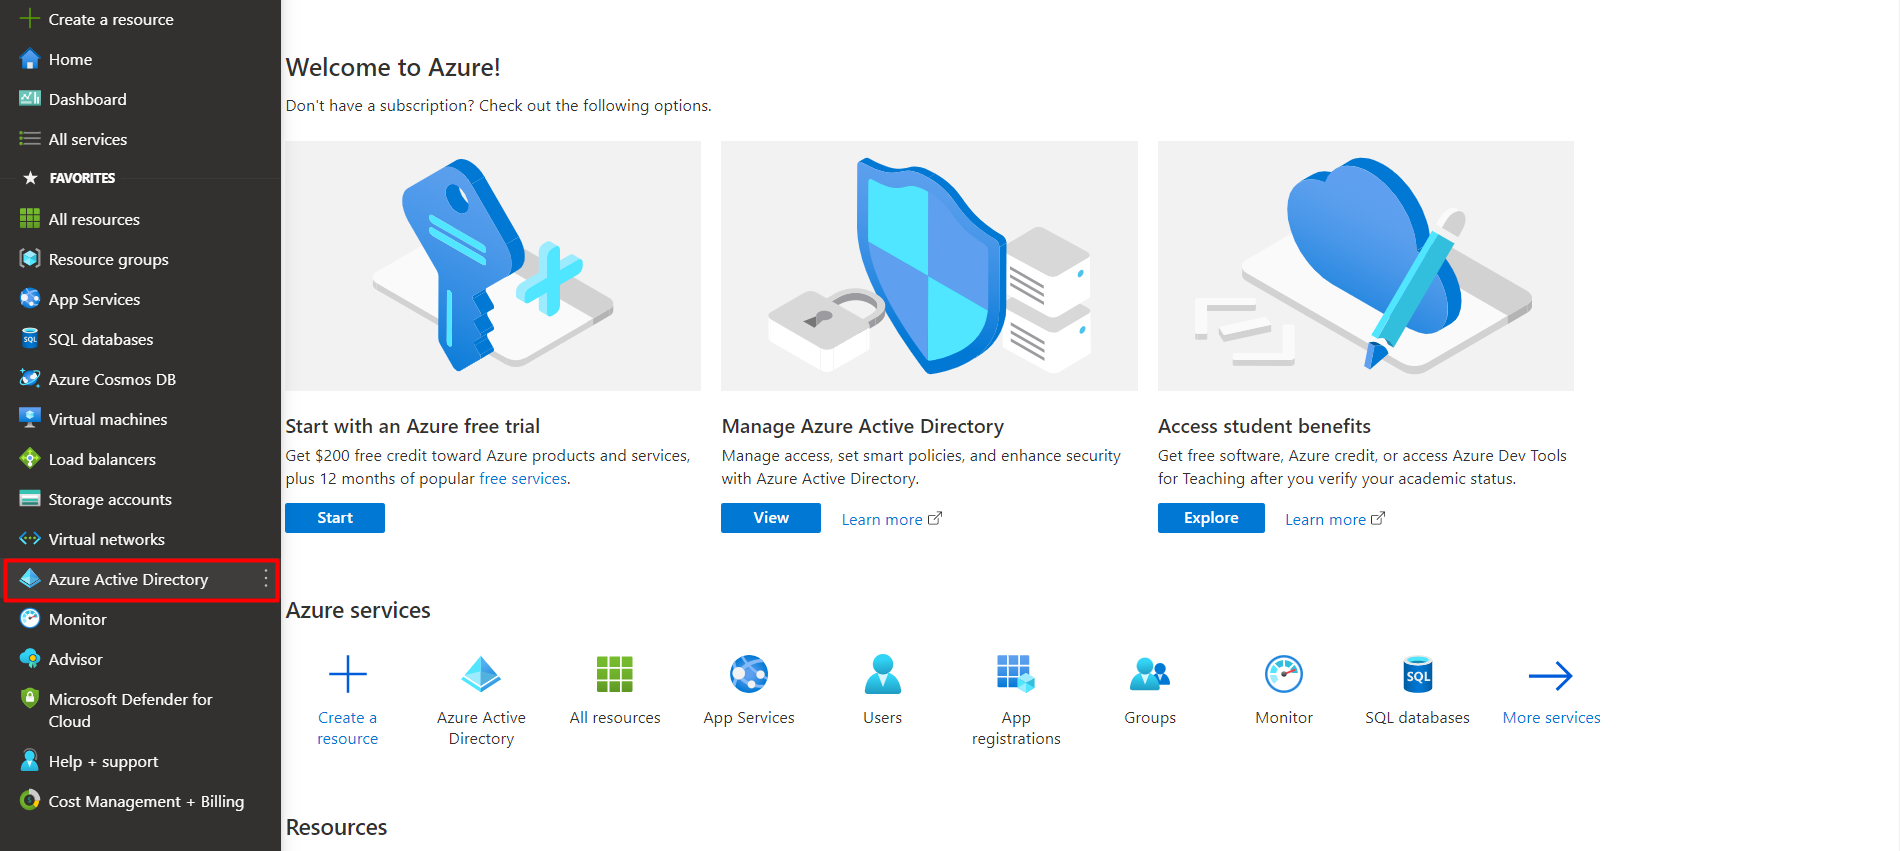
- Select "Azure Active Directory" from the left tab.
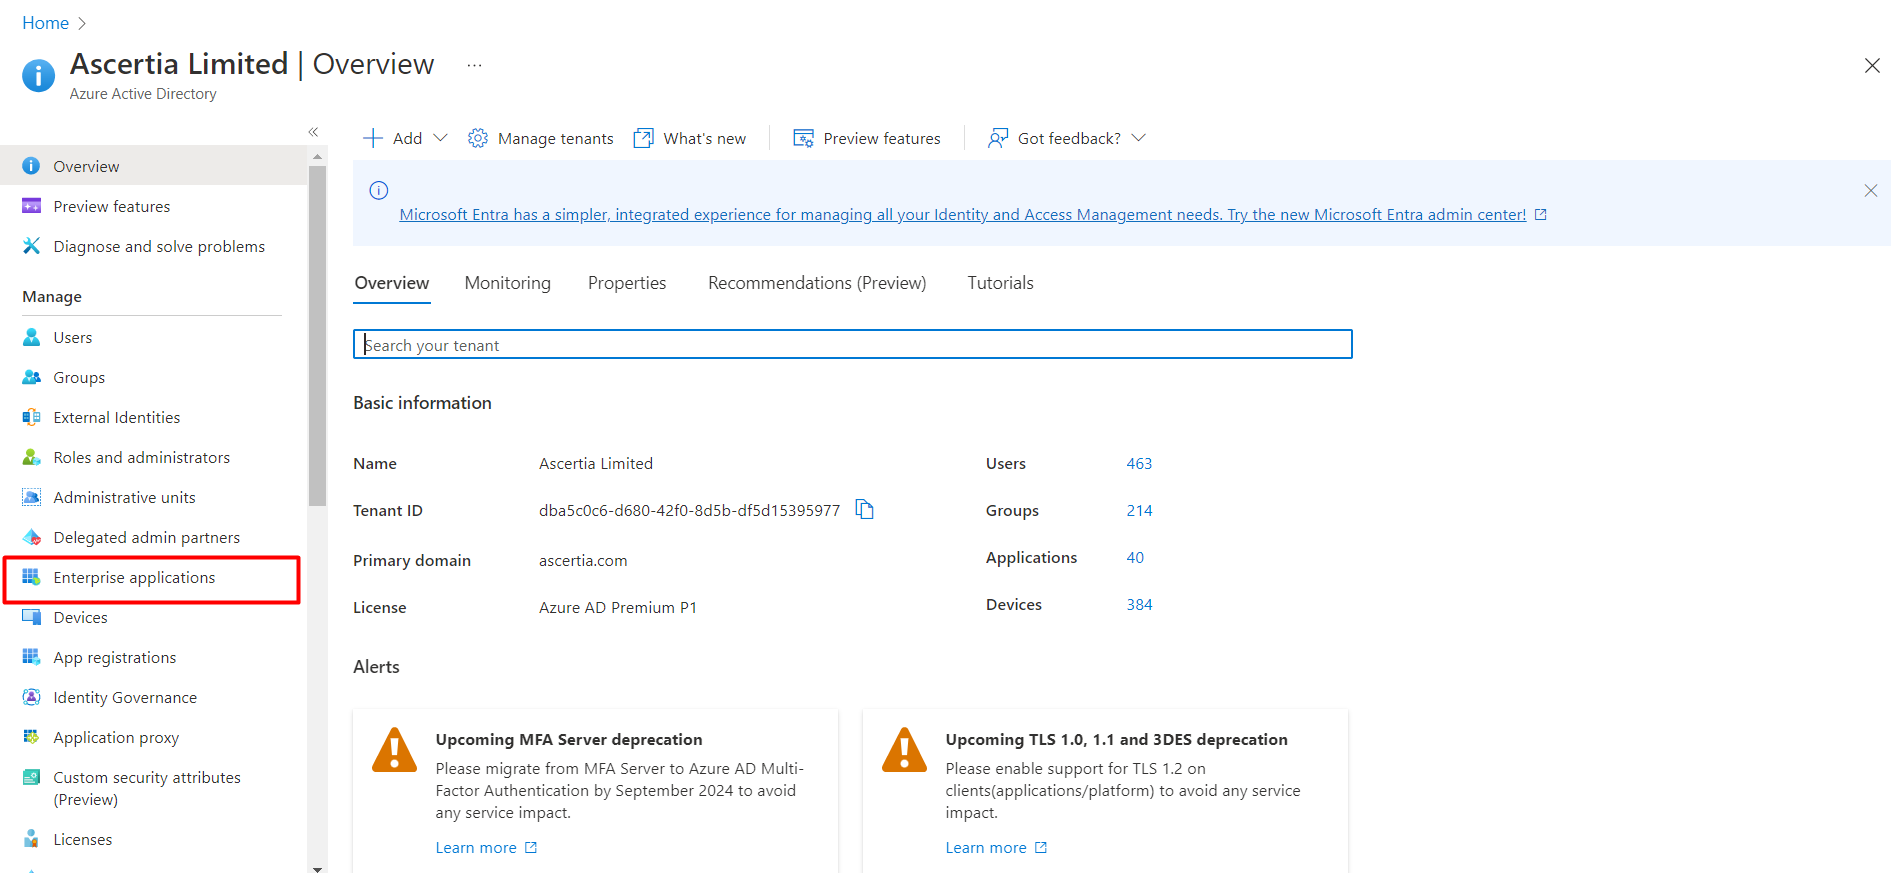
- Click on the "Enterprise Applications" from the left panel.
- Click on the "New application" button.

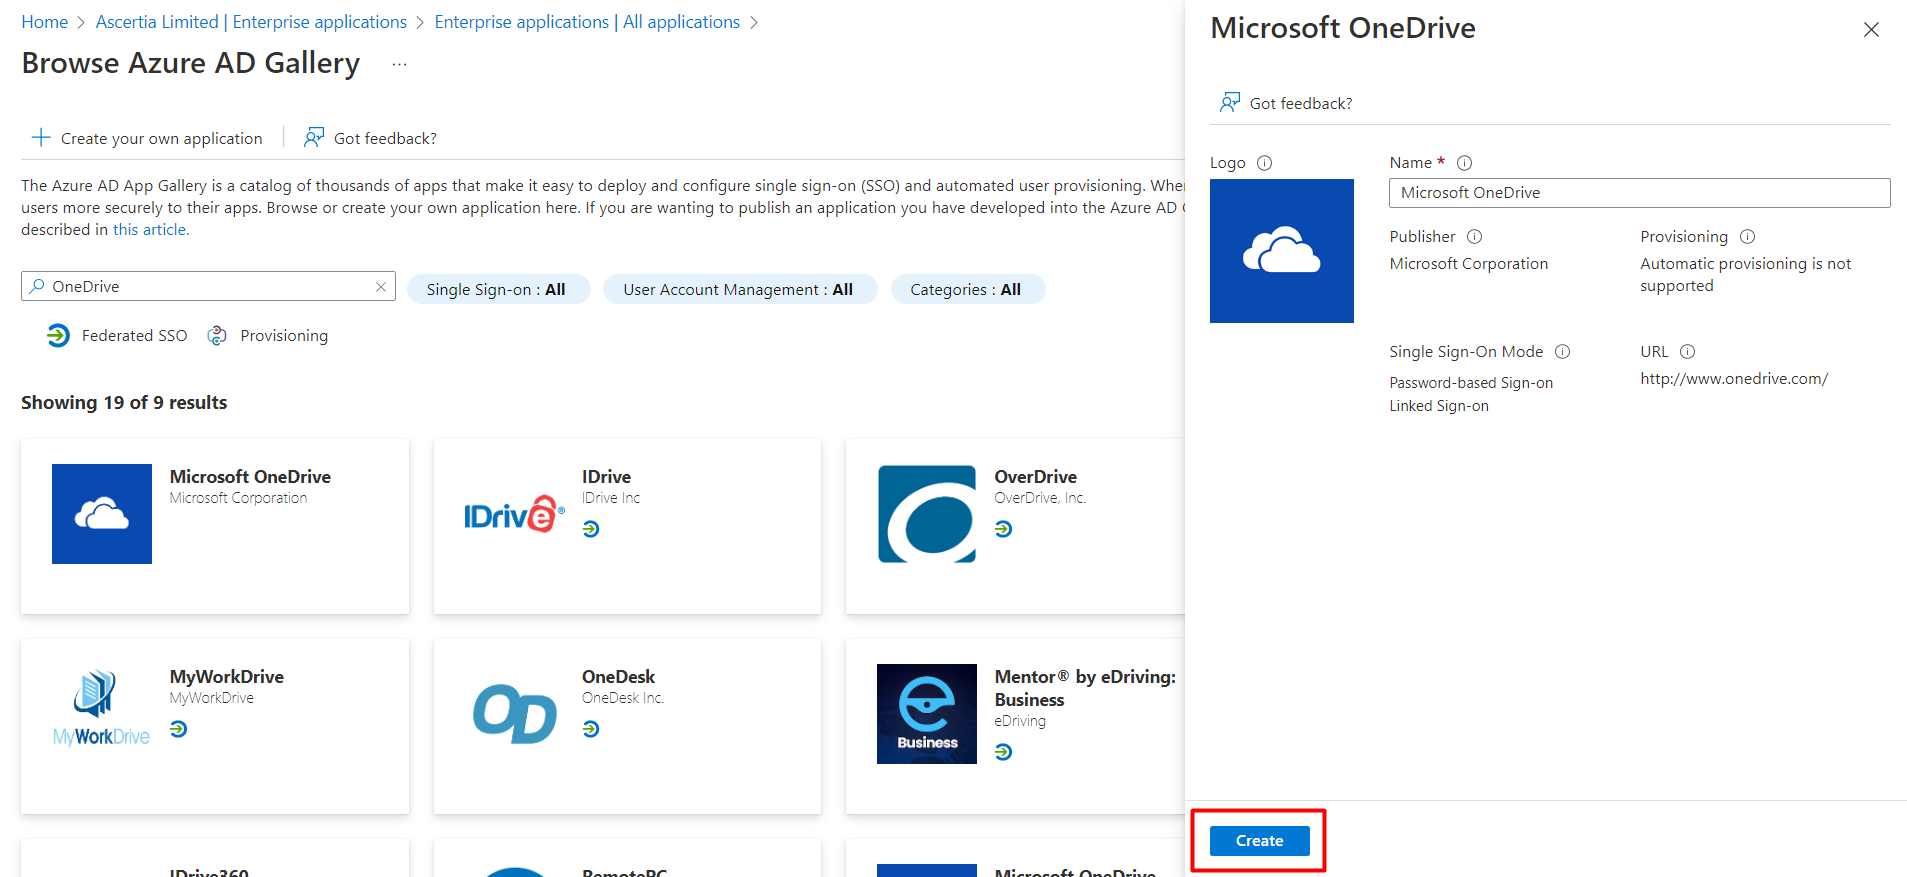
- Type "OneDrive" in the search bar, and select the app icon.

- Enter the name for the app, and click on the "Create" button.
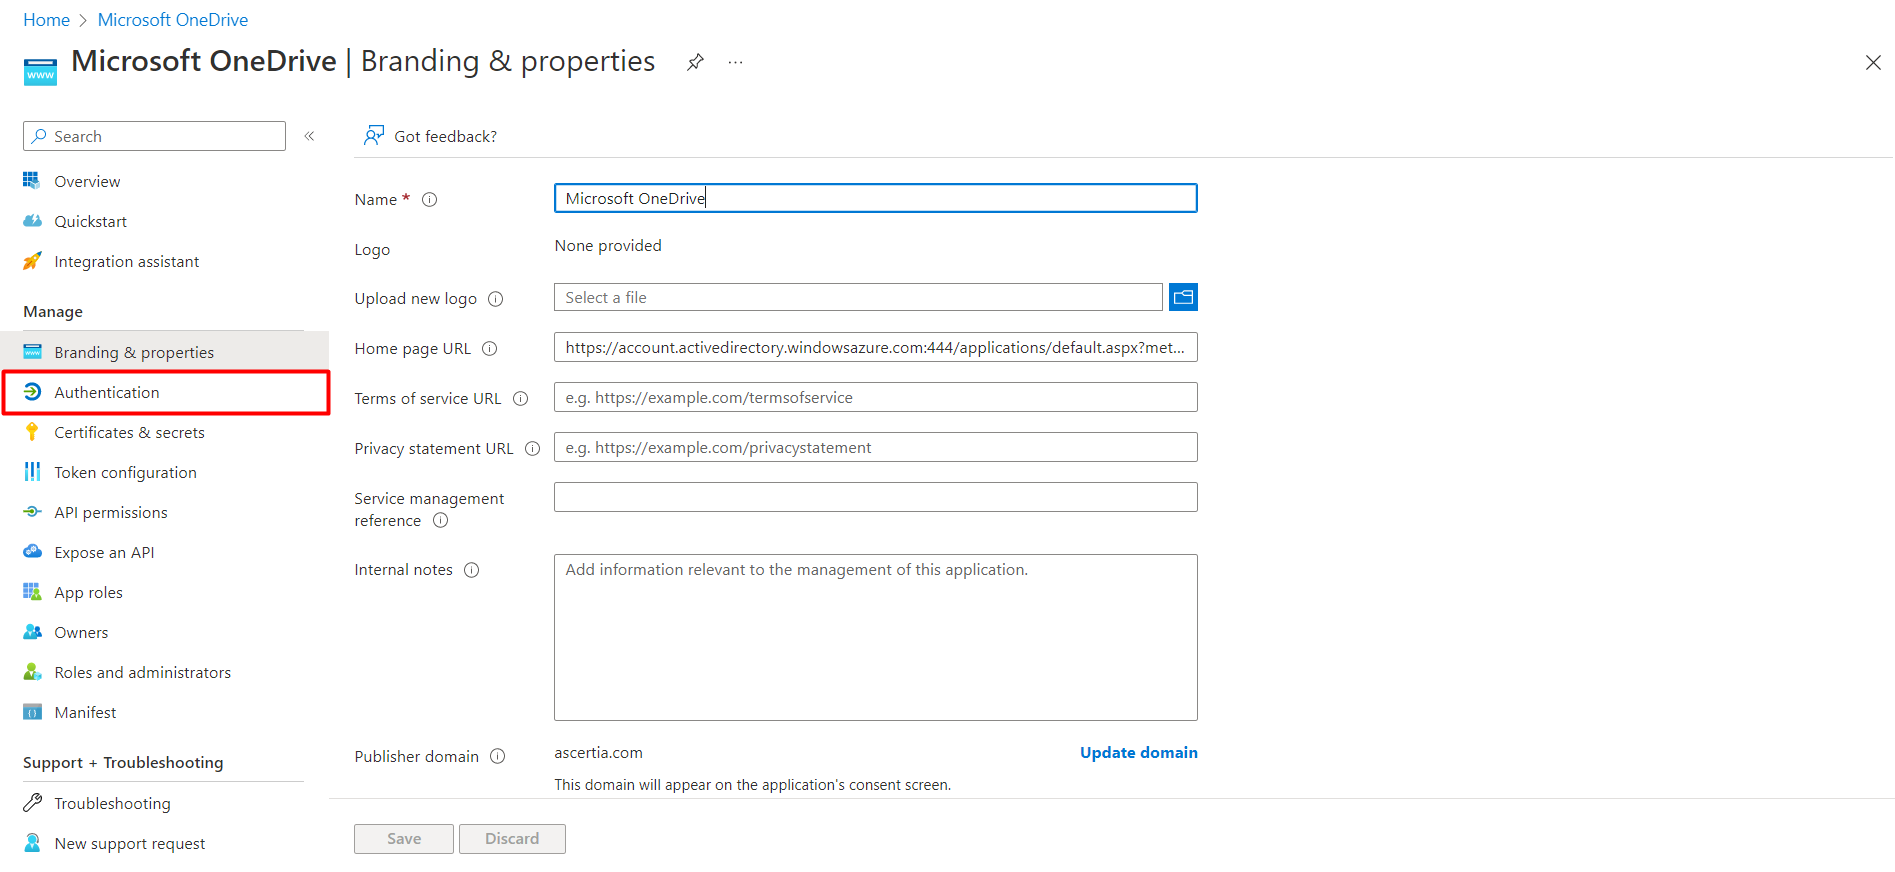
- You will be taken to the app overview screen. Select "Properties" from the left tab.

- From the properties screen, click on the "application registration" hyperlink.

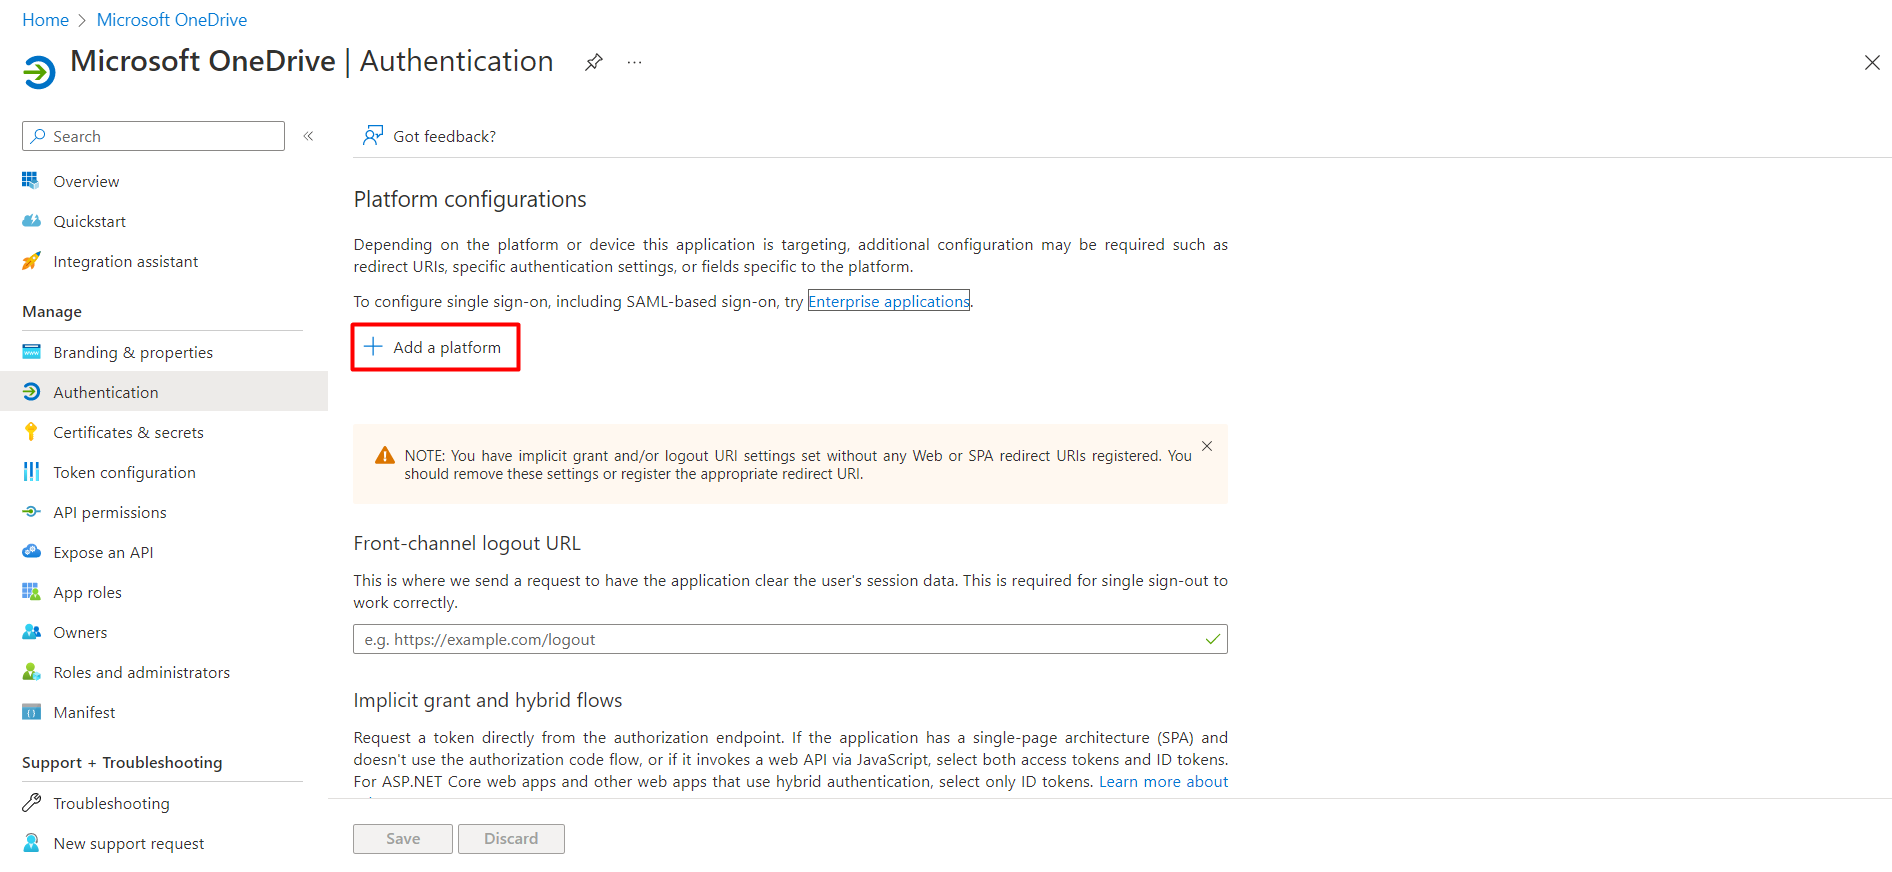
- From the left tab, click on "Authentication".
- Click on the "Add a platform" button.
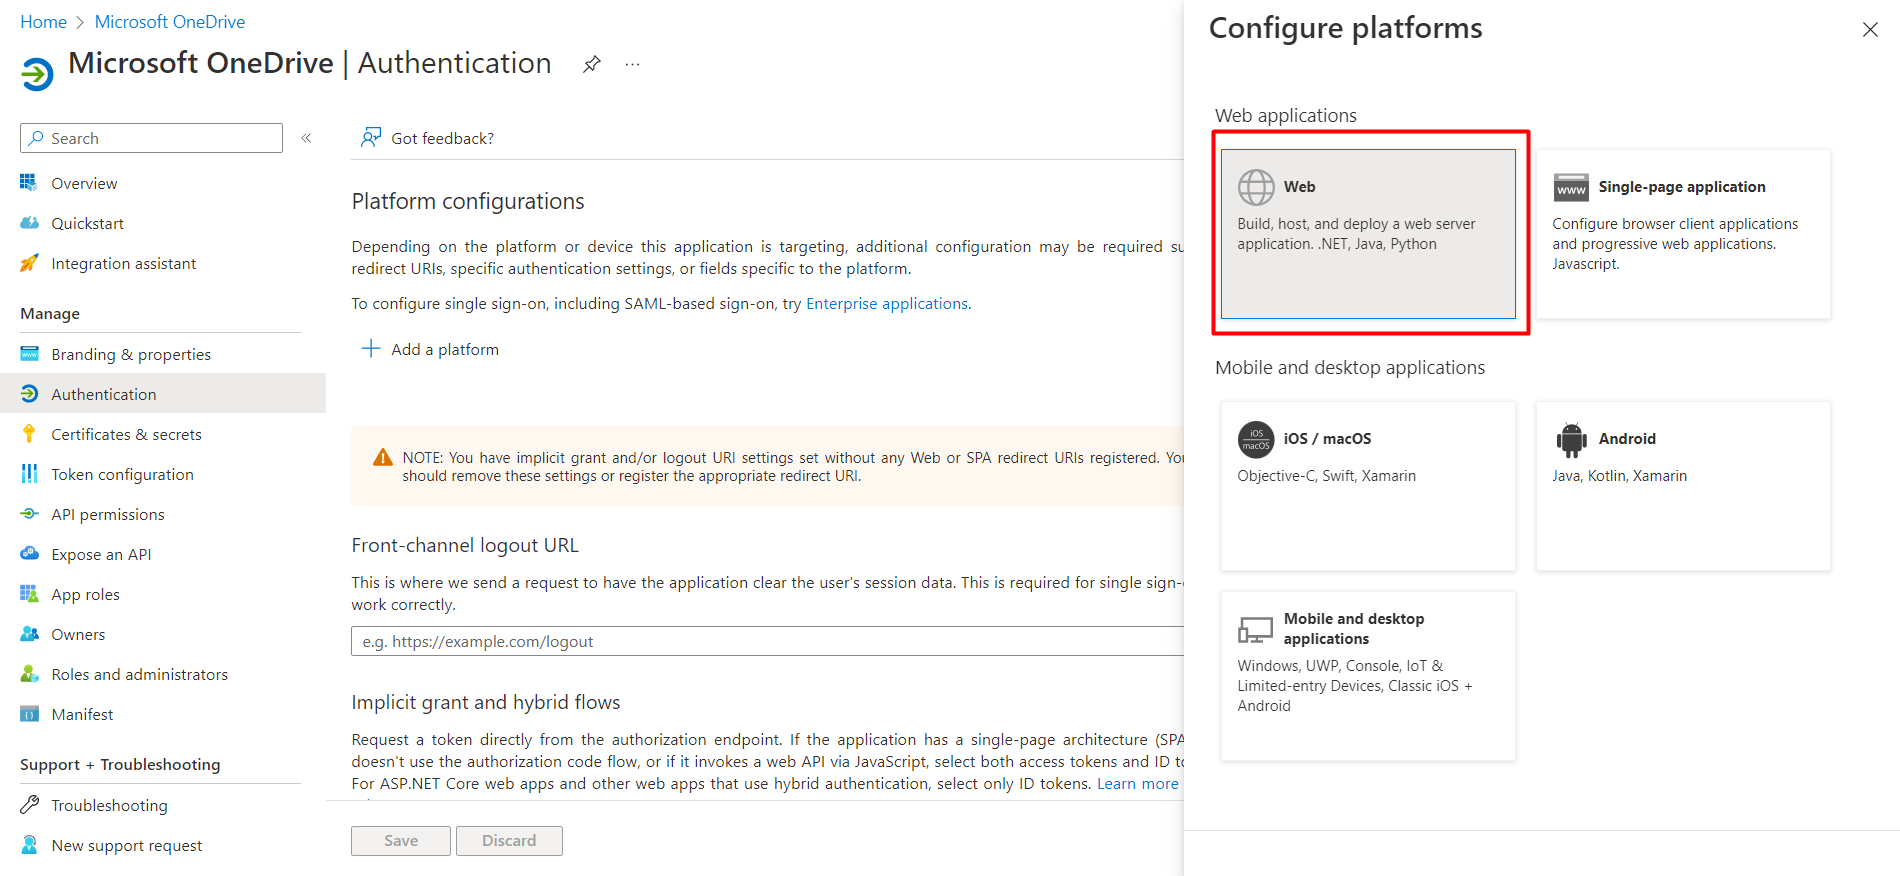
- From the "Configure platforms" pop up, select "Web".
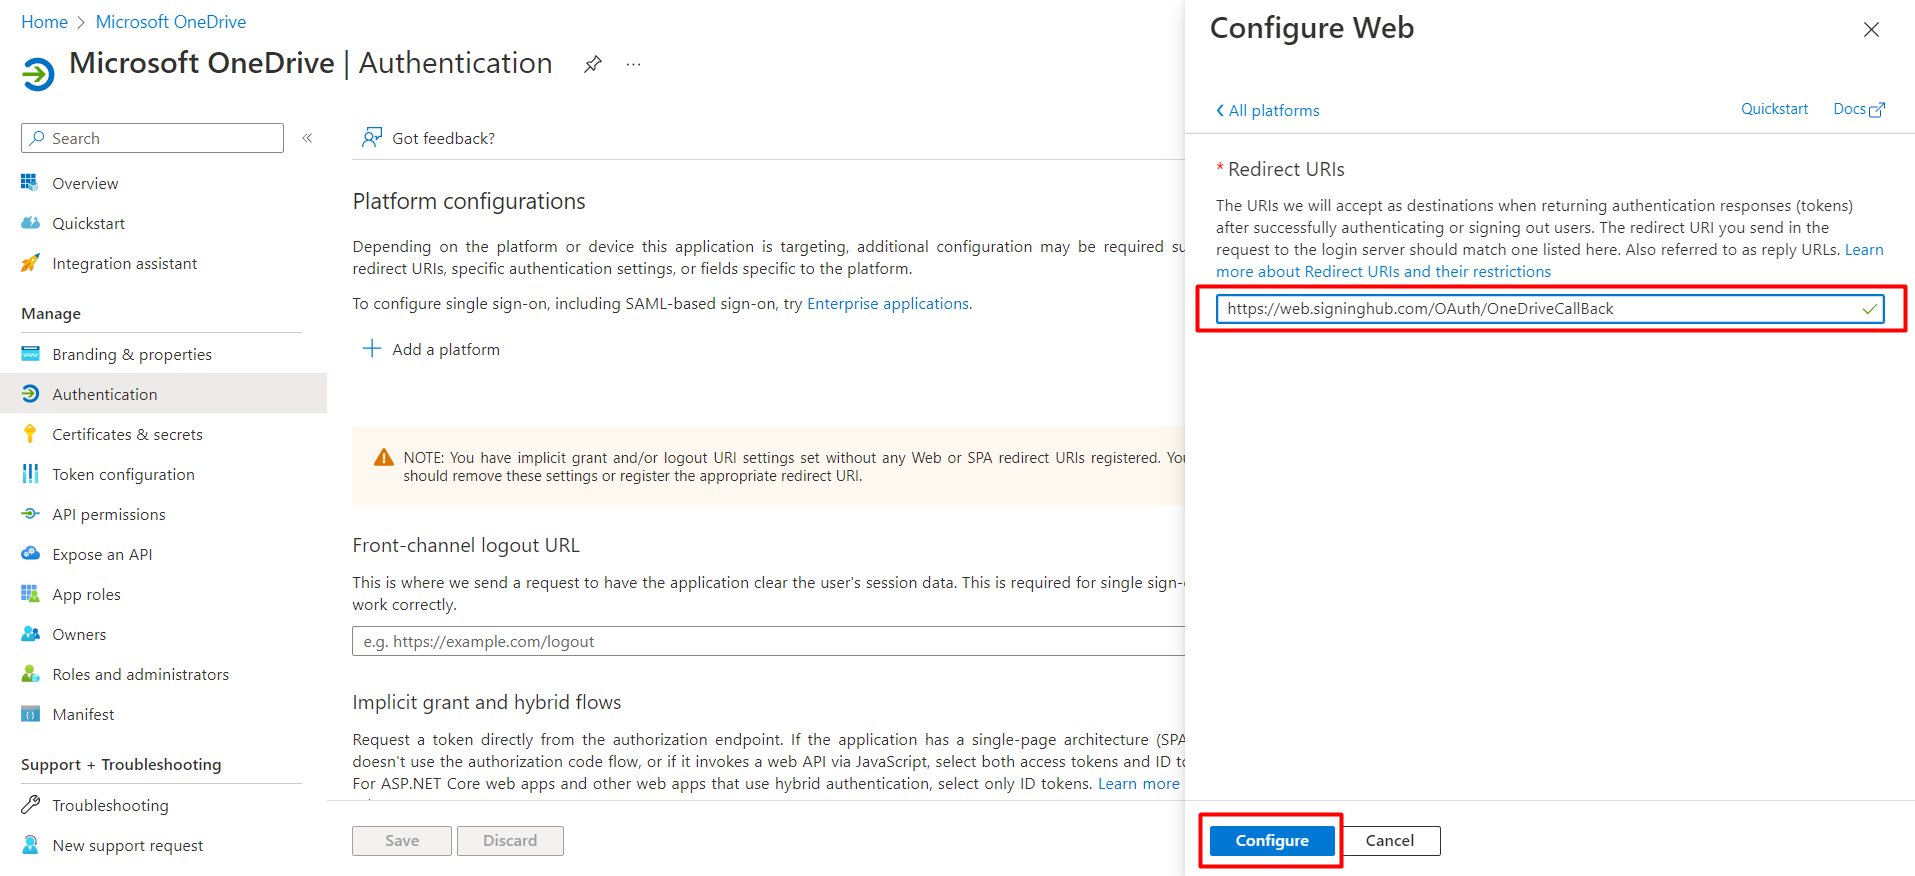
- Set "https://web.signinghub.com/OAuth/OneDriveCallBack" under :Redirect URls" and click the "Configure" button.
- Select "API permissions" from the left tab.
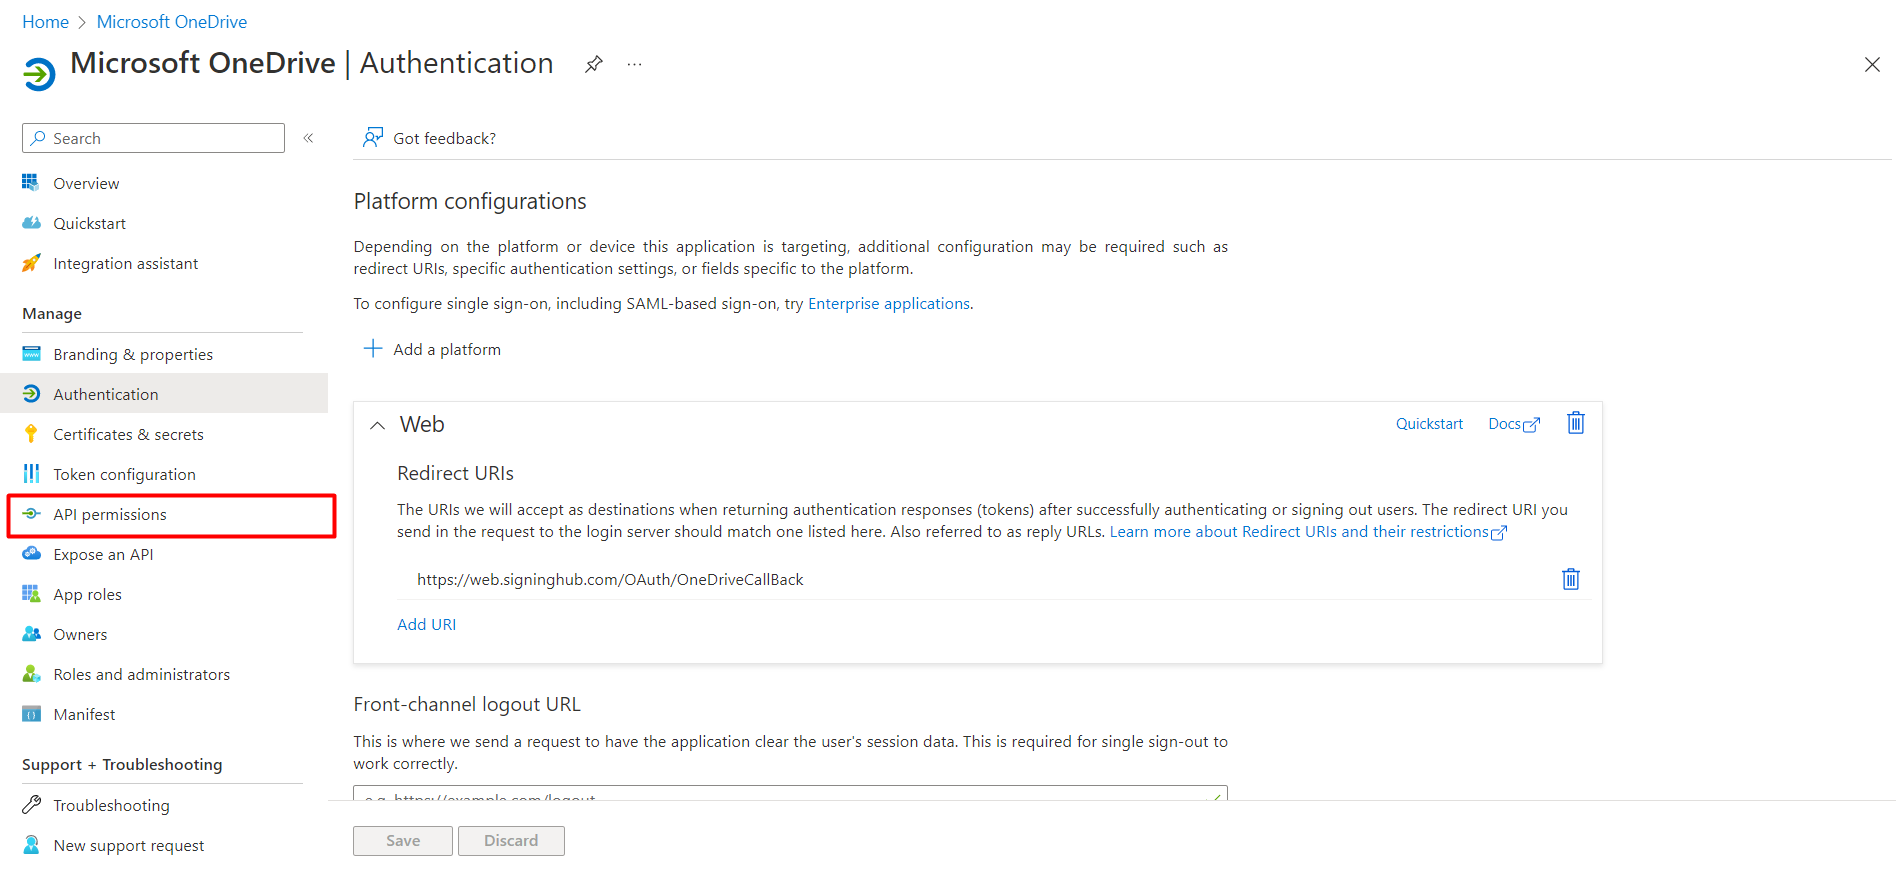
- From the "API permissions" screen, click the “Add a permission” button.
(Permission is needed to read and writes files on OneDrive).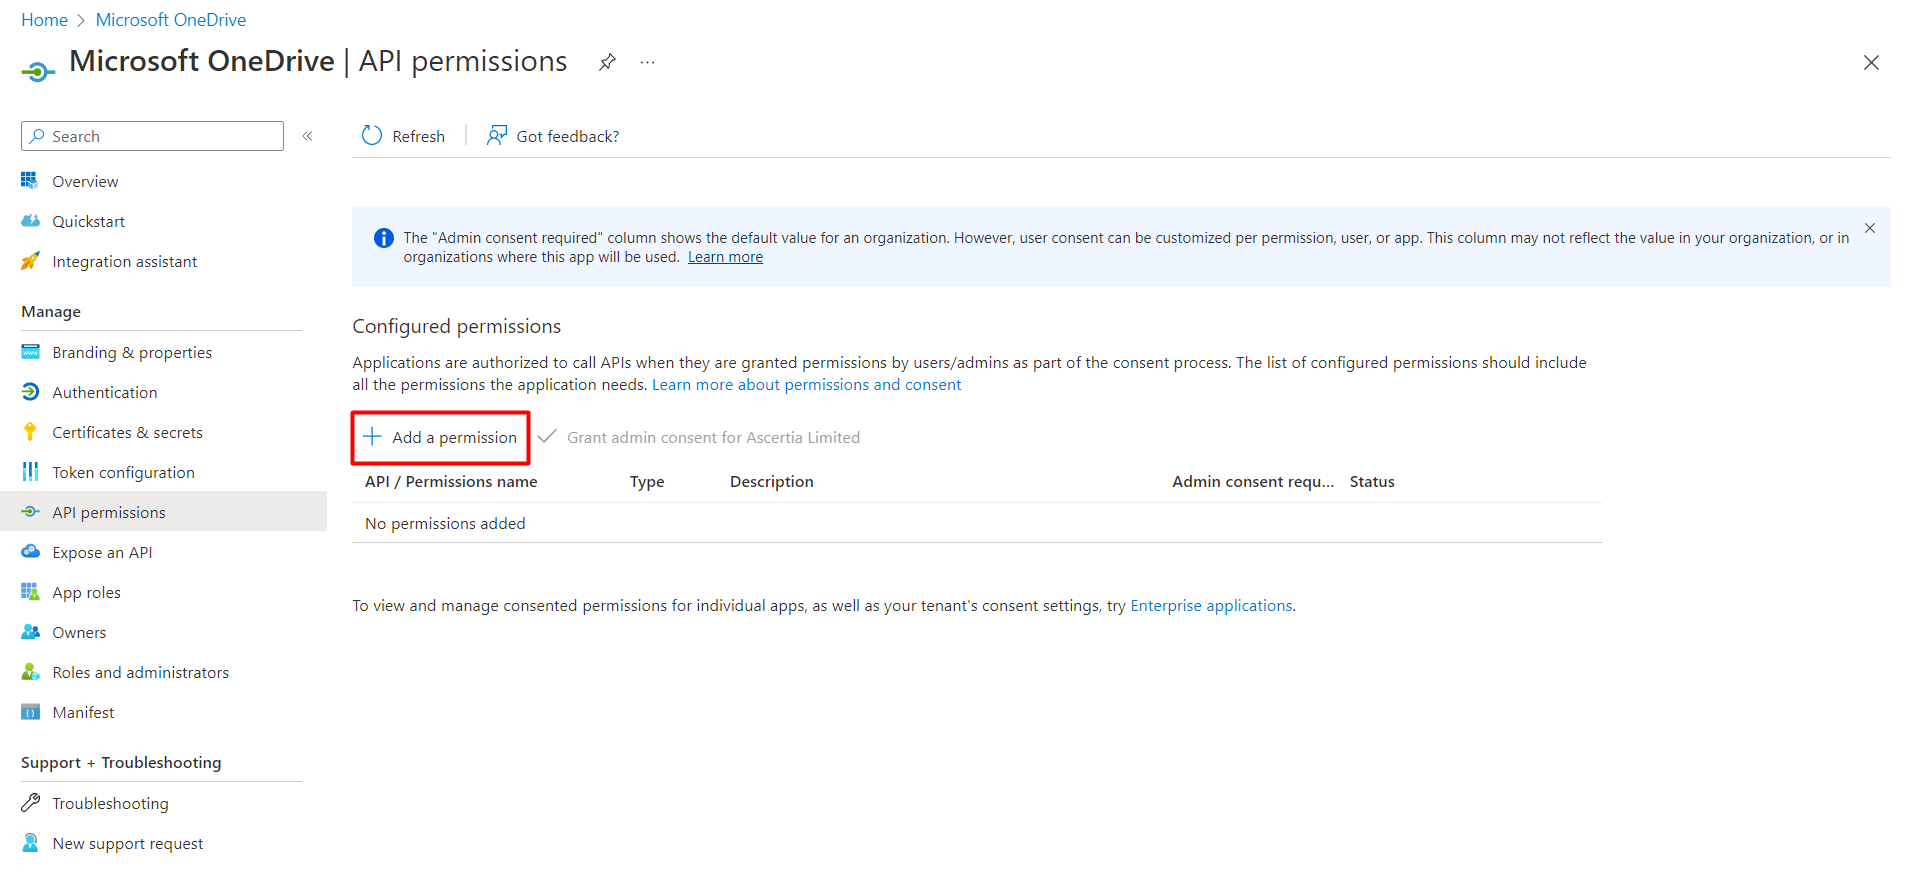
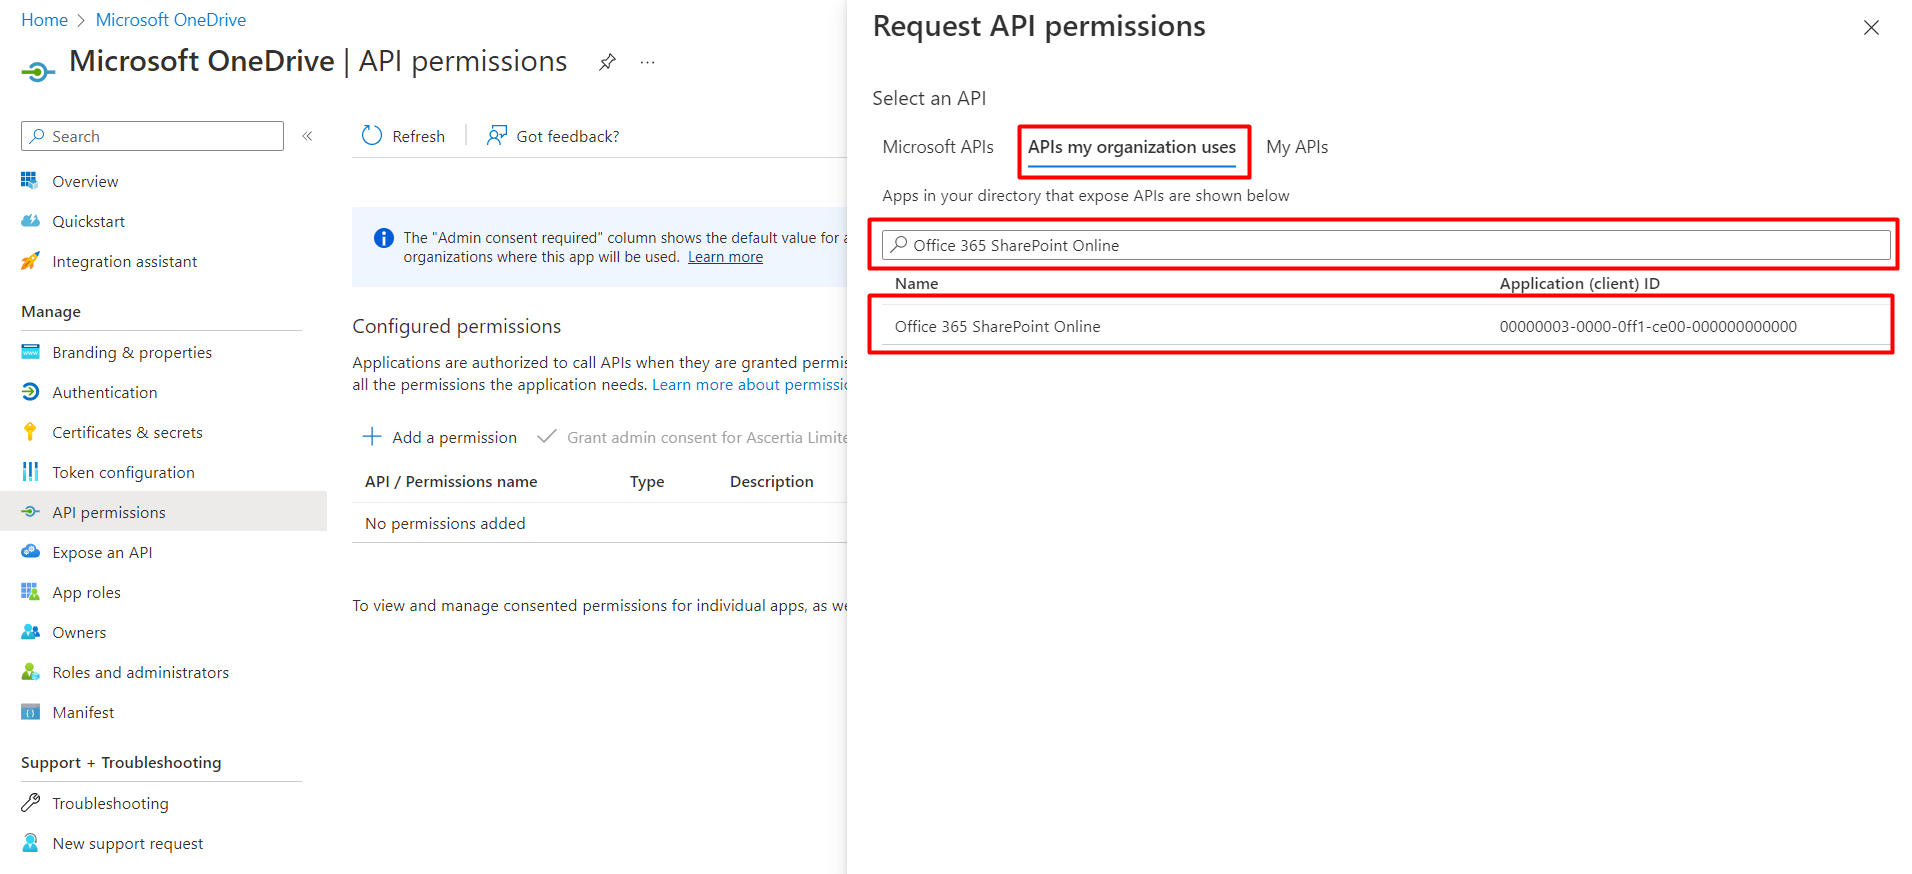
- From the "Request API permissions" screen, select "APIs my organizaion uses".

- Search and select, “Office 365 SharePoint Online”.
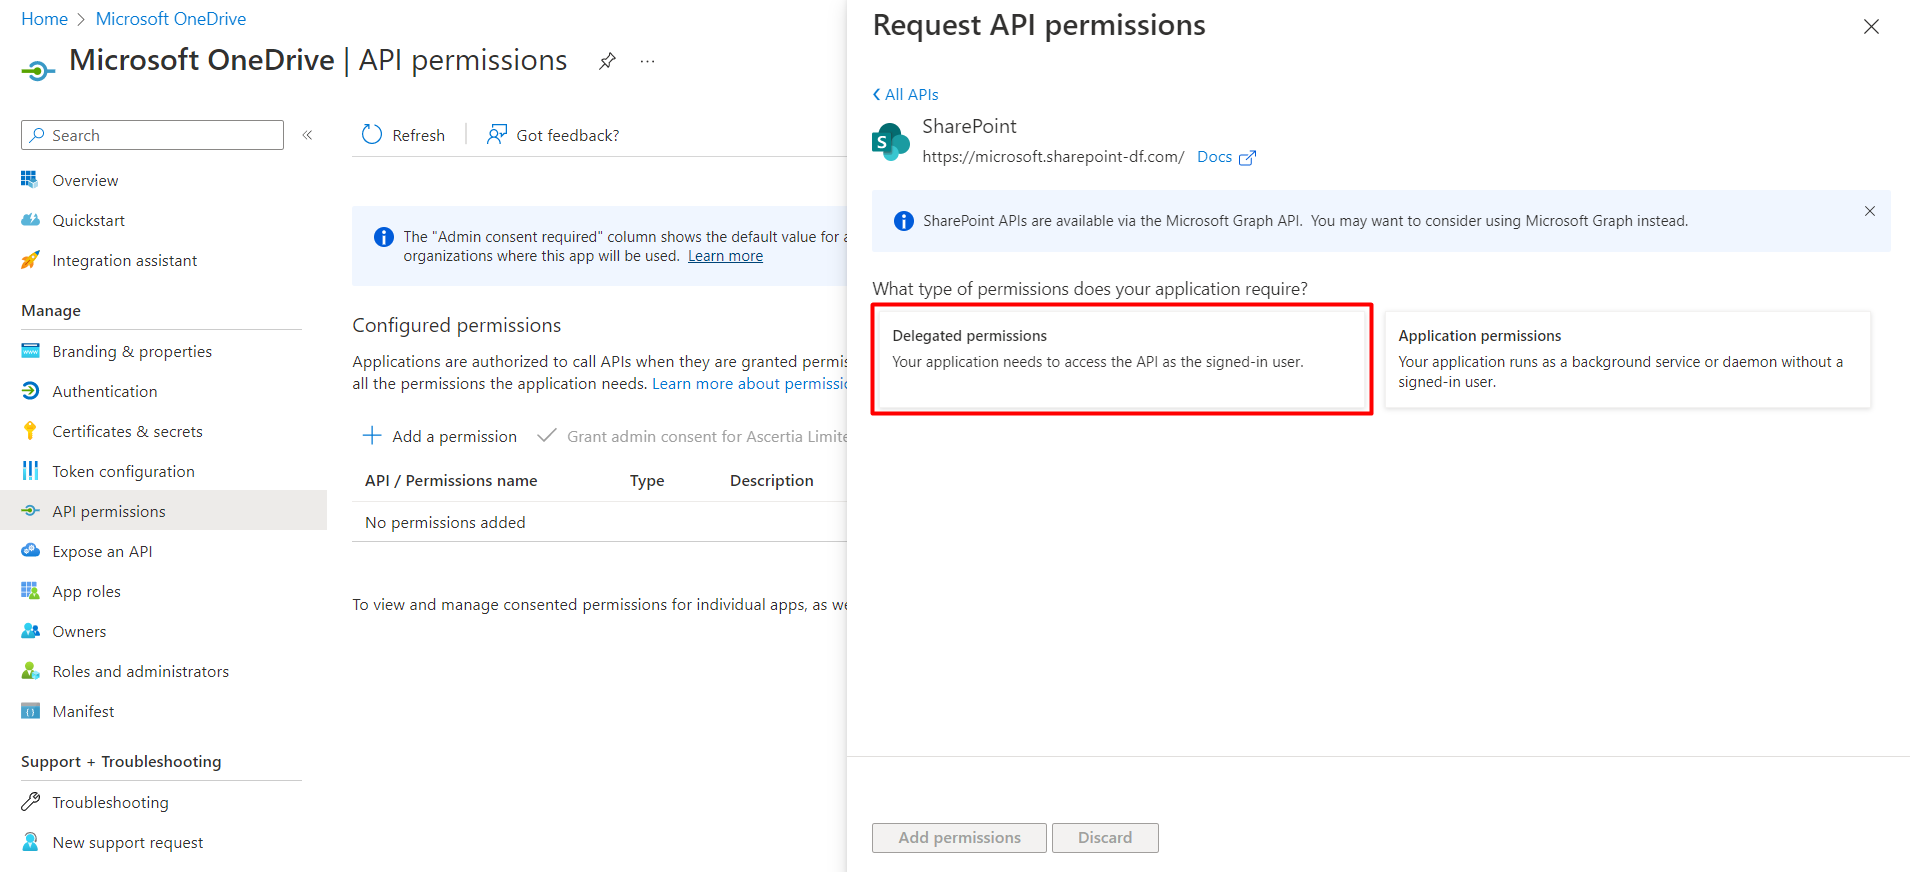
- Click on the "Delegated permissions" button.
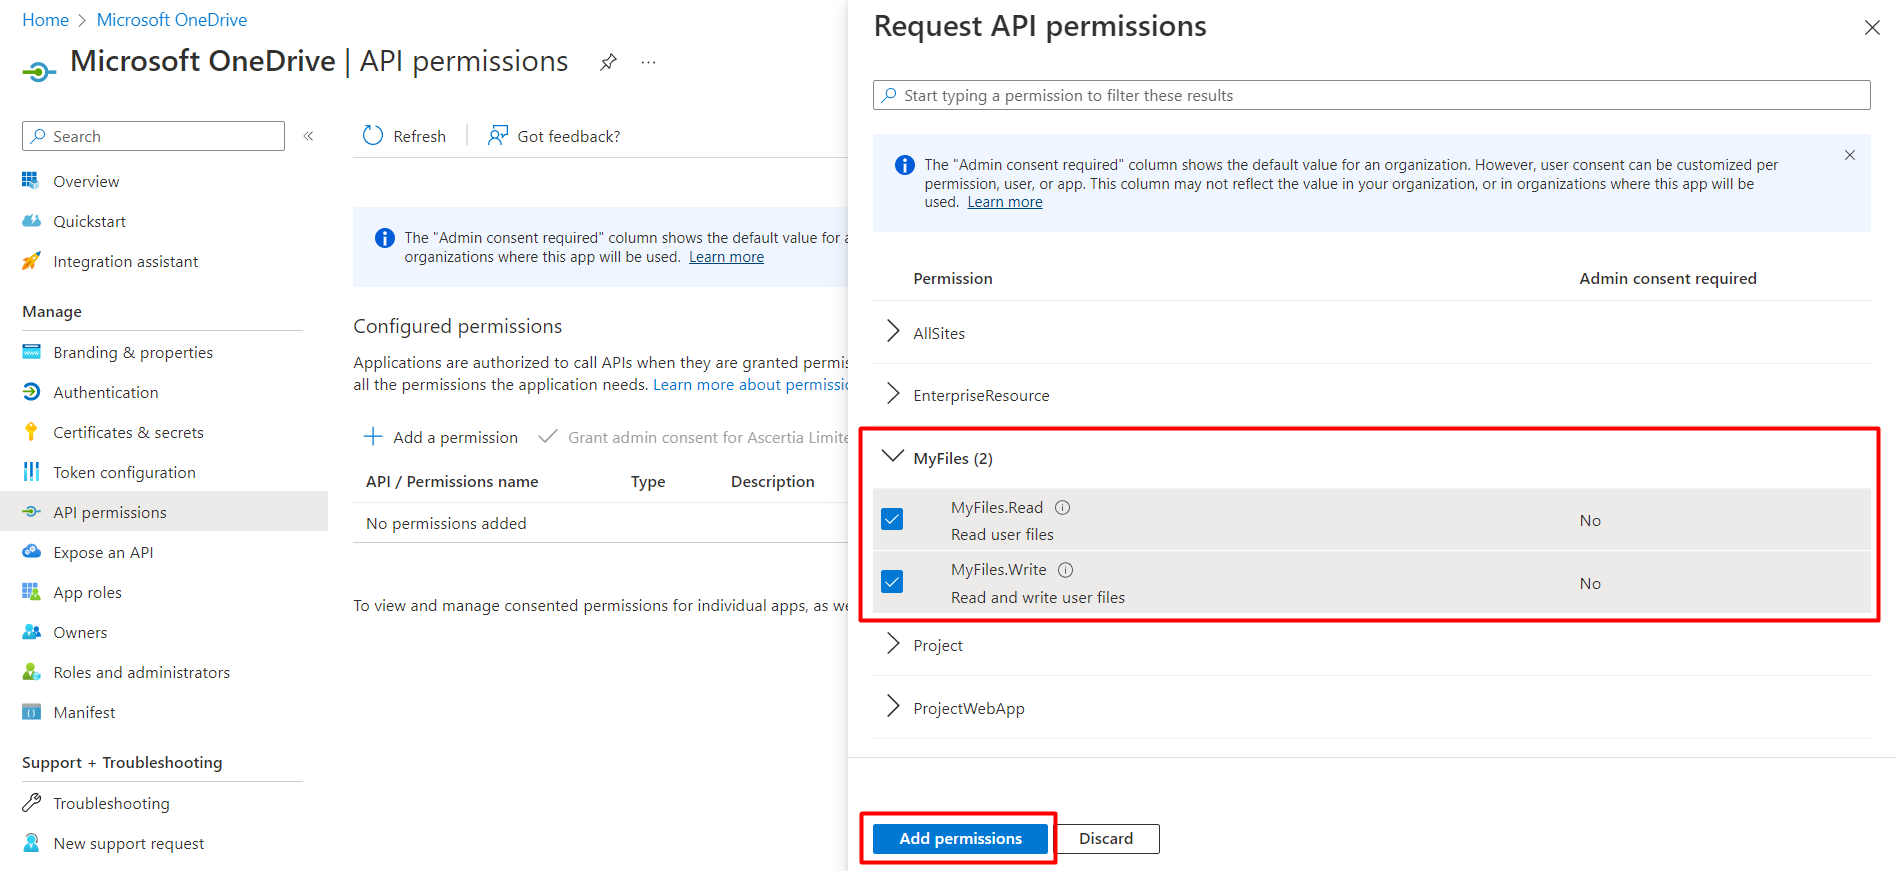
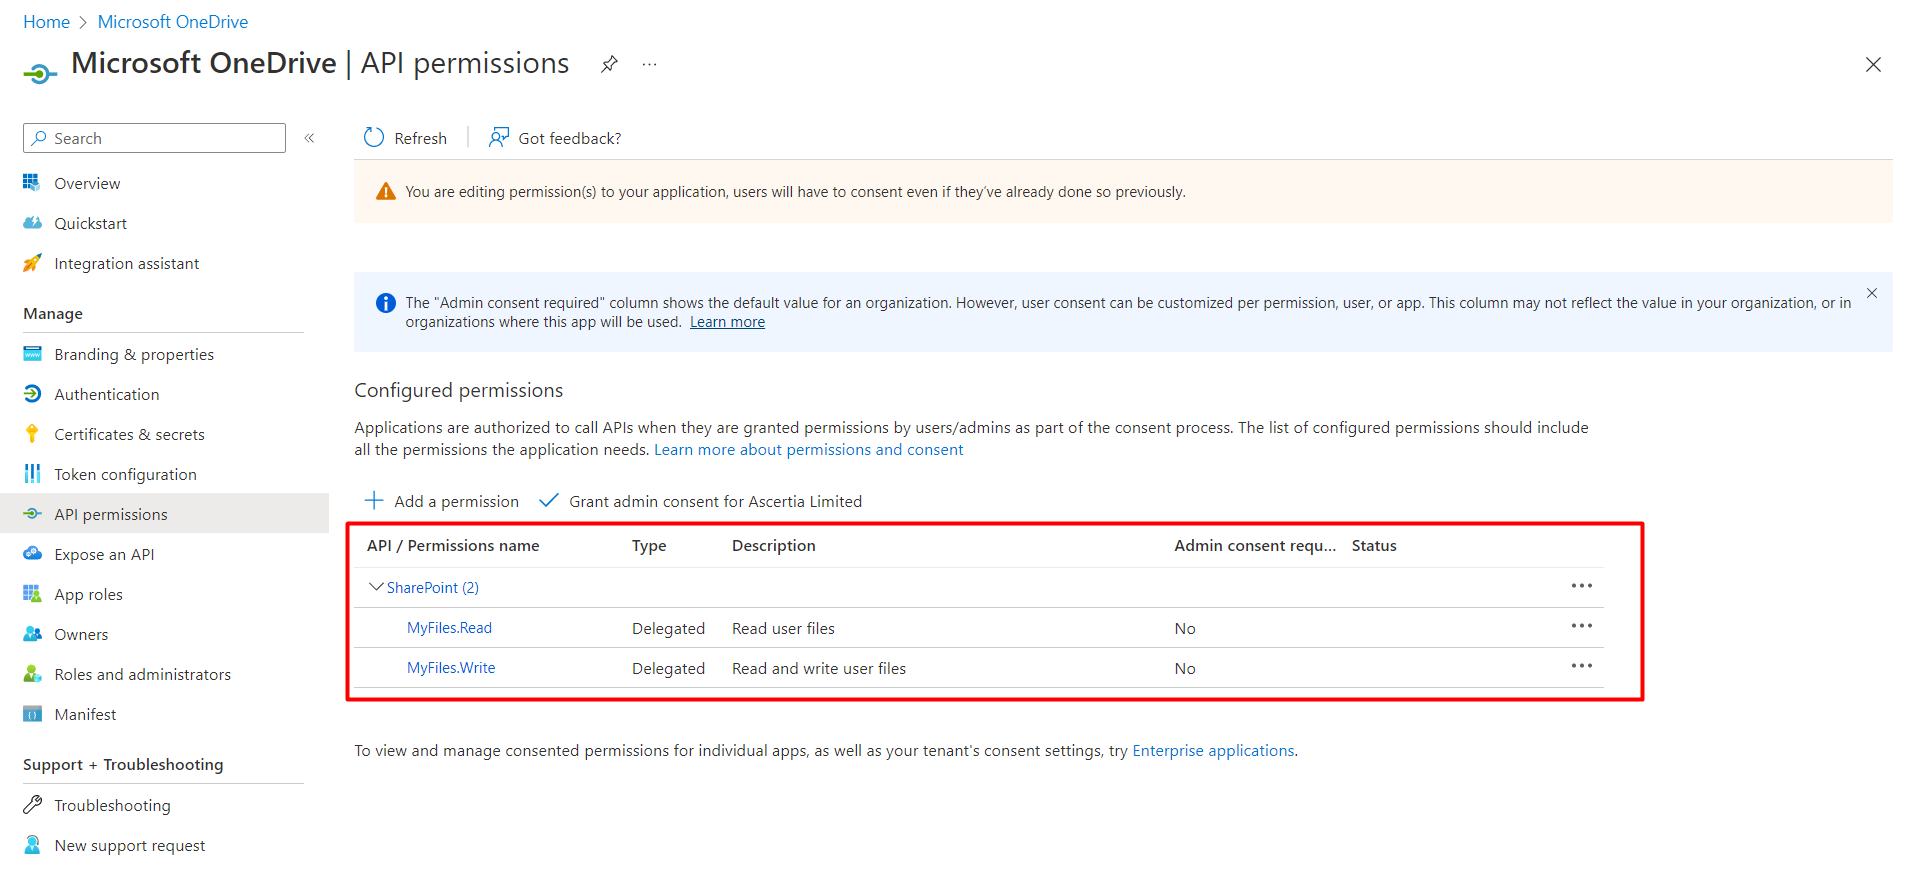
- Under "Delegated permissions", select “MyFiles.Read" and "MyFiles.Write” permissions. Click the "Add permissoins" button.
- Added permission will be shown as follows.
- Select “Certificates & secrets” from the left tab. Create a new client secret by clicking on the “New client secret” button. Save the client secret for use in the SigningHub connector.

- Get the ClientID, directory ID and endpoints from “Overview”.
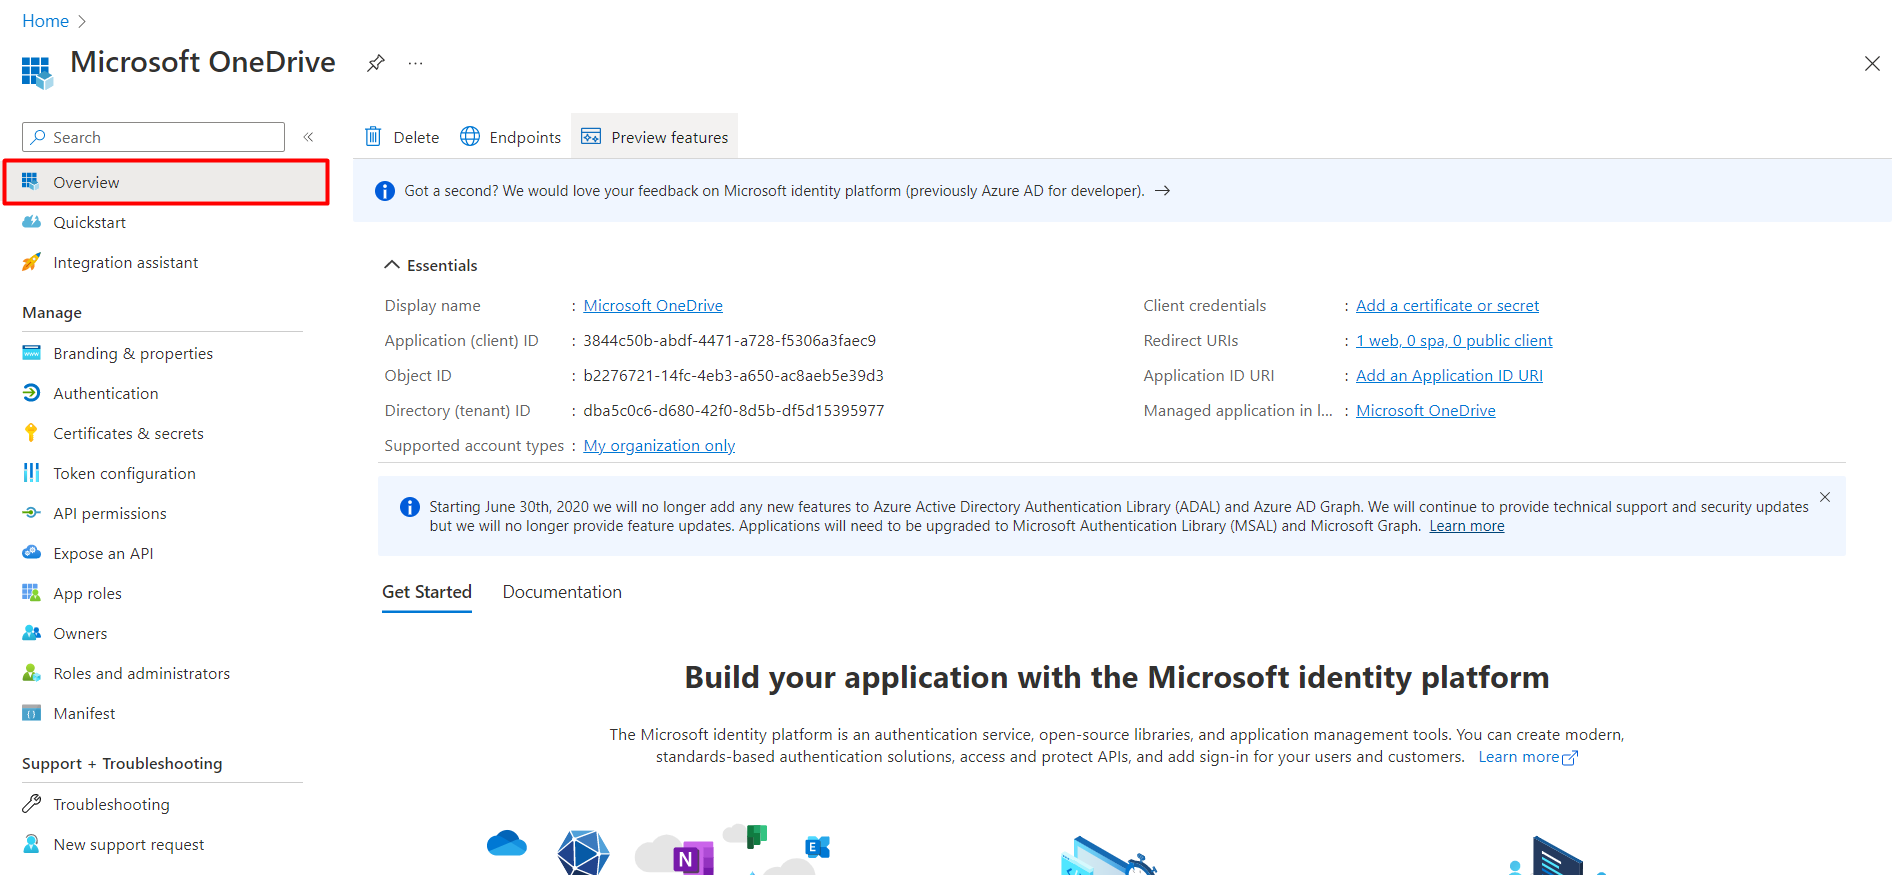
- For adding user, go to “Microsoft OneDrive” from “Overview”.

- Click on the “Assign users and groups” button.

Then click on the “Add user/group” button.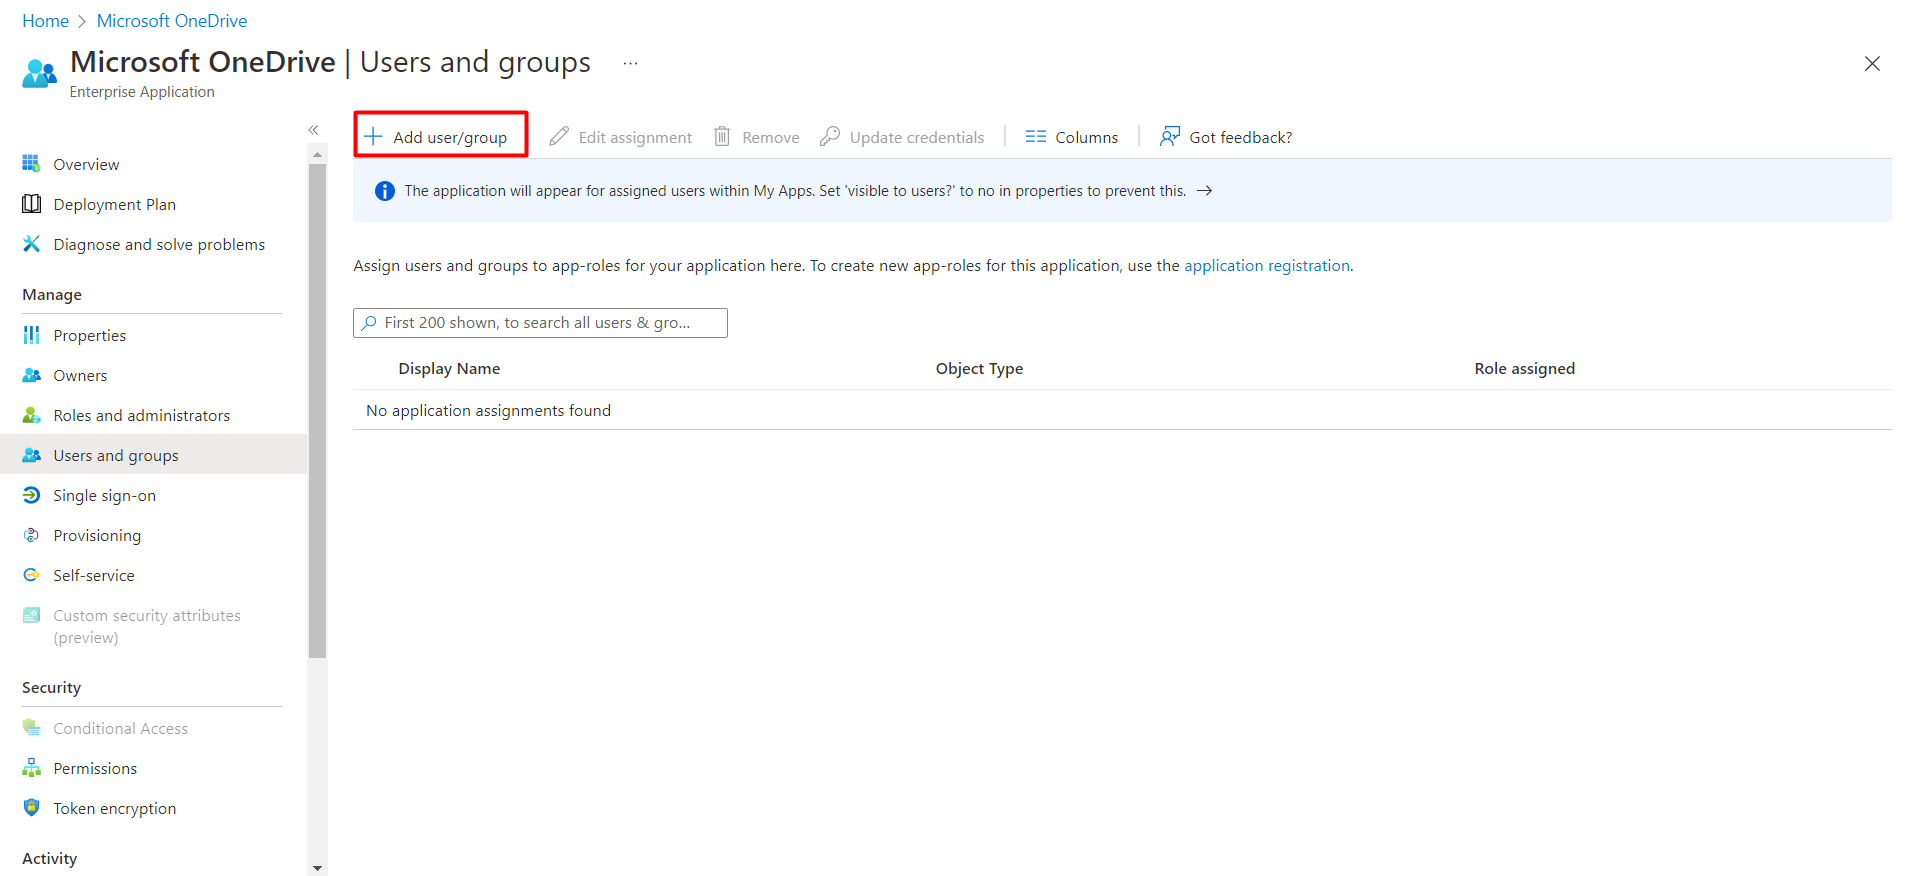
- Access the SigningHub Admin portal.
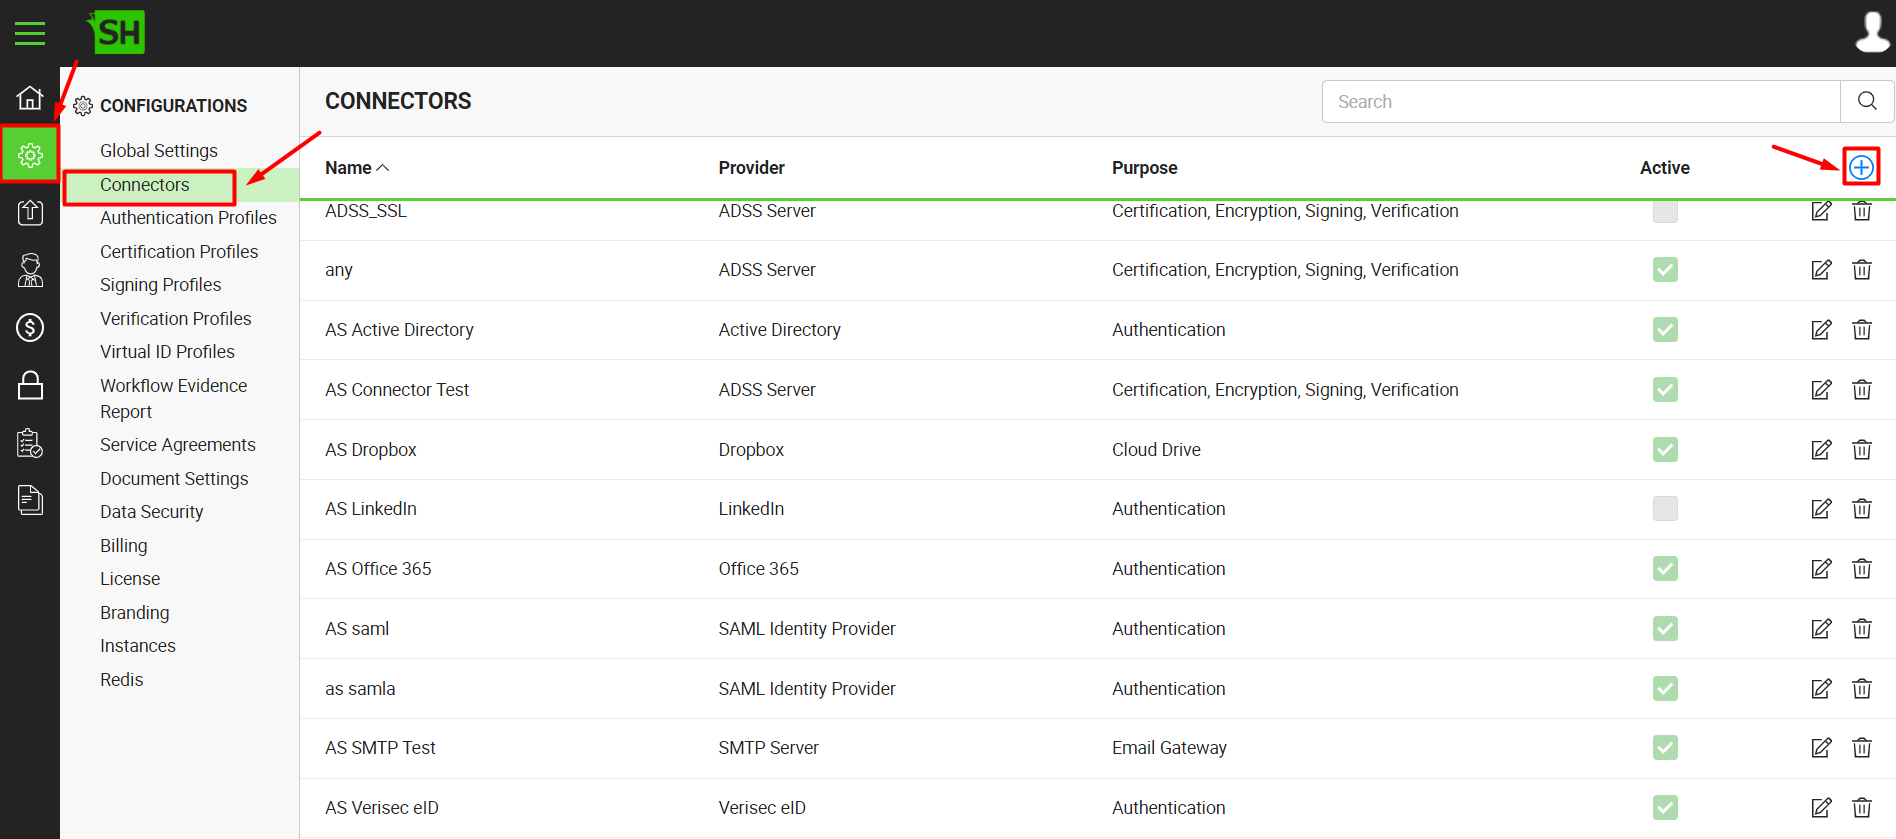
- Click the "Configurations"section from the left menu.
- Click the "Connectors" tab. The "Connectors" screen will appear.
- Click
 from the grid header.
- A dialog will appear to add the connector details. The connector dialog is comprised of two screens, i.e. Basic Information and Details. Specify the basic information and click the "Next" button to provide the respective connector details. See the below table for fields description.
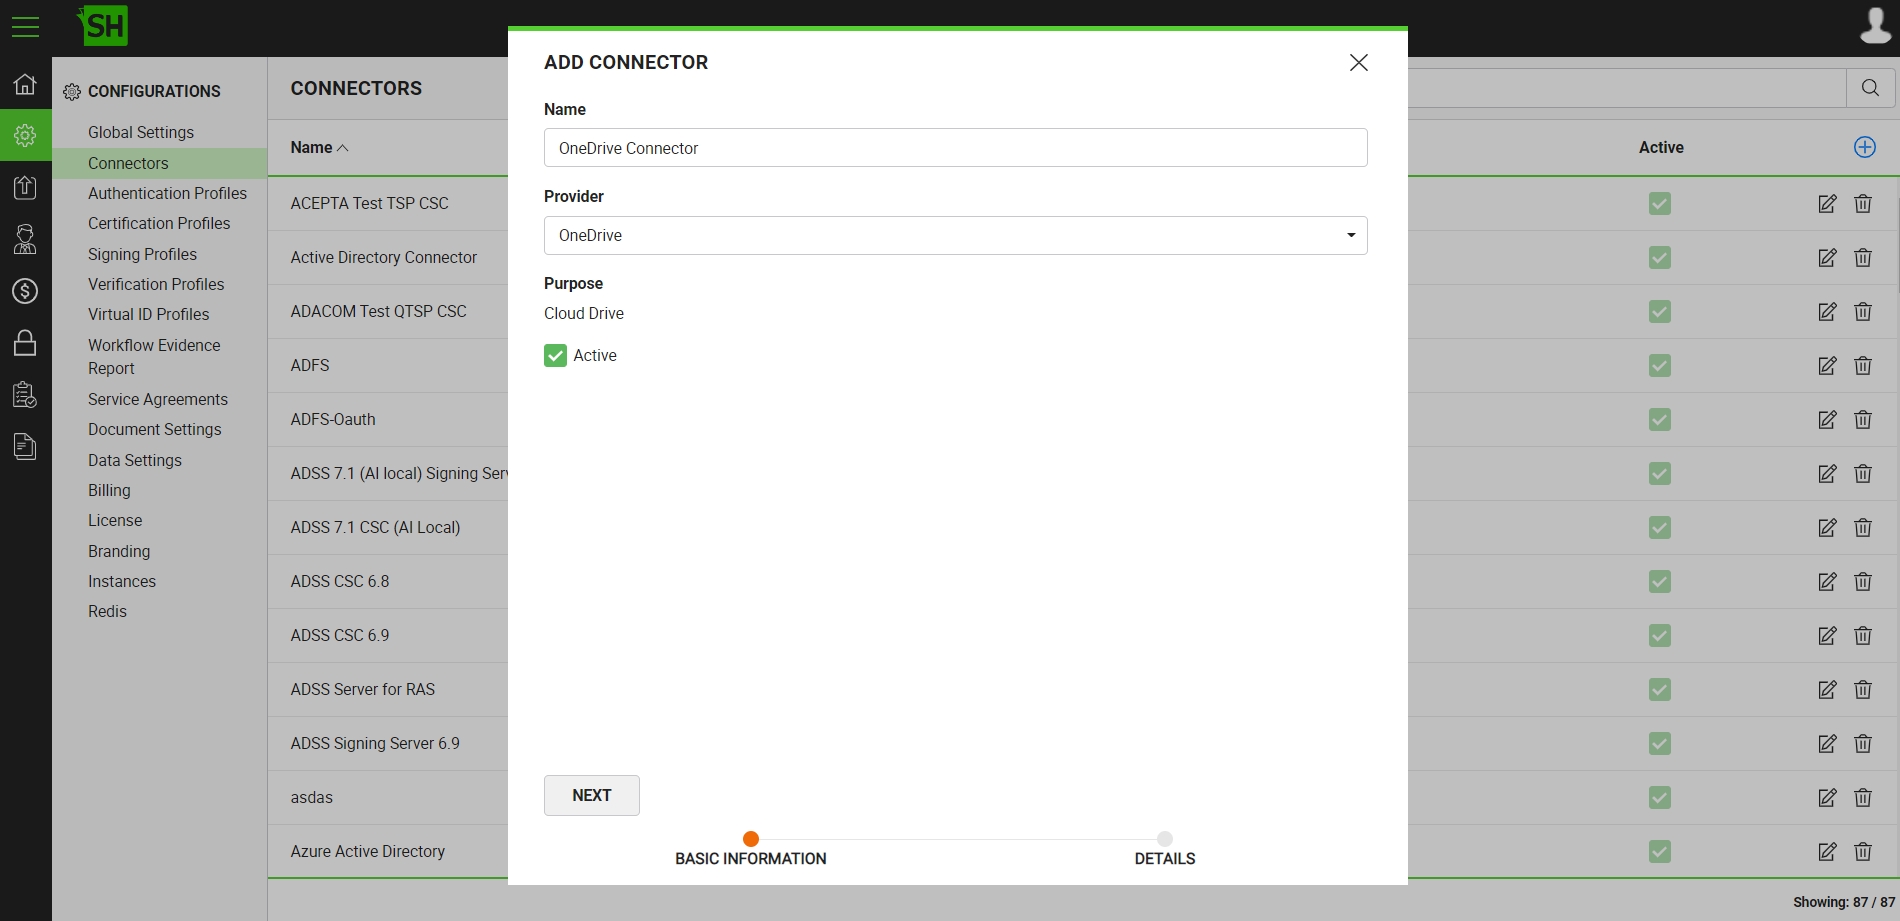
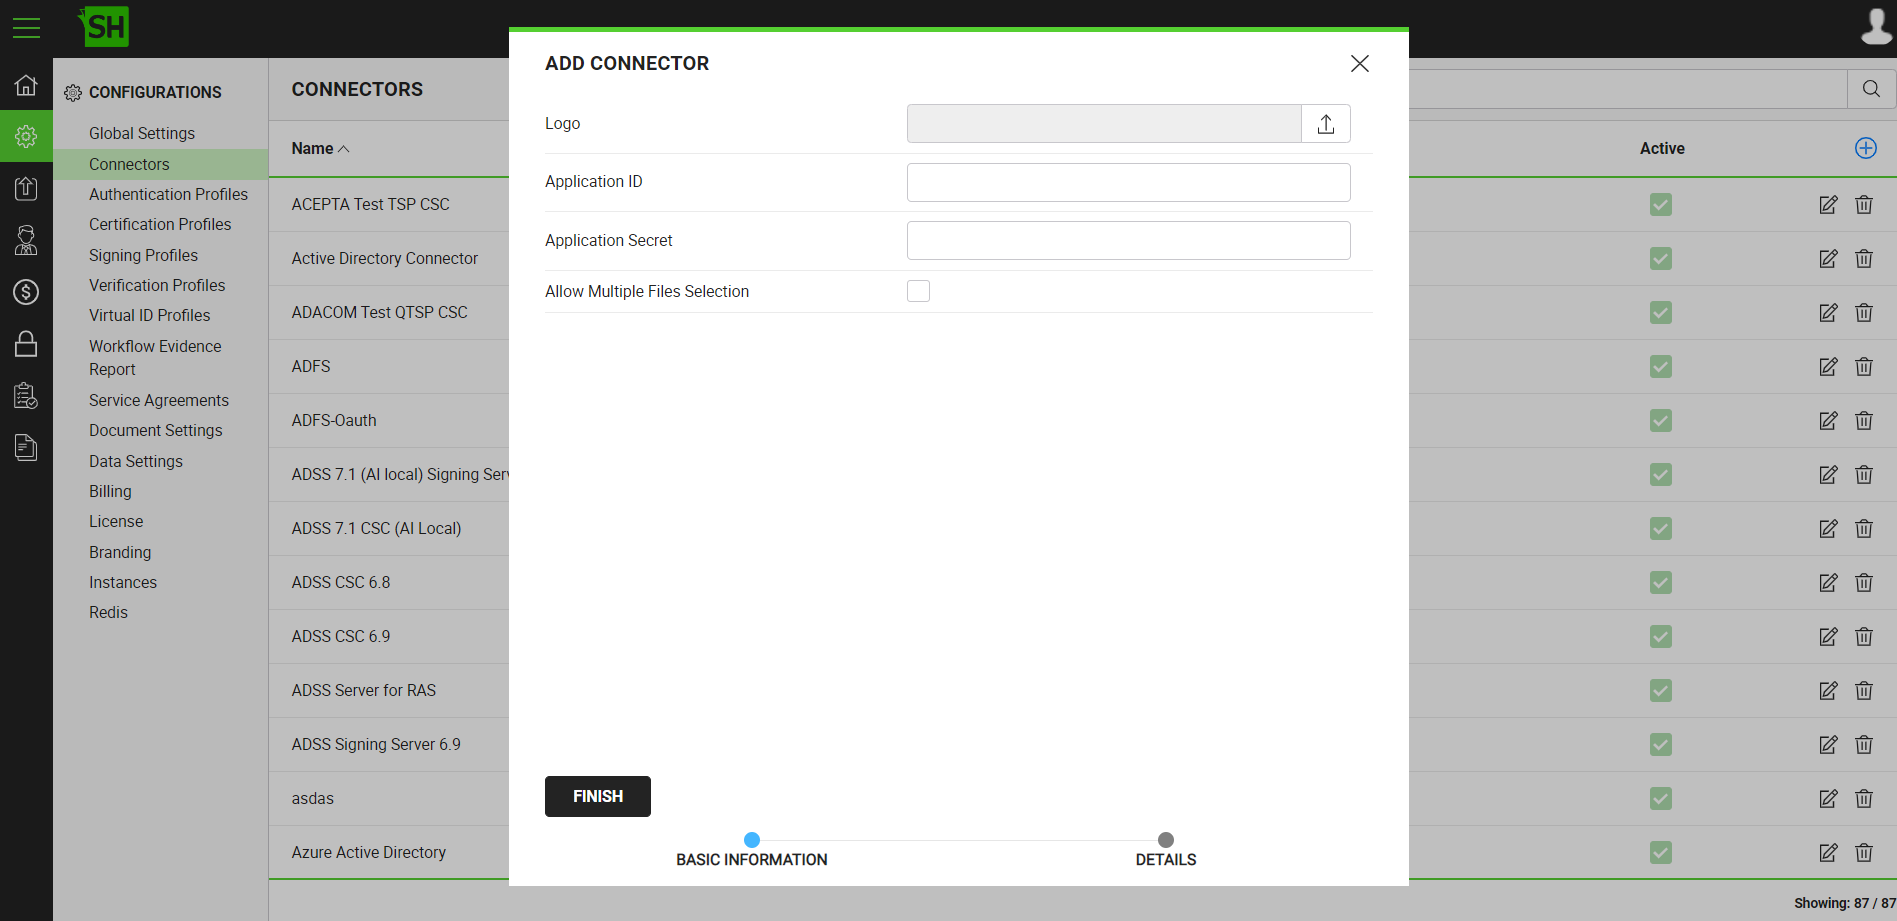
- Click the "Finish" button. A new connector will be saved and displayed in the list.
|
Basic Information |
|
|
Fields |
Description |
|
Name |
Specify a unique name for this connector, i.e. My OneDrive. This connector will be used in the configuration of Global Settings. |
|
Provider |
Select the provider for this connector, i.e. "OneDrive". |
|
Purpose |
This field will display the purpose of the selected provider above, i.e. the purpose of "OneDrive" is "Cloud Drive". |
|
Active |
Tick this check box to make this connector active. Inactive connectors cannot be configured in the Global Settings. |
|
Details |
|
|
Fields |
Description |
|
Logo |
Select an appropriate image in the jpeg, jpg, gif or png format for the connector's logo that will be displayed on the login screen. |
|
Application ID |
Specify the registered app ID that has been provided by OneDrive to connect to the OneDrive server, e.g. 6cb83478-721c-9034-8318-78a09f6ed409 |
|
Application Secret |
Specify the registered app secret that has been provided by OneDrive to connect to the OneDrive server, e.g. Os6iC59BGb8dOmh2jjLJQDM |
|
Allow Multiple Files Selection |
Tick this check box to enable the end users to import multiple files from OneDrive. |
Configure the OneDrive Connector as Default in the SigningHub Global Settings
- Click the "Configurations" option from the left menu.
- Click the "Global Settings" option.
- Global Settings will appear, select the "Default Connectors" option from the top right drop down.
- Configure these settings as required and click the "Save" button from the screen bottom.
- Select the default OneDrive connector for SigningHub Desktop Web. The selected connector will be used to pull the OneDrive content (documents) directly into SigningHub Desktop Web. The OneDrive connectors are managed through the connectors section, see details.

- Access the SigningHub Web portal.
- Click your profile drop down menu (available at the top right corner).
- Click the "My Settings" option.
- Click the "Cloud Drives" option from the left menu.
- Click the "Enable" option against the OneDrive cloud drive.
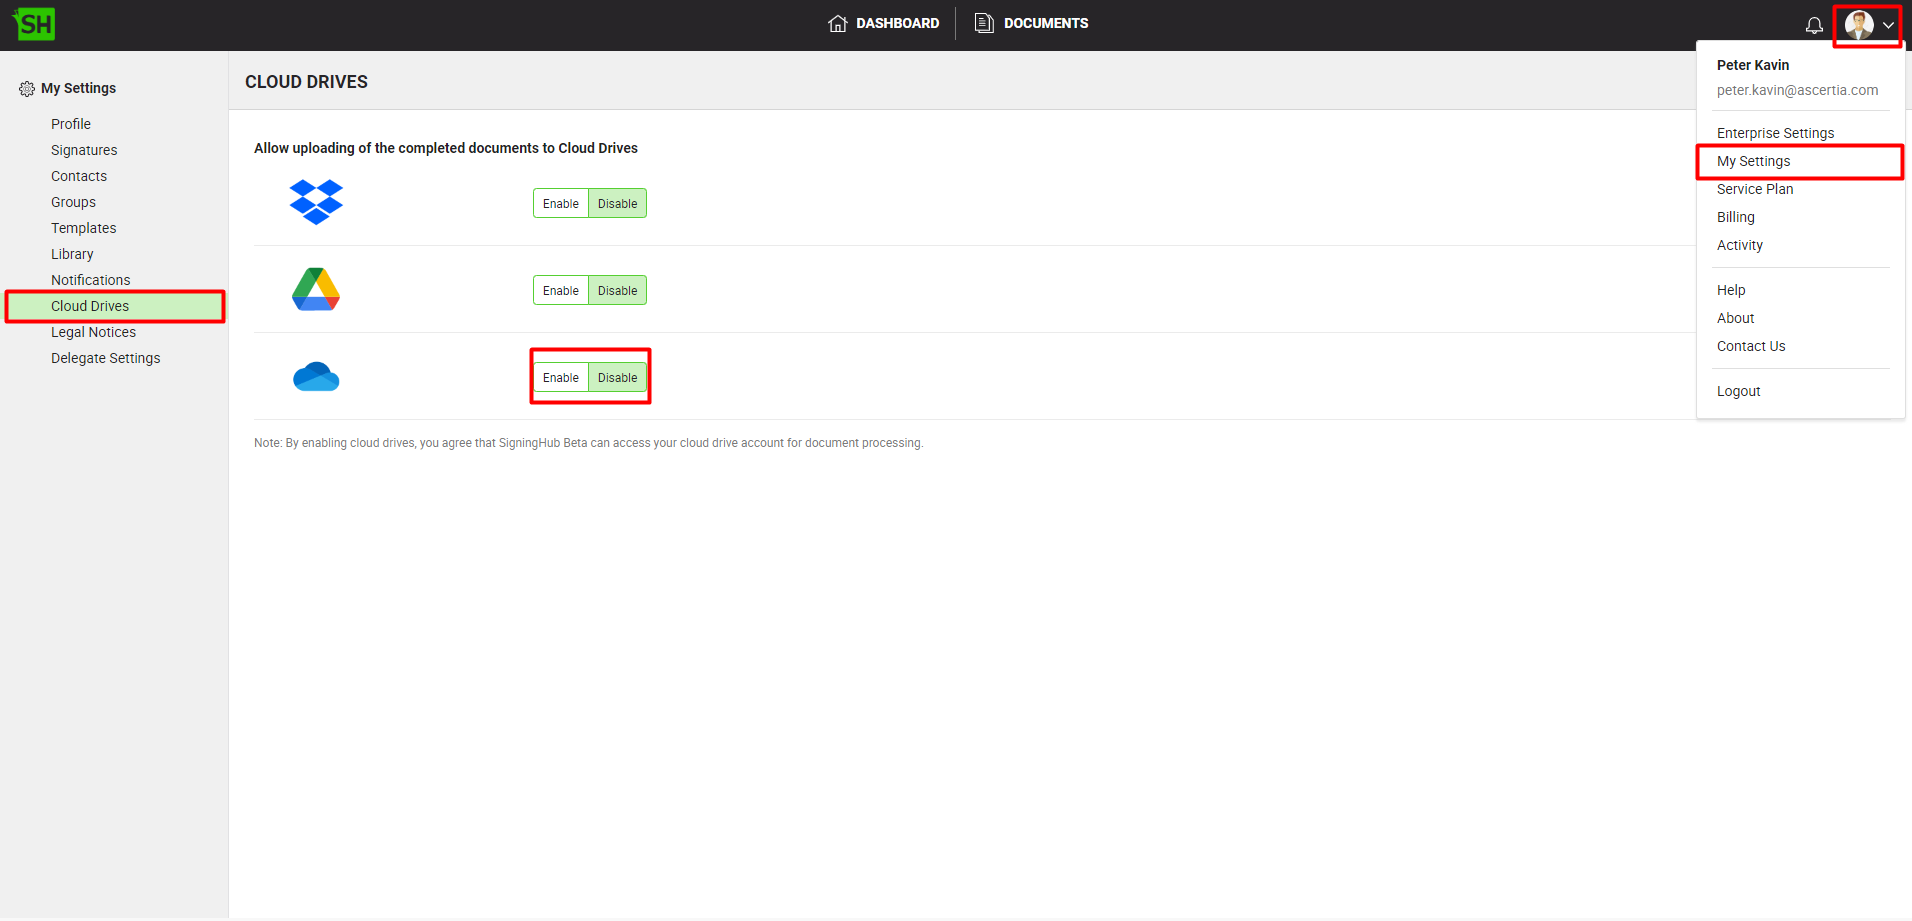
- A pop-up will appear asking for the authentication of the cloud drive. Provide your credentials and click Login.
- Upon successful authentication, the cloud drive will be enabled, and will start appearing in the Post Processing screens.
- To pull document from OneDrive, go to “Start New Workflow” and click on the OneDrive icon to upload document.
- Document will be pushed to the OneDrive account (if post processing was set during workflow) that has been configured, once a workflow will be completed.
See Also
- How to Integrate Power BI
- How to Obtain Firebase Integration Key
- How to Obtain the Azure AD Integration Key
- How to Obtain the Office 365 Integration Key
- How to Obtain a Salesforce Consumer Key
- How to Obtain the Dropbox Integration Key
- How to Obtain the Google Drive Integration Key
- How to Obtain the HubSpot Integration Key
