Add a document
SigningHub offers a wide range of custom documents that can be shared for approval/ sign off purposes. Each document is automatically converted into PDF format before it is brought to the SigningHub platform. In SigningHub v7, documents are shared in the form of a workflow package.
A package may contain different files to facilitate sharing of multiple documents in one go. It is shared collectively as a bundle, by consuming a single workflow from your available quota. A recipient/ group after receiving the package will have to sign/ edit/ approve all the documents in it to complete their collaboration part.
When using an on-premises deployment, please ensure that the font(s) being used in a document, must be installed on your server machine where SigningHub has been deployed.
Supported documents
See details.
There are three different ways to add a document in a workflow package:
- Upload a document from your local machine.
- Import a document from SigningHub library. The Library contains your personal documents (and your enterprise documents in case you are an enterprise user).
- Get a document directly from your cloud storage.
- Get it from your Dropbox account, or
- Get it from your Google Drive, or
- Get it from your OneDrive.
Add a document from your local machine
After you have selected an appropriate variant from "New Workflow" button:
- Click
 and upload a document by browsing it on your local machine. Or

- You may locate a document on your local machine, and drag and drop it directly onto the "Add Documents" area.
The document(s) will be added in a package for further processing.
Add a document from your SigningHub library
After you have selected an appropriate variant from "New Workflow" button:
- Click
 and import a document from SigningHub library.

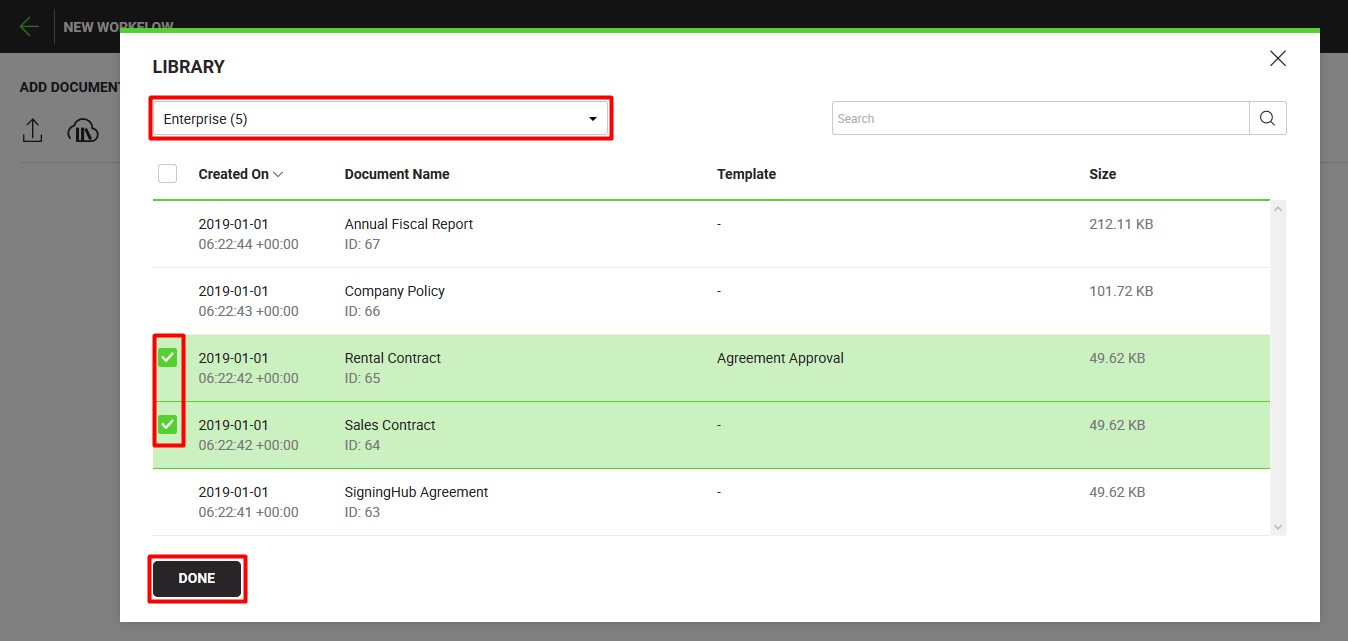
- The "Library" dialog will appear, giving you the options to list of your personal documents (and your enterprise documents, in case you are an enterprise user). The document with a configured template will be showing the template name adjacent to it. Selecting such a document will apply the template details on the document automatically.
Select the "All", "Personal" or "Enterprise" option to list the respective documents for selection. The adjacent count shows the respective number of documents available under each option.

- Locate and select the required document(s) from the list and click "Done".
The document(s) will be added in a package for further processing.
Add a document from your Google Drive
After you have selected an appropriate variant from "New Workflow" button:
- Click
 and specify your Google credentials (ID & password) in the next appearing popup to log into your Google account.

- SigningHub will display the list of your Google documents after the successful login. Locate and select the required document(s) from the list. Use Ctrl+click to select multiple documents.
- Click the "Select" button to bring the selected documents into SigningHub.
The document(s) will be added in a package for further processing.
Add a document from your Dropbox account
After you have selected an appropriate variant from "New Workflow" button:
- Click
 and specify your Dropbox credentials (ID & password) in the next appearing popup to log into your Dropbox account.

- SigningHub will display the list of your Dropbox documents after the successful login. Locate and select the required document(s) from the list.
- Click the "Choose" button to bring the selected documents into SigningHub.
The document(s) will be added in a package for further processing.
Add a document from your OneDrive account
After you have selected an appropriate variant from "New Workflow" button:
- Click
 and specify your OneDrive credentials (ID & password) in the next appearing popup to log into your OneDrive account.

- SigningHub will display the list of your OneDrive documents after the successful login. Locate and select the required document(s) from the list.
- Click the "Select" button to bring the selected documents into SigningHub.
The document(s) will be added in a package for further processing.
Change the documents order in a package
By default the documents are added serially in a documents package. However, you can change their order in the package after adding them, according to your workflow requirements. To change the documents order:
- Simply drag and drop
 adjacent to any added document and move it up/ down in the package, as required.
When the workflow is triggered, the recipients will receive this documents package in the same order.

Merge the added documents
You can also merge your documents after adding them in a package. In this way all the added documents will be fused together as a single PDF. The dimensions of the documents (being merged) should be the same, however SigningHub allows up to 5 pixels difference.
To merge the package documents:
- Click
 after adding the documents in a package.
 - A confirmation message will appear, click the "Yes" button.
All the added documents will be merged.

|
|
|
See Also
- New workflow button
- Add recipient(s) and placeholder(s)
- Configure workflow type
- Configure special privileges
- Add email message
- Add comments
- Add attachments
- Merge documents
- Add data fields
- Save your configurations in a template
- Apply a template on your document(s)
- Change a recipient/ placeholder after sharing

