Configure workflow type
Once you are done with adding the documents, recipients and placeholders, you need to define the order in which your workflow should proceed. SigningHub supports four different types of a workflow, see the following table for details:
|
Workflow Types |
|
|
Roles |
Description |
|
Serial |
In a serial workflow, a single copy of document is circulated among all the recipients in a defined (linear sequential) order, and collects all signatures on it. Each recipient has to wait for their turn to process the document. Tick the "Continue workflow on decline" option, if you want the serial workflow to continue even when any recipient declines/ deletes the document. |
|
Parallel |
In a parallel workflow, a single copy of document is circulated among all the recipients at the same time (i.e. in a parallel order), and collects all signatures on it. The recipients can process the document in any order. Tick the "Continue workflow on decline" option, if you want the parallel workflow to continue even when any recipient declines/ deletes the document. |
|
Individual |
In an individual workflow, an exclusive copy of document is sent to each recipient for processing. In this case multiple signed copies of the document are produced. |
|
Custom |
In a custom workflow, a single copy of document is circulated among all the recipients in a choice order, and collects all the signatures on it. You can set a combination of serial and parallel signing orders in a custom workflow. The recipients will have to process the document accordingly. Tick the "Continue workflow on decline" option, if you want the custom workflow to continue even when any recipient declines/ deletes the document. See the details of custom workflow below. |
Define workflow type
After you have:
- Added the documents, and
- Added all the recipients and placeholders in a workflow package:
- Choose the required workflow type, i.e. Serial, Parallel, Individual, or Custom. The default workflow type as defined in your role is selected.

- Click the adjacent
 and select the "Continue Workflow on Decline" option as required, in case of a Serial, Parallel, or Custom type. See the "Workflow Types" table above for details.

- Click the "Save" button.
Custom Workflow
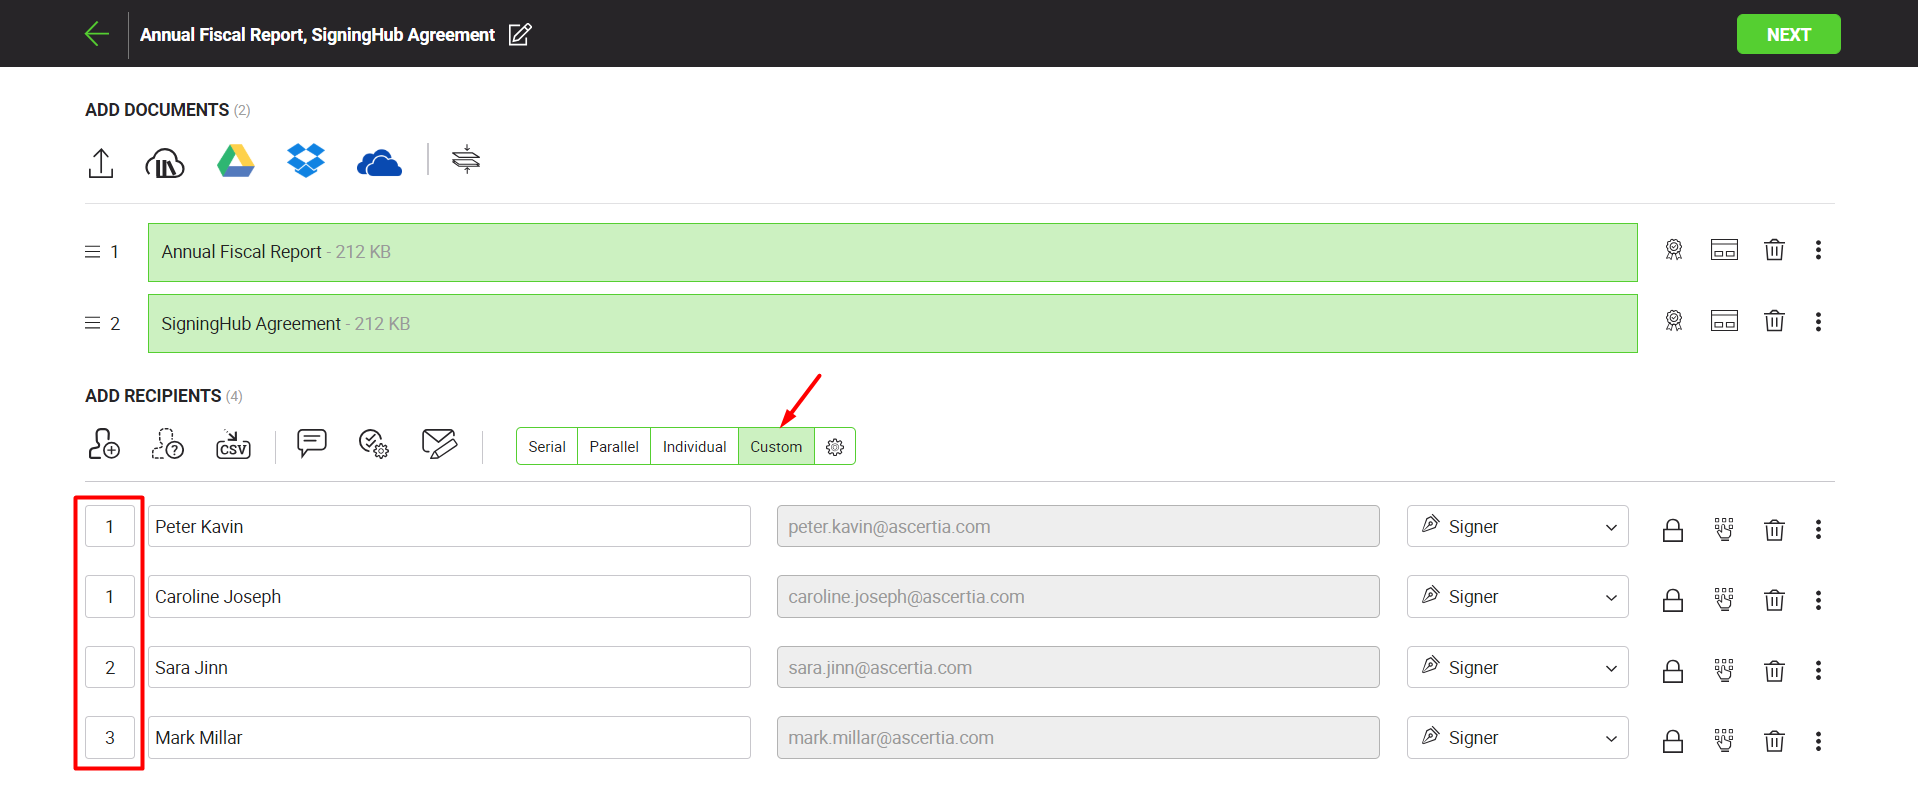
As defined above, a custom workflow can be a combination of serial and parallel workflows. It is triggered on the basis of specified signing order(s), see the red highlighted area in the below image. You can only provide a positive integer, which may or may not be in incremental order, e.g. 1, 2, 2, 3, 4, 4, 5 or 1, 2, 3, 3, 3 etc. The same numbers imply that signing order is parallel, while incremental numbers imply that signing order is serial.

In the above mentioned example:
- Firstly, Peter and Caroline will receive these documents together in parallel order, as both these recipients are available at the signing order 1.
- The documents will not be shared with the next recipient (i.e. Sara) until both recipients (i.e. Peter and Caroline) complete their actions.
- After that these documents will be shared in serial order with Sara and Mark, as they are available at the signing order 2 and 3 respectively.
- The workflow will be marked as Completed when Mark signs the documents.
|
|
After configuring the workflow type, proceed to the Configure special privileges phase. |
See Also
- New workflow button
- Add a document
- Add recipient(s) and placeholder(s)
- Configure special privileges
- Add email message
- Add comments
- Add attachments
- Merge documents
- Add data fields
- Save your configurations in a template
- Apply a template on your document(s)
- Change a recipient/ placeholder after sharing

