Add recipient(s) and placeholder(s)
After you have added all the documents in a workflow package, its time to add the users with whom you want to share the document(s) for sign off. There are two types of users to whom you can send a document, i.e. Recipient and Placeholder.
Each type of user is assigned a definite role in a workflow, see the following table for details:
|
User Roles |
|
|
Roles |
Description |
|
Document Signer |
Being a signer, the recipient/ placeholder needs to sign a document. As per the workflow configuration, this signature can either be electronic or digital. After signing in the assigned signature field, a signer has to click the "Close" button to complete the document signing. Alternatively they may use the "Decline" option to refuse it, or use the "Delegated" option to assign their role to someone else. |
|
Document Reviewer |
Being a reviewer, the recipient/ placeholder needs to approve a document by clicking the "Approve" button. Alternatively s/he may use the "Decline" option to refuse it, or use the "Delegated" option to assign their role to someone else. Reviewing does not involve any signing activity. Moreover, a reviewer should also fill in the assigned form fields, and/ or initials (if any) before reviewing. |
|
Document Editor |
Being an editor, the recipient/ placeholder needs to update a document by clicking the "Submit" button. Alternatively s/he may use the "Decline" option to refuse it, or use the "Delegated" option to assign their role to someone else. Editing does not involve any signing activity. An editor should also fill in the assigned form fields, and/ or initials (if any) before updating. |
|
Meeting Host |
Being a meeting host, the recipient/ placeholder needs to facilitate the document signing process for the configured in-person signers. A host can give his/her device control to the (in-person) signers, and get their signatures in his/her presence. After getting all the signatures, a meeting host has to click the "Close" button to complete the document hosting. Alternatively they may use the "Decline" option to refuse it, or use the "Delegated" option to assign their role to someone else. |
|
Send a Copy |
When the "Send a Copy" role is selected for a recipient, SigningHub emails the most recent copy (at that stage of workflow) of document to the recipient as an email attachment. The document copy is auto sent (on its turn) and does not require any human intervention. |
Add a recipient manually
As you add a document in a workflow package, the "Add Recipients" area will appear:
- Click
 and specify the recipient name or their National ID in the provided field. As you type in, your (related) personal contacts/ groups (and enterprise contacts/ groups in case you are an enterprise user) will appear for selection. Select a recipient and their email address will be automatically populated in the adjacent field.
In case your intended recipient does not have a SigningHub account (i.e. guest user), specify their name and email address in the provided fields accordingly.
For a document owner who is a part of any enterprise, and looking to add a guest user as document recipient, must have the "Restrict Delegated Signing to only registered users" option un-selected in their assigned role.
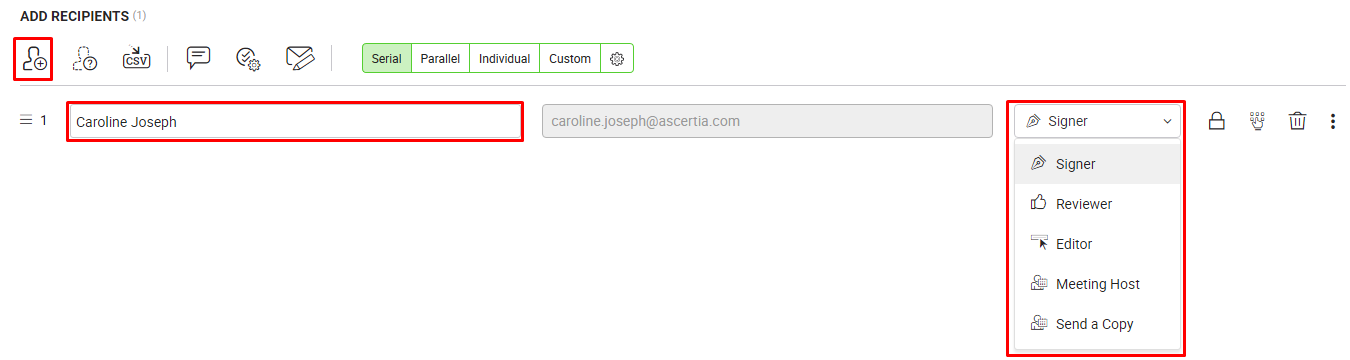
- Assign a role to the recipient from the immediate next drop down, i.e. Signer, Reviewer, Editor, Meeting Host, or Send a Copy. See the above "User Roles" table for details.
- Repeat the above two steps to add multiple recipients.
Add recipients through a CSV file
You can also add recipients through a CSV file. The file must have the valid email addresses of each recipient. SigningHub supports three different types of email headers: Primary Email, E-mail Address, and Email Address, to read the email address from the CSV file. This is a smart way for a document owner to add multiple recipients in a workflow through a single click.
- Click
 . A dialog will appear, click
  to locate and select the required CSV from your system.

- All the recipients inside the CSV (with valid email addresses) will be listed in a dialog box for selection. Select your choice recipient(s) and click the "Add" button.
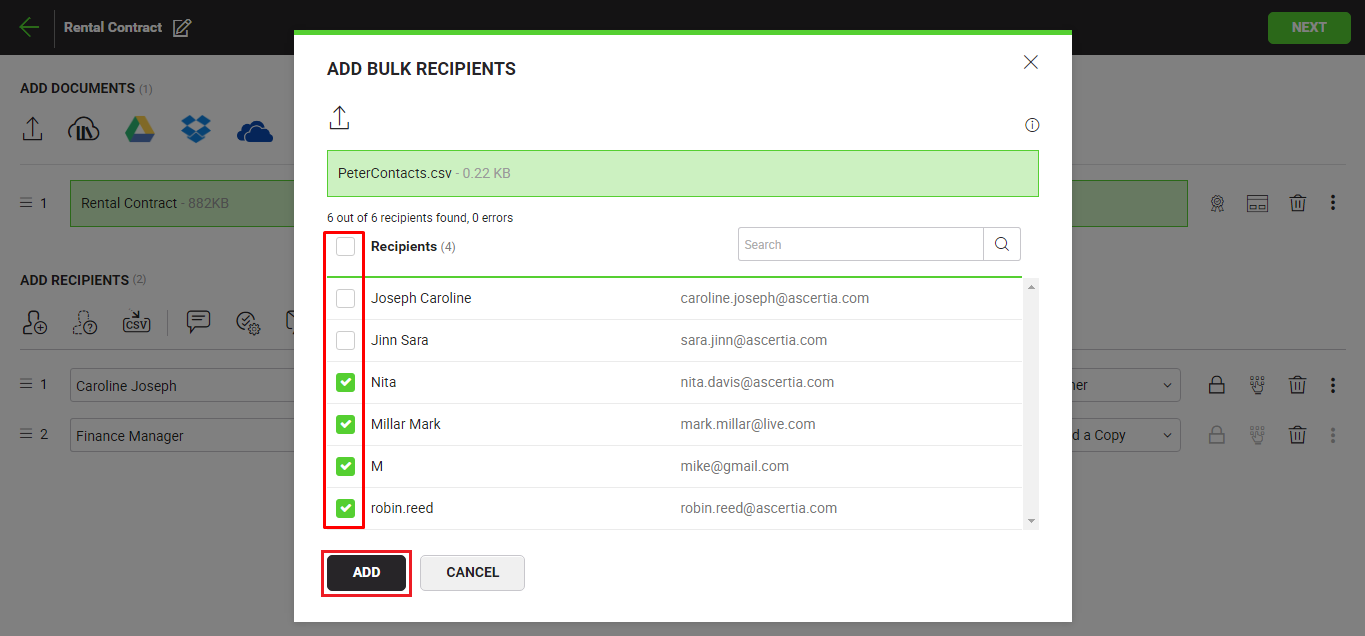
- The selected contacts will be added in the workflow recipients list. Now assign a role to each recipient from the immediate next drop down, i.e. Signer, Reviewer, Editor, Meeting Host, or Send a Copy. See the above "User Roles" table for details.
Add a placeholder
You can also add placeholder(s) in a workflow. To do this:
- Click
 and specify the placeholder name.
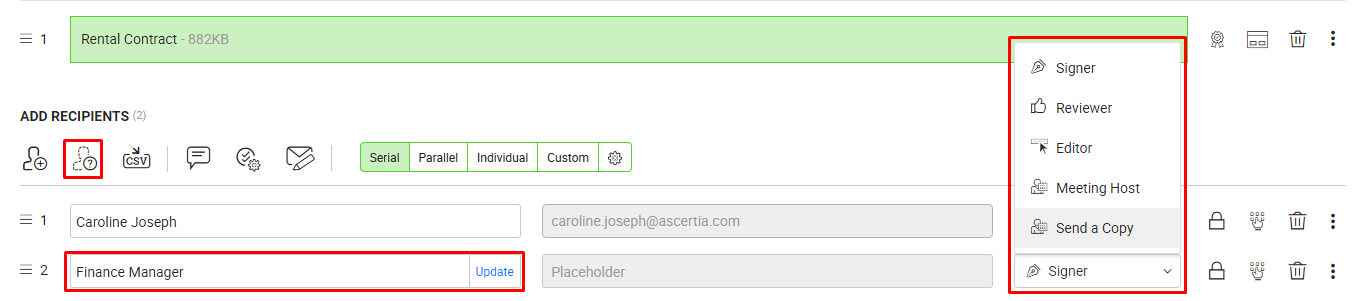
- Assign a role to the placeholder from the provided drop down, i.e. Signer, Reviewer, Editor, Meeting Host, or Send a Copy. See the above "User Roles" table for details.
- Repeat the above two steps to add multiple placeholders.
Delete a recipient/ placeholder
- Click
 against the recipient/ placeholder, which you want to delete from the list.

Change the recipients/ placeholders sequence
By default all the recipients and placeholders are added serially in a workflow. However, you can change their collaboration sequence after adding them, according to your document(s) approval flow. The set sequence is applicable to the serial workflows only. To change the sequence:
- Simply drag and drop
 adjacent to your desired recipient/ placeholder and move it up/ down in the list, as required.
When the workflow is triggered, SigningHub will execute the signing process according to the set sequence.

|
|
|
