SigningHub allows the installation of its multiple (load-balanced) instances with an existing installation.
This is useful to meet the modern computing requirements that involves but not limited to efficiently managing concurrent requests from clients, and distributing incoming network traffic across a group of back-end servers.
When you install SigningHub as a load-balanced instance through SigningHub installer, an entry is created in SigningHub database for each SigningHub instance along with its specific machine IP and URL. All the installed instances are then listed in SigningHub Admin, where an admin operator can monitor their current status and modify their machine name or service address as required. Hence providing a smart way of publishing the changes on all the SigningHub instances by using a single interface.
In this way, SigningHub is configured as a High Availability service, as the network load is automatically shared across multiple servers in a fast and reliable manner.
Configure your SigningHub instances
This is useful to meet the modern computing requirements that involves but not limited to efficiently managing concurrent requests from clients, and distributing incoming network traffic across a group of back-end servers.
When you install SigningHub as a load-balanced instance through SigningHub installer, an entry is created in SigningHub database for each SigningHub instance along with its specific machine IP and URL. All the installed instances are then listed in SigningHub Admin, where an admin operator can monitor their current status and modify their machine name or service address as required. Hence providing a smart way of publishing the changes on all the SigningHub instances by using a single interface.
In this way, SigningHub is configured as a High Availability service, as the network load is automatically shared across multiple servers in a fast and reliable manner.
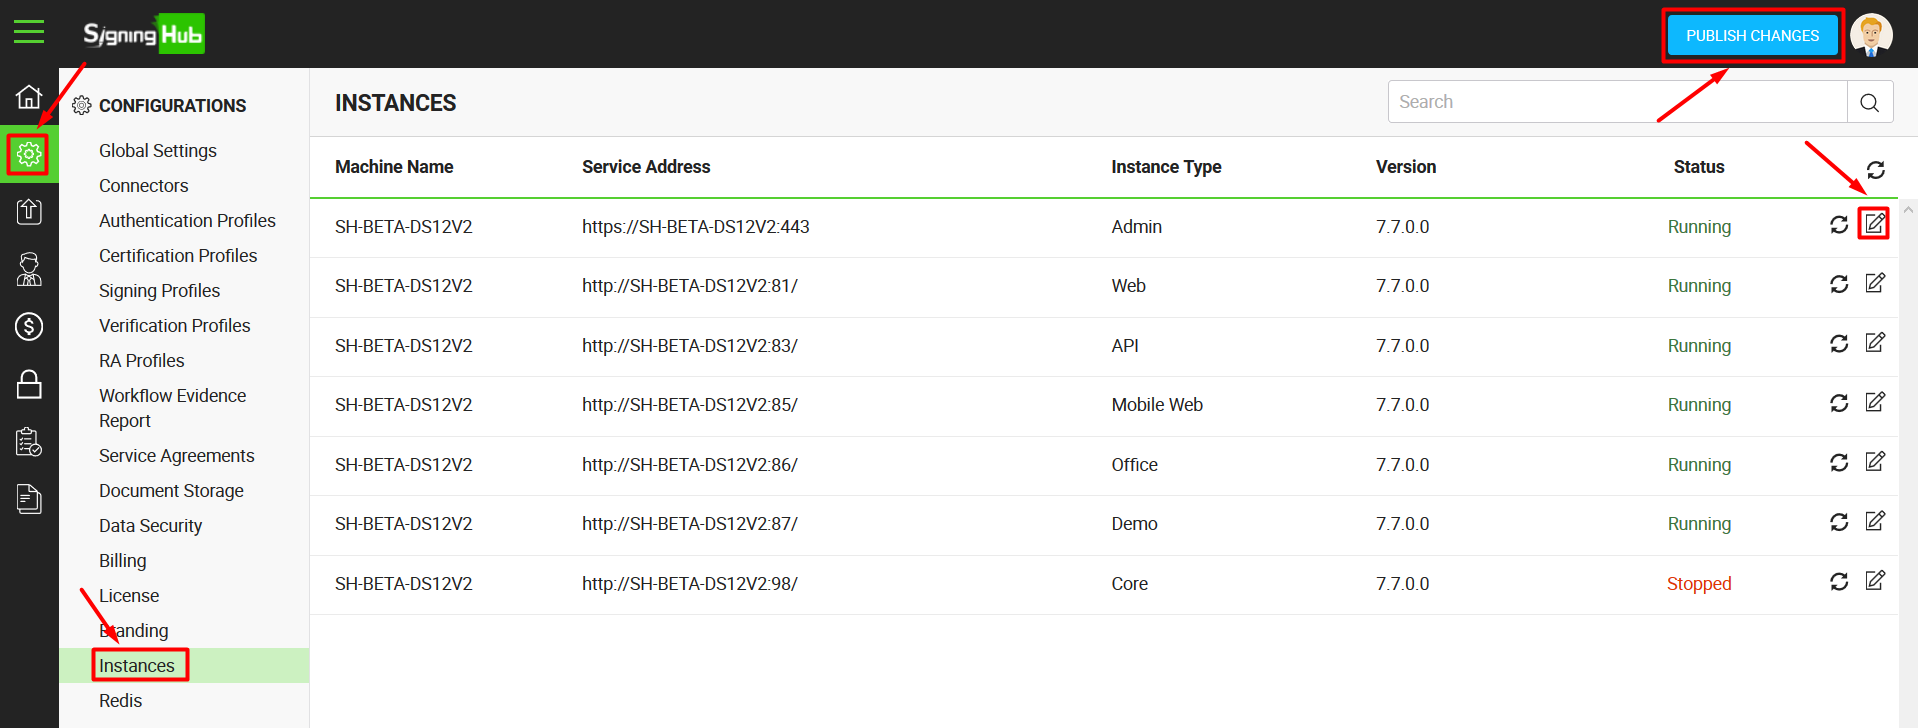
- Click the "Configurations" option from the left menu.
- Click the "Instances" option.
The Instances screen will appear listing all the installed instances of SigningHub along with their respective details, i.e.:- Machine Name to display the machine name/ IP on which an instance is installed.
- Service Address to display the internal URL and port number of an installed instance.
- Instance Type to display the type of an installed instance, i.e. Admin, Web, API, Core, etc.
- Version to display the SigningHub version of an installed instance.
- Status to display the current status of an installed instance, i.e. Running or Stopped.
- Click
 from the grid header to refresh the status of all the running instances. In case you want to refresh an individual instance, click adjacent to it.
 - Click
 adjacent to an instance to edit its Machine Name and Service Address.
 - Click the "Publish Changes" button from the top right corner, to make these configurations effective.
A dialog will appear to show the instances on which the specified changes have been successfully published. Please note that the changes are published only against the Core, Web and Admin instances.