Creating CSR/Certificates
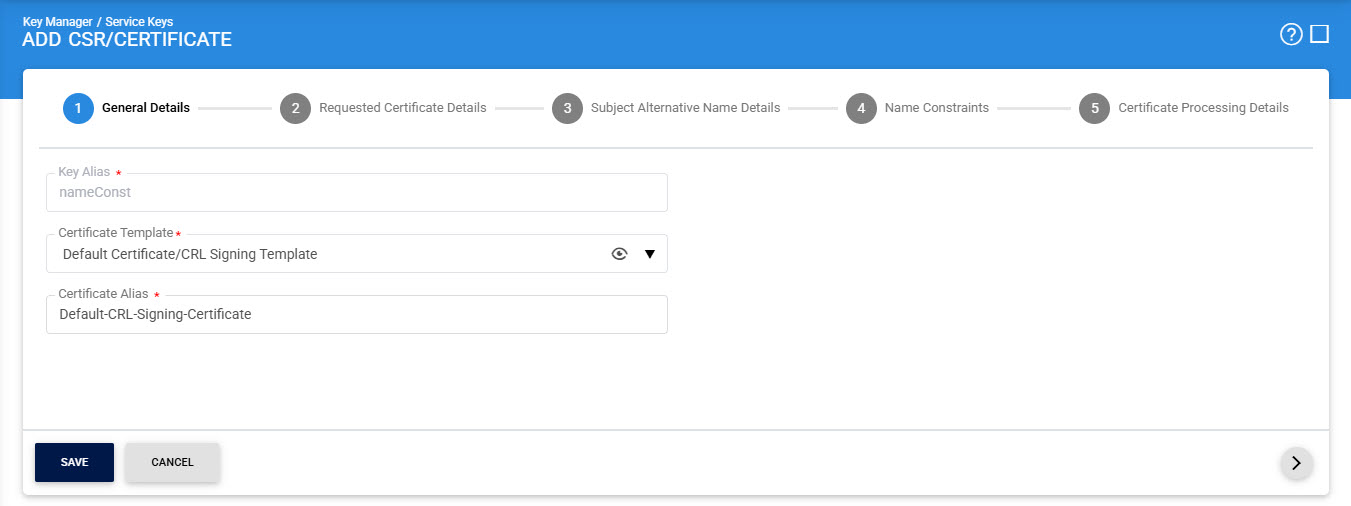
Key can be certified (Delegated/Self-Signed) by clicking the Create CSR/Certificates button on the Key Manager > Service Keys > Certificates screen as shown below:
|
|
When selecting a certificate template, users should be aware that the Unity Console has limited support for configurations related to ePassport-type certificates. It is important to consider this limitation to ensure compatibility and proper functionality when working with such certificate types. |
Once the the General Details of the certificate are filled, clicking on the Next Arrow (>) will display the subject distinguished names (SDNs) on the Requested Certificate Details screen:
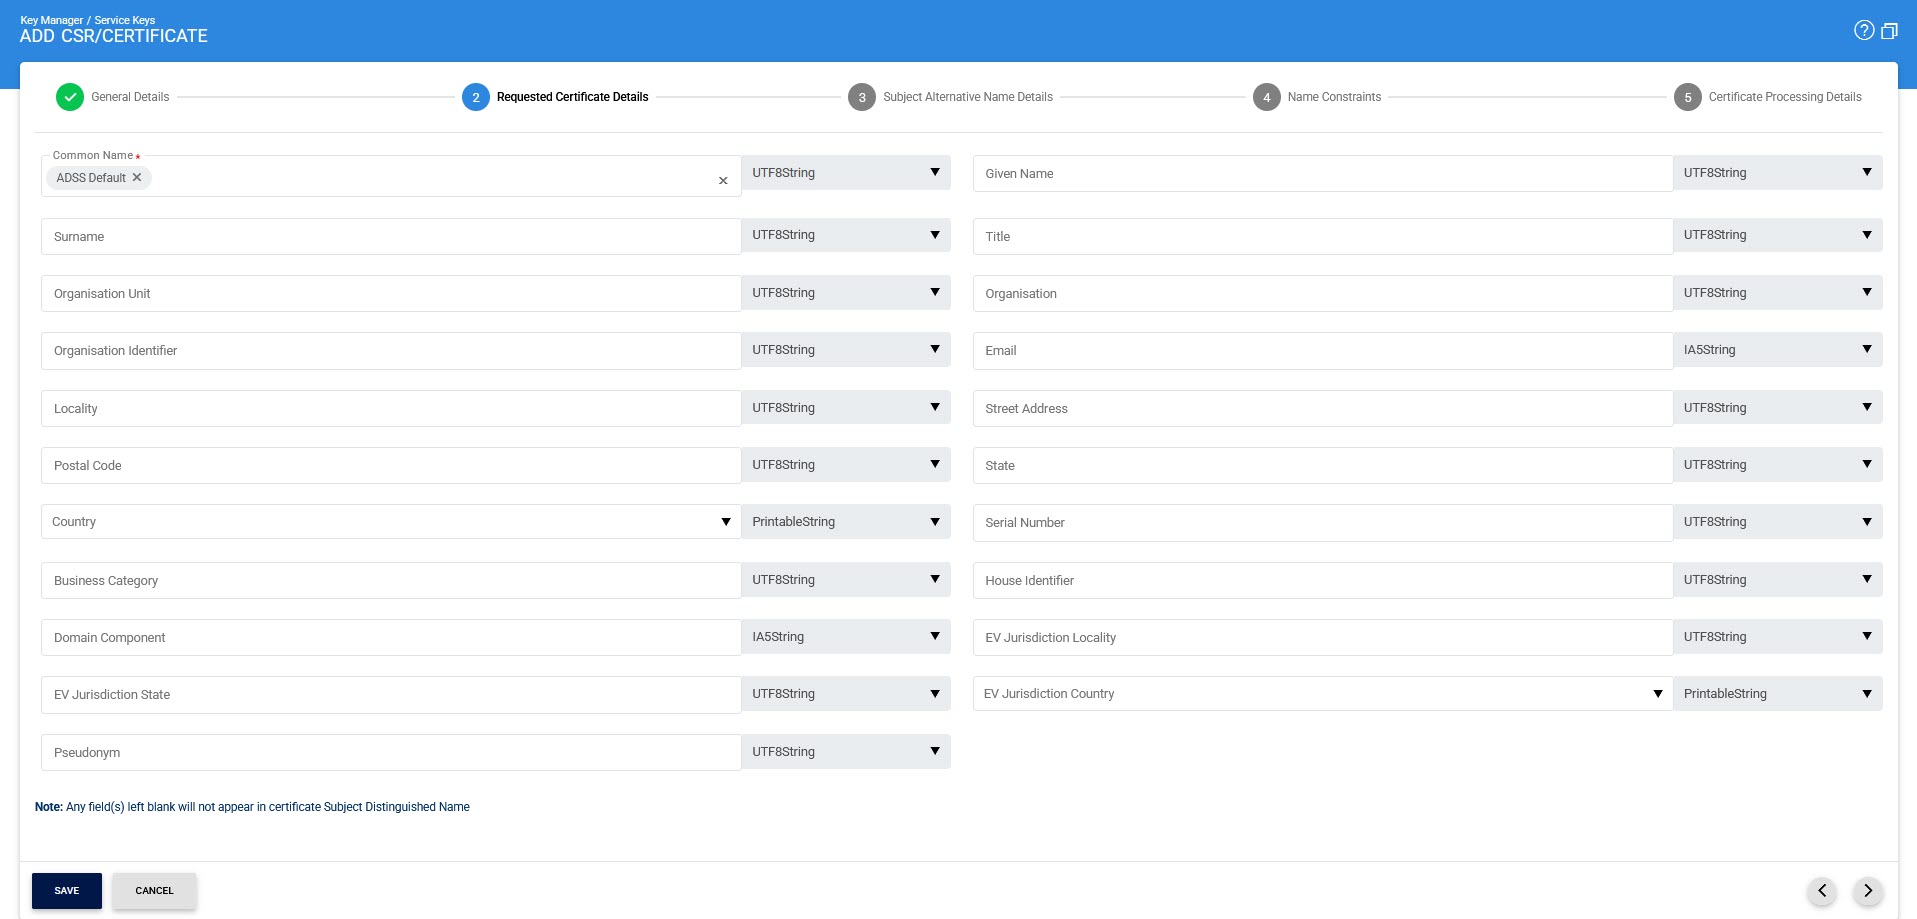
Here, the ADSS Server operator can configure the encoding format used for the certificate Subject Distinguished Name (SDN) for each supported SDN field individually. For every SDN field, a drop-down menu is provided, making it easy to select the required encoding type.
The following encoding options are available:
- UTF8String
- PrintableString
- TeletexString
- UniversalString
- BmpString
|
|
By default, UTF8String encoding is selected for all SDN fields. However, for the Email and Domain Component fields, the drop-down menu automatically selects IA5String encoding. Similarly, for the Country and EV Jurisdiction Country fields, PrintableString encoding is selected by default. |
Once the required Certificate Details are filled, clicking on the Next Arrow (>) will display the Subject Alternative Name Details screen:
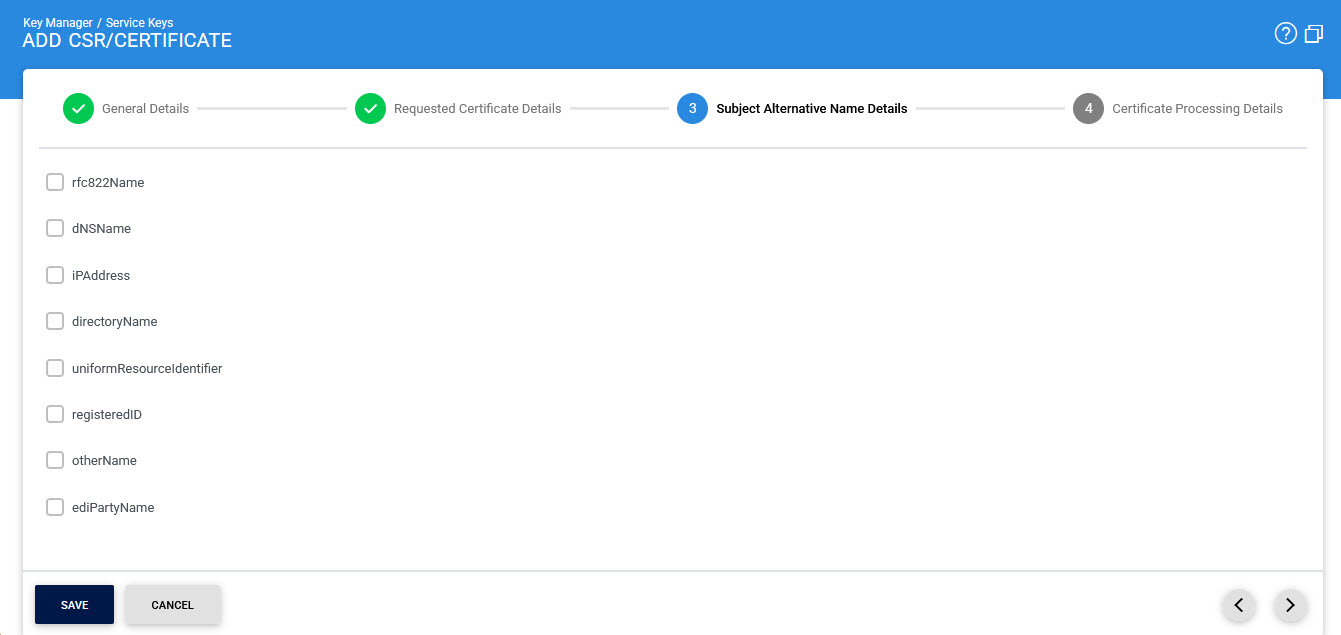
Once the required Subject Alternative Name Details are filled, clicking on the Next Arrow (>) will display the Name Constraints screen:
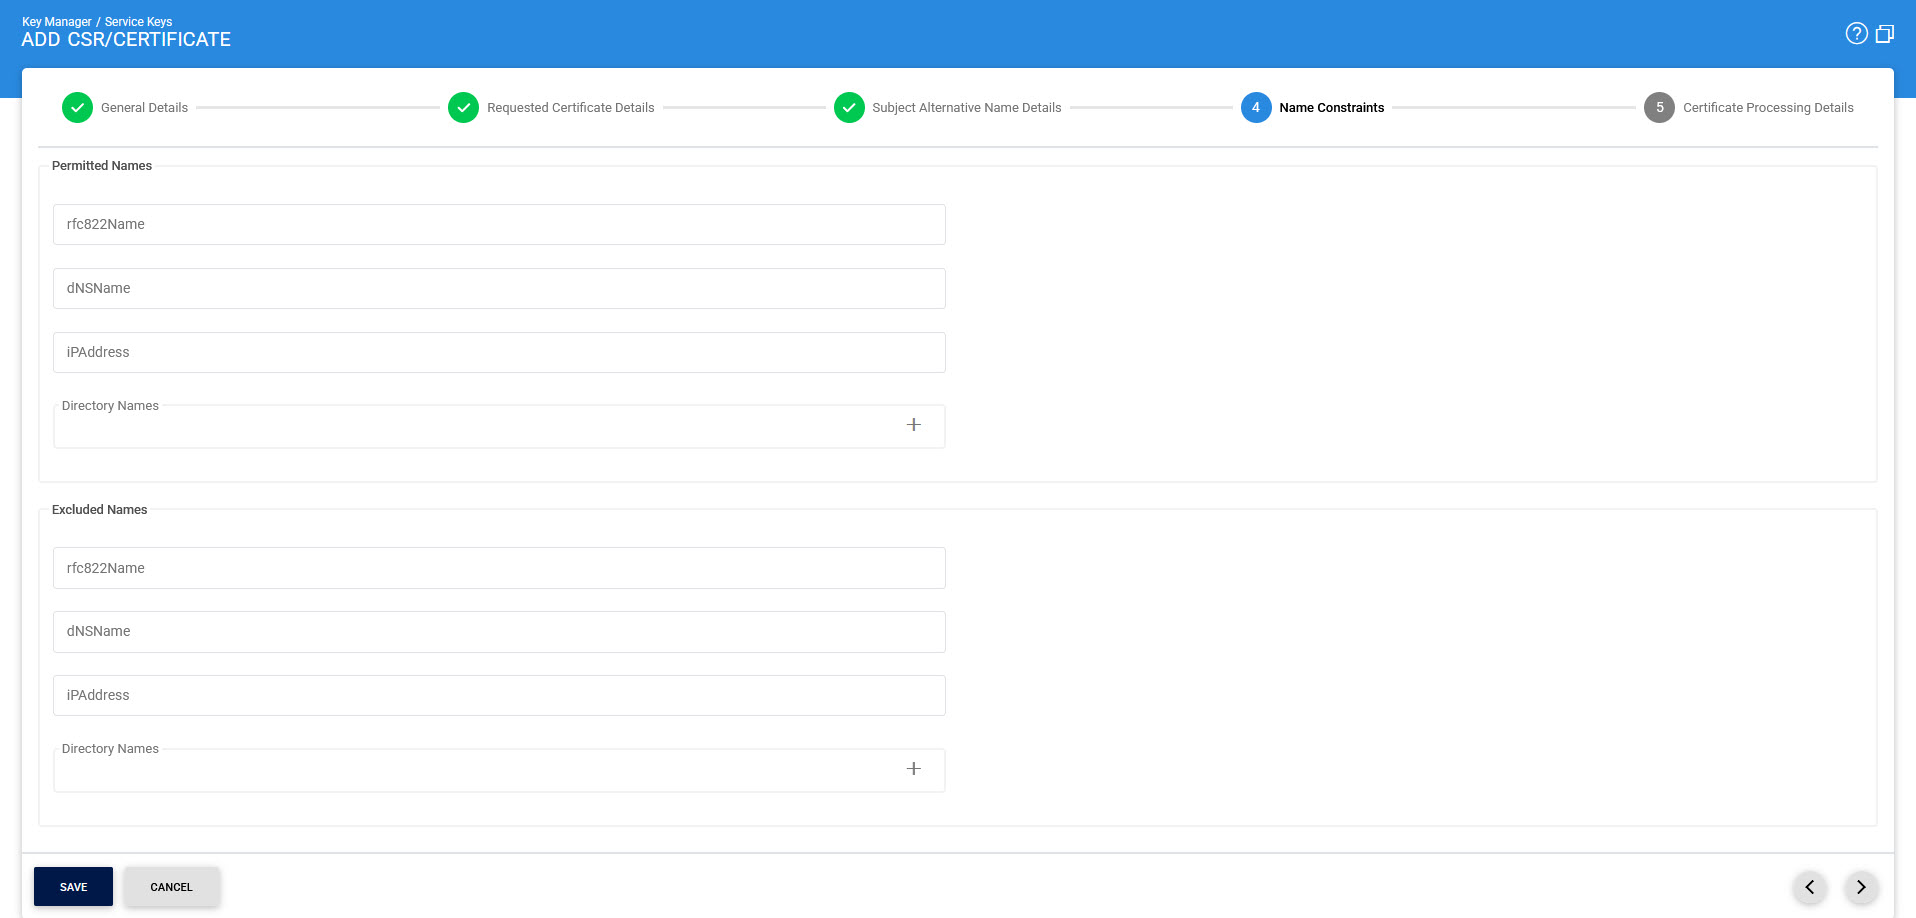
Once the required Name Constraints are filled, clicking on the Next Arrow (>) will display the Certificate Processing Details screen:

Once the required details are filled, click on the Save button to save the changes.
The details of the above configurations are as follows:
|
Items |
Description |
||||||||||
|
Key Alias |
Displays the name of the key pair to be certified. |
||||||||||
|
Certificate Template |
Displays the purpose defined for the key pair within ADSS Server. |
||||||||||
|
Certificate Alias |
Defines a unique internal name for the certificate (referred to as an alias)
|
||||||||||
|
Distinguish Name |
Select the Distinguished Name (DN) to be entered as the Subject name of the certificate (the fields Common Name through to Serial Number). Note, a default value for Distinguished Name can be set using the Key Manager menu item Default DName. Note: If the user selects one of the following key purposes:
Then, the below RDNs will be available:
|
||||||||||
|
Subject Alternative Name (SAN) |
Provide the subject alternative name if you wish to add SAN extension in the certificate. You can add as many SANs as required by clicking the + button. rfc822Name, dNSName, iPAddress, directoryName, uniformResourceIdentifier, registeredID, otherName and ediPartyName as subject alternative name can be configured via console. All the SANs can be configured via console by simply adding their respective values against the given fields. However in case of directoryName, click on the 'Add' button, the following screen would be displayed:
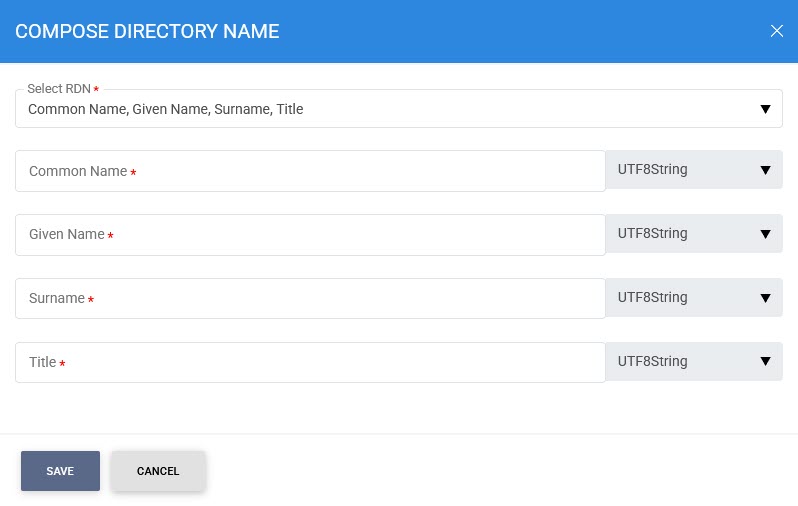
Choose the required RDN from the drop-down list and set it's value in corresponding field respectively. For example, here we have selected 'Common Name', 'Given Name', 'Surname', and 'Title' as our required RDN. Here, the ADSS Server operator can configure the encoding format used for each supported RDN field individually. For every selected RDN field, a drop-down menu is provided, making it easy to select the required encoding type. The following encoding options are available:
The user can add multiple RDNs in the directoryName by clicking on the Add button. List of supported RDNs are mentioned below:
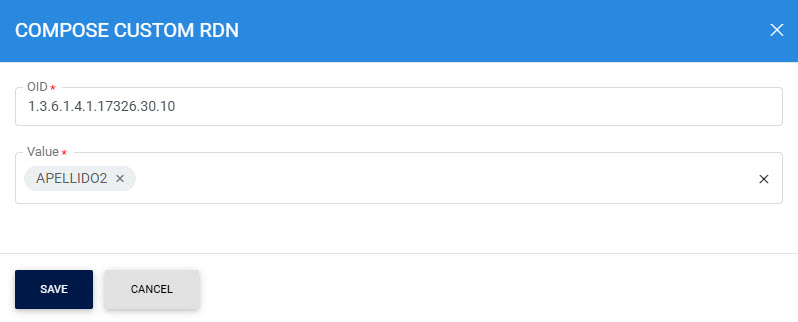
ADSS Server also supports Custom RDNs, allowing users to enter an OID along with its corresponding value. Once this information is entered, it will be included in the directoryName attribute.
Click on the '+' button to add the Custom RDN, it displays the following screen:
Once this information is entered, click on the Save button, it will be included in the directoryName attribute.
|
||||||||||
|
Name Constraints |
The Name constraint section will only be visible if it was enabled while creating the respective certificate template. The Name Constraint extension is used in CA certificates which specifies those constraints which will apply on Subject DN and Subject Alternative Names of subsequent certificates in CA path. These Constraints can be applied in the form of Permitted and Excluded name list , where at least one list i.e. permitted or excluded must be present in the extension.
If a constraint is stated in permitted names list, the subsequent certificates should comply with this list and must contain only those names in their Subject DN and Subject Alternative Name (SAN) which are permitted. Following options are available in Permitted Name List.
Excluded Names: If a constraint is stated in excluded names list, then the subsequent certificates must not have those names in their Subject DN and Subject Alternative Name (SAN). Following options are available in Excluded Name List.
|
||||||||||
|
Certificate Processing Details |
1. Use Local CA: Select this radio button if the ADSS Local CA module is to generate the certificate. In this case Key Manager will automatically communicate with the ADSS Local CA and the certificate will be issued and imported within Key Manager without further manual intervention. Ensure the ADSS Server Local CA module is configured and ready to accept requests (see the Manage CAs Service module for further details).
Use this option to use an external CA for certifying the PKCS#10. Select the CA to use from the drop-down menu. If “Offline CA” is selected then the PKCS#10 can be saved as a file. This file should be presented to the offline CA. Later, after the certificate has been generated by the required CA, it can be imported back into ADSS Server as a file using the Import Certificate button. Alternatively if a CA is configured such that ADSS Server can communicate online in an automatic way (via the ADSS Certification Service module) then these will also be shown in the drop-down menu. In this case ADSS Key Manager will send the PKCS#10 request automatically to the online CA and wait for the certificate response in a synchronous session.
|
||||||||||
|
Use Auto Renewal |
This option is only available if you are using a Local CA module. It allows the auto-renewal of the certificate at the time of expiry of the original certificate. Note the public key remains the same as in the original cert. This is a useful option in case you want to use “short-lived” certificates but wish to avoid the overhead of generating new certificates manually. |
||||||||||
|
CDP Address (HTTP/LDAP) |
The CDP Address field will be displayed to the user only when 'Create Self-Signed Certificate' is selected from the 'Use CA' dropdown menu, and the CDP extension is enabled in the selected certificate template. |
|
|
A certificate can include multiple Relative Distinguished Names (RDNs) of the same type. To add additional RDNs, simply click the '+' button next to each Distinguished Name (DN) field. Please note that the DN Serial Number field does not represent the certificate’s serial number. Instead, it is a customizable field that organizations may use for various purposes, for example, to store a device’s serial number. |
See also
Importing Certificates
Exporting Keys/ Certificates
Searching Certificates


