User Registration
In this section, learn about the end to end user flow for user registration in ADSS Web RA Server through Citizen ID / email ID.
An administrator will follow the steps mentioned below to enable user registration via citizen ID.
- Create a Connector
- Create an Authentication Profile
- Create a Certification Profile
- Create a Service Plan
- Create an Enterprise & configure Service Plan to it
- Configure Default Settings for User Registration
- Configure Login Authentications in Enterprise Role (Claims Mapping)
- Registration/sign-up and login from ADSS Web RA Server Web Portal
- Once you have performed the above configurations, now you can perform the following actions from Virtual ID:
- View Certificate
- Download Certificate
- Provision Certificate
- Delete Certificate
- Revoke Certificate
- Renew Certificate
- Rekey Certificate
- More Actions (Reissue Certificate)
- You can also perform the following actions from SigningHub:
- View Certificate
- Download Certificate
- Provision Certificate
- Delete Certificate
Create an OIDC Connector
OpenID Connect (OIDC) is an open authentication protocol, built upon the OAuth 2.0 framework. OIDC enables individuals to employ single sign-on (SSO) for accessing various relying party sites by leveraging OpenID Providers (OPs). These providers, like email services or social networks, authenticate user identities. The protocol provides pertinent user information, authentication context, and access to profile details to the application or service involved.
The purpose of OIDC is to enable users to utilize a single set of credentials across multiple sites. When users sign in to an application or service through OIDC, they are directed to their chosen OpenID Provider (OP). After authentication at the OP, they are redirected back to the application or service they intended to access.
OIDC stands as a contemporary security protocol engineered to safeguard browser-based applications, APIs, and native mobile applications. It delegates user authentication to the service provider hosting the user account, granting authorization to third-party applications for accessing the user's account.
A connector is required in ADSS Web RA Admin to communicate with OpenID Connect (OIDC).
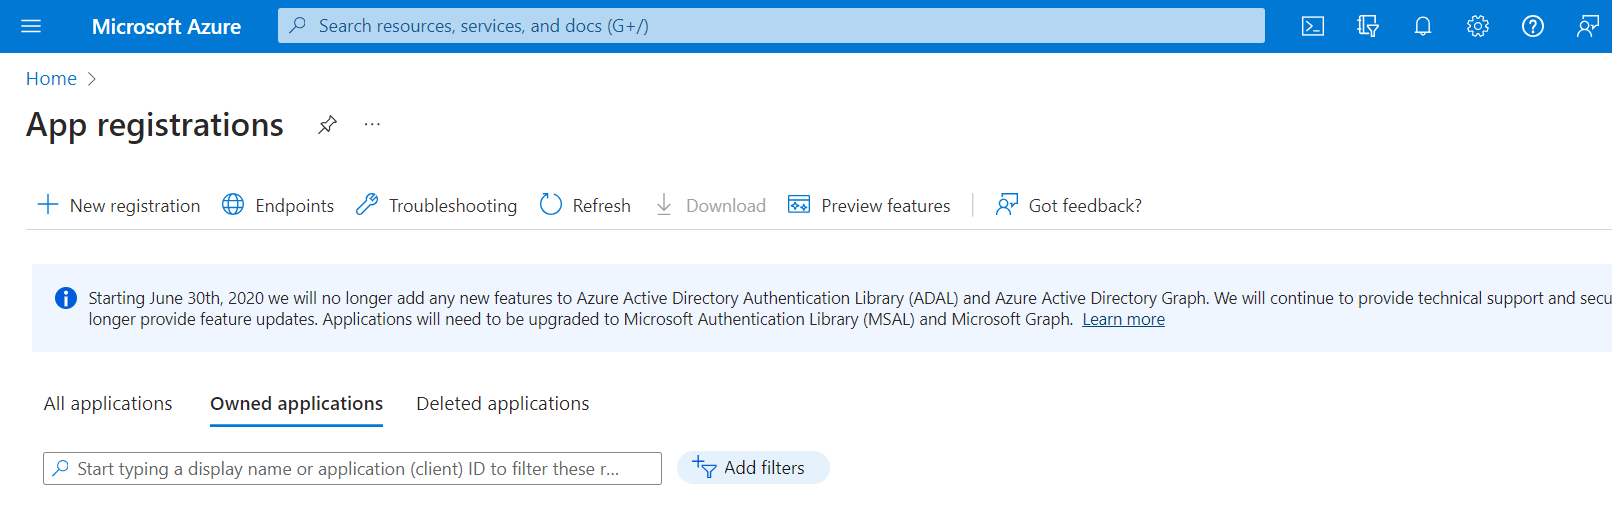
- Expand External Services > Connectors from the left menu.
- Click
 from the grid header.
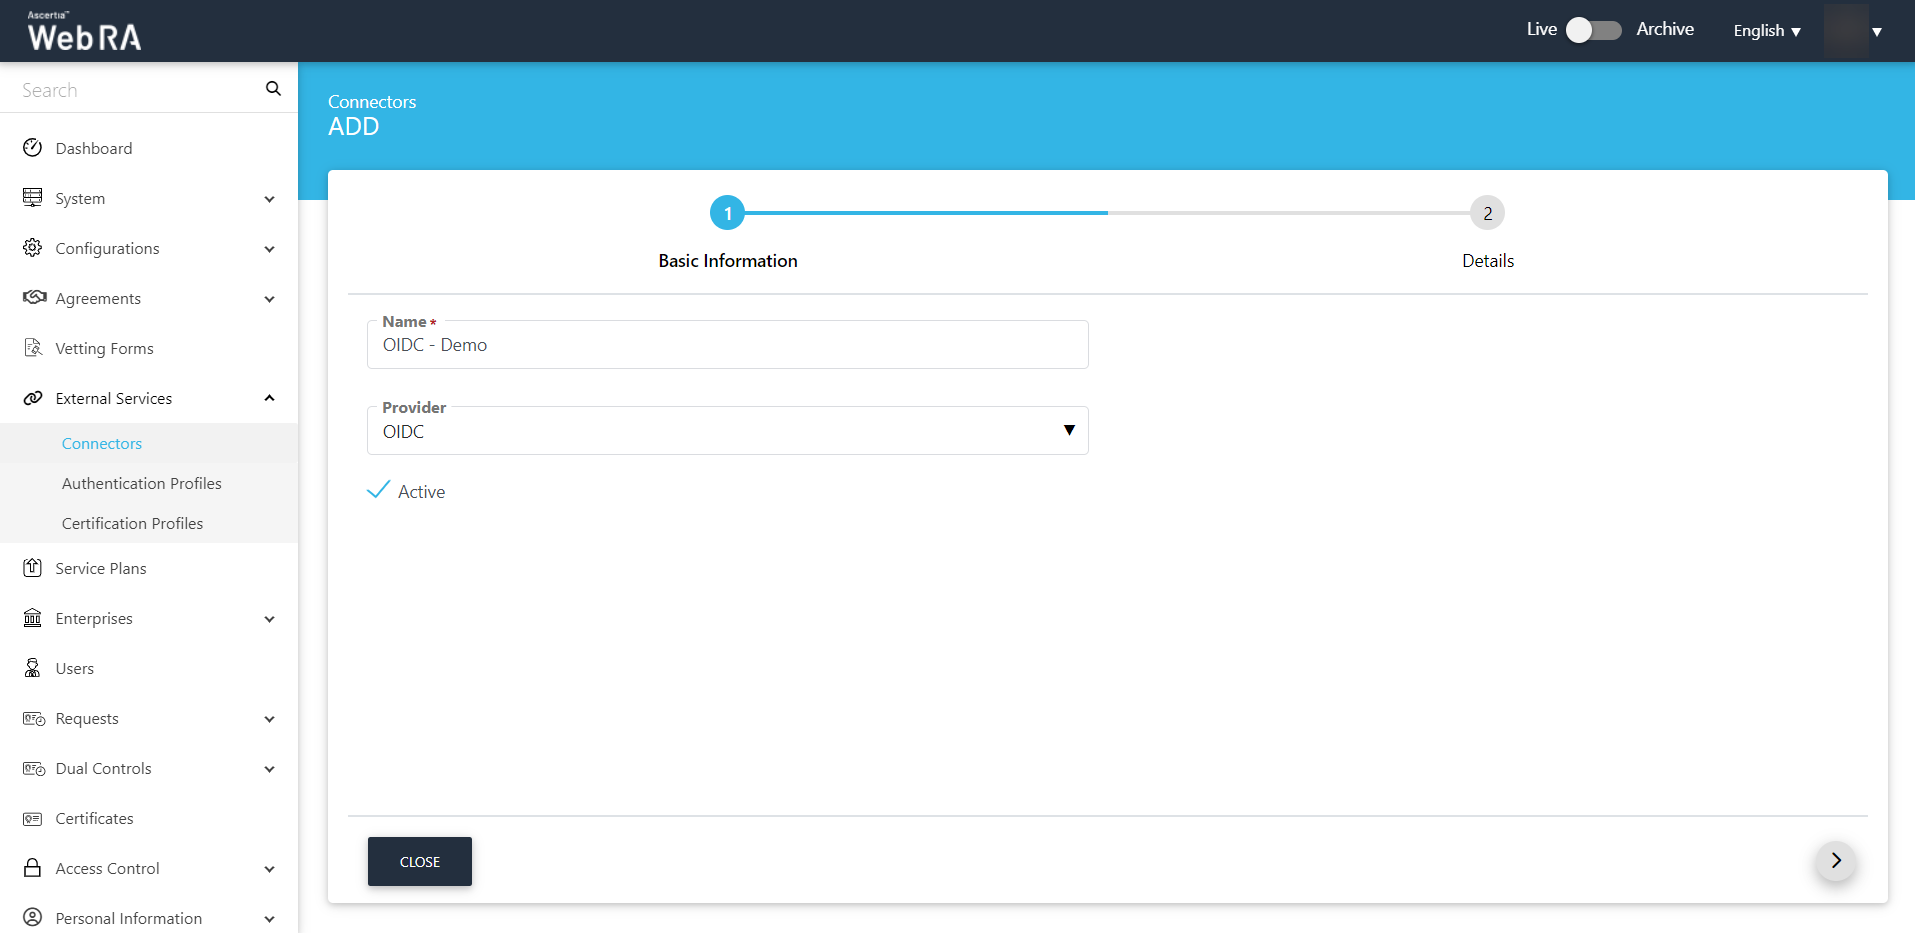
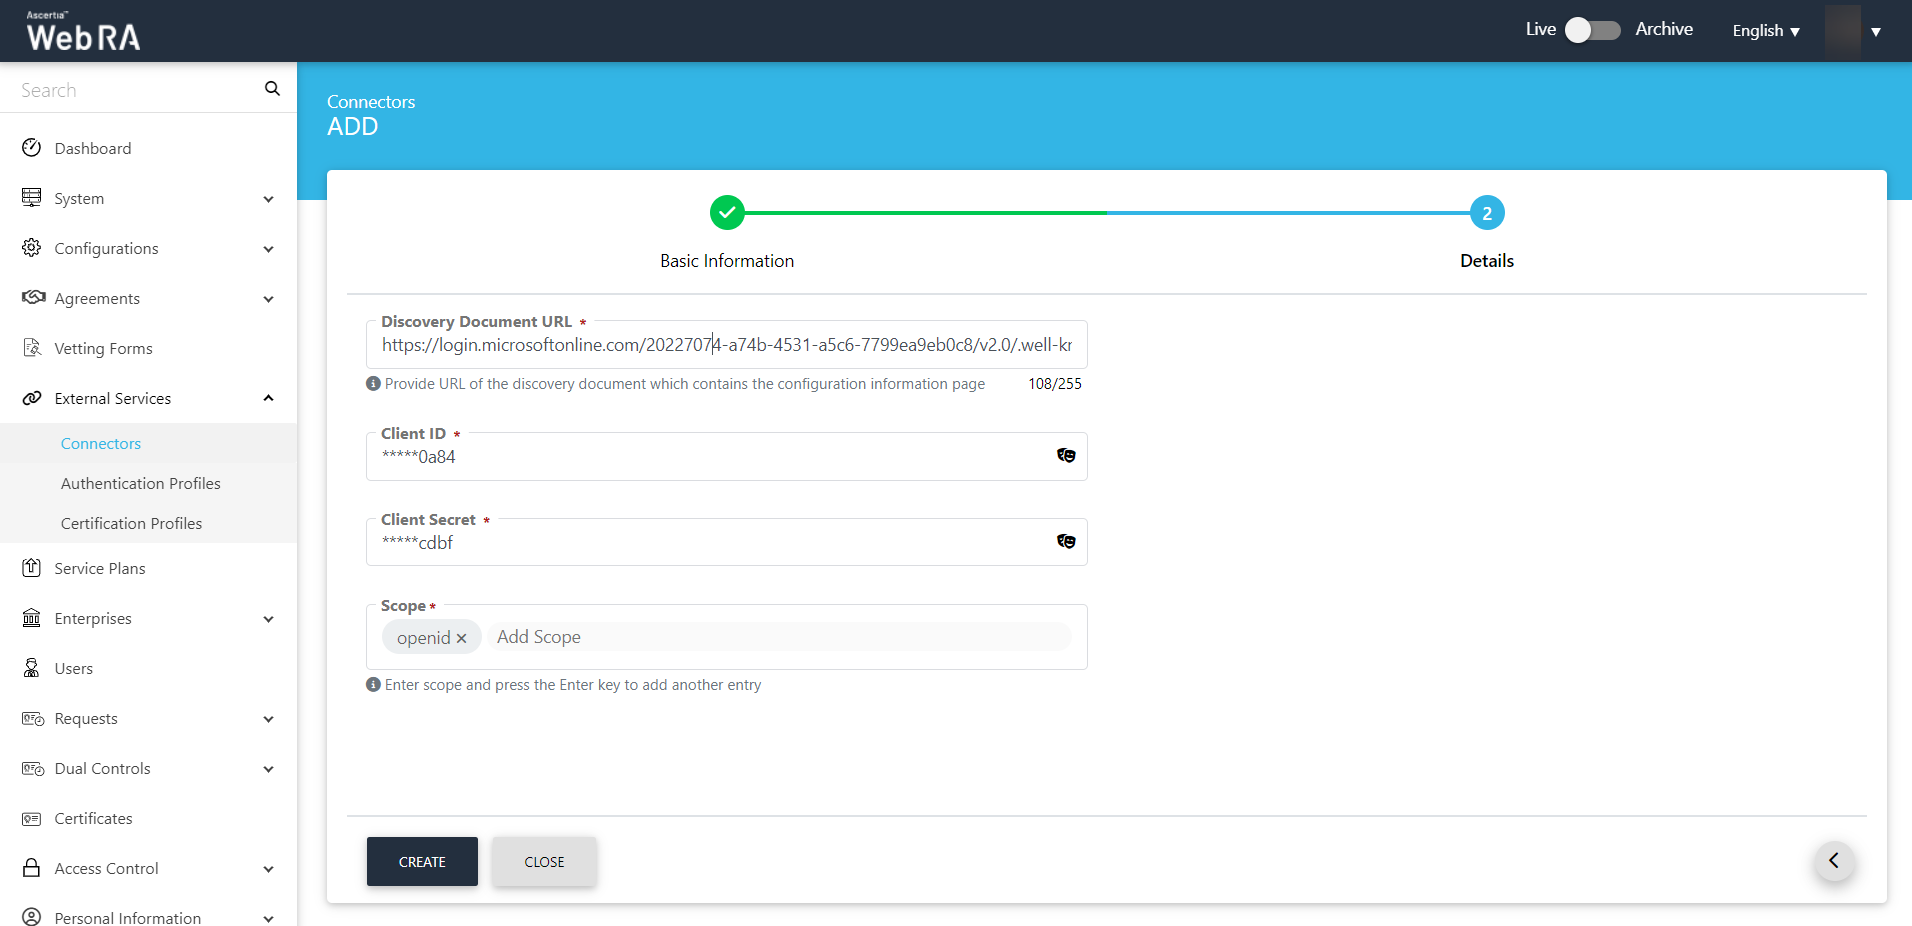
 - A dialog will appear to add the connector details. The connector dialog consists of two screens, i.e. Basic Information and Details. Specify the basic information and click Next to provide the respective connector details. See the below table for fields description.
- Click Create. A new connector will be saved and displayed in the list.
|
Basic Information |
|
|
Field |
Description |
|
Name |
Specify a unique name for this connector, e.g. OIDC Demo. This connector will be used in the OIDC. |
|
Provider |
Select OIDC as a provider for this connector. |
|
Active |
Select this check box to make this connector active. Inactive connectors cannot be configured in authentication profiles. |
|
Details |
|
|
Field |
Description |
|
Discovery Document URL |
Specify the discovery document URL from the Azure portal application. In case of Single tenant: The discovery document URL will contain the tenant ID in organization's part of the URL. In case of Multi-tenant: The discovery document URL will not contain the tenant ID in organization part of the URL. An operator will have to copy the tenant ID from the Azure portal application and paste it in the organisation part of the URL. (Details mentioned in the How to Configure- OIDC section of the guide) |
|
Client ID |
Specify the client ID from the Azure Active Directory application. |
|
Client Secret |
Specify the client secret that has been generated in the Azure Active Directory application. |
|
Scope |
It is mandatory to enter "openid" scope in this field. You may also enter email, profile, etc. |
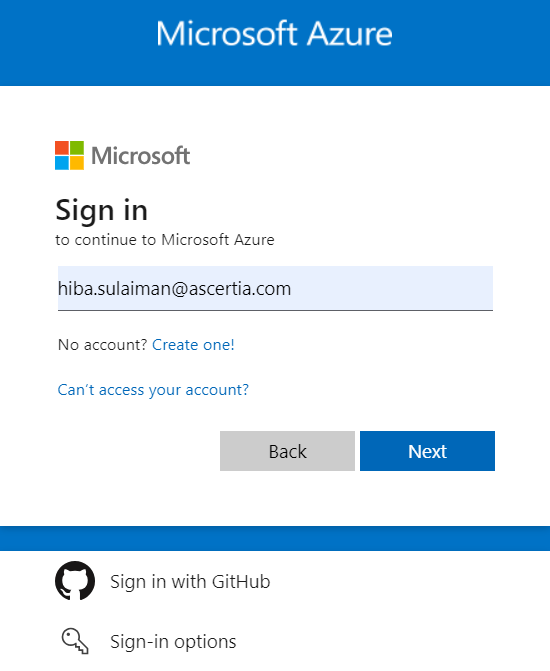
- Access the link portal.azure.com
- You will be redirected to sign-in using your organizational directory's email, then click Next.
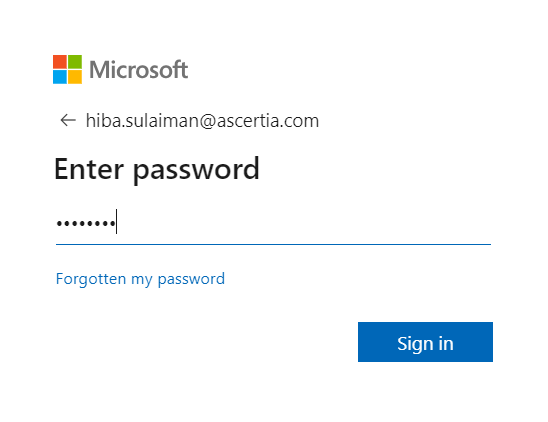
- Enter password and click Sign in.
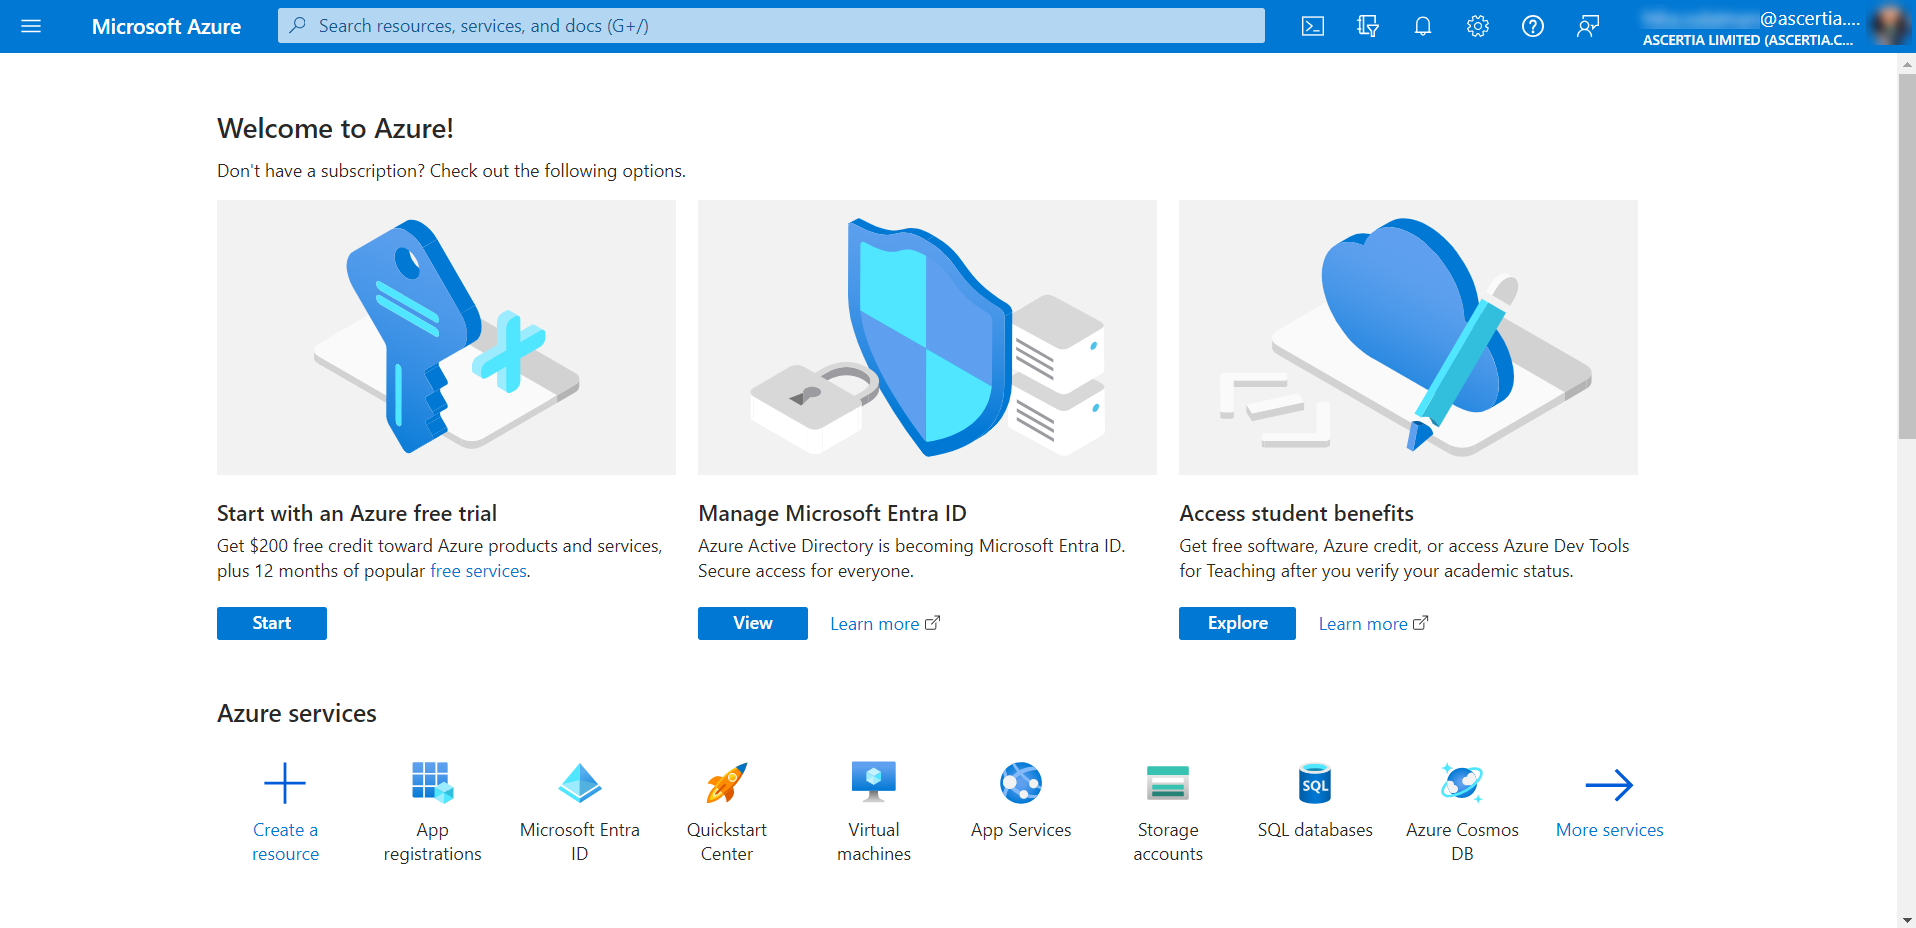
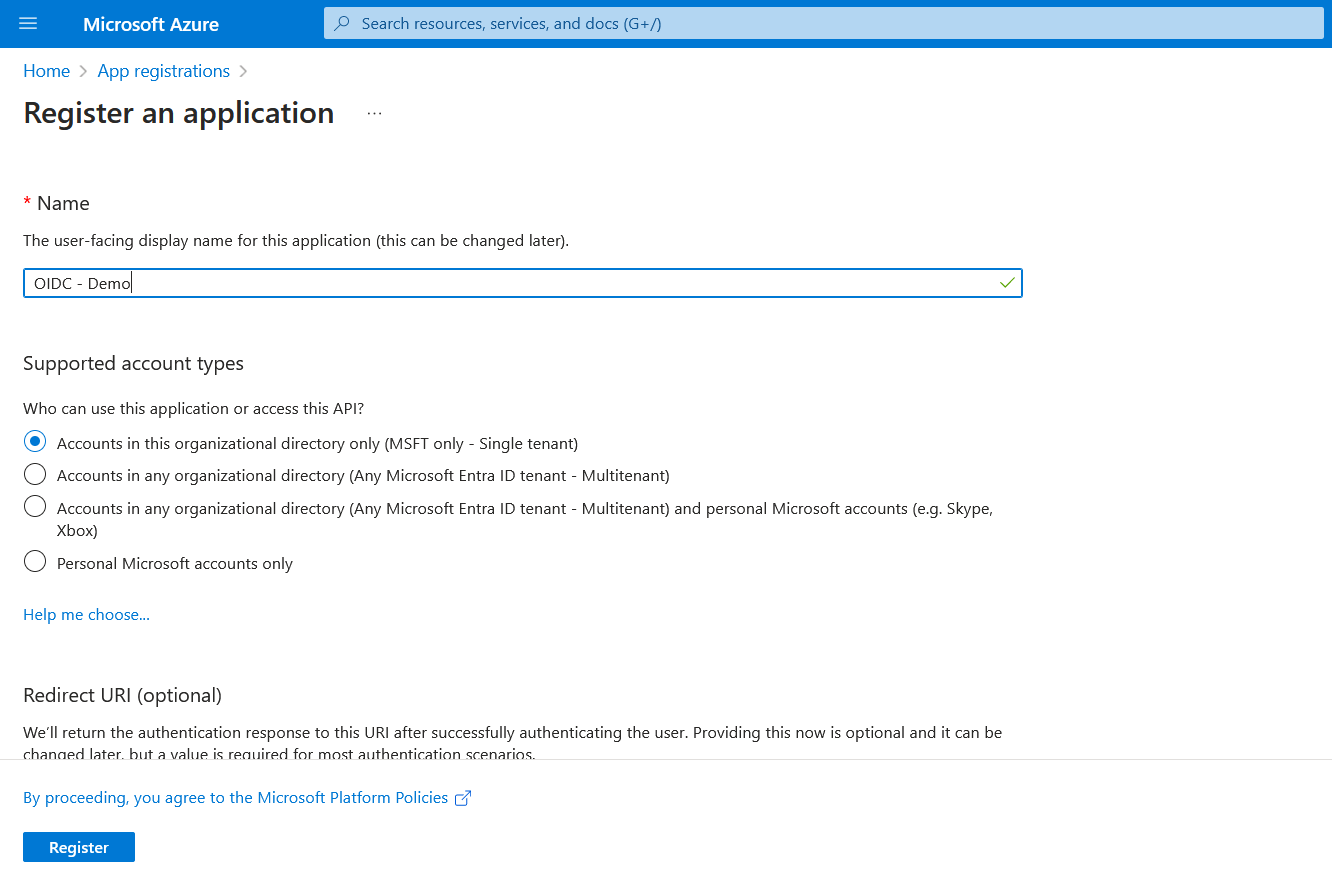
- The Azure Portal home page will appear. Click App registrations from the Azure services.
- Click New registration.
- Enter the name, select an option from the supported account types, e.g. Accounts in this organizational directory only (MSFT only - Single tenant). Then click Register.
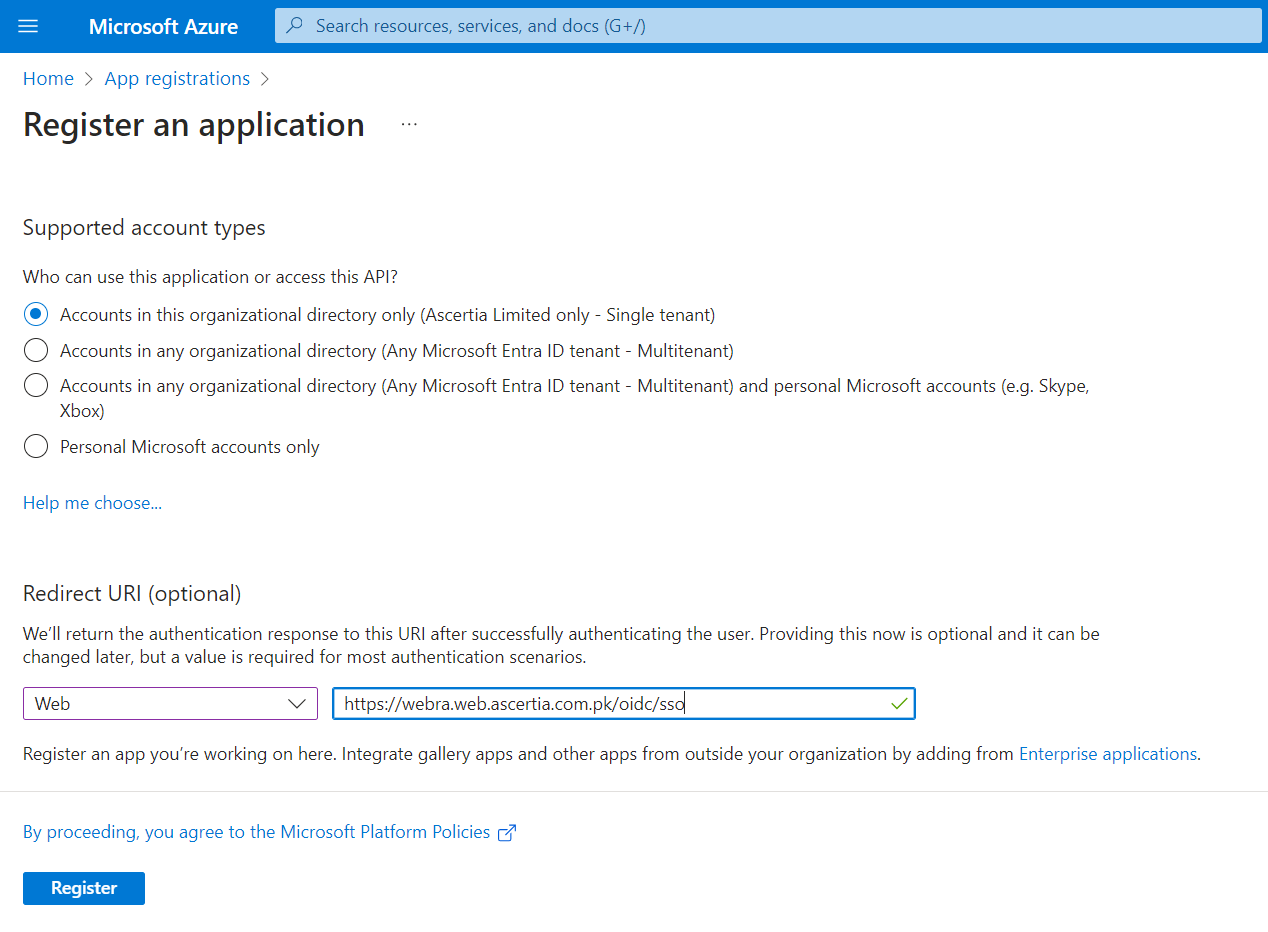
If you select the second option from the supported account types, e.g. Accounts in any organizational directory only (any Microsoft Entra ID - Multi tenant), then you will be required to enter the URI as displayed below:
Select Web and then for ADSS Web RA web, enter its URL and then /oidc/sso after it, e.g. https://webra.web.ascertia.com.pk/oidc/sso
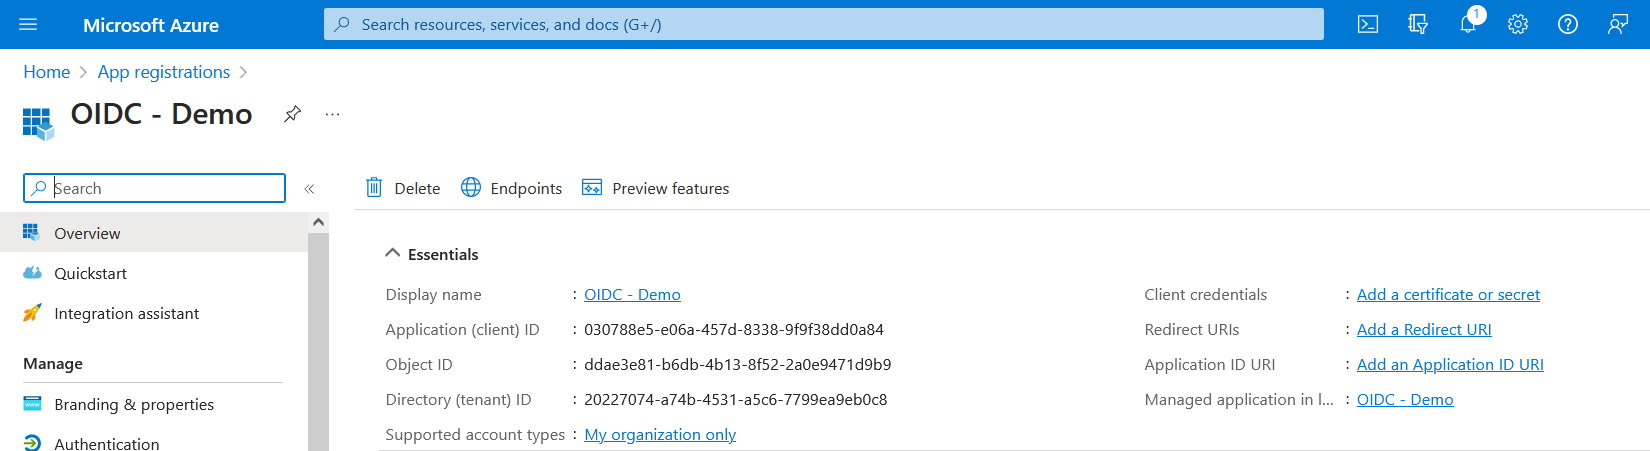
- The app will be created and its details will appear as displayed below:
Copy the Application (client) ID and save it for future use. (That is required as the client ID in ADSS Web RA's connector)
- Click the link against Client credentials or Certificates & secrets under Manage. Then click New client secret.
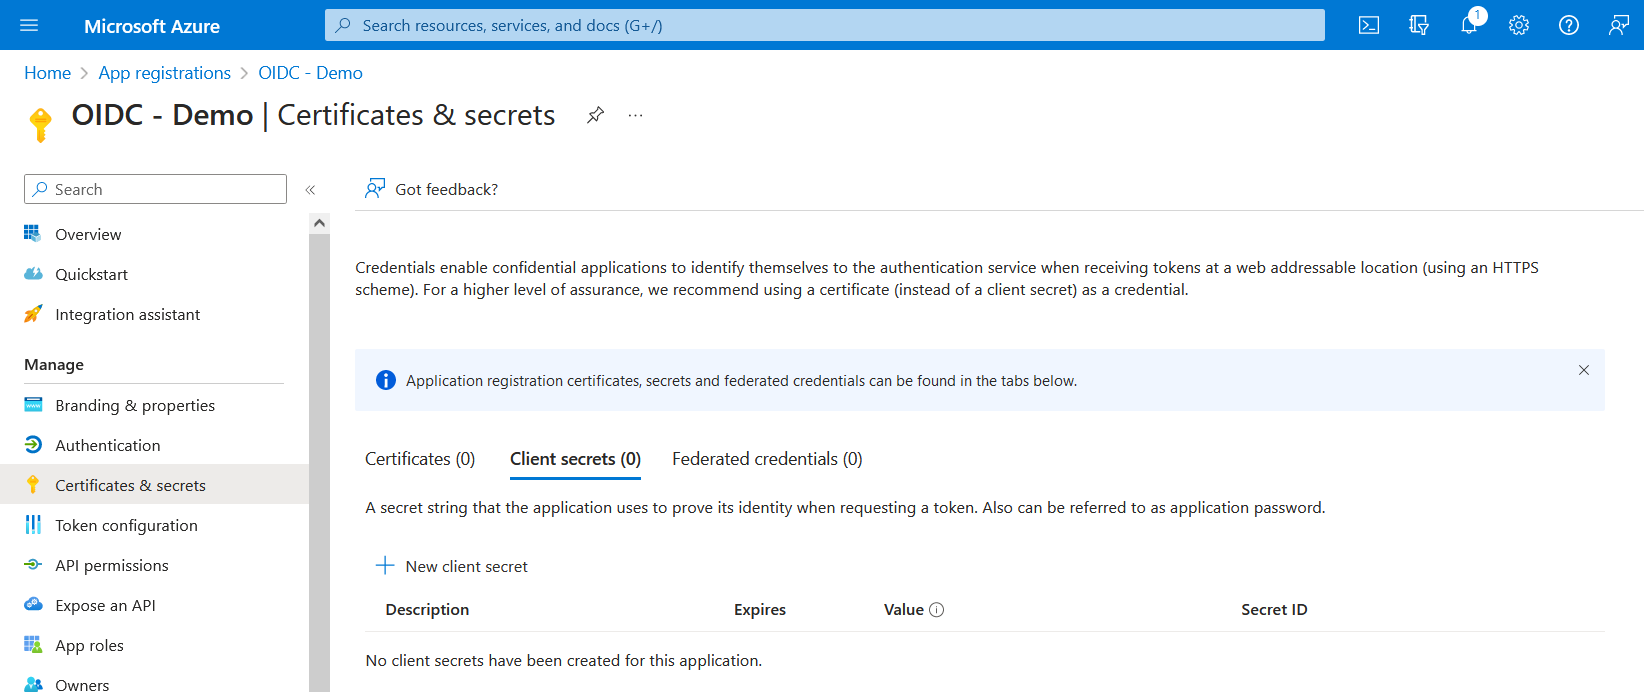
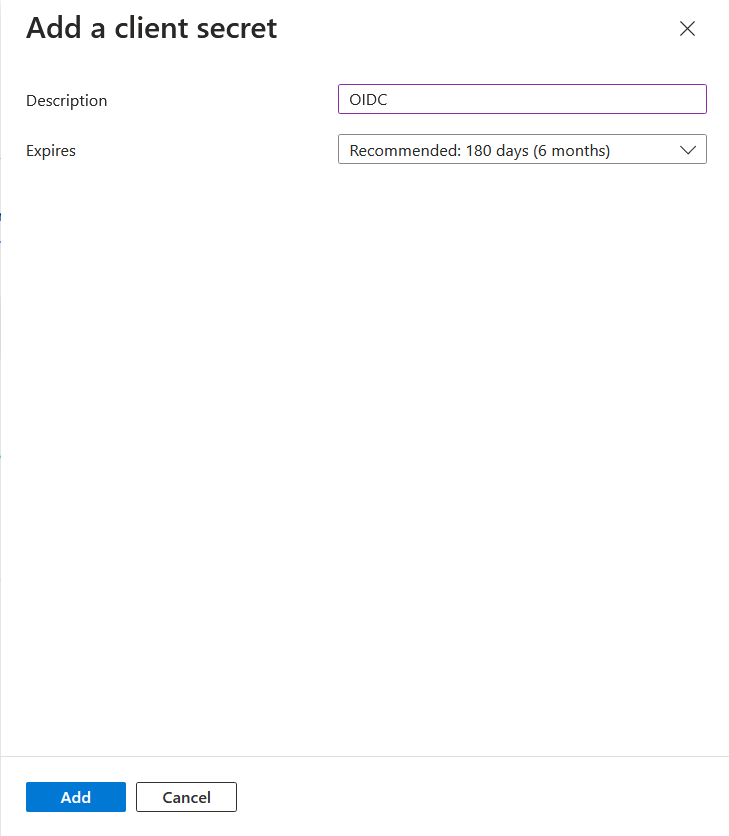
- At the Add a client secret window, enter the description and expiry. Click Add.
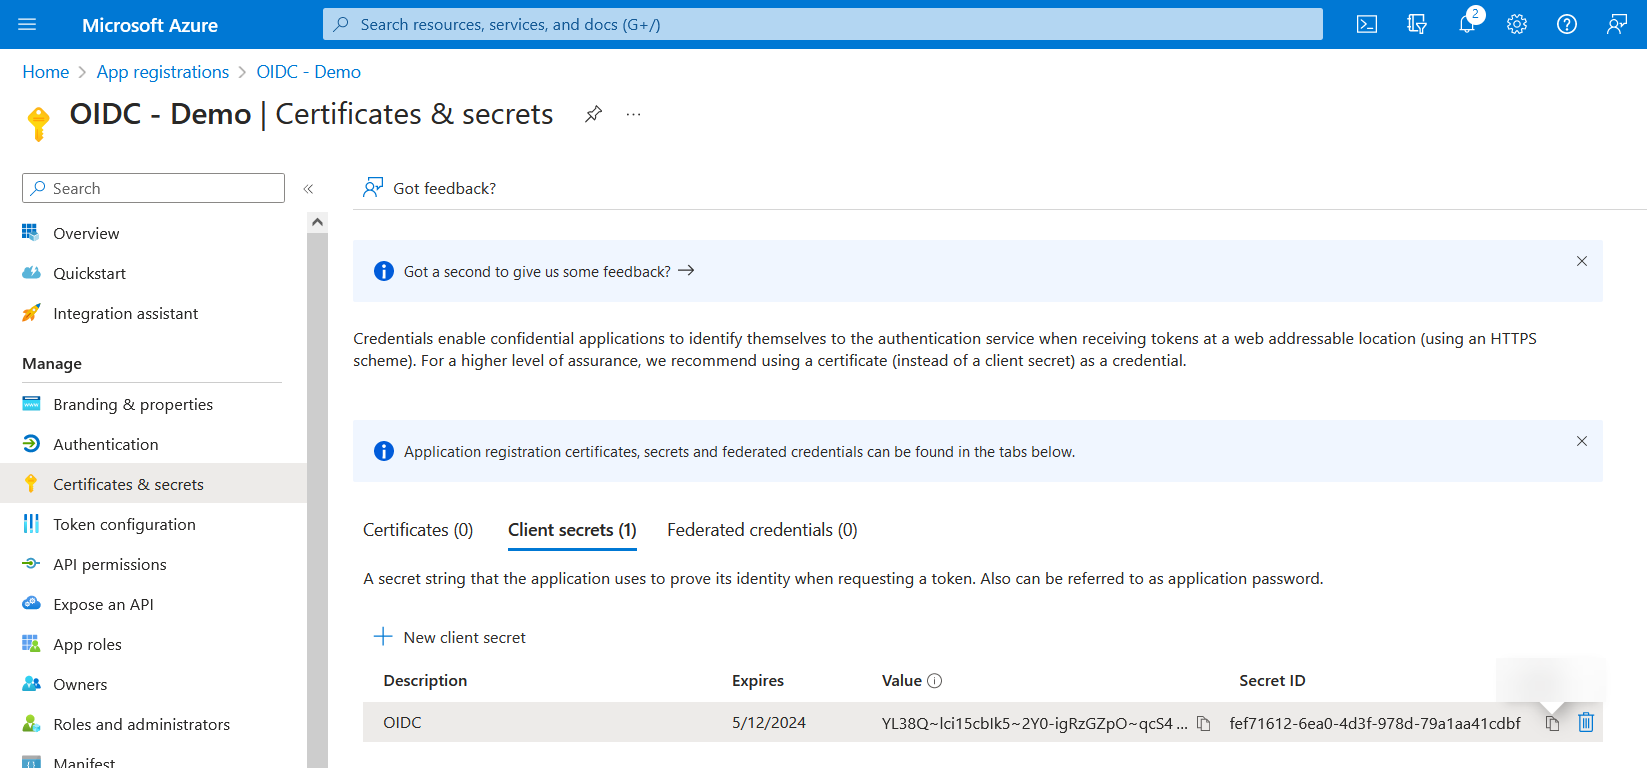
- Once the client secret is created, it will appear in the list. Copy the value and save it for future use. (That is required as the Client Secret in ADSS Web RA's connector).
- Then click Overview and return to the application you created. Then click Endpoints.
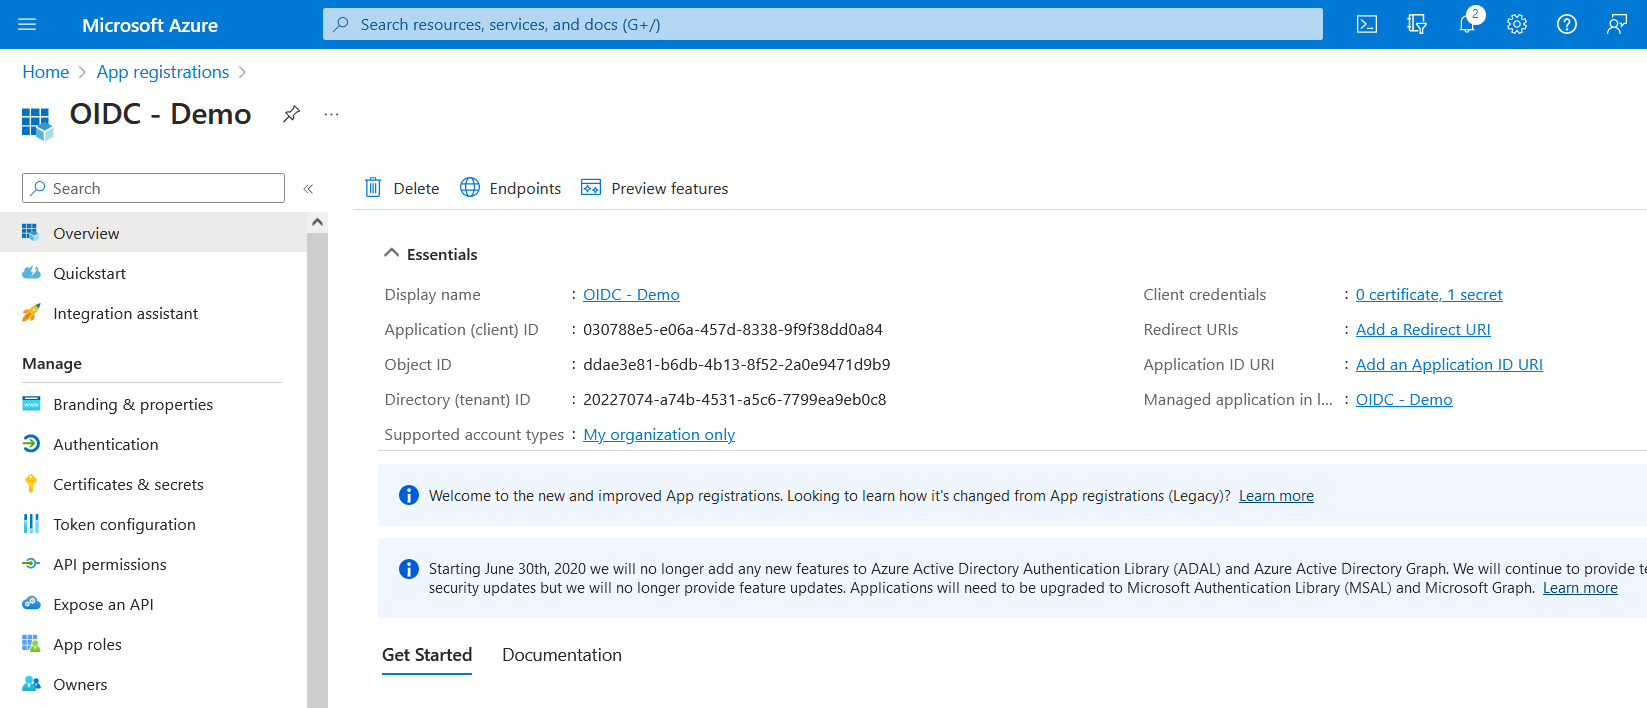
- From here, the value against OpenID Connect metadata document is the Discovery document URL (that is required in the ADSS Web RA's connector). Copy and save this value for later use.

The process for app registration and all information required from the Azure portal for ADSS Web RA (connector) is complete.
The user will return to the connector, add the Discovery Document URL, Client ID, Client Secret and Scope. Then click Create, a connector will be listed as active in the connector's listing.
Create an Authentication Profile
An operator can use authentication profiles in following ways:
- Primary Authentication - used for an authorized access to login into ADSS Web RA user portal. Generally set under Service Plans > Login Authentications under the Advance Settings tab.
- Secondary Authentication - used upon certificate requests creation, renewal and revocation. Generally set under Certification Profiles under the Authentications tab.
You can create an authentication profile using an authentication method, whether the authentication profile can be set as primary or secondary. It is also necessary to select the check box Enable Secondary Authentication.
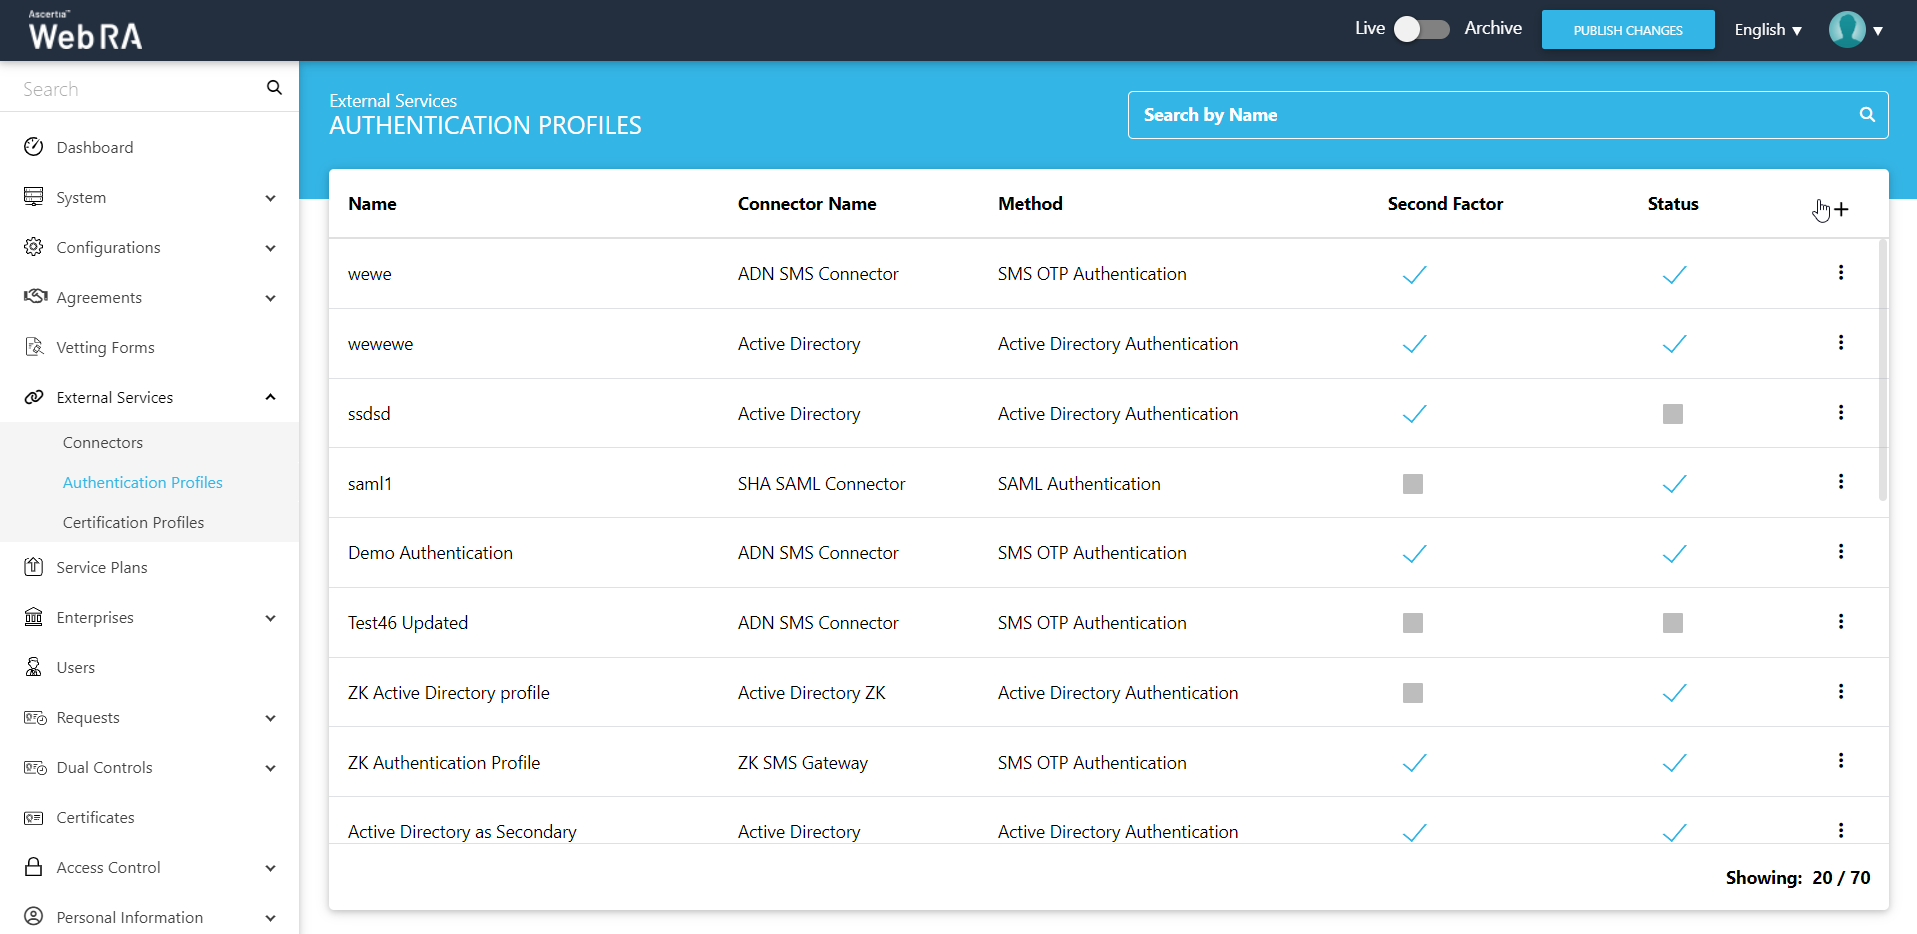
- Expand External Services > Authentication Profiles from the left menu pane, you will be navigated to the listing page.
- Create a new authentication profile, using
 icon on top right.
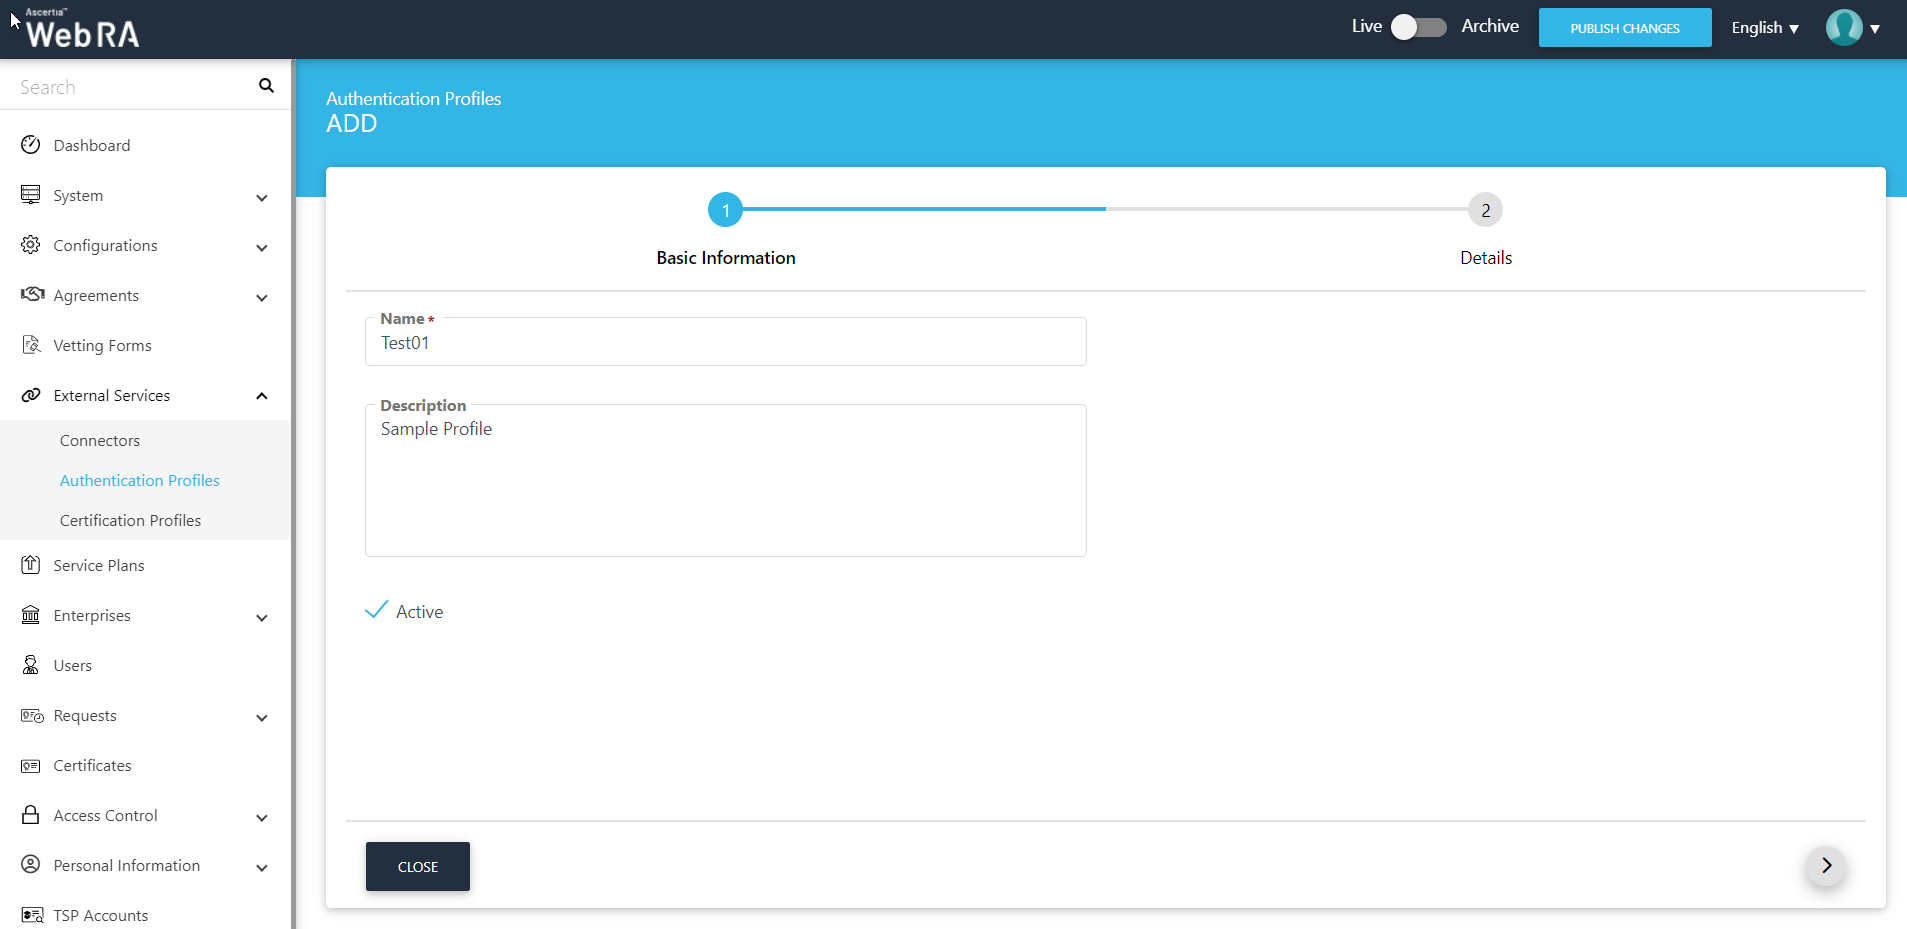
- Provide all the required information, including profile name and description.
|
Basic Information |
|
|
Field |
Description |
|
Name |
Specify a unique name for this profile. |
|
Description |
Mention necessary details for this profile. |
|
Active |
Select this check box to activate this profile. |
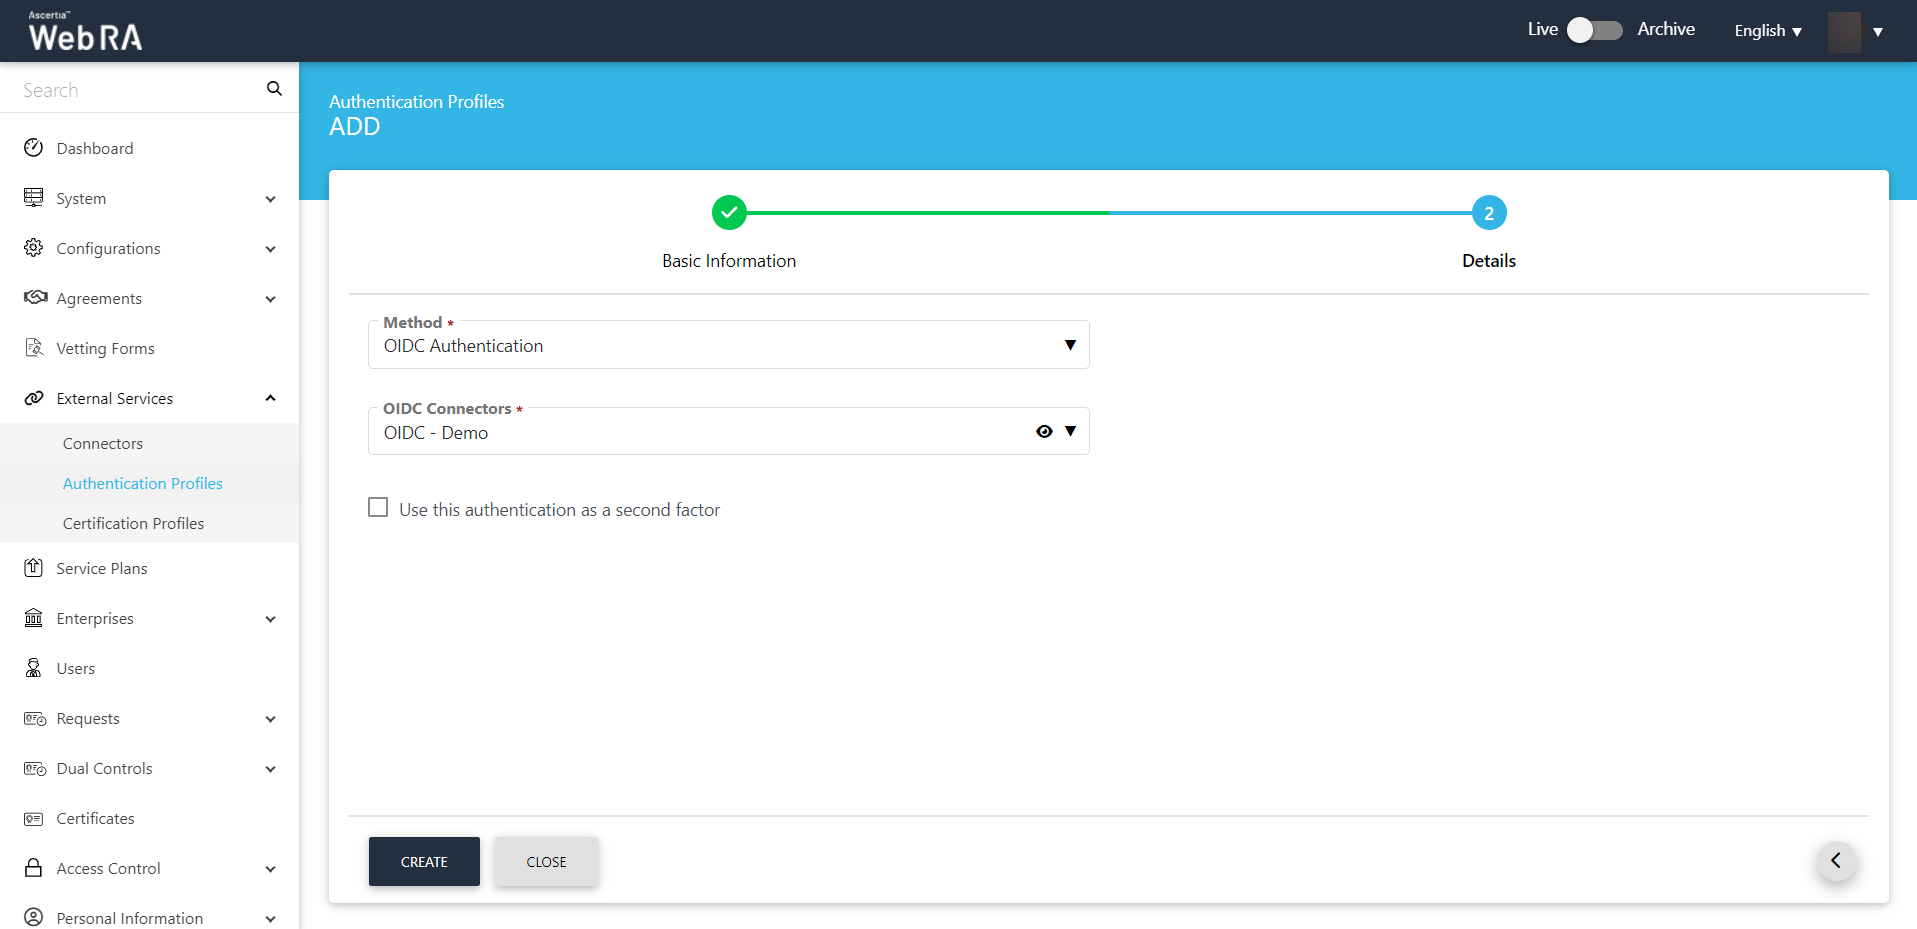
- Select the OIDC connector from the drop down.
|
Details |
|
|
Field |
Description |
|
Method |
An administrator should select an authentication method. (OIDC Authentication in this case) |
|
OIDC Connectors |
An administrator should select an OIDC connector that he wants to use for authentication |
|
Use this authentication as a second factor |
Select this checkbox if you want to use this profile for second-factor authentication. If unchecked, this profile will only be used as primary authentication |
Click on the Create button to create an authentication profile. It will be listed in the authentication profiles listing.
Create a Certification Profile
A certification profile is created in ADSS Web RA to configure ADSS Profiles (Certification and/or CSP) to issue different types of certificates for the ADSS Web RA users. In other words, a certification profile (Certification and/or CSP) is actually created in the ADSS Server, and it is used in the ADSS Web RA Admin for its implication.
Certification profiles entail all complex configurations and business requirements (i.e. CA details, Key Algorithm, Validity, etc.) to issue corresponding certificates for the ADSS Web RA users.
ADSS Web RA supports the following certificate types:
Server side key generation for remote authorized signing
- Client must be registered in ADSS Server Client Manager
- The Client must be configured in the ADSS Web RA connector of ADSS Server
- A SAM Profile must be created in the ADSS SAM Server
- A RAS Profile must be created in the ADSS RAS Server
- The ADSS Web RA Certification Profile must be configured in the Service Plan
Create a Certification Profile in ADSS Web RA
- From the admin portal, expand External Services > Certification Profiles from the left menu to see the certification profiles listing screen.
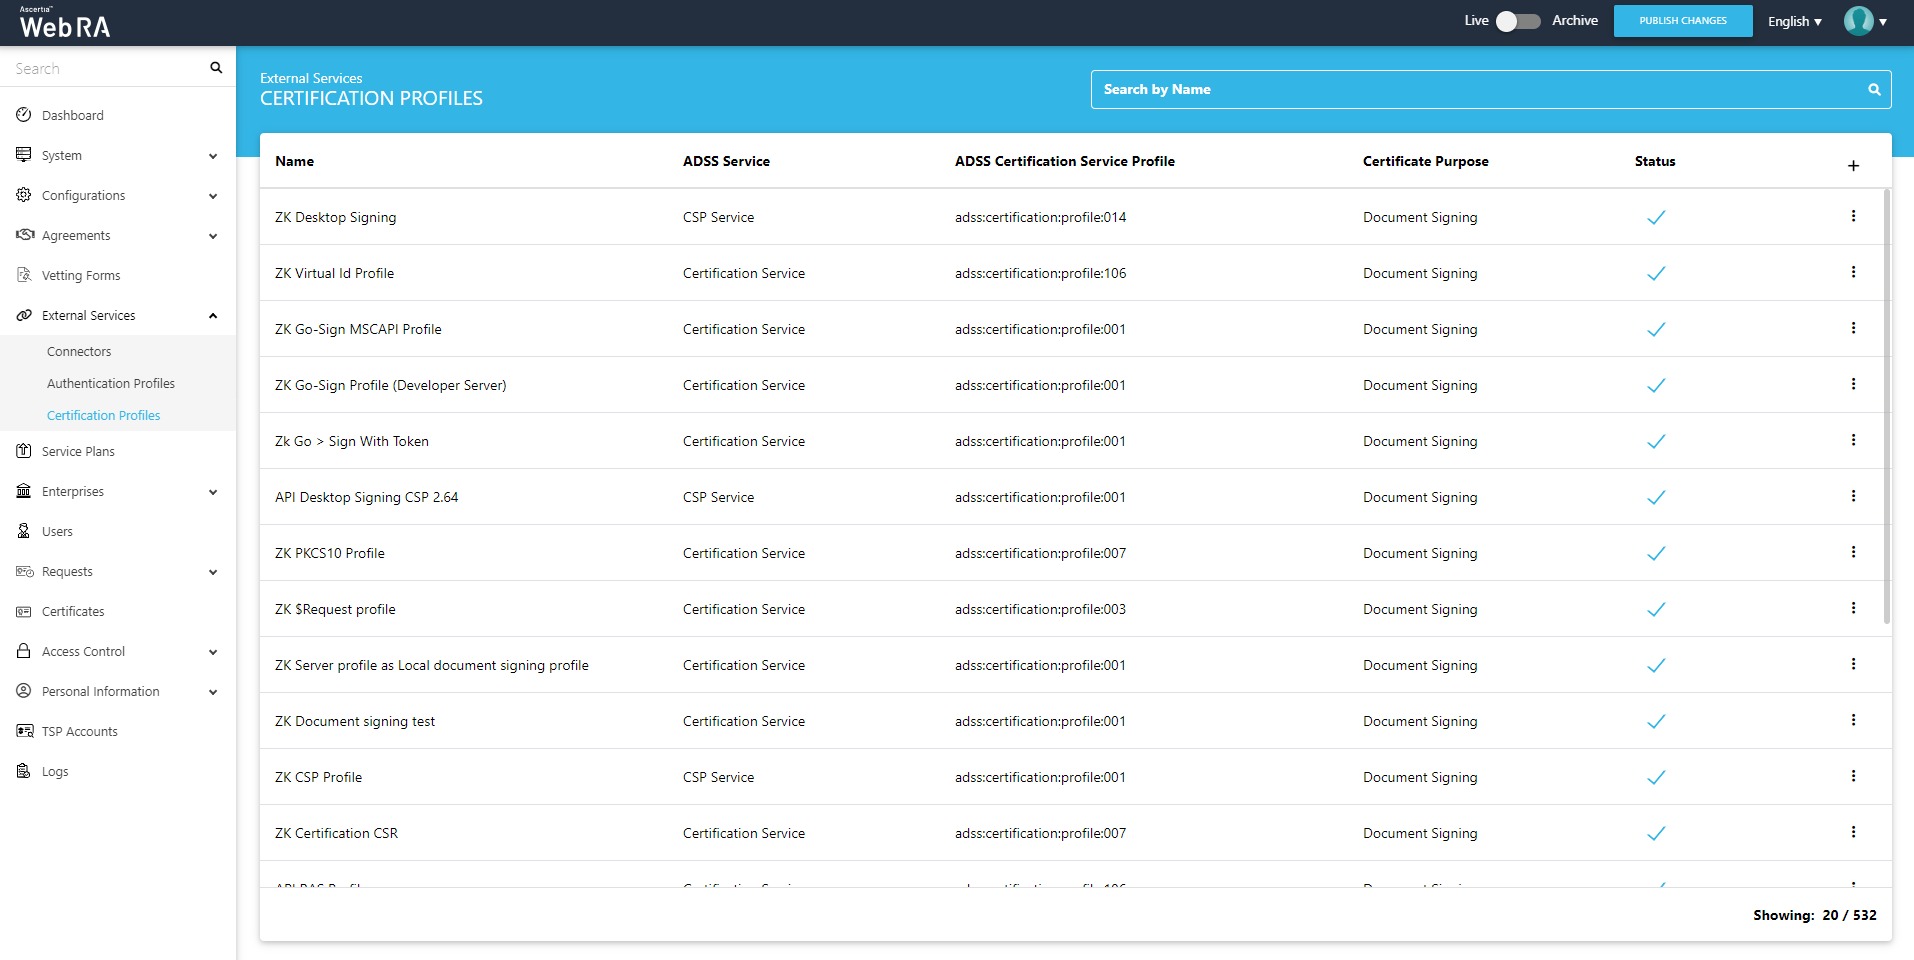
- Click
 from the grid header.
 - A dialog will appear to add the profile details. The certification profile dialog consists of 5 screens, i.e. Basic Information, Profile Settings, Details. Authentications, Advance Settings.
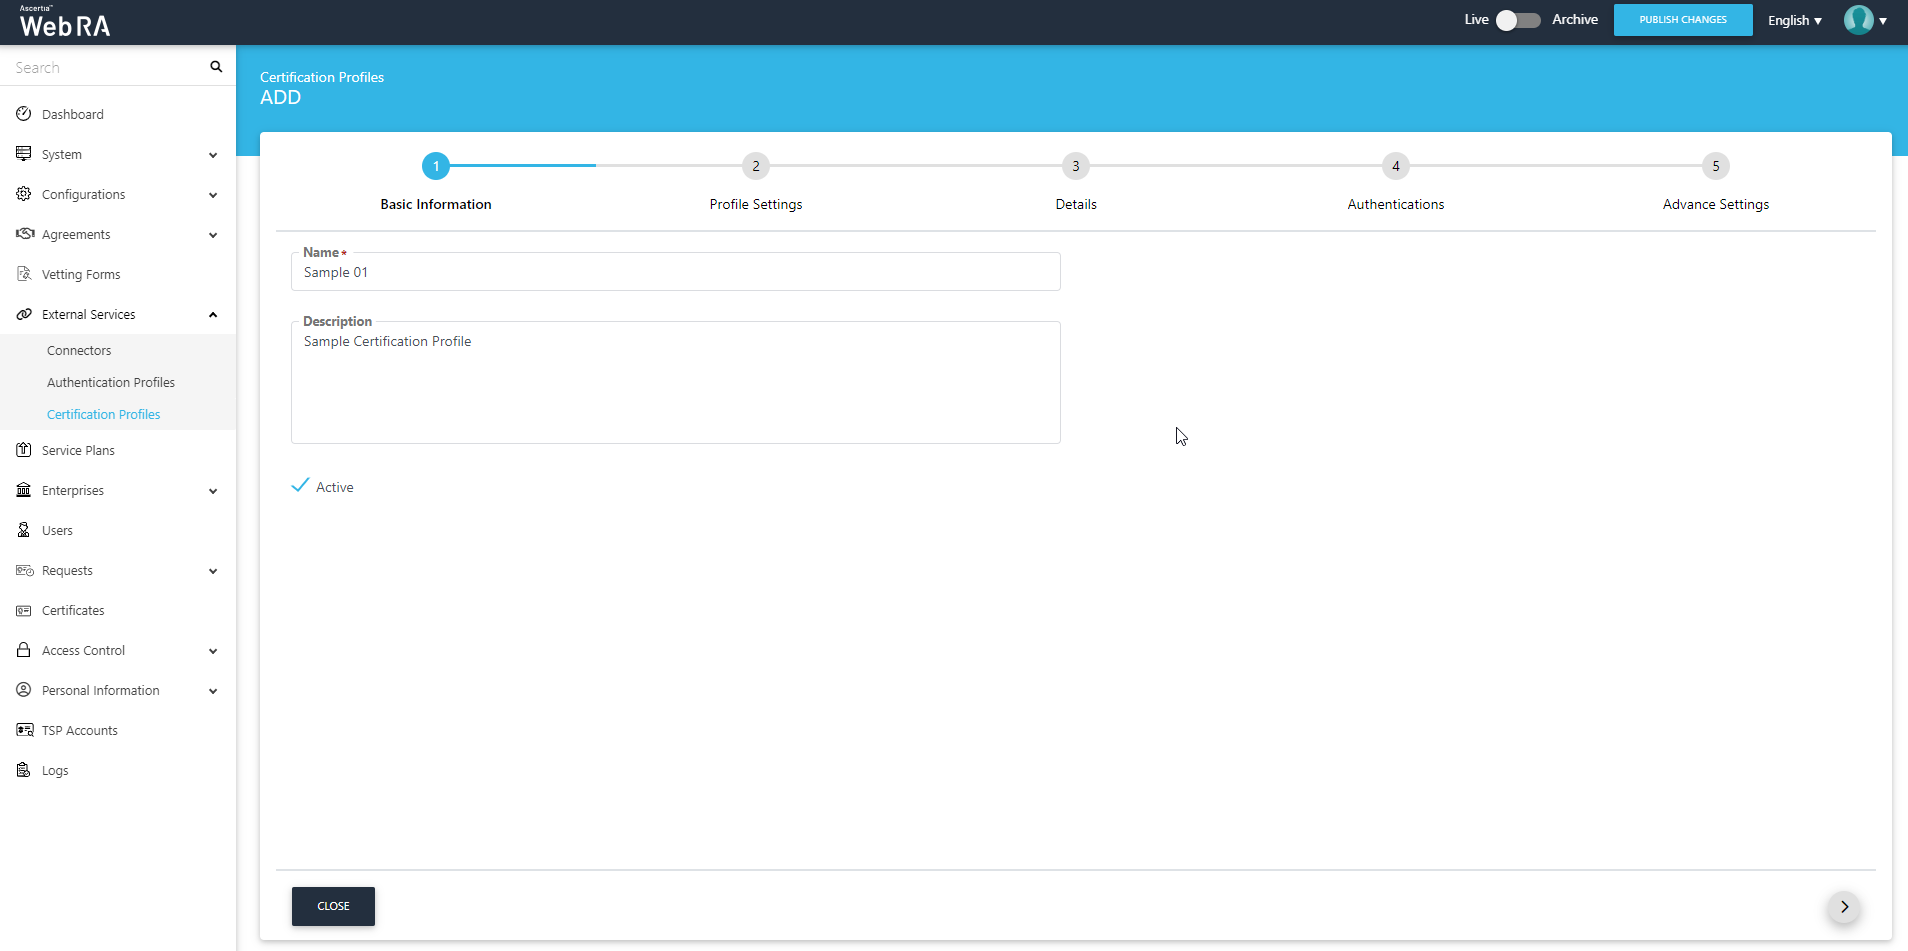
Basic Information
|
Basic Information |
|
|
Field |
Description |
|
Name |
Specify a unique name for this profile. |
|
Description |
Specify any description related to this certification profile. |
|
Active |
Select this check box to activate this profile. |
At the Basic Information screen, enter the fields, then click >.
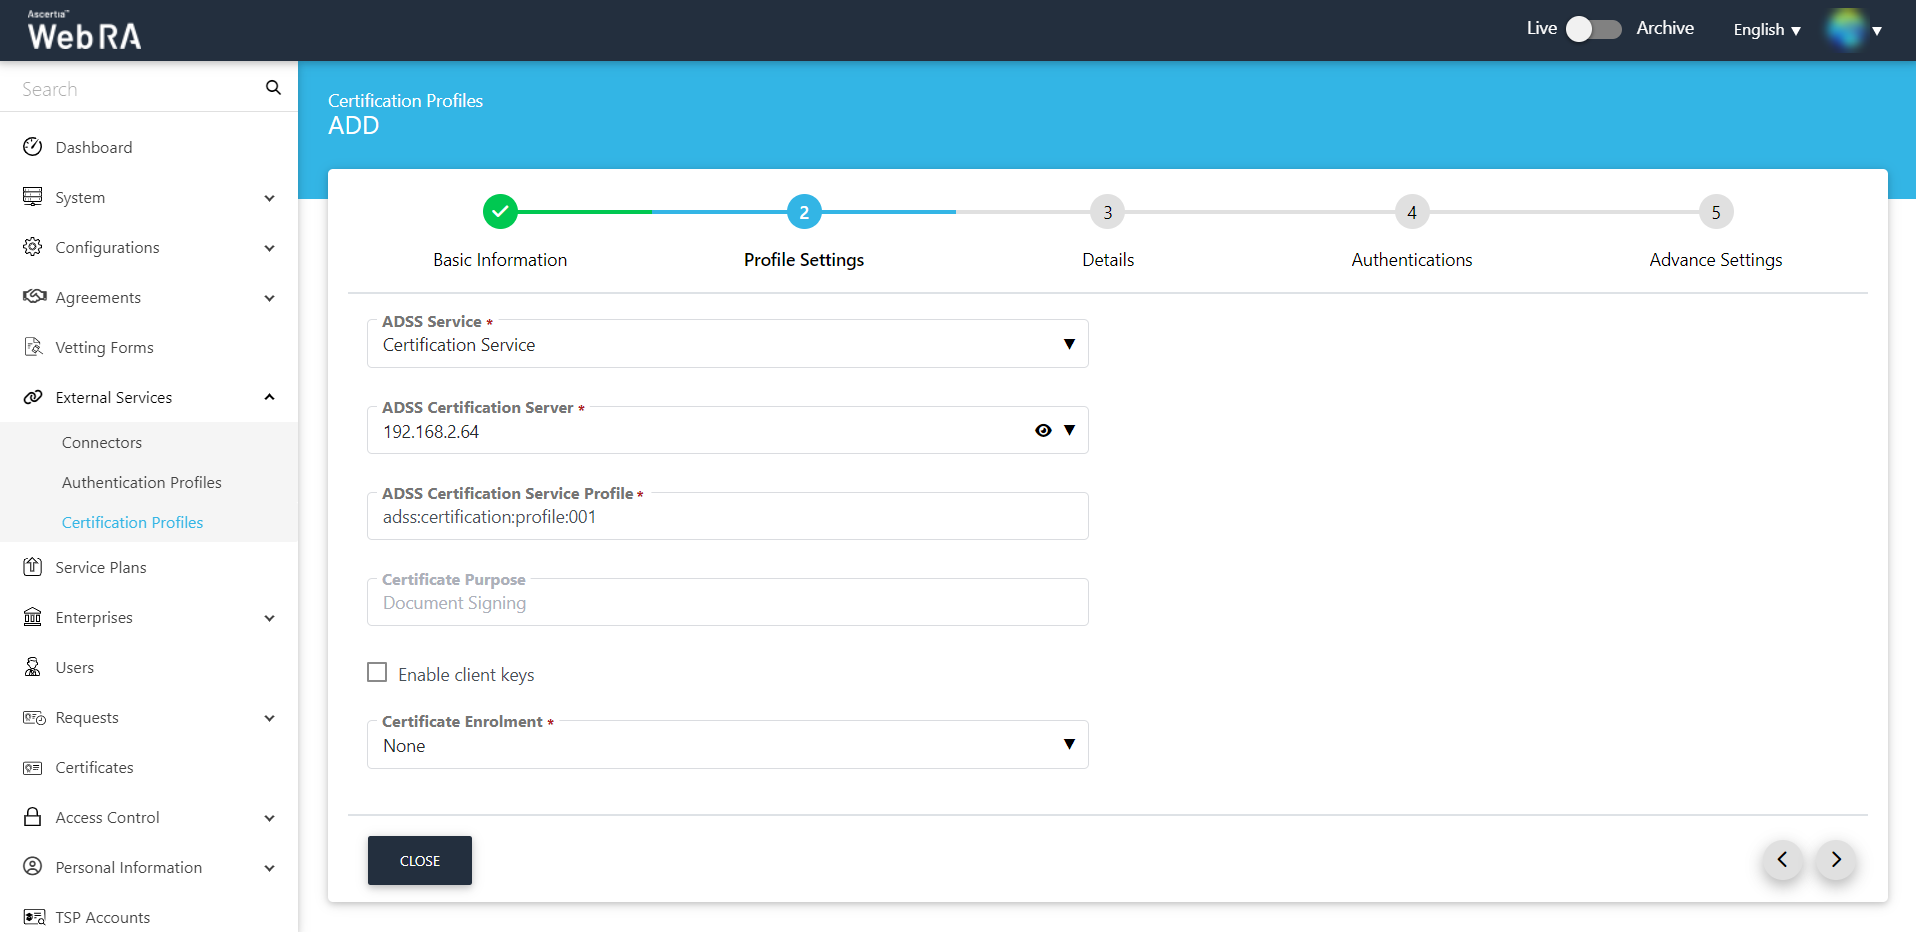
Certification Profile Settings for a Certification Service profile:
|
Profile Settings |
|
|
Field |
Description |
|
ADSS Service |
This field will display the ADSS Services (i.e. Certification Service and CSP Service) that are available for ADSS Web RA. Select Certification Service. |
|
ADSS Certification Server |
This field will display the list of active ADSS connectors in ADSS Web RA. Select the one to use for this certification service profile, e.g: 192.168.2.64. |
|
ADSS Certification Service Profile |
In this field, enter the certification profile that you created on the ADSS Sever, e.g. adss:certification:profile:001. |
|
Certificate Purpose |
This field will appear in a disabled form. It contains a list of standard certificate purposes which actually comes from ADSS, based on selected certification profile. A certificate will be generated based on provided certification profile ID, and it will be in a disabled form as it is configured under that ADSS Certification Service Profile. Possible certificate purposes could be Document Signing, TLS Server Authentication, Code Signing etc. ADSS Web RA supports the following types of TLS certificates:
When an EV TLS Server authentication certificate is revoked, ADSS Web RA will support only the following six revocation reasons:
|
|
Verification Type |
Select an option from the following:
|
|
Certificate Enrolment |
A drop down where you can select one from the following:
|
|
Active Directory Profile |
It allows a user to select an active directory profile which is required for Windows Enrolment. |
|
Device Enrolments |
Select this checkbox. A drop box will appear, allowing the user to choose and select between SCEP, CMP, ACME and EST according to requirement. |
|
Certificate Template |
This drop down will fetch the list of certificate template fetched from the active directory selected above. |
|
Enable Device Enrolment |
By enabling this setting, user will not be required to upload an authentication certificate while creating an account. |
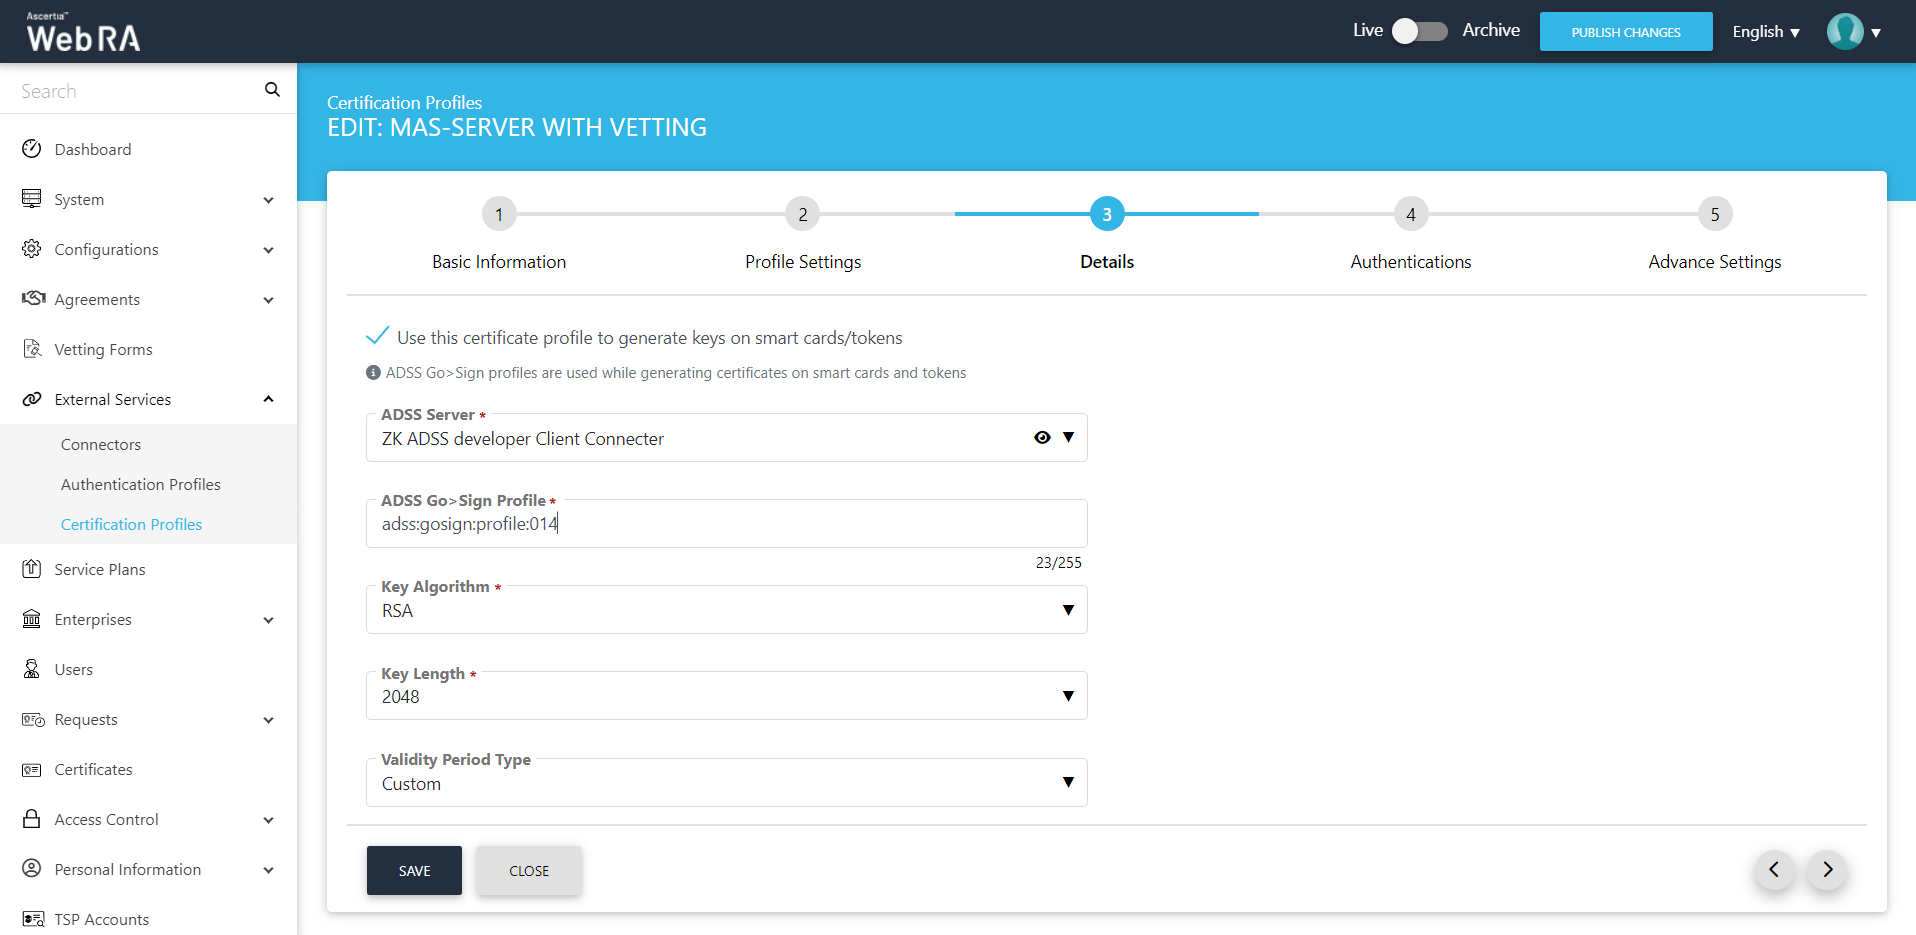
Details
Once you have configured the profile settings, click > to move to the Details screen.
|
Details |
|
|
Field |
Description |
|
Use this certificate profile to generate keys on smart cards/tokens |
Enable this option if this profile will be used to generate the certificates in the smart card/token. |
|
Key Algorithm |
Key Algorithm that will be used to generate the key pair in the smart card/token. This configuration is coming from the ADSS Server so it cannot be changed |
|
Key Length |
Key Length that will be used to generate the key pair in the smart card/token. This configuration is coming from the ADSS Server so it cannot be changed |
|
Validity Period Type |
Validity period type can be configured as a Fixed to restrict the enterprise user to change the certificate validity or it can be set as Custom if enterprise RAO allow an enterprise user to set validity period while creating a certificate request. These Fixed and Custom values can only be used on ADSS Web RA admin, if the selected ADSS Certification profile has set overridable option in certification profile. It will be shown as Fixed validity period type otherwise. |
|
Validity Period |
The certificate validity period. If the CA profile is configured to use its time instead taking the time from the request then this value will be dropped by the CA server. |
|
Validity Duration |
The time unit of the validity period. It could be minutes, hours, days, months and years. |

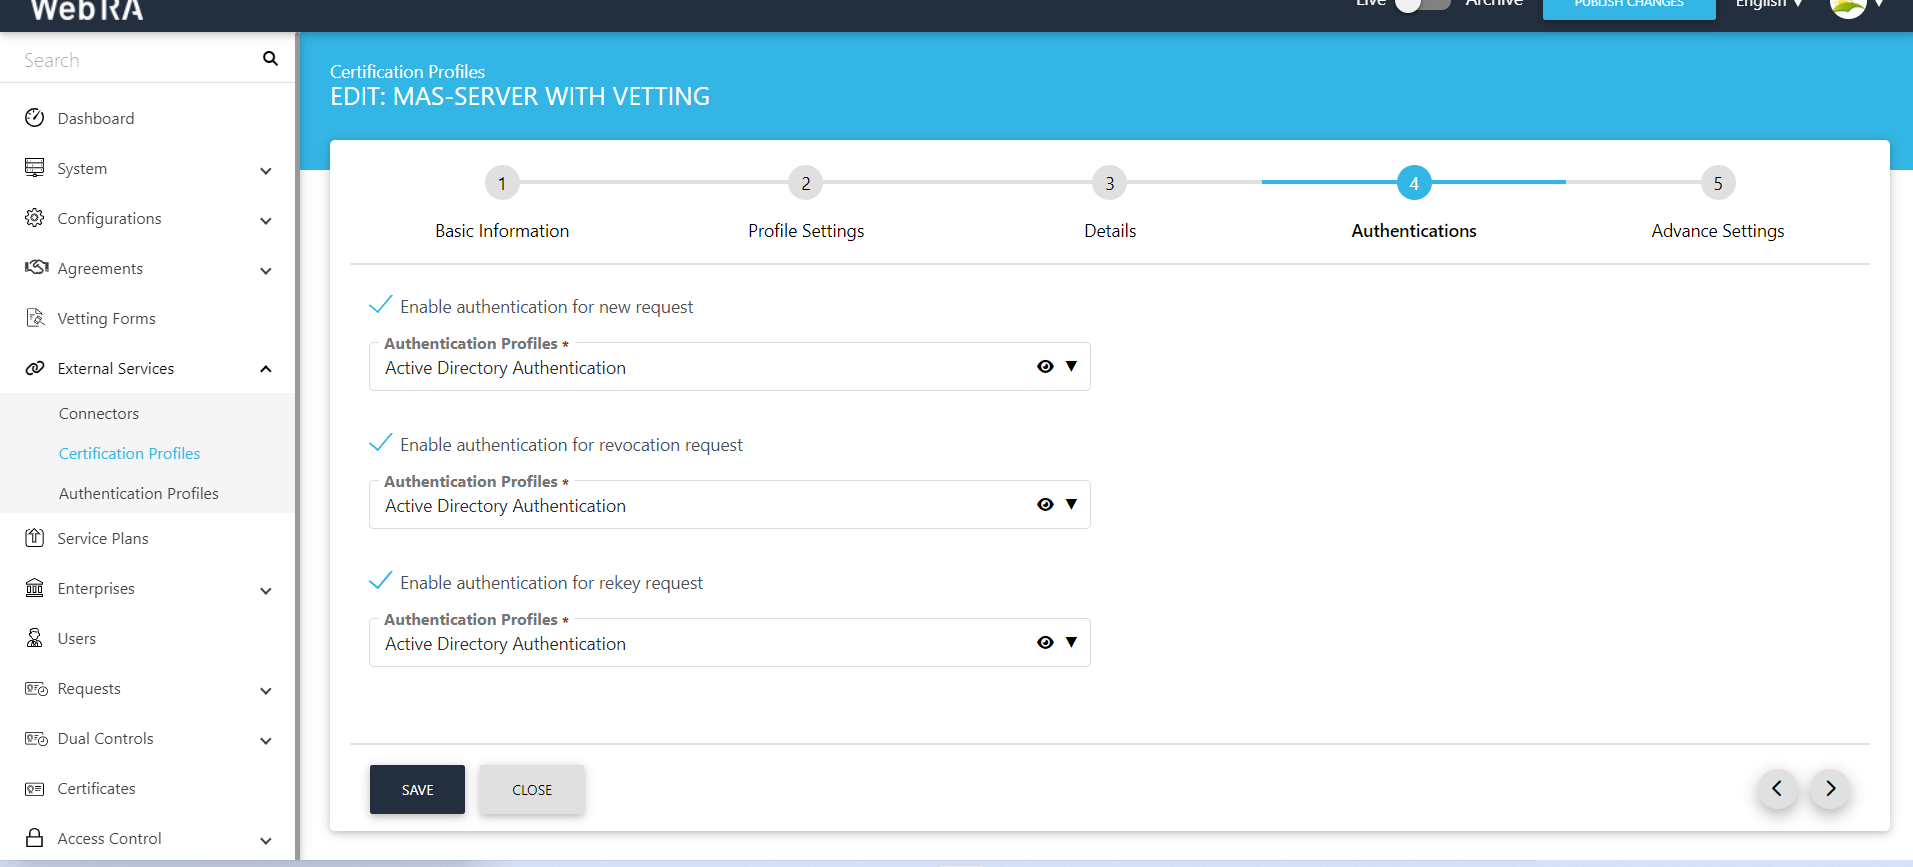
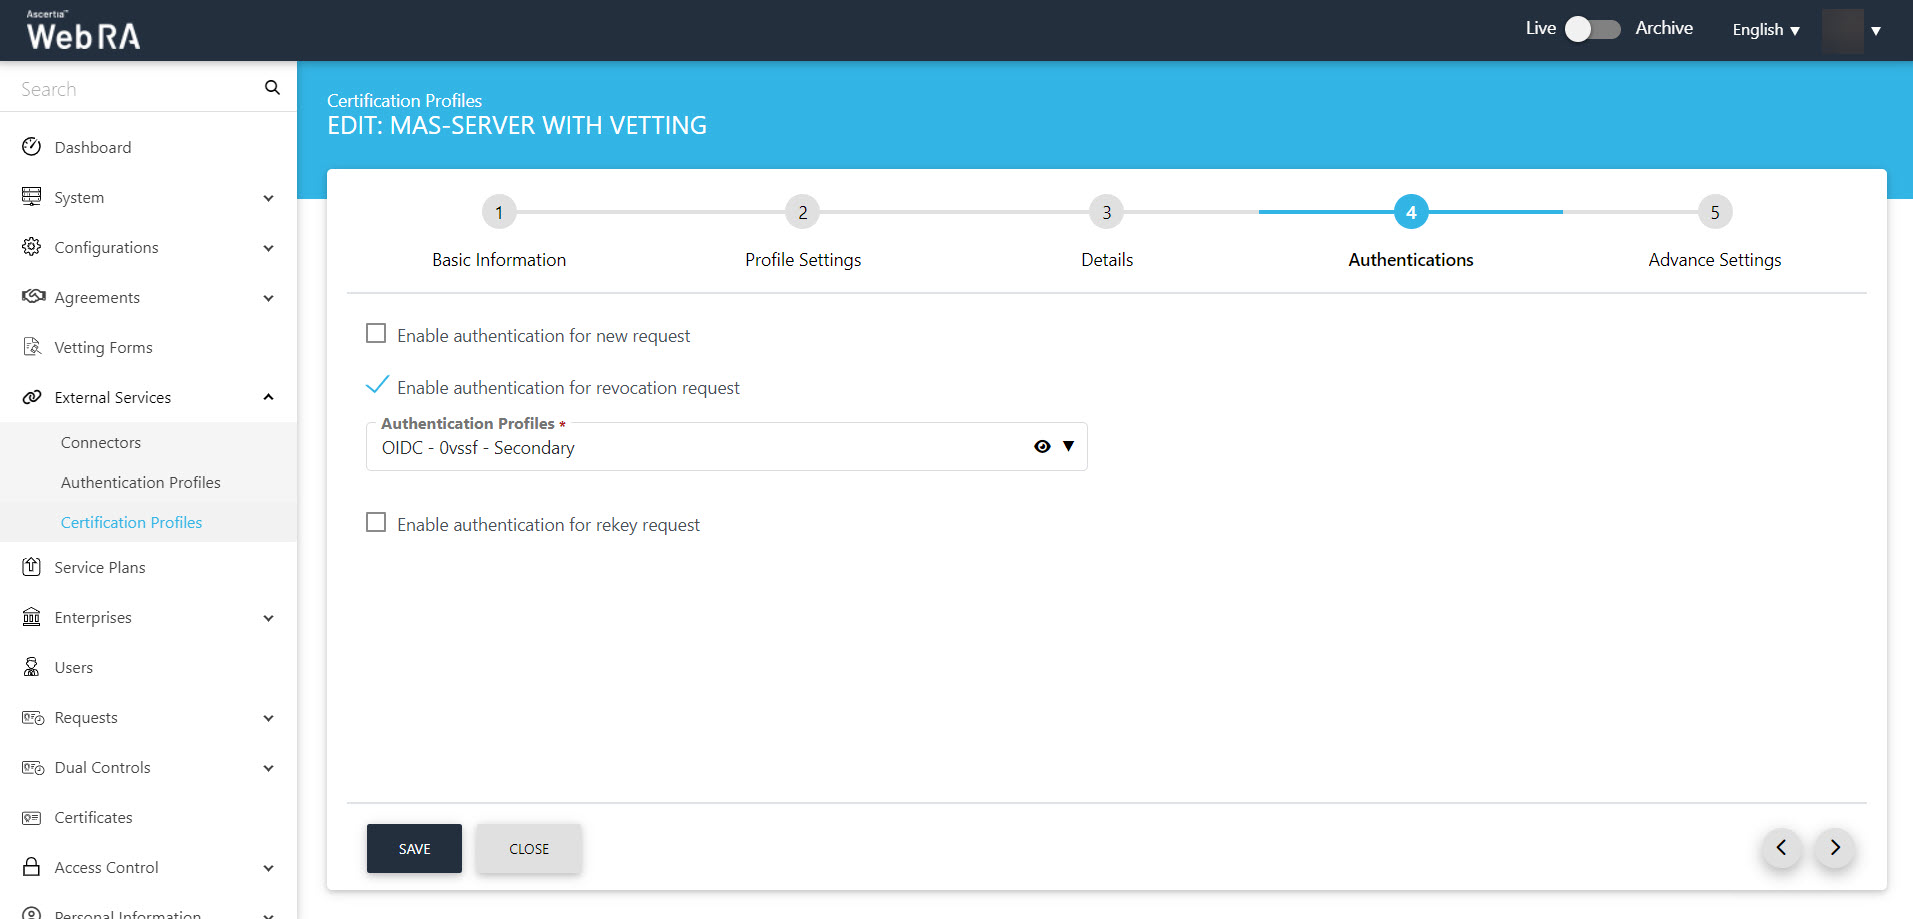
Authentications
|
Authentications - Enable Secondary Authentication for: |
|
|
Field |
Description |
|
New Requests |
If enabled then an OTP (One TIme Password) can be set as a second factor authentication, and an enterprise RAO has to provide an OTP to approve new certificate request. The OTP can be received either through SMS or via an email, depending upon the selected profile. In Authentication Profiles list only those profiles are listed for which secondary authentication has configured while creating that authentication profile. See Authentication Profiles section for details. |
|
Revocation Requests |
If enabled then an OTP (One TIme Password) can be set as a second factor authentication, and an enterprise RAO has to provide an OTP to approve a certificate revocation request. The OTP can be received either through SMS or via an email, depending upon the selected profile. In Authentication Profiles list only those profiles are listed for which secondary authentication has configured while creating that authentication profile. See Authentication Profiles section for details. |
|
Rekey Requests |
Enable authentication for rekey requests will show in the 'Authentications' section to handle second factor authentications for rekey certificate. This section appears only when the operator has enabled the 'rekey' policy. Configurations > Policy |
|
Renew Requests |
Enable authentication for renew requests will show in the Authentications section to manage second factor authentication for renew certificate. This section appears only when the operator has enabled the 'rekey' policy.Configurations > Policy |
An administrator can use any of the available methods (OTP, SAML, Active Directory, Azure Active Directory, or OIDC) for secondary authentications, and can enable authentication for new certificate requests, revocation requests and rekey requests as displayed in the screenshot below:
Details
Once you have configured the profile settings, click > to move to the Details screen.
|
Details |
|
|
Field |
Description |
|
Use this certificate profile to generate keys on smart cards/tokens |
Enable this option if this profile will be used to generate the certificates in the smart card/ token. |
|
Key Algorithm |
Key Algorithm that will be used to generate the key pair in the smart card/token. This configuration is coming from the ADSS Server so it cannot be changed |
|
Key Length |
Key Length that will be used to generate the key pair in the smart card/token. This configuration is coming from the ADSS Server so it cannot be changed |
|
Validity Period Type |
Validity period type can be configured as a Fixed to restrict the enterprise user to change the certificate validity or it can be set as Custom if enterprise RAO allow an enterprise user to set validity period while creating a certificate request. These Fixed and Custom values can only be used on ADSS Web RA admin, if the selected ADSS Certification profile has set overridable option in certification profile. It will be shown as Fixed validity period type otherwise. |
|
Validity Period |
The certificate validity period. If the CA profile is configured to use its time instead taking the time from the request then this value will be dropped by the CA server. |
|
Validity Duration |
The time unit of the validity period. It could be minutes, hours, days, months and years. |
Authentications
An administrator can use any of the available methods (OTP, SAML, Active Directory, Azure Active Directory, or OIDC) as secondary authentications for new certificate requests, revocation requests and rekey requests. In the screenshot below, OIDC is set as a second factor authentication on the revocation requests.
|
Authentications - Enable Secondary Authentication for: |
|
|
Field |
Description |
|
New Requests |
If enabled then an OTP (One TIme Password) can be set as a second factor authentication, and an enterprise RAO has to provide an OTP to approve new certificate request. The OTP can be received either through SMS or via an email, depending upon the selected profile. In Authentication Profiles list only those profiles are listed for which secondary authentication has configured while creating that authentication profile. See Authentication Profiles section for details. |
|
Revocation Requests |
If enabled then an OTP (One TIme Password) can be set as a second factor authentication, and an enterprise RAO has to provide an OTP to approve a certificate revocation request. The OTP can be received either through SMS or via an email, depending upon the selected profile. In Authentication Profiles list only those profiles are listed for which secondary authentication has configured while creating that authentication profile. See Authentication Profiles section for details. |
|
Rekey Requests |
Enable authentication for rekey requests will show in the 'Authentications' section to handle second factor authentications for rekey certificate. This section appears only when the operator has enabled the 'rekey' policy. Configurations > Policy |
|
Renew Requests |
Enable authentication for renew requests will show in the Authentications section to manage second factor authentication for renew certificate. This section appears only when the operator has enabled the 'rekey' policy.Configurations > Policy |
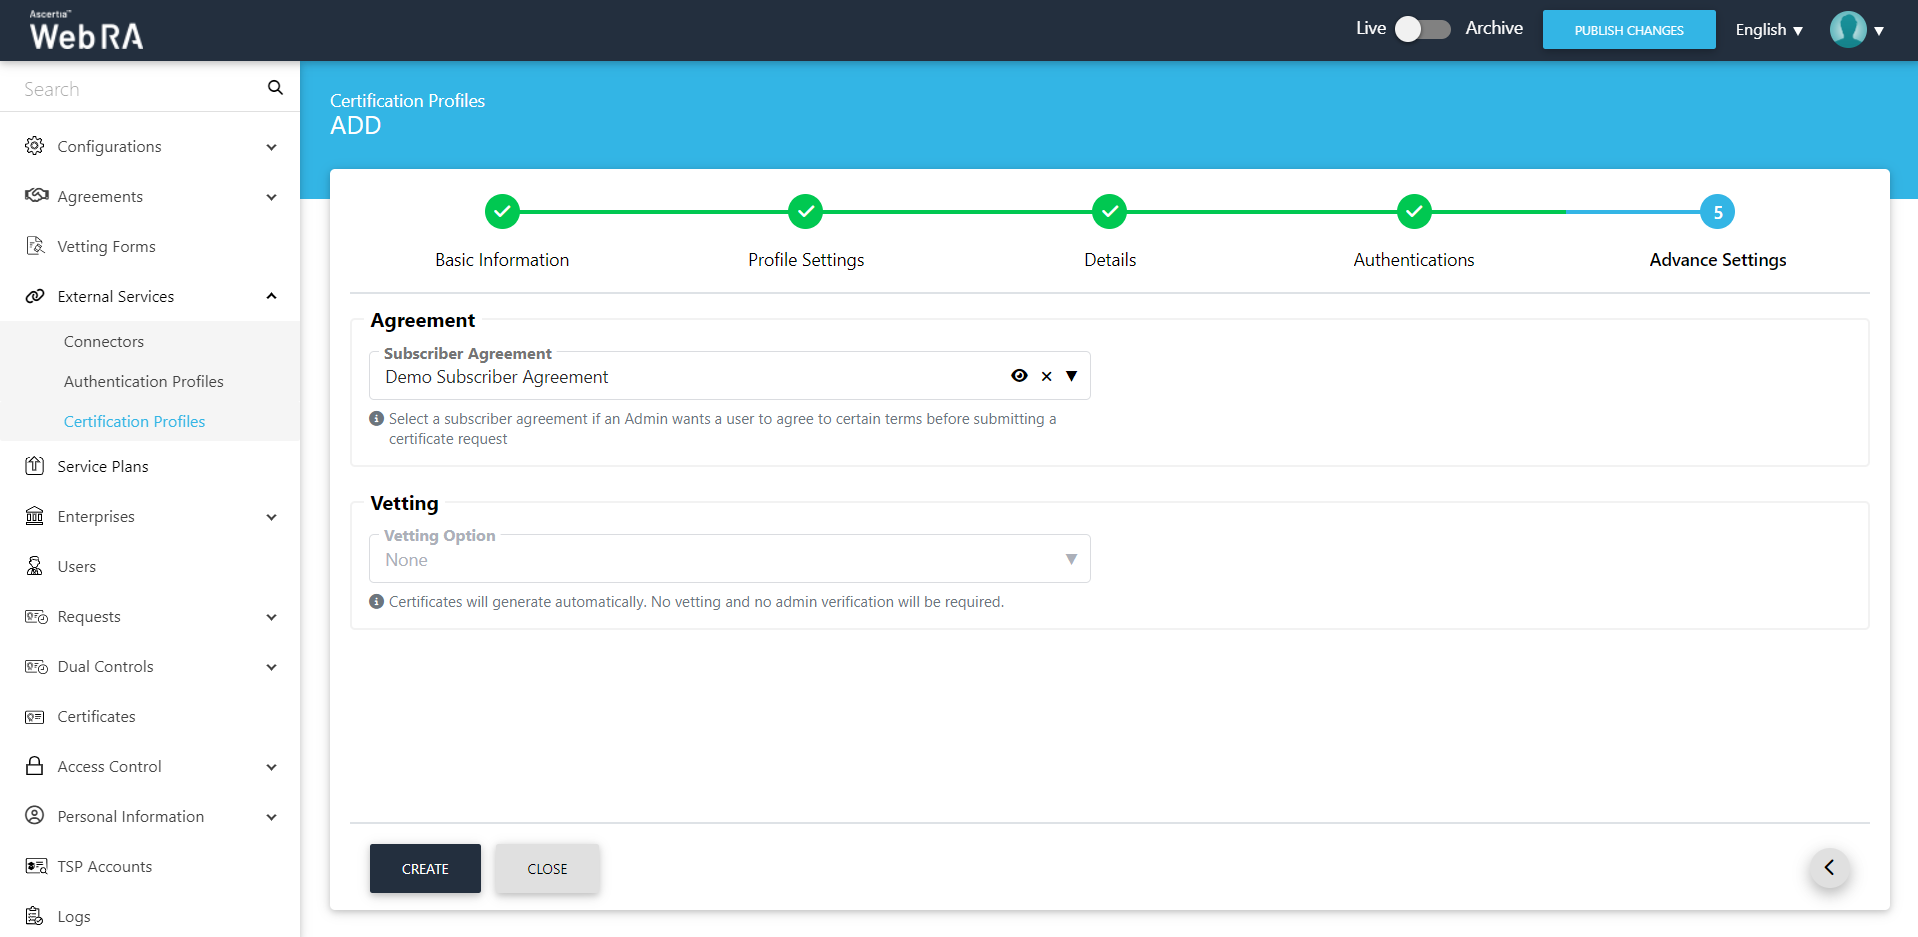
Select a subscriber agreement from the drop down. You can also apply vetting
|
|
If a certification profile is created without vetting, then a user will be registered in the ADSS Web RA, his virtual ID certificate will be created and provisioned in SigningHub. However, if vetting is set in the profile only a user will be registered in the ADSS Web RA , no certificate will be generated and no user will be created in SigningHub. |

|
Advance Settings |
|
|
Field |
Description |
|
Agreement |
Select a subscriber agreement if an admin wants a user to agree on certain terms before submitting a certificate request |
|
Vetting Option |
Select whether vetting is required for this certification service profile or not. Select the Manual Vetting option if you require the vetting provision and then select a vetting form from the next appearing field. |
|
Vetting Form |
This field will display the list of active vetting forms. Select the one to use for this certification profile. |
|
Enable Revocation Vetting |
Select this checkbox to enable vetting for revocation |
|
Special Permission |
Special permission configurations allow you to permit creation or revocation of certificates to a specific number of Admin RAOs and Enterprise RAOs |
|
Vetting Permission |
Vetting permissions for new certificate request:
|
|
Admin RAO for Certificate Creation |
The number of Admin RAO (s) that can vet a certificate request |
|
Enterprise RAO for Certificate Creation |
The number of Enterprise RAO (s) that can vet a certificate request |
Click Create to complete the process of creating a certification profile.
The next step is to create a service plan.
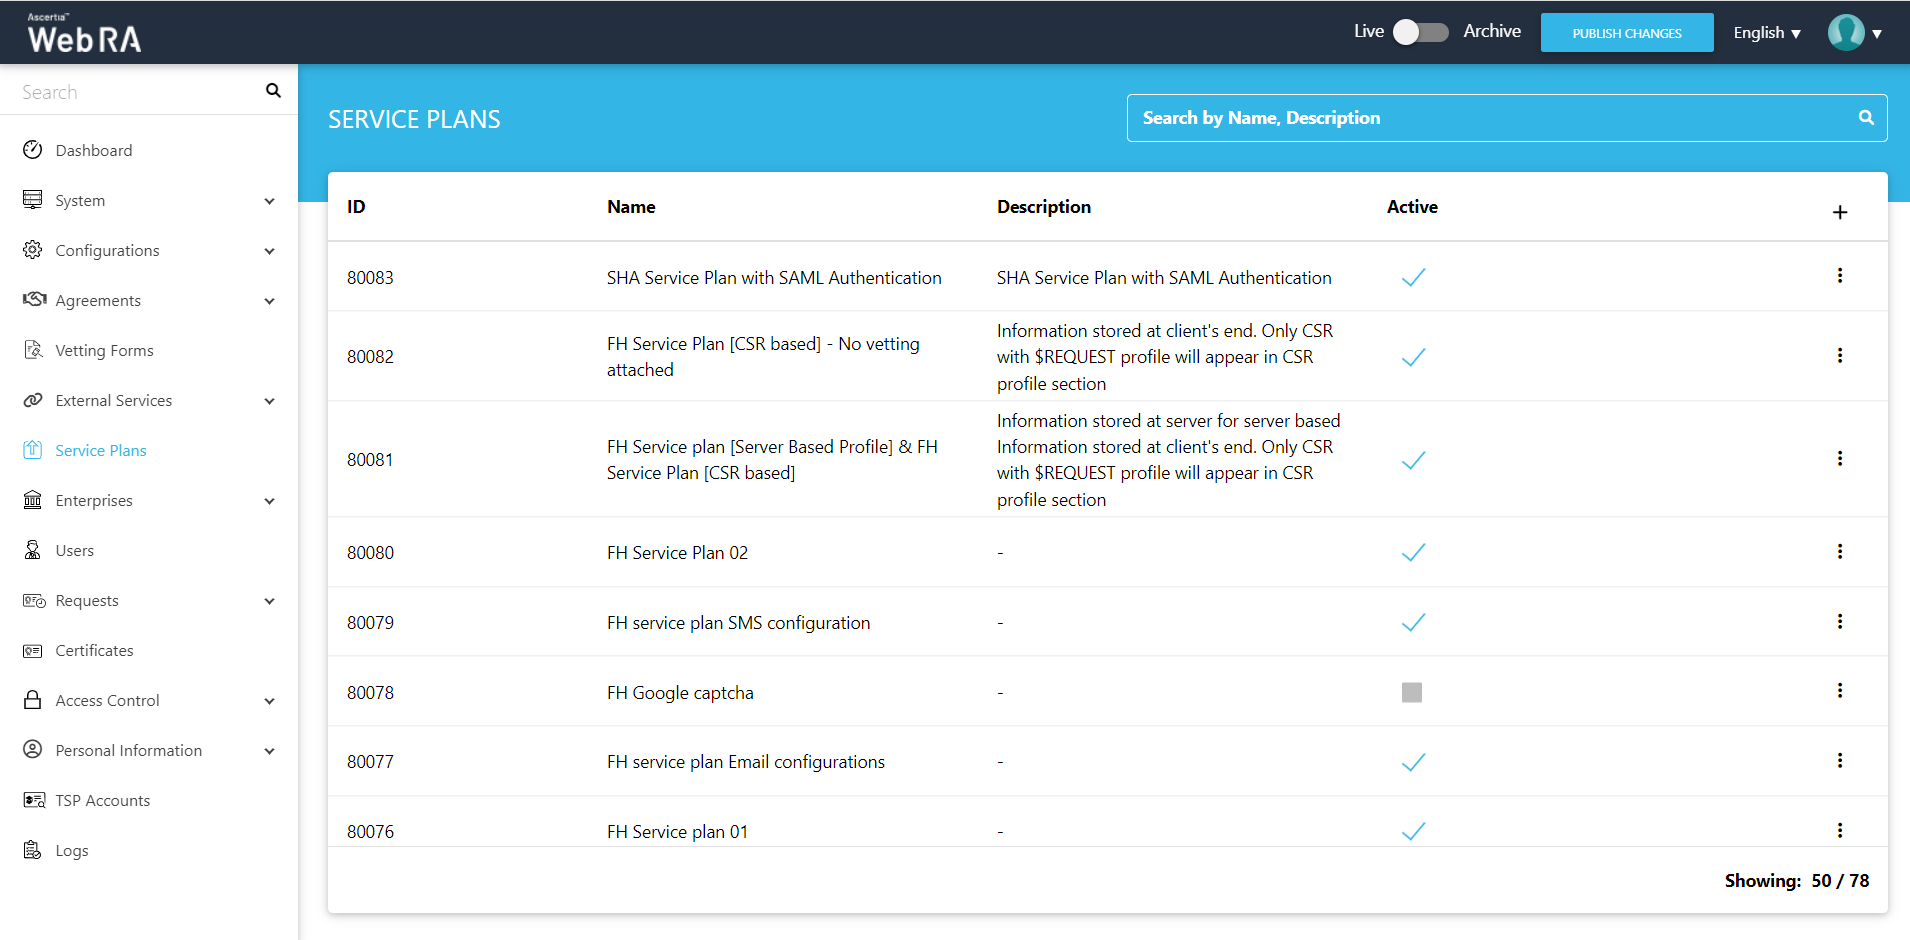
A service plan is a collection of allowed services and certificate types that are assigned to an Enterprise.
- A service plan (s) can be assigned to enterprises only. You cannot assign a Service Plan to the users directly.
- Based on your business requirements you can create multiple service plans to offer different set of certification services to different enterprises.
- You can configure one service plan in multiple enterprises but it is a good practice to create separate service plans for each enterprise if you are a service provider and there are many enterprises registered in the ADSS Web RA application.
- You can also change the service plan for a particular enterprise from the web portal. Click here.
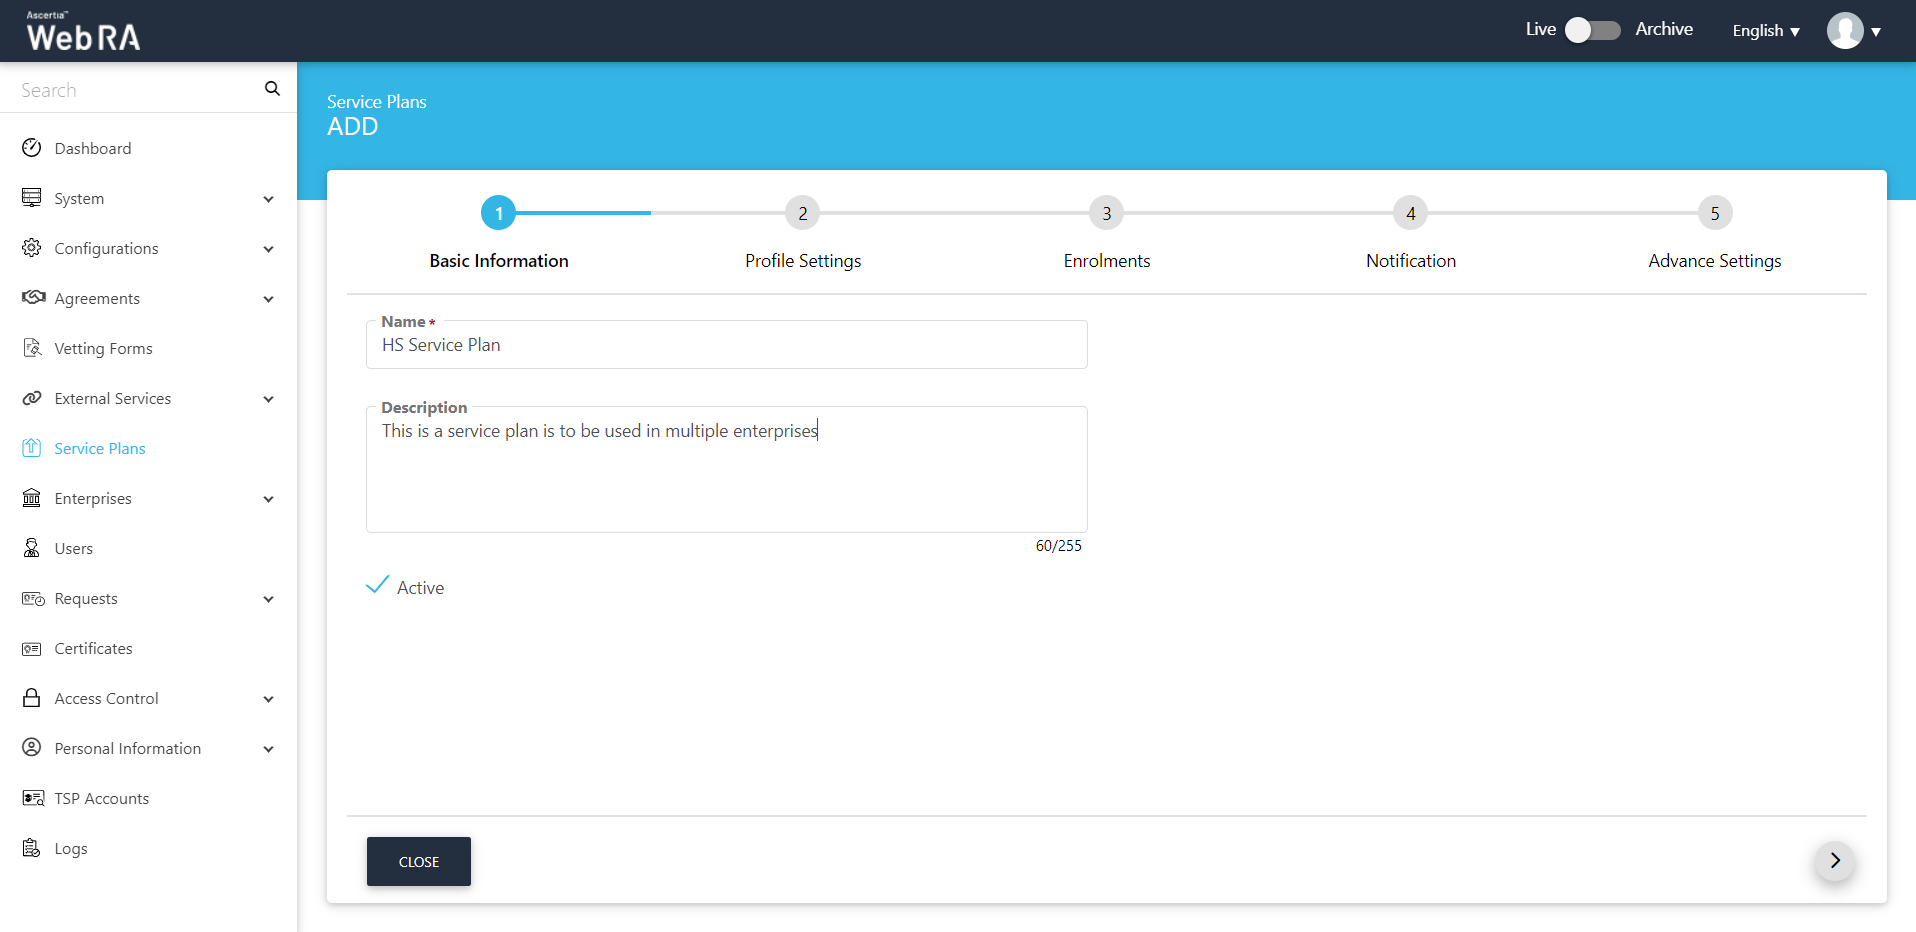
Follow these steps to create a service plan
- Click Service Plans from the left menu.
- Click
 from the grid header.
- A dialog wizard will appear to configure the service plan details. The wizard consists of 5 sequential screens, i.e.: Basic Information, Profile Settings, Enrolments, Notification and Advance Settings.
Enter fields on the Basic Information tab. Then click >.
|
Basic Information |
|
|
Field |
Description |
|
Name |
Specify a unique name for this service plan, i.e. My Service Plan. The service plans are used in the configuration of Enterprise Accounts. |
|
Description |
Specify any description related to this service plan for your record. |
|
Active |
Select this check box to make this service plan active. Inactive service plans cannot be configured in the Enterprise Accounts. |
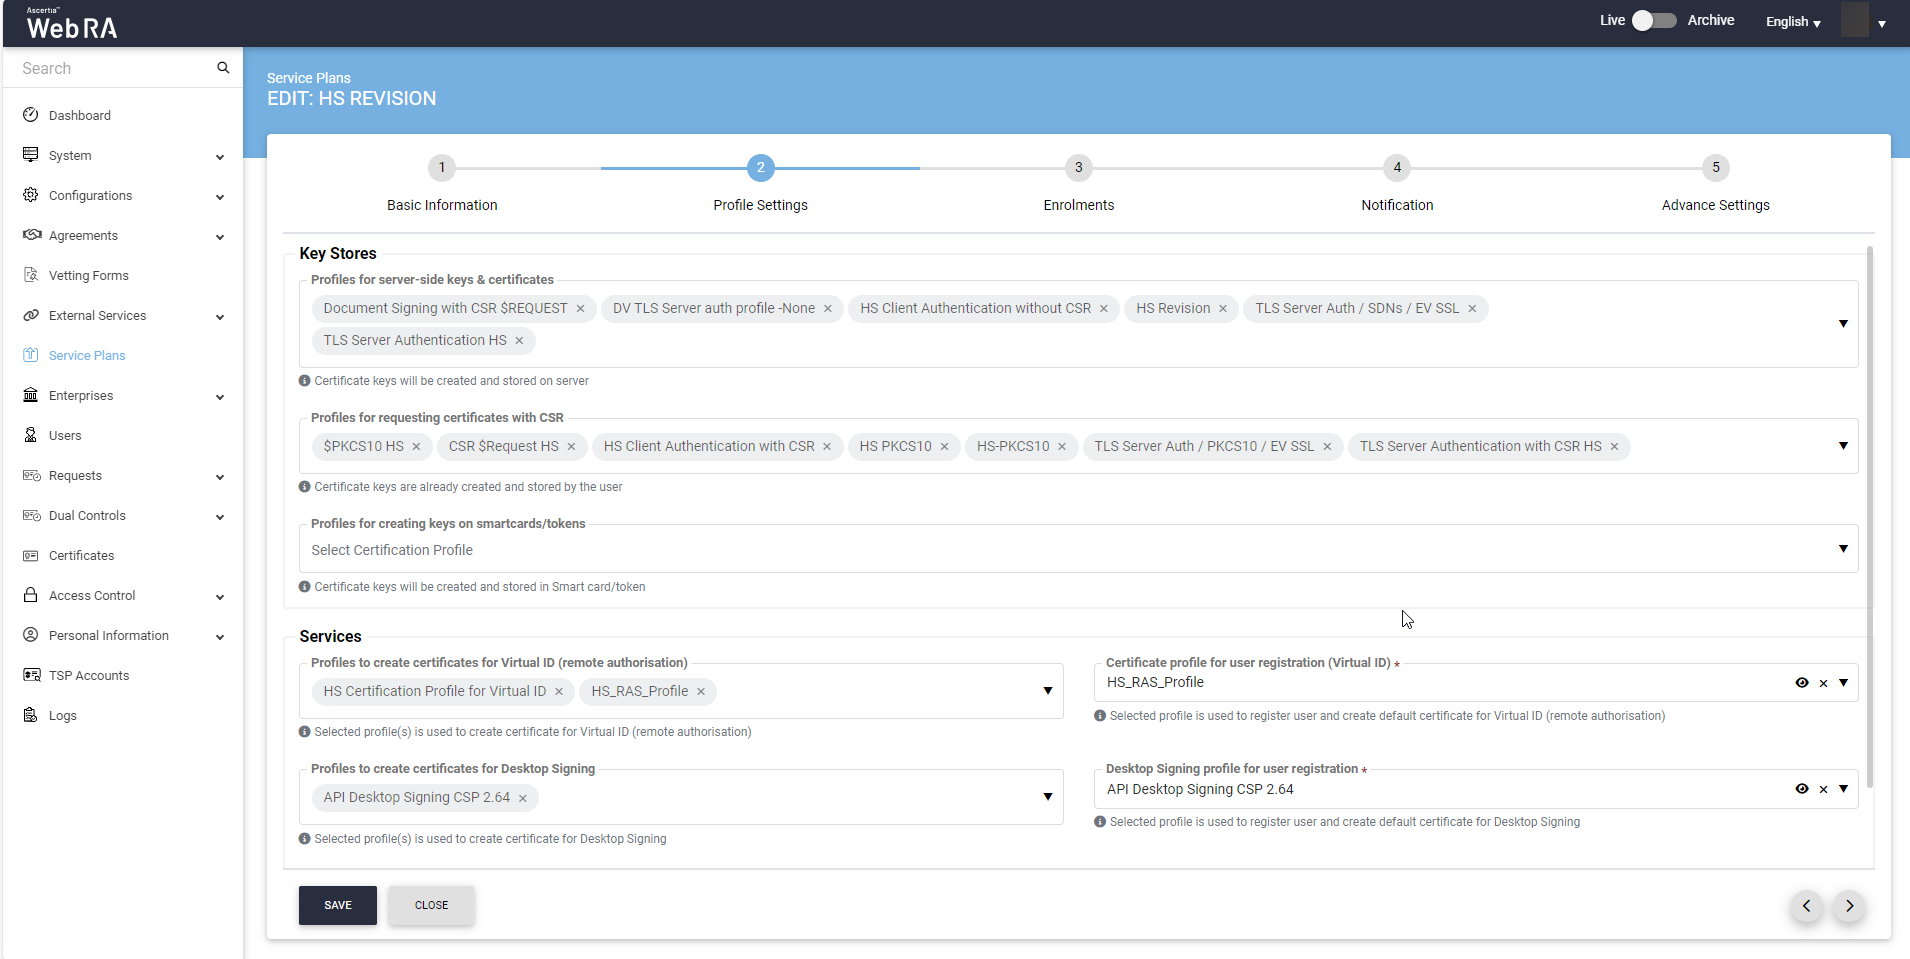
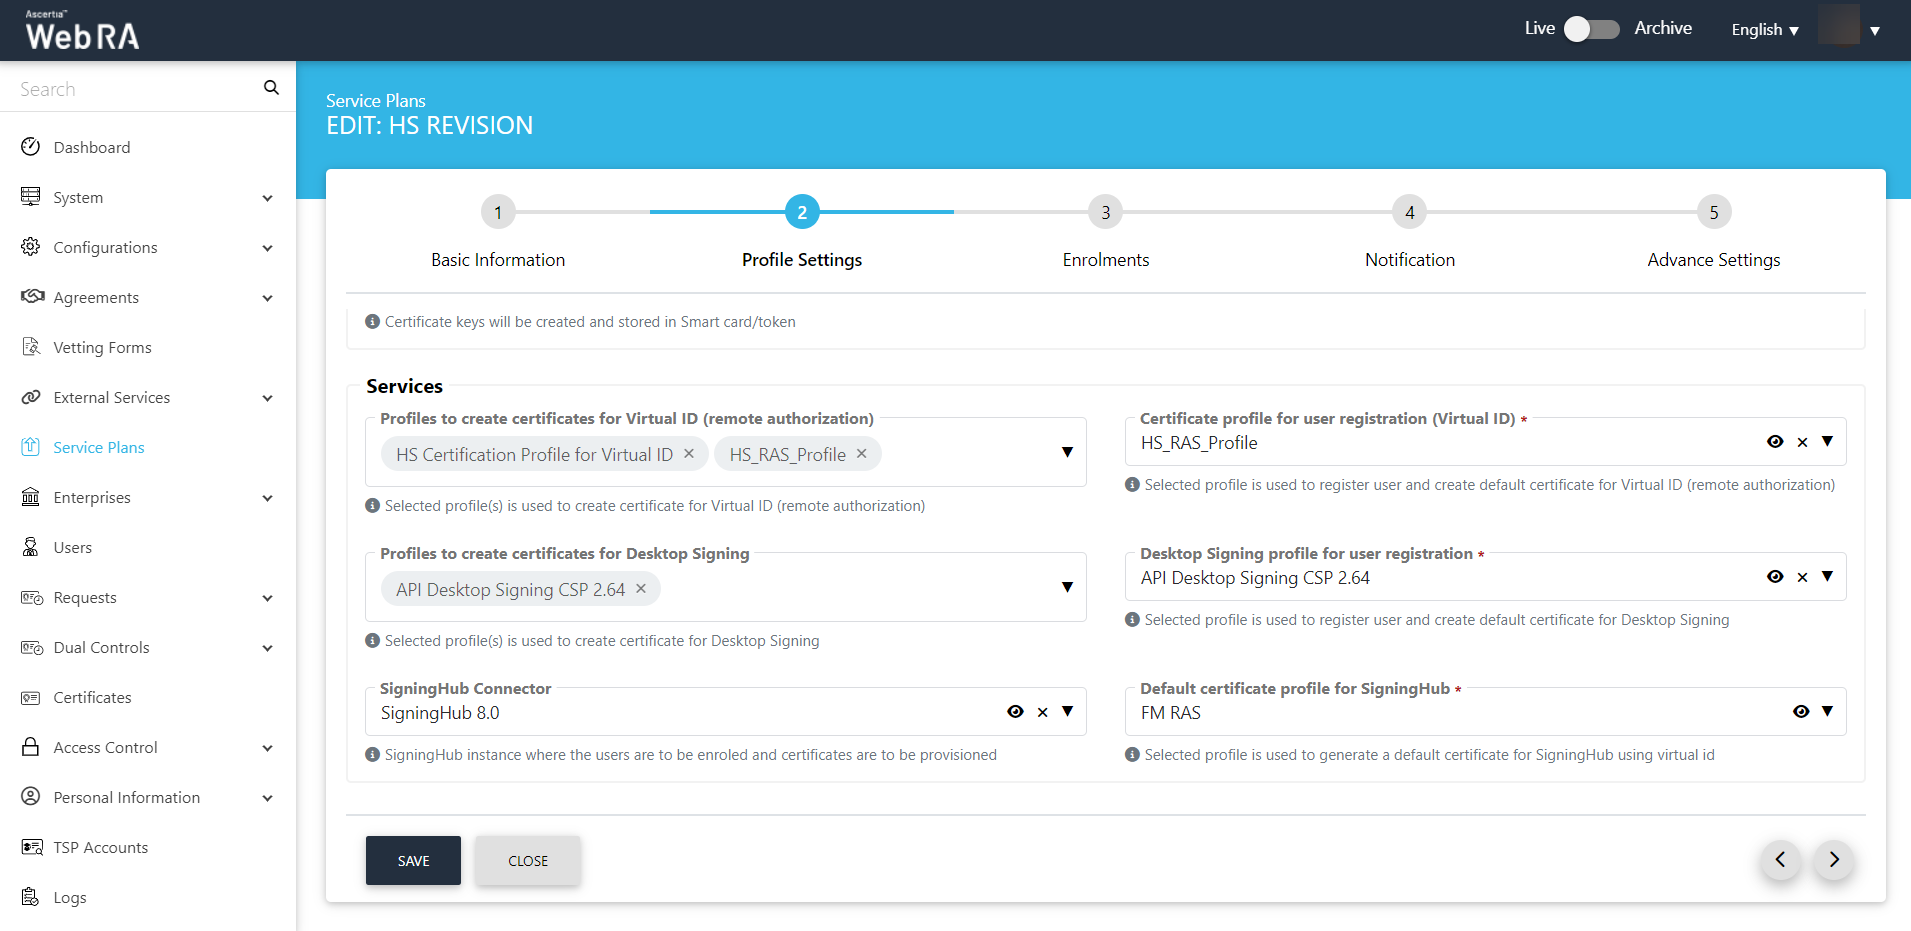
Select profiles to create certificates on the Profile Settings tab and then click >.
|
Profiles Settings |
|
|
Field |
Description |
|
Services >Profiles to create certificates for Virtual ID (remote authorisation) |
This drop down will allow user to set multiple profiles to create Virtual ID certificates. |
|
Services >Certificate profile for user registration (Virtual ID) |
This drop down will allow user to set a default profile to create Virtual ID certificates. |
|
Desktop Signing profile for user registration |
This field will allow a user to select a profile to register user and create a default certificate for Desktop Signing. |
|
Services > SigningHub Connector |
This shows the list of all configured SigningHub connectors that can be used for ADSS Web RA integration. |
|
Services > Default certificate profile for SigningHub |
This shows the list of all configured certification profiles which can be used for default certificate generation for Remote Authorisation Signing under integrated app. If None is selected then no default certificate will be generated under integrated app for enterprise account at registration time. |
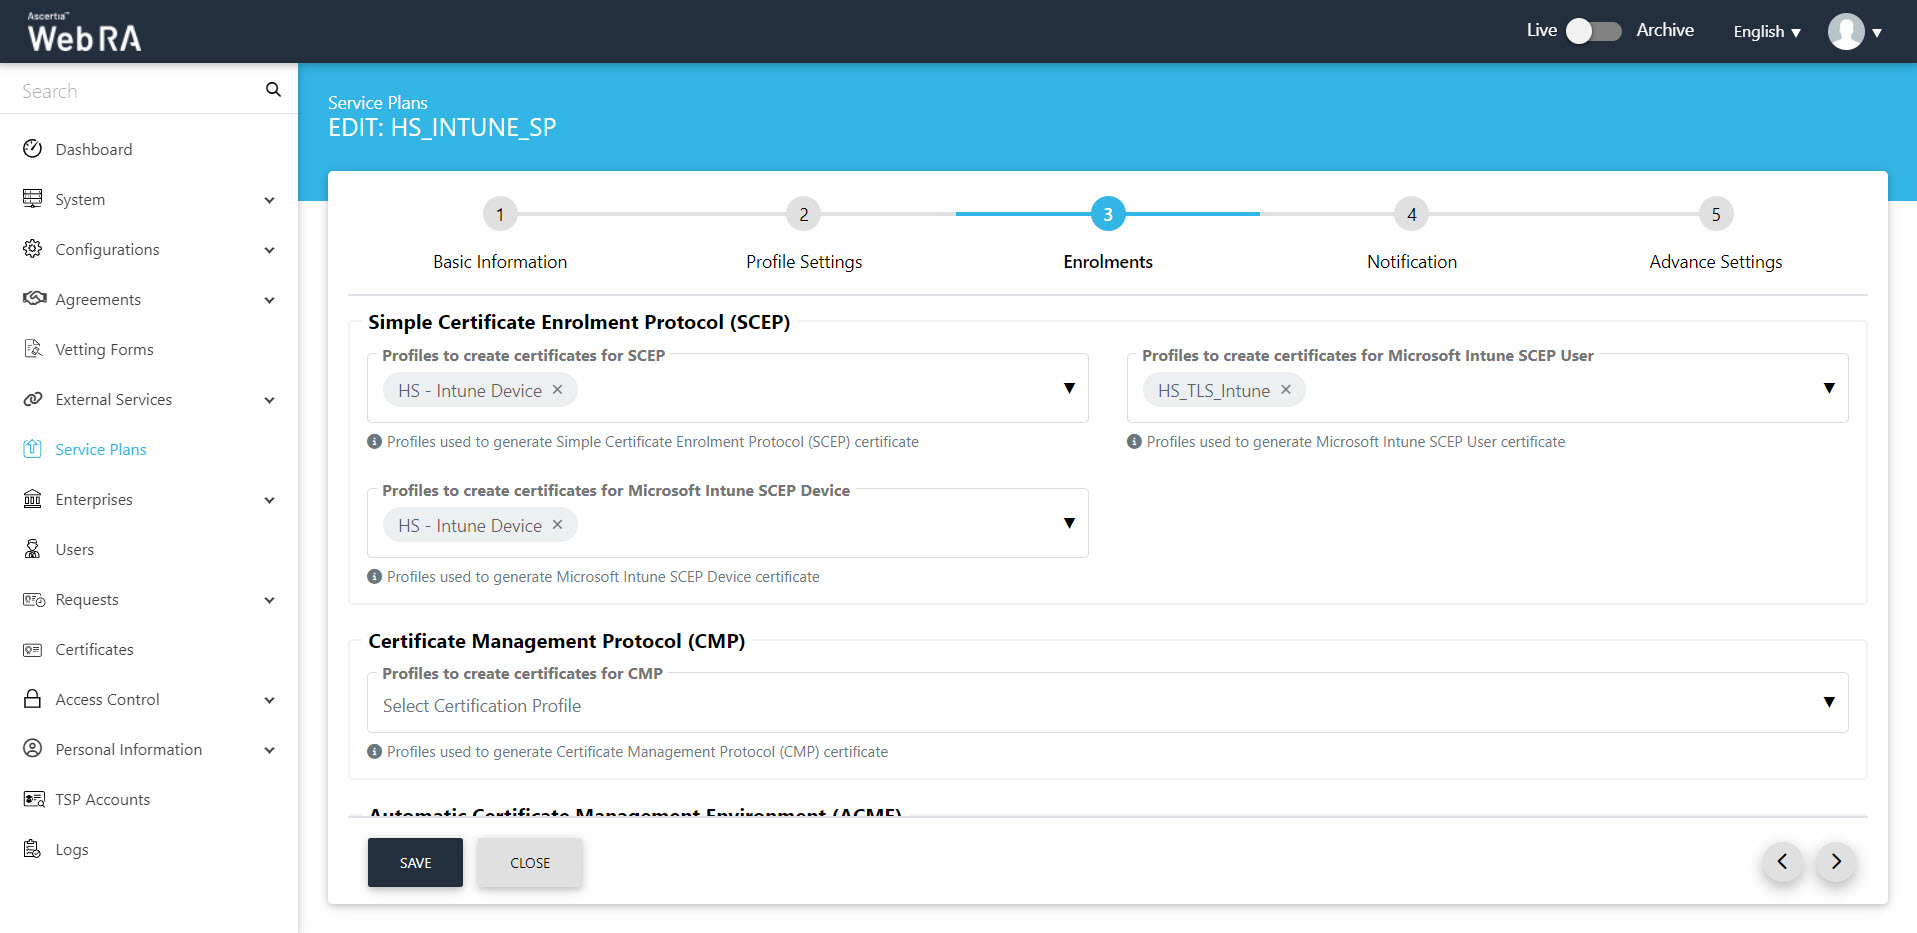
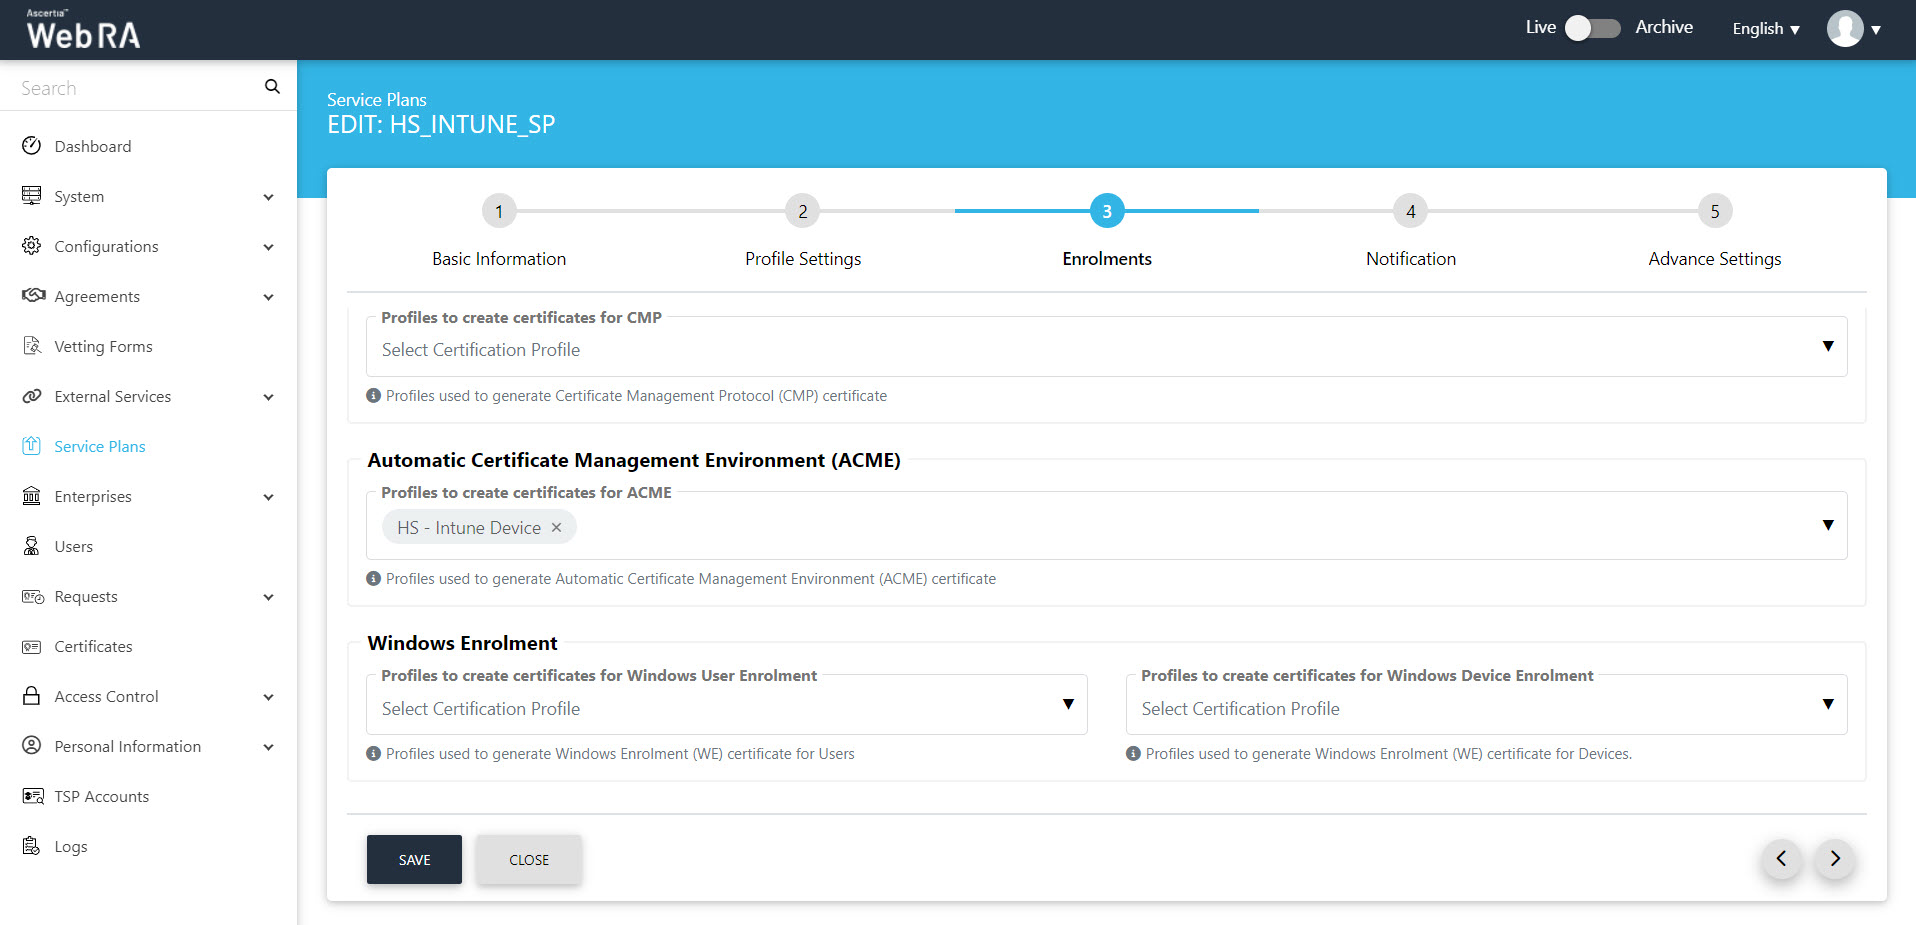
Enrolments
Select the required profiles for generating certificates on the Enrolments tab and then click > to proceed.
|
Profiles Settings |
|
|
Field |
Description |
|
Profile to create certificates for SCEP |
This drop down lists all profiles used to generate Simple Certificate Enrolment Protocol (SCEP) certificate. |
|
Profile to create certificates for CMP |
This drop down lists all profiles used to generate Certificate Management Protocol (CMP) certificate. |
|
Profile to create certificates for ACME |
This drop down lists all profiles used to generate Automatic Certificate Management Environment (ACME) certificate. |
|
Profile to create certificates for EST |
This drop down lists all profiles used to generate Enrolment over Secure Transport (EST) certificate. |
|
Profile to create certificates for Windows User Enrolment |
This section lists all profiles used to generate Windows enrolment certificate for users. |
|
Profile to create certificates for Windows Device Enrolment |
This section lists down all configured profiles to create certificates for Windows enrolment certificate for devices. |
Notification
You can configure SMS Gateway and Email Gateway in the Notification tab, and then click >.
|
Notification |
|||
|
Field |
Description |
||
|
SMS Gateway |
This shows all the configured SMS gateway connectors that can be selected to receive OTP via SMS. Additionally, OTP length and retry interval can also be set. |
||
|
OTP Length(digits) |
Set the length of OTP |
||
|
OTP Retry Interval (secs) |
Set the retry interval if an OTP does not appear on your mobile device. |
||
|
Email Gateway |
This shows the list of configured SMTP connectors that can be selected to receive email notifications.
|
||

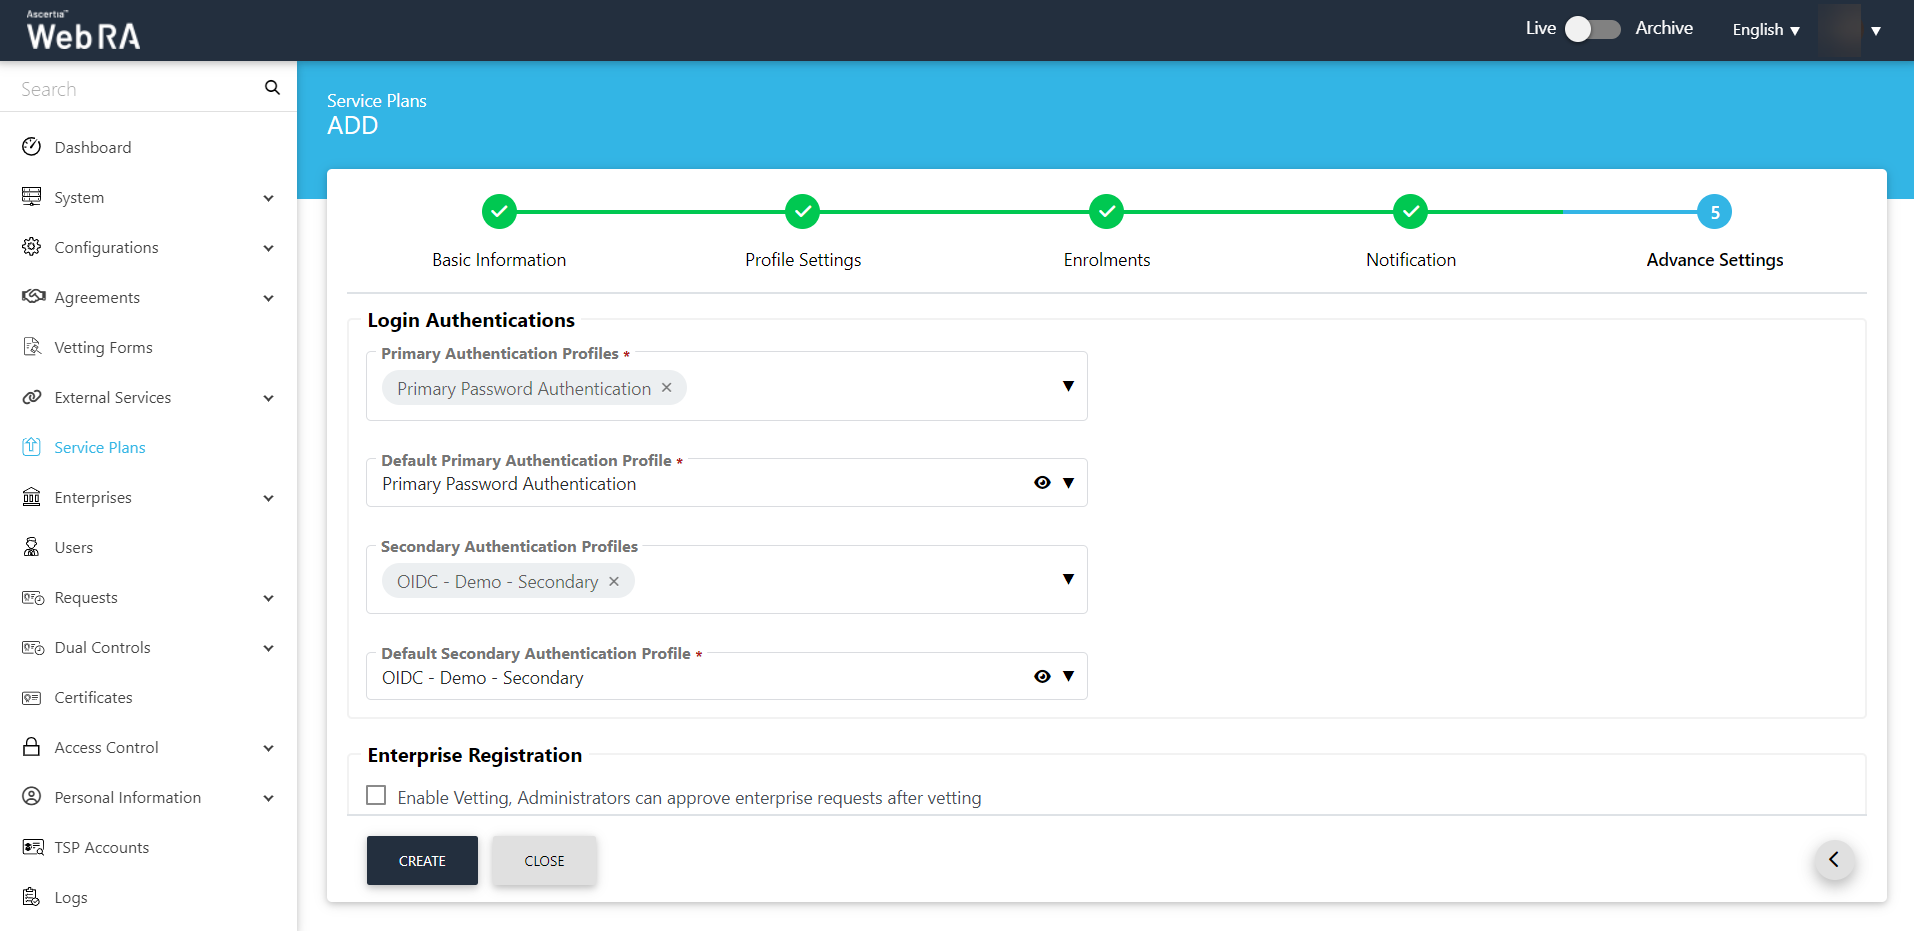
Advance Settings
The Advance Settings screen will display a drop down named as 'Login Authentications', which will require all the primary authentications that are to be configured in the system. Here, the user can select one of the following mechanisms for primary and secondary authentications.
A user can configure the following authentication mechanisms in a service plan:
- Email / Password Authentication
- SMS OTP Authentication
- Email OTP Authentication
- Email & SMS Authentication
- SAML Authentication
- Active Directory Authentication
- Azure Active Directory Authentication
- OIDC
|
Advance Settings |
|
|
Field |
Description |
|
Login Authentications > Primary Authentication Profiles |
When primary authentication is configured as login authentication, it allows an enterprise RAO to login on ADSS Web RA User Portal. An operator can set multiple primary authentication profiles for users in an enterprise. |
|
Default Primary Authentication Profile |
One of the available Primary Authentication profiles must be selected by default for a new service plan. |
|
Secondary Authentication Profiles |
When secondary authentication is configured as login authentication, it allows an Enterprise RAO to login to ADSS Web RA web portal. |
|
Default Secondary Authentication Profile |
One of the available Secondary Authentication profiles must be selected by default for a new service plan. |
|
Enterprise Registration > Enable vetting to approve enterprise registration |
This check box enables vetting for new enterprise account registrations. If enabled, the list of vetting forms appear to select a vetting form while registering an enterprise either through ADSS Web RA admin or ADSS Web RA web. When "None" is selected under vetting form list, then no vetting form appears to be filled. An Admin RAO is required to approve the new enterprise registration only. |
Once you specify the configurations of each screen accordingly, click Next to proceed further.
Click Create. A new service plan will be saved and displayed in the list. You can also edit and delete a service plan, if required.
|
|
It is important to note that primary and secondary authentication profiles mechanism cannot be the same. |
Once you create a service plan, create an enterprise and configure the service plan to it.
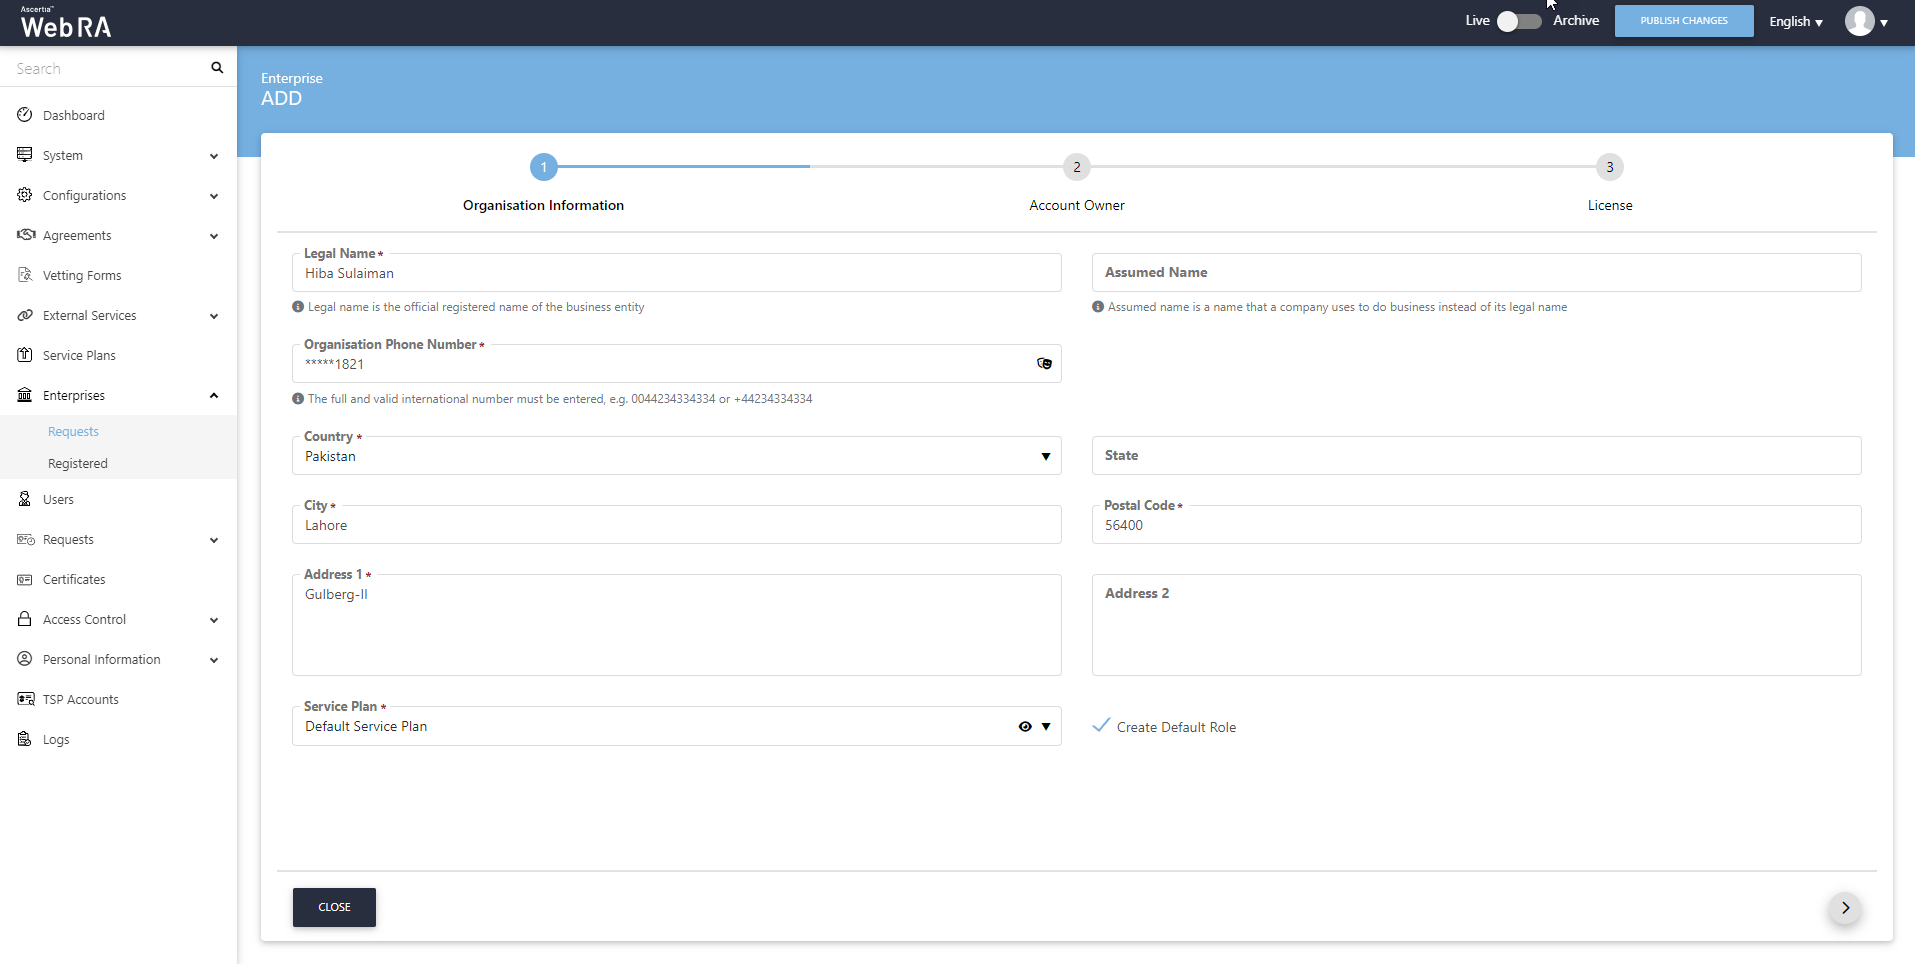
Create/Register an Enterprise and assign Service Plan to it
- Expand Enterprises > Requests from the left menu.
- Click
 from the grid header as displayed in the screenshot below:

- A screen will appear with three navigation tabs, i.e. Organisation Information (Assign Service Plan), Account Owner and License. See the table below for fields and their respective description.
Fill in the Organisation Information fields and the click >.
|
Organisation Information |
|
|
Field |
Description |
|
Legal Name |
Legal Name is the official name of the organisation under which the organization is registered with the government and it is the name that is used when submitting tax to the government e.g. Ascertia Limited |
|
Assumed Name |
It could be the name of the organisation that is commonly used e.g. Ascertia |
|
Organsation Phone Number |
Official phone number of the organisation that is registered in the government documents |
|
Address |
Complete address of the organisation as it was provided to government at the time of company registration. The following fields should be filled as part of Address:
|
|
Service Plan |
Select and assign a service plan to this enterprise. You can use a shared service plan or create a separate plan for each enterprise depending on the certificate issuance of each organisation |
|
Create Default Role |
Select checkbox to create a default role while creating a new enterprise. (screenshot attached below) |
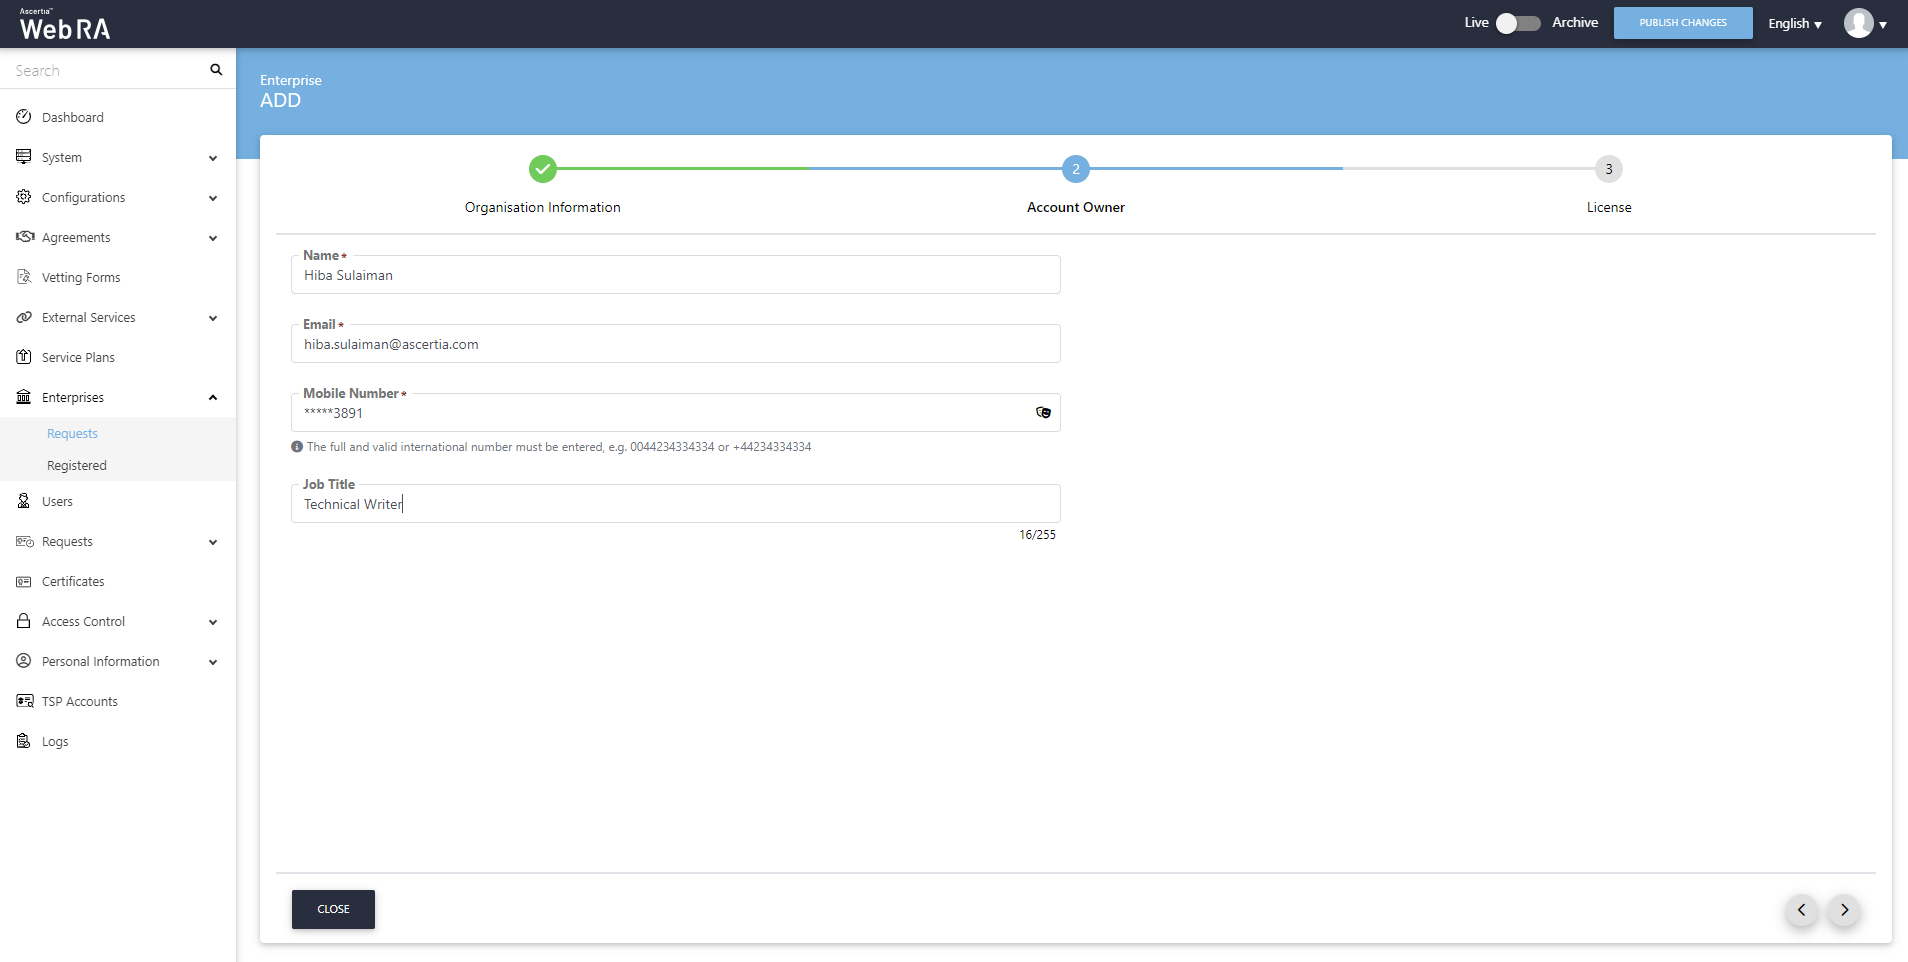
Fill the mandatory fields and click > to proceed.
|
Account Owner |
|
|
Field |
Description |
|
Name |
Name of the enterprise owner. It could be any representative of the organisation but ideally it should be the CEO. Any change request in the enterprise should be initiated by the enterprise owner. |
|
|
Email address of the enterprise owner. An email will be sent to this email address to create an account on the ADSS Web RA Web. |
|
Mobile Number |
Mobile number of the enterprise owner to send the OTP code if enabled in the profile. |
|
Job Title |
The role of the enterprise owner in his organisation. |
- Set Certificate Quote and expiry for the certification profiles on the License screen and click Create.
|
License |
|
|
Field |
Description |
|
Name |
Name of the certification profile for which an enterprise wants to use ADSS Web RA to create certificates. |
|
Unlimited |
It is a check-box that can be used to allow a user to create unlimited certificates. This field will appear only if a user is allowed to create unlimited certificates. |
|
Certificates Quota |
This defines the total number of certificates an enterprise is allowed to generate from ADSS Web RA against each certification profile. |
|
Expiry |
This defines the duration for which these certificates are valid. |
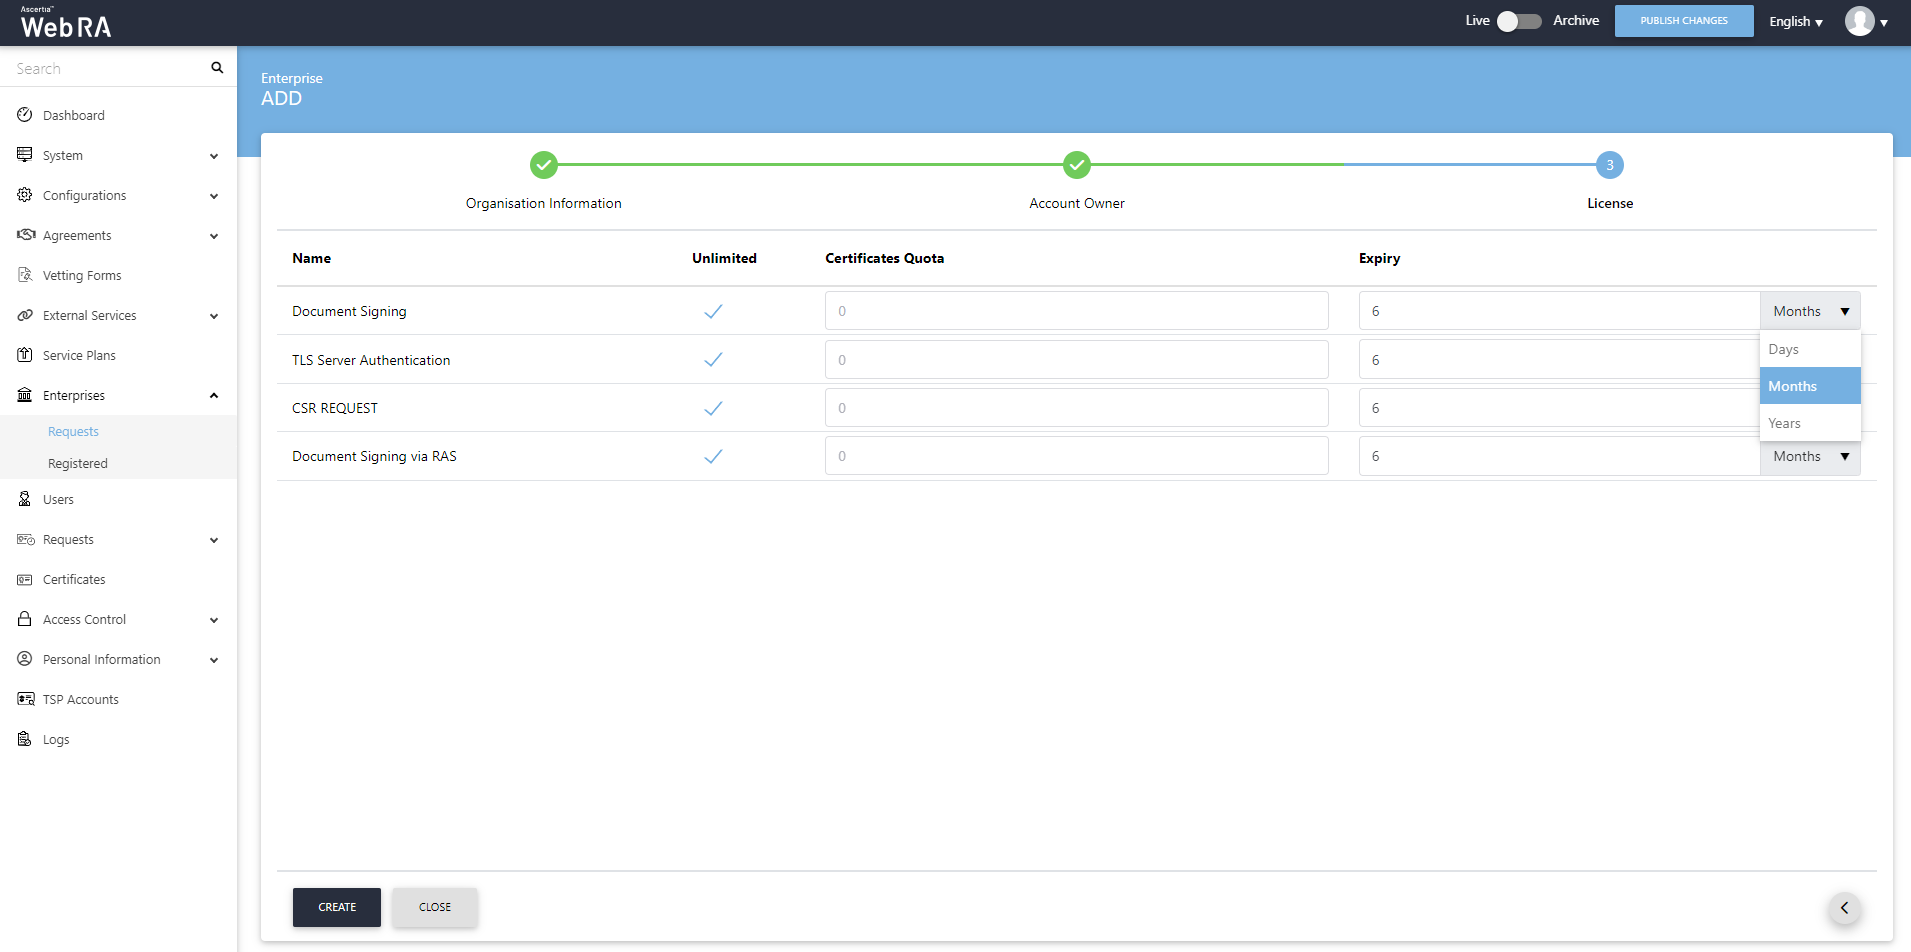
- A new enterprise will be saved and displayed in the list.
|
|
1) An enterprise registration request must be approved by an administrator while registering an enterprise account from ADSS Web RA admin, if vetting is enabled for enterprise registration under service plan. The enterprise account must be shown with Approved status under Enterprises > Requests and with Active status under Enterprises > Registered, once it's approved by an administrator. |


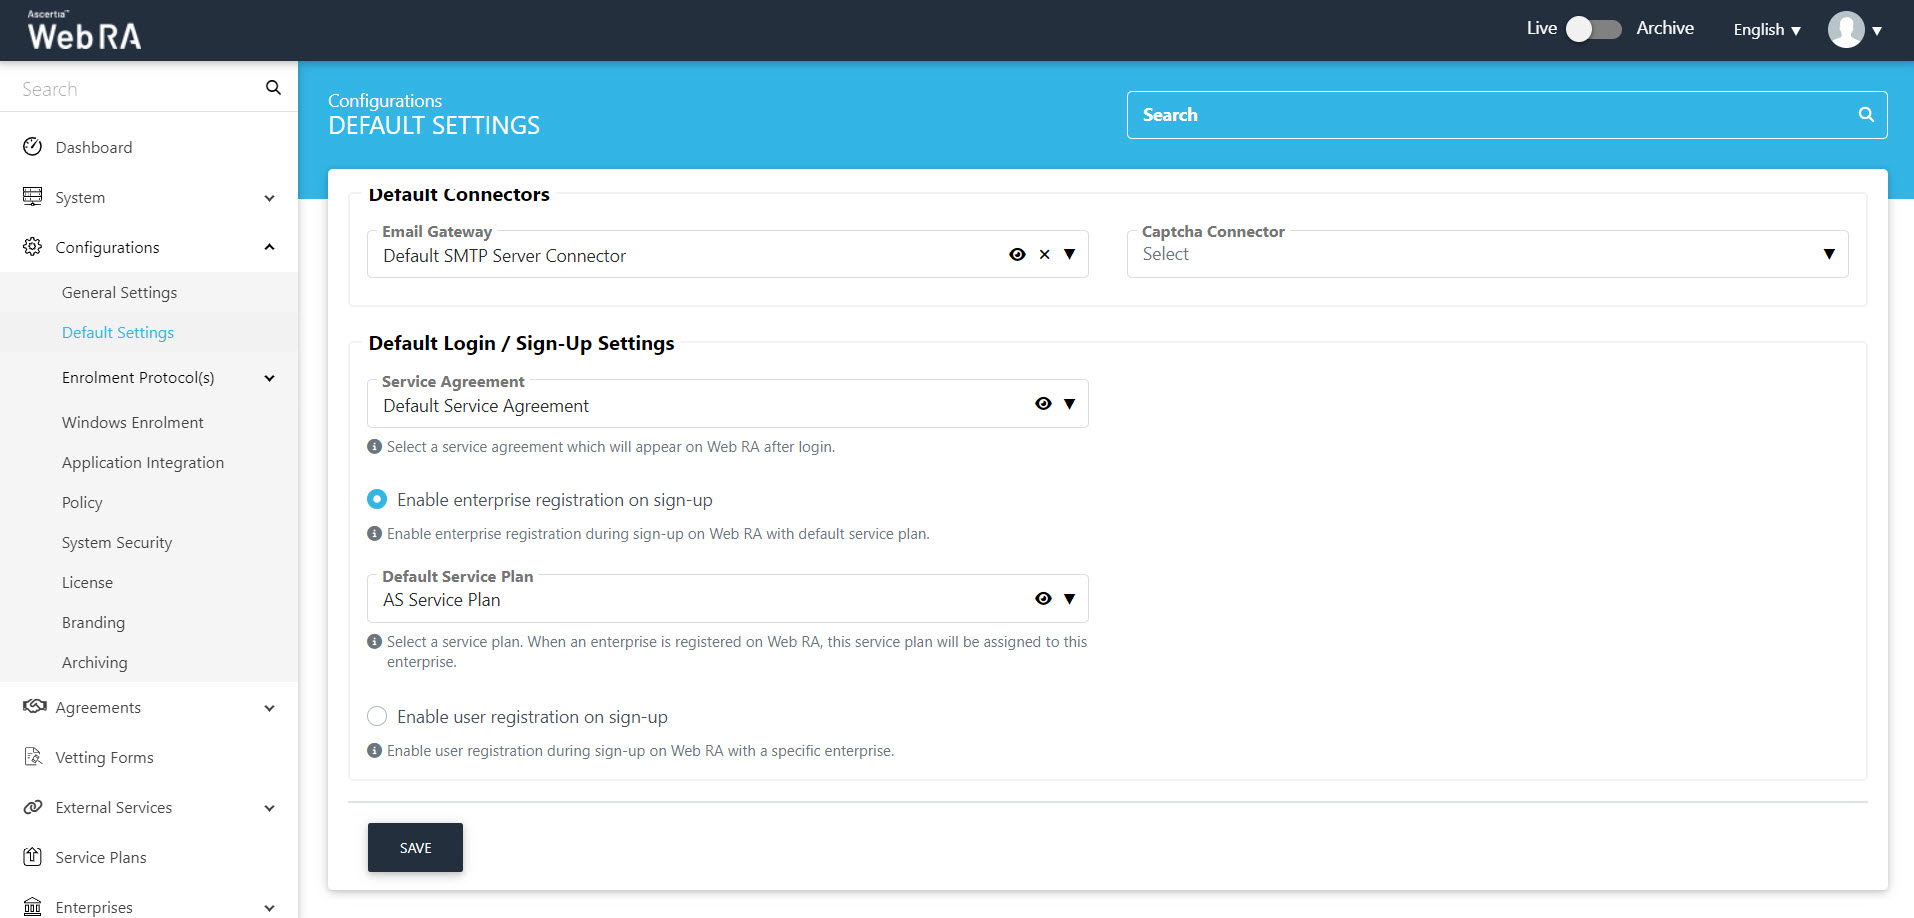
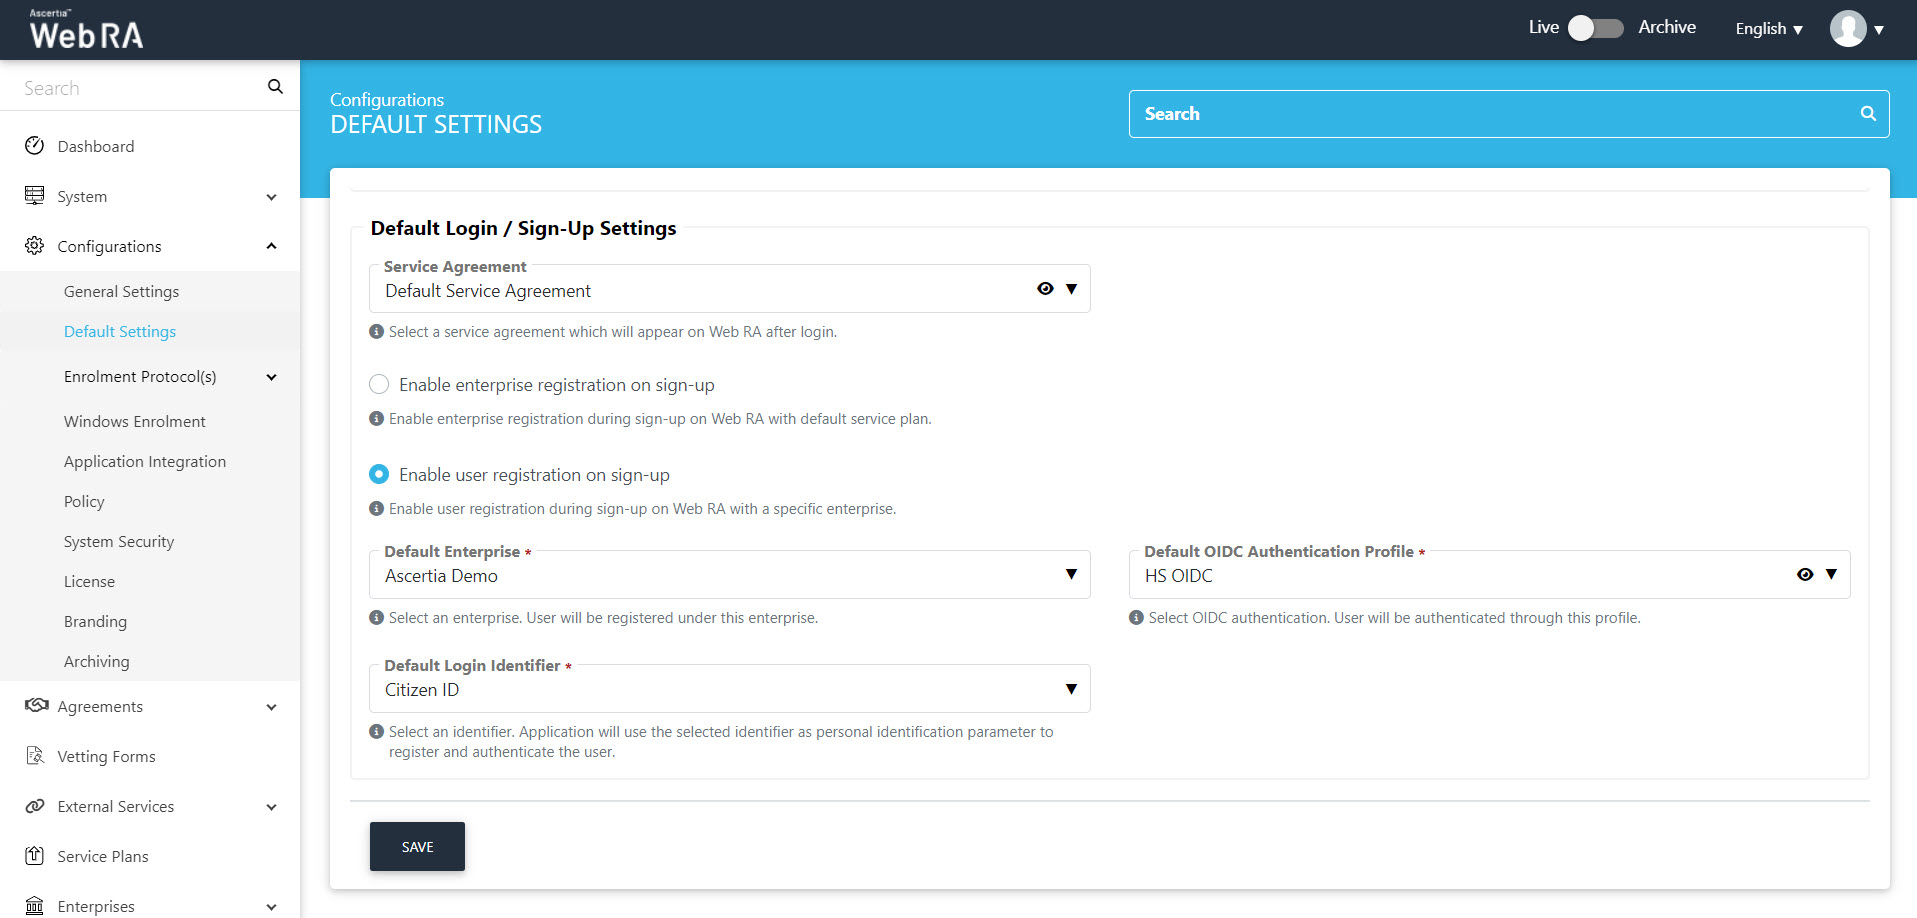
Configure Default Settings for User Registration
Expand Configurations > Default Settings from the left menu.
This section allows an administrator to configure settings for the following:
- Default Locale
- Default Password Policy
- Default Connectors
- Default Login / Sign-Up Settings
An operator can configure registration/sign-up settings in this section. The registration process in ADSS Web RA Server is based on two identifiers:
- Enterprise registration - An operator will enable enterprise registration on sign-up. This means that an enterprise will be registered to ADSS Web RA Server using an email address.
- User registration - An operator will enable user registration on sign-up. In this case, a user will be registered to ADSS Web RA Server using either his citizen ID or email address as the login identifier.
Default Login / Sign-Up Settings
|
Field |
Description |
|
Service Agreement |
A service agreement will appear when a user logs in to ADSS Web RA. |
|
Field |
Description |
|
Enable enterprise registration on sign-up |
Select this radio button if you want to enable enterprise registration during sign-up on Web RA with default service plan. A user can sign-up through his email ID. In this an enterprise will be registered and a default service plan will be assigned to it. |
|
Enable user registration on sign-up |
Select this radio button if you want to enable user registration during sign-up on Web RA with a specific enterprise. A user can sign-up through his citizen ID or email. |
If you select Enable enterprise registration on sign-up the following screen will appear:
|
Field |
Description |
|
Default Service Plan |
Select a service plan. This service plan will be assigned to this enterprise upon registration. An administrator can either select a service plan or select none from this drop down. In case of None, the Sign up option doesn't appear when a user logs in from the web portal. |
If you select Enable user registration on sign-up the following screen will appear:
|
Field |
Description |
|
Default Enterprise |
A user will be registered under this enterprise. So when a user will sign-up/login from ADSS Web RA web portal, he will be registered under this enterprise. |
|
Default OIDC Authentication Profile |
A user will be authenticated through this profile. |
|
Default Login Identifier |
This identifier will be used to register and authenticate the user. Administrator can set one of the following identifiers:
|
Click Save to save your configurations.
Configure Login Authentications in Enterprise Role (Claims Mapping)
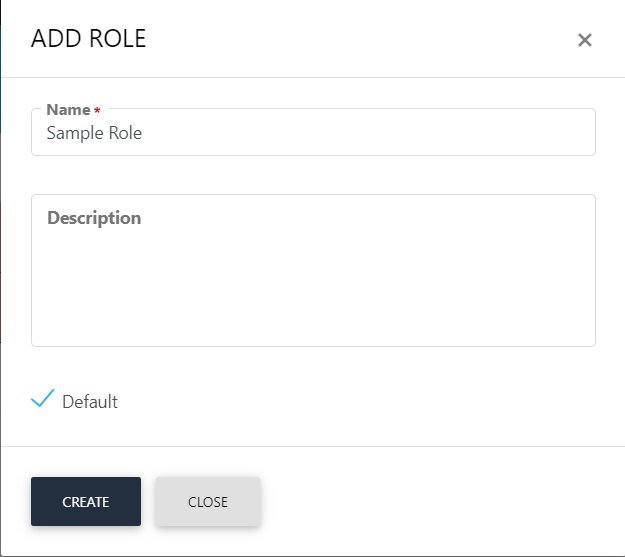
Create a new role:
- The operator can add a role by clicking on the
 button.
 - The operator then needs to enter the name and description, and can also set that role as default by selecting the check box Default.
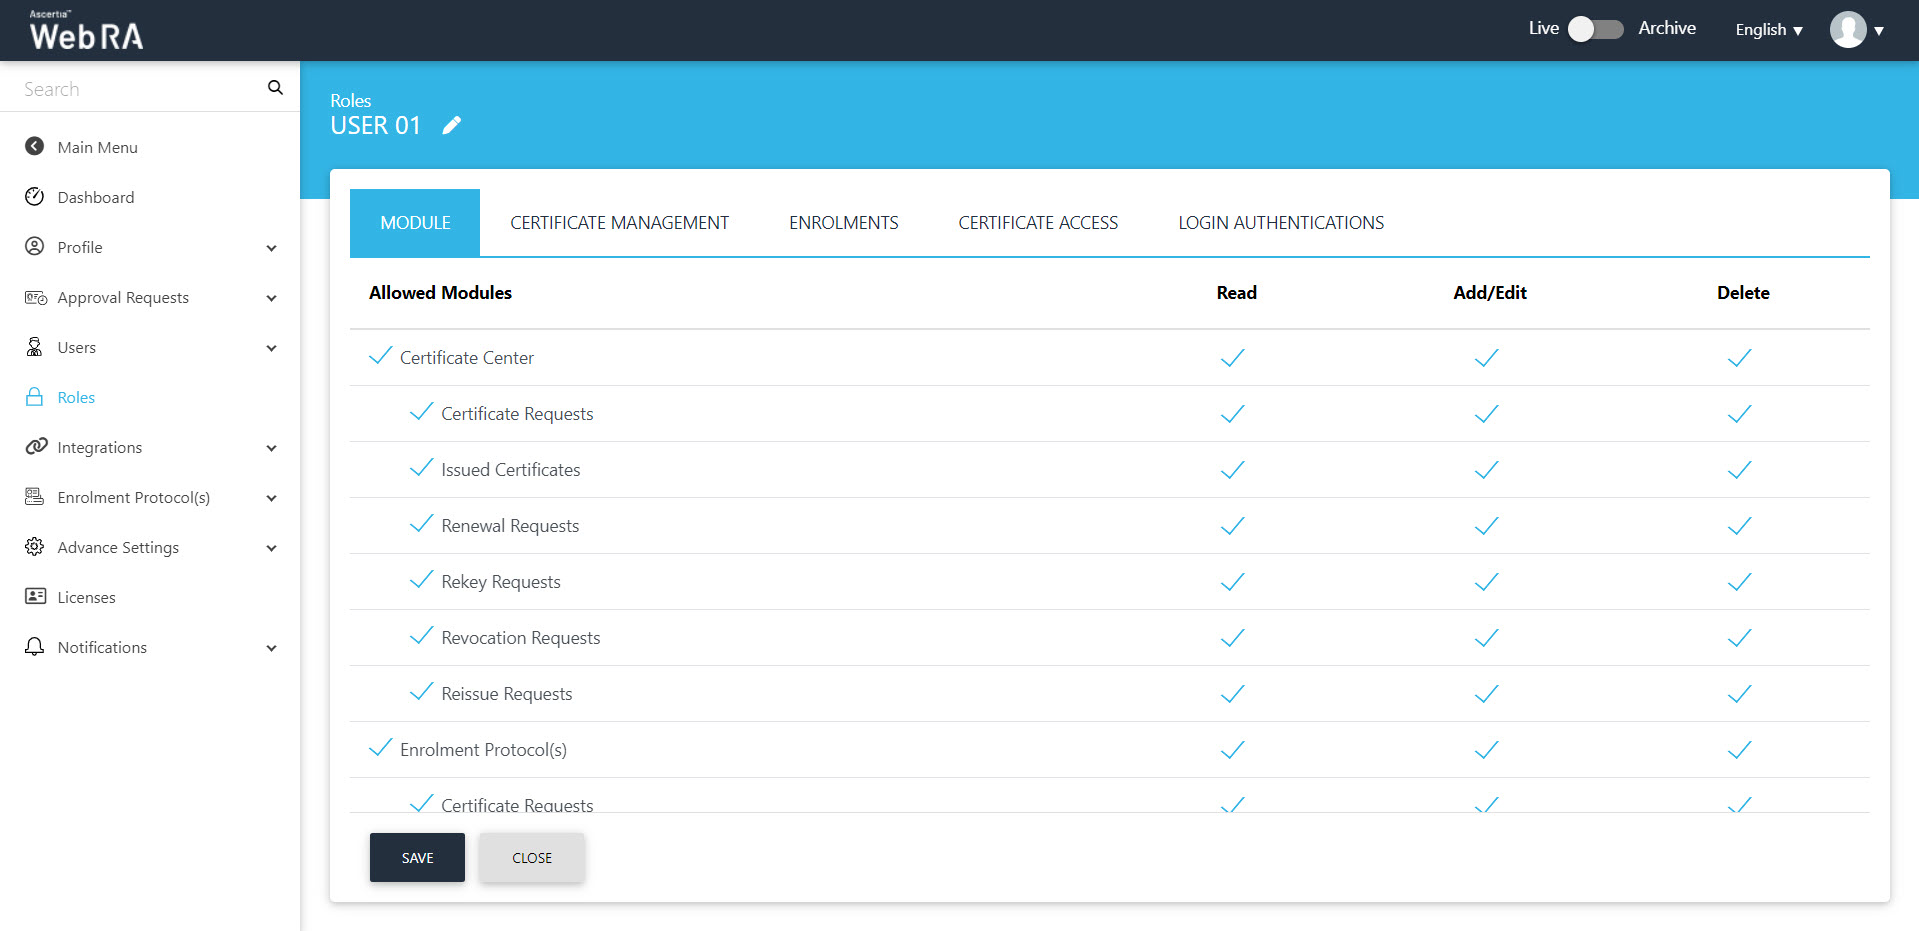
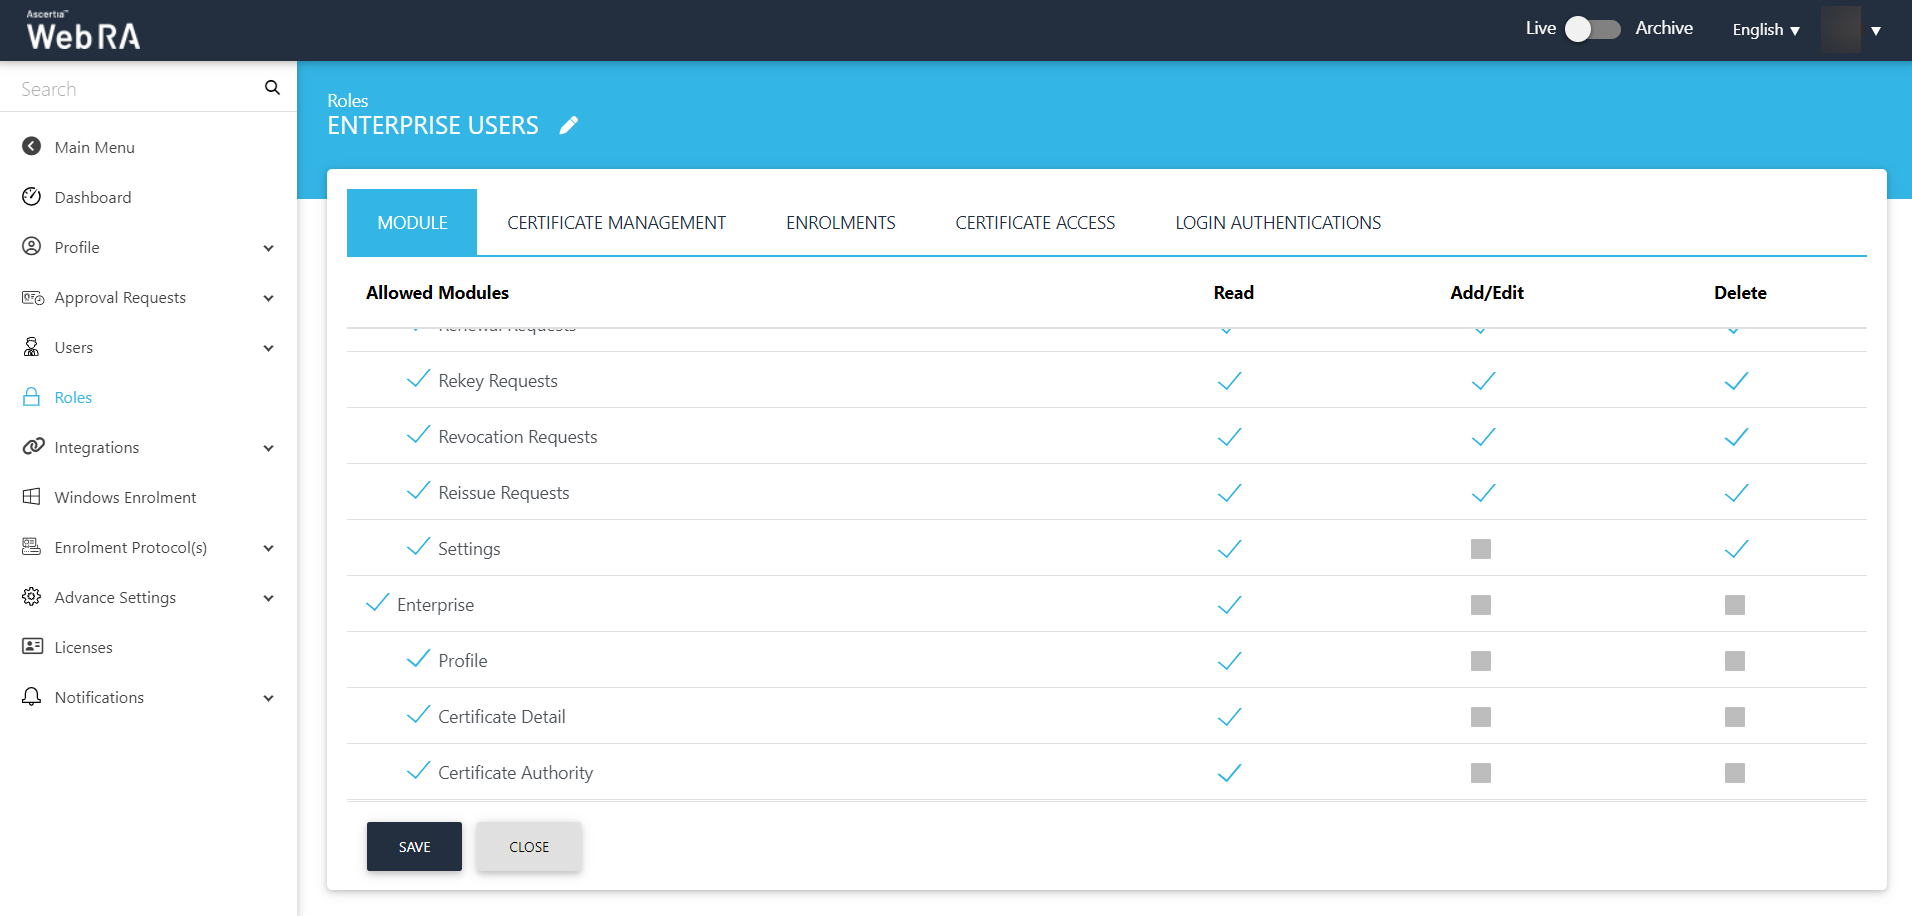
Once an operator Adds or Edits a role, the module section form will appear with all allowed modules. It is on the discretion on the operator to allow read, add/edit and delete options against the allowed modules. The operator can set the role as Default.

An operator can add, update and delete enterprise roles. By default, only one role is created when an enterprise is registered.
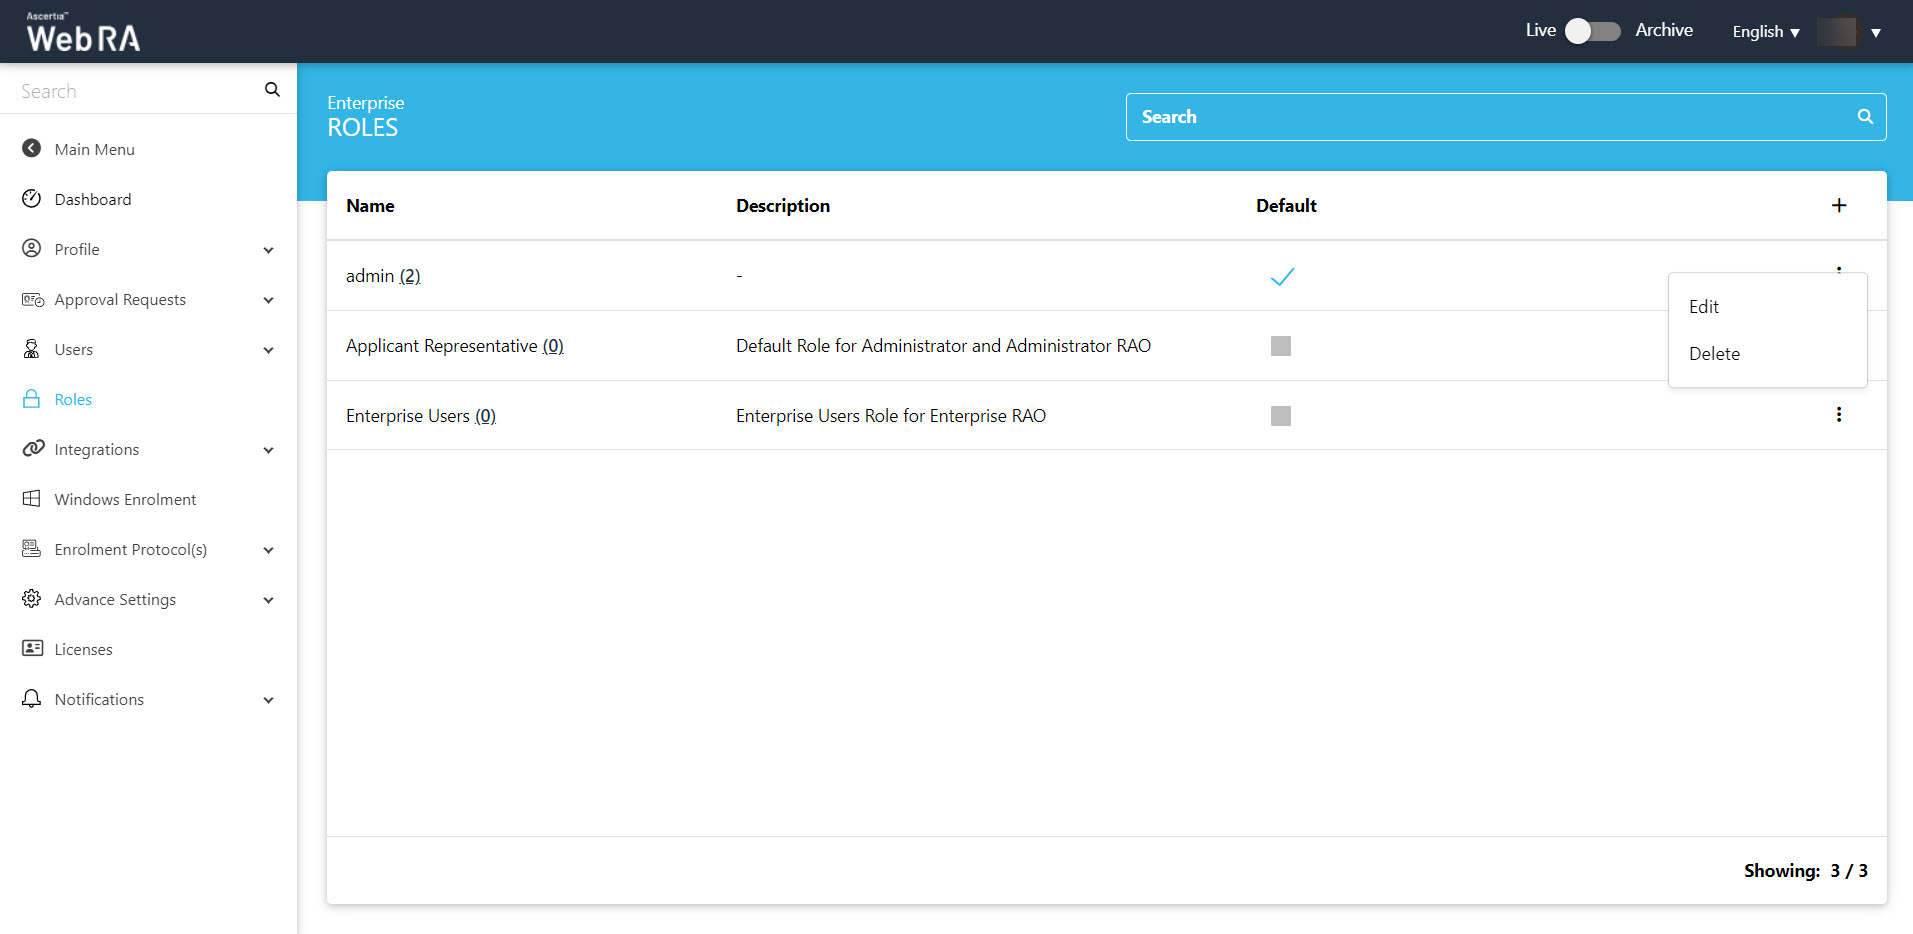
Click  and then the Edit button to find the following sections on this screen:
- Module
- Certificate Management
- Enrolments
- Certificate Access
- Login Authentications
Following is the description of each section in detail:
When an operator creates a new role, all options to Read, Add/Edit and Delete against the allowed modules are unchecked. He can choose from these options to assign it with the role for allowed modules. Two screenshots are added below to display all the modules ( including Windows Enrolment):
A user can create specific certificates by using different configurations and will be able to manage certificate key generation for the following:
- Key Stores - First of all, user will set the profiles in the key stores.
- Server-side keys and certificates
- Certificates with CSR
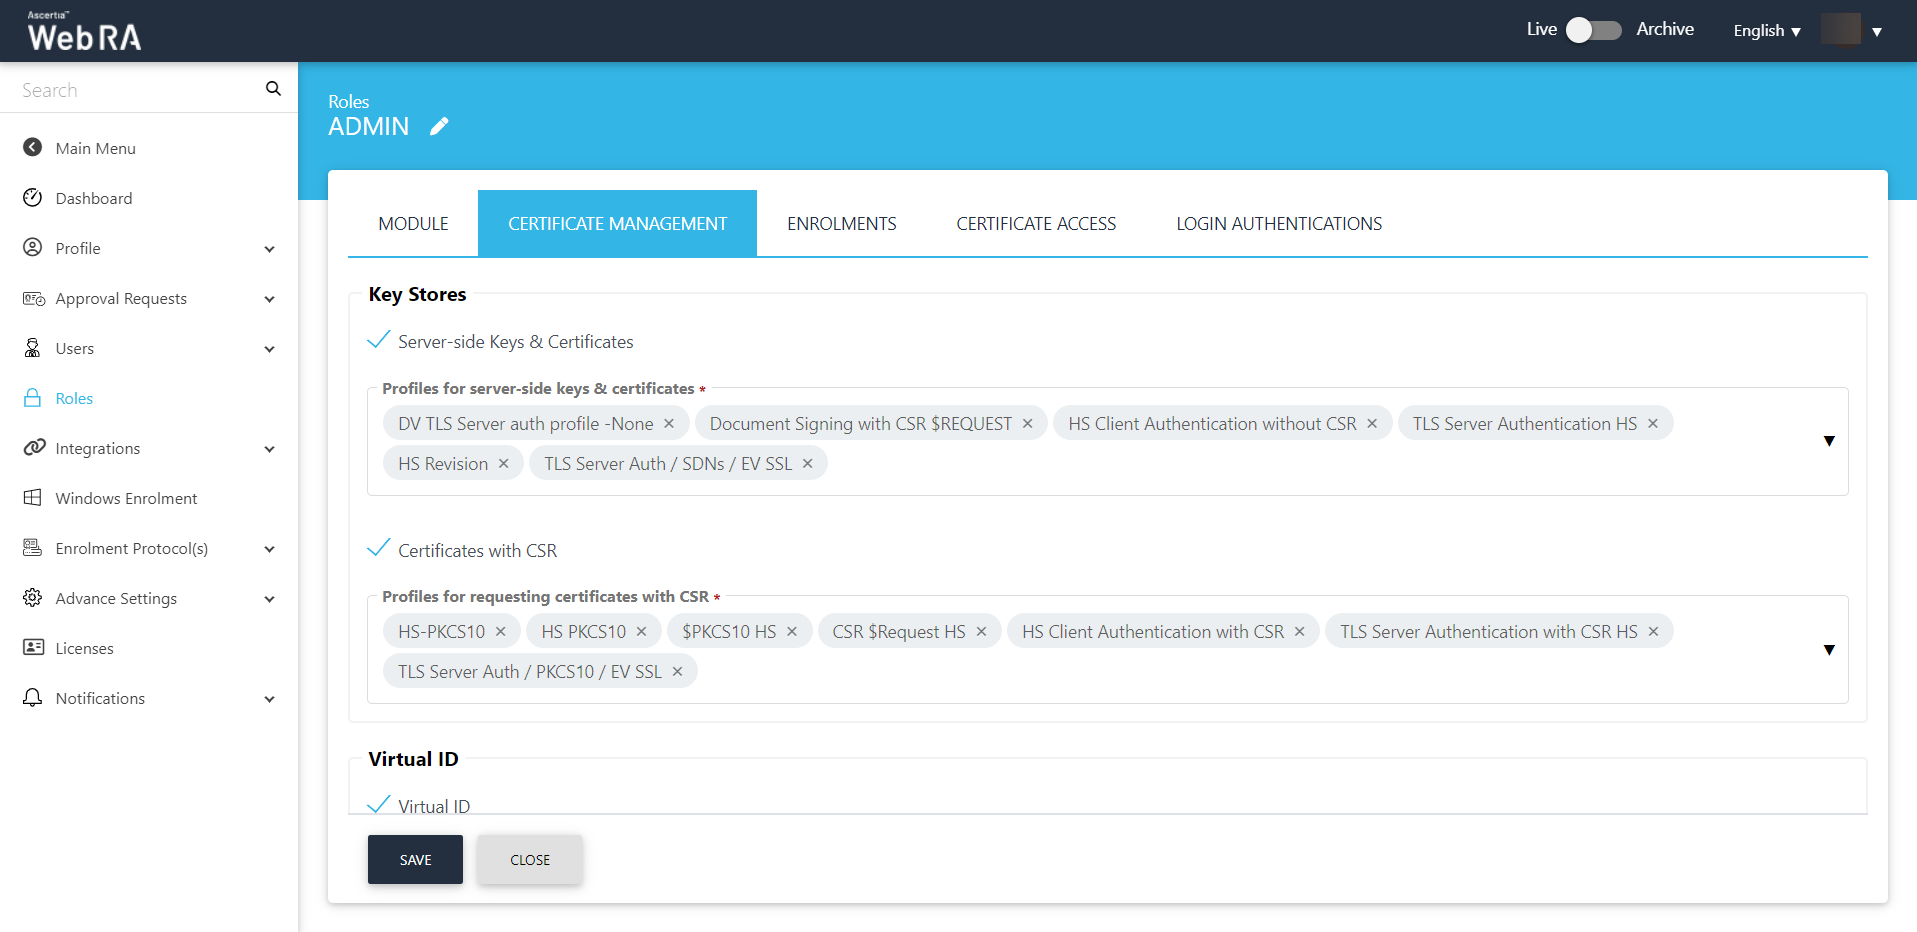
Then you will configure Virtual ID according to the description explained in the table below
|
Key Stores |
|
|
Field |
Description |
|
Server-side Keys & Certificates |
Select this check box to configure profiles for server-side keys and certificates. Then select the profiles from the drop down to that you want to allow for a role that belongs to an enterprise. |
|
Certificates with CSR |
Select this check box to configure profiles with CSR.Then select the profiles that you want to allow for a role that belongs to an enterprise. |
|
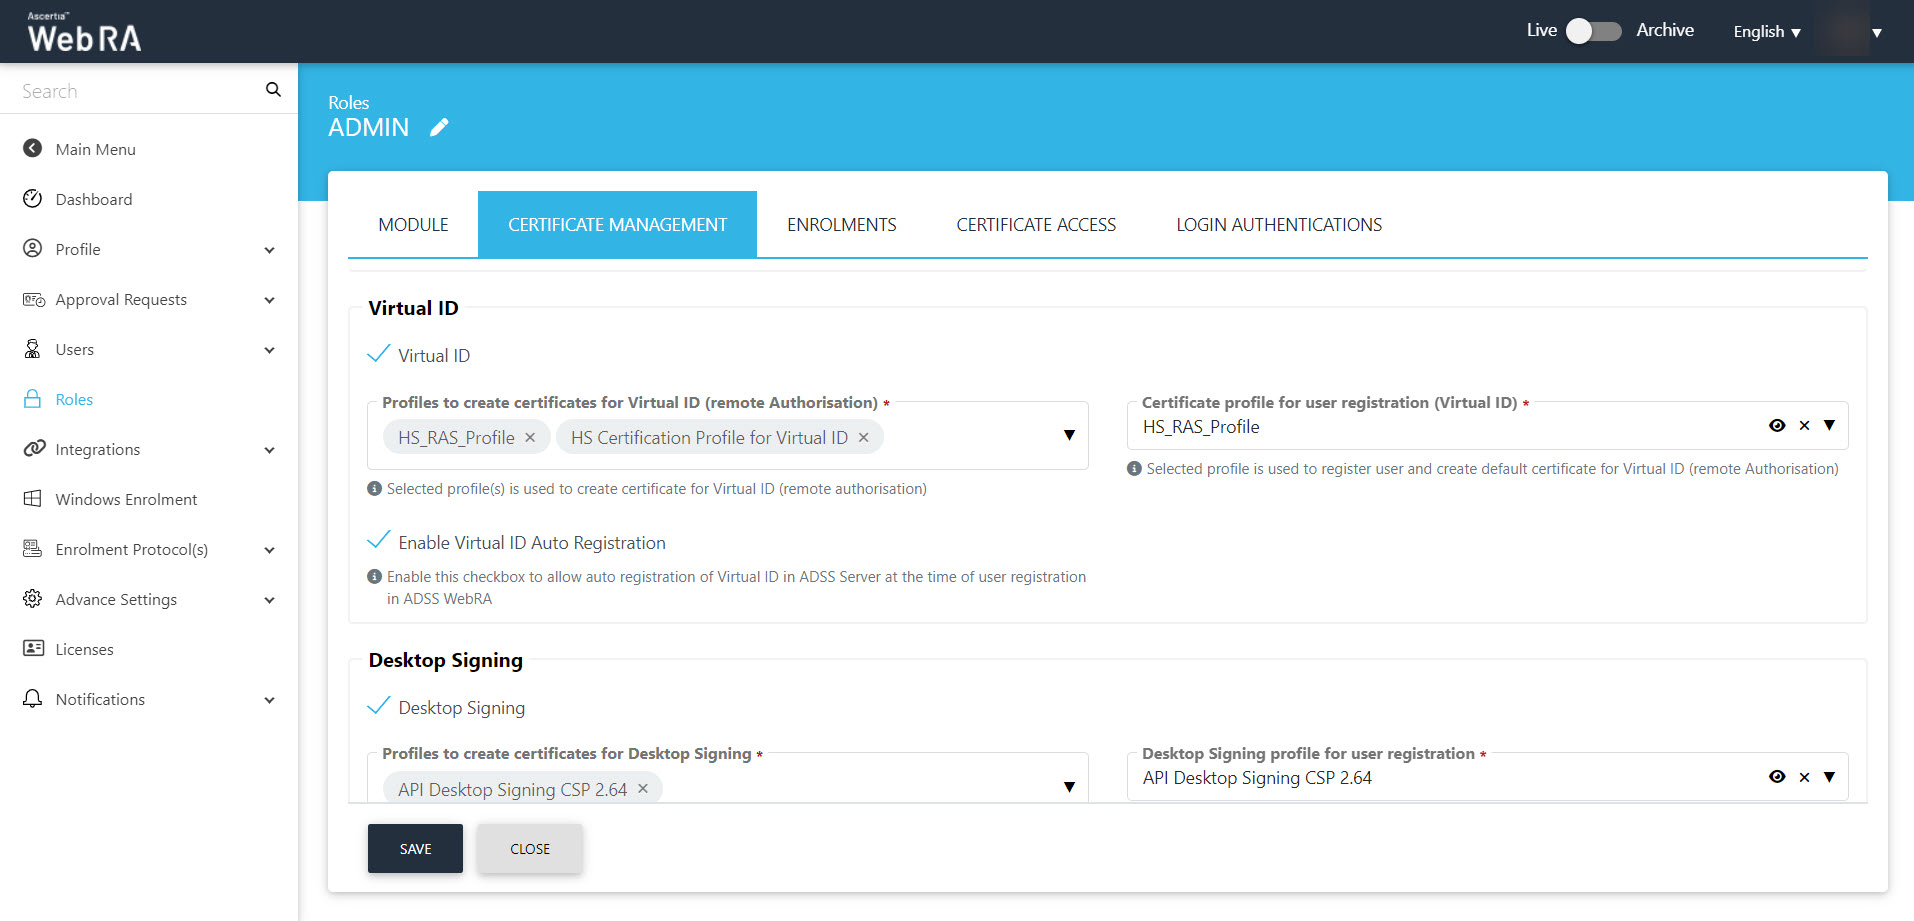
Virtual ID check box |
Select this check box to configure profiles to enable Virtual ID. |
|
Profiles to create certificates for Virtual ID (remote authorisation) |
Select the profiles that you want to use to create Virtual ID certificates. |
|
Certificate profile for user registration (Virtual ID) |
Select a profile to create a default Virtual ID certificate. |
|
Enable Virtual ID Auto Registration |
Select this check box to allow auto registration of Virtual ID in ADSS Server while user registration in ADSS Web RA Server. |
|
Desktop Signing check box |
Select this check box to configure profiles to enable Desktop Signing. |
|
Profiles to create certificates for Desktop Signing |
Select the profiles that you want to use to create certificates for Desktop Signing. |
|
Desktop Signing profile for user registration |
Select a profile that you want to use to register user and create a default certificate for Desktop Signing. |
|
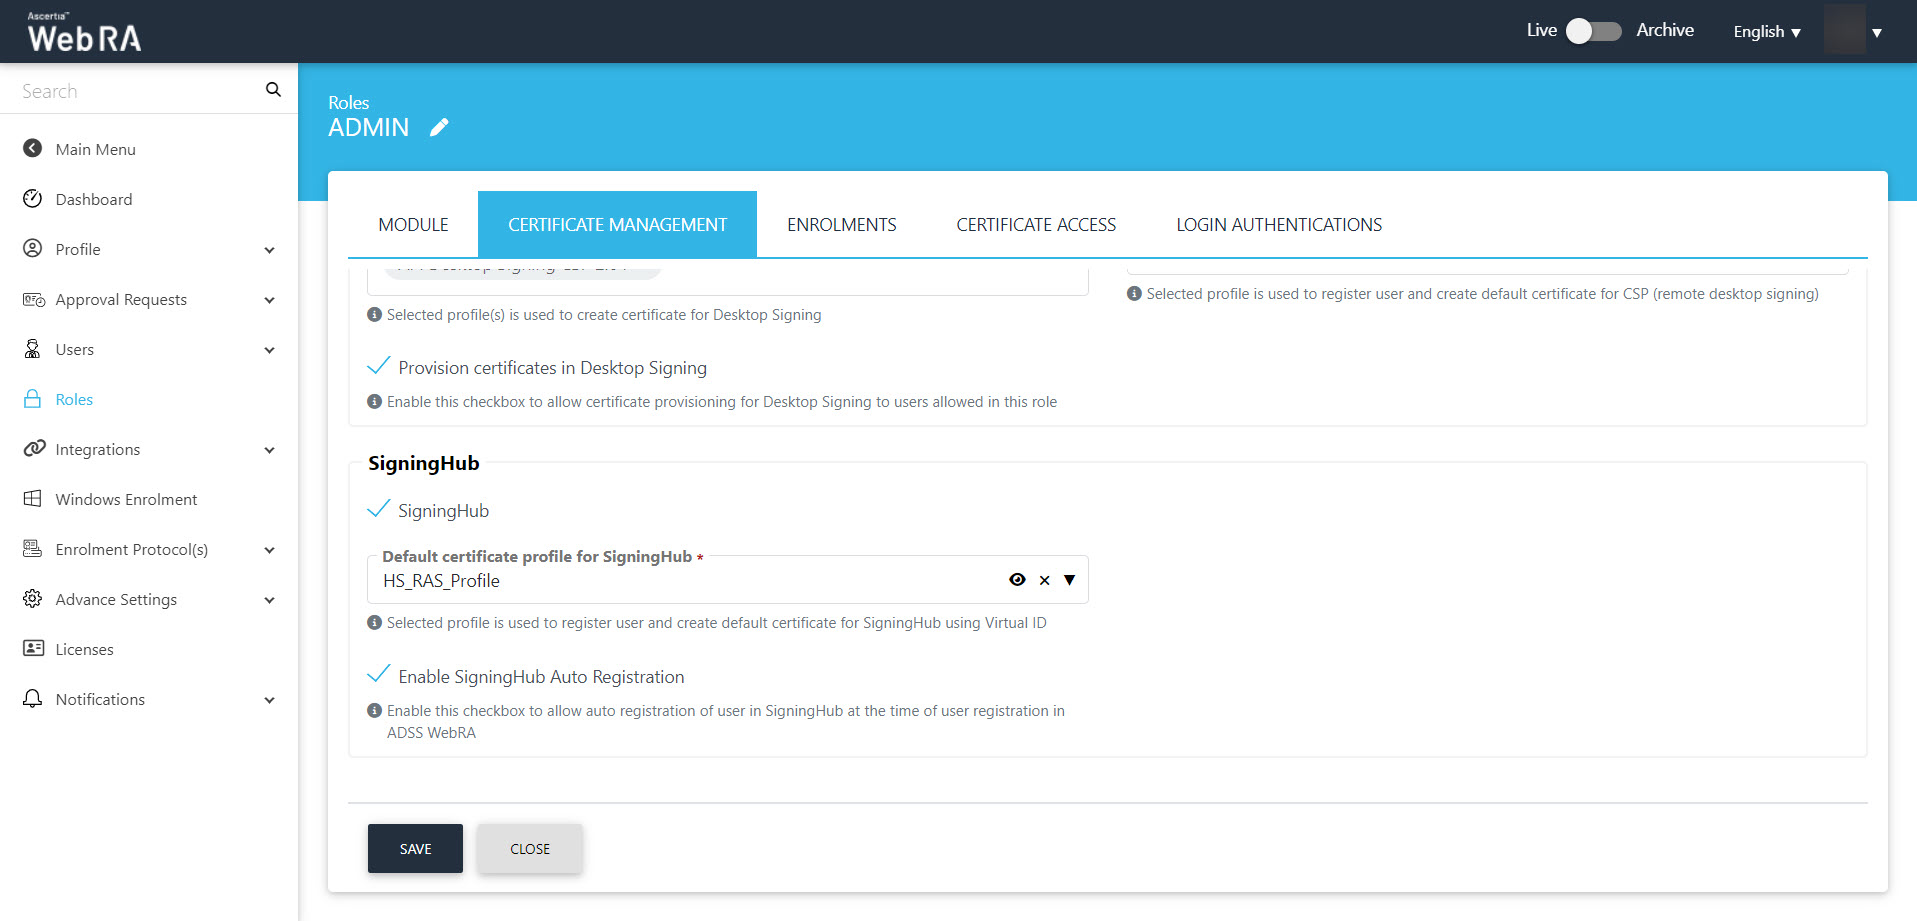
Provision certificates in Desktop Signing |
Select this checkbox to allow certificate provisioning for Desktop Signing to users allowed in this role. |
|
SigningHub check box |
Select this check box to configure profiles to enable SigningHub. |
|
Default certificate profile for SigningHub |
Select a profile that you want to use to register user and create a default certificate for SigningHub using Virtual ID. |
|
Enable SigningHub Auto Registration |
Select this check box to allow auto registration of user in SigningHub while user registration in ADSS Web RA Server. |
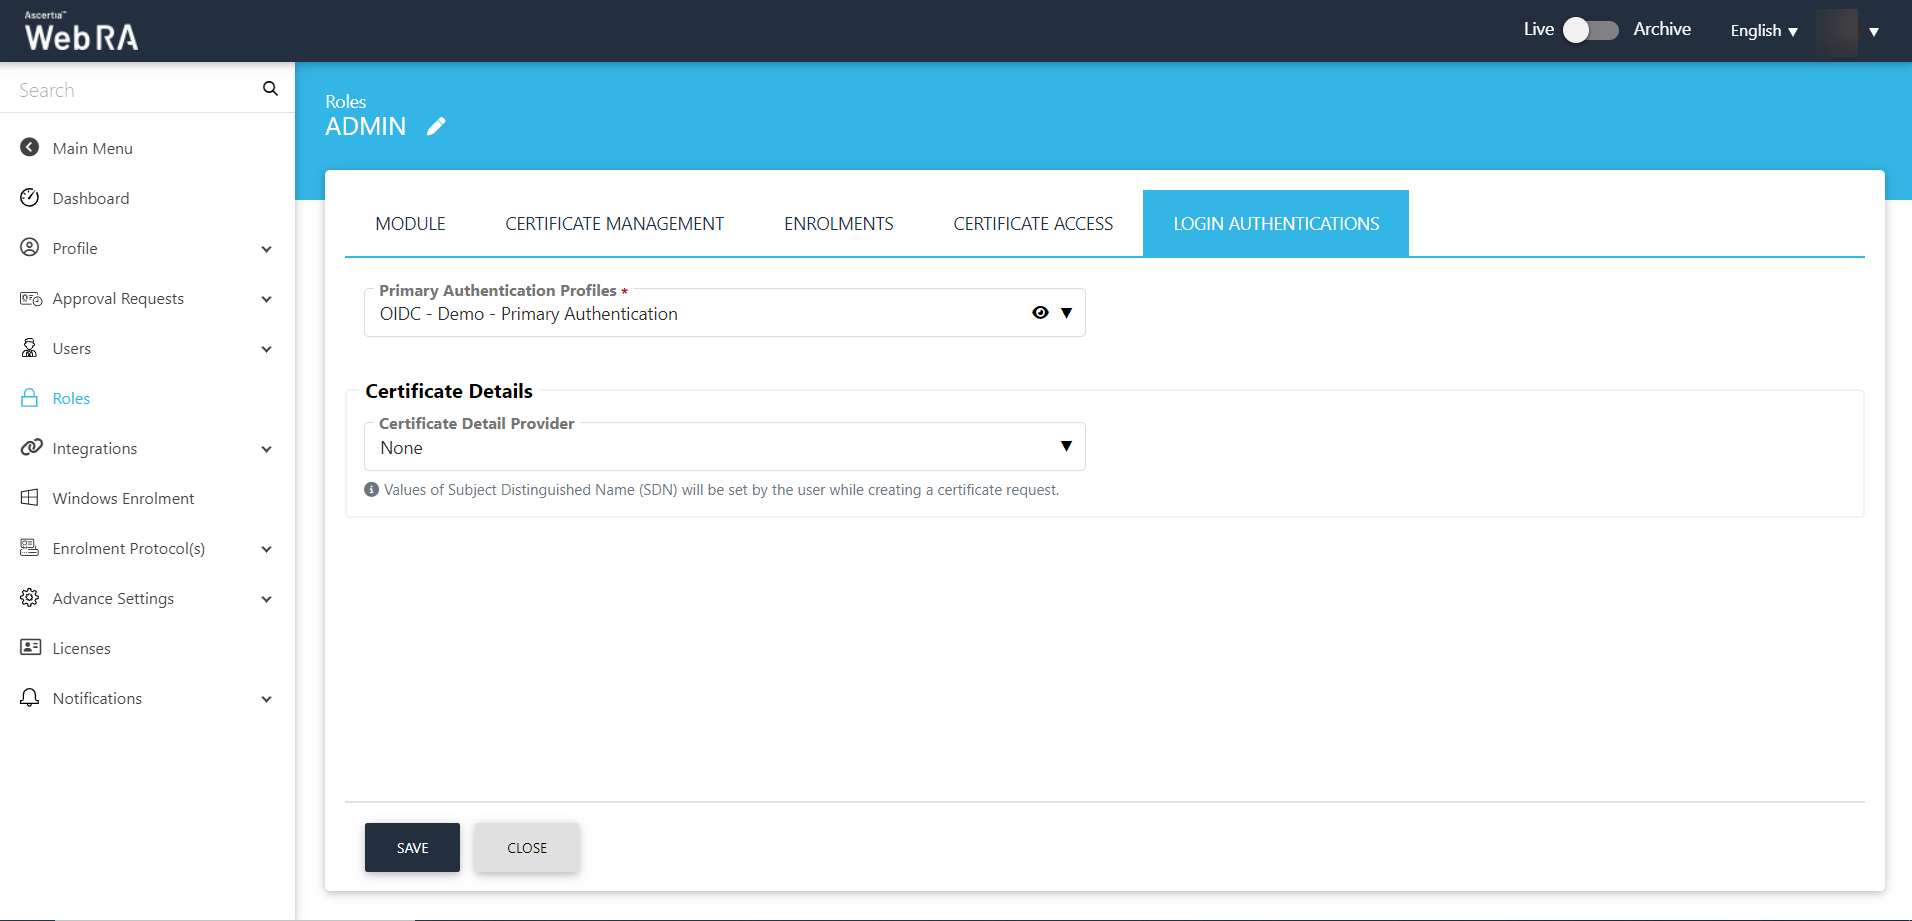
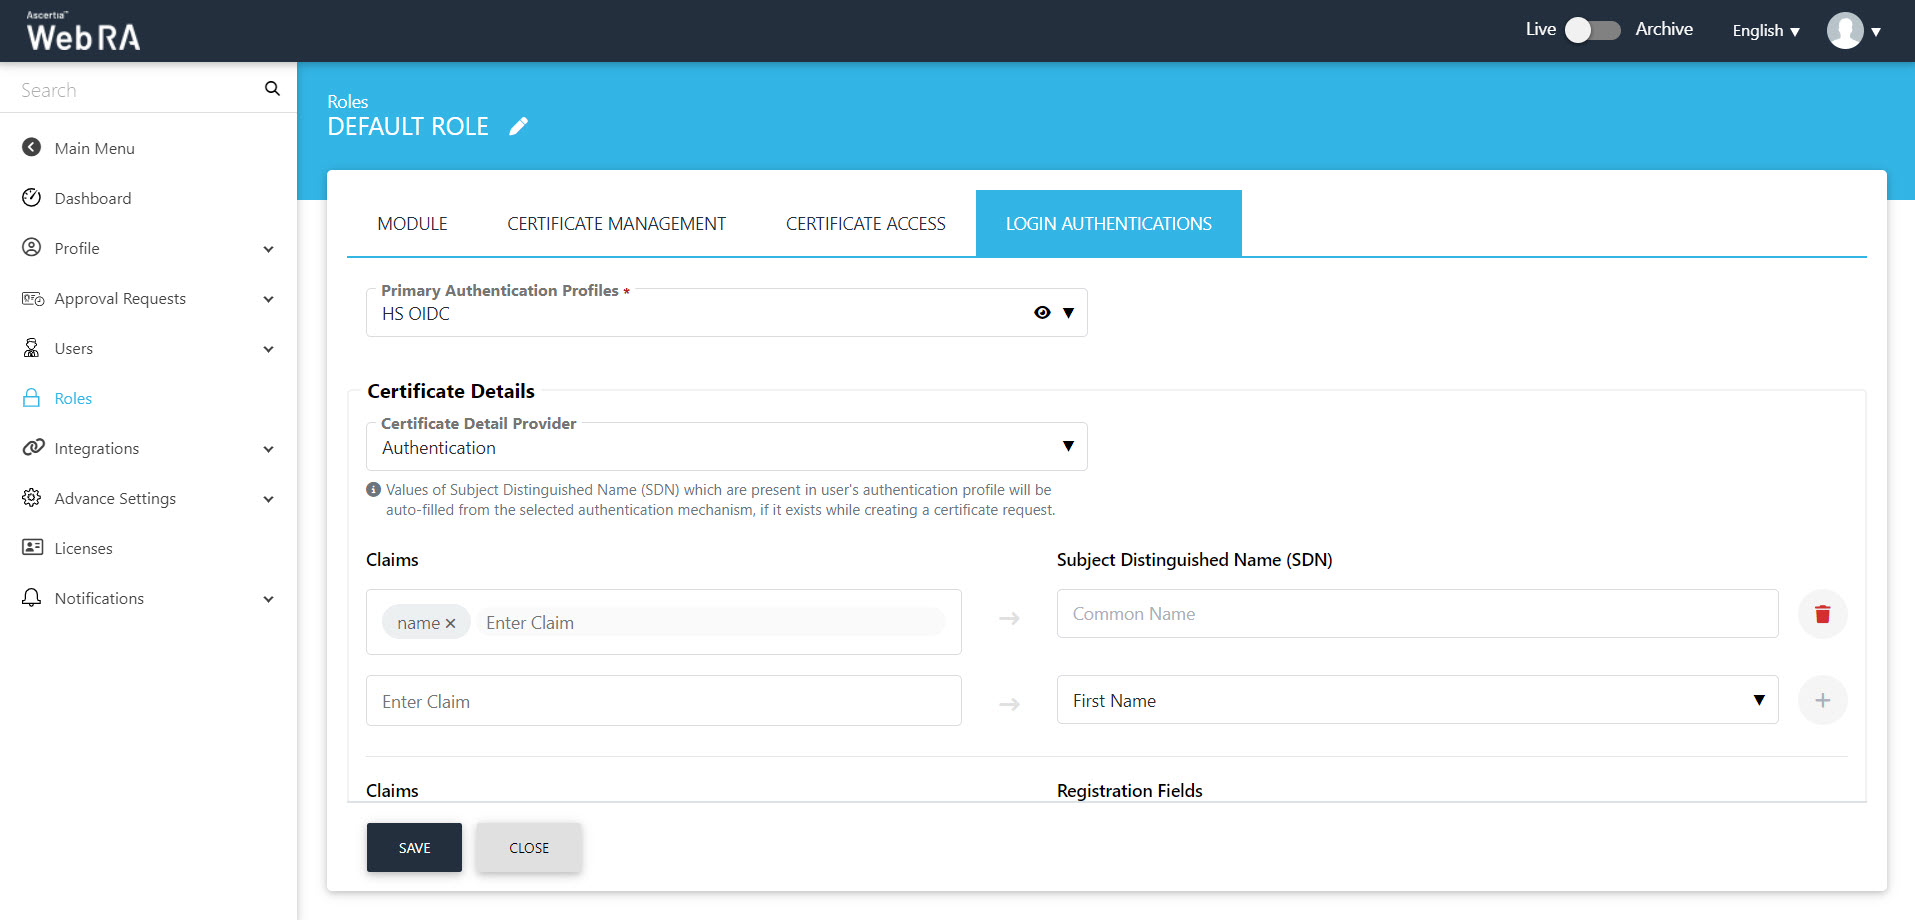
After this, the user will move to the Login authentications tab to configure primary authentication for login.
|
Advance Settings |
|
|
Field |
Description |
|
Primary Authentication Profiles |
When primary authentication is configured as login authentication, it allows an enterprise RAO to login on ADSS Web RA User Portal through the authentication type that is configured in this profile. An operator can select from multiple primary authentication profiles here. |
The screenshot below displays OIDC set as a primary authentication profile.
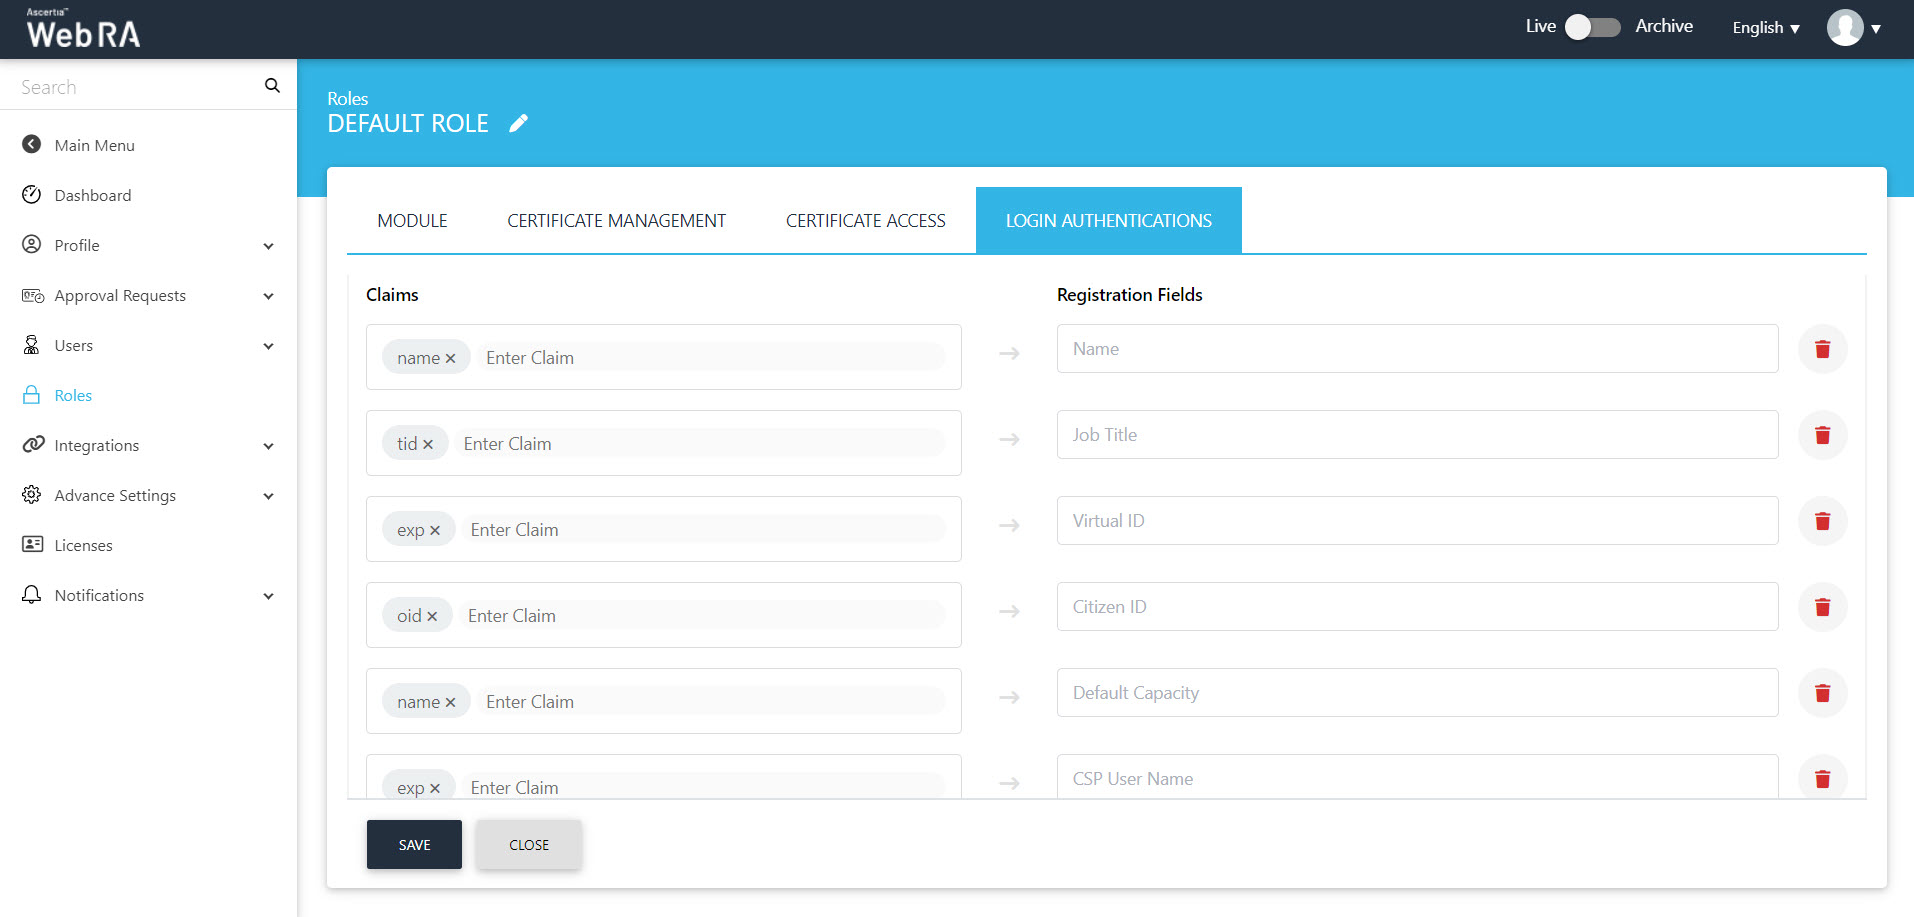
Registration form claim mapping - Login Authentications
The next step is to map claims for the registration process.
An administrator can control SDNs and SAN extensions for certificate requests in the Role section from the admin portal. This is based on the mechanism selected from the Certificate Detail Provider drop down.
When Primary Authentication profile is OIDC, and you select Authentication as the Certificate Detail Provider.
- Click Login Authentications.
- Select a OIDC as Primary Authentication Profile from the drop down.
|
Certificate Details |
|
|
Field |
Description |
|
Certificate Details Provider |
Select authentication from this drop down. |
|
Claims |
|
|
Claim |
Subject Distinguished Name (SDN) |
|
Select a claim against the SDN |
Click + and select SDN from the list. These fields include |
These claims will appear in the Sign up form under the SDN section.
|
Claims |
|
|
Claim |
Registration Fields |
|
Select a claim against the registration fields |
Click + and select SDN from the list. These fields include Name, Job Title, Virtual ID, Citizen ID, Default Capacity (for Signing purposes while provisioning certificate in SigningHub), CSP User Name, Email Address and Mobile Number. |
These claims will appear in the Sign up form under the user registration section.
Once you have completed all configurations, click Save.
Registration/sign-up and login from ADSS Web RA Server Web Portal
A user can register via citizen ID or email.
- A user will first login on User RA through IDP and the complete registration process in ADSS Web RA Server.
- If the user has selected user registration during sign-up in the Configurations > Default Settings, User can select default login identifier as email or citizen ID.
In any of the two cases, after login through IDP, user will be redirected to the following screen:
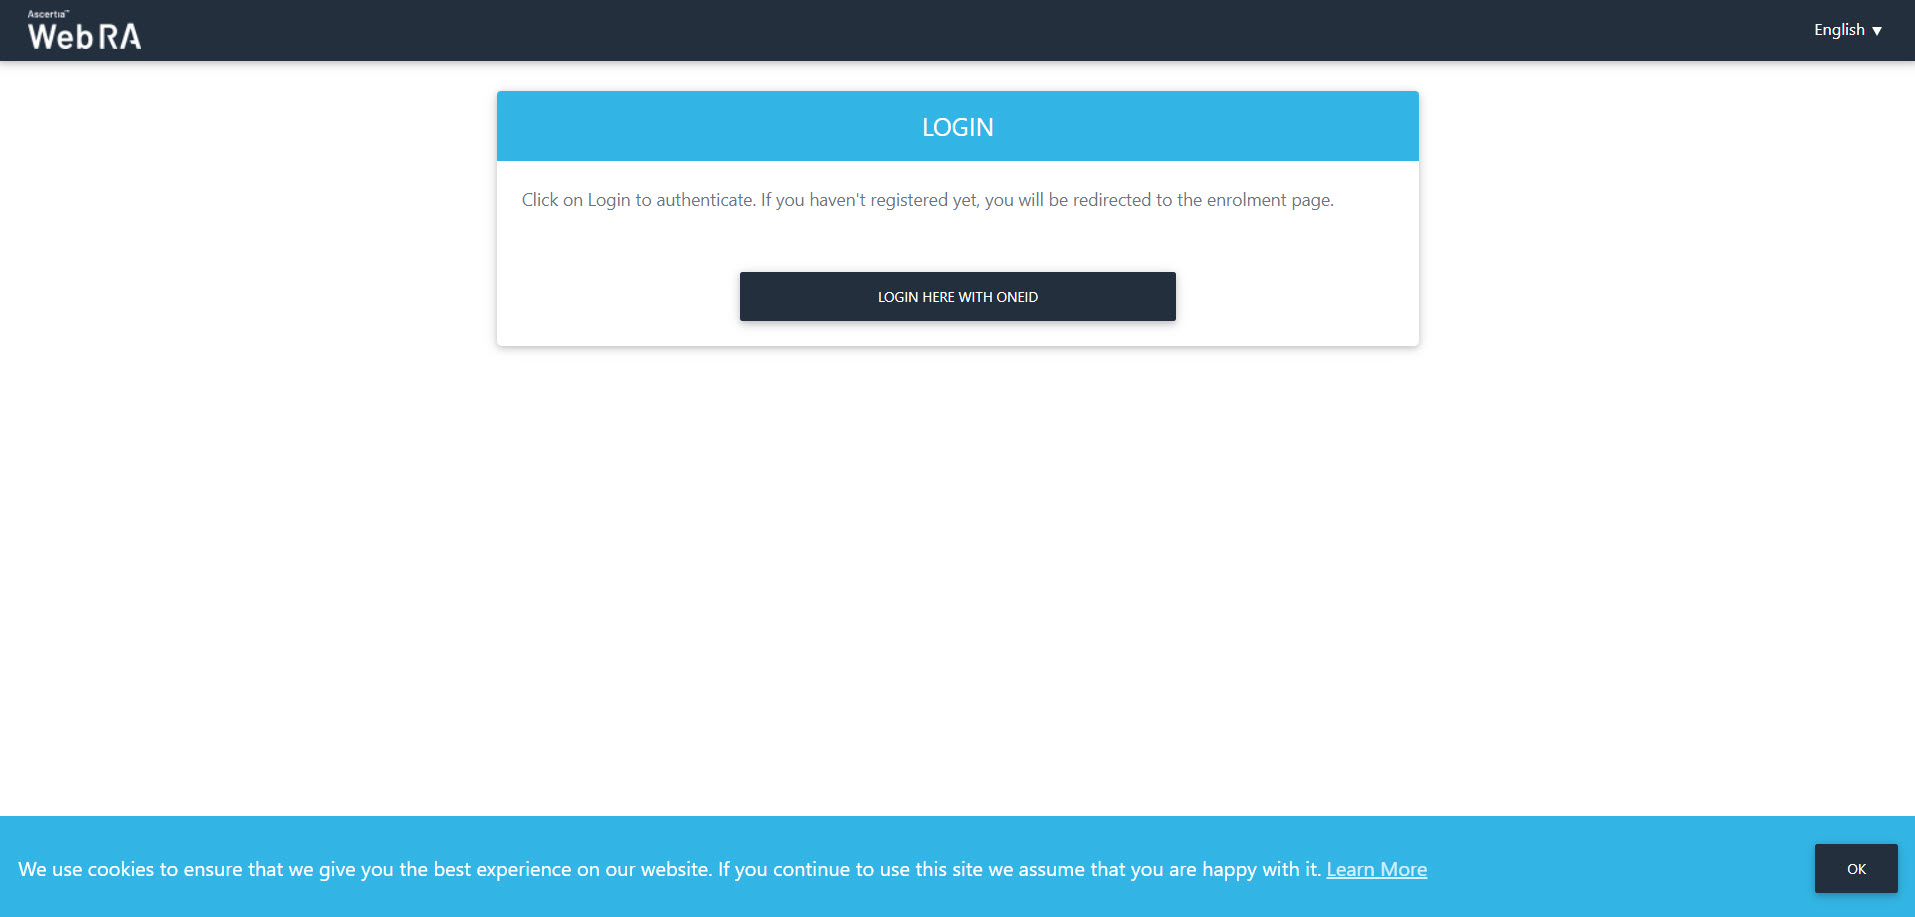
- Click Login Here with OneID. The OIDC authentication will approve a user and then he will complete the registration process.
- The Sign Up page will appear. The User information will appear on the left side of the screen and Subject Distinguished Name (SDN) will appear on the right side as displayed below. All this information will appear according to the claims mapped in the Enterprise > Role> Login Authentications section from the ADSS Web RA admin portal. (Explained in the Login Authentications heading)
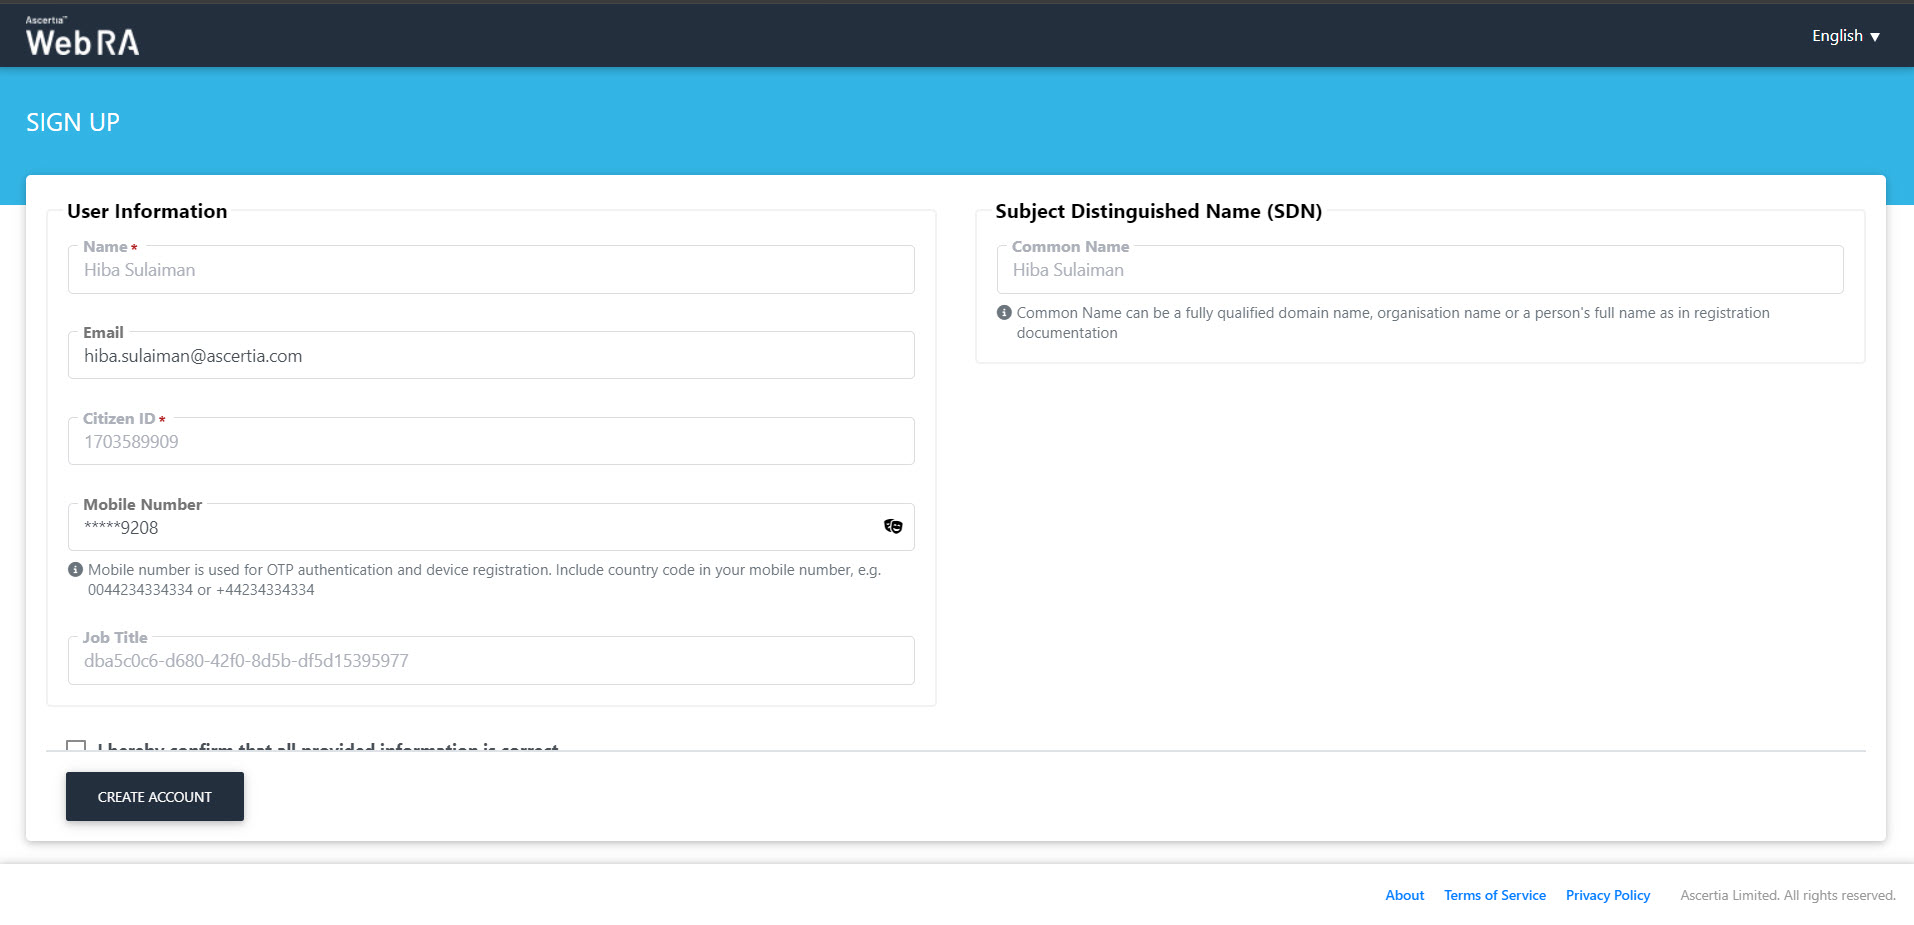
- Enter the email and mobile number. Then scroll down.

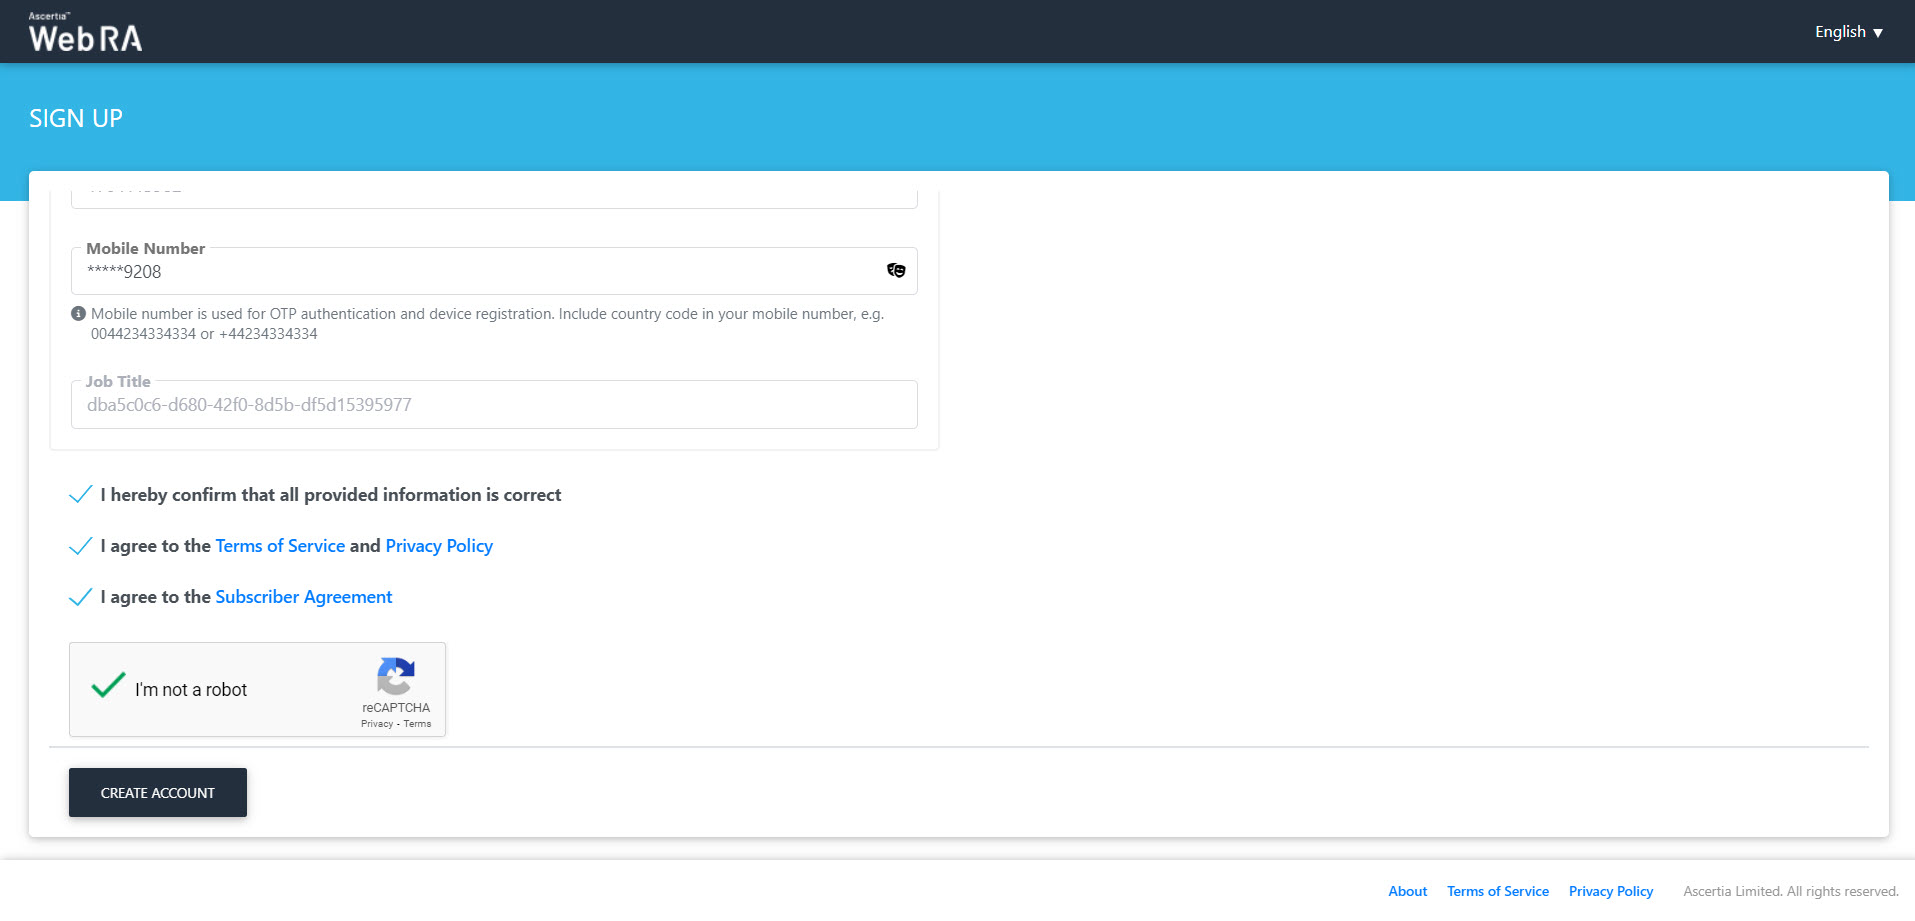
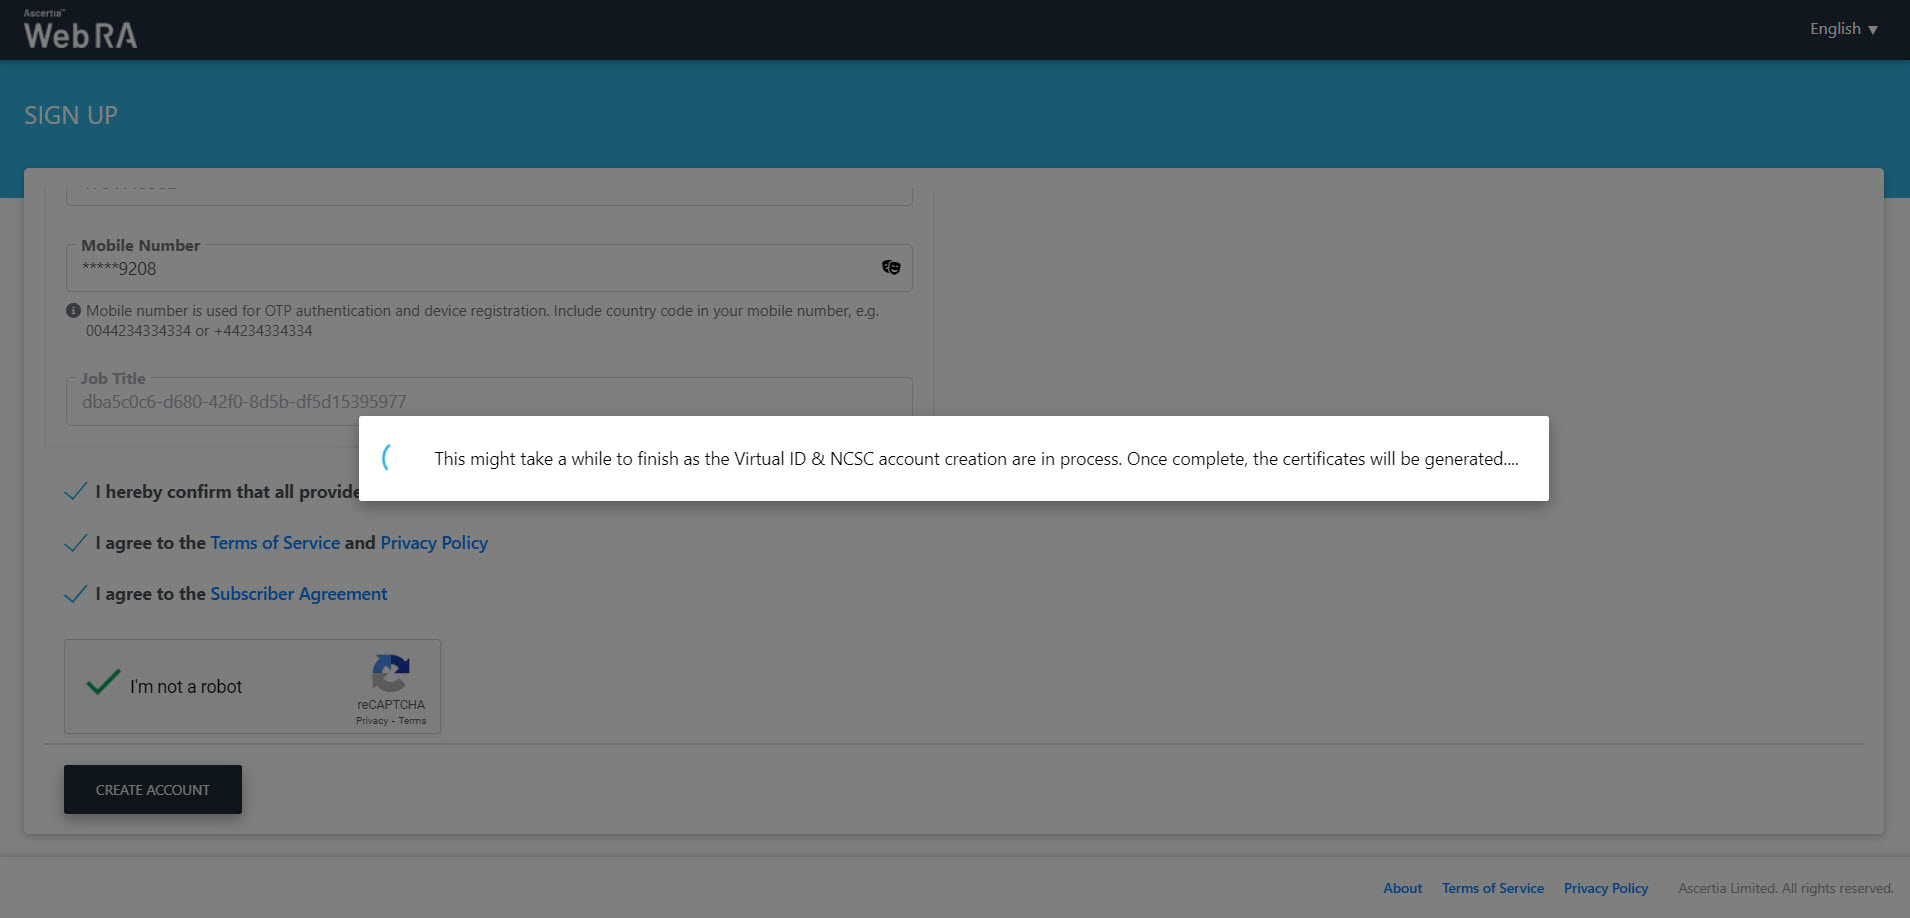
- Select the following three check boxes:
- I hereby confirm that all provided information is correct.
- I agree to the Terms of Service and Privacy Policy.
- I agree to the Subscriber Agreement.
Select the I'm not a robot reCAPTCHA check box, then click Create Account.
- The process make require some time to complete. It involves the creation of a virtual ID and SigningHub account for the user. Additionally, a virtual ID certificate will be generated and provisioned into SigningHub if enabled in the enterprise role section.
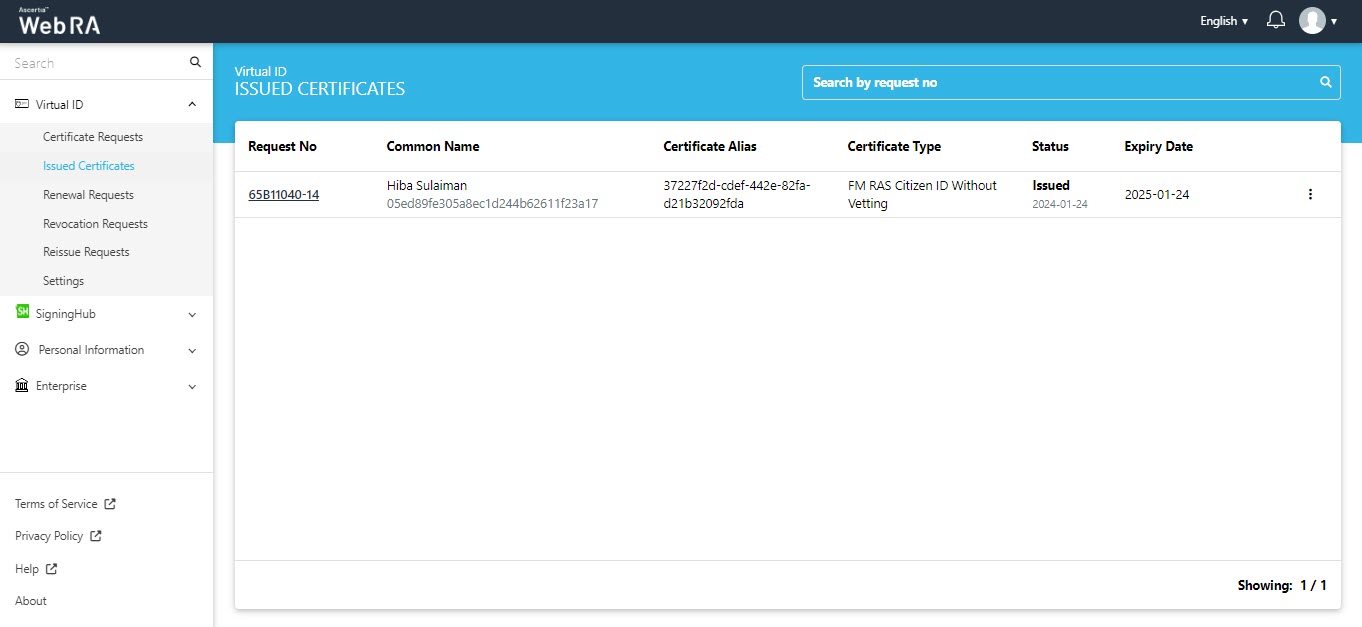
- The user will be logged-in and the Virtual ID > Issue Certificates listing screen will appear.
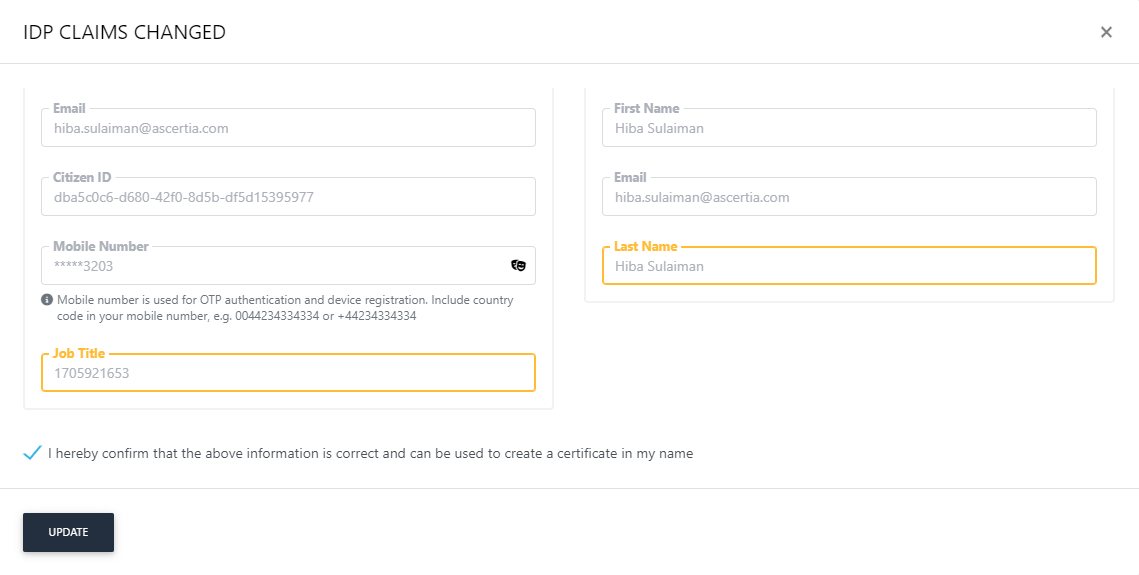
When a user changes a claims mapping in Configurations > Default Settings and then a user logs into the ADSS Web RA web portal, they'll see a screen displaying the modifications. The altered claims will be highlighted in yellow.
Select the confirmation check box and then click Update to proceed.
Upon successful login, the user will be directed to the listing of issued certificates under Virtual ID.
Virtual ID
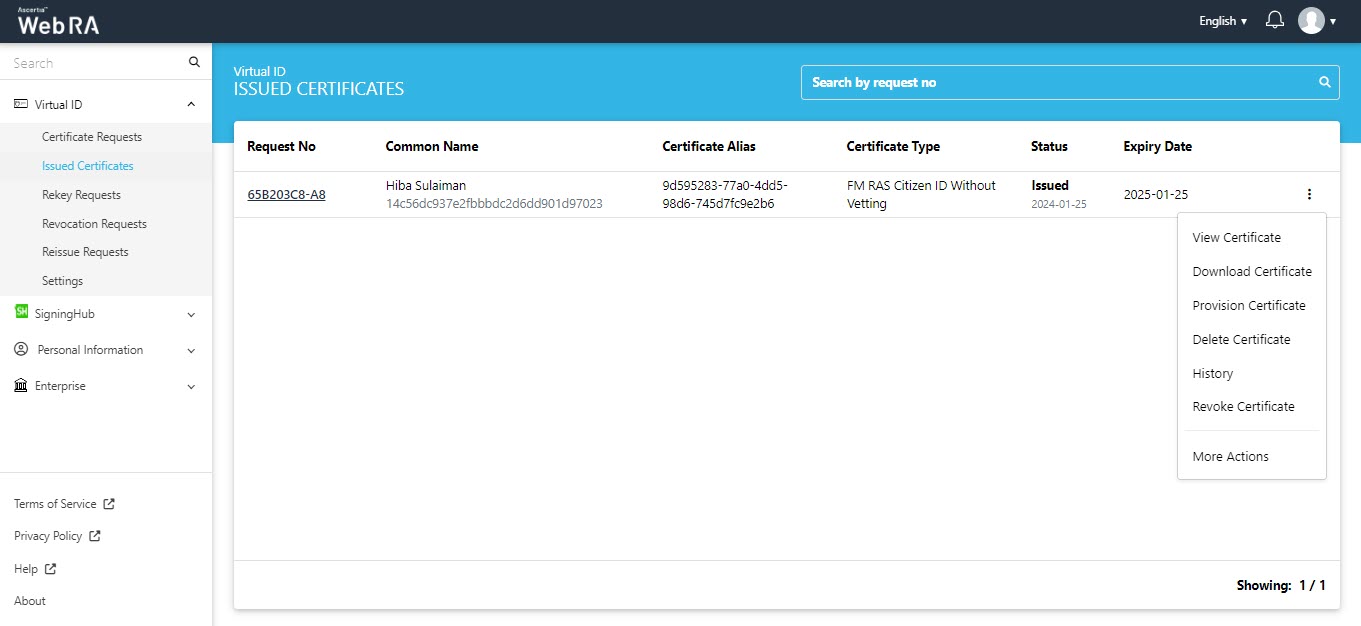
Below, you'll find an explanation of the actions that can be carried out from the listing of issued certificates under Virtual ID.
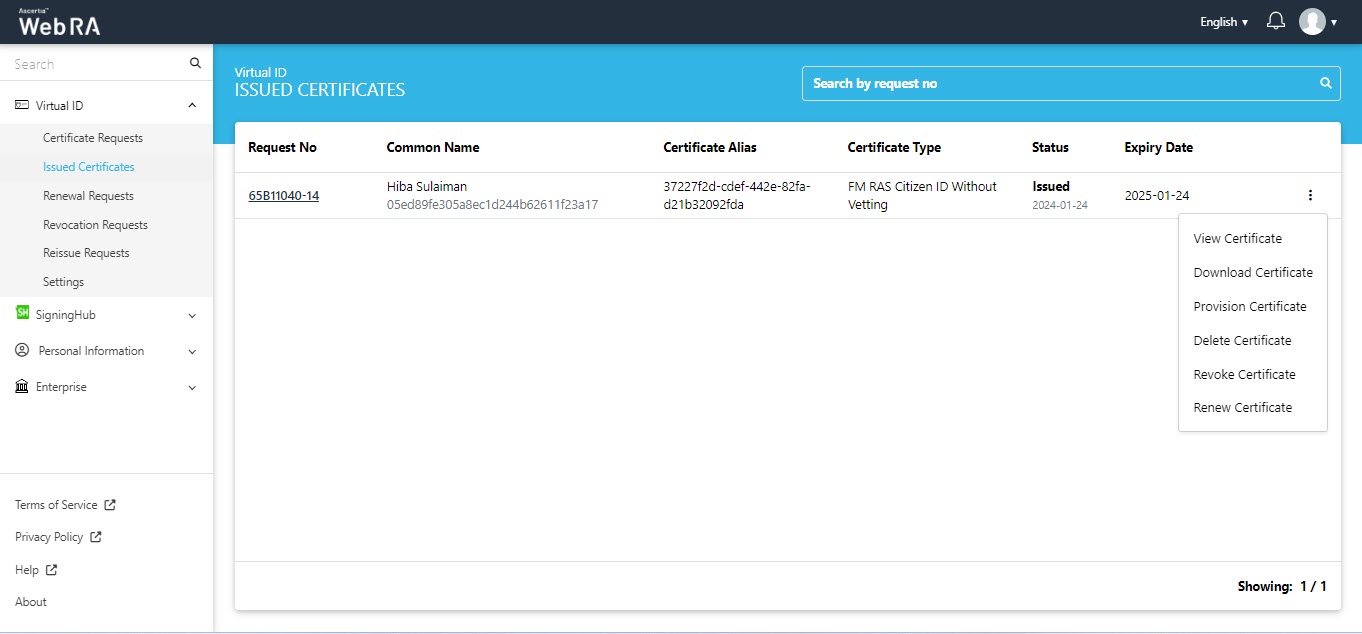
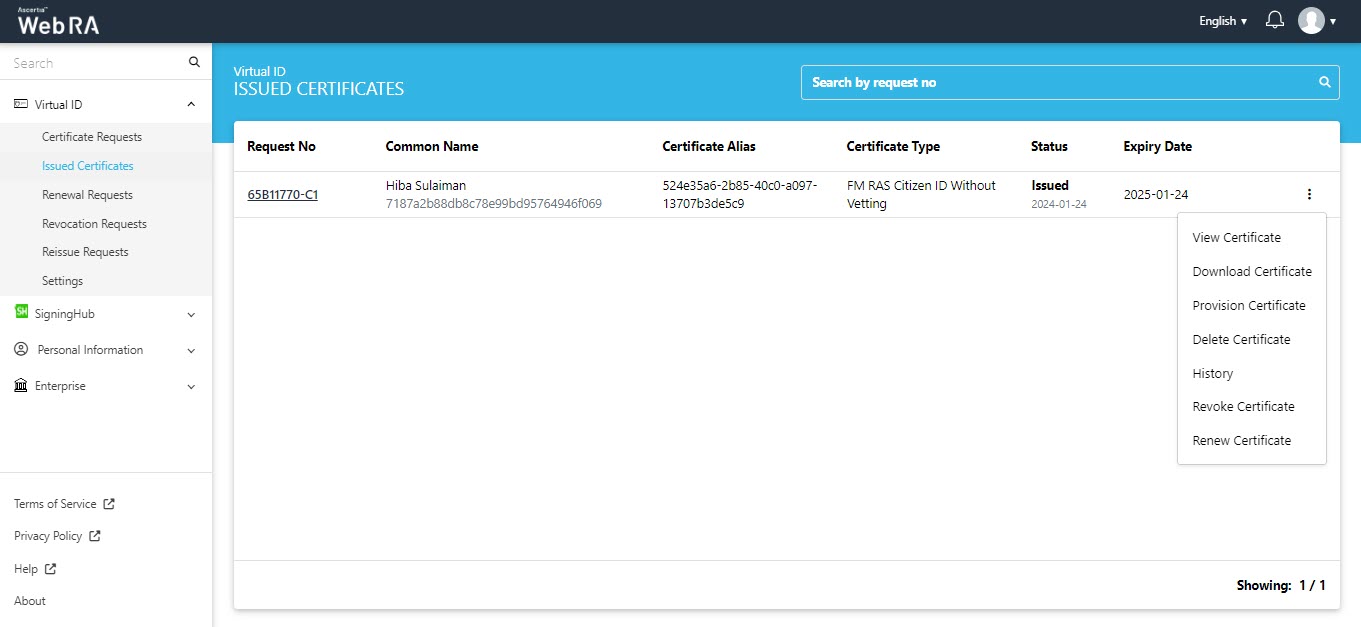
Click  against a certificate and you can see the actions as follows:
- View Certificate
- Download Certificate
- Provision Certificate
- Delete Certificate
- Revoke Certificate
- History
- Rekey Certificate
- Renew Certificate
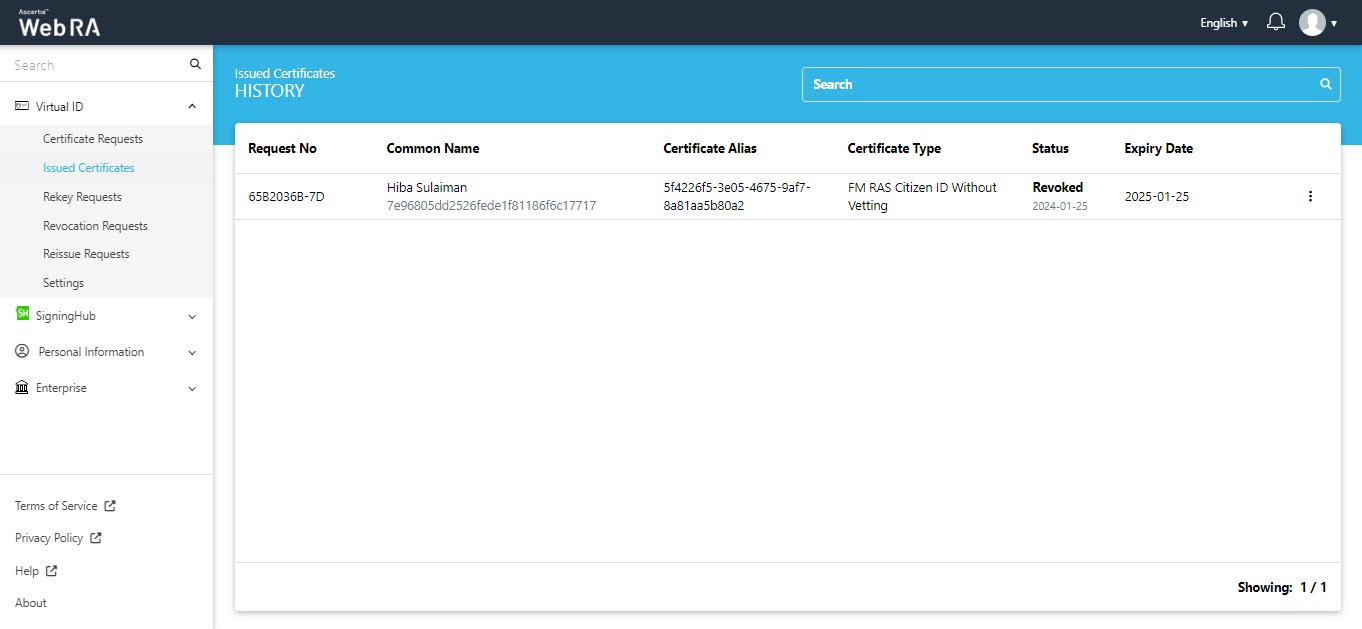
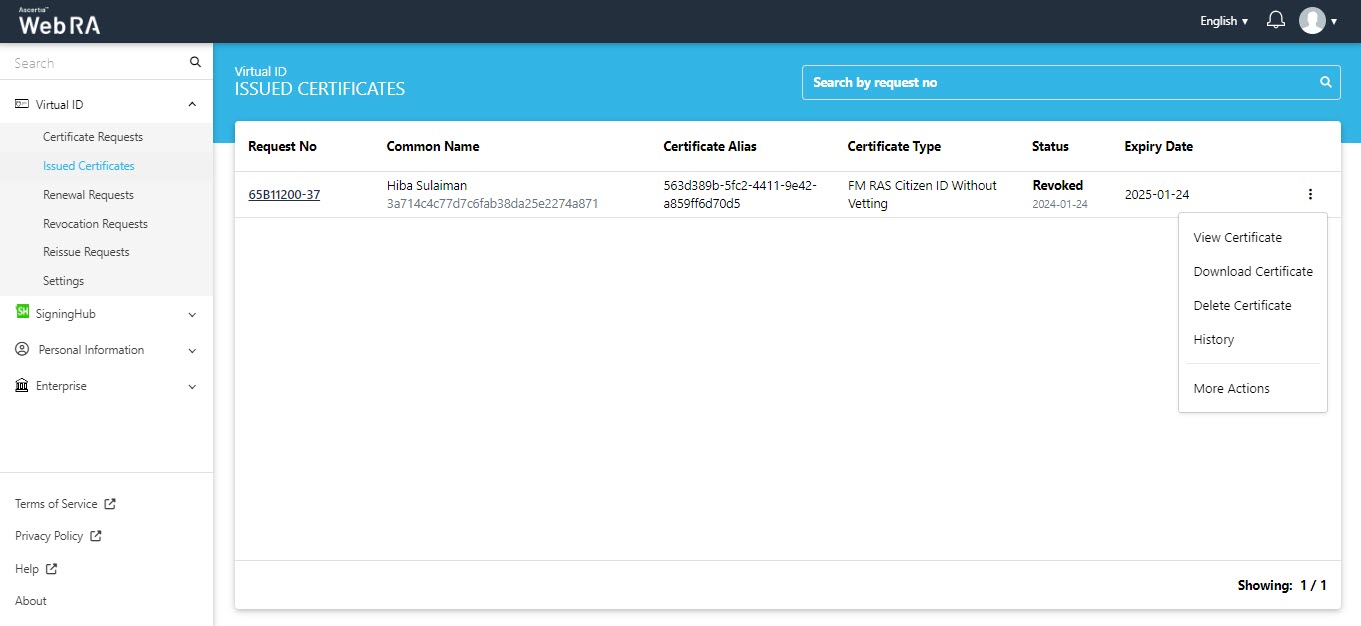
History
Once you have revoked a certificate, and you click the button against the certificate, the history button will appear.
You can click it to view what actions were performed on the certificate.
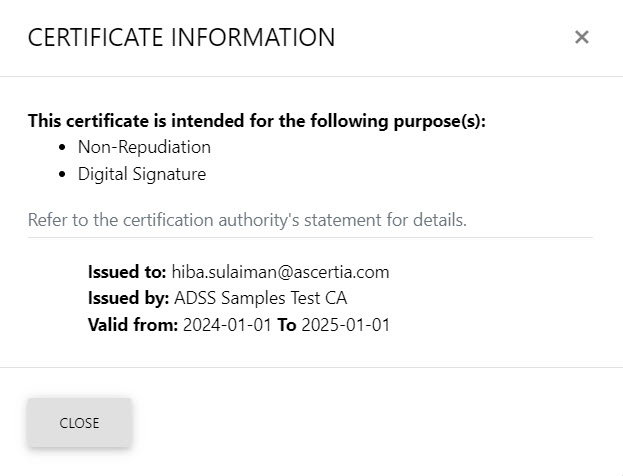
Click View Certificate to view details. Click Close after viewing the details.
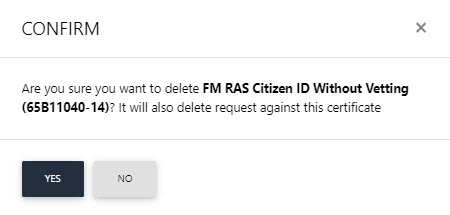
From the ![]() button click Delete Certificate. A confirmation message will appear. Click Yes to proceed.
button click Delete Certificate. A confirmation message will appear. Click Yes to proceed.
Provision Certificate
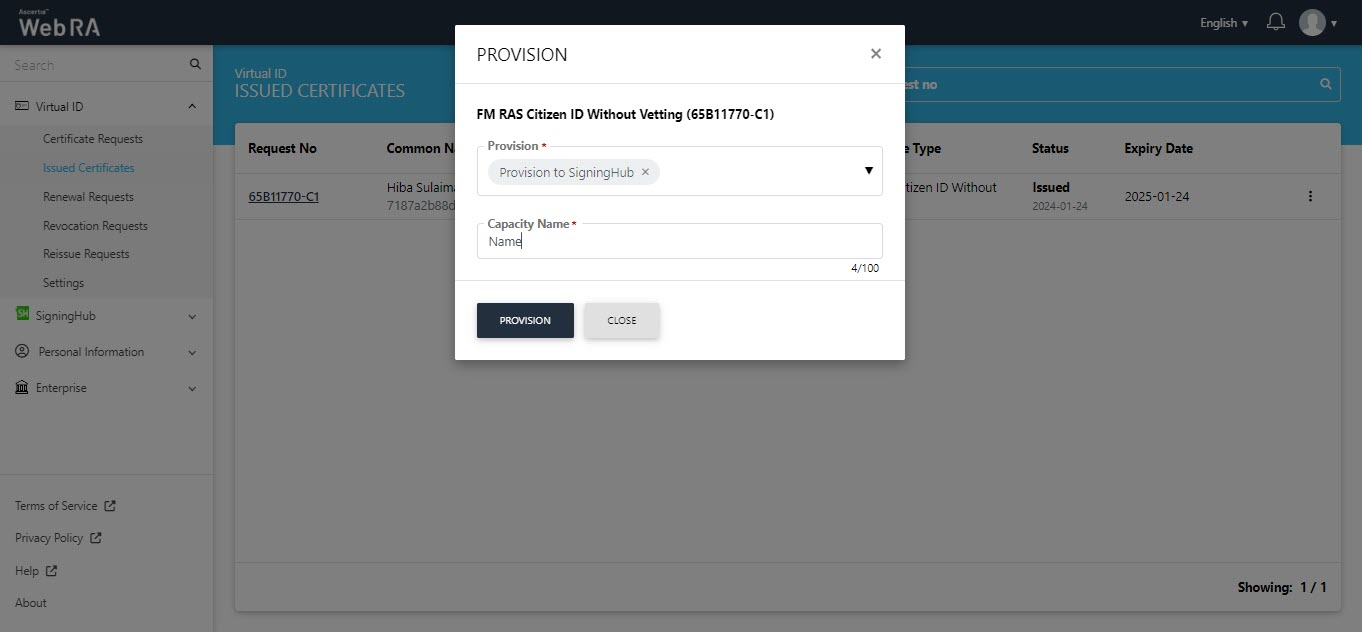
The certificate will be provisioned into SigningHub.
Choose Revoke Certificate, and the subsequent screen will be displayed. The revocation reason will not be displayed when a user is logged in with citizen ID and he is a part of the default enterprise.
Here, you can provide an optional message, select the confirmation checkbox, and then proceed by clicking Revoke.
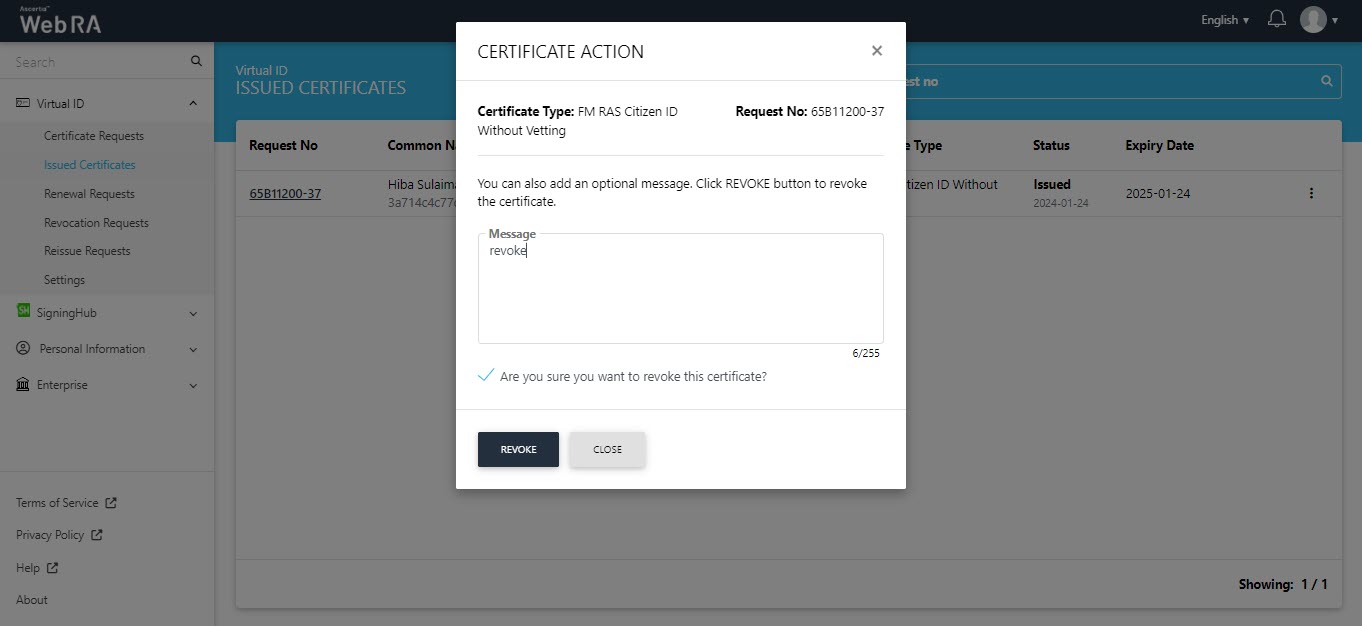
The certificate will appear in the revocation requests.
Expand Virtual ID > Issued Certificates.
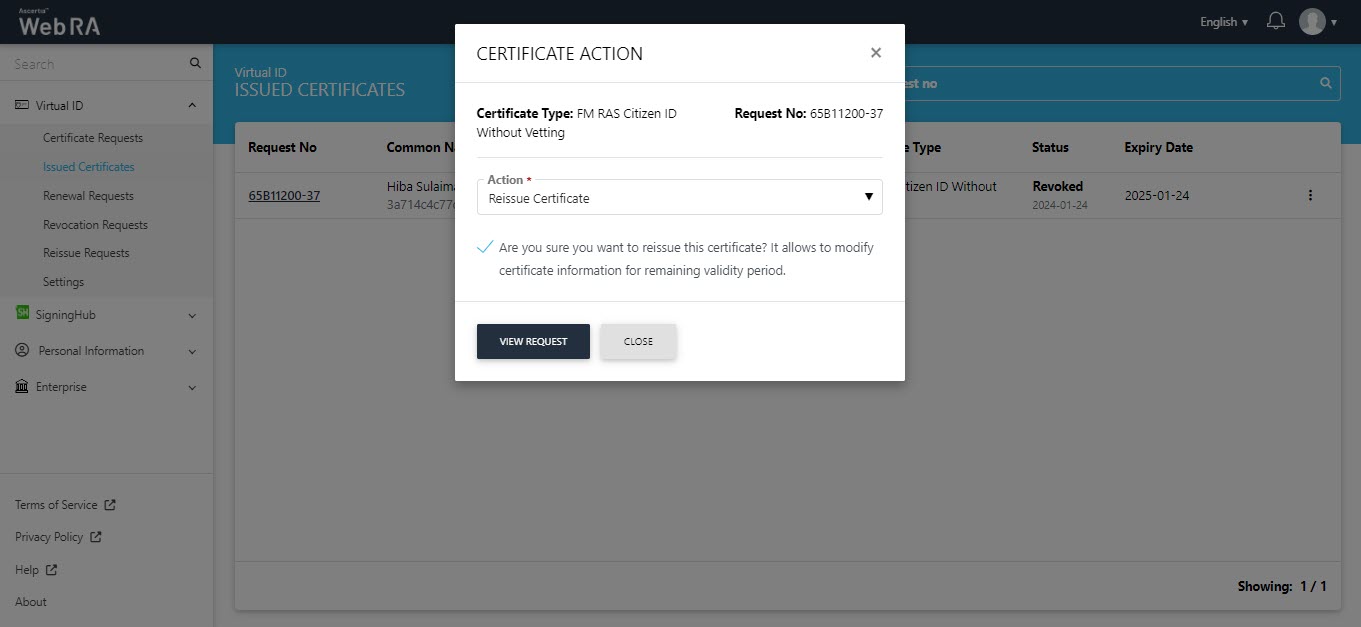
Click More Actions against a revoked certificate and the following screen will appear. Select Reissue Certificate from drop down and select the confirmation message. Then click View Request.
The SDN screen will appear. Enter the SDNs and click Reissue.
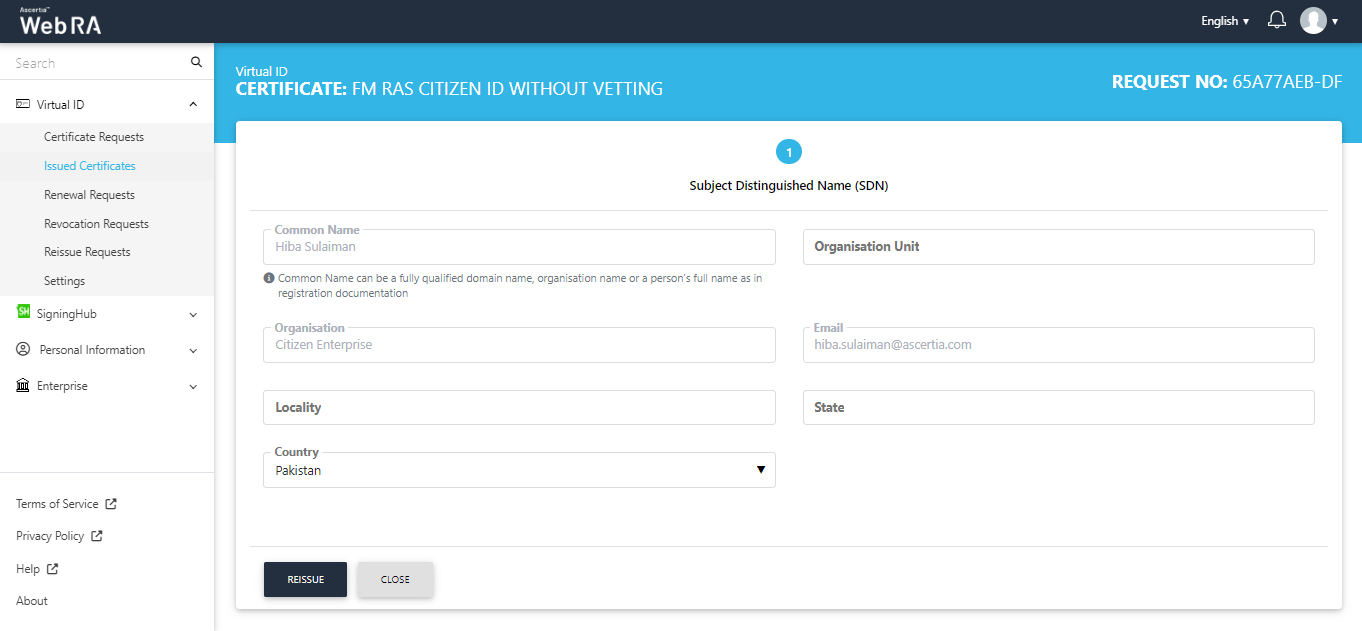
The Subscriber Agreement will appear, click I Agree to proceed.

On the Certificate Reissue screen, you can add an optional message, then click Reissue.
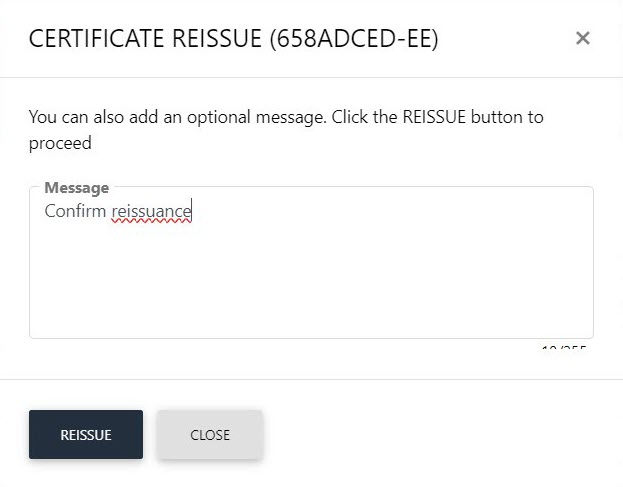
The certificate will appear in the Reissue Requests listing.
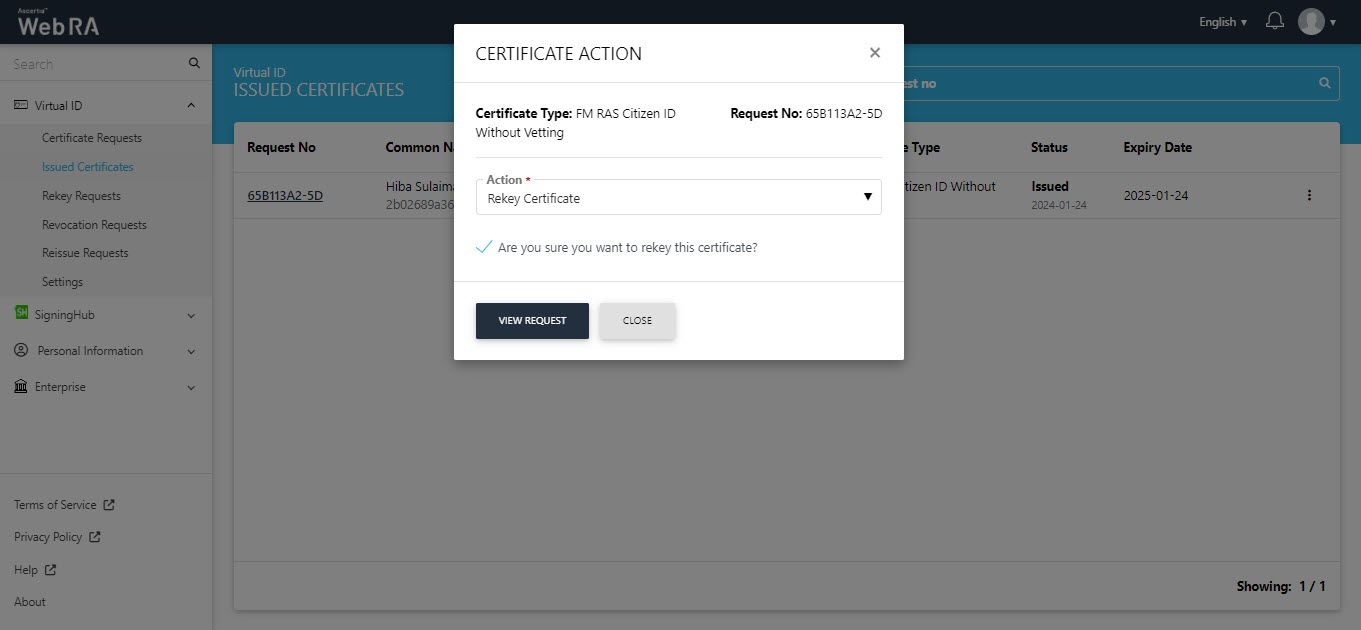
Click More Actions against a certificate and the following screen will appear. Select Rekey Certificate from drop down and select the confirmation message. Then click View Request.
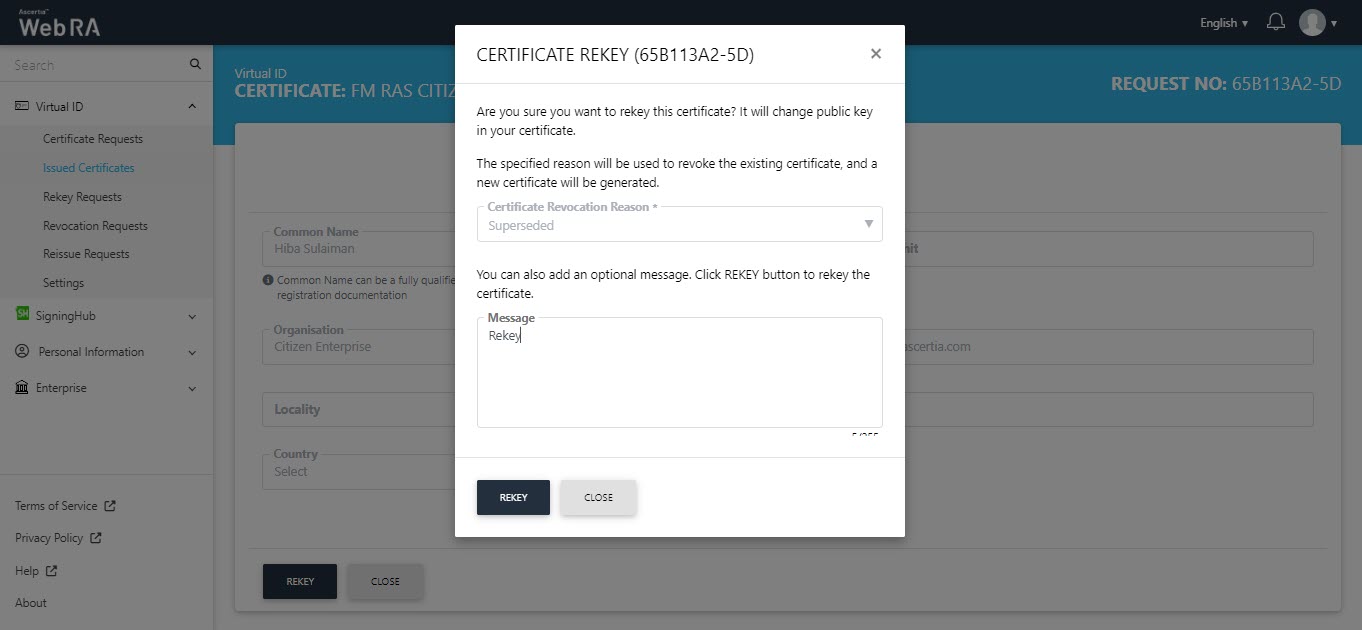
The SDN screen will appear. Enter the SDN and click Rekey.

On the Certificate Rekey screen, you can add an optional message, then click Rekey.
On the Certificate Rekey screen, you can add an optional message, then click Rekey.
The certificate will appear in the Rekey Requests listing.
Click against a certificate and the following screen will appear. Select Renew Certificate from drop down and select the confirmation message. Then click View Request.
The SDN screen will appear. Enter the SDNs and click Renew.
The Subscriber Agreement will appear, click I Agree to proceed.
On the Certificate Renew screen, you can add an optional message, then click Renew.
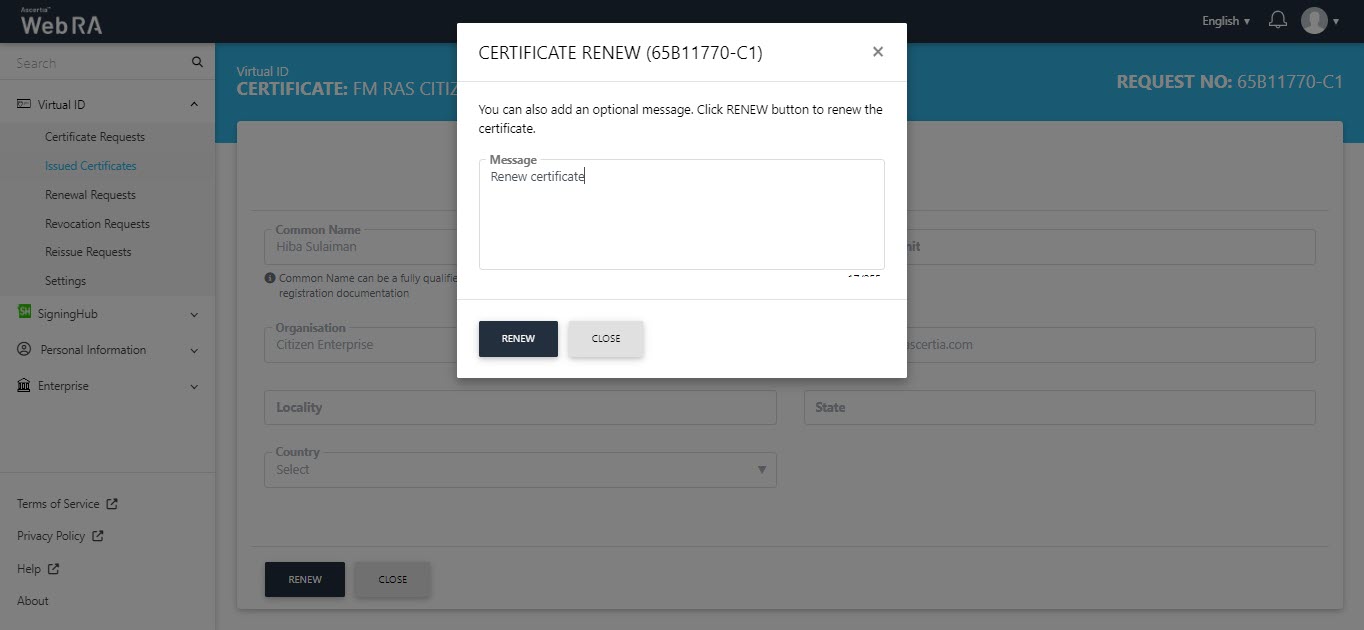
The certificate will appear in the Renew Requests listing.
Settings
You can click on the settings to view/change the mobile number.
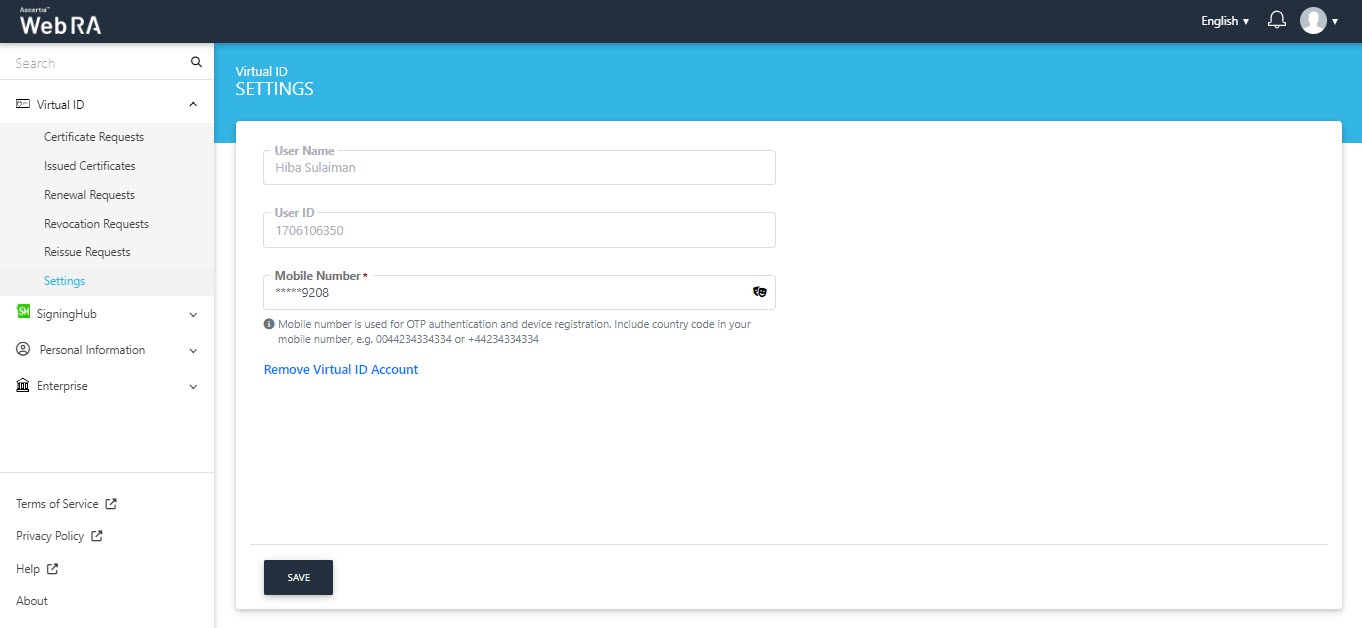
If no mobile number is added in the claims section on the sign up screen, then the Virtual ID will be created with a dummy mobile number +00123456789. A user can change the mobile number, if required.

SigningHub
In case of user registration, only two sections of the SigningHub will be visible to the user as displayed below.
- Issued Certificates
- Settings
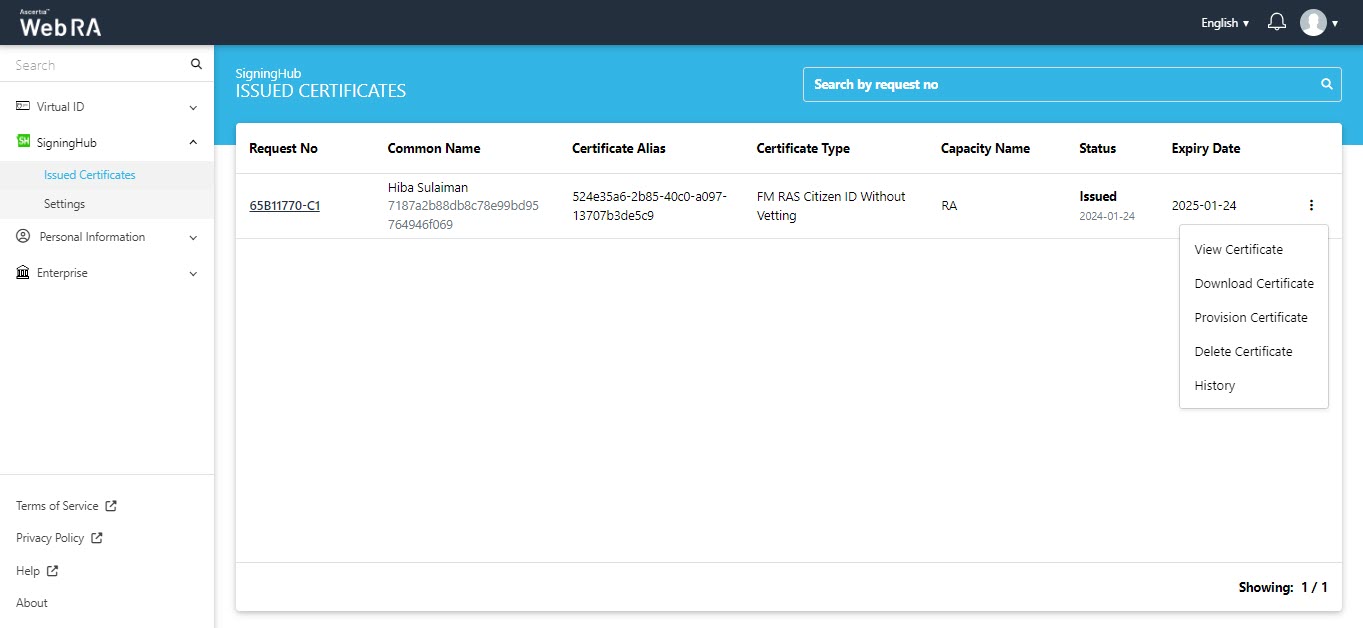
Issued Certificates
The issued certificates will be listed here. Click the ![]() button to perform a number of actions such as:
button to perform a number of actions such as:
- View Certificate
- Download Certificate
- Provision Certificate
- Delete Certificate
View Certificate
Click the ![]() button, then click View Certificate to view the certificate details.
button, then click View Certificate to view the certificate details.
Download Certificate
Click Download Certificate and the certificate will be downloaded to your machine's download folder.
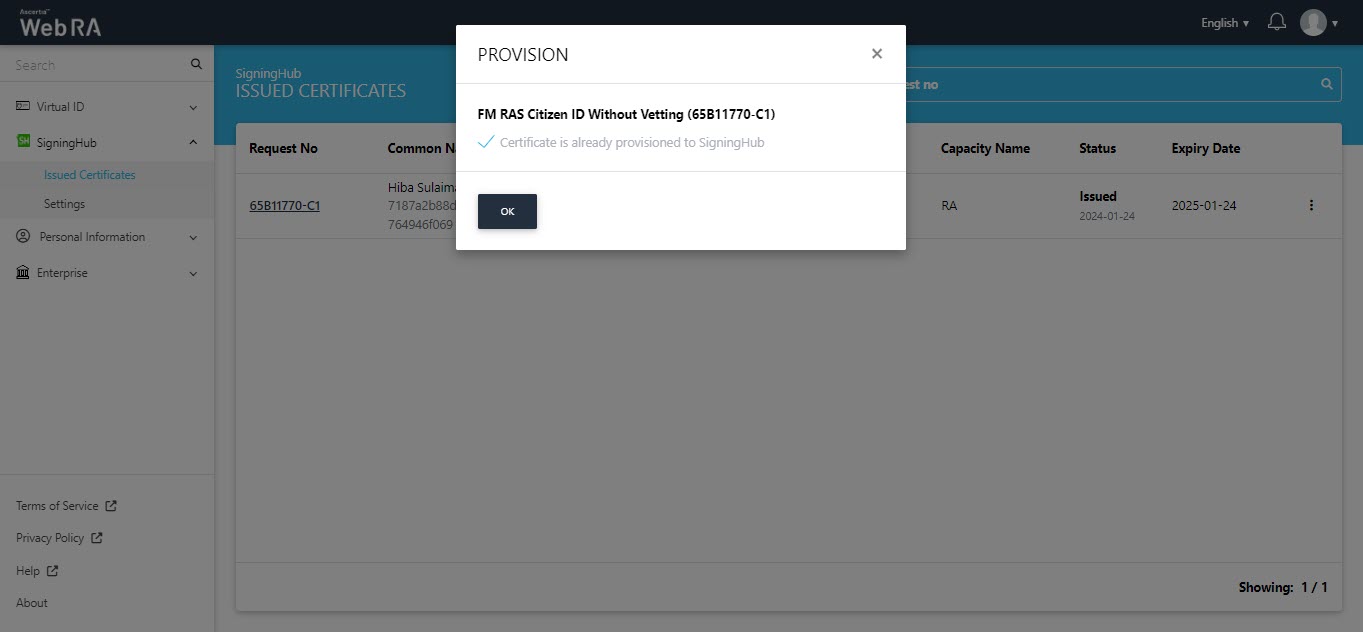
Provision Certificate
When you click Provision Certificate, the following dialog appears.
It displays that the certificate is already provisioned to SigningHub. Click OK to close the dialog. (This screen appears when auto-provisioning is enabled from the Role section in the admin portal).
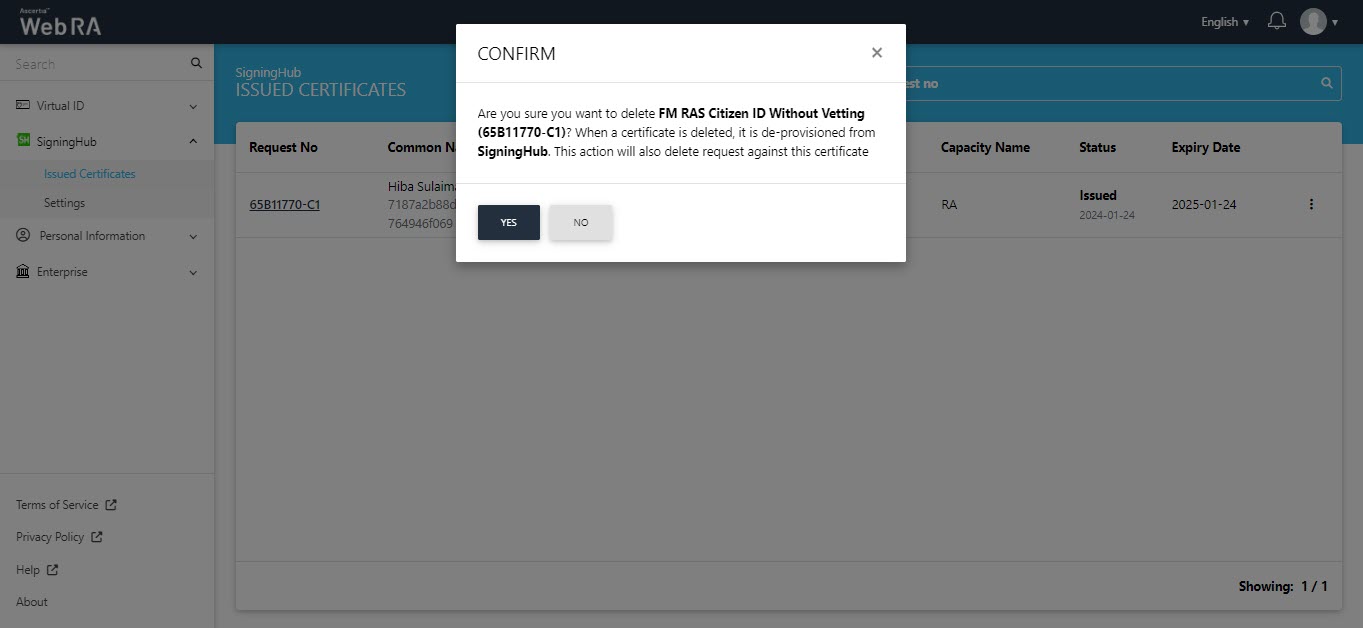
Delete Certificate
Click Delete Certificate to delete the certificate. A confirmation dialog will appear. Click yes to confirm.
Settings
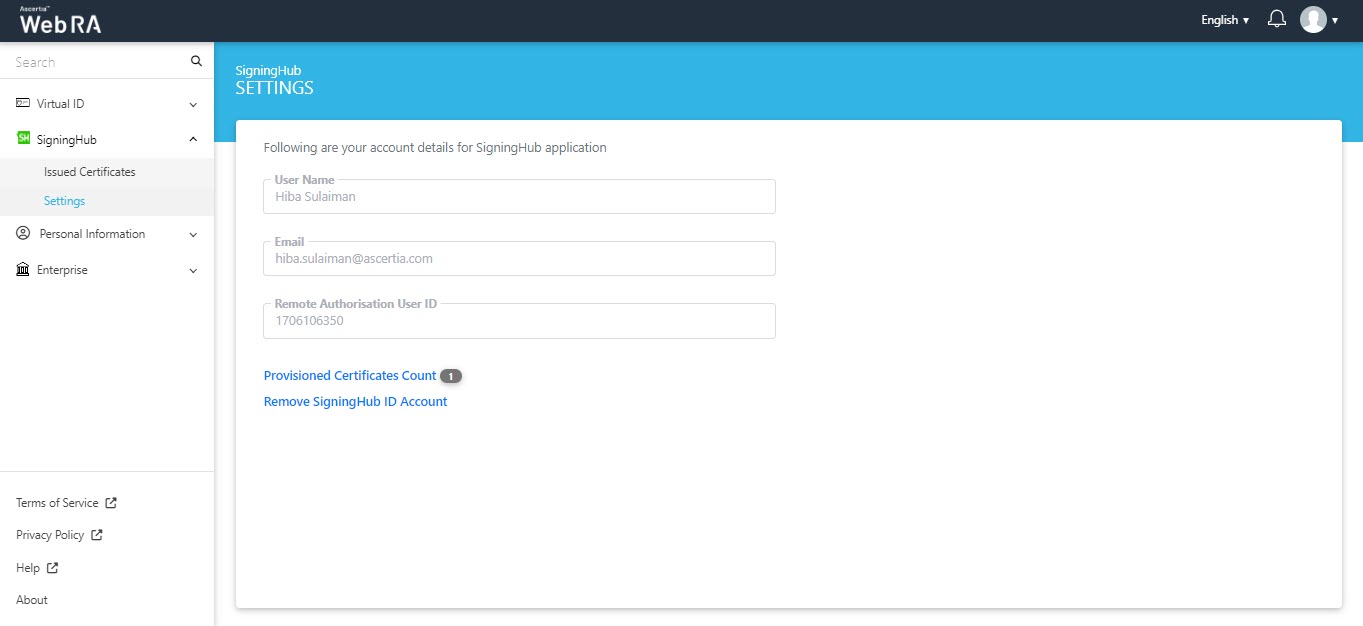
- The SigningHub settings display the User Name, Email and Remote Authorisation User ID in a disabled form.
- The Provisioned Certificates Count explains the number of VIrtual ID certificates that are provisioned into SigningHub currently.
- The Remove SigningHub ID Account button allows a user to delete the SigningHub account.
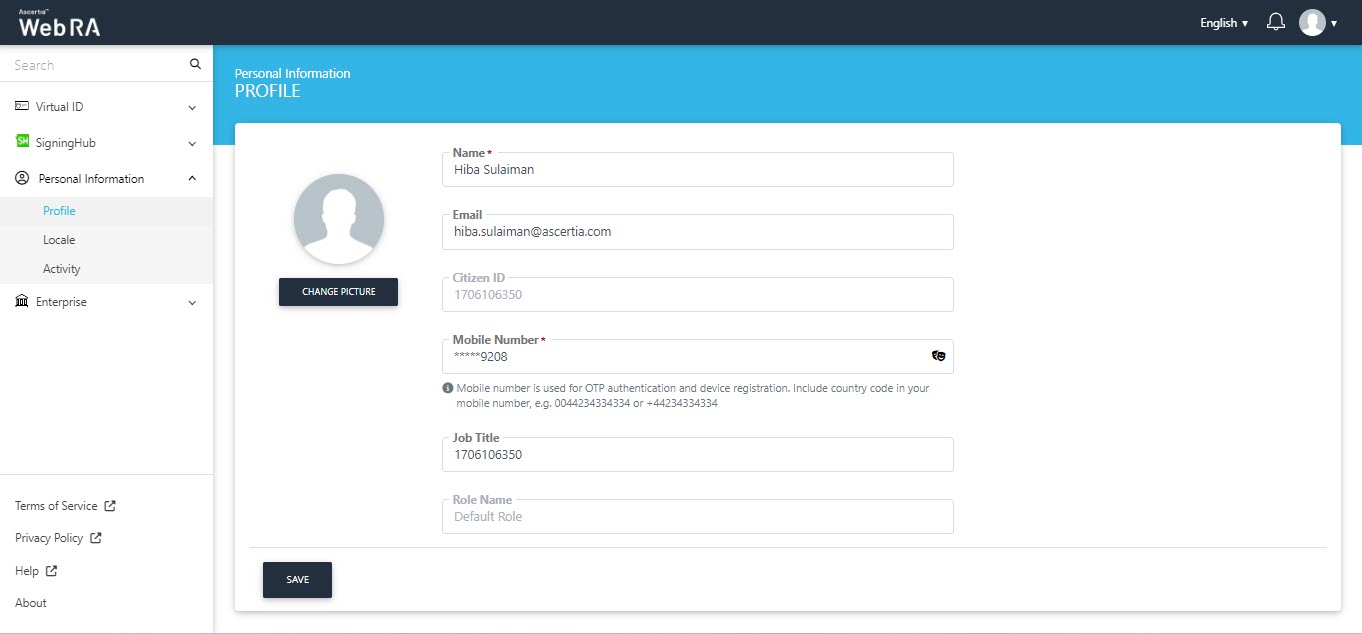
Personal Information
Expand Personal Information > Profile to view the profile information.
Profile
This section displays the name, email, citizen ID, mobile number, job title and role name as displayed.
A user can change his name, email and mobile number, the rest of the fields will appear in a disabled form.
Click Save if you have made changes to the profile information.
Switch Enterprise
If a user switches to an enterprise other than the default enterprise, the revocation reasons will appear when revoking a certificate.
The complete flow for user registration is complete here.