
Open MPIC
This guide discusses the complete Open MPIC verification workflow in Web RA. It provides an end-to-end overview of the process, covering connector configuration, domain configuration through Enterprise Domain Settings, and Open MPIC validation during certificate request creation.
The following topics are covered in this guide:
- Create an Open MPIC Connector
- Policy Settings in Configurations Module
- Create a Certification Profile
- Create a Service Plan
- Create an Enterprise and Associate the Service Plan
- Create a new Role in Enterprise and Assign Profiles
- Domains Configuration in Enterprise Settings
- Create a Certificate Request from Web Portal
- Create a Certificate Request from Admin Portal
The Open MPIC Connector is responsible for establishing a secure communication with the MPIC service to perform required validation checks during the creation of certificate request.
To create an Open MPIC Connector, expand External Services > Connectors from the left-tree menu.
Then, click the add ‘+’ icon in the grid header.
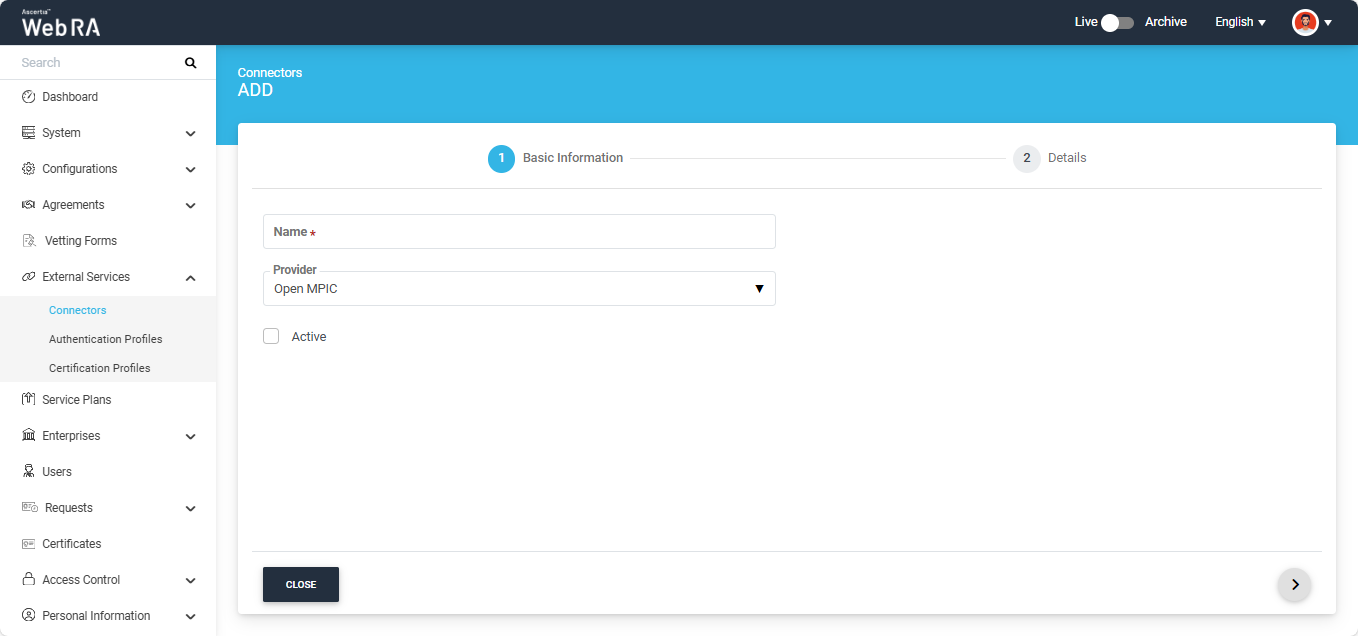
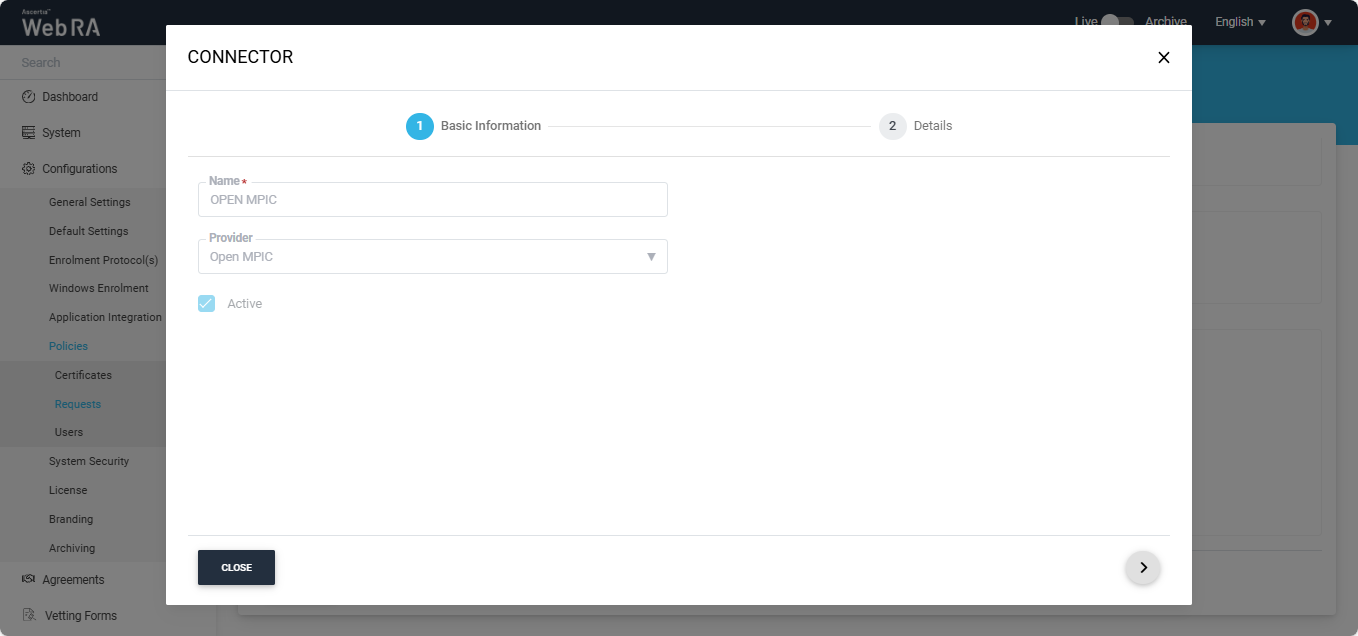
The system will display the Add Connector screen, which consists of two sections: Basic Information and Details.
Basic Information
The fields appearing on the Basic Information screen are explained below:
|
Field |
Description |
|
Name |
Specify a unique name for this connector, for example: Open MPIC. |
|
Provider |
Select Open MPIC as a provider for this connector. |
|
Active |
Select this check box to make this connector active. Inactive connectors cannot be configured in certification profiles. |
After specifying the information in the required fields, click the ‘>’ button to navigate to the ‘Details’ section.
Details
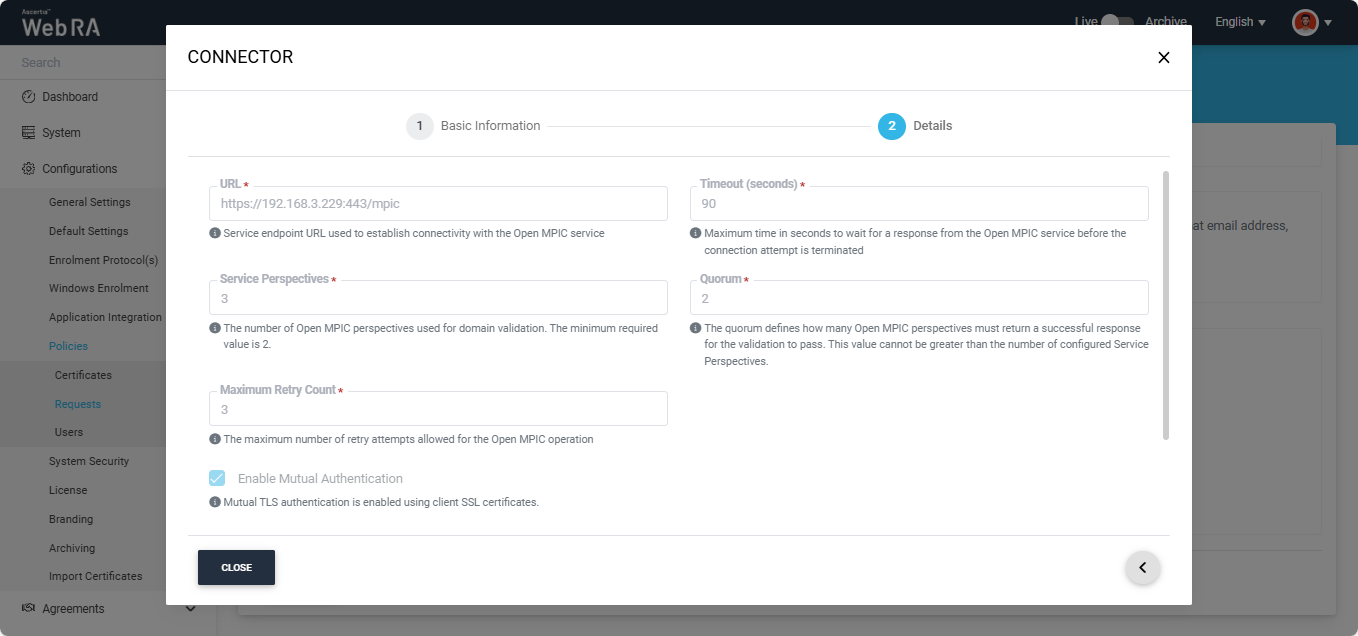
The fields appearing on the Details screen are explained below:
|
Field |
Description |
|
URL |
Specify the service endpoint URL that will be used to establish connectivity with the Open MPIC service. |
|
Timeout (seconds) |
Specify the maximum time (in seconds) to wait for a response from the Open MPIC service before the connection attempt is terminated. |
|
Open MPIC Service Perspective |
Specify the number of Open MPIC perspectives required for domain validation. The perspective count must be at least 2. |
|
Quorum |
Specify the minimum number of successful responses required from Open MPIC to process the certificate request. The quorum count must not exceed the configured Service Perspective count. |
|
Maximum Retry Count |
Specify the maximum number of retries allowed for Open MPIC operation. |
|
Enable Mutual Authentication |
Select this checkbox if you require mutual TLS authentication for this connector. If this checkbox is enabled, the following two fields will appear on the screen:
|
|
TLS Mutual Auth Key (PFX / PKCS#12) |
Upload the PFX that will be used for mutual TLS authentication. |
|
TLS Mutual Auth Key password |
Specify the password for the PFX being used for mutual TLS authentication. |
After entering all the required details, click the ‘Test Connection’ button to check if the Open MPIC is working.
If the connection is successful, the system will display a success alert on the screen.
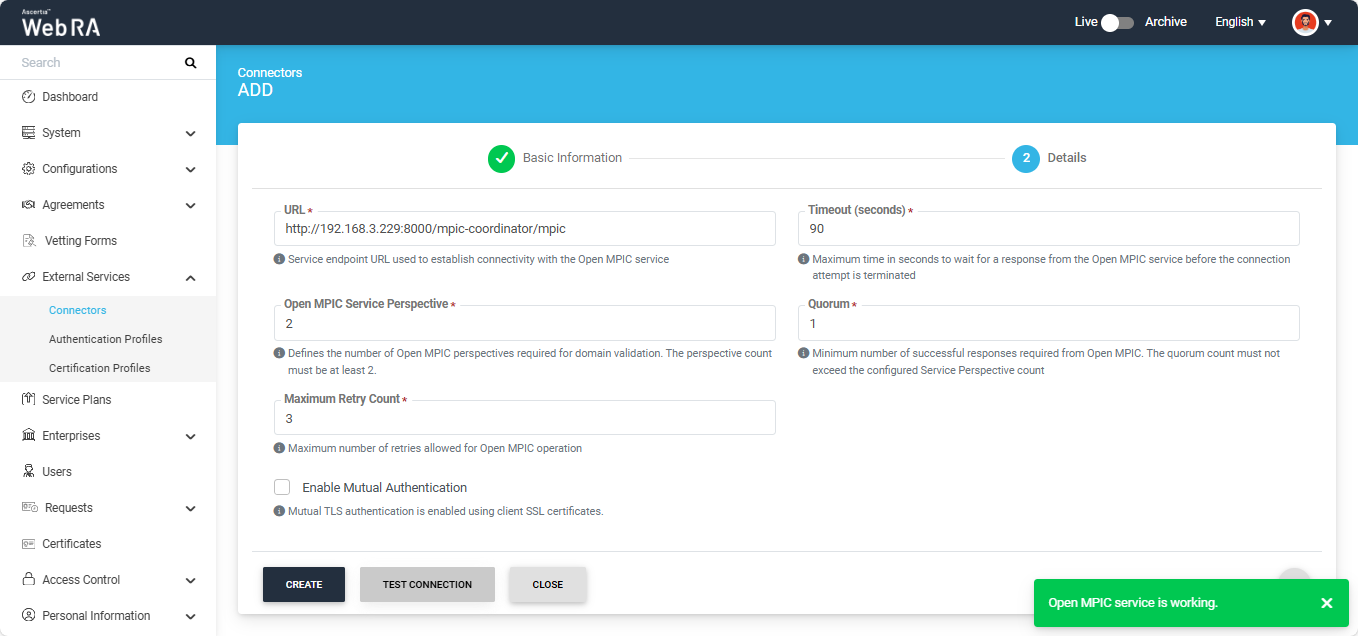
Once all the details are finalized, click ‘Create’ to complete the creation of Open MPIC connector. The connector will be saved in the system and will appear in the Connector listing.
Policy Settings in Configurations Module
Open MPIC Connector
The Open MPIC Connector is responsible for establishing a secure communication with the MPIC service to perform required validation checks during the creation of certificate request.
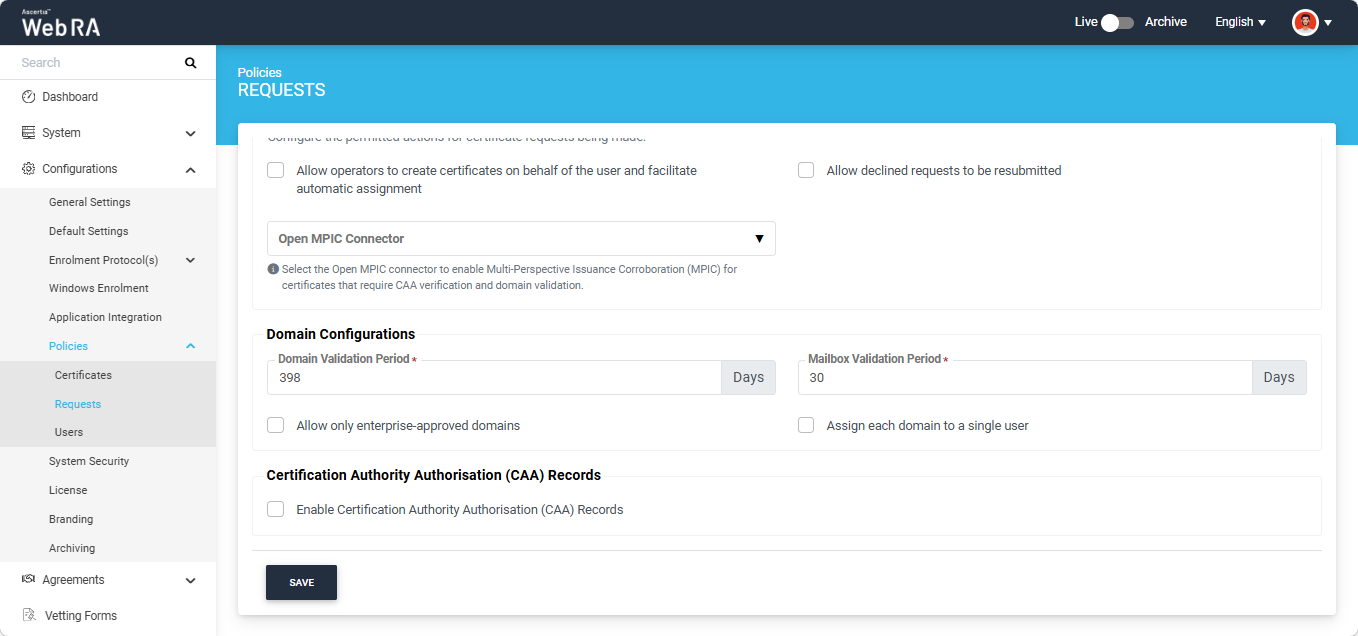
Expand Configurations > Policies > Requests from the left-tree menu in the Admin portal. Then navigate to the 'Request Settings' section.
If you click the 'Open MPIC Connector' dropdown field, it displays all the active Open MPIC connectors created in the Web RA system.
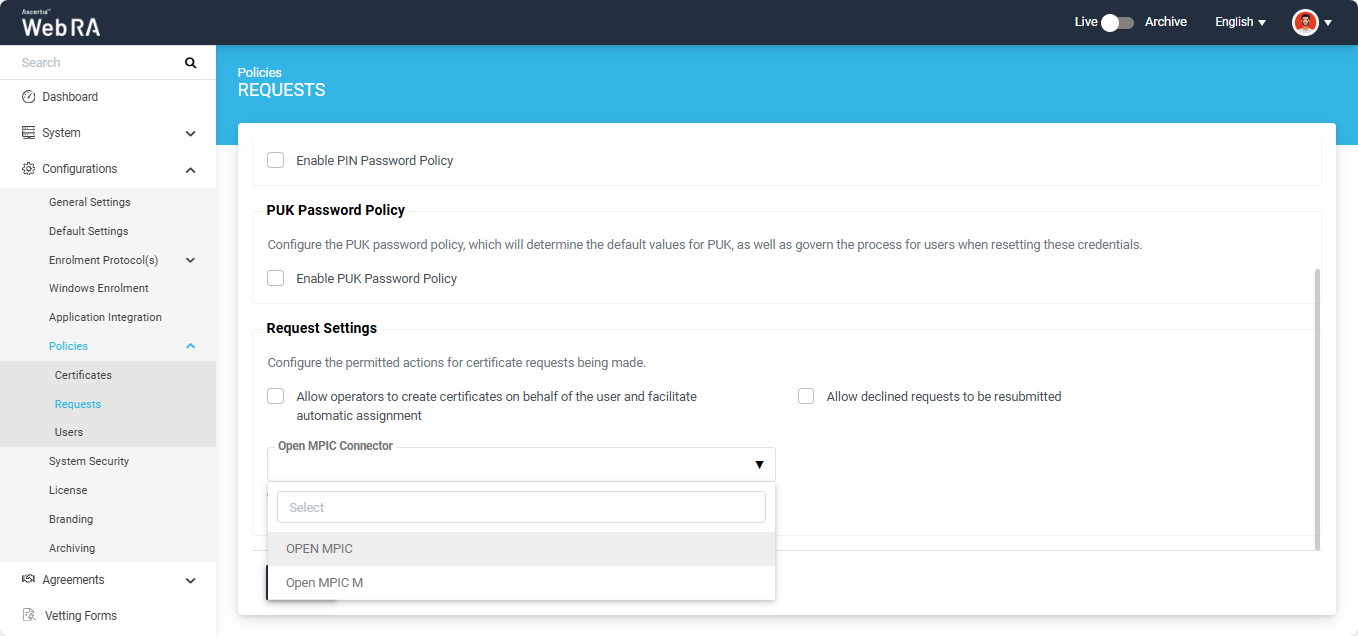
You can select the required connector from the list, which will then appear in the dropdown field.
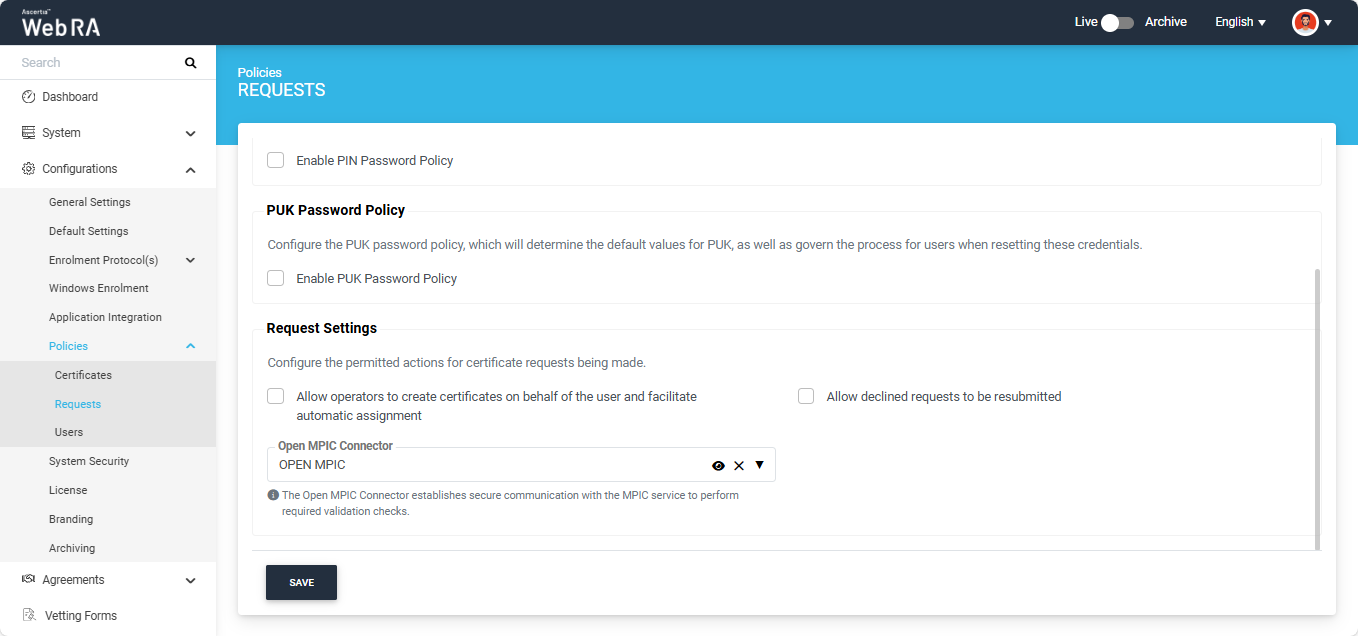
If you want to view the details of the selected connector, click the ‘Eye’ icon. The system will display the ‘Connector’ dialog with the complete information in read-only mode.
To remove the selected connector, click the cross ‘x’ icon present on the right side of the dropdown field.
Domain Configurations
The Domain Configurations section allows administrators to define how domain and mailbox validation is managed within the system. These settings control the validation validity period, domain ownership behaviour, and whether users are permitted to add and validate domains during certificate request creation.
|
|
The policy changes for domain configurations made from this screen will be applied to all newly created Enterprises. However, the operator can make enterprise-specific policy changes for domain configurations from the Enterprise Policies section. |

Expand Configurations > Policies > Requests module from the left-tree menu in the Admin portal. Then, navigate to the Domain Configurations section.
Domain Validation Period (Days)
This policy defines the validity period for domain validation across the Web RA application. The configured validity period applies to both domains and subdomains validated within the system.
The default value is 398 days and the configured value must not exceed 398 days.
Once the configured validation period expires, the domain must be revalidated before it can be used for certificate issuance.
Mailbox Validation Period (Days)
This policy defines the validity period for mailbox validation across the application. The default value is 30 days and the configured value must not exceed 30 days.
Once the configured validation period expires, mailbox validation must be performed again before certificate issuance.
Allow only enterprise-approved domains
This checkbox controls whether users are permitted to add and validate new domains during certificate request creation.
Note: If this checkbox is enabled, the ‘Assign each domain to a single user’ checkbox becomes disabled. You can only enable and select one option at once.
When Enabled
Users are only allowed to select domains that have already been validated and approved at the enterprise level. They are not permitted to add or validate new domains during certificate request creation.
When Disabled
Users may either select an existing enterprise-validated domain or add and validate a new domain during certificate request creation. The newly validated domains are automatically added to the enterprise validated domain list.
|
|
If the user adds and validates a new domain during the certificate request creation, then the domain validity period for that domain will be applied according to the configured validity period in the certification profile. |
Create a Certification Profile
Expand External Services > Certification Profiles from the left menu. The system will display the certification profiles listing screen.
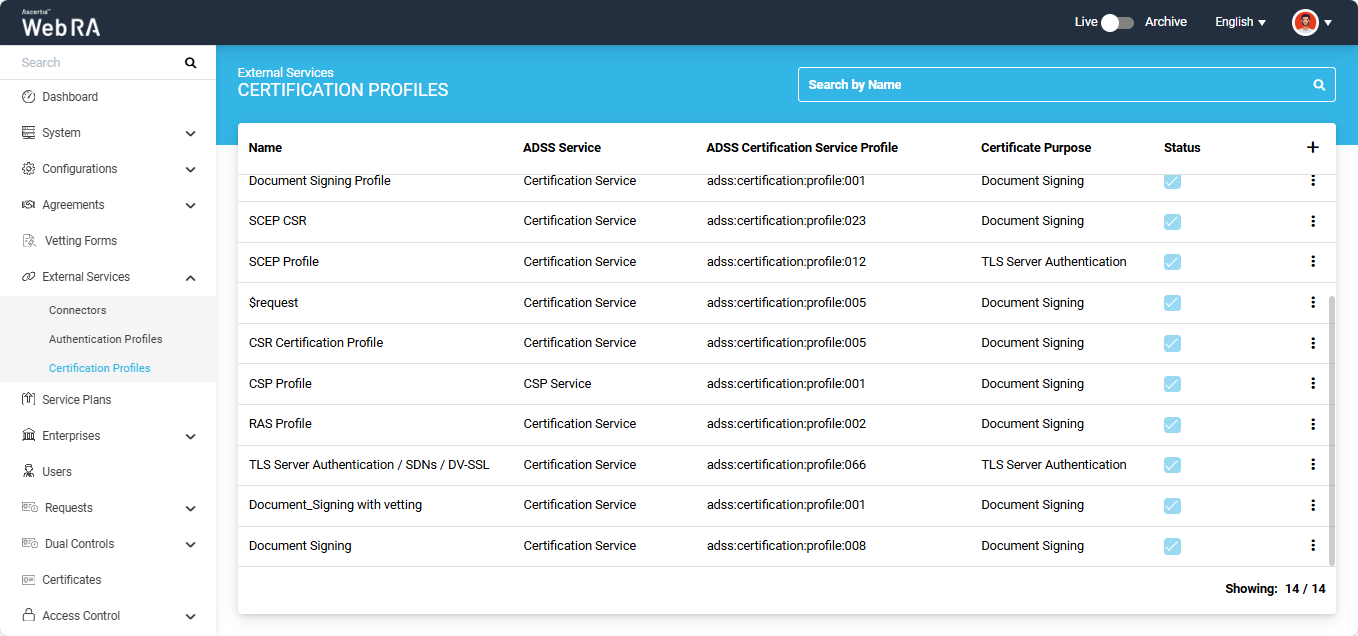
To add a new certification profile, click the ‘+’ button on the left side of the table header. The system will display the ‘Basic Information’ screen.
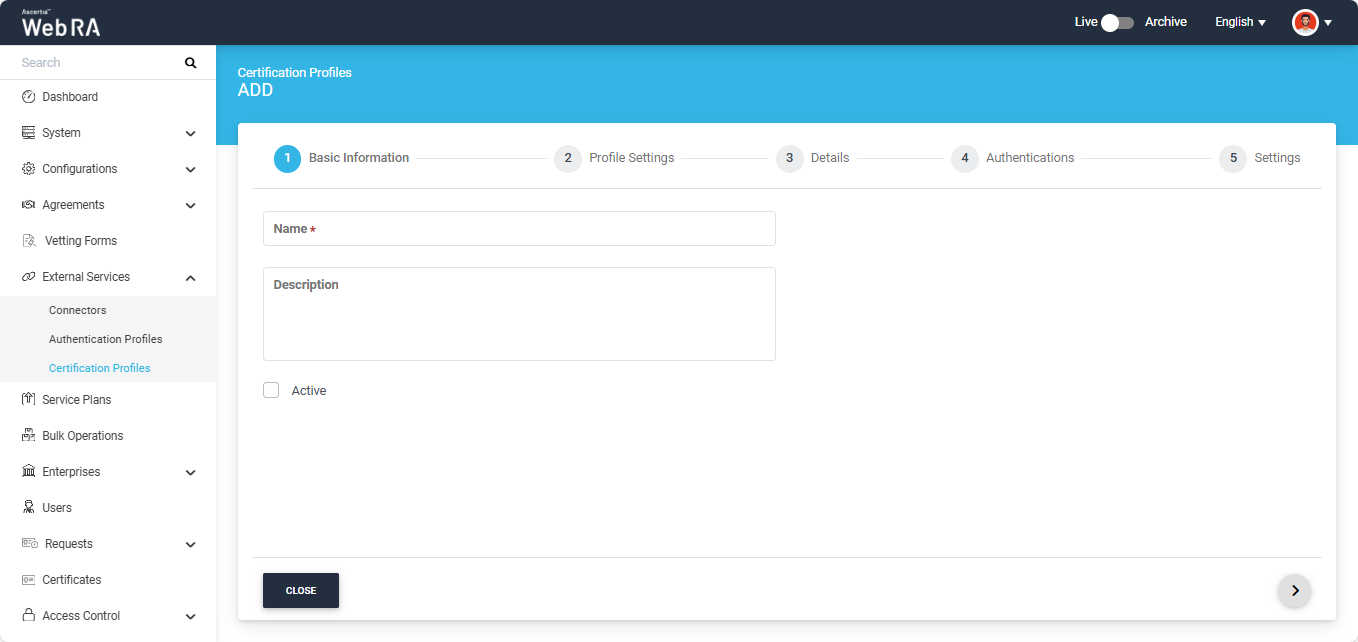
Basic Information
The basic information screen will display the following fields:
|
Field |
Description |
|
Name |
Specify a unique name for this profile. |
|
Description |
Specify any description related to this certification profile. (Optional) |
|
Active |
Select this checkbox to make the profile active. |
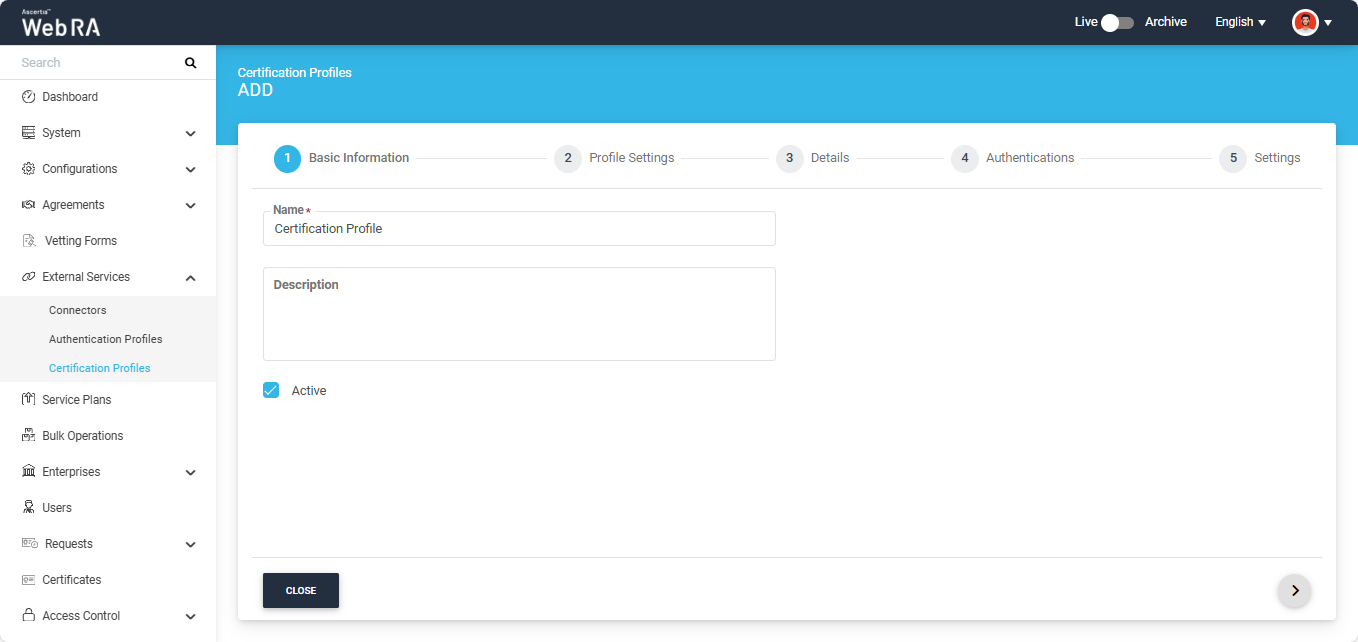
After entering the required details, click the next ‘>’ icon to proceed to the ‘Profile Settings’ screen.
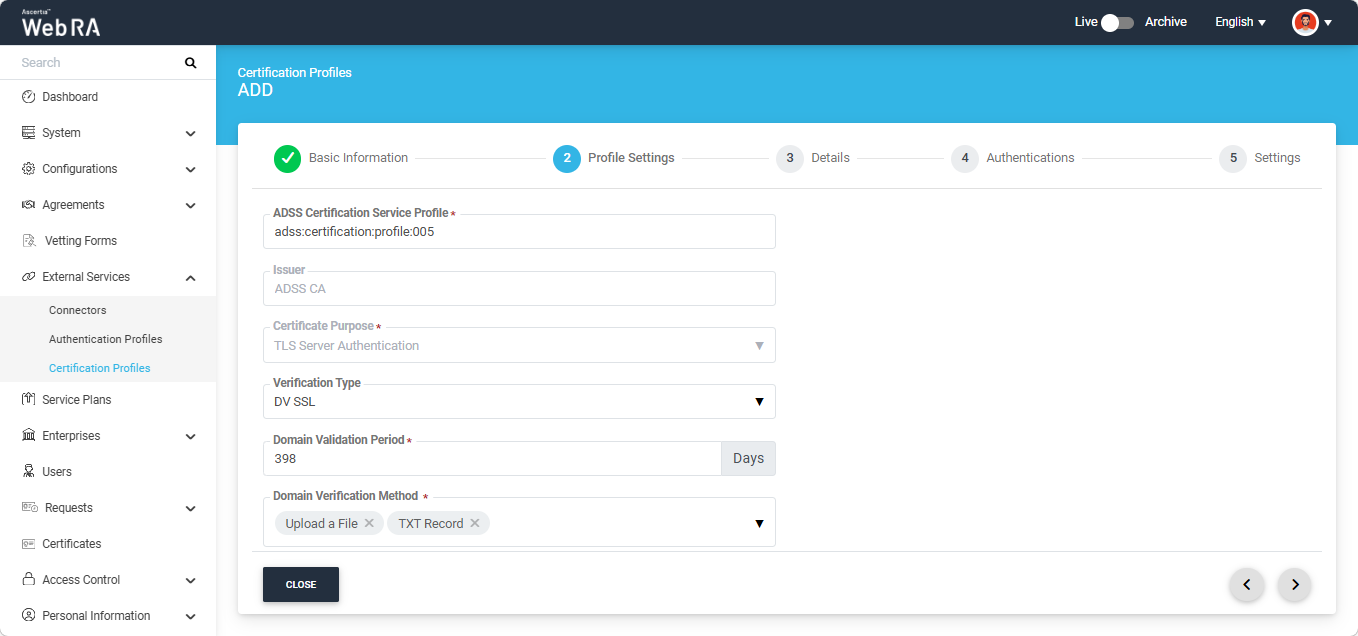
Profile Settings
|
Field |
Description |
|
ADSS Service |
This field will display the ADSS Services (i.e. Certification Service and CSP Service) that are available for ADSS Web RA. Select the ‘Certification Service’ option from the dropdown. |
|
ADSS Certification Server |
This field will display the list of active ADSS connectors in ADSS Web RA. Select the one to use for this certification service profile, for example: 192.168.2.64. |
|
ADSS Certification Service Profile |
In this field, enter the certification profile that you created on the ADSS Sever, for example: adss:certification:profile:001. |
|
Issuer Name |
It will display the issuer CA name. (This field will appear in disabled form) |
|
Certificate Purpose |
This field contains the list of standard certificate purposes, which come from ADSS based on the selected certification profile. A certificate is generated based on the provided certification profile ID, and it will be in a disabled form as it is configured in the ADSS Sever under that ADSS Certification Service Profile. Possible certificate purposes could be Document Signing, TLS Server Authentication, Code Signing etc. ADSS Web RA supports the following types of TLS certificates:
When an EV TLS Server authentication certificate is revoked, ADSS Web RA will support only the following six revocation reasons:
In case of external CA this field will be enabled and operator can select certificate purpose. |
|
Verification Type |
Select an option from the following:
If you select any option other than ‘None’, the system will display the ‘Domain Verification Method’ dropdown field on the screen. |
|
Domain Validation Period (Days) |
This field will appear if the selected Verification Type is DV SSL, EV SSL, or OV SSL. In this field, you can define the validity period of the domain verified during the creation of the certificate request. The default value of the validity period is 398 days and the configured value must not exceed 398 days. Note: If you set the domain validity period to 0 days, the user will be required to verify the domain each time a certificate request is generated.
Note: The domain validity period configured in the certification profile will only be applicable for new domains added and validated by the users while creating the certificate request. If the user has selected any enterprise-validated domain, the enterprise-level domain validation validity period will override the certificate profile validation period. |
|
Domain Verification Method |
From this dropdown, you can select the method that will be used to verify the domain. The available verification methods include:
You can either choose one option or select all options depending on your requirement. |
|
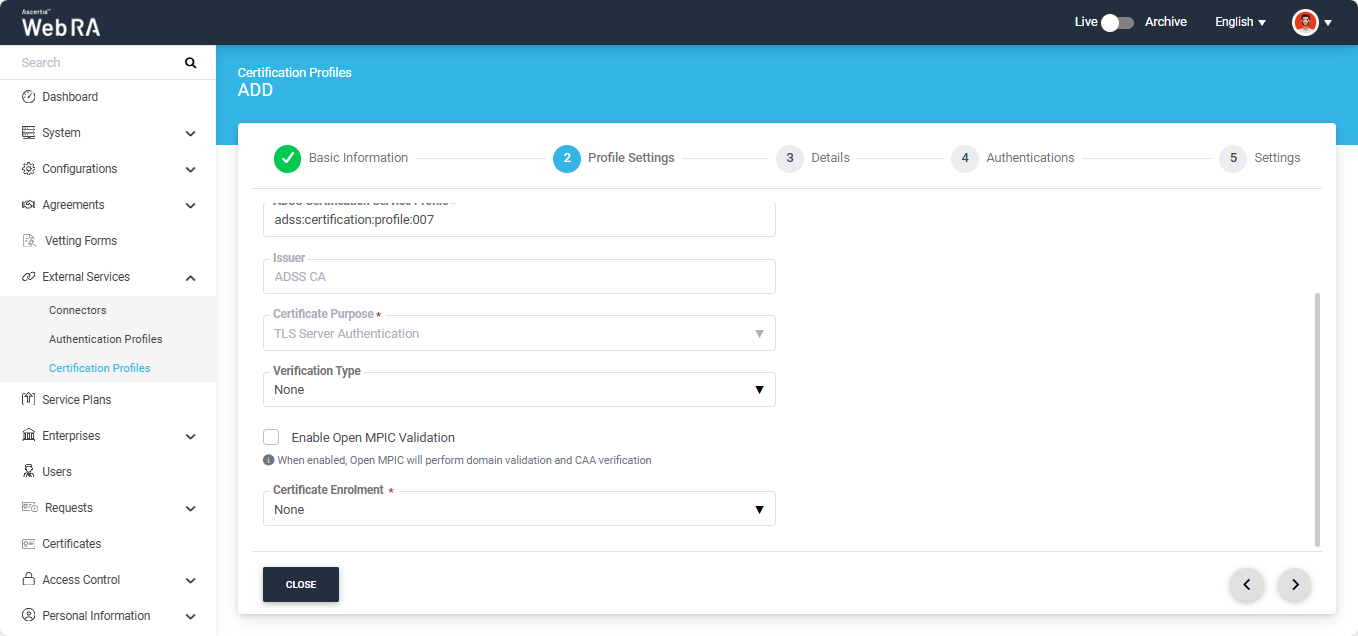
Enable Open MPIC Validation |
If this checkbox is enabled, Open MPIC will perform domain validation and CAA verification. Note: This option will only appear if the “Open MPIC Connector” is selected in the Configurations > Policies > Requests section. To learn more about this, navigate to the “Requests” section. Furthermore, the Open MPIC Validation option is only available when the certificate purpose is ‘TLS Server Authentication’ or ‘Email Signing’. |
|
Enable one-time PFX download |
If enabled, users can download the PFX file only once from the Web Portal. After that, the PFX download option will not be available. Additionally, when this option is enabled, the operator will not be able to download the PFX from the admin portal. |
|
Enable Client Keys |
Enabling the client keys option will require public key to generate the certificate. The Subject Distinguished Names (SDNs) in the certificate request will be populated based on what is configured in the ADSS certification profile and the data provided in the CSR (Certificate Signing Request). |
|
Certificate Enrolment |
This dropdown displays the following options:
|
|
Enrolment Protocol(s) |
This dropdown displays the following enrolment protocols:
You can choose an enrolment protocol according to your specific requirements. |
|
Active Directory Profile |
It allows a user to select an active directory profile which is required for Windows Enrolment. |
|
Certificate Template |
This drop down will fetch the list of certificate template fetched from the active directory selected above. |
|
Enable Device Enrolment / Windows Device Certificate |
By enabling this setting, user will not be required to upload an authentication certificate while creating an account. |
|
Enable Virtual ID Registration with Password |
Enable this checkbox if you want the user to provide a password during the process of registering a Virtual ID. This password will be used for credential authorization within business applications. |
You can view the details of the selected ADSS connector by clicking the ‘Eye’ icon next to the connector name. When you click the icon, the system will open the ‘Connector’ dialog on the screen displaying the basic information.
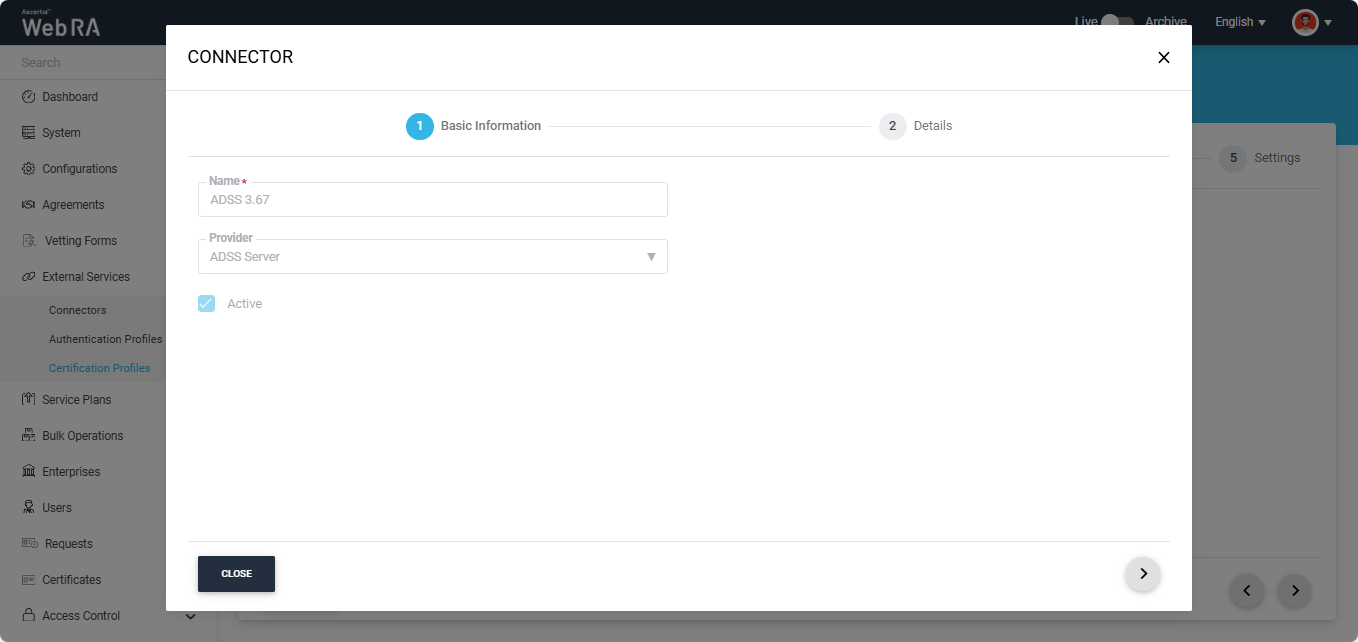
To view complete details of the connector, navigate to the ‘Details’ tab.
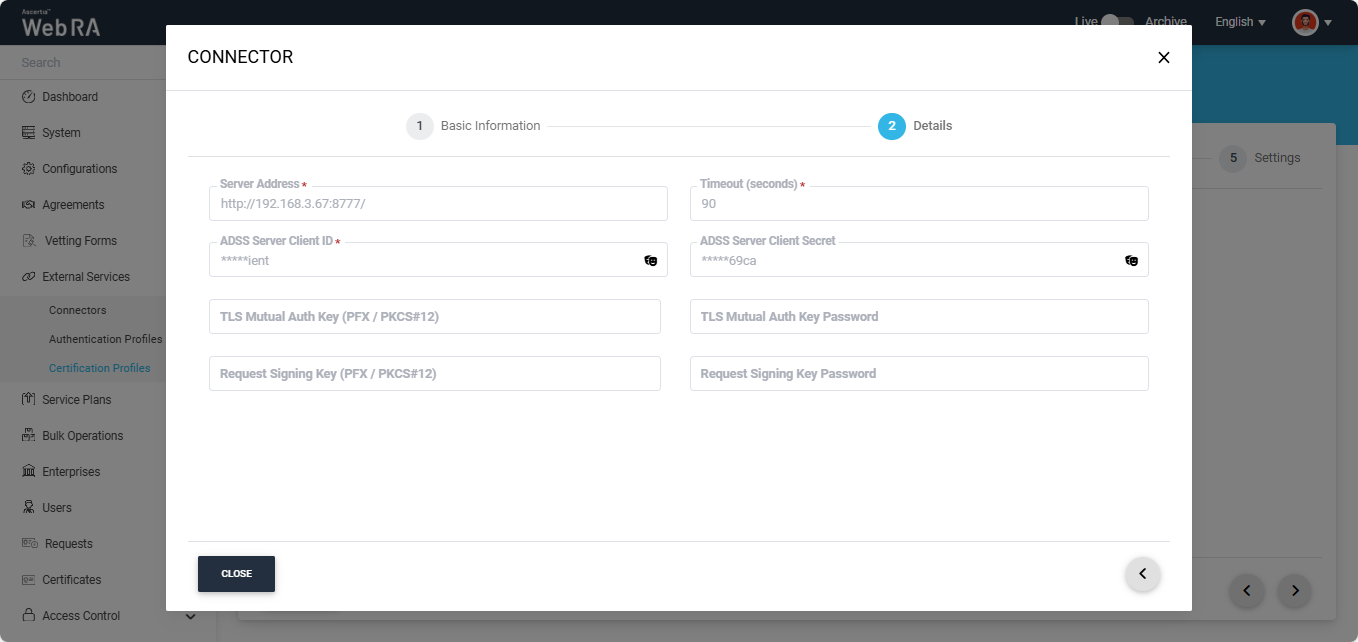
After selecting the required options in the Profile Settings section, click the next ‘>’ button to navigate to the ‘Details’ tab.
After completing the Profile Settings section, set the options in the Details, Authentications, and Advanced Settings to their default values. You can also modify the configurations in these sections as per your requirement.
After navigating to the ‘Settings’ tab, click ‘Create’ to finalise your certification profile.
After creating the certification profile, you need to configure it in a Service Plan that will be later associated with an Enterprise.
To do that, expand ‘Service Plan’ module from the left tree menu.
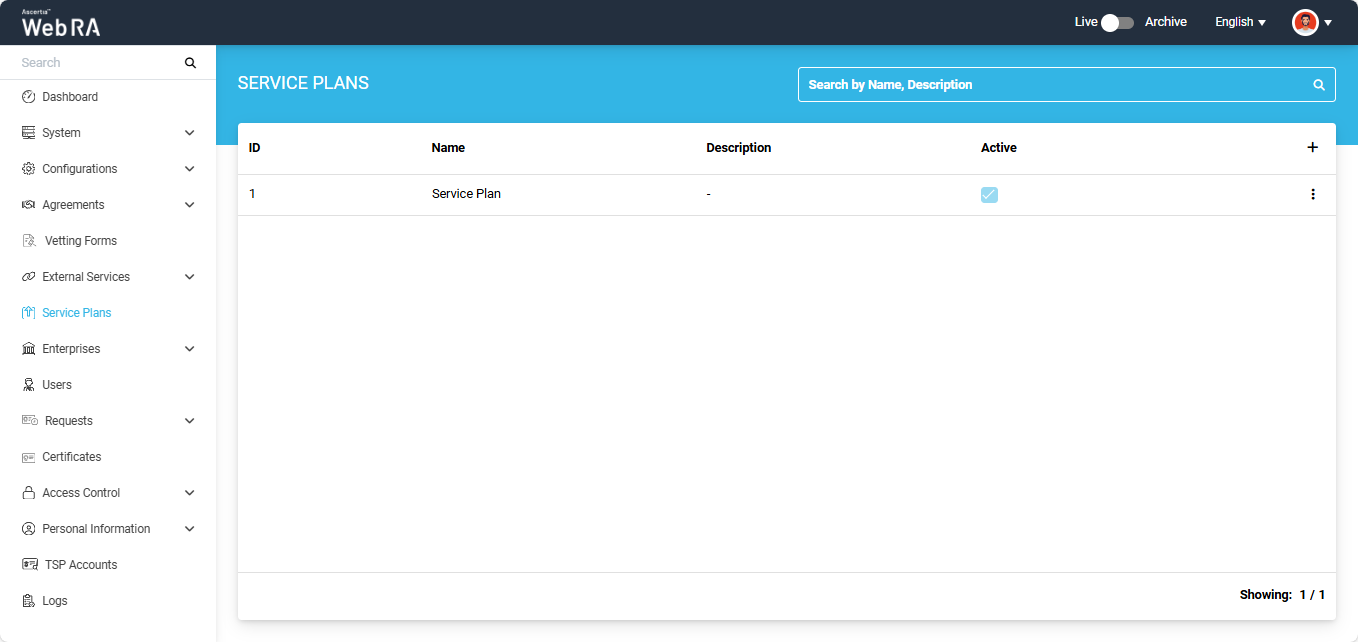
Then, click on the ‘+’ icon to create a new service plan. The system will display the ‘Add’ service plan screen.
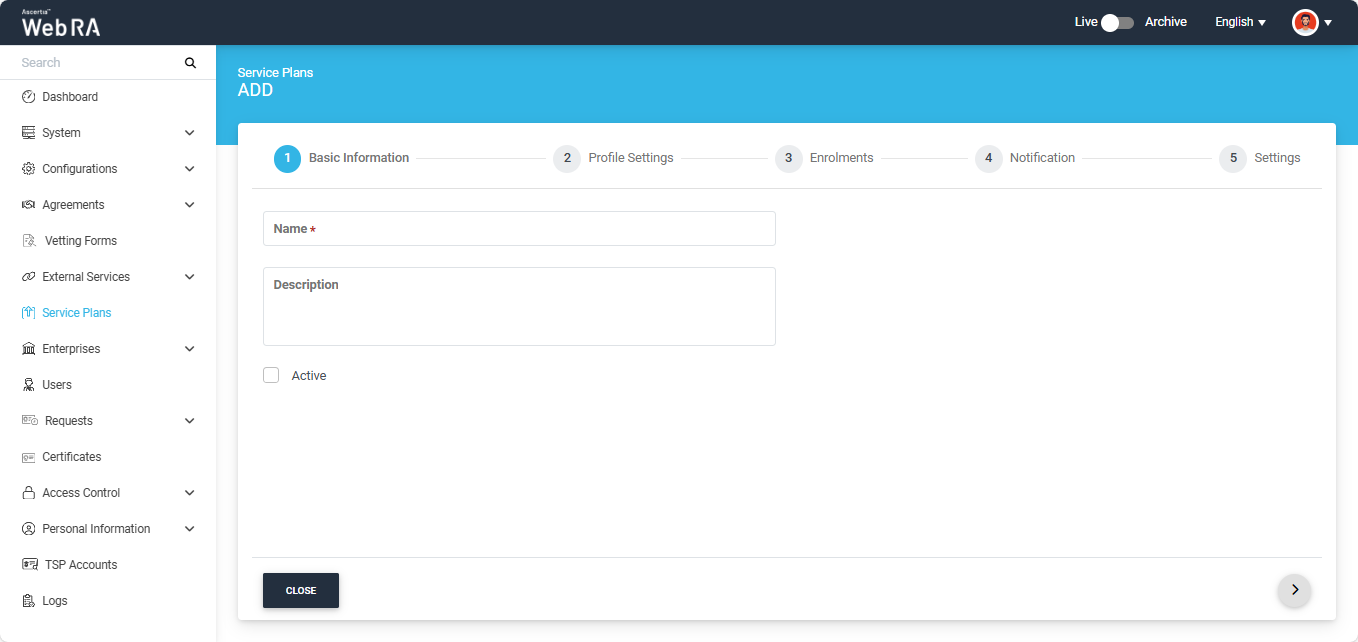
Under the ‘Basic Information’ section, enter the name of the service plan and an optional description. Then, enable the ‘Active’ checkbox.
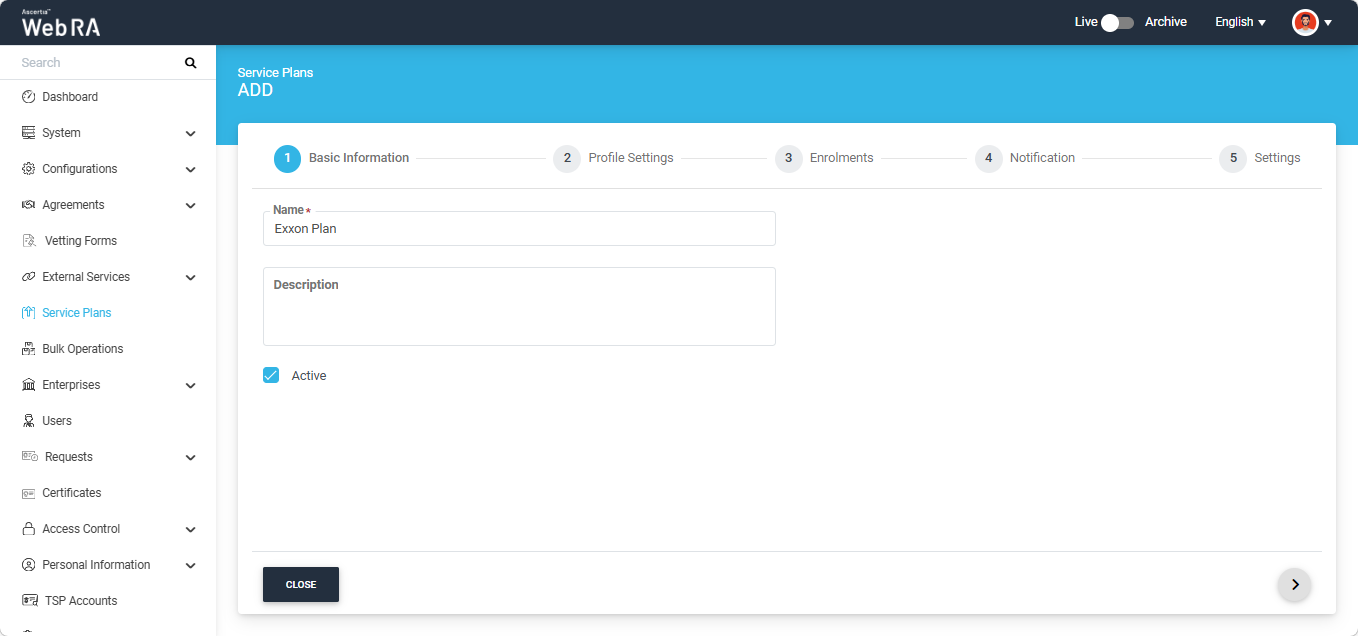
Note: Inactive service plans cannot be configured under Enterprise Accounts.
After entering the details, click the ‘>’ button to navigate to the ‘Profile Settings’ section. Here, click on the ‘Profiles for server-side keys & certificates’ dropdown and select the certification profile you created in the previous step.
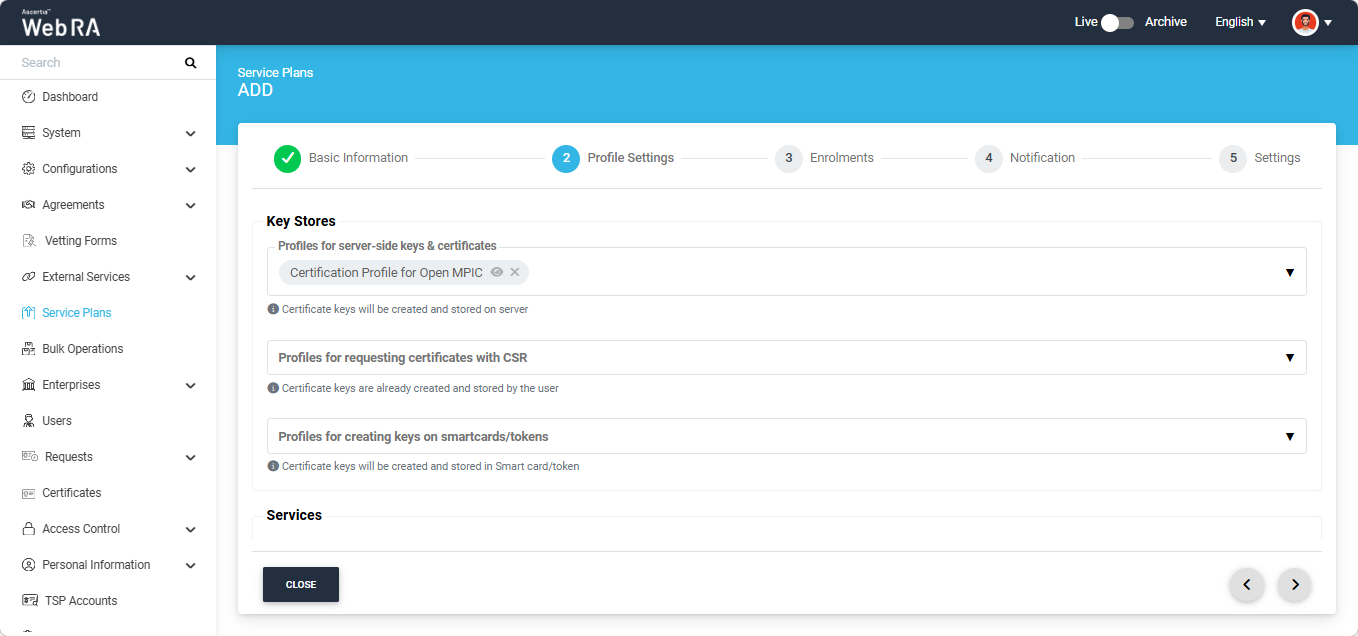
Once you have selected the profile, click the ‘>’ button to navigate to the ‘Settings’ screen. On the ‘Settings’ screen, click ‘Create’ to finalise the new service plan.
Create an Enterprise and Associate the Service Plan
Expand Enterprise > Requests from the left tree menu. The Service Plans listing screen will appear.
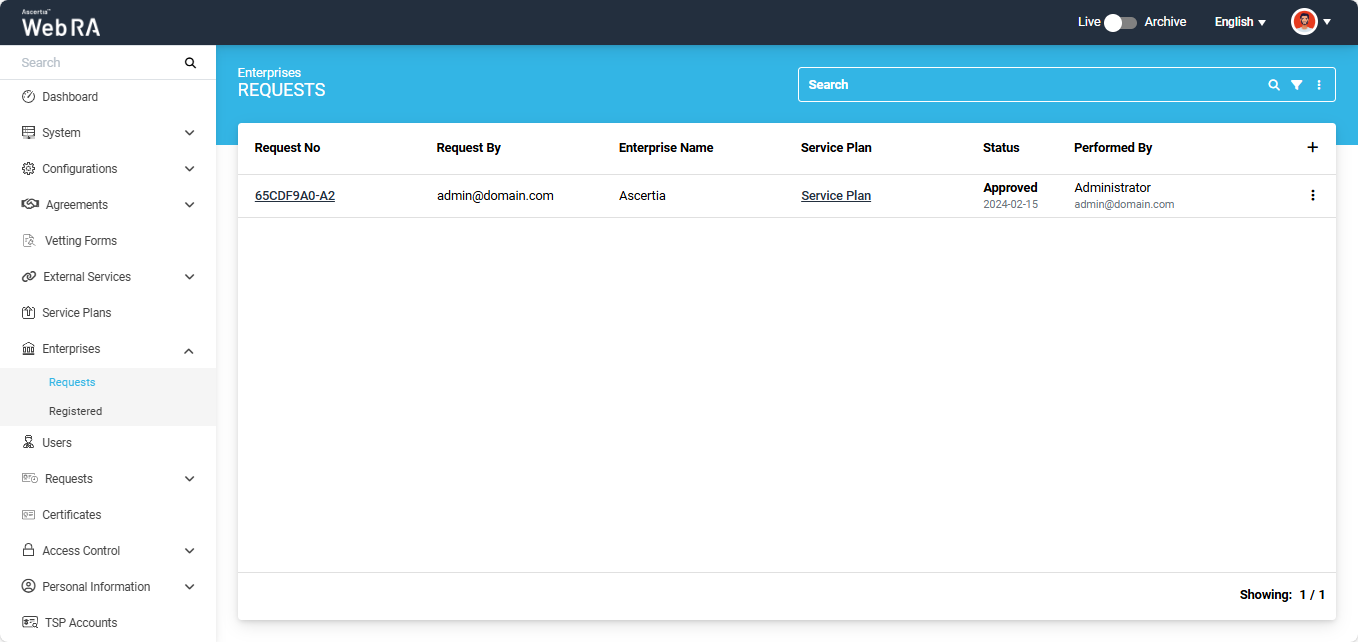
Click the ‘+’ button from the grid header to create a new Enterprise. The system will display the ‘Add Enterprise’ screen.
Under the ‘Organisation Information’ section, enter the required information in their designated fields and assign the service plan to the enterprise from the ‘Service Plan’ dropdown.
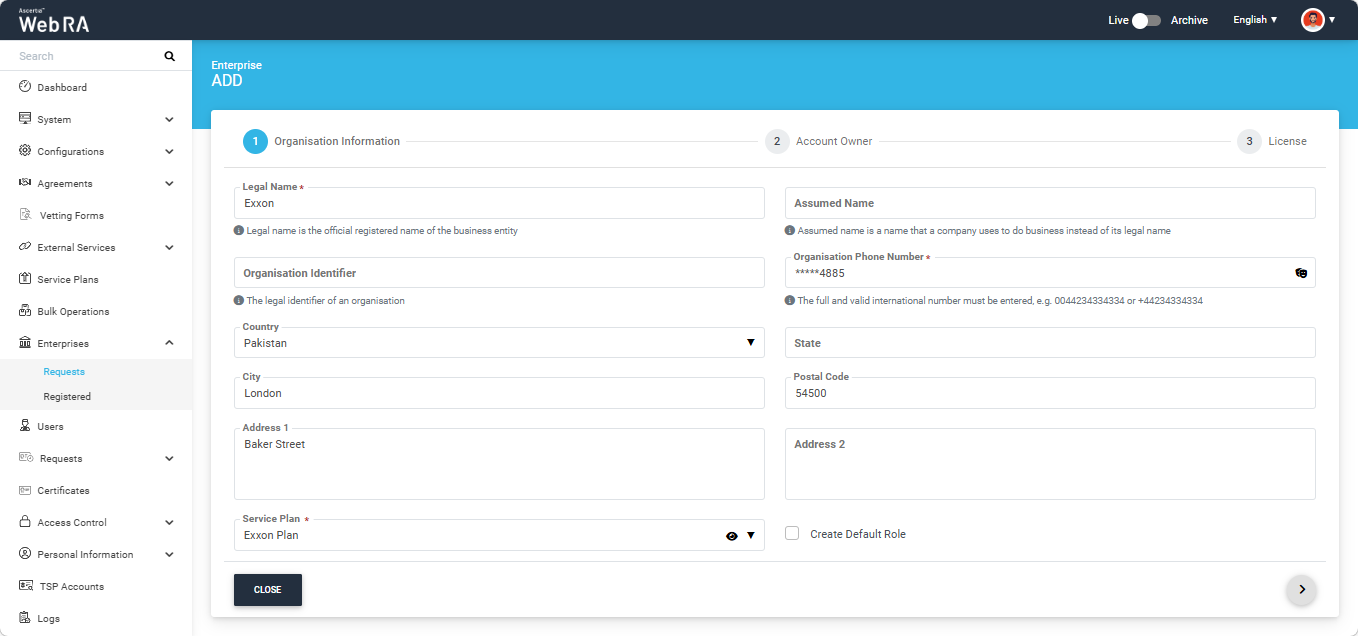
Click the next ‘>’ button to proceed to the ‘Account Owner’ section.
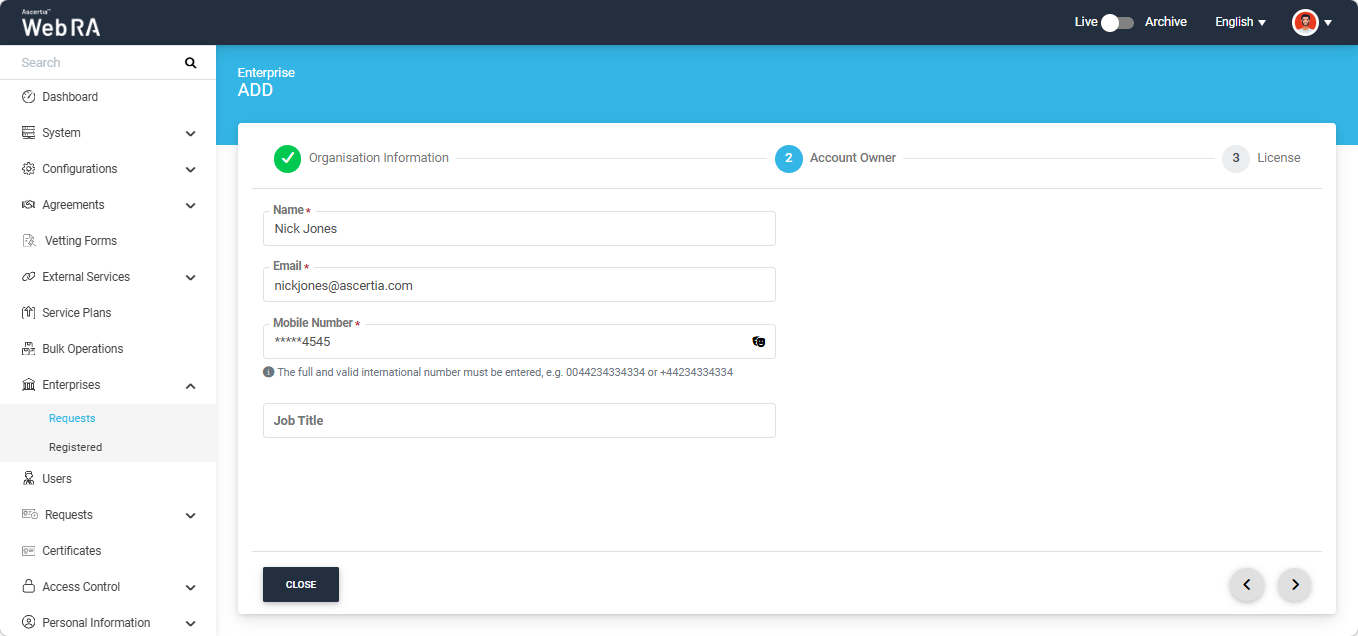
On this screen, enter the required details of the Enterprise Owner and click the next ‘>’ button to navigate to the License section.
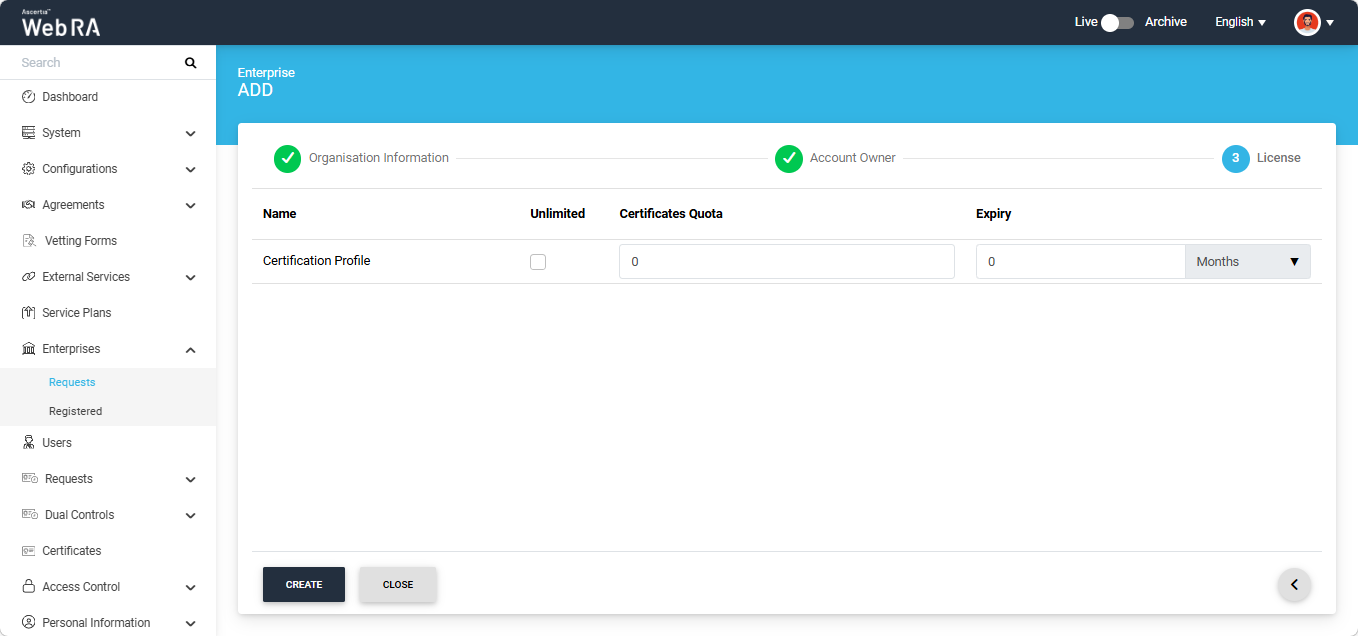
Assign the license quota from this screen for the certification profile and click ‘Create’.
Create a New Role in Enterprise and Assign Profiles
Navigate to the Roles module by following the path given below from the Admin portal:
Enterprises > Registered > Your Enterprise > Roles
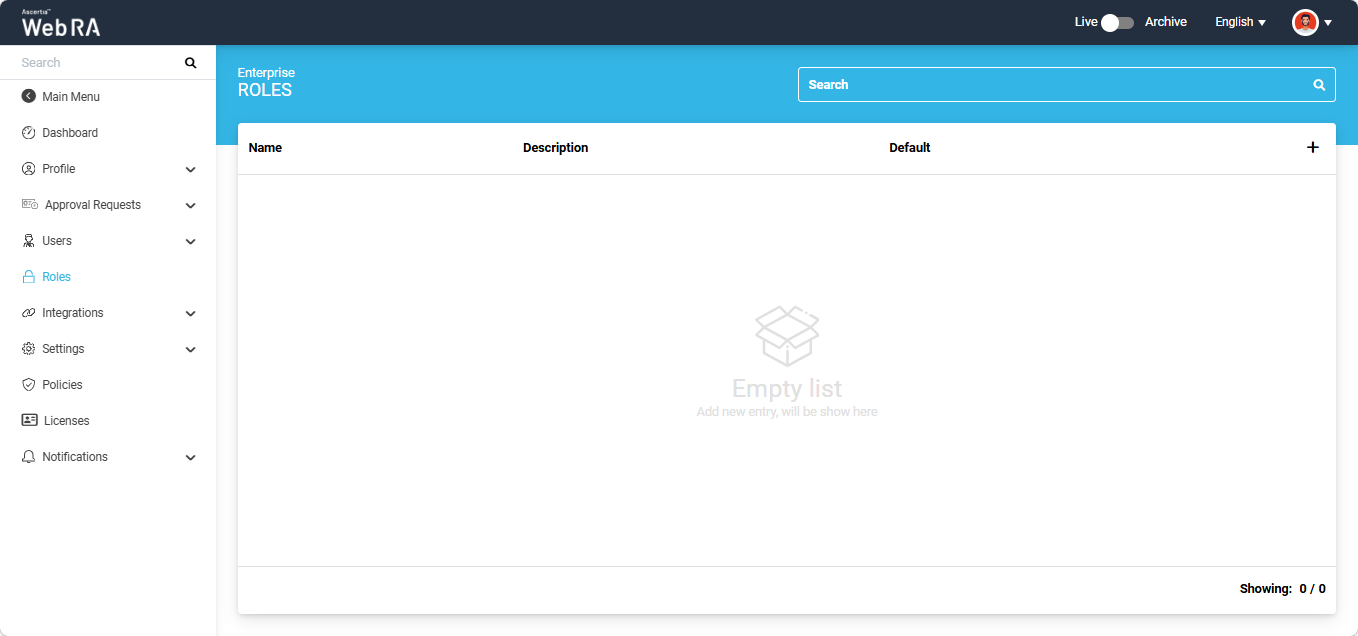
Click on the ‘+’ icon to add a new role in the Enterprise. The system will display the ‘Add Role’ dialog on the screen.
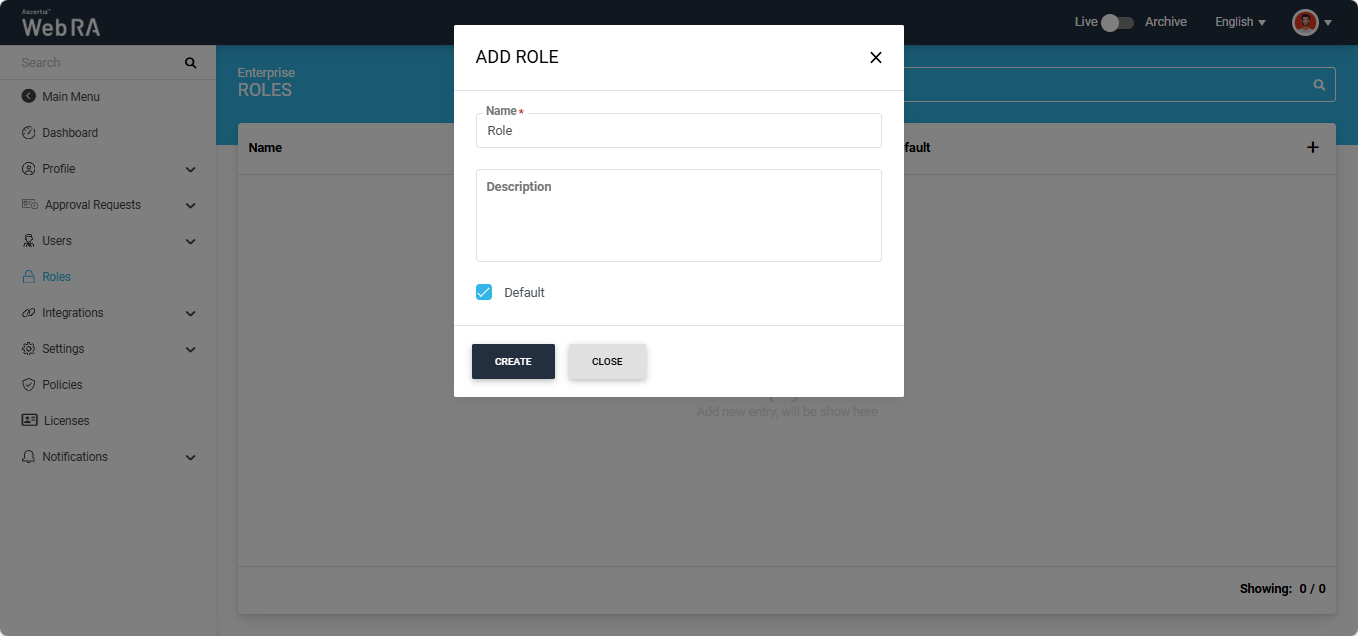
Enter the name of the Role and description (optional). If you want to set the role as default, enable the ‘Default’ checkbox.
After entering the details, click ‘Create’.
The ‘Module’ screen will appear, displaying all allowed modules. The operator can choose to allow Read, Add/Edit, and Delete permissions for these modules as required.
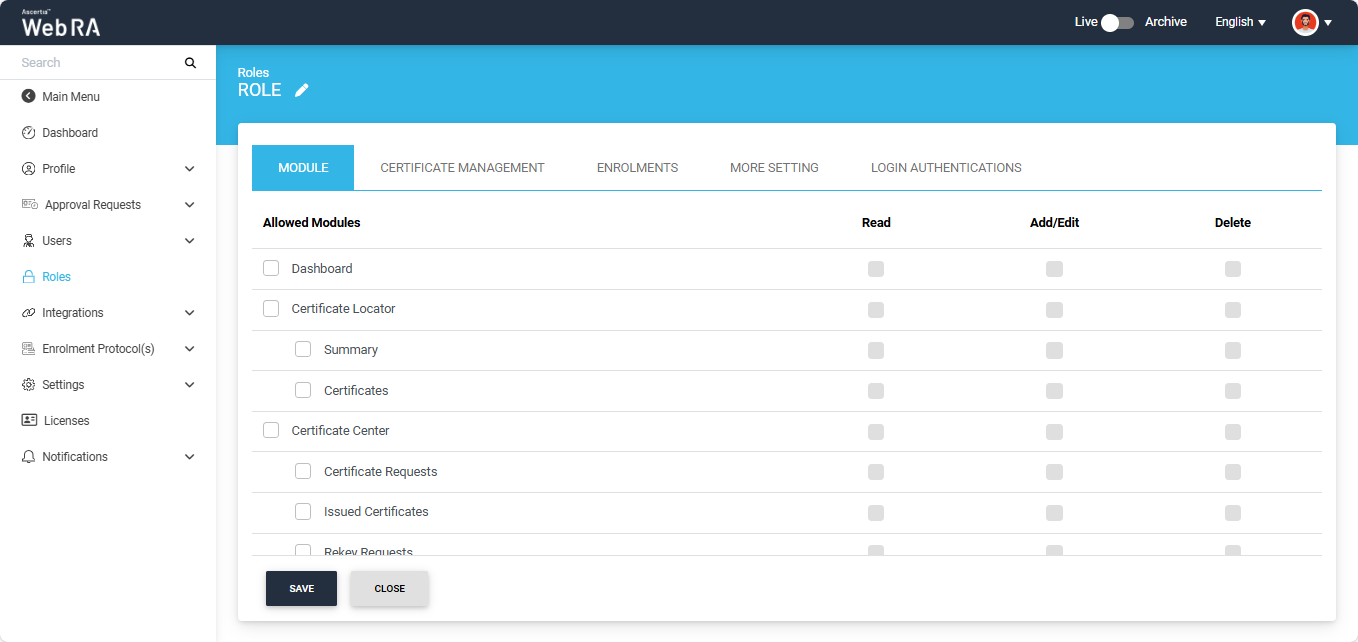
After allowing the required permissions, navigate to the Certificate Management section. Select the profiles that will be used to generate certificates by the users.
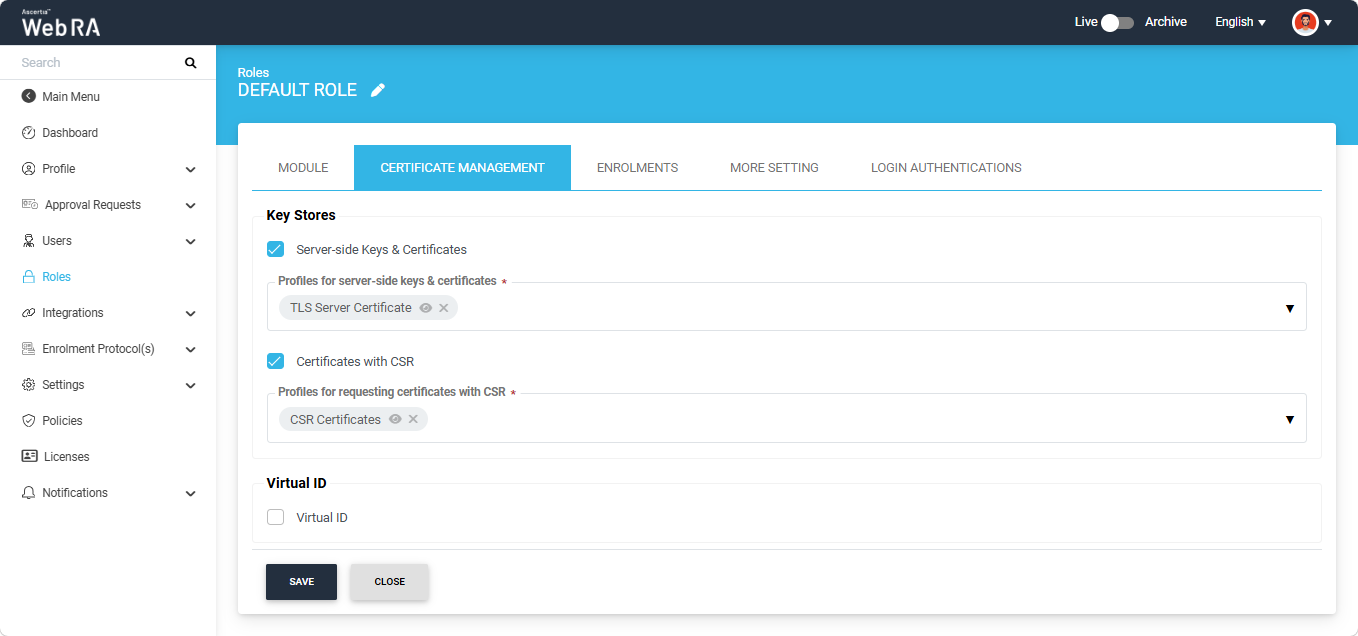
After selecting the required profiles, click ‘Save’ to finalise the changes in the Roles section.
Domain Configurations
The Domain Configurations section allows operators to manage enterprise domains and subdomains used for certificate issuance within the system. From this section, operators can add and verify domains, configure domain validity periods, reverify previously validated domains, and delete domains when required.
This section helps organisations centrally manage validated domains and maintain control over domain usage across the enterprise environment.
To add and verify a new domain, expand Settings > Domains from the Enterprise left-tree menu. The system will display the ‘Domain Configurations’ listing screen.
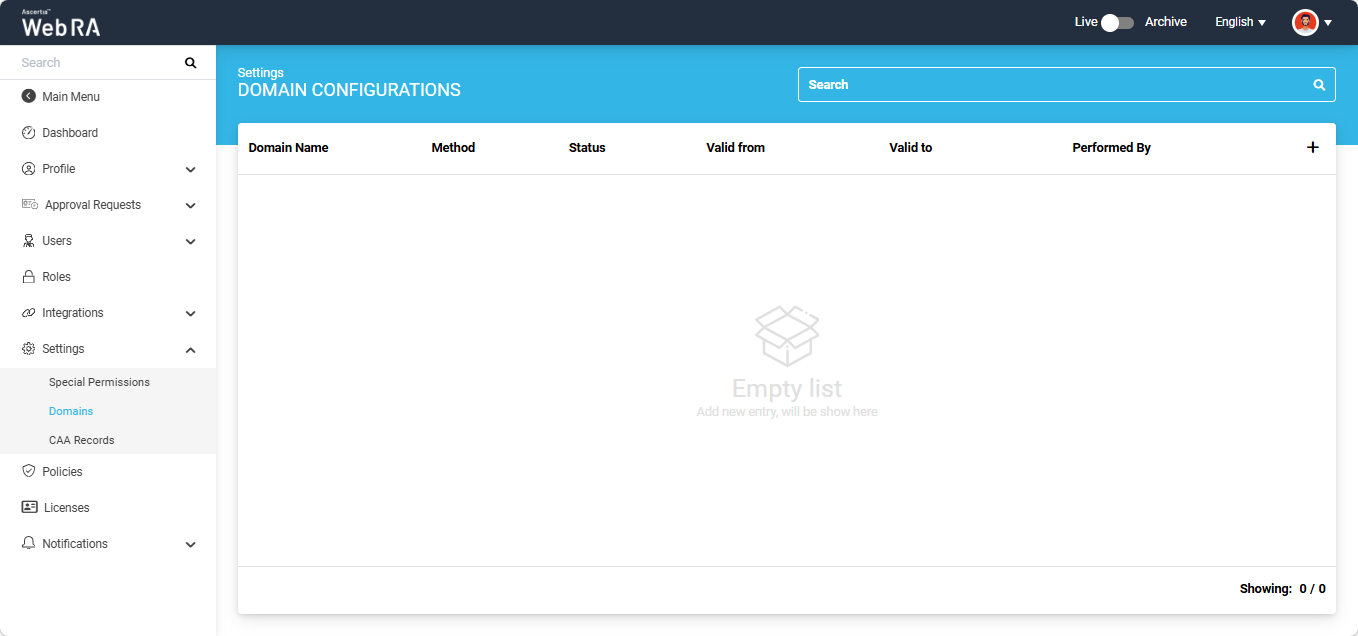
Click the ‘+’ button present in the grid header to add a new domain. The ‘Basic Information’ screen will appear.
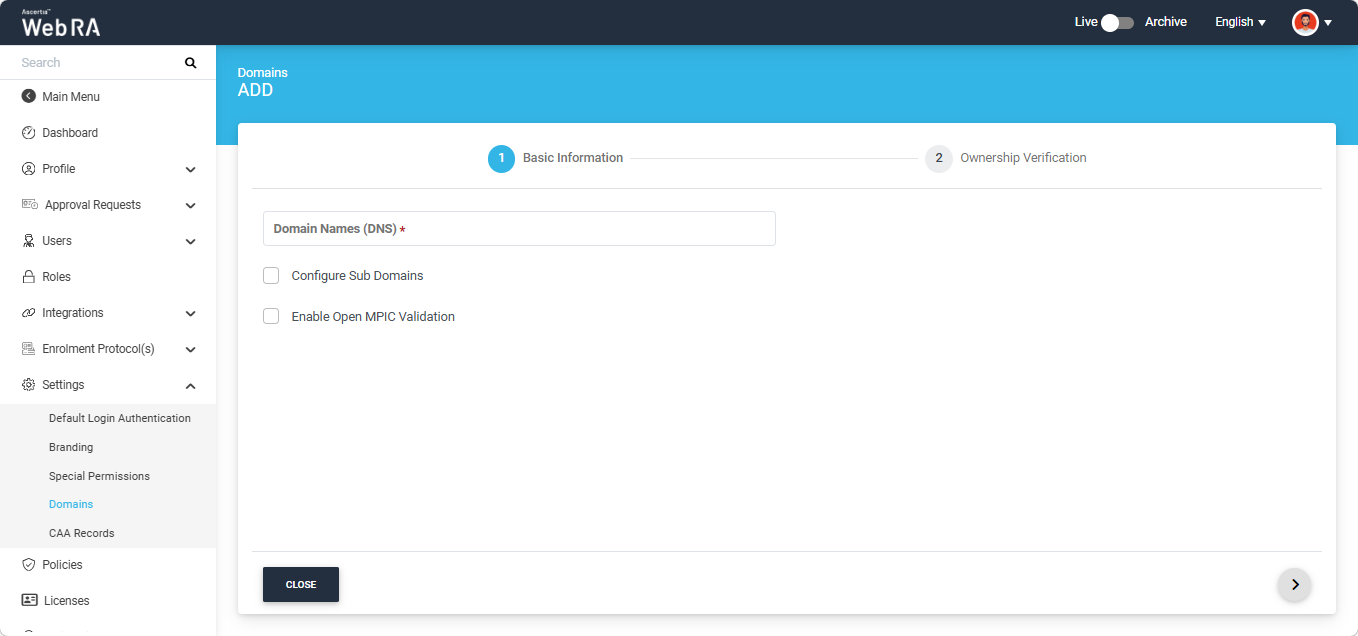
Enter the new domain you want to add and verify in the ‘Domain Names (DNS)’ field.
To add sub domains associated with the pre-configured main domain, enable the ‘Configure Sub Domains’ checkbox. The system will display the ‘Domain Names (DNS)’ field under the checkbox.
Enter one or more sub domains in this field as per your requirement.
Enable Open MPIC
Select this checkbox if you want Open MPIC to perform domain validation. The domain validation will be performed in the 'Ownership Verification' screen.
Note: This option will only appear if the “Open MPIC Connector” is selected in the Configurations > Policies > Requests section. To learn more about this, navigate to the “Requests” section.
After entering the domains and making the required selection, click the ‘>’ button to proceed to the ‘Ownership Verification’ screen.
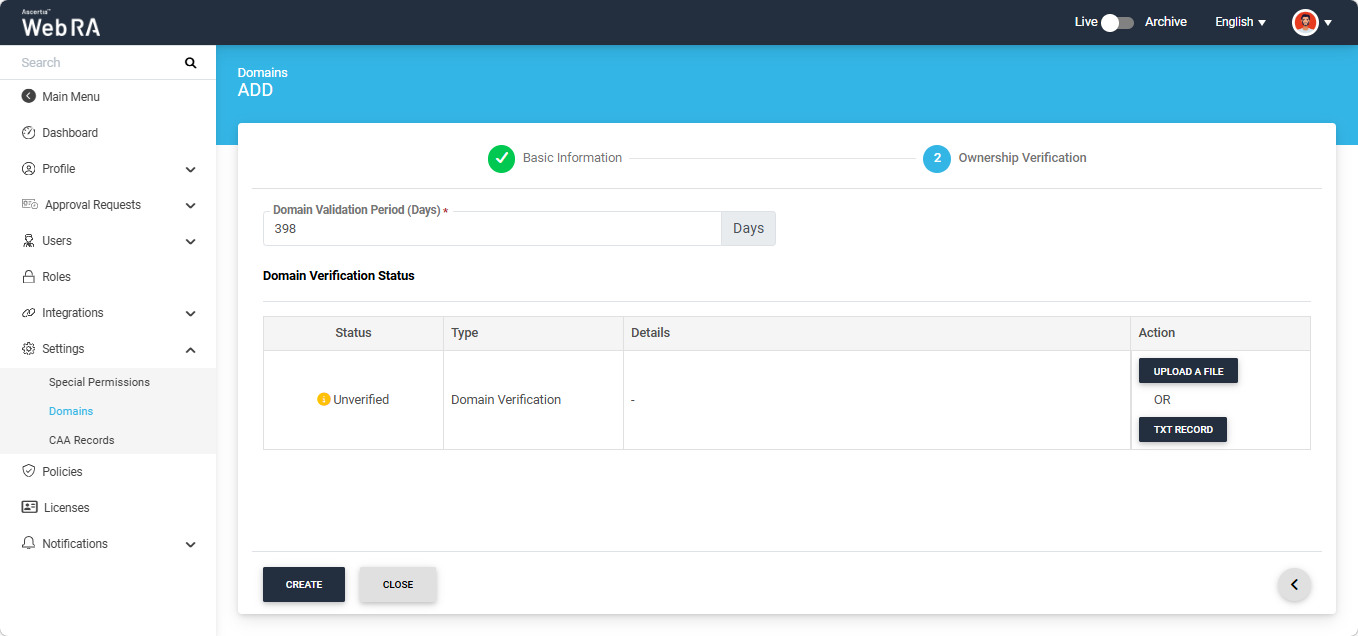
Domain Validation Period (Days)
In this field, you can define the validity period of the domain being verified. The configured validity period applies to both domains and subdomains validated within the system. The default value is 398 days and the configured value must not exceed 398 number.
Note: If you set the domain validity period to 0 days, the user will be required to verify the domain each time a certificate request is generated.
Domain Verification Status
The ‘Domain Verification Status’ will appear as ‘Unverified’. To verify the status, you will be required to either Upload a file or add a TXT Record.
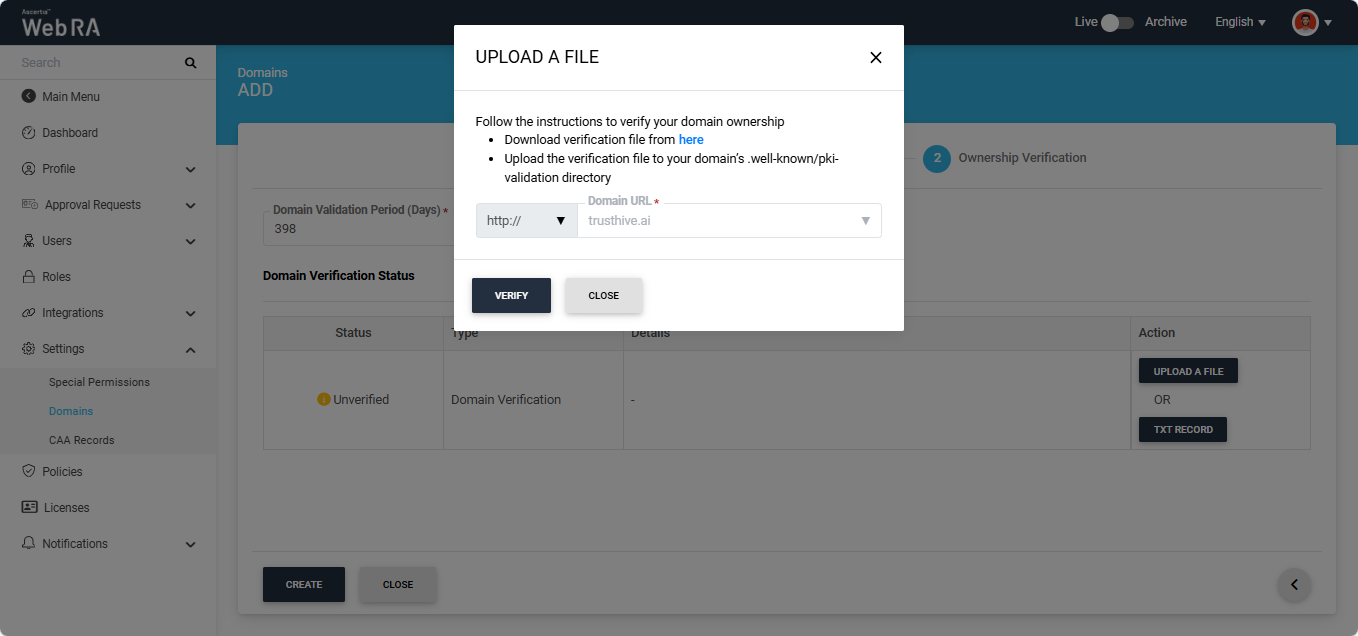
Upload a File
Click the ‘Upload a File’ button. The system will display the ‘Upload a File’ dialog, which contains instructions on how to verify the domain using this method.
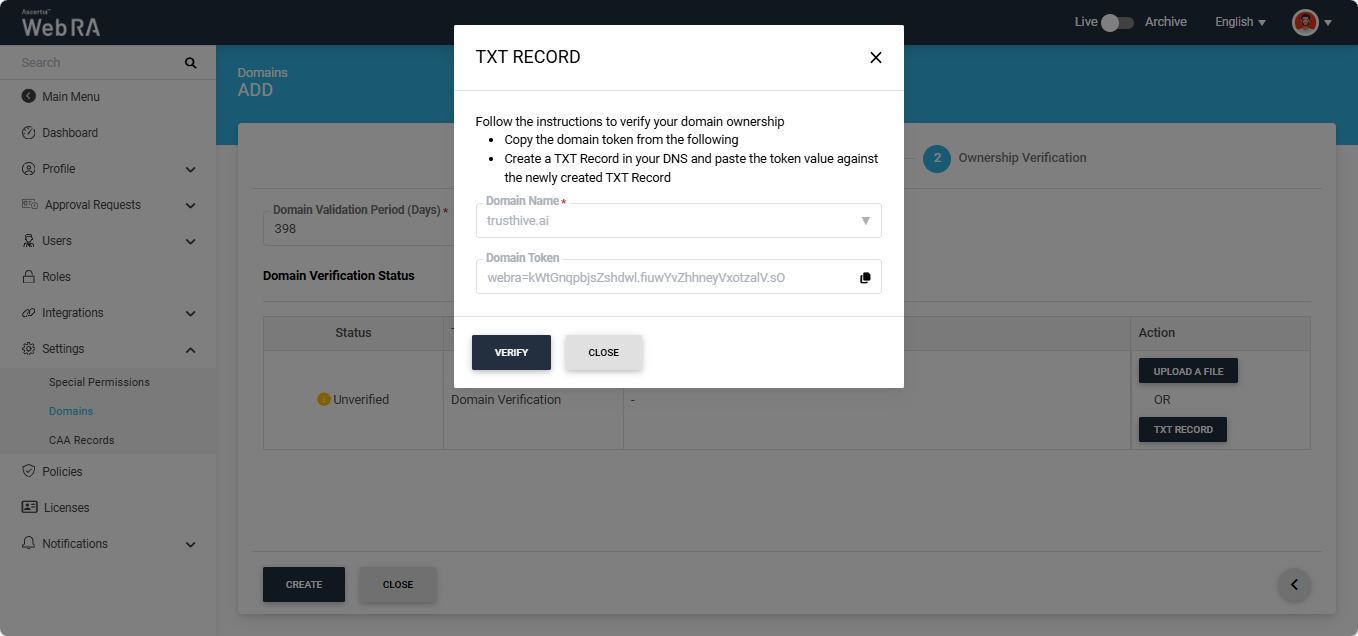
TXT Record
Click the ‘TXT Record’ button. The system will display the ‘TXT Record’ dialog, which contains instructions on how to verify the domain using this method.
After selecting the required method from the two mentioned above, click the 'Verify' button. If all steps are completed correctly, the ‘Verified’ status will appear for the entered domain.
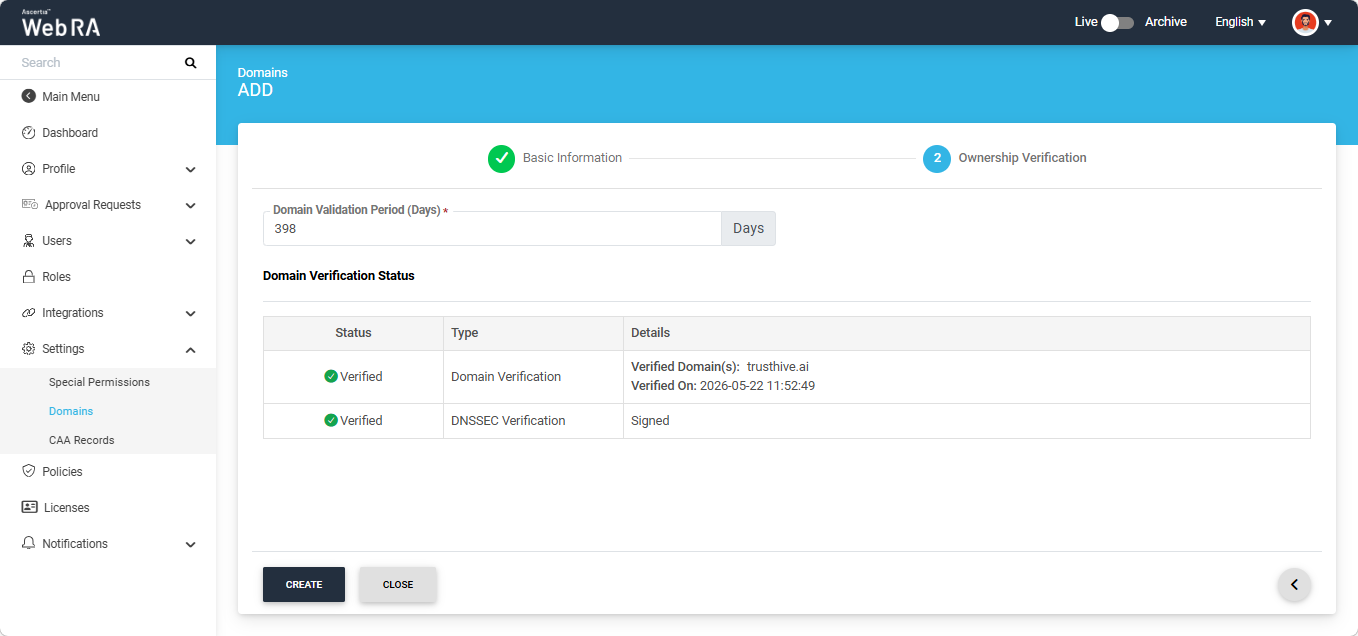
Note: If DNSSEC is enabled and configured for the domain, the system also validates the domain’s DNSSEC signature during the domain verification. If the signature is valid and the domain verification is successful, the system displays a ‘Verified’ status for DNSSEC verification.
Meanwhile, if 'Enable Open MPIC' checkbox is selected in the 'Basic Information' section, Open MPIC will perform domain validation. The domain will be verified by the Open MPIC perspectives, if the domain verification meets the minimum quorum count specified in the Open MPIC connector, the domain will verified and the operator will be able to add the domain in the Enterprise. For more details about Open MPIC connector, refer to the Connectors section.
After Open MPIC verification, the information in the 'Details' column will appear as shown in the image below:
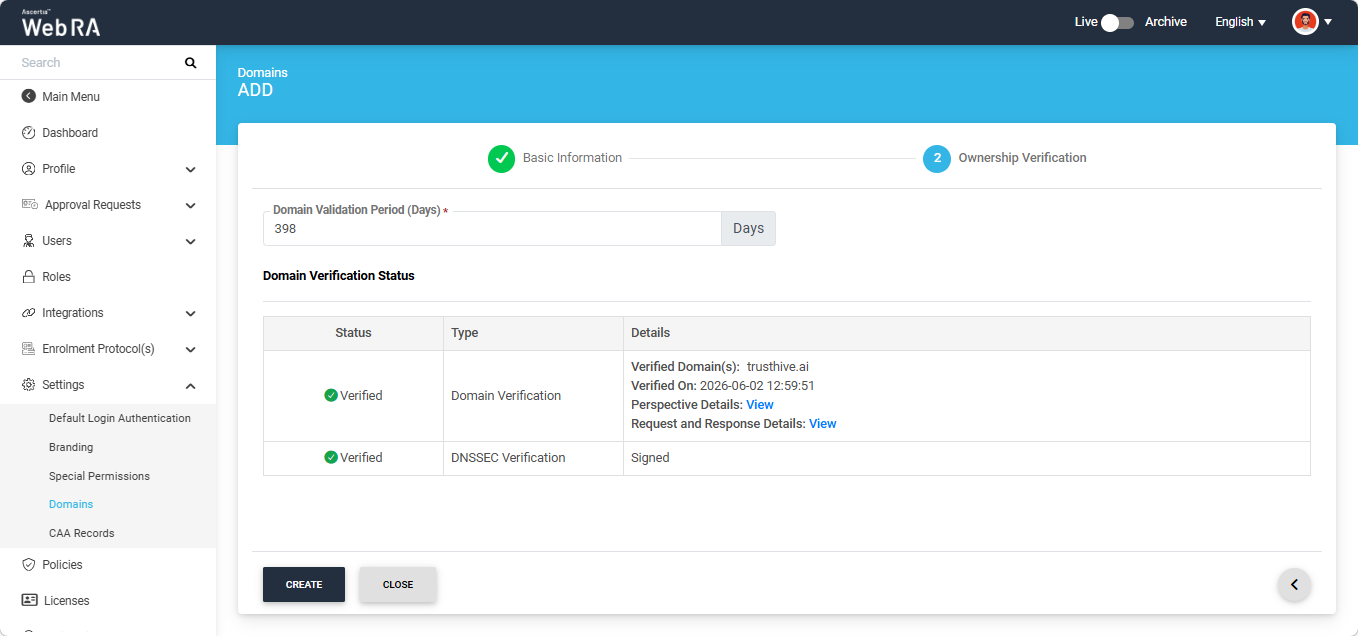
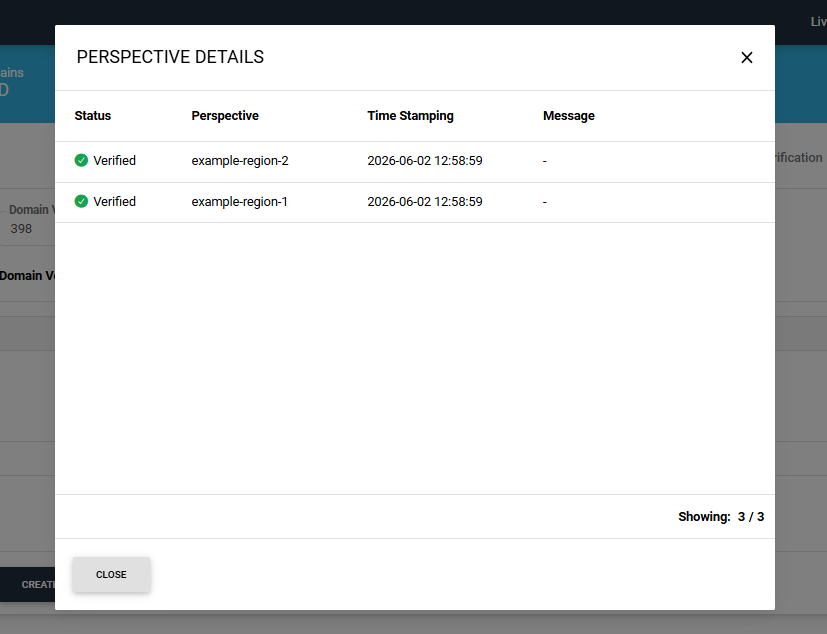
To view the Open MPIC perspective details, click the ‘View’ button next to 'Perspective Details' text. The system will display the ‘Perspective Details’ dialog on the screen.
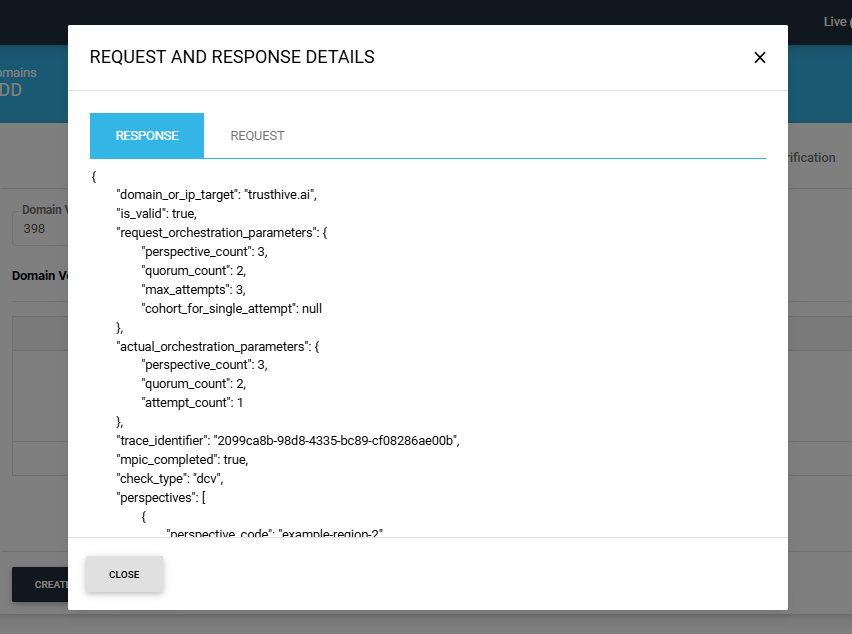
To view the Request and Response details, click the 'View' button. The system will display the 'Request and Reponse Details' dialog.
You can view both Request and Response details from their respective tabs.
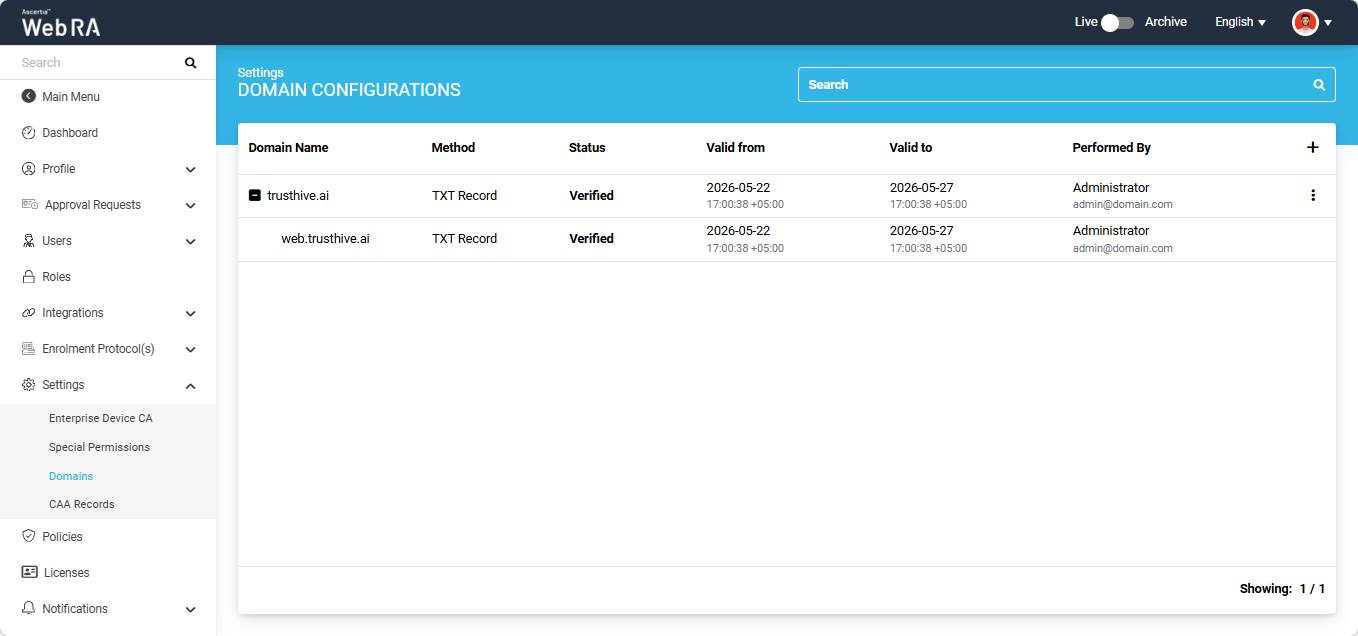
After the verification is complete, click the ‘Create’ button to add the validated domain in the saved Enterprise domain listing.
The domain with its configured sub domain (if added) will appear in the listing screen as shown in the image below.
Note:
If a user adds and validates a new domain during certificate request creation, the Performed By column displays the name of the user against that domain.
Alternatively, if an administrator validates a new domain and generates a certificate for a user from the Admin portal after enabling the Generate a Certificate on Behalf of the User checkbox, the Performed By column displays the administrator's name.
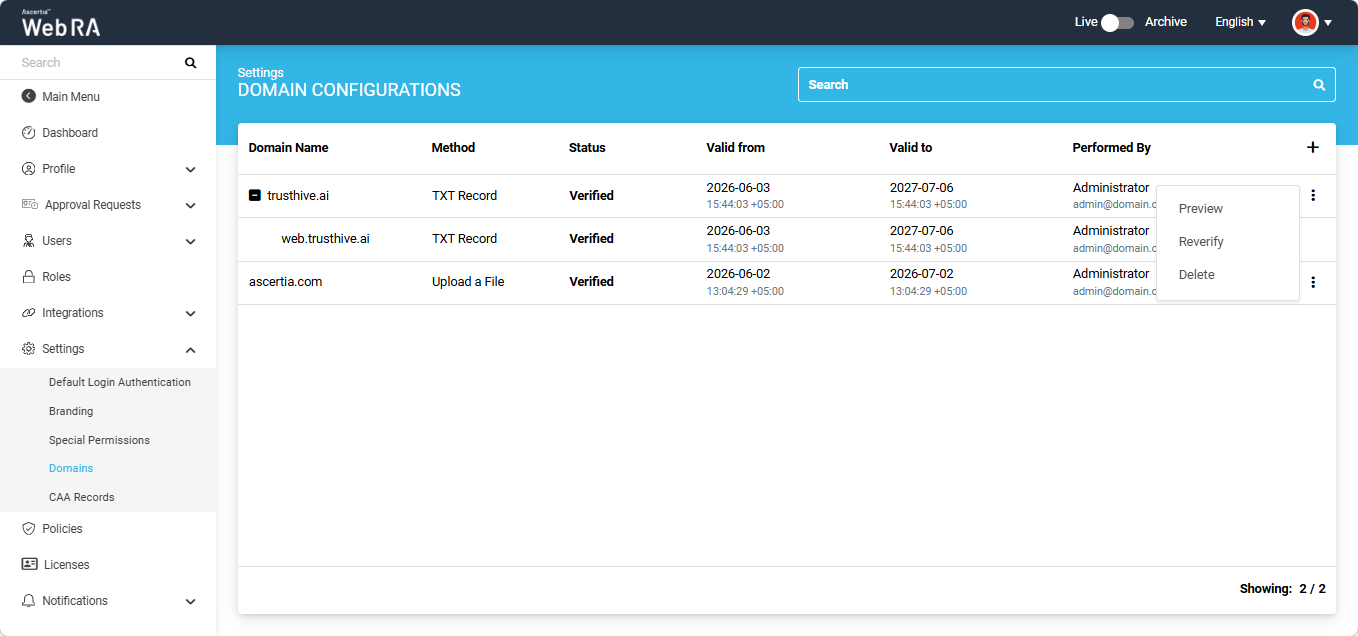
Click the three-dots  icon next to any domain entry to perform the following actions:
Expand Settings > Domains module from the Enterprise left-tree menu.
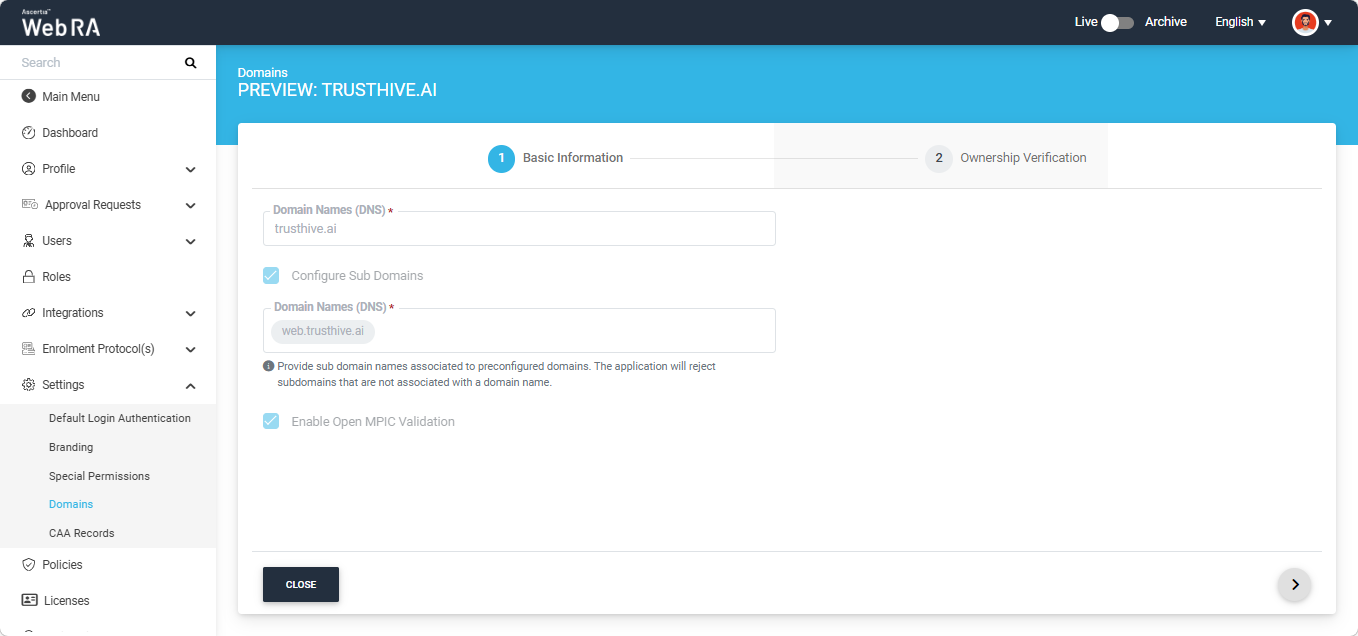
To review the details of a saved domain, select the 'Preview' option after clicking the three-dots icon next to that domain entry.
The system will open the 'Basic Information' screen. The information fields in the Preview mode will appear disabled.
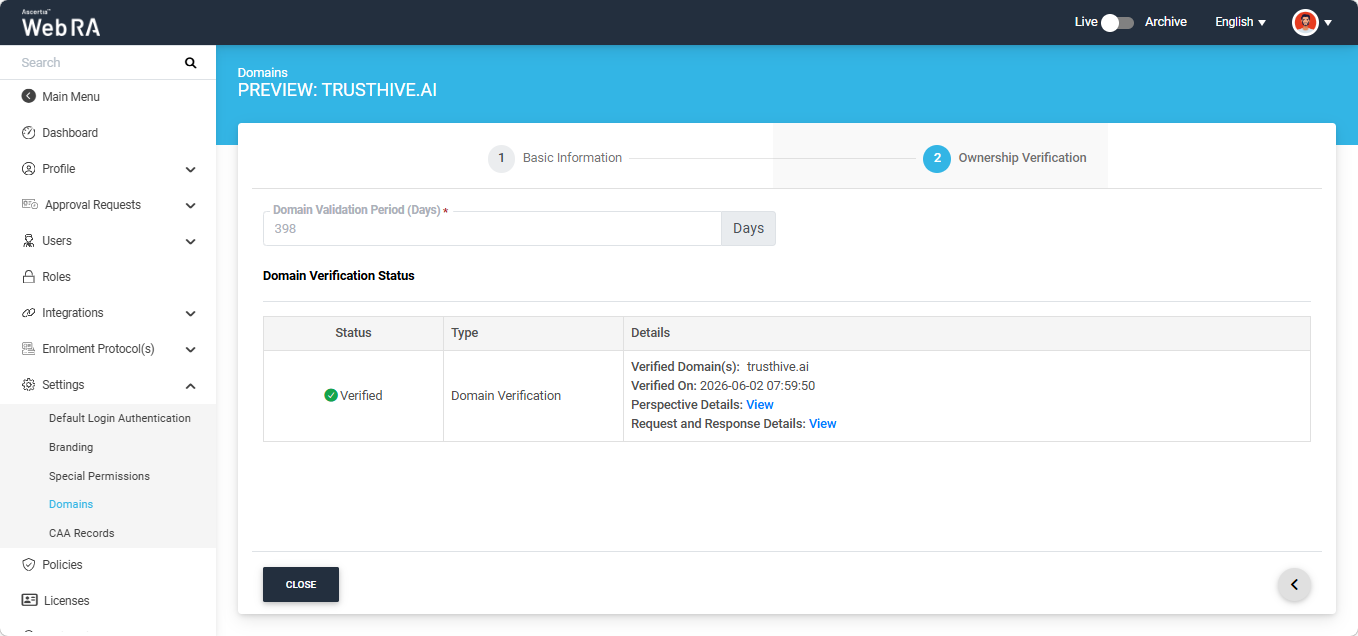
If the domain is validated through Open Mpic, you can view the verification related details by clicking the respective 'View' button in the 'Ownership Verification' section.
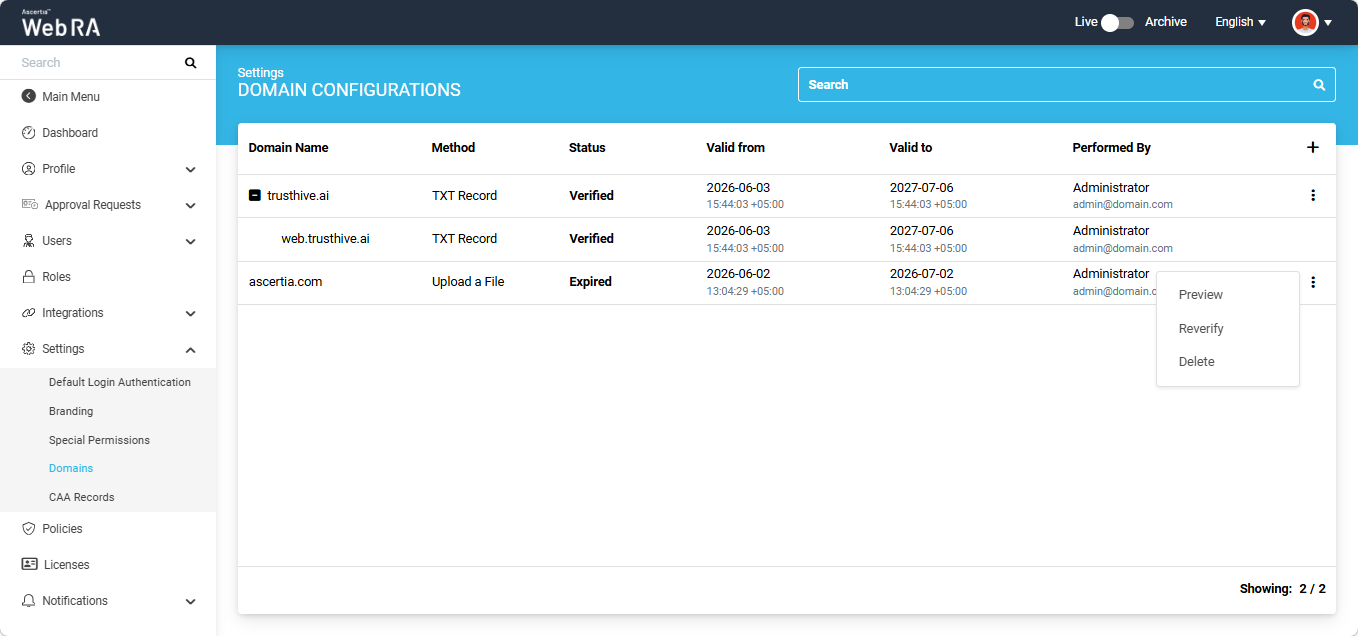
You can reverify an expired domain or any domain saved in the Enterprise domain settings.
Expand Settings > Domains module from the Enterprise left-tree menu. To reverify a domain, select the 'Reverify' option after clicking the three-dots icon next to that domain entry.
The system will open the 'Basic Information' screen.
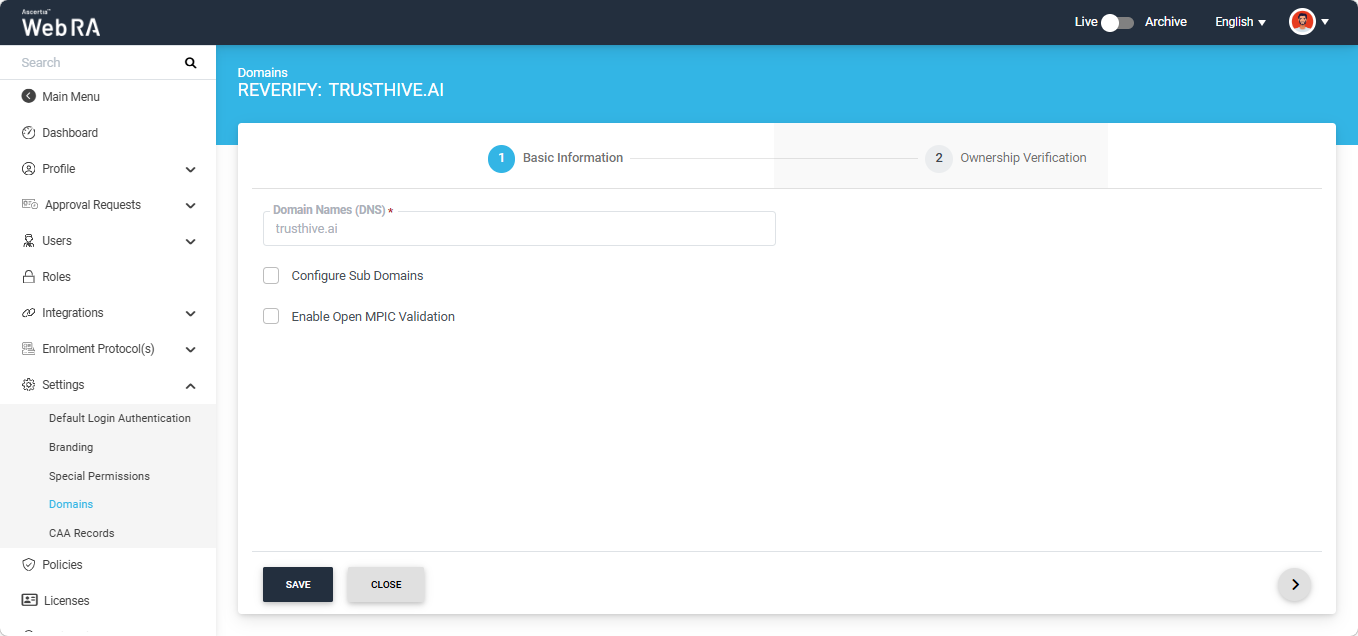
You can configure sub domains by enabling the 'Configure Sub Domains' checkbox entering the sub domains in the 'Domain Names' text box.
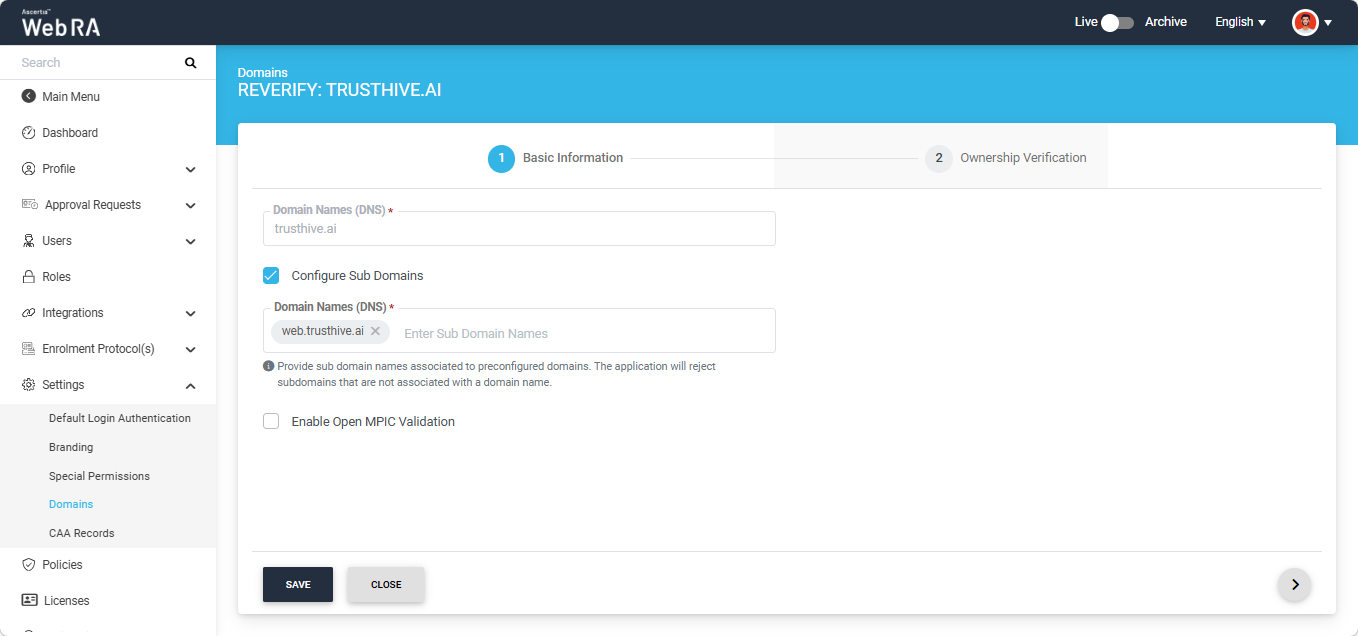
You can also enable Open MPIC validation if you want the domain to be verified through Open MPIC perspectives.
Note: The 'Configure Sub Domains' and 'Enable Open MPIC Validation' checkboxes will be pre-selected if they were enabled when the domain was verified for the first time.
After making the required selections, click the next button to navigate to the 'Ownership Verification' screen to reverify the domain.
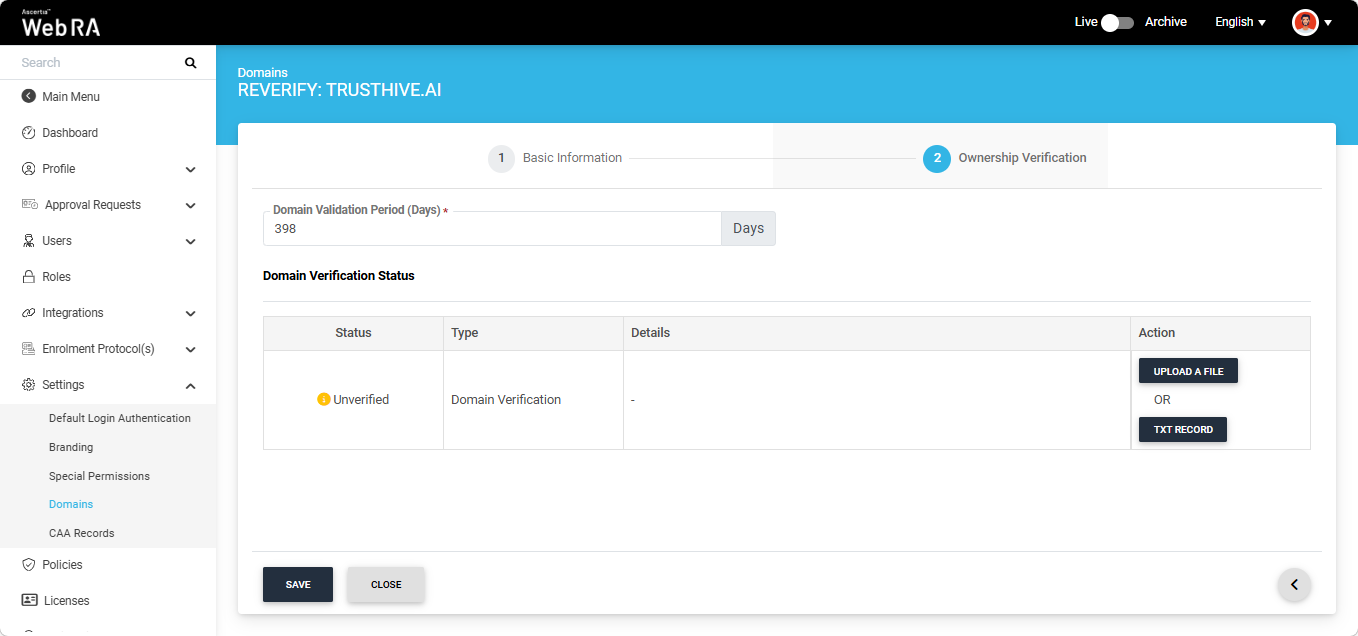
Domain Validation Period (Days)
In this field, you can define the validity period of the domain being reverified. The configured validity period applies to both domains and subdomains validated within the system. The default value is 398 days and the configured value must not exceed 398 number.
Domain Verification Status
The ‘Domain Verification Status’ will appear as ‘Unverified’. To reverify the domain, you will be required to either Upload a file or add a TXT Record.
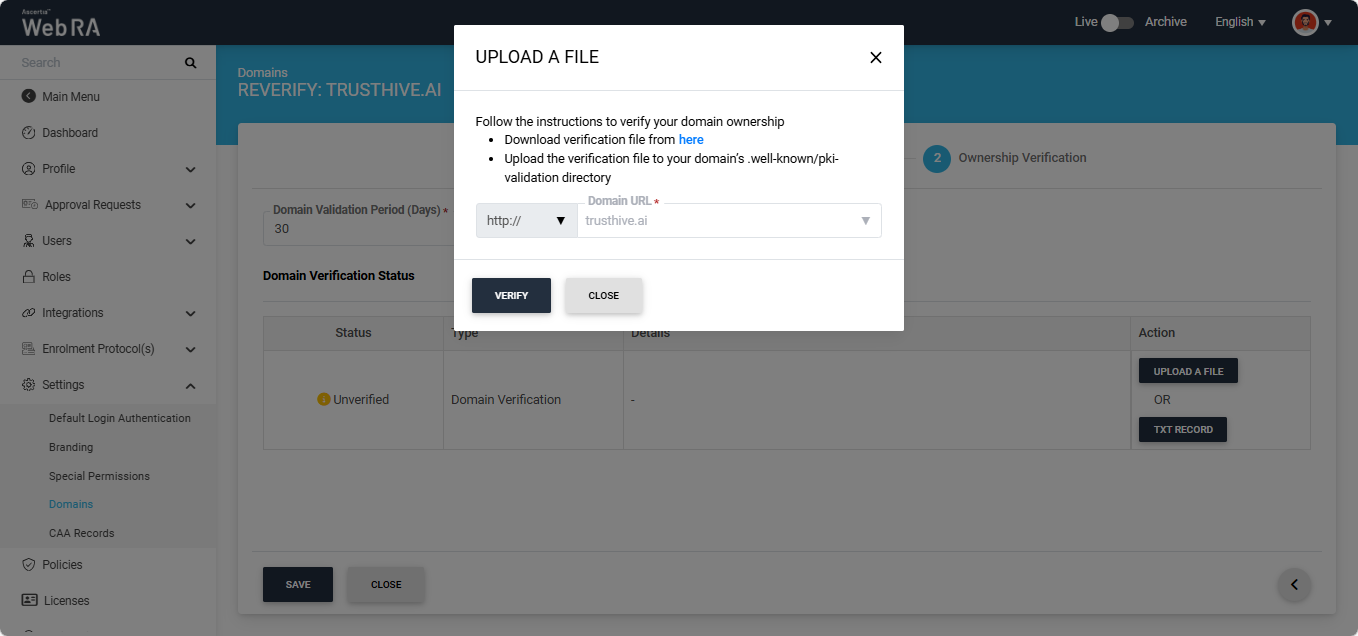
Upload a File
Click the ‘Upload a File’ button. The system will display the ‘Upload a File’ dialog, which contains instructions on how to verify the domain using this method.
TXT Record
Click the ‘TXT Record’ button. The system will display the ‘TXT Record’ dialog, which contains instructions on how to verify the domain using this method.
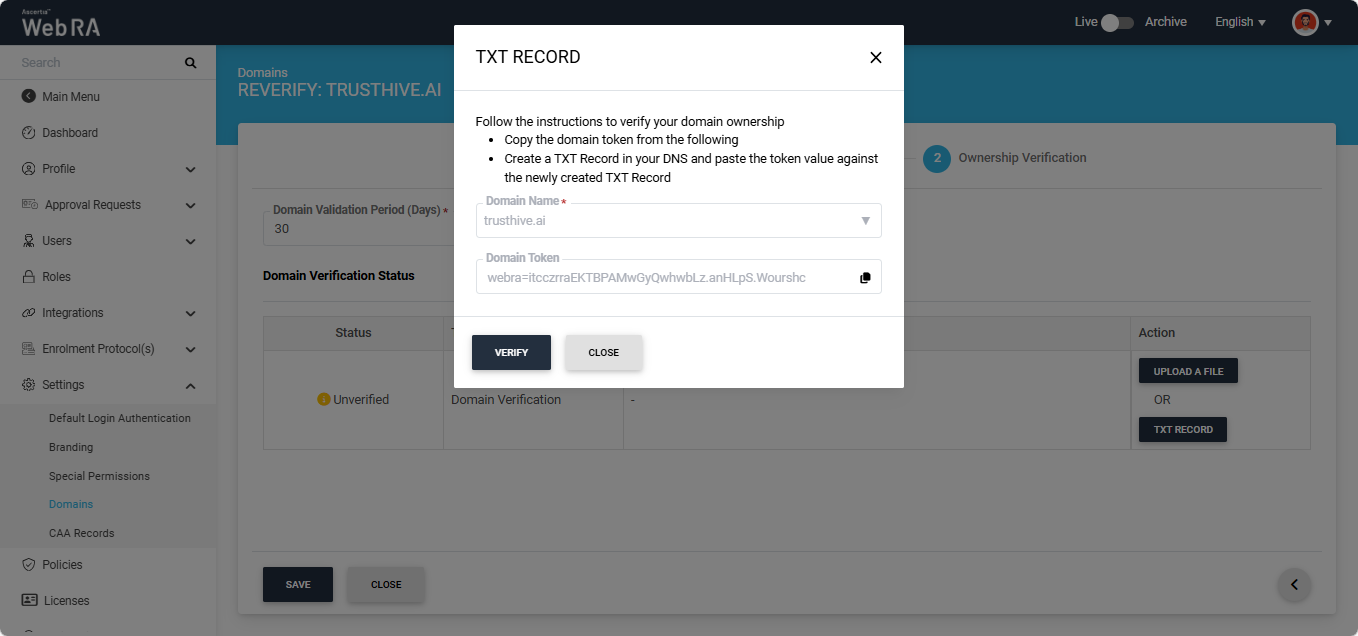
After selecting the required method from the two mentioned above, click the 'Verify' button. If all steps are completed correctly, the ‘Verified’ status will appear for the entered domain.
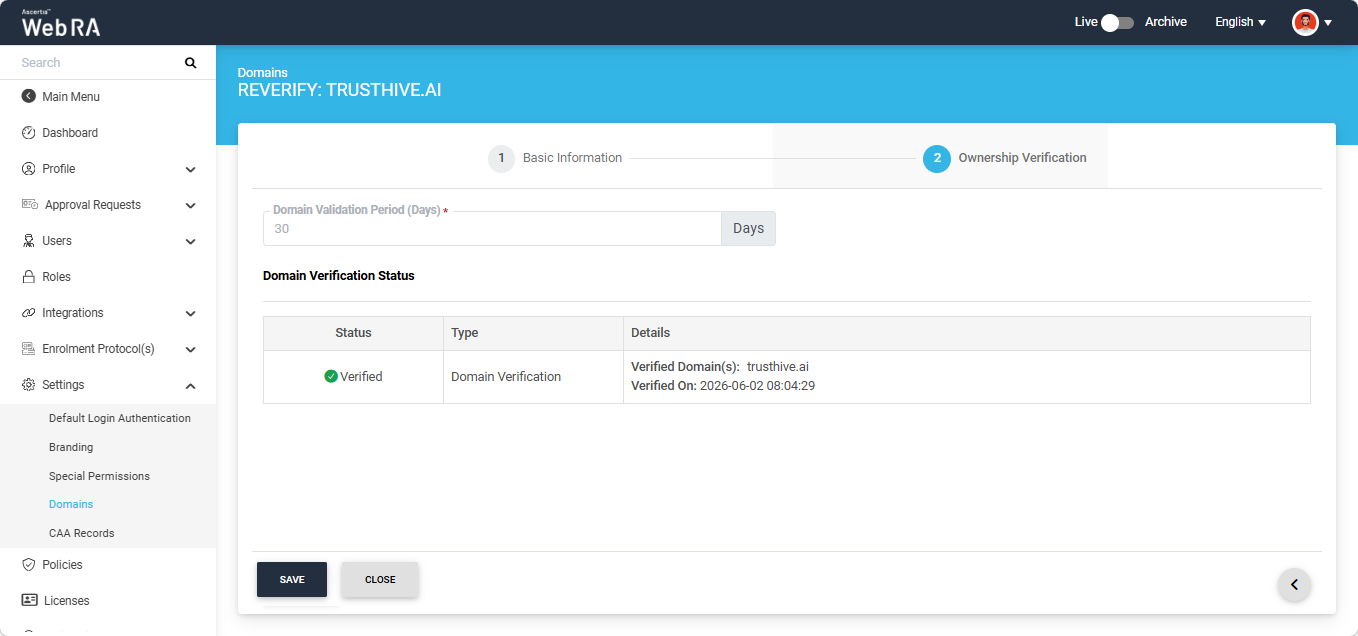
If the domain is validated through Open MPIC, the information in the 'Details' column will appear as shown in the image below:
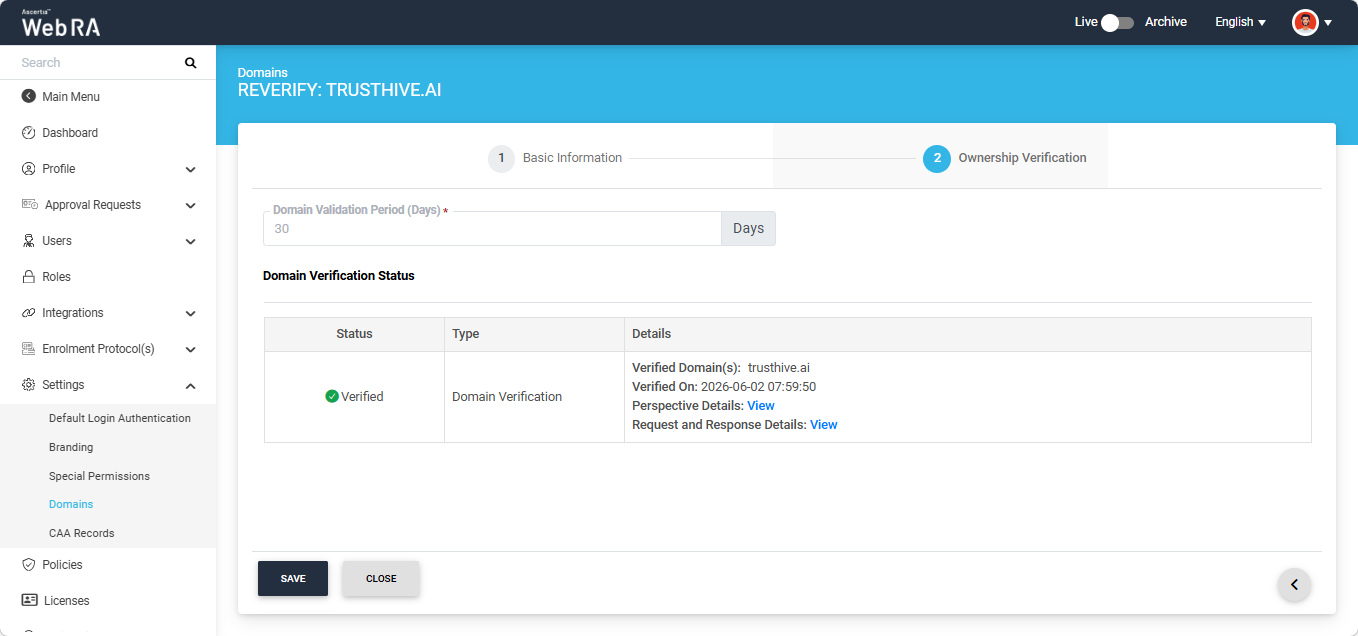
You can view the 'Perspective Details' and 'Request and Response Details' by clicking the respective 'View' button.
Expand Settings > Domains module from the Enterprise left-tree menu.
To delete a saved domain, select the 'Delete' option after clicking the three-dots icon next to that domain entry.
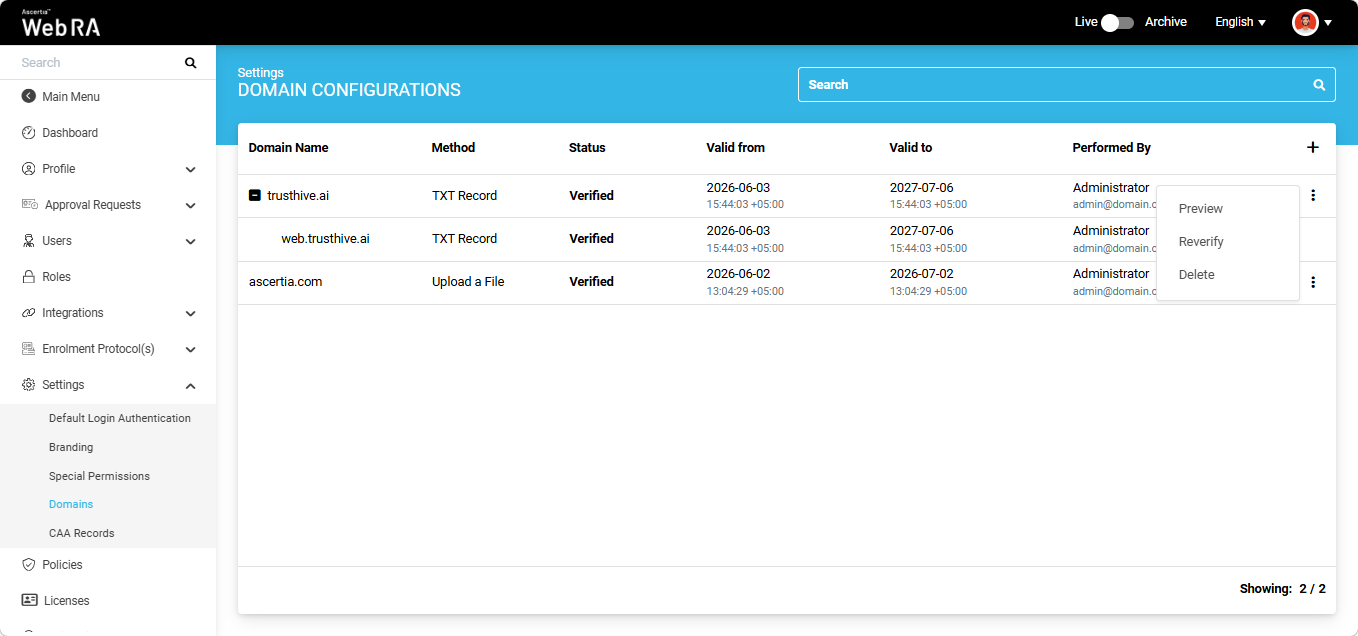
The system will display a confirmation dialog on the screen. Select 'Yes' to proceed with the domain deletion.
Create a Certificate Request from Web Portal
|
|
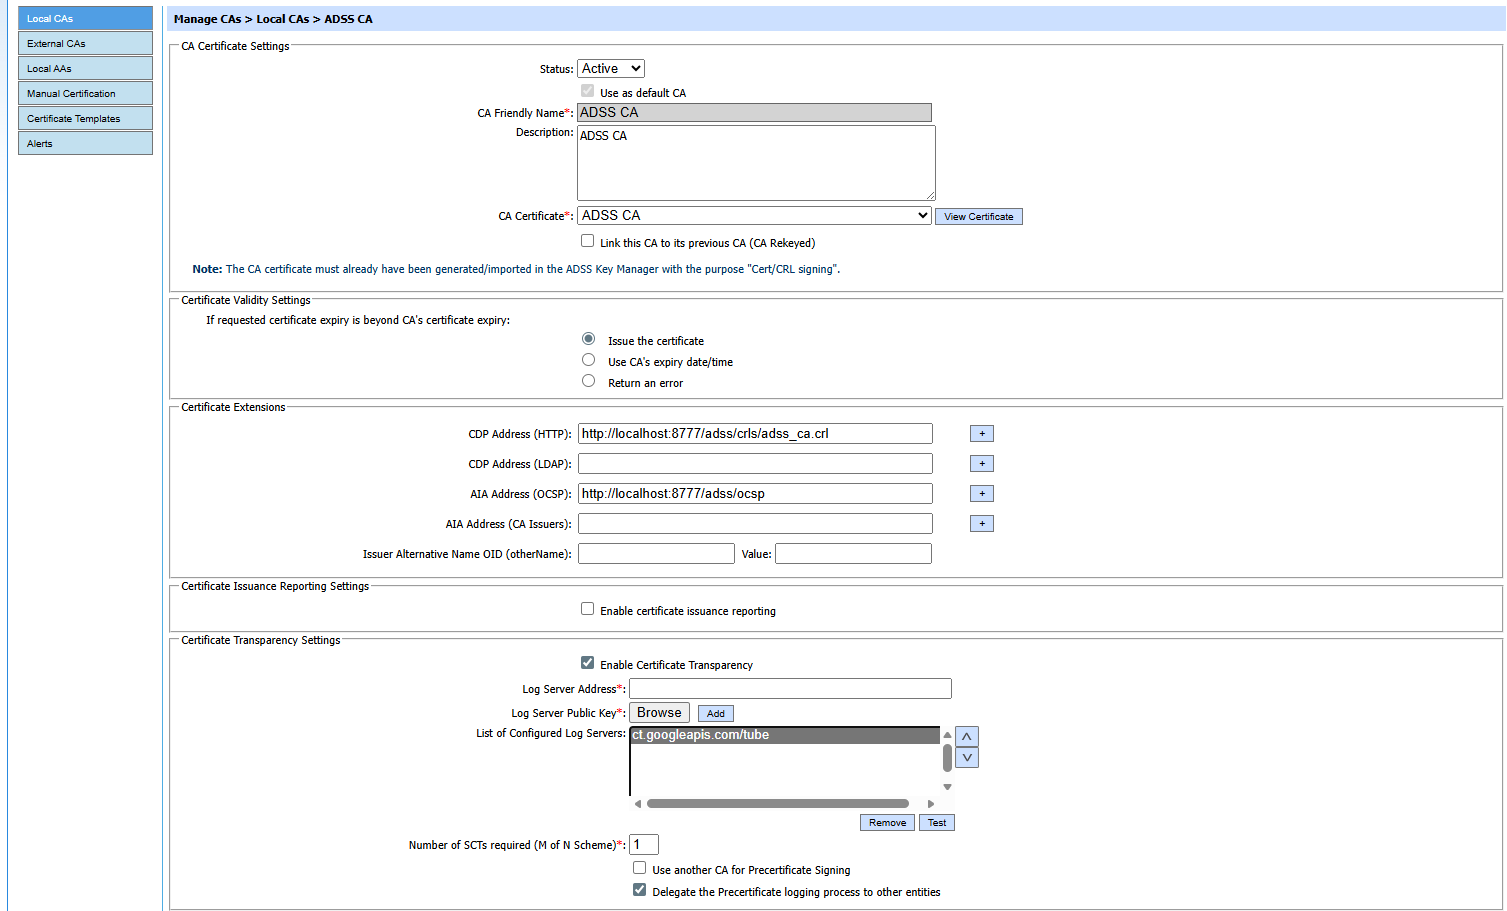
Important Note Certificate Transparency (CT) Log Configuration
In the above screenshot, a Certificate Transparency (CT) log server is configured.
When Web RA submits a TLS server certificate request to the ADSS Server, ADSS first checks whether the “Delegate the Precertificate Logging Process to Other Entities” option is enabled for the issuing CA under the Certificate Transparency Settings.
If precertificate logging delegation is enabled, ADSS generates a precertificate and returns the following information to Web RA:
At this stage, ADSS pauses the certificate issuance workflow and waits for the Signed Certificate Timestamps (SCTs).
Web RA then submits the received precertificate chain to the configured CT log server(s) in accordance with the Certificate Transparency process defined for publicly trusted TLS certificates.
The CT log server validates and logs the precertificate, and returns the SCT response. After receiving the SCTs from the CT log server(s), Web RA forwards the SCT information back to ADSS. ADSS then embeds the SCTs into the final TLS certificate and completes the certificate issuance process. |

In the web portal, expand the ‘Certificate Center’ tab from the left menu pane and click on the ‘Certificate Requests’ option.
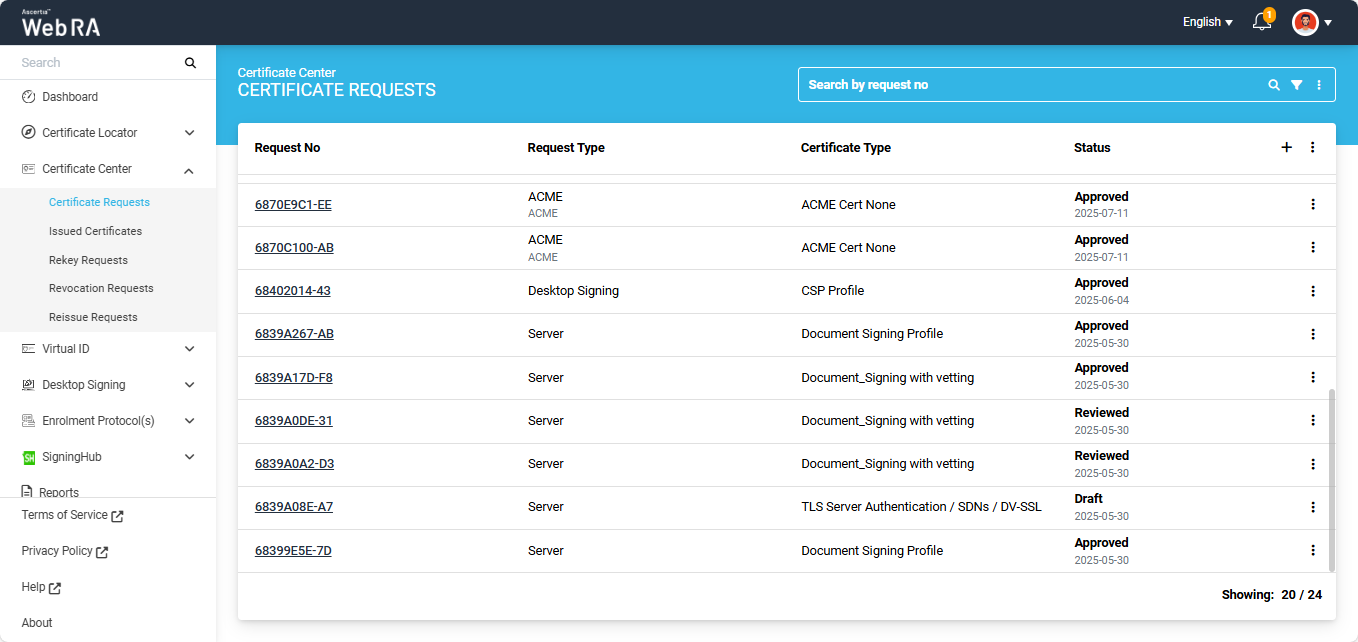
Click on the ‘+’ plus button in the listing header to create a new certificate request. The system will display the ‘Create Request’ screen.
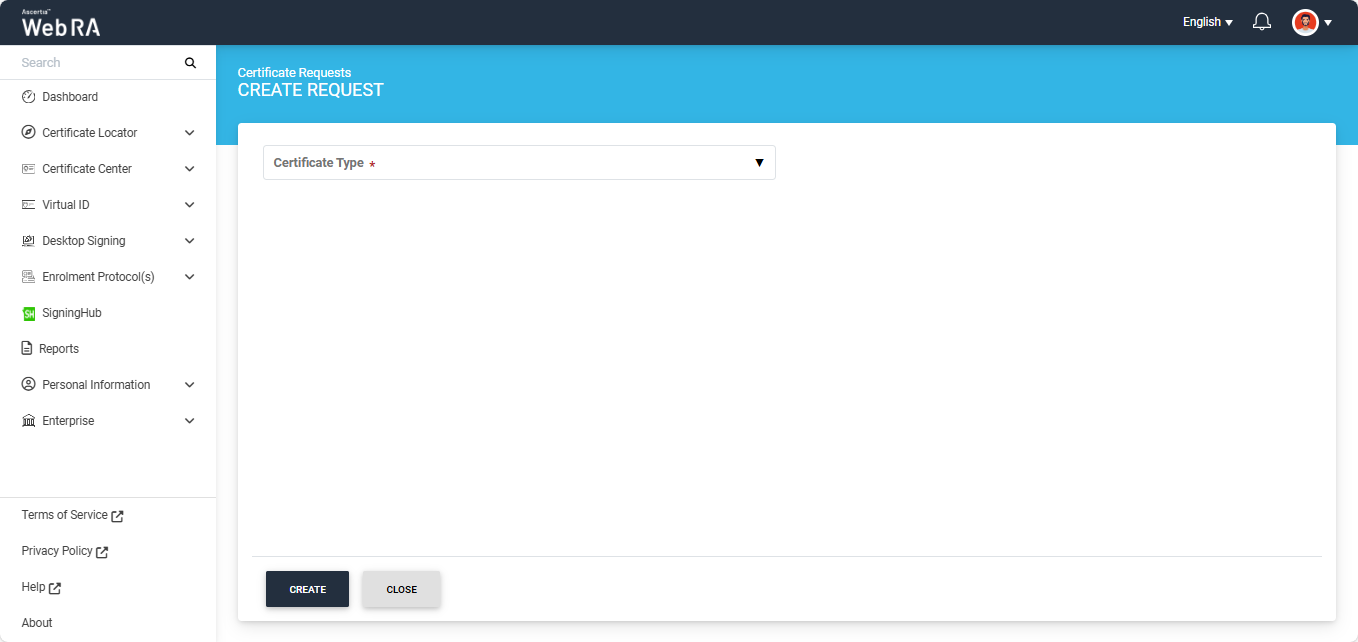
On this screen, select the ‘Certificate Type’ from the given dropdown.
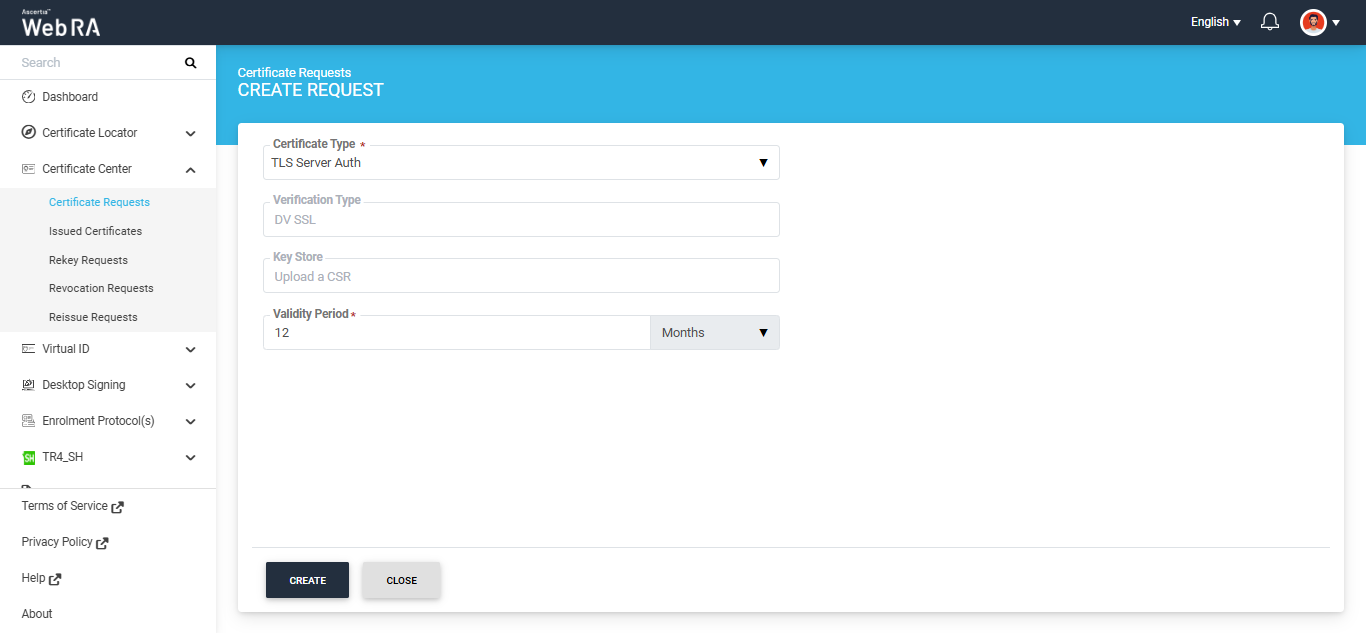
After selecting the profile, click the 'Create' button. The system will display the 'Certificate Signing Request (CSR)' screen.
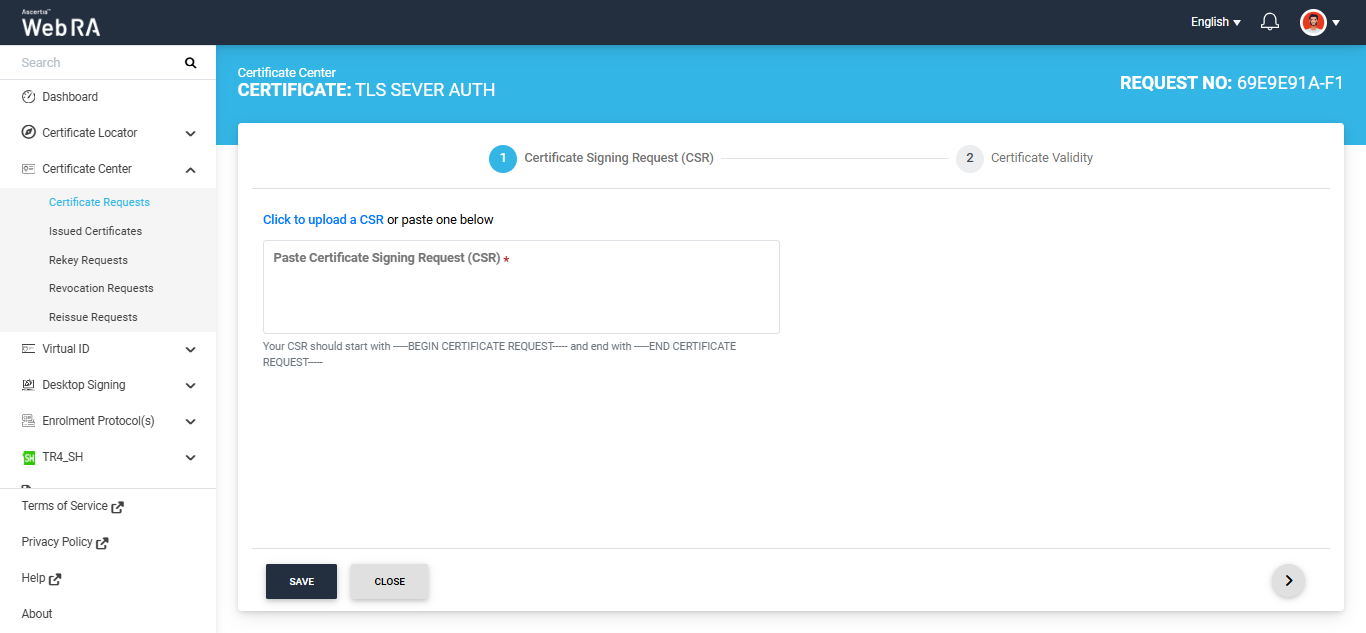
On this screen, either upload the CSR through 'Click to upload a CSR' heperlinked option or paste the CSR in the box below.Once the CSR is uploaded, it will appear on the screen and the system will also display additional tabs in the Create Request window.
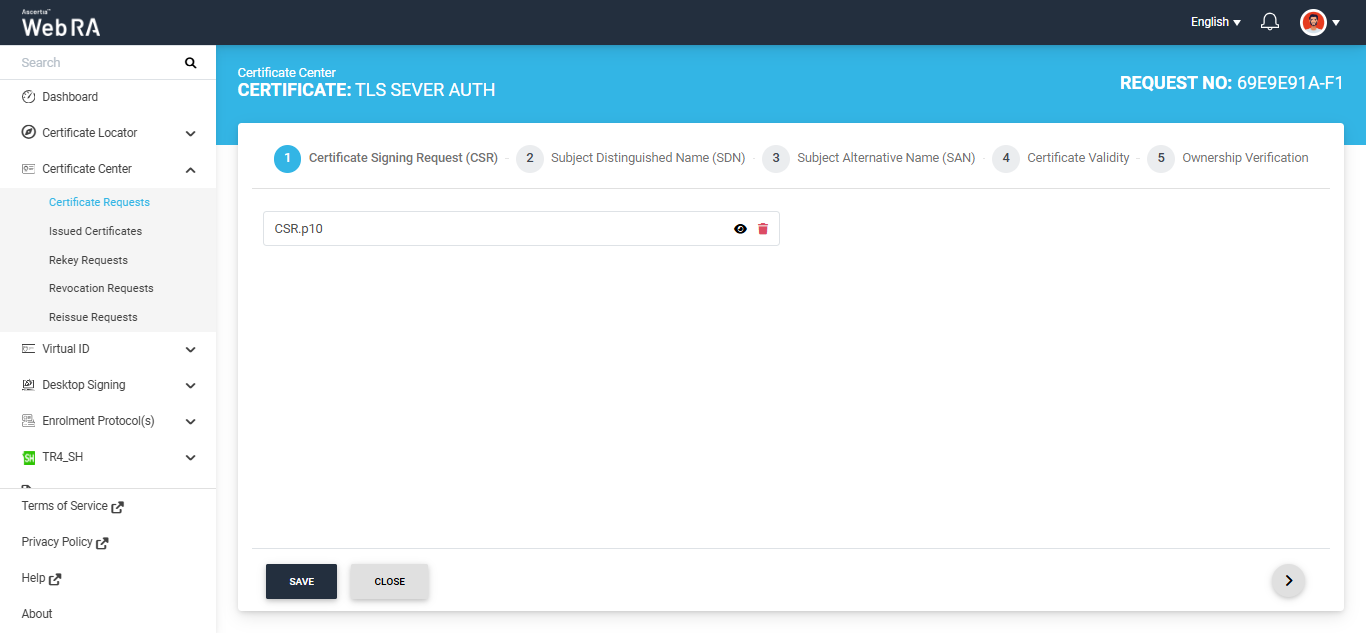
Click the '>' button to navigate to the ‘Subject Distinguished Name (SDN)’ screen.
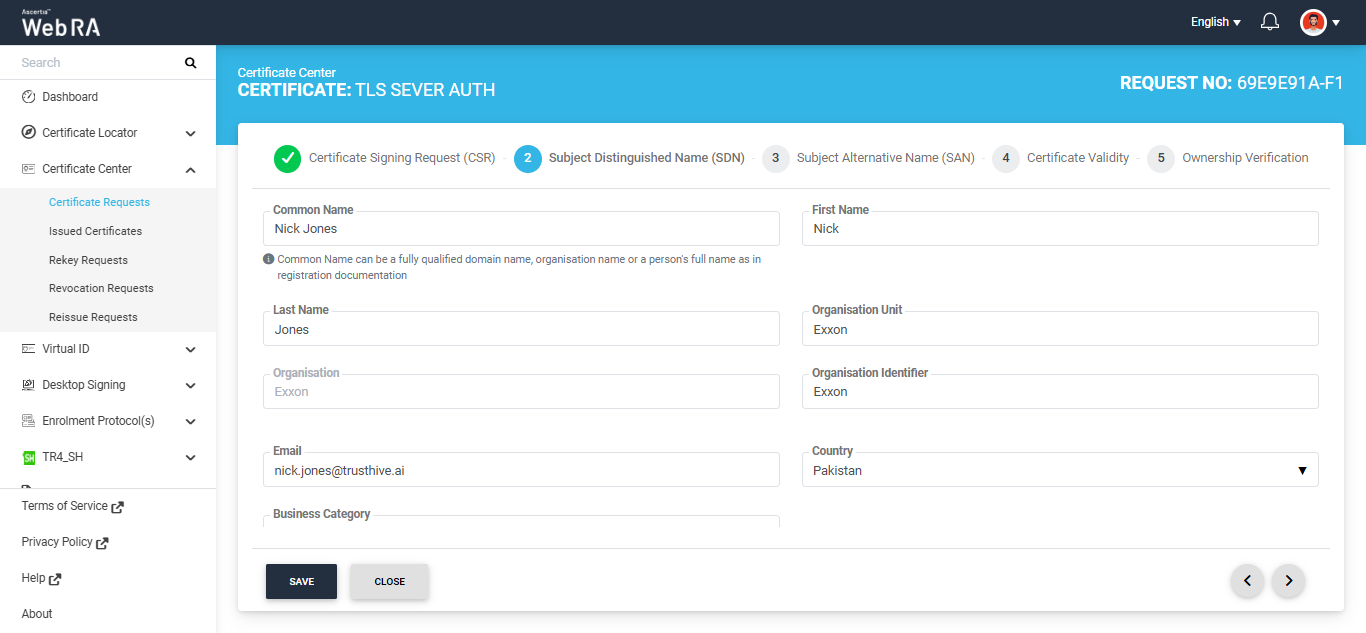
After entering the required information in the given fields click the next ‘>’ button to navigate to the ‘Subject Alternative Screen (SAN)’ screen.
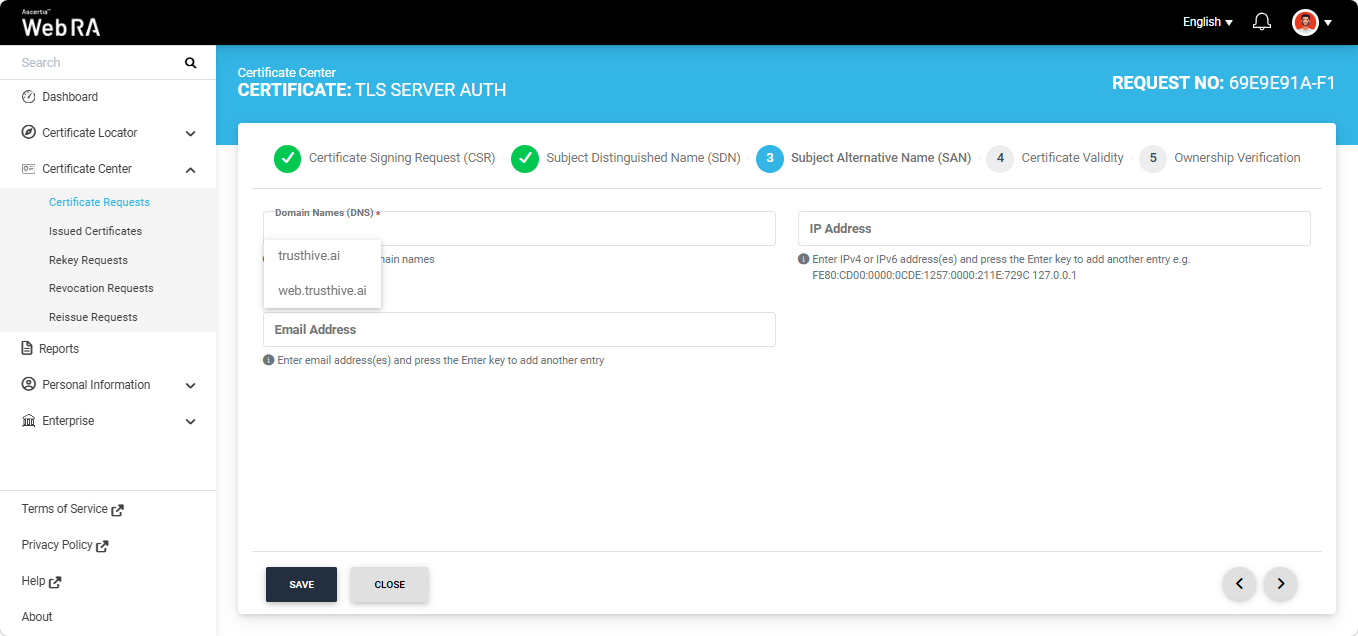
On this screen, the behaviour of the Domain Names (DNS) field depends on the configured Enterprise Policy settings.
If the 'Allow Only Enterprise-Approved Domains' policy is enabled in the Enterprise, the Domain Names (DNS) field is displayed as a dropdown list. In this case, users can only select an enterprise-approved domain from the available options. The dropdown list displays only active and verified domains configured for the Enterprise.
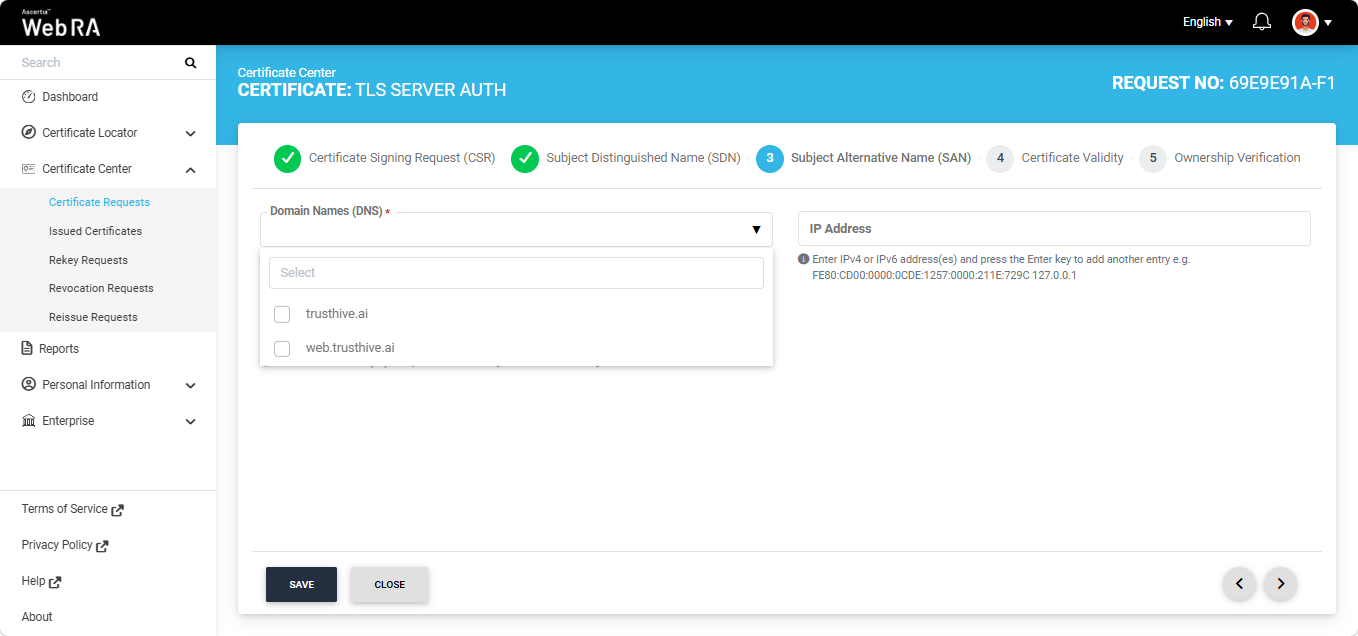
Alternatively, if the 'Assign Each Domain to a Single User' policy is enabled in the Enterprise, users can either select an enterprise-approved domain or enter a new domain in the Domain Names (DNS) field.
To select a pre-approved domain, click the Domain Names (DNS) field and select the required domain from the list. Alternatively, to enter a new domain, type the domain name in the field and press Enter.
|
|
If both checkboxes are unchecked in the Enterprise Policy settings, the user can only select enterprise-approved domains when creating a certificate request. The Domain Names (DNS) field appears as a dropdown, displaying all active and verified domains in the Enterprise. |
|
|
You can only specify a single domain and its associated subdomains in the DNS field. If you attempt to enter a different domain, the system displays an error message and prevents you from proceeding. |
|
|
If Email Validation checkbox is enabled in Configurations module and email address is present in the RFC822Name field of the Subject Alternative Names (SAN), the ownership verification screen will require you to complete email validation before generating the certificate. |
After providing the required information in SAN, click the next ‘>’ button to proceed to the 'Certificate Validity' screen.
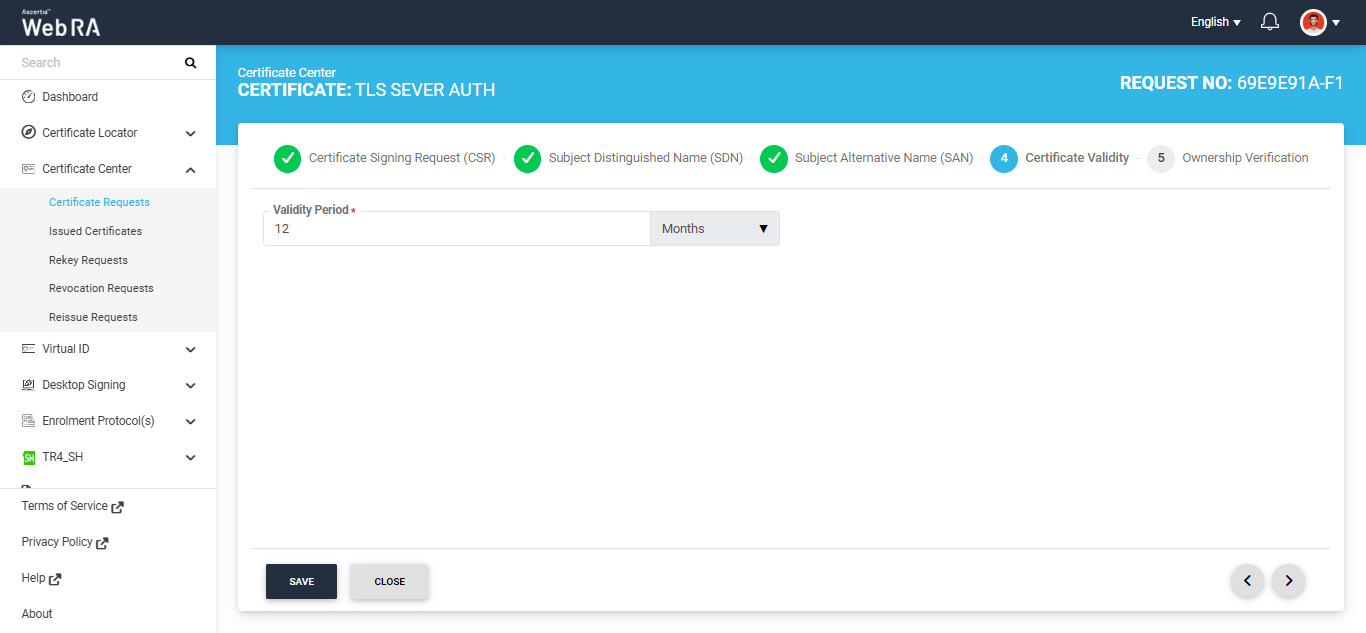
Click the '>' next button to navigate to the ‘Ownership Verification’ screen.
Note: If you selected an enterprise-approved domain in the SAN section, you are not required to perform domain validation on the Ownership Verification screen. For enterprise-approved domains, the system automatically displays a Verified status, allowing you to proceed directly with certificate generation by clicking Generate.
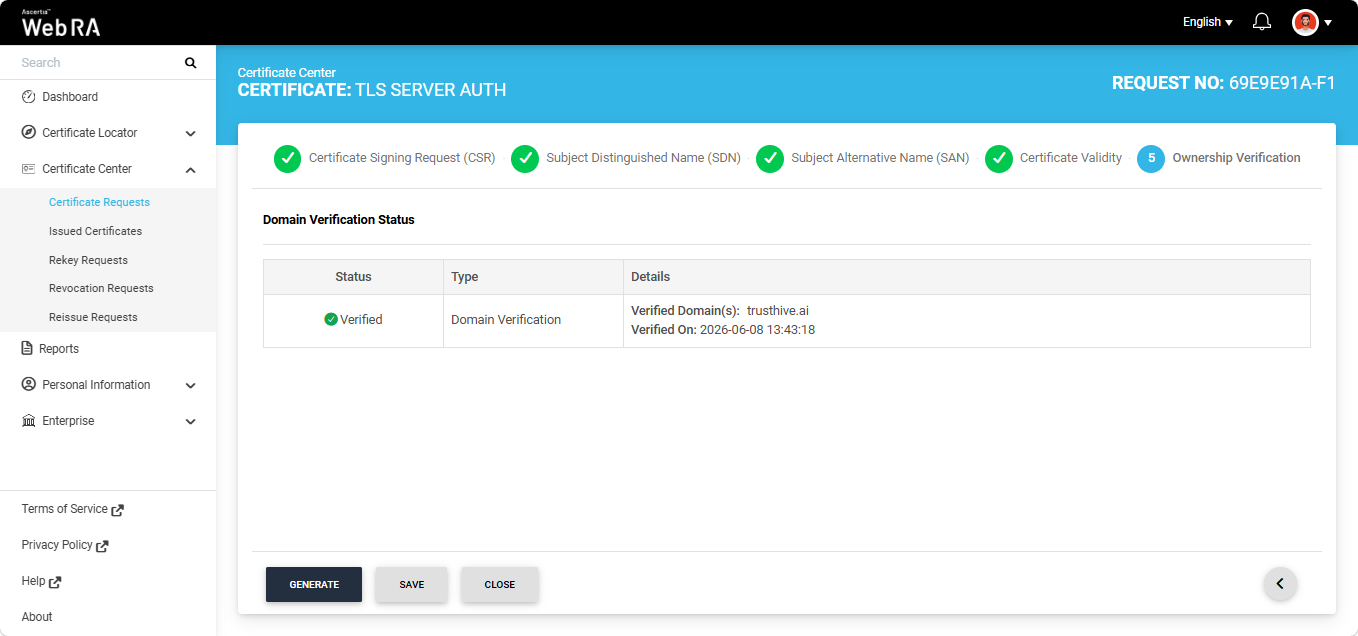
However, if you entered a new domain in the SAN section, you must complete the domain validation process before the certificate can be generated.
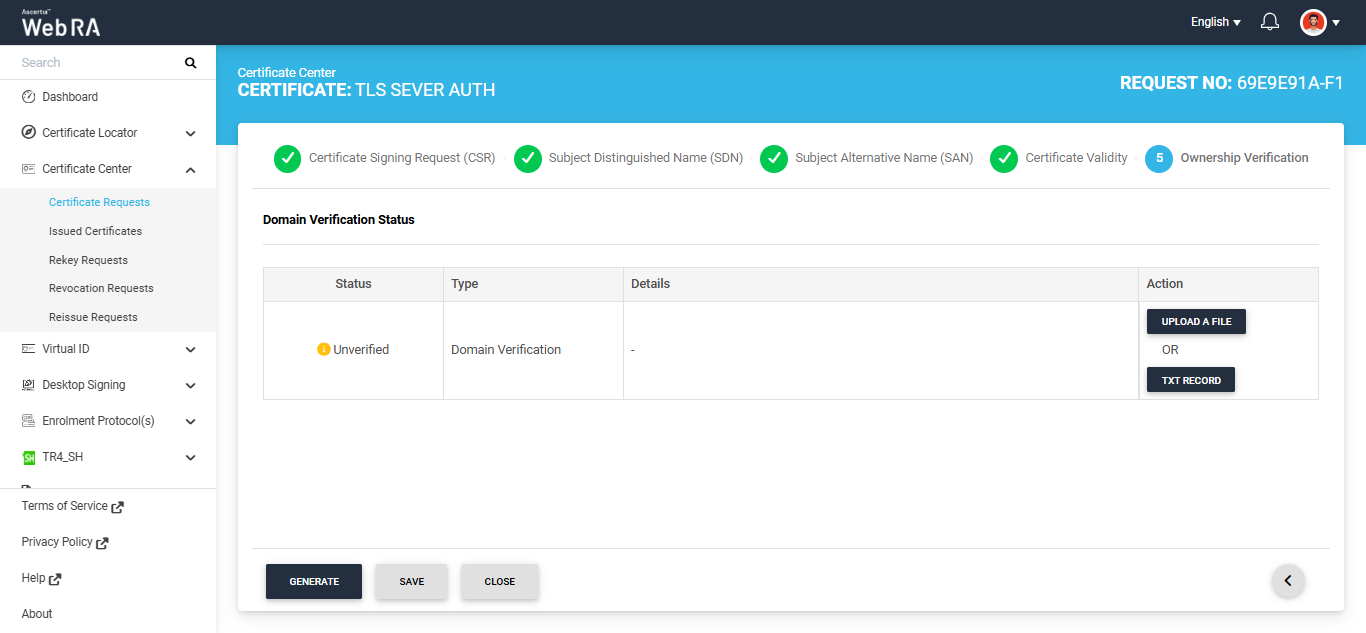
Domain verification can be performed either by uploading a file or by adding a TXT record.
Note: The action (Upload a File or TXT Record) through which domain verification can be performed is configured in the certification profile. The operator may select one or both methods for domain verification. If both methods are selected in the profile, you can use any of the method to verify your domain during certificate request creation. For more details about how the method is selected, navigate to the ‘Certification Profiles’ section.
Upload a File
Click the ‘Upload a File’ button. The system will display the ‘Upload a File’ dialog, which contains instructions on how to verify the domain using this method.
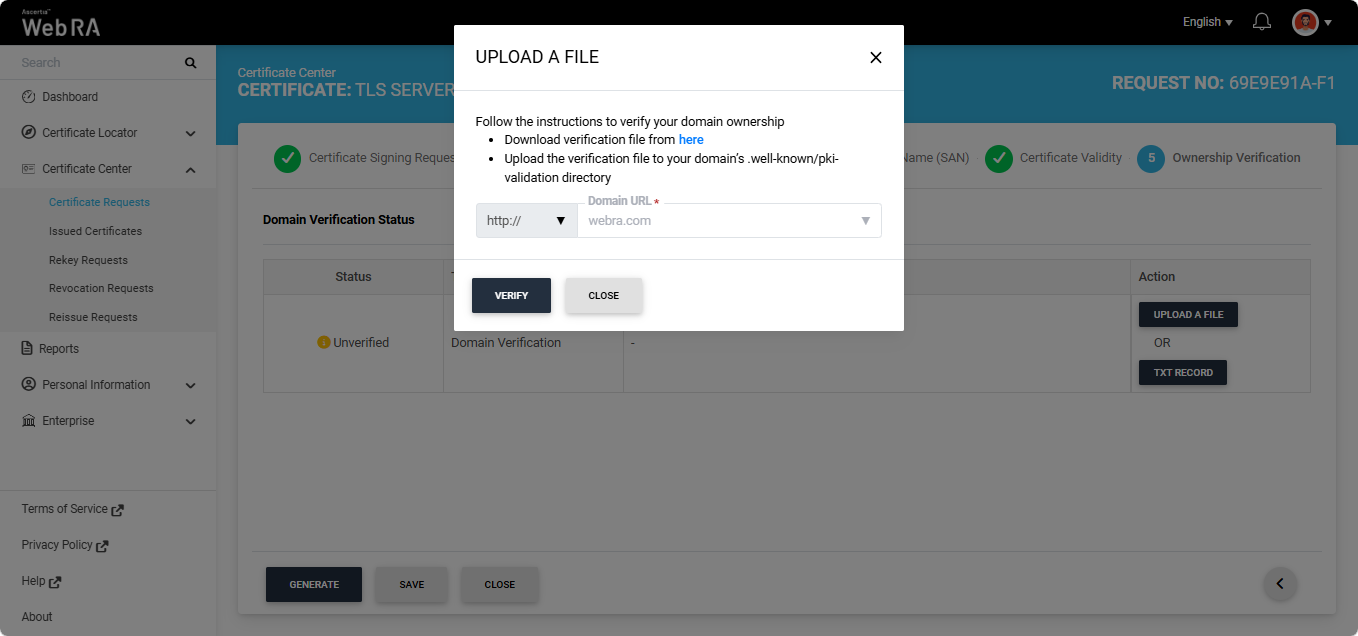
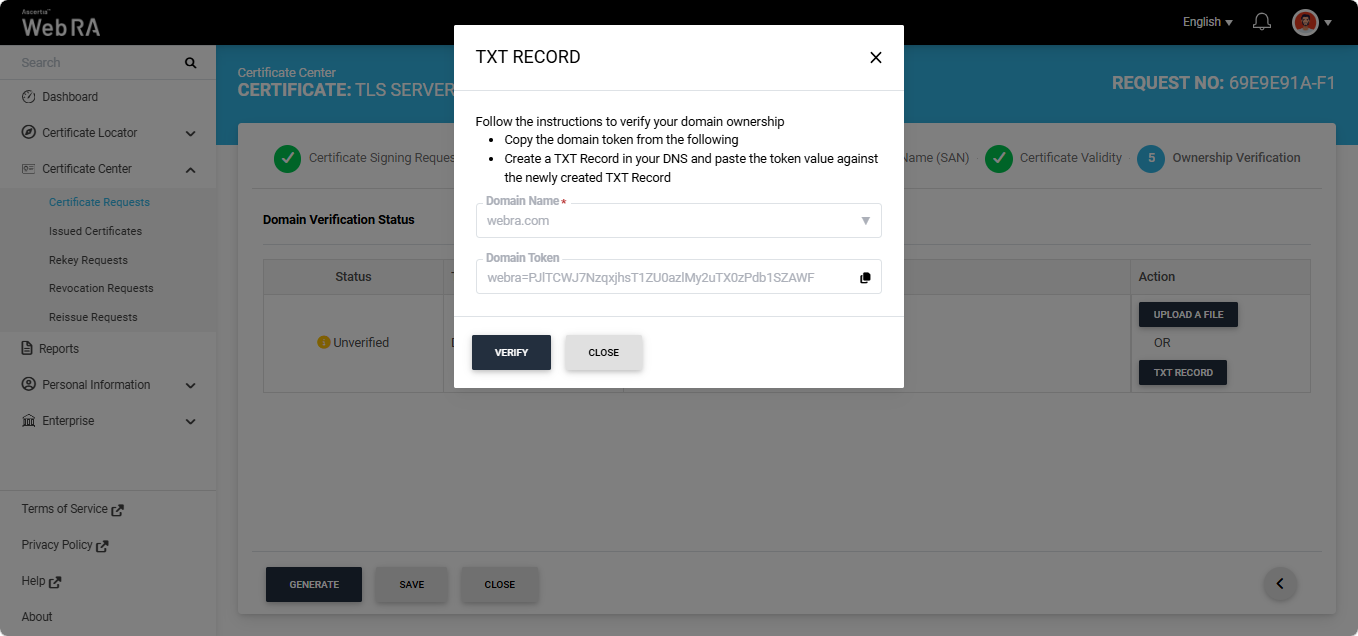
TXT Record
Click the ‘TXT Record’ button. The system will display the ‘TXT Record’ dialog, which contains instructions on how to verify the domain using this method.
After selecting the required method from the two mentioned above, click the 'Verify' button. If all steps are completed correctly, the ‘Verified’ status will appear for the entered domain.
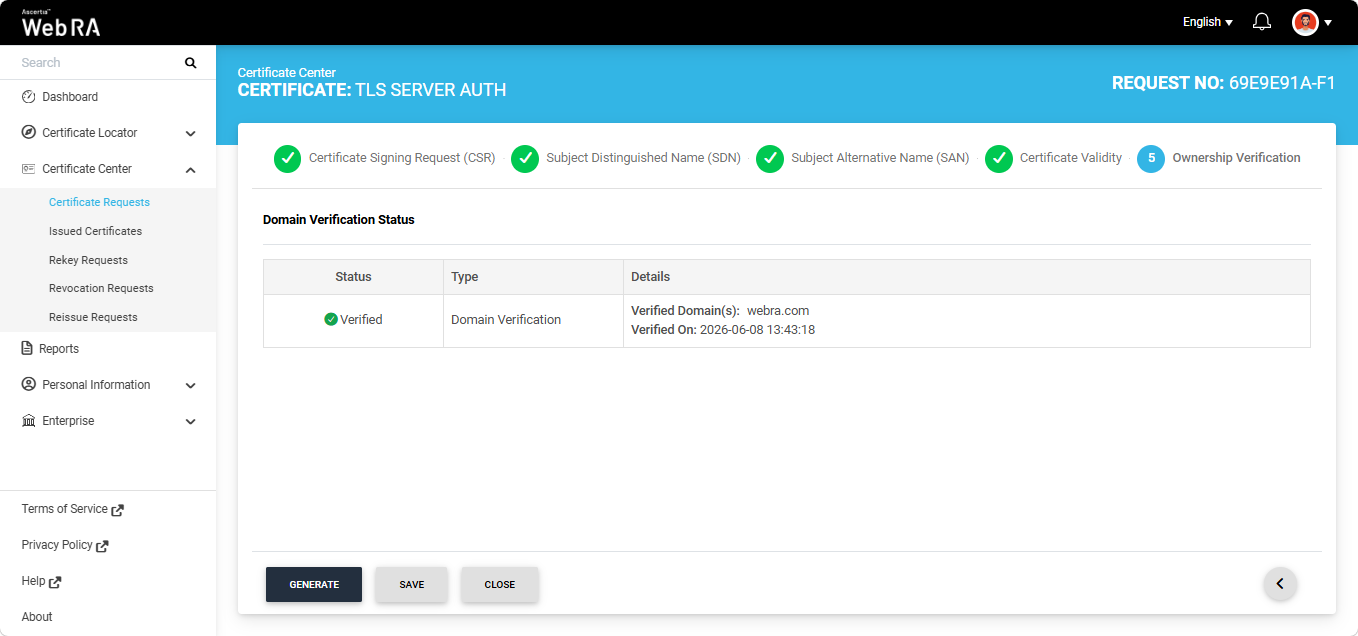
After the verification is complete you can click the 'Generate' button to create the certificate request.
Note: The steps mentioned above for creating a certificate request apply to the ‘DV SSL’ verification type. The same steps can be followed to generate certificate requests for ‘OV SSL’ and ‘EV SSL’ verification types.
Open MPIC Validation
If Open MPIC Validation is enabled in the certification profile, Open MPIC will also perform domain validation and CAA verification (if enabled in Enterprise domain settings) during certificate generation.
The domain will be verified by the Open MPIC perspectives. If the domain verification meets the minimum quorum count specified in the Open MPIC connector, the user will be able to generate the certificate. For more details about Open MPIC connector, refer to the Connectors section.
After domain verification is performed by Open MPIC, the system will display a Verified status for the specified domain. You can generate the certificate request after successful verification.
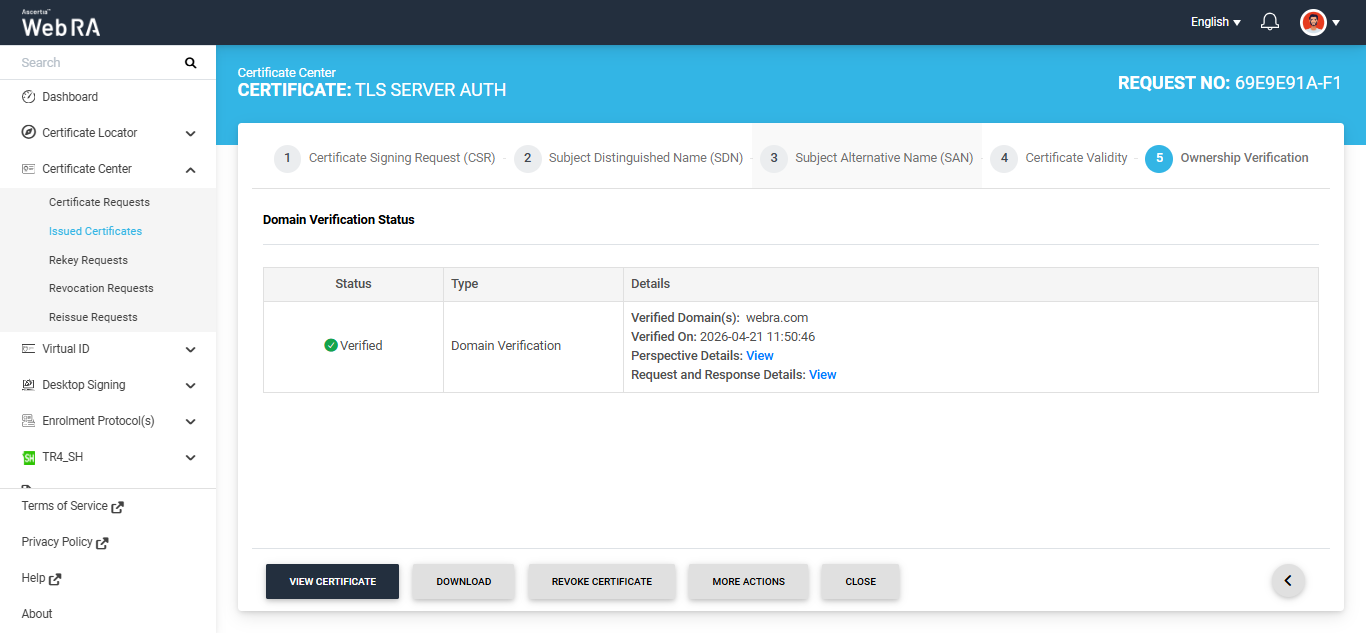
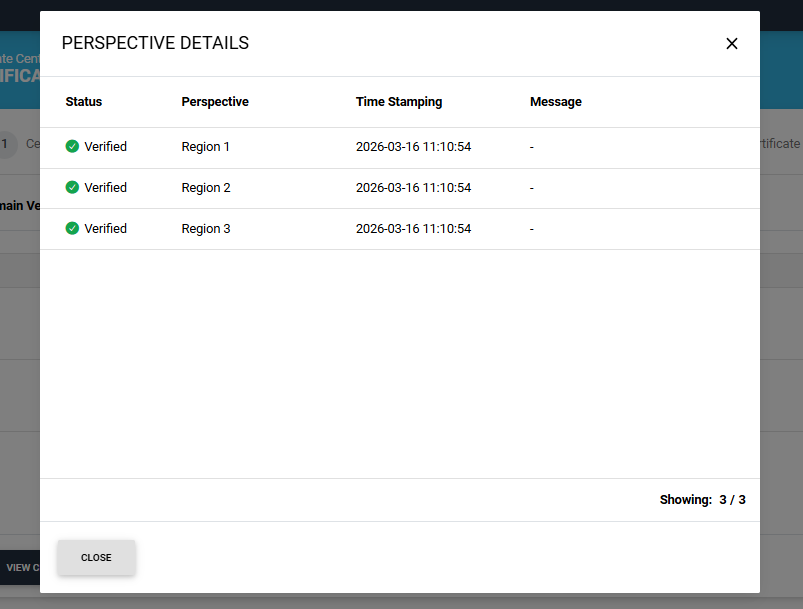
To view the Open MPIC perspective details, click the ‘View’ button next to 'Perspective Details'. The system will display the ‘Perspective Details’ dialog on the screen.
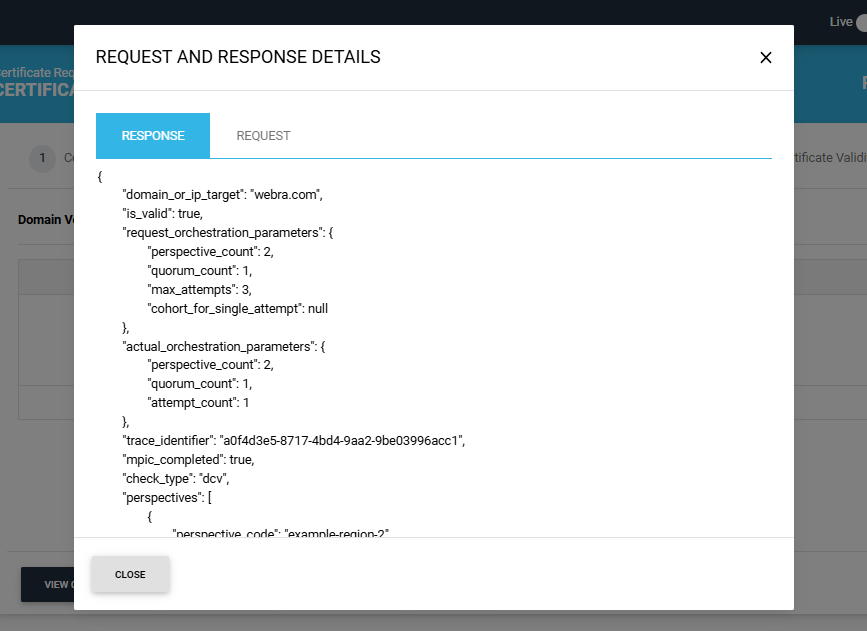
To view the Request and Response details, click the 'View' button. The system will display the 'Request and Reponse Details' dialog. You can view both Request and Response details from their respective tabs.
Note: If Open MPIC is enabled and DNSSEC Verification fails, the error will be displayed on the screen as shown in the image below.
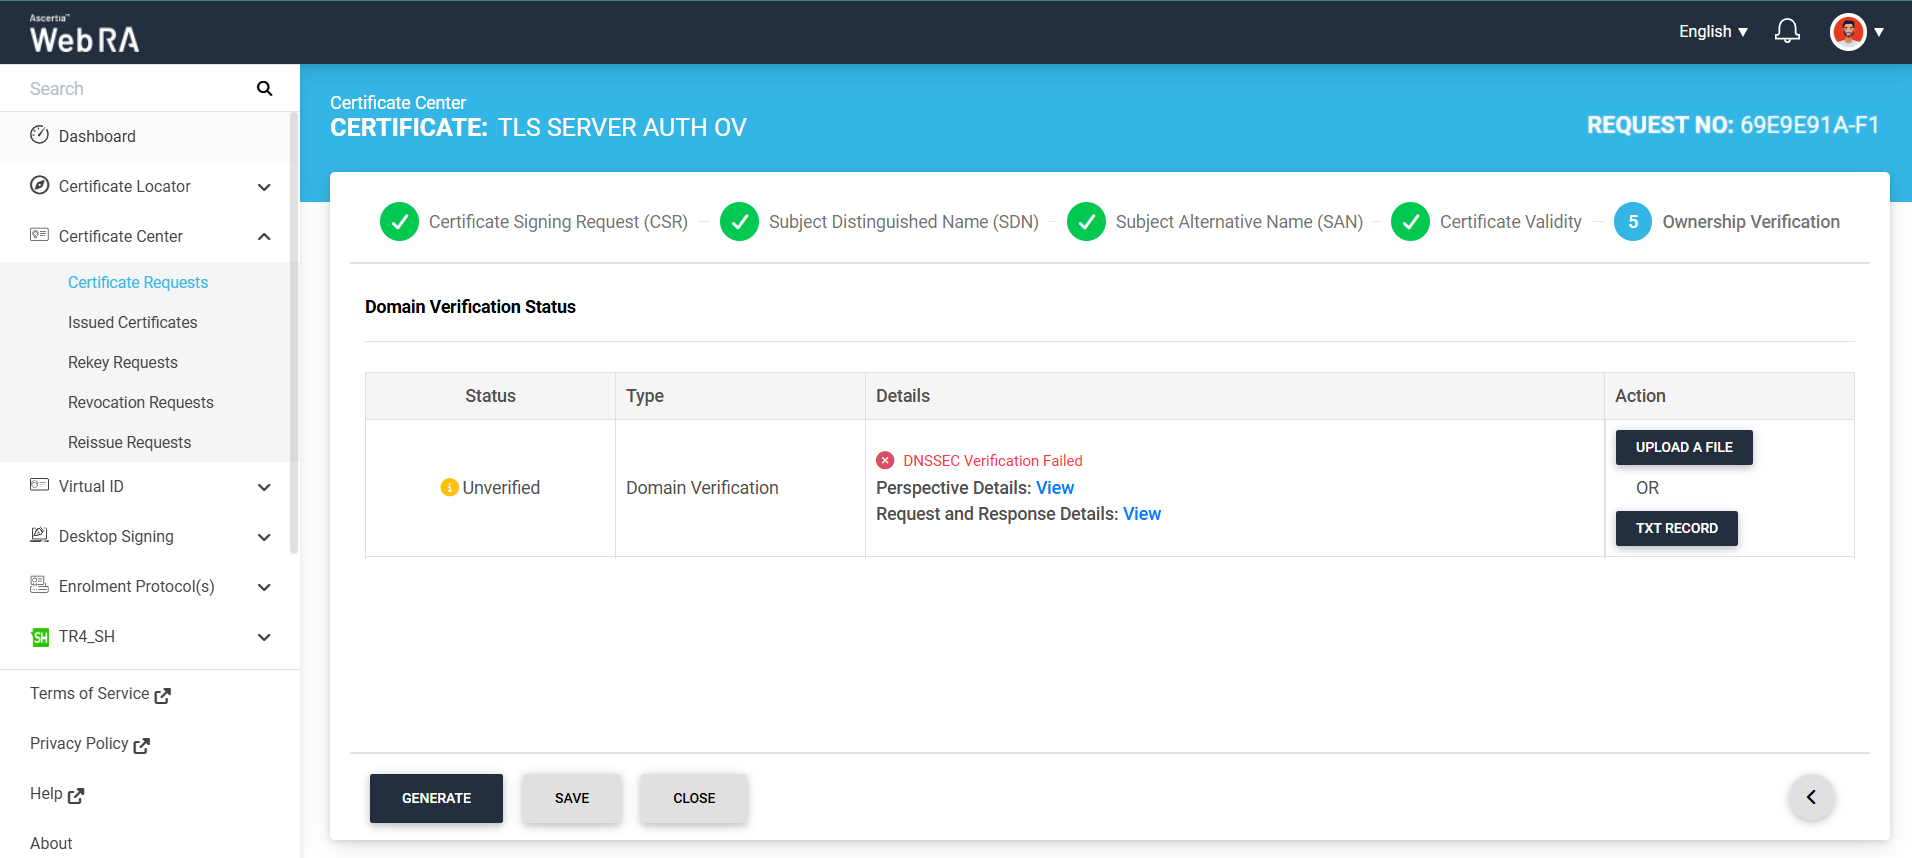
You can view the Perspective Details and Request and Response Details by clicking the respective 'View' button.
Note:
DNSSEC Verification
If DNSSEC is enabled and correctly configured for the domain, the system validates the domain’s DNSSEC signature during certificate request processing. If the signature is valid and the domain verification is successful, the certificate request is processed successfully and the system displays a ‘Verified’ status for DNSSEC verification. You can generate the certificate request after successful verification.
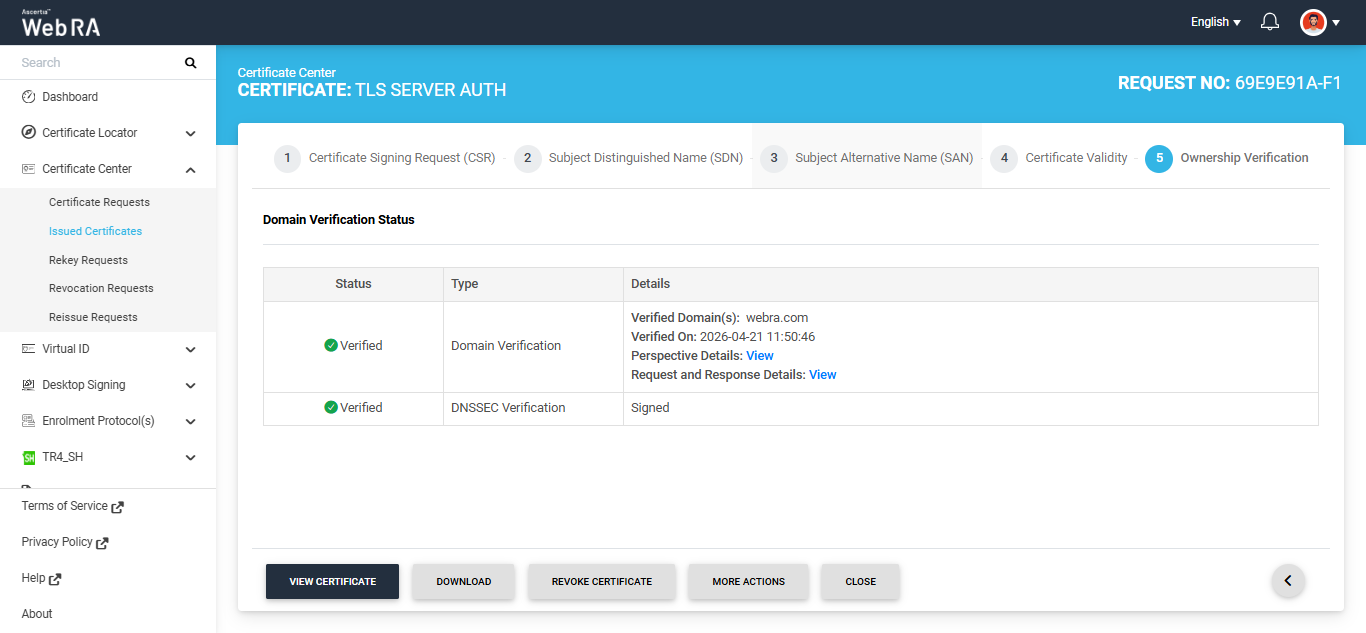
However, if Open MPIC is enabled and DNSSEC Verification fails, the system will display an error on the screen, as shown in the image below.
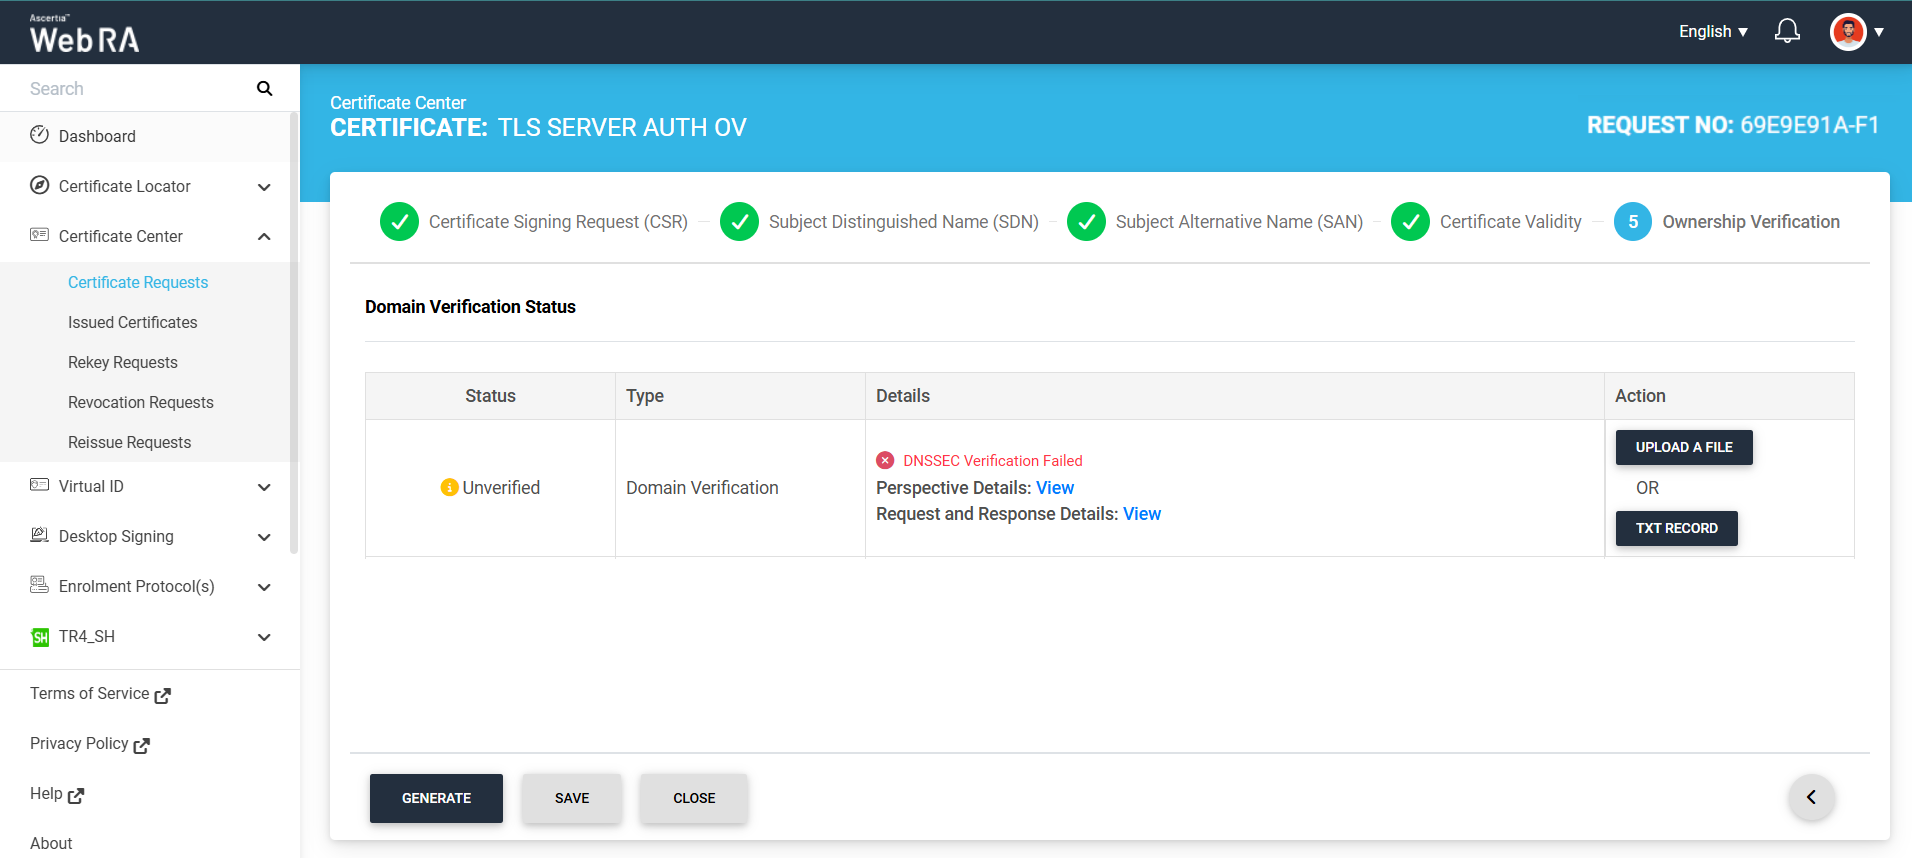
You can view the Perspective Details and Request and Response Details by clicking the respective 'View' button.
Create a Certificate Request from Admin Portal
|
|
Important Note Certificate Transparency (CT) Log Configuration
In the above screenshot, a Certificate Transparency (CT) log server is configured.
When Web RA submits a TLS server certificate request to the ADSS Server, ADSS first checks whether the “Delegate the Precertificate Logging Process to Other Entities” option is enabled for the issuing CA under the Certificate Transparency Settings.
If precertificate logging delegation is enabled, ADSS generates a precertificate and returns the following information to Web RA:
At this stage, ADSS pauses the certificate issuance workflow and waits for the Signed Certificate Timestamps (SCTs).
Web RA then submits the received precertificate chain to the configured CT log server(s) in accordance with the Certificate Transparency process defined for publicly trusted TLS certificates.
The CT log server validates and logs the precertificate, and returns the SCT response. After receiving the SCTs from the CT log server(s), Web RA forwards the SCT information back to ADSS. ADSS then embeds the SCTs into the final TLS certificate and completes the certificate issuance process. |
To create a new certificate request, expand Requests > Certificate Requests from the left menu pane in the admin portal. Then click the ‘+’ button from the grid header.
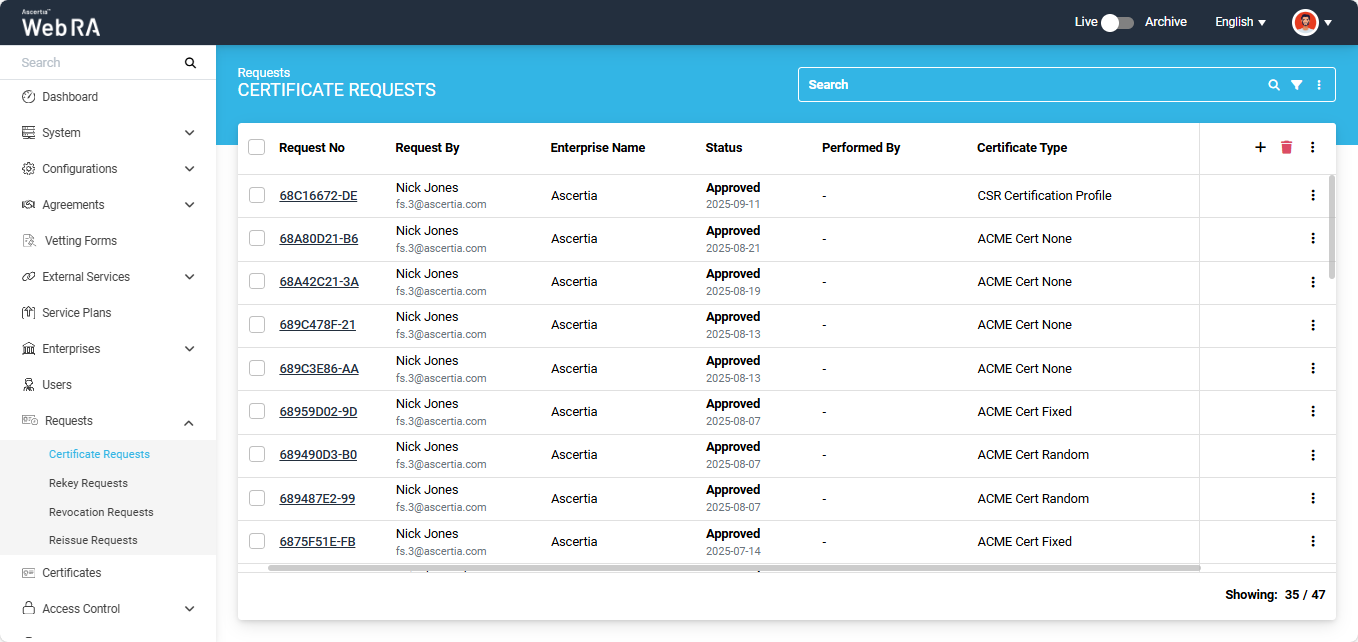
The system will display the ‘Create Request’ screen. Here, select your ‘Enterprise’ from the ‘Enterprise Name’ drop down, and select the ‘Certificate Type’.
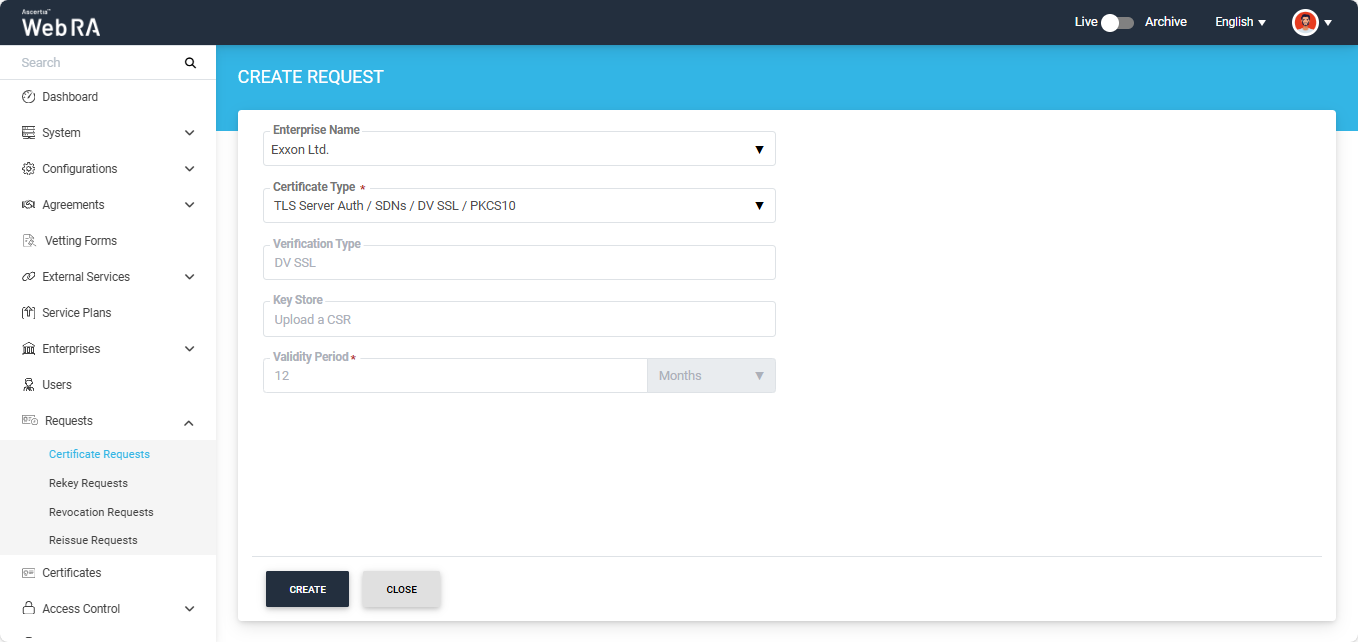
Note: A checkbox titled ‘Generate a certificate on behalf of the user’ will appear on this screen if the policy for this option is enabled in the Enterprise > Policies > Requests section.
Enabling this checkbox will allow the operator to generate a certificate on behalf of the user.
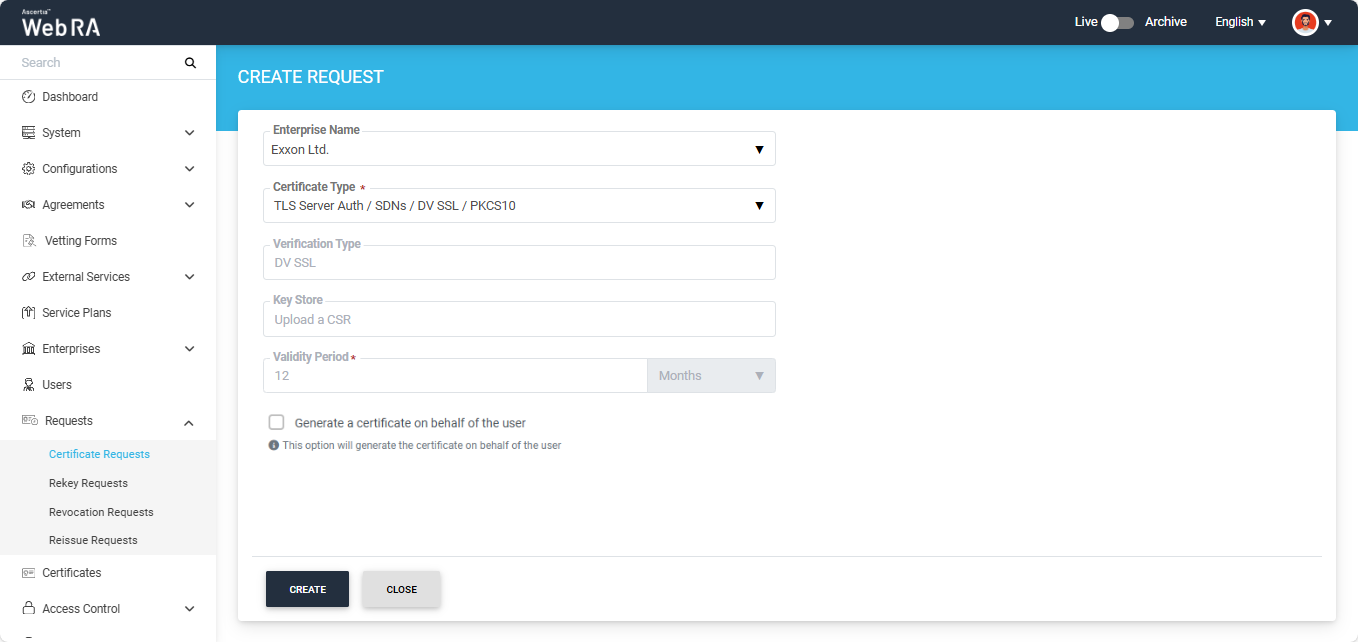
After making the required selections, click the ‘Create’ button. The system will display the Certificate Signing Request (CSR) screen.
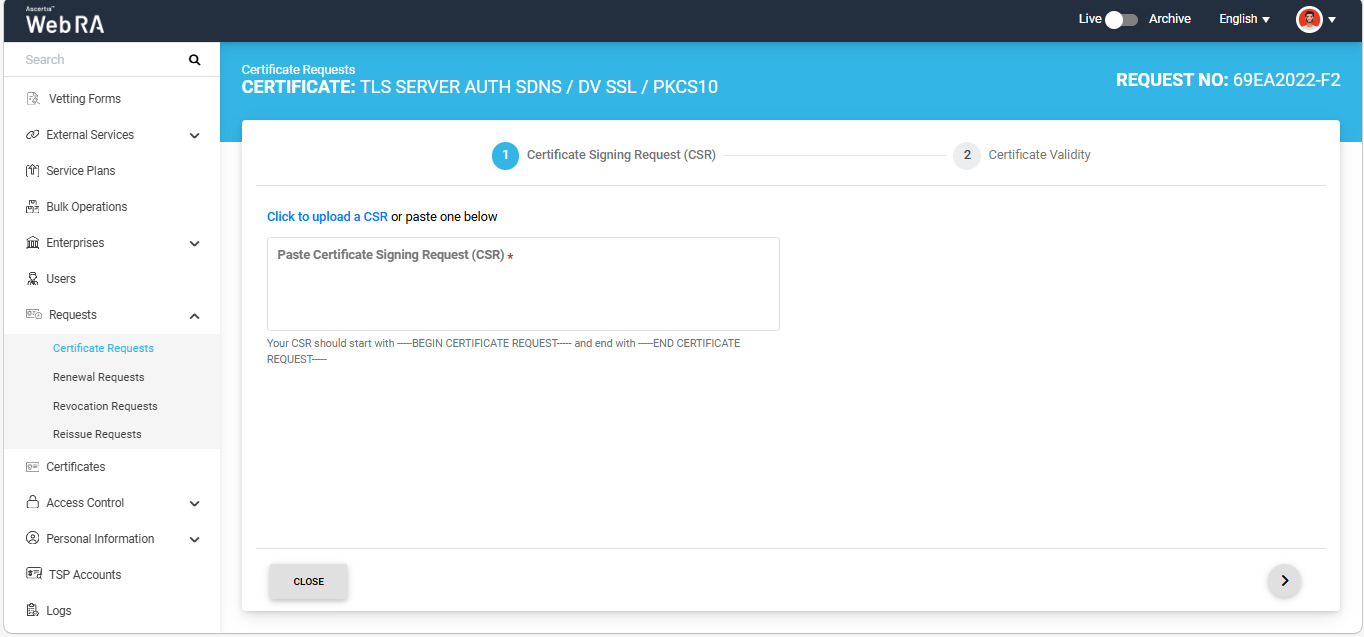
On this screen, either upload the CSR through 'Click to upload a CSR' hyperlinked option or paste the CSR in the box below. Once the CSR is uploaded, it will appear on the screen and the system will also display additional tabs in the Create Request window.
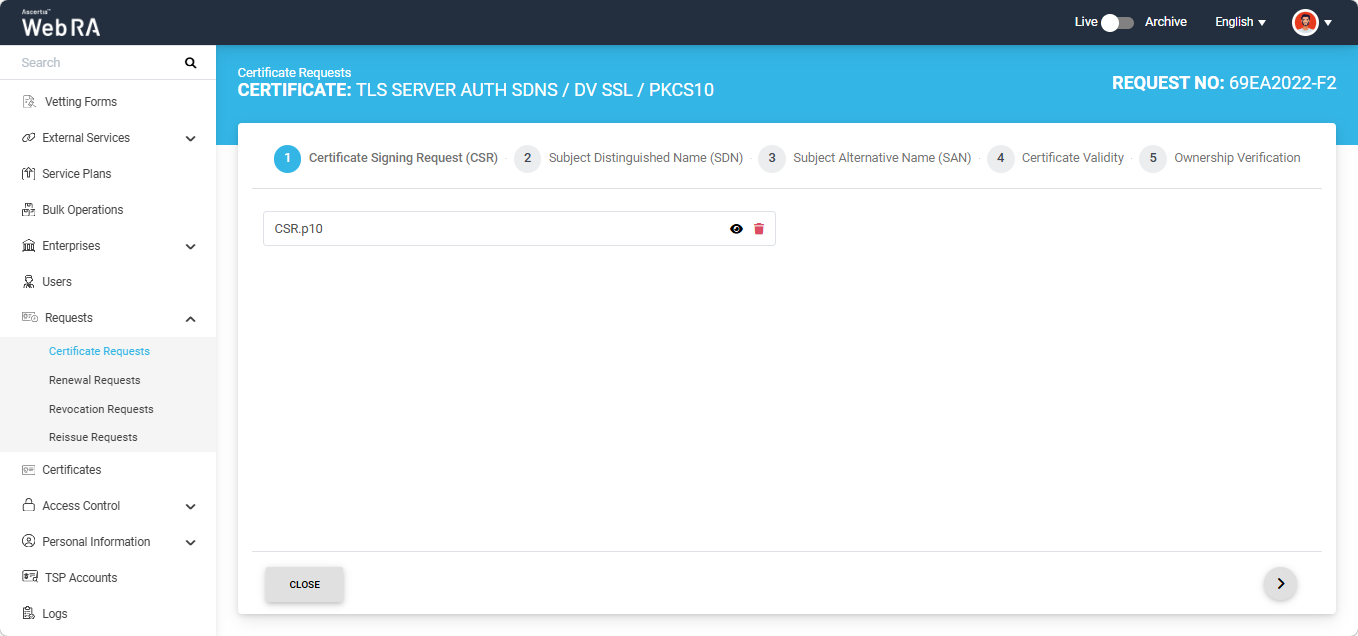
After uploading the CSR, click the '>' button to navigate to the ‘Subject Distinguished Name (SDN)' screen.
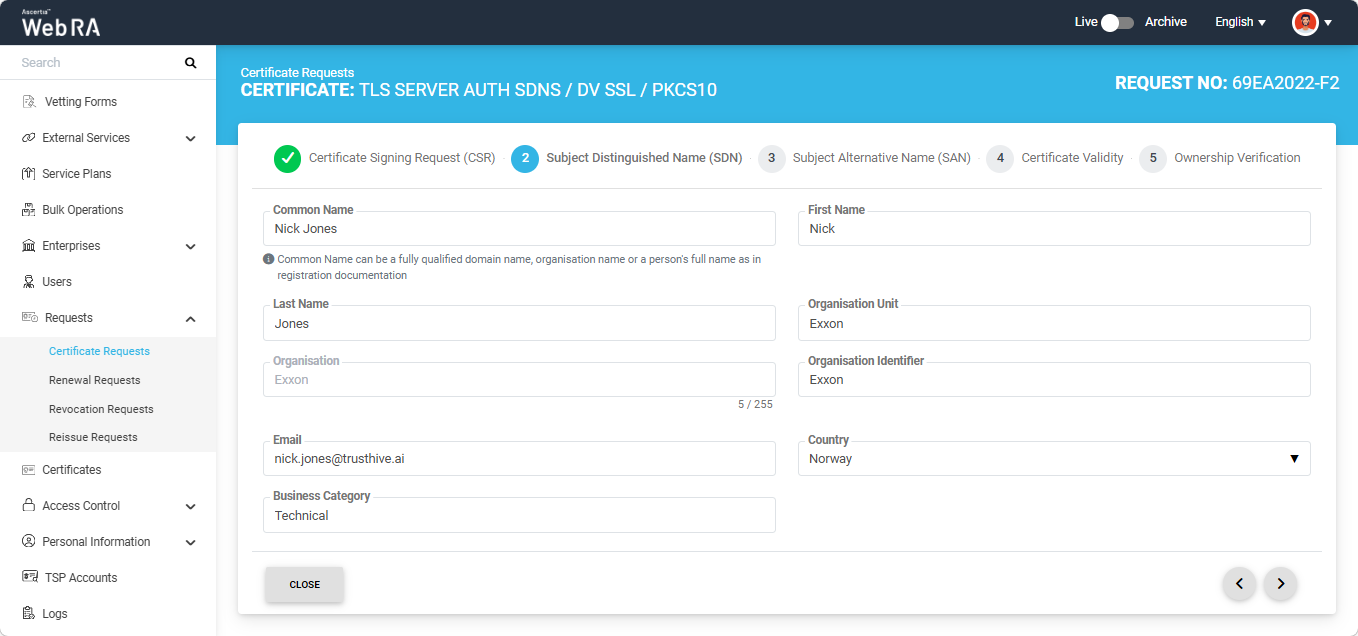
Enter the required details on this screen as per given fields and click the next ‘>’ button to navigate to the ‘Subject Alternative Name (SAN)’ screen.
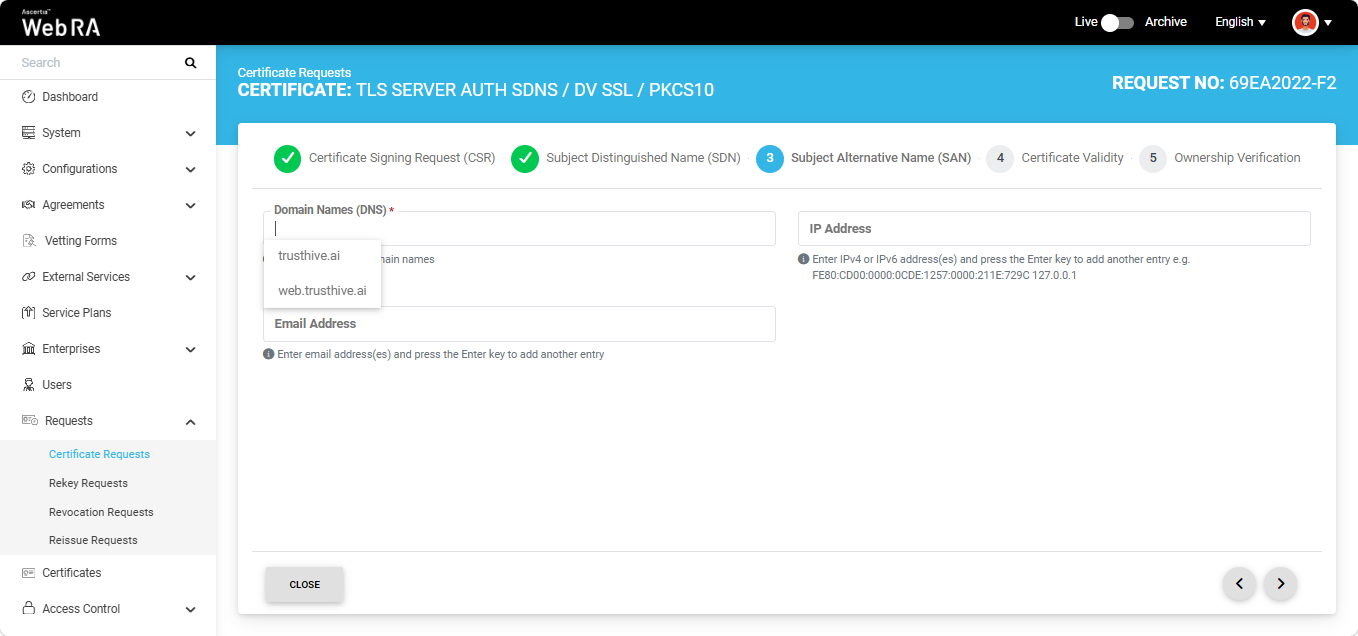
On this screen, the behaviour of the Domain Names (DNS) field depends on the configured Enterprise Policy settings.
If the 'Allow Only Enterprise-Approved Domains' policy is enabled in the Enterprise, the Domain Names (DNS) field is displayed as a dropdown list. In this case, users can only select an enterprise-approved domain from the available options. The dropdown list displays only active and verified domains configured for the Enterprise.
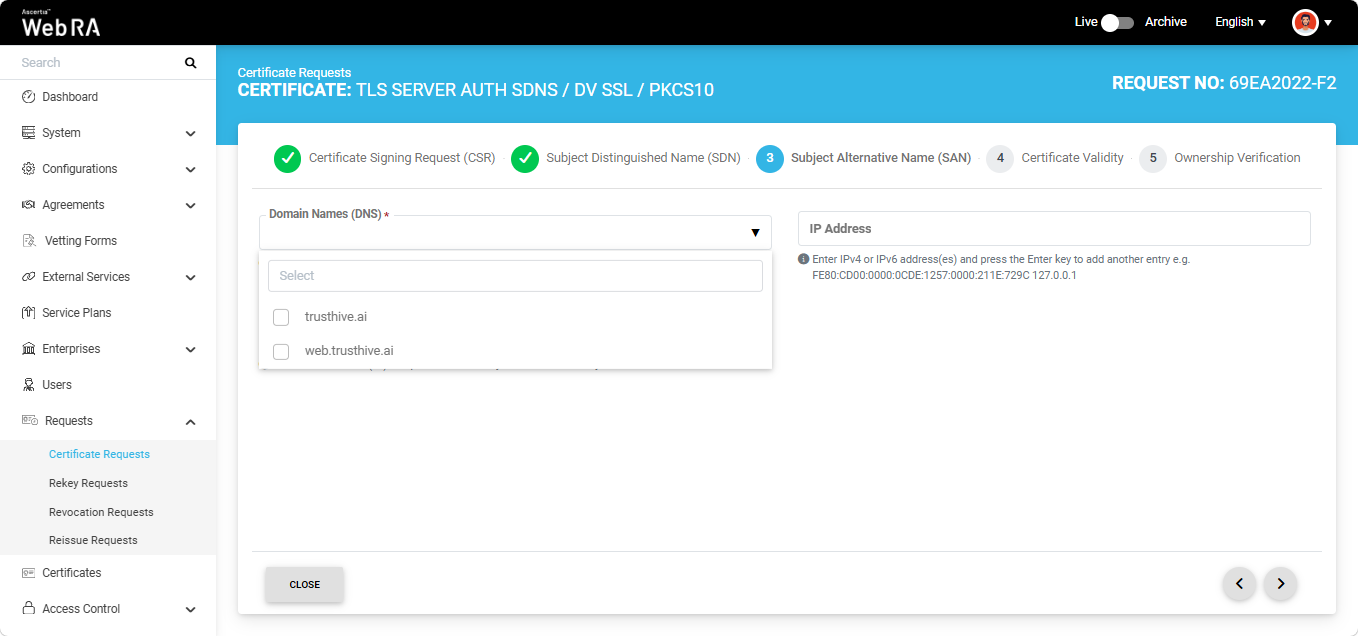
Alternatively, if the 'Assign Each Domain to a Single User' policy is enabled in the Enterprise, users can either select an enterprise-approved domain or enter a new domain in the Domain Names (DNS) field.
To select a pre-approved domain, click the Domain Names (DNS) field and select the required domain from the list. Alternatively, to enter a new domain, type the domain name in the field and press Enter.
|
|
If both checkboxes are unchecked in the Enterprise Policy settings, only enterprise-approved domains can be selected when creating a certificate request. The Domain Names (DNS) field appears as a dropdown, displaying all active and verified domains in the Enterprise. |
|
|
You can only specify a single domain and its associated subdomains in the DNS field. If you attempt to enter a different domain, the system displays an error message and prevents you from proceeding. |
|
|
If Email Validation checkbox is enabled in Configurations > Requests module and email address is present in the RFC822Name field of the Subject Alternative Names (SAN), the ownership verification screen will require you to complete email validation before generating the certificate. The domain of the email address must match the domain entered or selected in the DNS |
After providing the required information in SAN, click the next ‘>’ button to proceed to the 'Certificate Validity' screen.
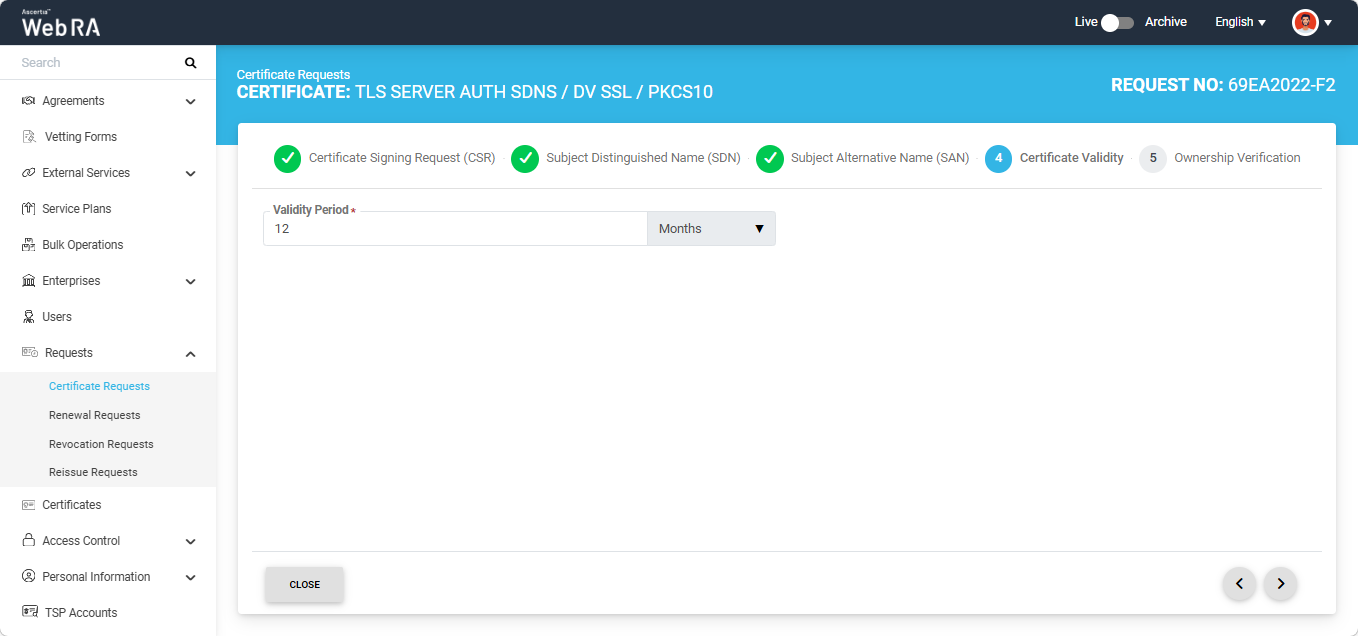
Click the next ‘>’ button to navigate to the ‘Ownership Verification’ screen. The system will display the 'Domain Verification' section on the screen.
Note: If you selected an enterprise-approved domain in the SAN section, you are not required to perform domain validation on the Ownership Verification screen. For enterprise-approved domains, the system automatically displays a Verified status, allowing you to proceed directly with certificate generation by clicking Generate.
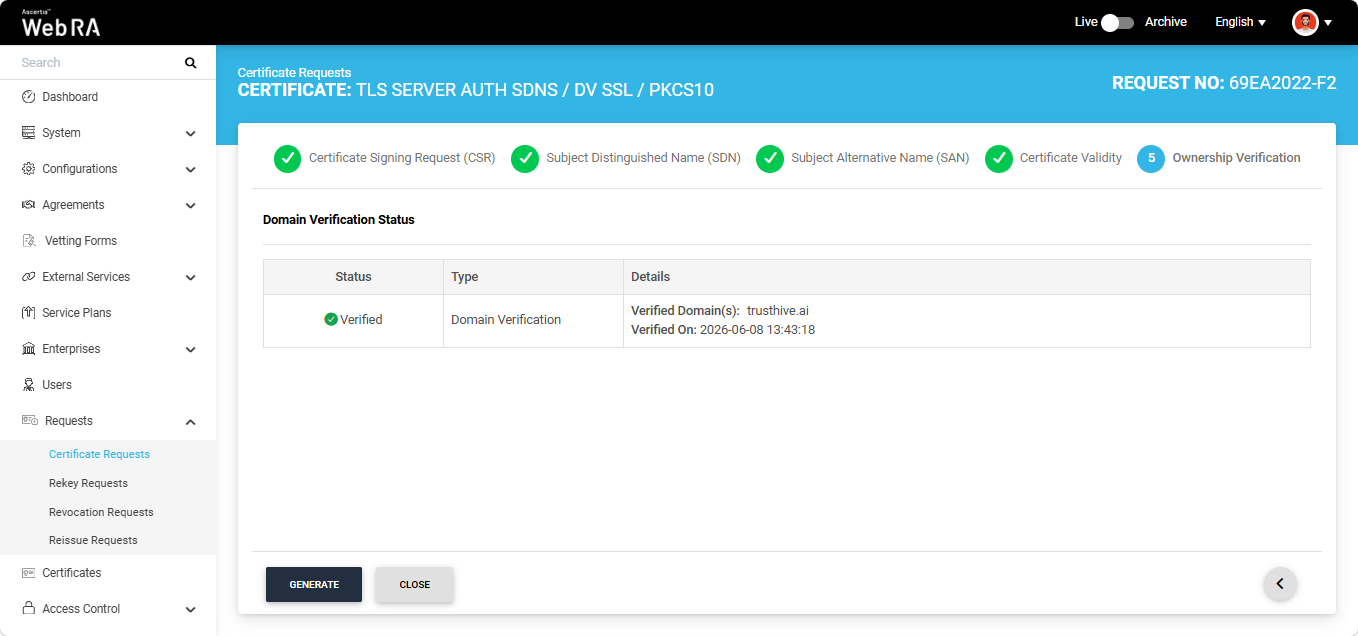
However, if you entered a new domain in the SAN section, you must complete the domain validation process before the certificate can be generated.
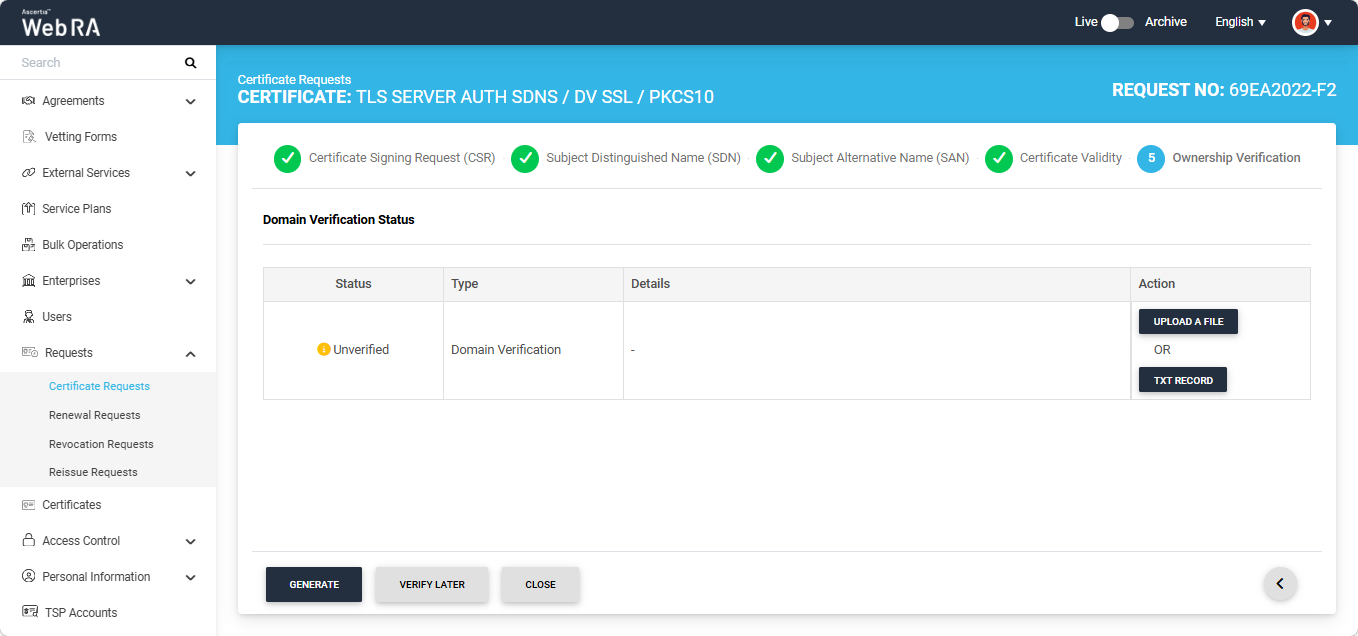
The domain verification can be performed either by uploading a file or by adding a TXT Record.
Note: The action (Upload a File or TXT Record) through which domain verification can be performed is configured in the certification profile. The operator may select one or both methods for domain verification. For more details, navigate to the ‘Certification Profiles’ section.
Upload a File
Click the ‘Upload a File’ button. The system will display the ‘Upload a File’ dialog, which contains instructions on how to verify the domain using this method.
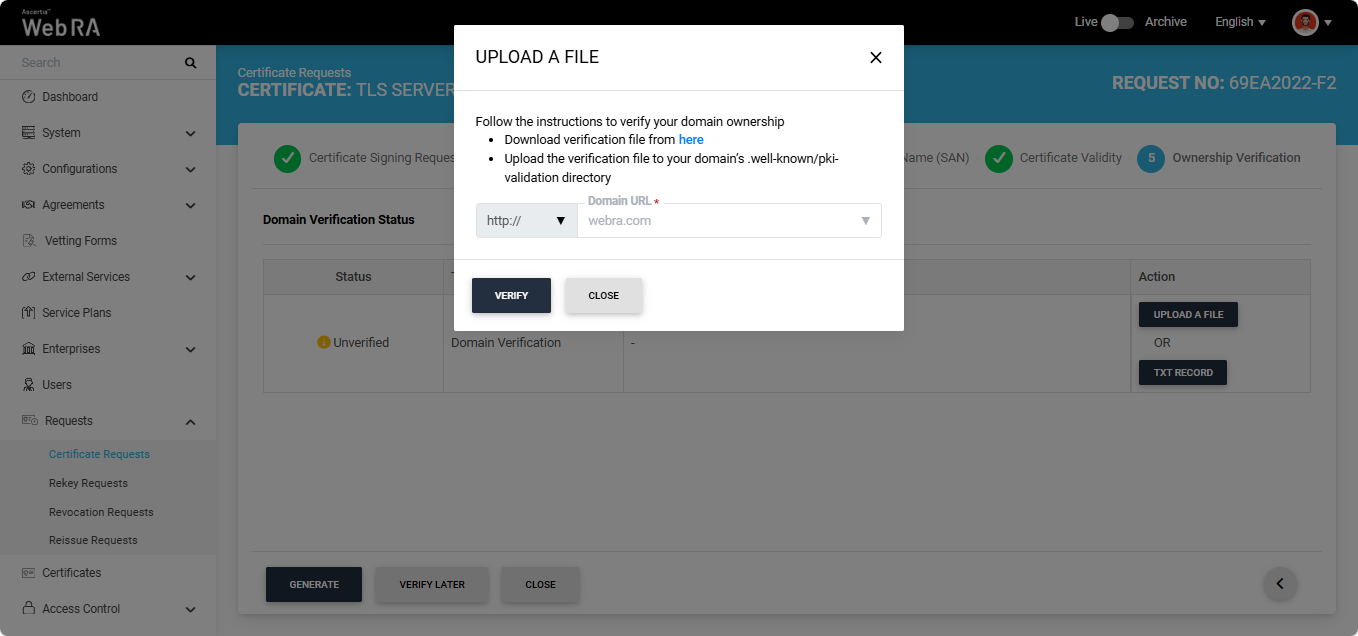
TXT Record
Click the ‘TXT Record’ button. The system will display the ‘TXT Record’ dialog, which contains instructions on how to verify the domain using this method.
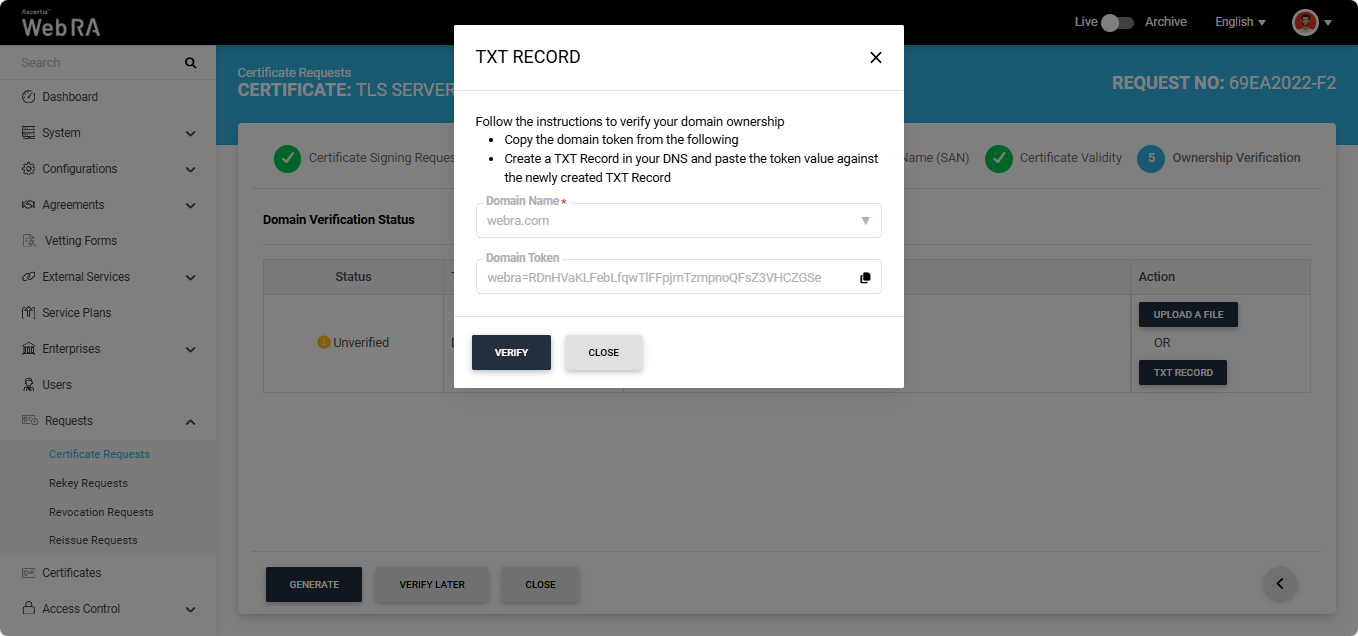
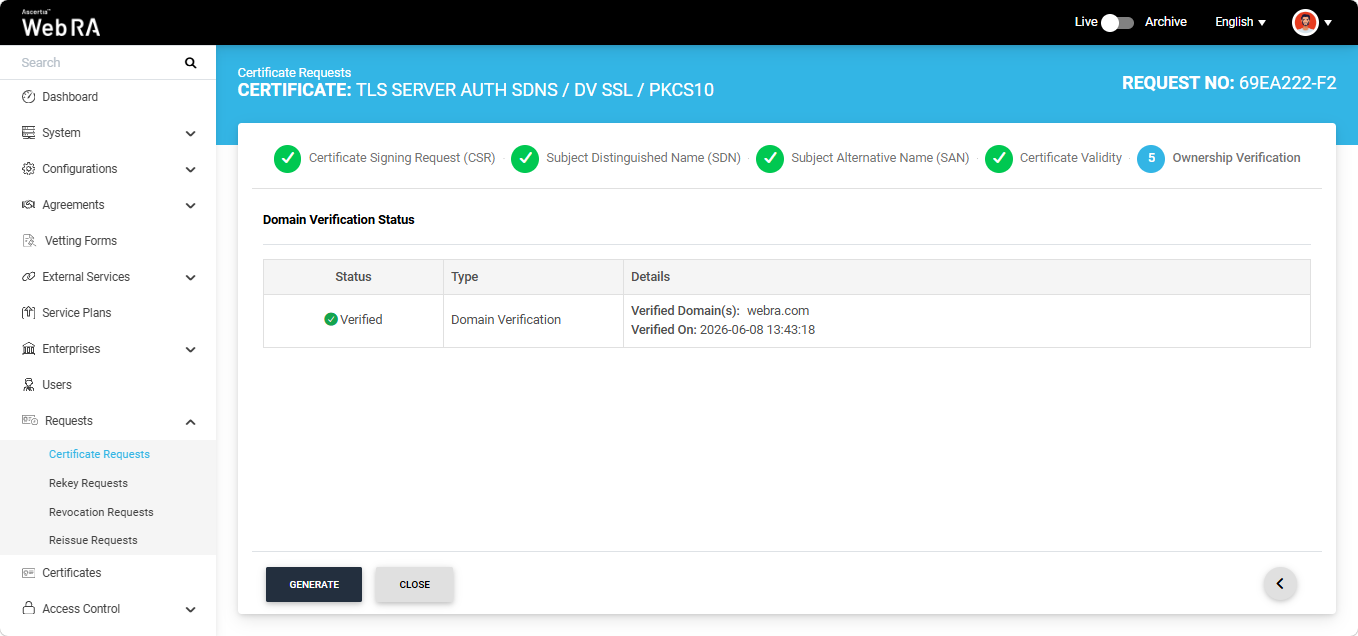
After selecting the required method from the two mentioned above, click the 'Verify' button. If all steps are completed correctly, the ‘Verified’ status will appear for the entered domain.
|
|
If Email Validation checkbox is enabled in Configurations > Requests module and email address is present in the RFC822Name field of the Subject Alternative Names (SAN), the ownership verification screen will require you to complete email validation before generating the certificate. |
After domain verification, click the ‘Generate’ button to create the certificate request. This certificate request will appear in the ‘Certificate Requests’ listing table as well.
Note: The steps mentioned above for creating a certificate request apply to the ‘DV SSL’ verification type. The same steps can be followed to generate certificate requests for ‘OV SSL’ and ‘EV SSL’ verification types.
Open MPIC Validation
If Open MPIC Validation is enabled in the certification profile, Open MPIC will also perform domain validation and CAA verification (if enabled in Enterprise domain settings) during certificate generation.
The domain will be verified by the Open MPIC perspectives. If the domain verification meets the minimum quorum count specified in the Open MPIC connector, the user will be able to generate the certificate. For more details about Open MPIC connector, refer to the Connectors section.
After domain verification is performed by Open MPIC, the system will display a Verified status for the specified domain.
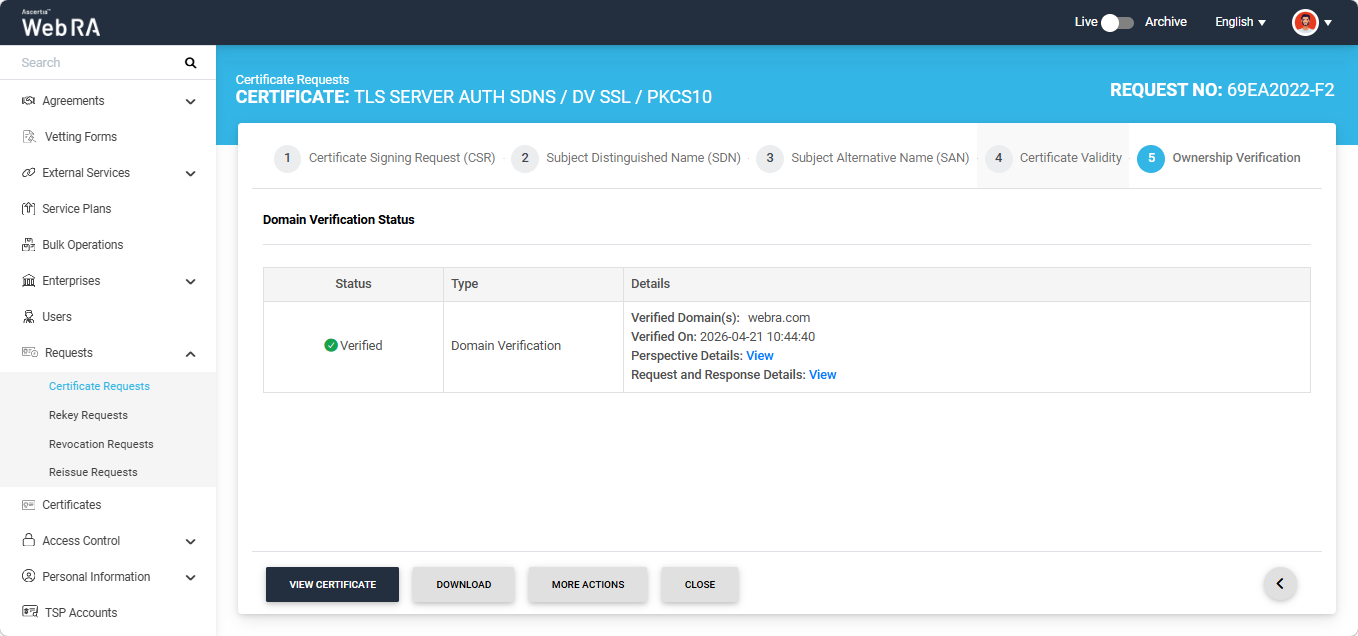
To view the Open MPIC perspective details, click the ‘View’ button next to 'Perspective Details'. The system will display the ‘Perspective Details’ dialog on the screen.
To view the Request and Response details, click the 'View' button. The system will display the 'Request and Reponse Details' dialog. You can view both Request and Response details from their respective tabs.
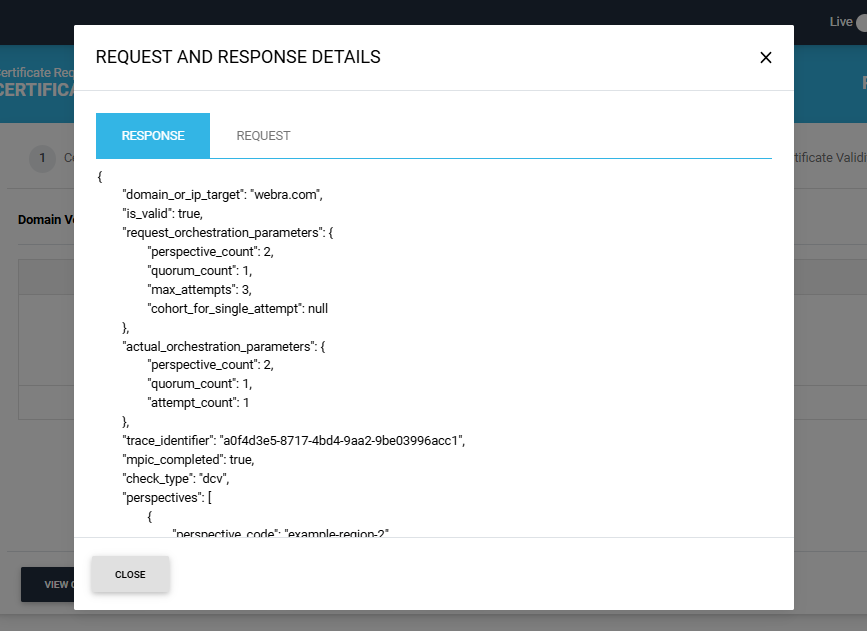
Note:
DNSSEC Verification
If DNSSEC is enabled and correctly configured for the domain, the system validates the domain’s DNSSEC signature during certificate request processing. If the signature is valid and the domain verification is successful, the certificate request is processed successfully and the system displays a ‘Verified’ status for DNSSEC verification. You can generate the certificate request after successful verification.
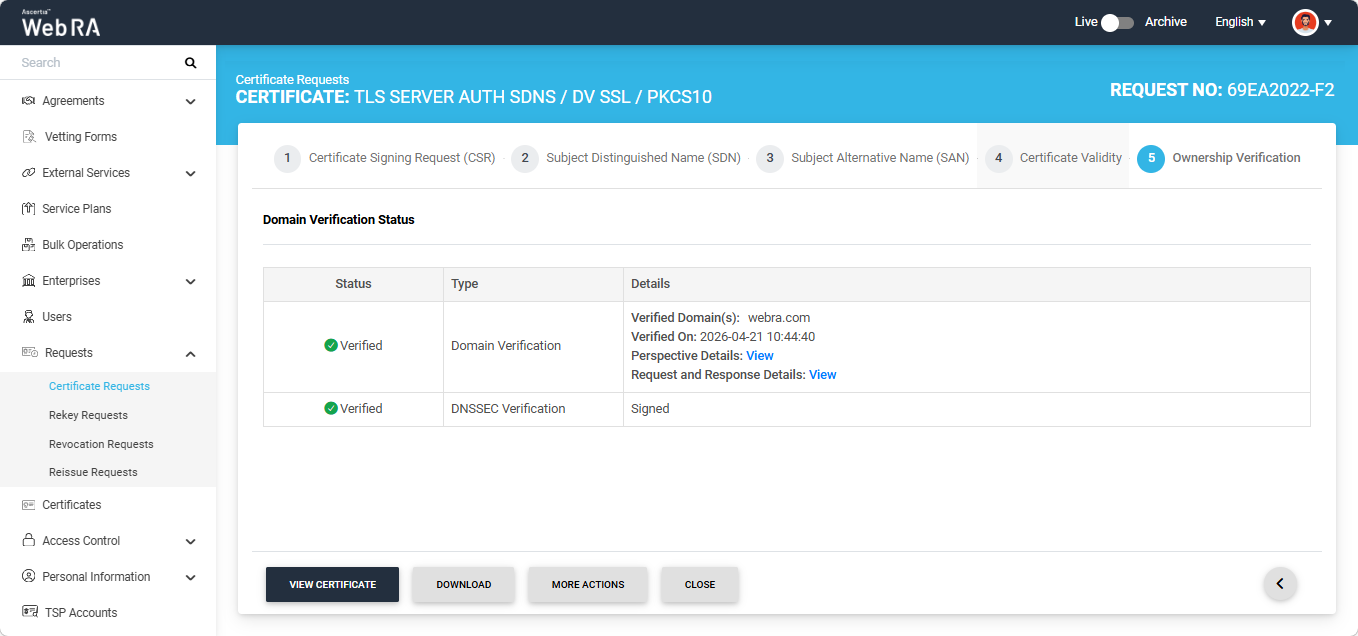
However, if DNSSEC is not enabled for the domain, DNSSEC verification will not be performed and certificate generation will proceed without it.
Note: If Open MPIC is enabled and DNSSEC Verification fails, the error will be displayed on the screen as shown in the image below.
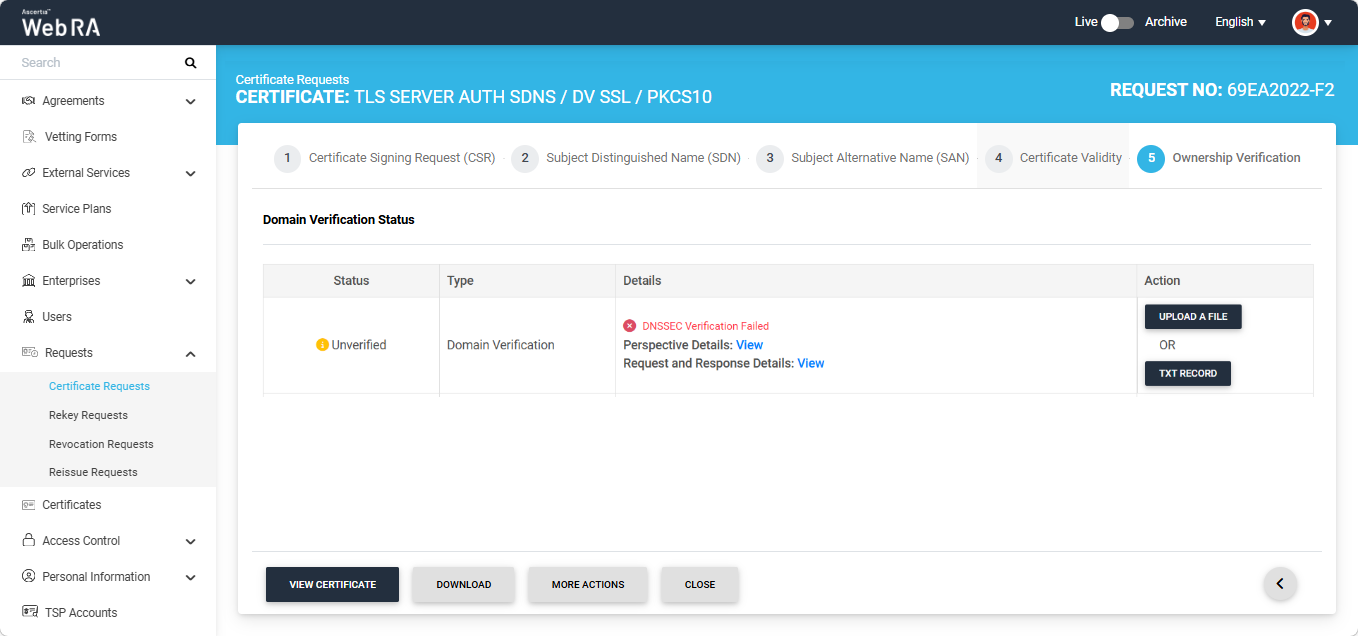
You can view the Perspective Details and Request and Response Details by clicking the respective 'View' button.
|
|
If the ‘Generate a certificate on behalf of the user’ checkbox is enabled, the system will display an additional screen titled ‘User Information’ next to the Certificate Validity screen. |
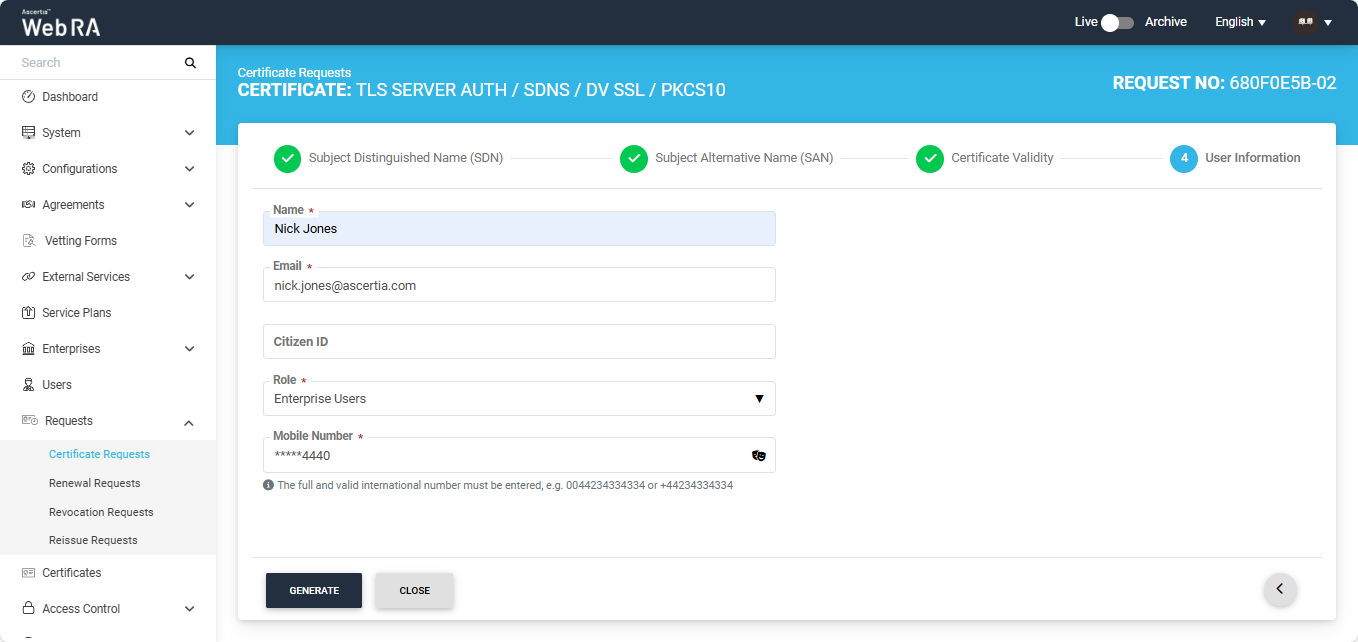
On this screen, you will be required to enter and enter/select the Name, Email, Citizen ID, Mobile Number, and Role of the user for whom the certificate is being generated.
After entering the details, click ‘Generate’. The system will then display a subscriber agreement (if configured) for this user's profile.
When you agree to the subscriber agreement, the system will create an account for the user and generate the certificate. The user will receive an email regarding the account and certificate creation and is prompted to activate their account.
|
|
If the certificate is being created for a user who does not exist in the system, a new account will be created for the user along with the certificate. If the user already has a registered account in the Web RA system, only the certificate will be created. The user will be notified via email about the certificate generation. Meanwhile, if the user exists in the system but is not part of the enterprise where the certificate is being created, the system will send an invitation for the user to join that enterprise and will generate the certificate as well. |