Domains
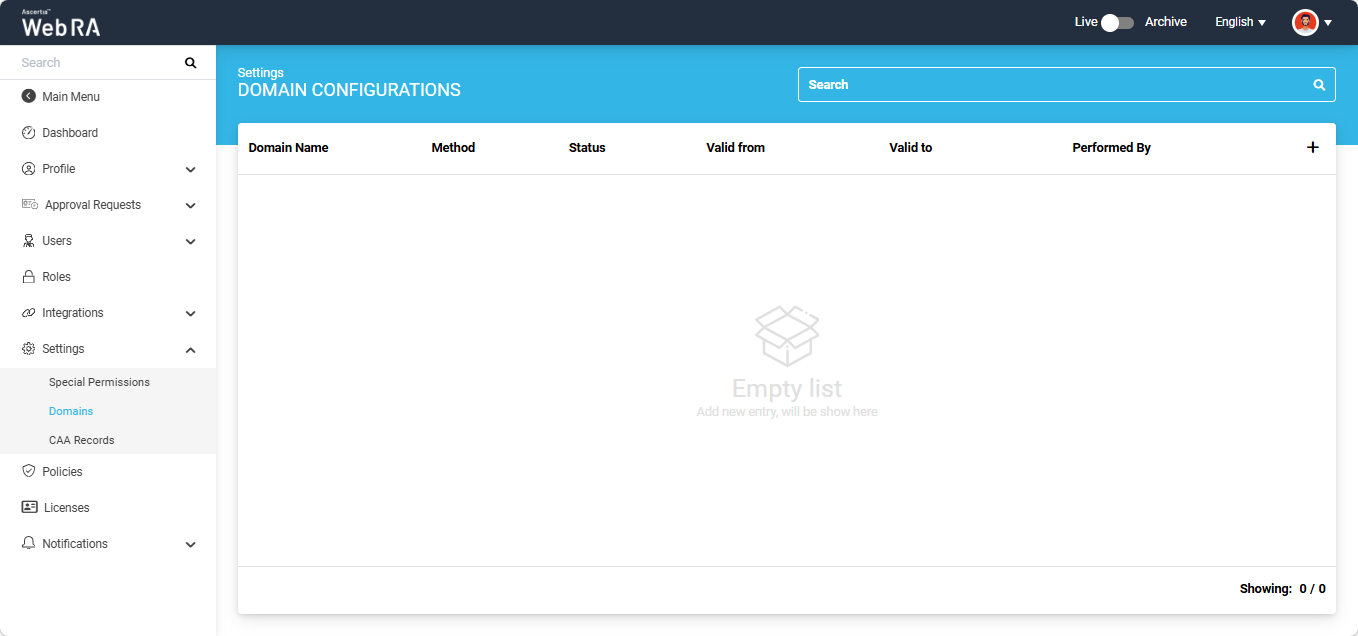
Domain Configurations
The Domain Configurations section allows operators to manage enterprise domains and subdomains used for certificate issuance within the system. From this section, operators can add and verify domains, configure domain validity periods, reverify previously validated domains, and delete domains when required.
This section helps organisations centrally manage validated domains and maintain control over domain usage across the enterprise environment.
To add and verify a new domain, expand Settings > Domains from the Enterprise left-tree menu. The system will display the ‘Domain Configurations’ listing screen.
Click the ‘+’ button present in the grid header to add a new domain. The ‘Basic Information’ screen will appear.
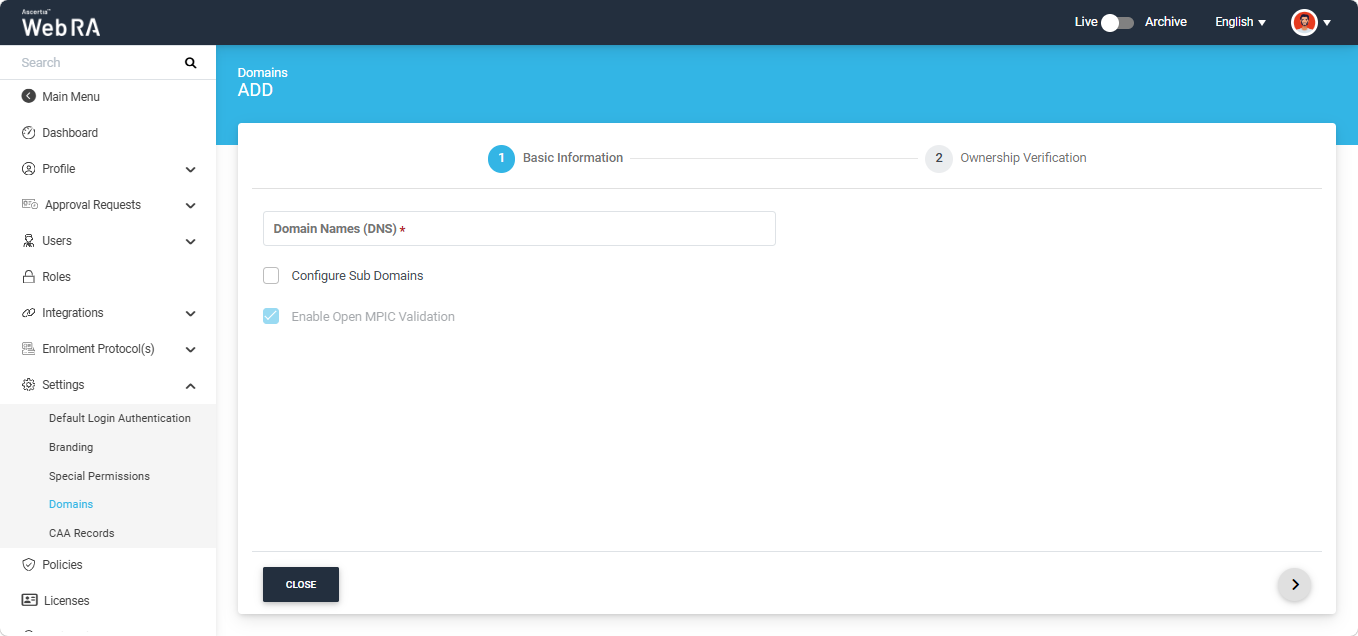
Enter the new domain you want to add and verify in the ‘Domain Names (DNS)’ field.
To add sub domains associated with the pre-configured main domain, enable the ‘Configure Sub Domains’ checkbox. The system will display the ‘Domain Names (DNS)’ field under the checkbox.
Enter one or more sub domains in this field as per your requirement.
Note: The configuration for Open MPIC validation is managed through the global policy settings. The 'Enable Open MPIC Validation' checkbox is displayed in read-only mode on this screen when the 'Open MPIC Connector' is selected in Configurations > Policies > Requests section.
After entering the domains and making the required selection, click the ‘>’ button to proceed to the ‘Ownership Verification’ screen.
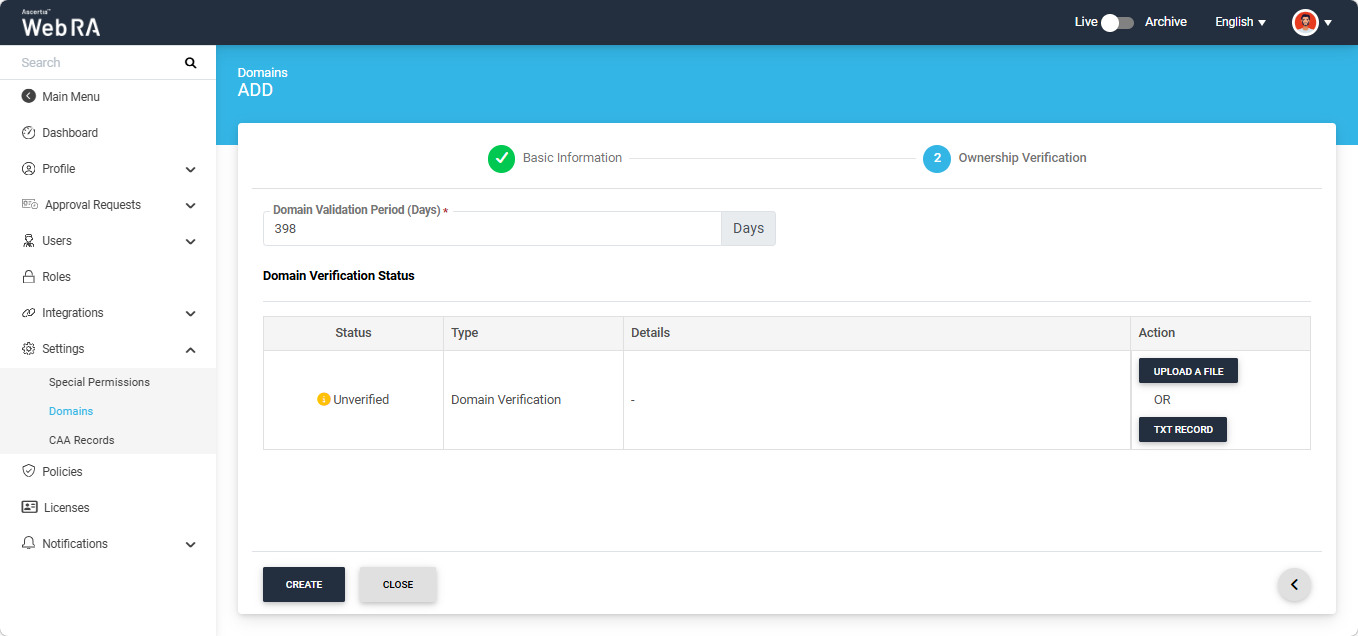
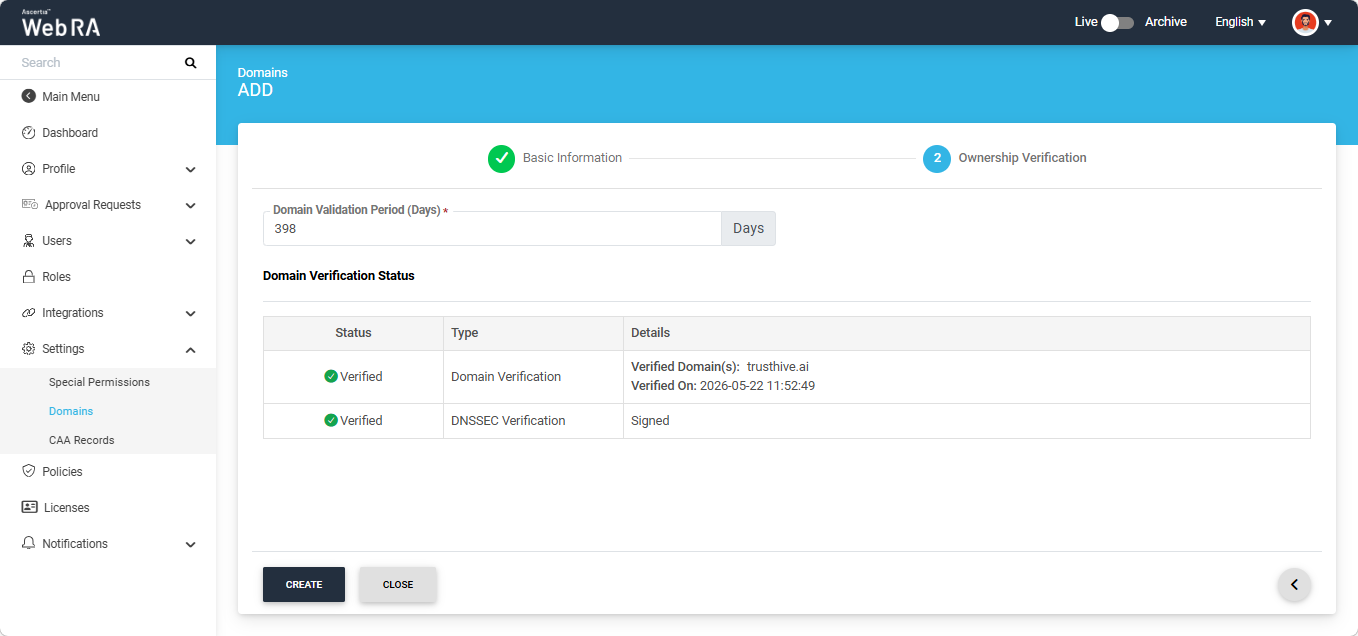
Domain Validation Period (Days)
In this field, you can define the validity period of the domain being verified. The configured validity period applies to both domains and subdomains validated within the system. The default value is 398 days and the configured value must not exceed 398 number.
Note: If you set the domain validity period to 0 days, the user will be required to verify the domain each time a certificate request is generated.
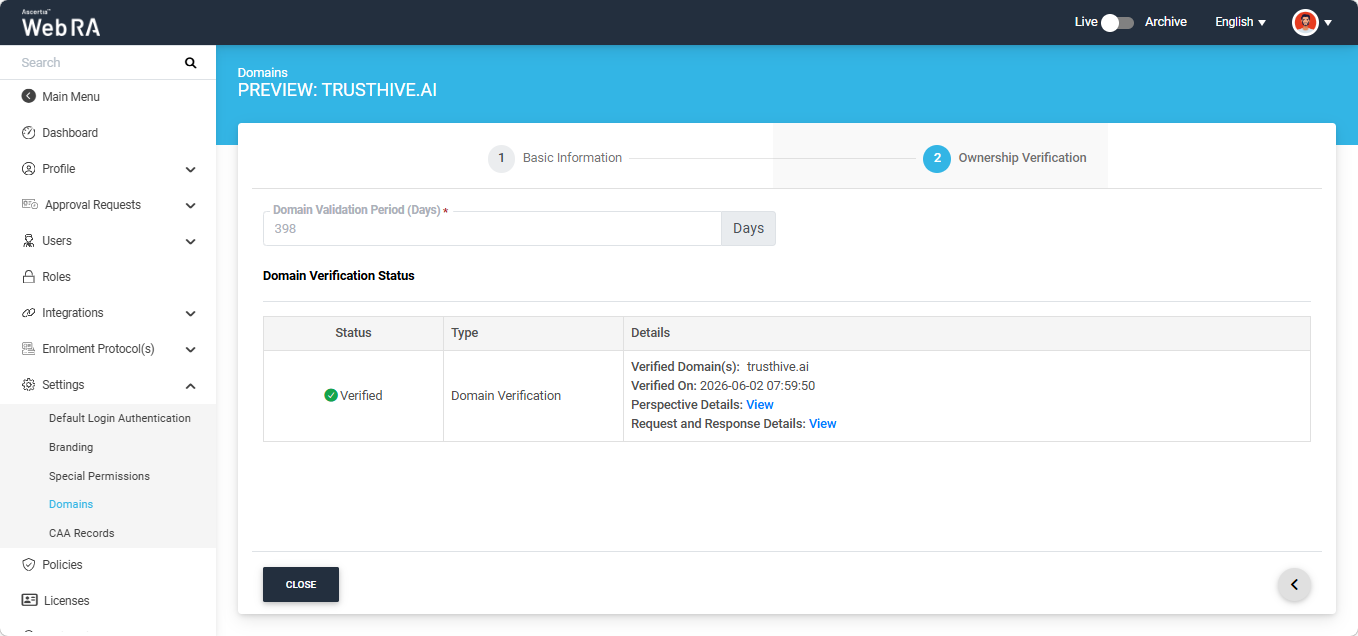
Domain Verification Status
The ‘Domain Verification Status’ will appear as ‘Unverified’. To verify the status, you will be required to either Upload a file or add a TXT Record.
Upload a File
Click the ‘Upload a File’ button. The system will display the ‘Upload a File’ dialog, which contains instructions on how to verify the domain using this method.

TXT Record
Click the ‘TXT Record’ button. The system will display the ‘TXT Record’ dialog, which contains instructions on how to verify the domain using this method.
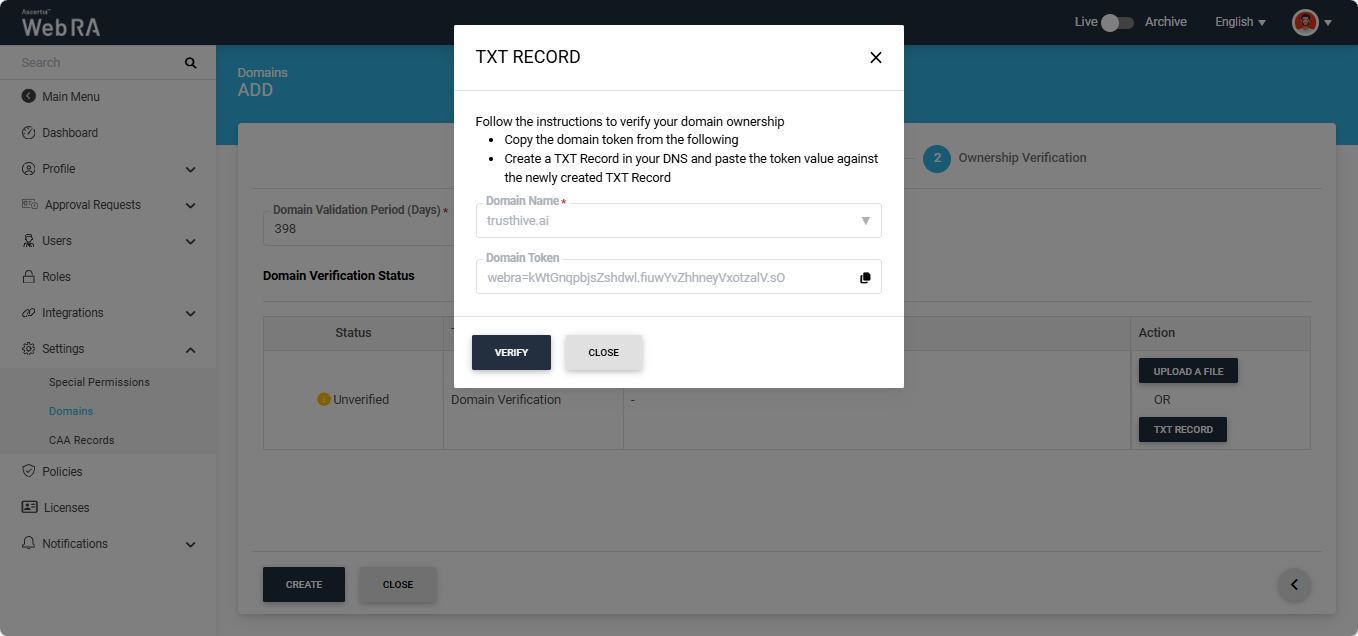
After selecting the required method from the two mentioned above, click the 'Verify' button. If all steps are completed correctly, the ‘Verified’ status will appear for the entered domain.
Note: If DNSSEC is enabled and configured for the domain, the system also validates the domain’s DNSSEC signature during the domain verification. If the signature is valid and the domain verification is successful, the system displays a ‘Verified’ status for DNSSEC verification.
Meanwhile, if 'Open MPIC' is enabled in the global policy settings, Open MPIC will perform domain validation. The domain will be verified by the Open MPIC perspectives, if the domain verification meets the minimum quorum count specified in the Open MPIC connector, the domain will verified and the operator will be able to add the domain in the Enterprise. For more details about Open MPIC connector, refer to the Connectors section.
After Open MPIC verification, the information in the 'Details' column will appear as shown in the image below:
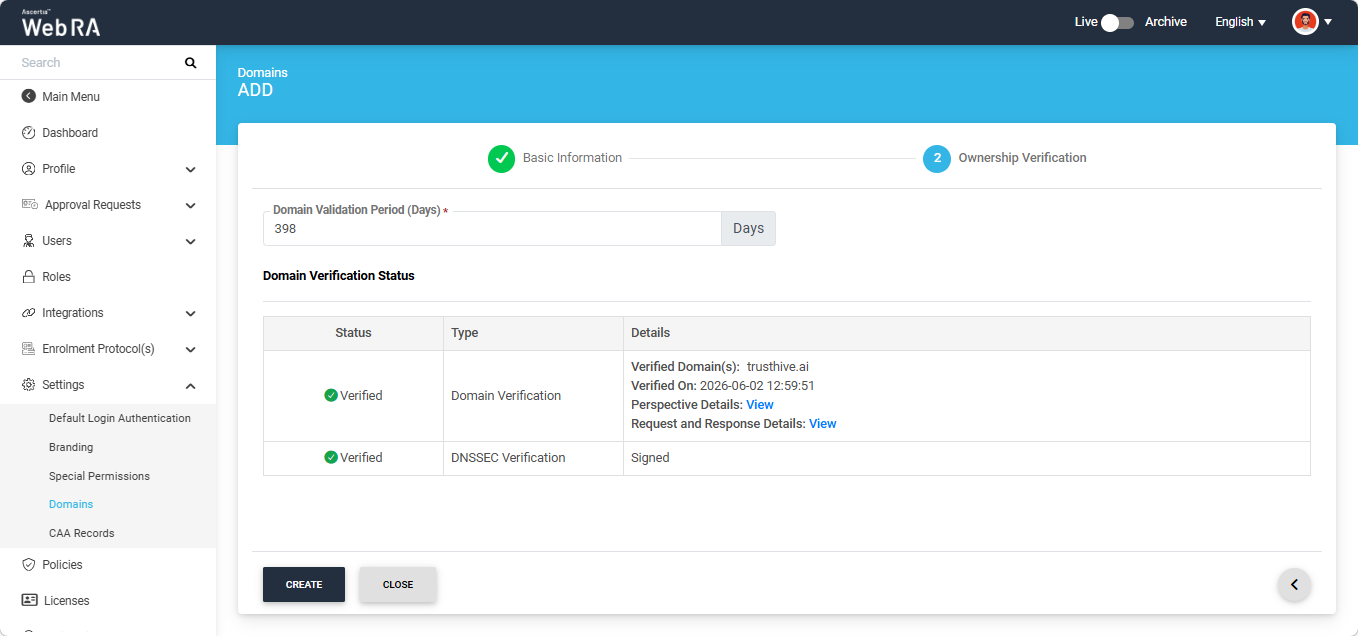
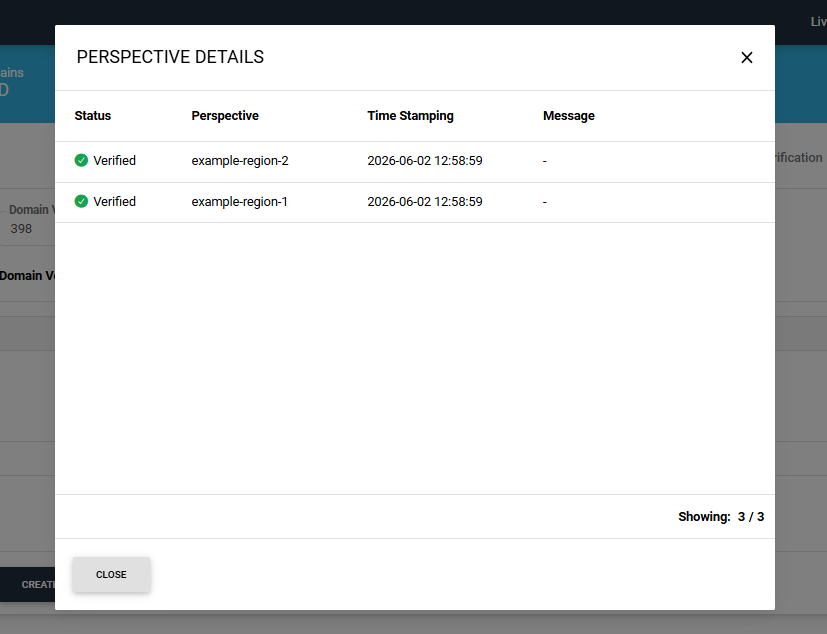
To view the Open MPIC perspective details, click the ‘View’ button next to 'Perspective Details' text. The system will display the ‘Perspective Details’ dialog on the screen.
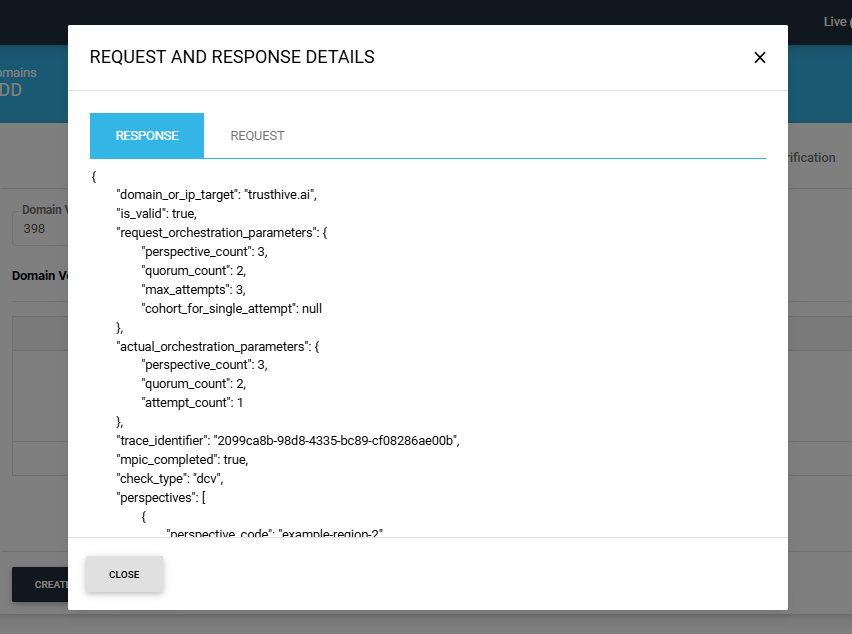
To view the Request and Response details, click the 'View' button. The system will display the 'Request and Reponse Details' dialog.
You can view both Request and Response details from their respective tabs.
After the verification is complete, click the ‘Create’ button to add the validated domain in the saved Enterprise domain listing.
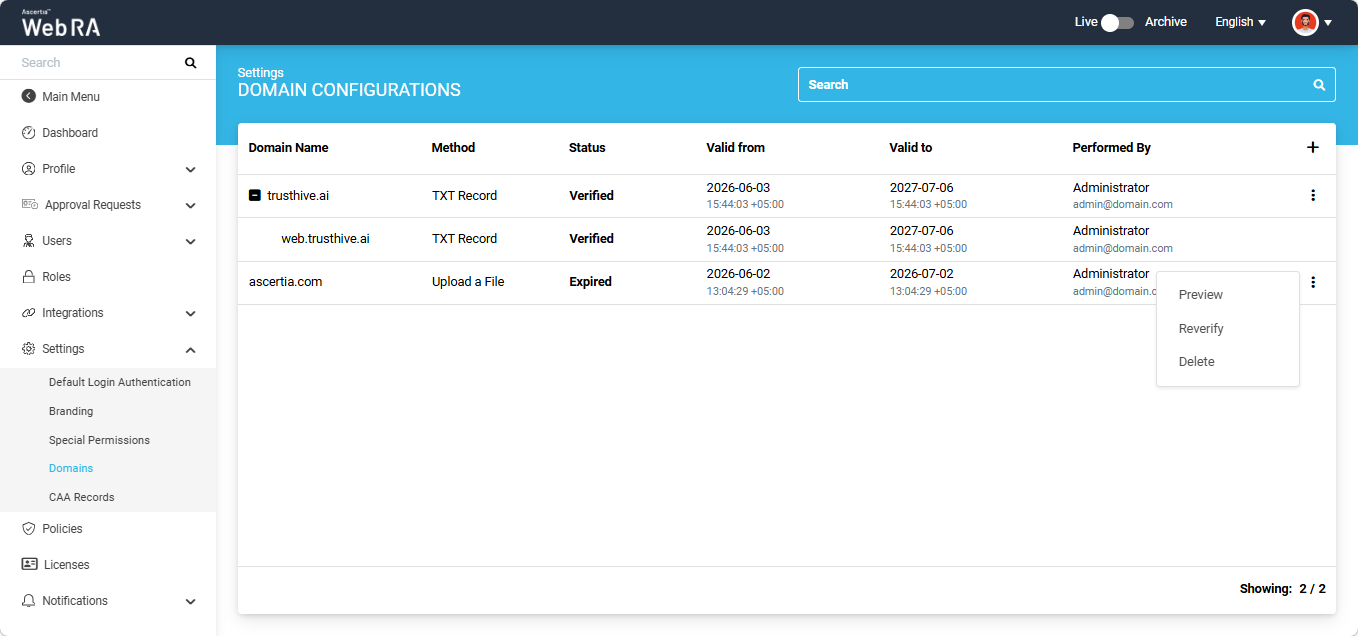
The domain with its configured sub domain (if added) will appear in the listing screen as shown in the image below.
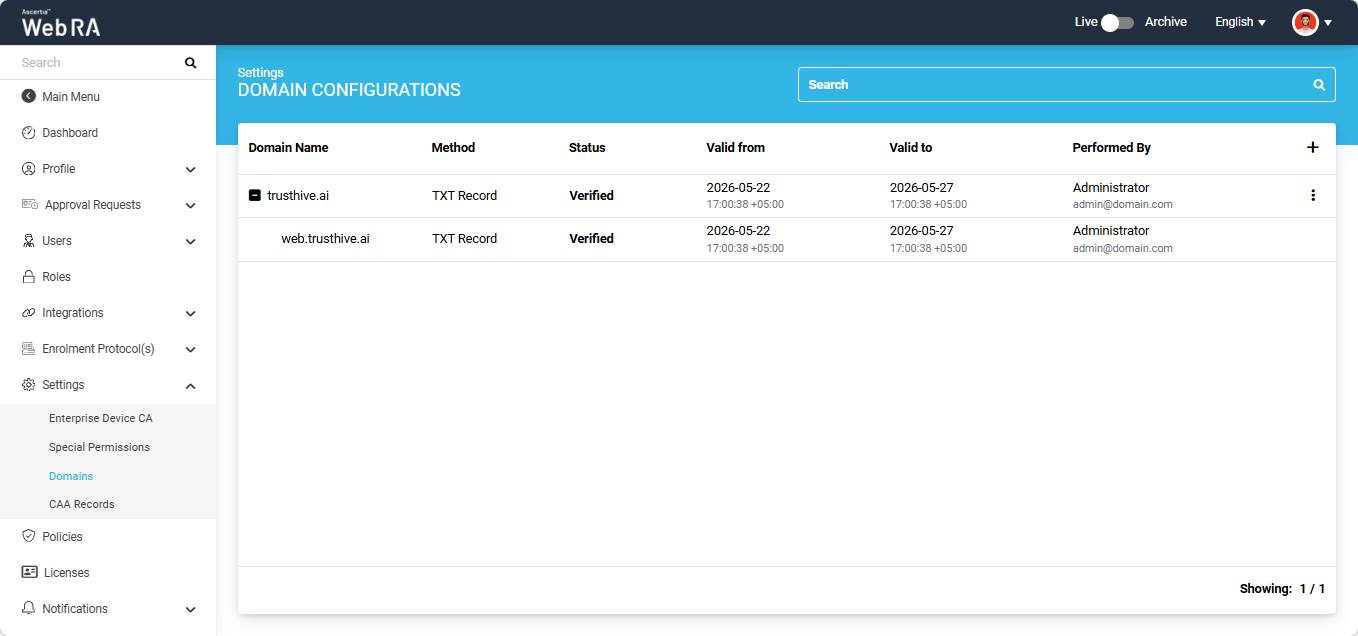
Note:
If a user adds and validates a new domain during certificate request creation, the Performed By column displays the name of the user against that domain.
Alternatively, if an administrator validates a new domain and generates a certificate for a user from the Admin portal after enabling the Generate a Certificate on Behalf of the User checkbox, the Performed By column displays the administrator's name.
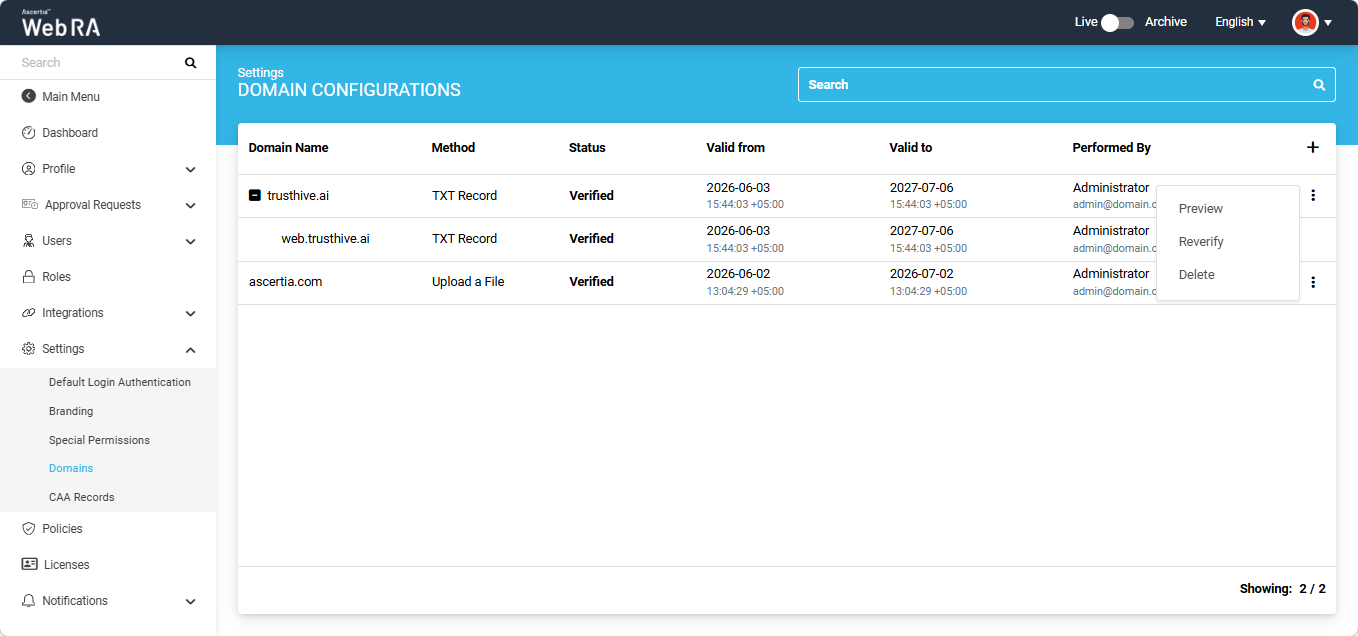
Click the three-dots  icon next to any domain entry to perform the following actions:
Expand Settings > Domains module from the Enterprise left-tree menu.
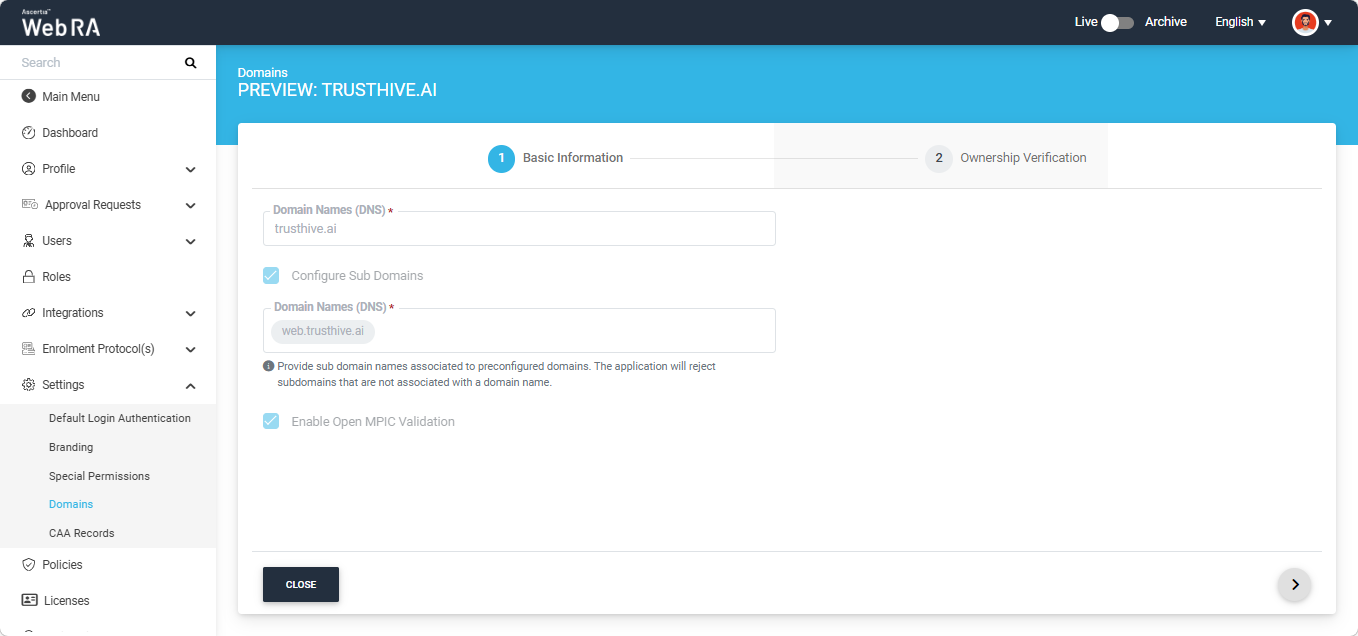
To review the details of a saved domain, select the 'Preview' option after clicking the three-dots icon next to that domain entry.
The system will open the 'Basic Information' screen. The information fields in the Preview mode will appear disabled.
If the domain is validated through Open Mpic, you can view the verification related details by clicking the respective 'View' button in the 'Ownership Verification' section.
You can reverify an expired domain or any domain saved in the Enterprise domain settings.
Expand Settings > Domains module from the Enterprise left-tree menu. To reverify a domain, select the 'Reverify' option after clicking the three-dots icon next to that domain entry.
The system will open the 'Basic Information' screen.
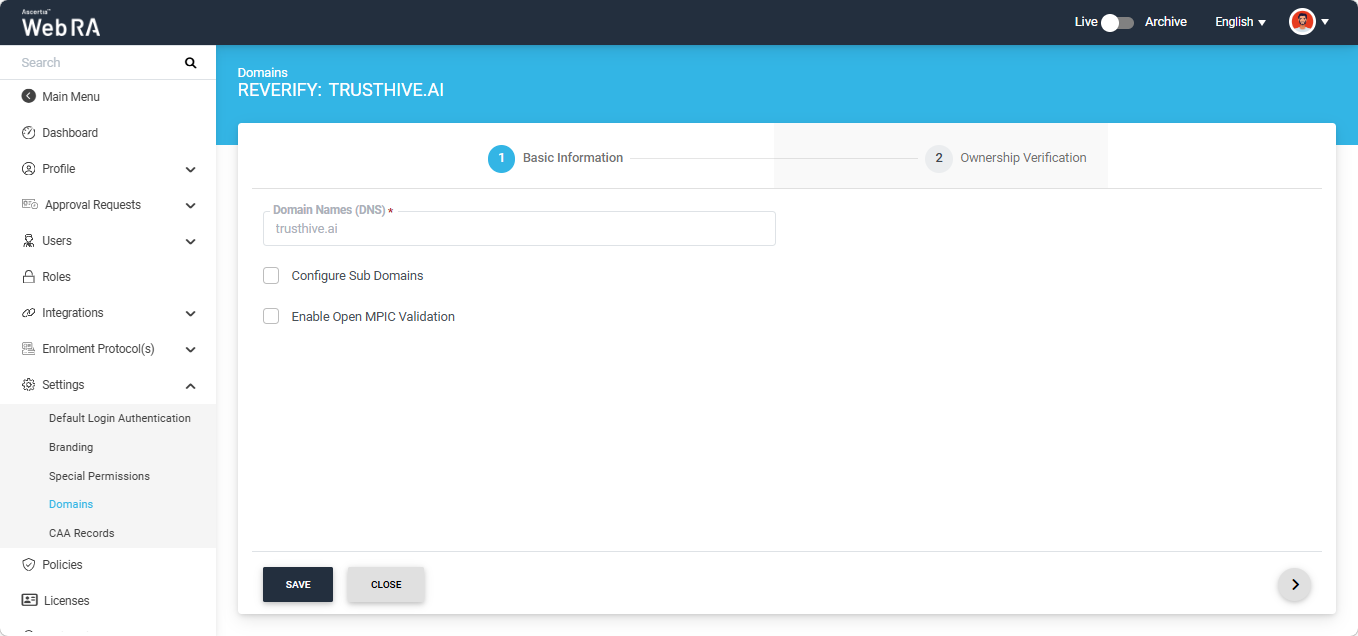
You can configure sub domains by enabling the 'Configure Sub Domains' checkbox entering the sub domains in the 'Domain Names' text box.
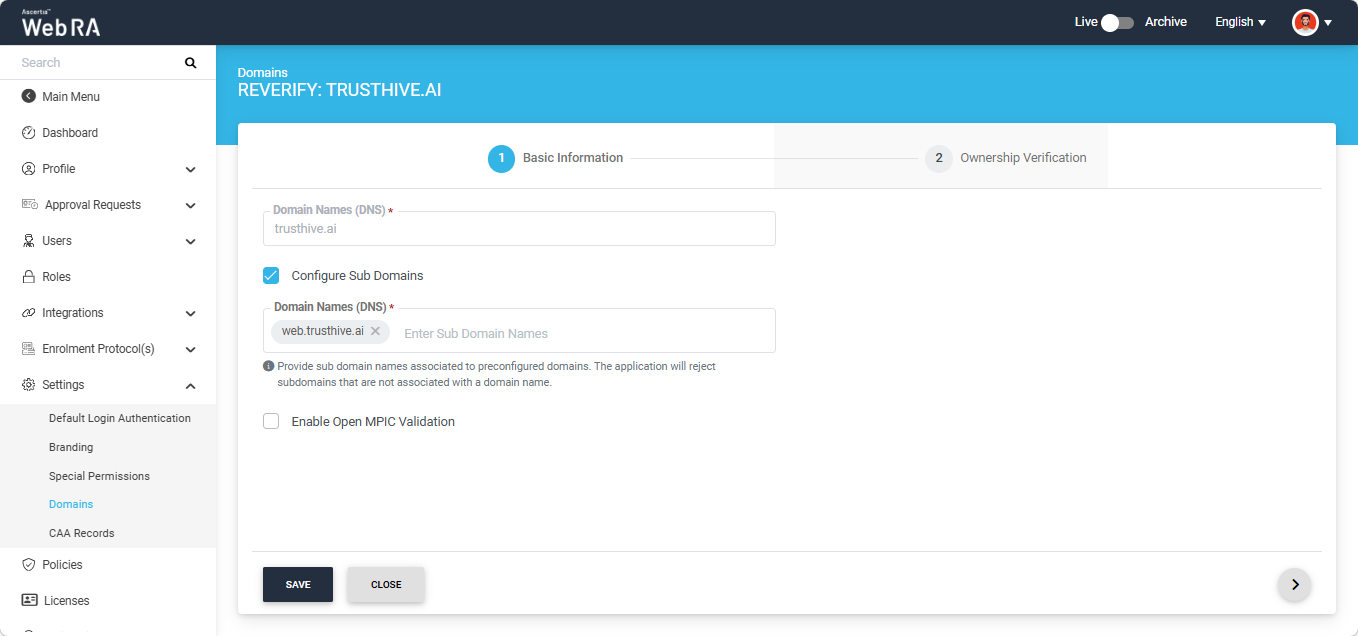
You can also enable Open MPIC validation if you want the domain to be verified through Open MPIC perspectives.
Note: The 'Configure Sub Domains' and 'Enable Open MPIC Validation' checkboxes will be pre-selected if they were enabled when the domain was verified for the first time.
After making the required selections, click the next button to navigate to the 'Ownership Verification' screen to reverify the domain.
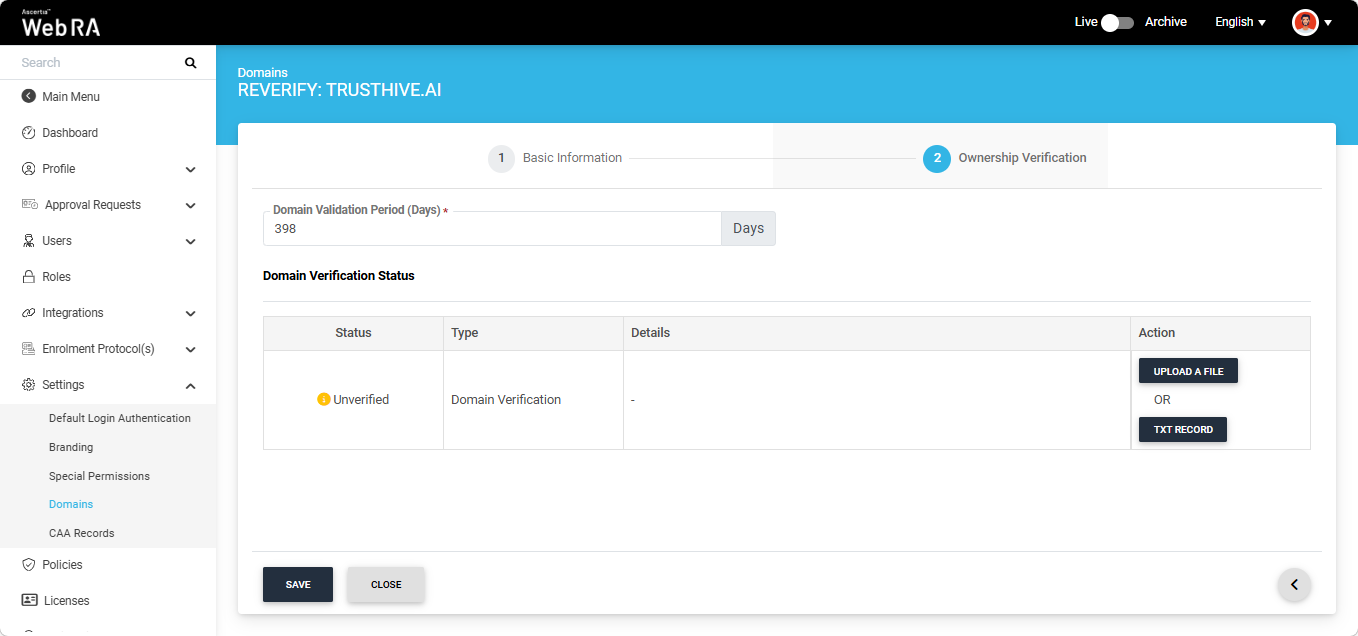
Domain Validation Period (Days)
In this field, you can define the validity period of the domain being reverified. The configured validity period applies to both domains and subdomains validated within the system. The default value is 398 days and the configured value must not exceed 398 number.
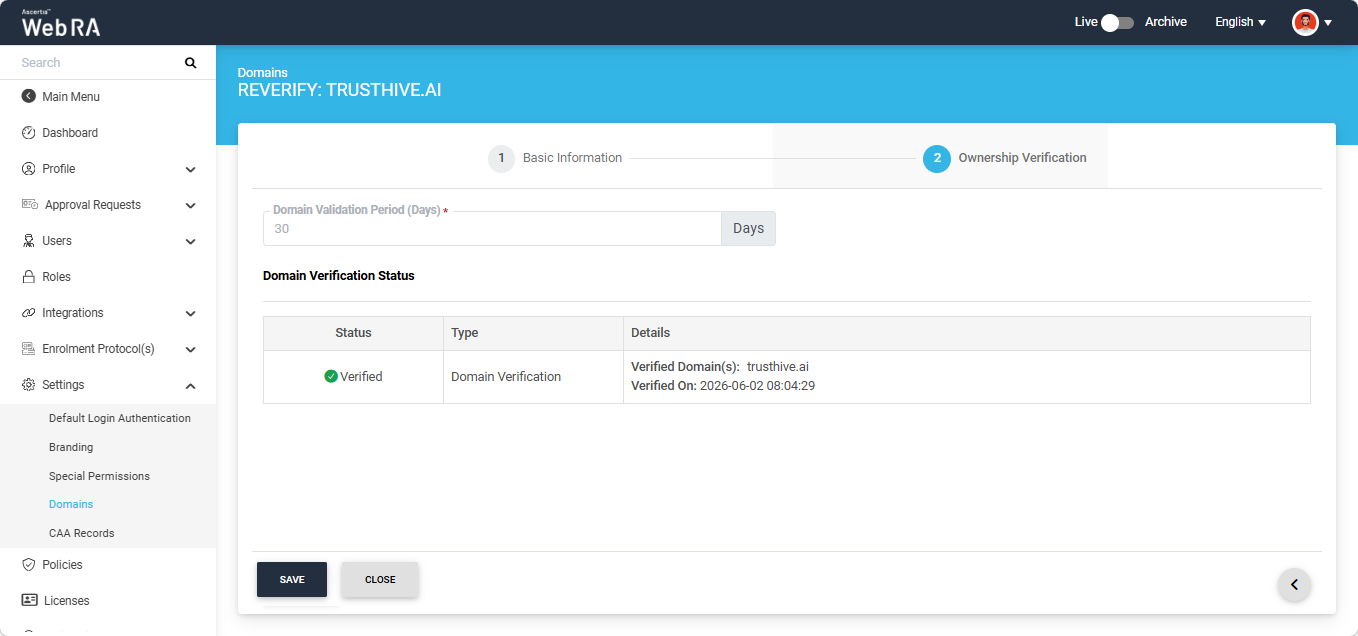
Domain Verification Status
The ‘Domain Verification Status’ will appear as ‘Unverified’. To reverify the domain, you will be required to either Upload a file or add a TXT Record.
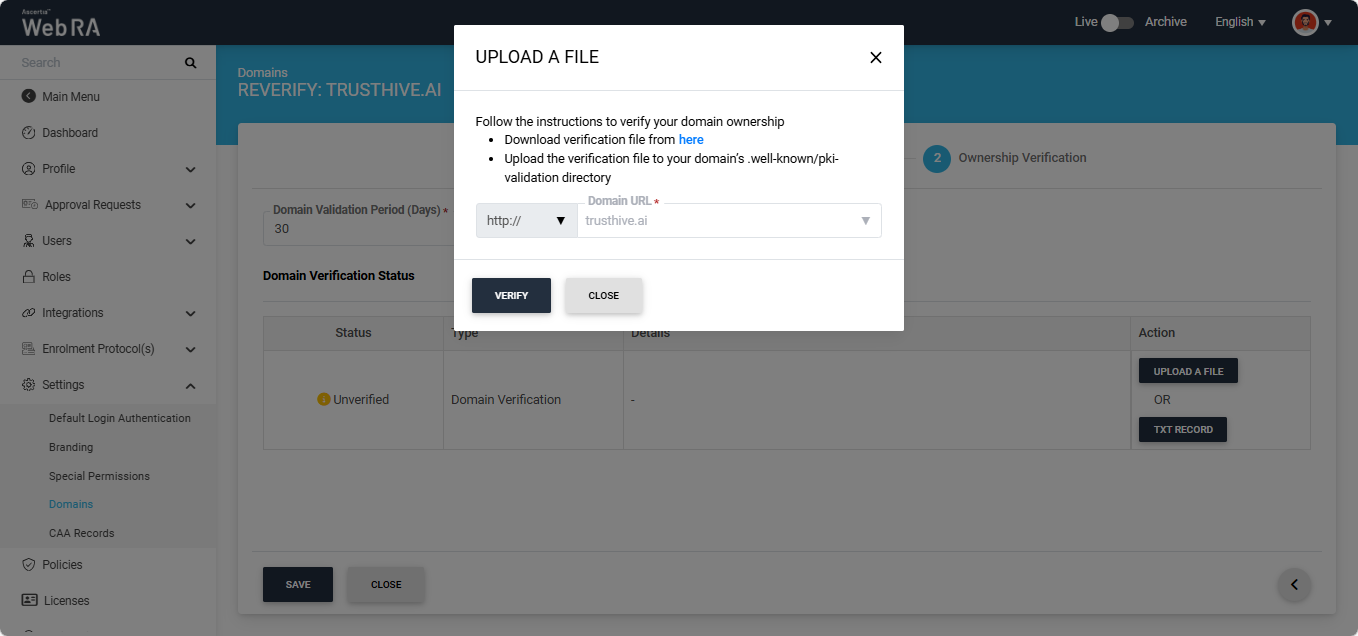
Upload a File
Click the ‘Upload a File’ button. The system will display the ‘Upload a File’ dialog, which contains instructions on how to verify the domain using this method.
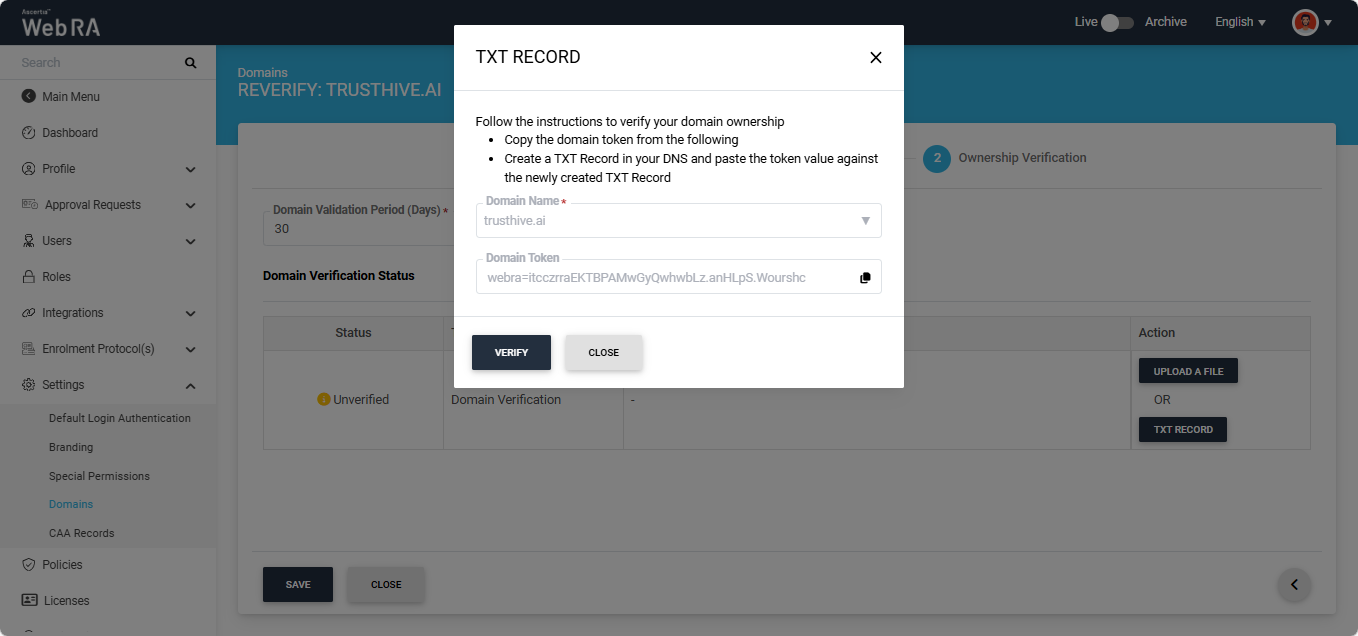
TXT Record
Click the ‘TXT Record’ button. The system will display the ‘TXT Record’ dialog, which contains instructions on how to verify the domain using this method.
After selecting the required method from the two mentioned above, click the 'Verify' button. If all steps are completed correctly, the ‘Verified’ status will appear for the entered domain.
If the domain is validated through Open MPIC, the information in the 'Details' column will appear as shown in the image below:
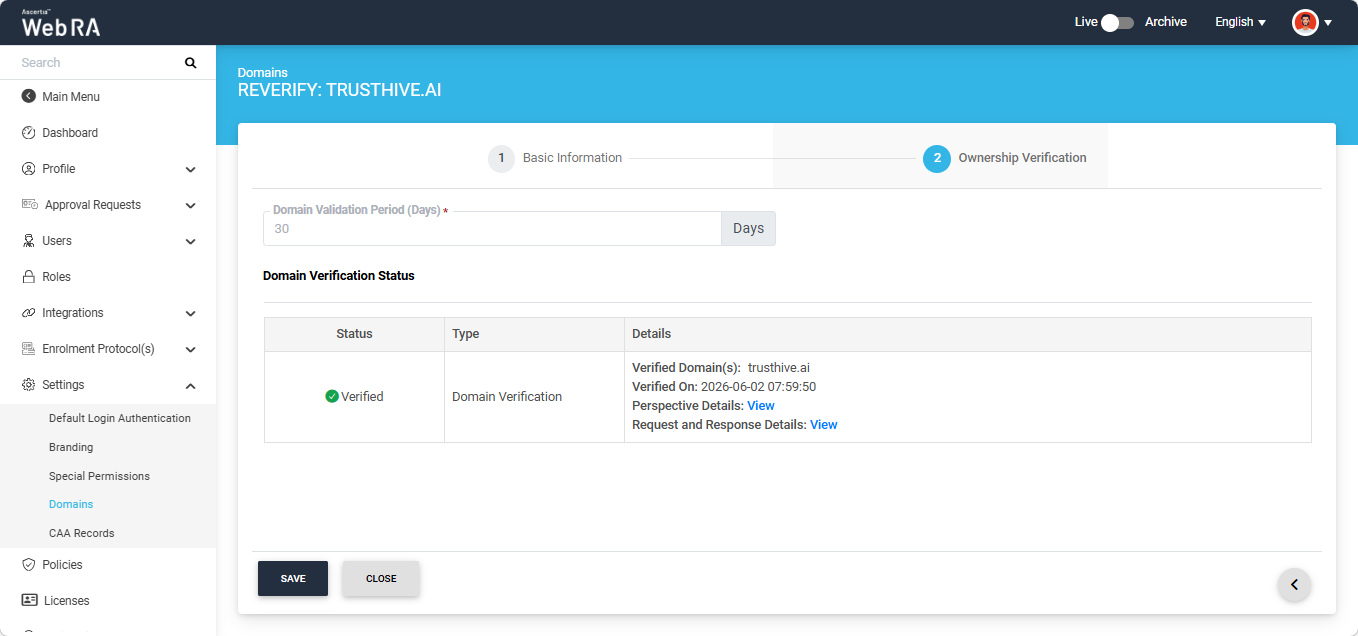
You can view the 'Perspective Details' and 'Request and Response Details' by clicking the respective 'View' button.
Expand Settings > Domains module from the Enterprise left-tree menu.
To delete a saved domain, select the 'Delete' option after clicking the three-dots icon next to that domain entry.

The system will display a confirmation dialog on the screen. Select 'Yes' to proceed with the domain deletion.