Creating a Certification Profile
This step defines how to create a Certification profile for Identity Certificates. A certification profile is a set of parameters configured within the ADSS Certification Service which define characteristics of the keys (e.g. which public key algorithm and key length to be used) and the attributes of the digital certificates (e.g. subject DName details and the validity periods for the certificate) generated by the service using this profile. The advantage of configuring a certificate profile on ADSS Server is that client applications do not need to pass all these parameters within each service request message, but can simply refer to a particular configured certification profile. Certification Profiles can also be used to tightly control what can be defined within a certificate and thus enforce CA Certificate Policies. ADSS Server allows the flexibility to override the profile attributes if specifically allowed within the profile settings.
To manage Certification Profiles navigate to the following location in ADSS Server Console:
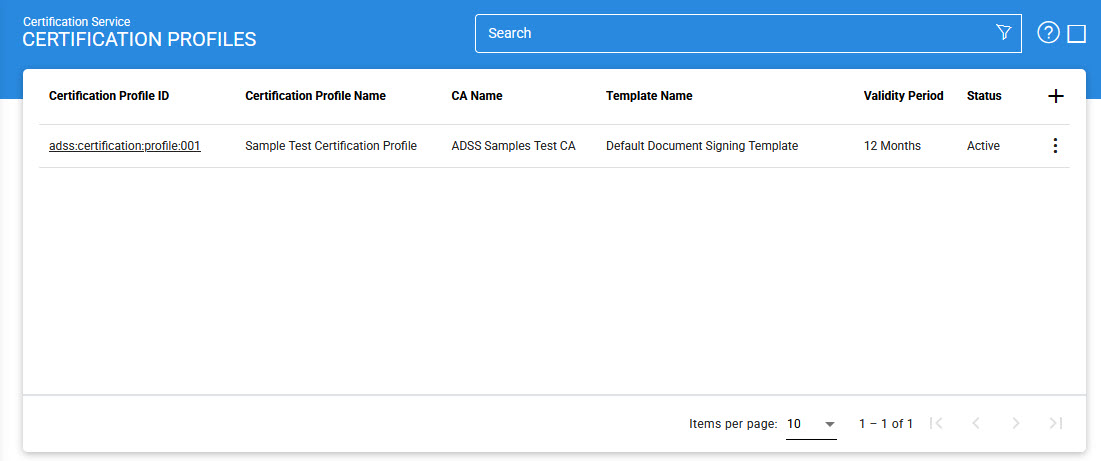
This table shows the list of existing certification profiles. These can be edited or deleted.
To create a new profile, click the '+' button, this will present the following form:
Profile Identification
The first step is to define the identification details of Certification Profile. The user need to fill the below fields with the appropriate information:
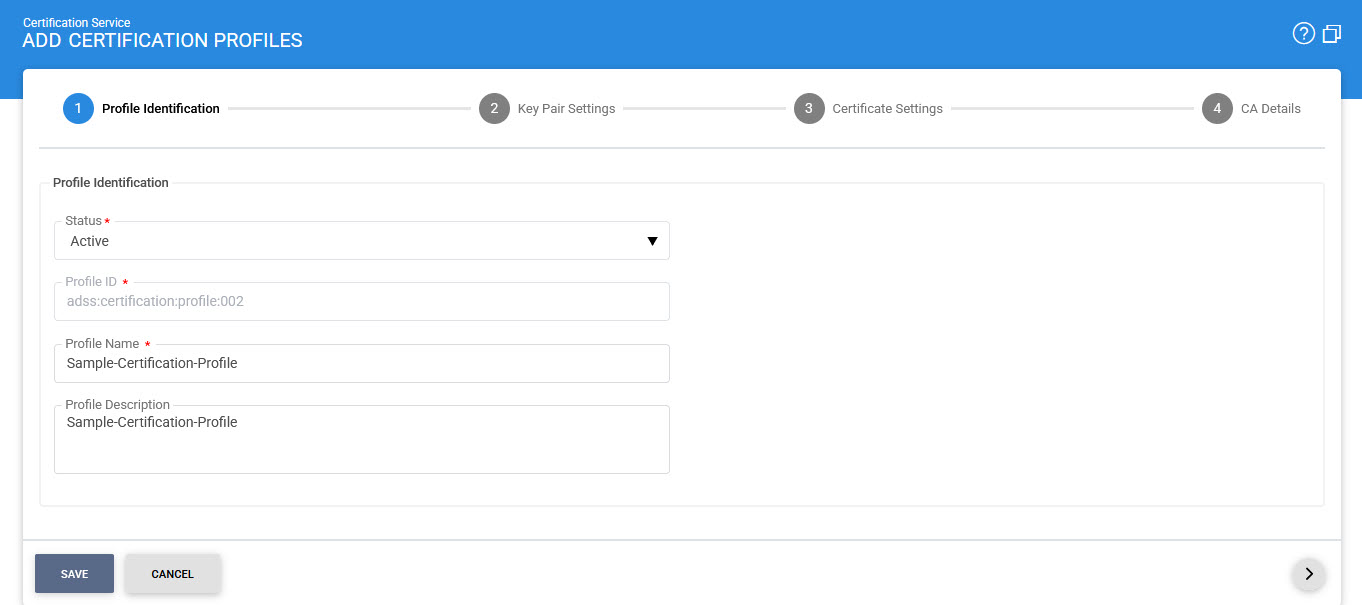
The configuration items are as follows:
|
Items |
Description |
|
Status |
A certification profile may be marked Active or Inactive. Note an inactive certification profile will not be used to process certification requests. |
|
Profile ID |
A system-defined unique identifier for this profile. This must be referenced in certification service requests if this certification profile is to be used by the client application. |
|
Profile Name |
An user-defined unique name for easier human recognition within the ADSS user Console. This could be referenced instead of Profile ID in certification service requests if this certification profile is to be used by the client application |
|
Profile Description |
This can be used to describe the certification profile in more detail (e.g. in which circumstances this certification profile will be used and/or what sort of setting the certification profile holds etc). This is for information purposes only. |
Key Pair Settings
The second step is to enable the required key pair settings in Certification Profile. See the below image:
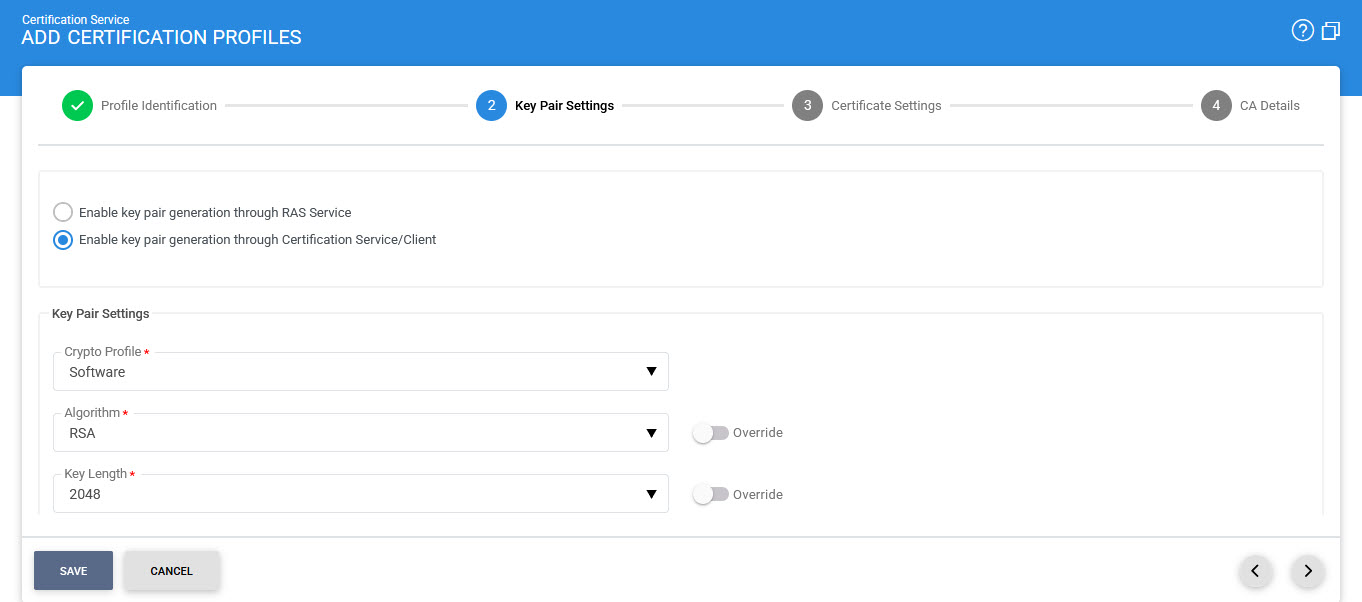
The configuration items are as follows:
|
Items |
Description |
||
|
Enable key pair generation through RAS Service |
If this radio button is enabled, the key pair will be generated via ADSS RAS Service. |
||
|
Enable key pair generation through Certification Service/Client |
If this radio button is enabled, the key pair will be generated via ADSS Certification Service and below fields will be displayed. |
||
|
Crypto Profile |
Select whether to generate and store the key/certificate within the ADSS Server database (software mode), Azure Key Vault or to store the key/certificate on a hardware security module (HSM) preconfigured within ADSS Server Key Manager as described in the section Crypto Processor Settings.
|
||
|
Algorithm |
Select the Key Algorithm that should be use to generate the end entity key under this certification profile, Currently following key algorithm are supported:
Note:
|
||
|
Key Length |
Select the Key Length that ADSS Server should generate under this certification profile.
Note:
|
||
|
Security Level |
The Security Level drop-down will be available when either ML-DSA or ML-KEM is selected in the 'Algorithm' field. This drop-down allows the user to choose the security level for the selected key algorithm. The security levels for both ML-DSA and ML-KEM are defined below:
|
Other than a generic Certification Profile, user can also configure a Certification Profile that will be used for key pair generation through RAS Service of the ADSS Server. In such configuration, this profile will be accessed by RA Service for certificate enrolment of a registered user. Certification Service interacts with the RAS Service by making two calls, key pair and CSR generation. The details about its configurations are given below.
If user enabled the checkbox Enable key pair generation through RAS Service then following screen will be shown:
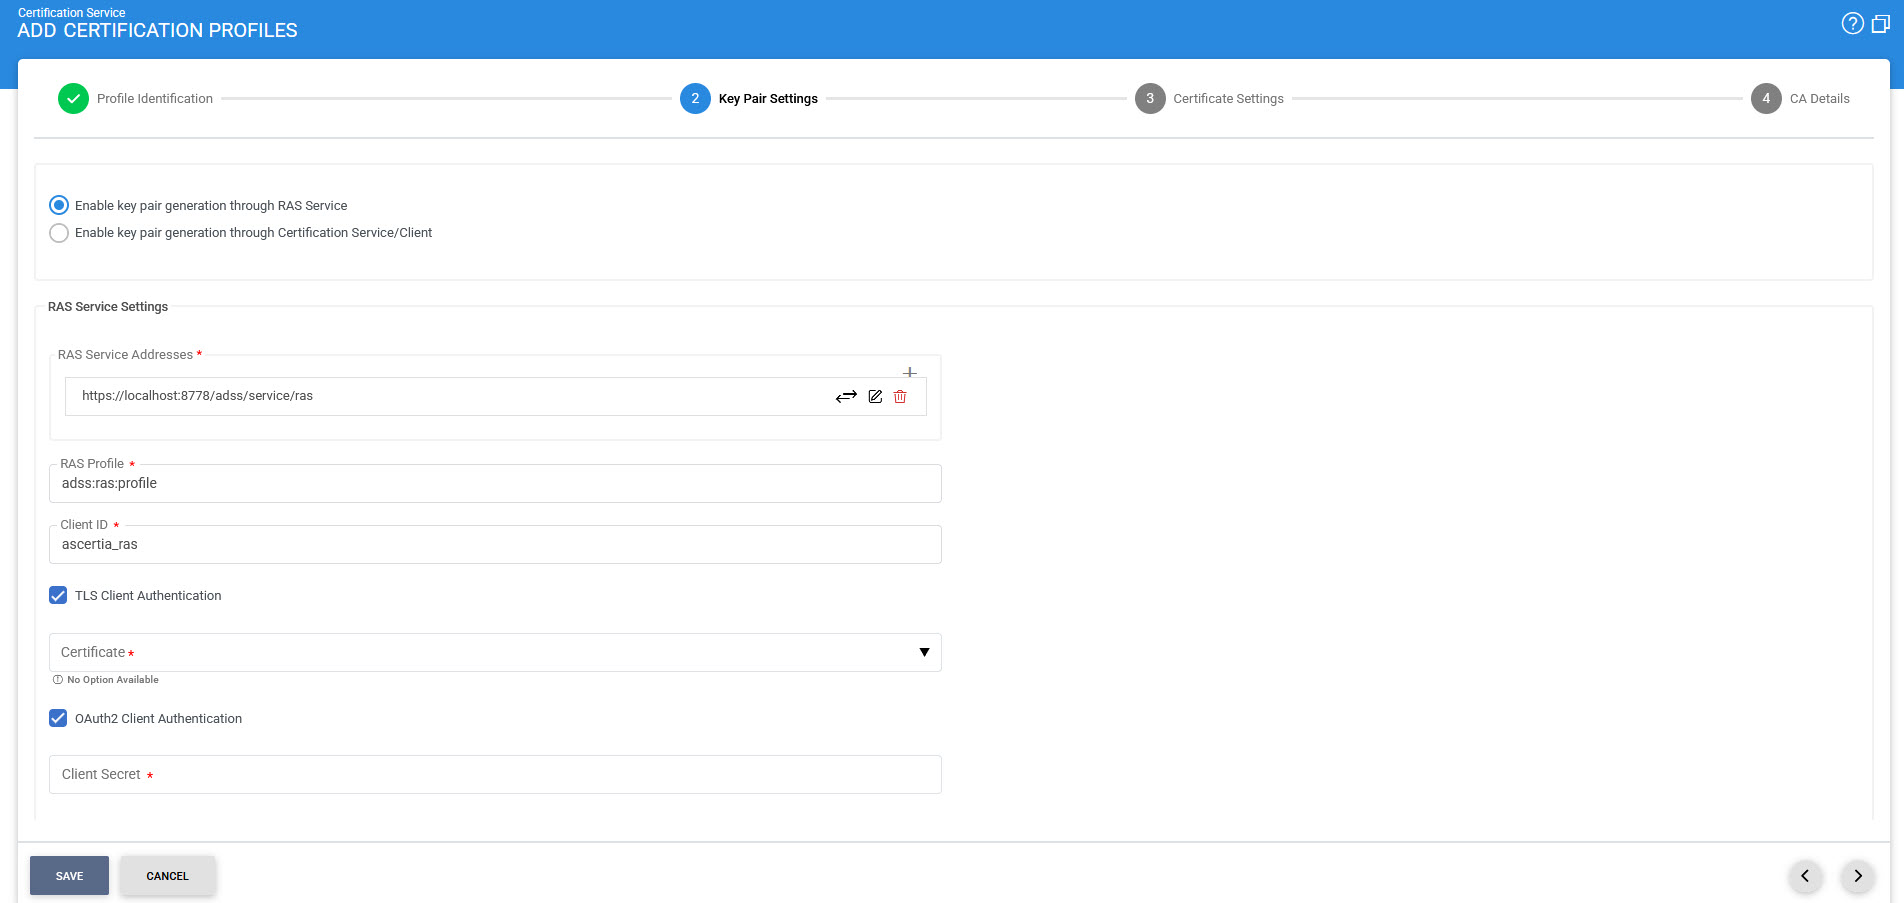
The configuration items are as follows:
|
Items |
Description |
||
|
RAS Service Address |
Use this field to add RAS service address(es). User can enter the address in the field and then press ADD button to include the address in list of RAS Service addresses. |
||
|
List of RAS Service Addresses |
This field shows the available RAS service address(es) use for key generation in ADSS SAM. Multiple service addresses can be added to handle the Primary and Secondary service addresses as a fallback mechanism. The Test button checks that the ADSS RAS Server is available. The Remove button deletes a configured RAS Service address |
||
|
RAS Profile |
Specify the RAS profile Name/ID to be used with this certification profile. |
||
|
Client ID |
Define the client ID for this ADSS Certification profile to be included in the request message when communicating with the ADSS RAS Service for keypair generation inside ADSS SAM. This client ID needs to be registered within the ADSS Client Manager module. |
||
|
Use TLS Client Authentication |
After enabling this option, ADSS Certification Service will communicate with the ADSS RAS Service over TLS Client Authentication, select the TLS Client Certificate which pre-exists in the Key Manager. User can select the certificate from the list of available certificates by clicking on drop-down appears when it is enabled. |
||
|
OAuth2 Client Authentication |
Enabling this checkbox ensures that the RAS APIs are authenticated by the Certification Service through OAuth2 Authentication. In this setup, the RAS Service provides an access token, which the Certification Service can use for subsequent communications. |
||
|
Client Secret |
This field becomes available only when OAuth2 Client Authentication is enabled. It allows the user to enter the Client Secret that was generated for the configured Client during registration.
|
Certificate Settings
The third step is to configure the Certificate Settings for Certification Profile. See the below image:
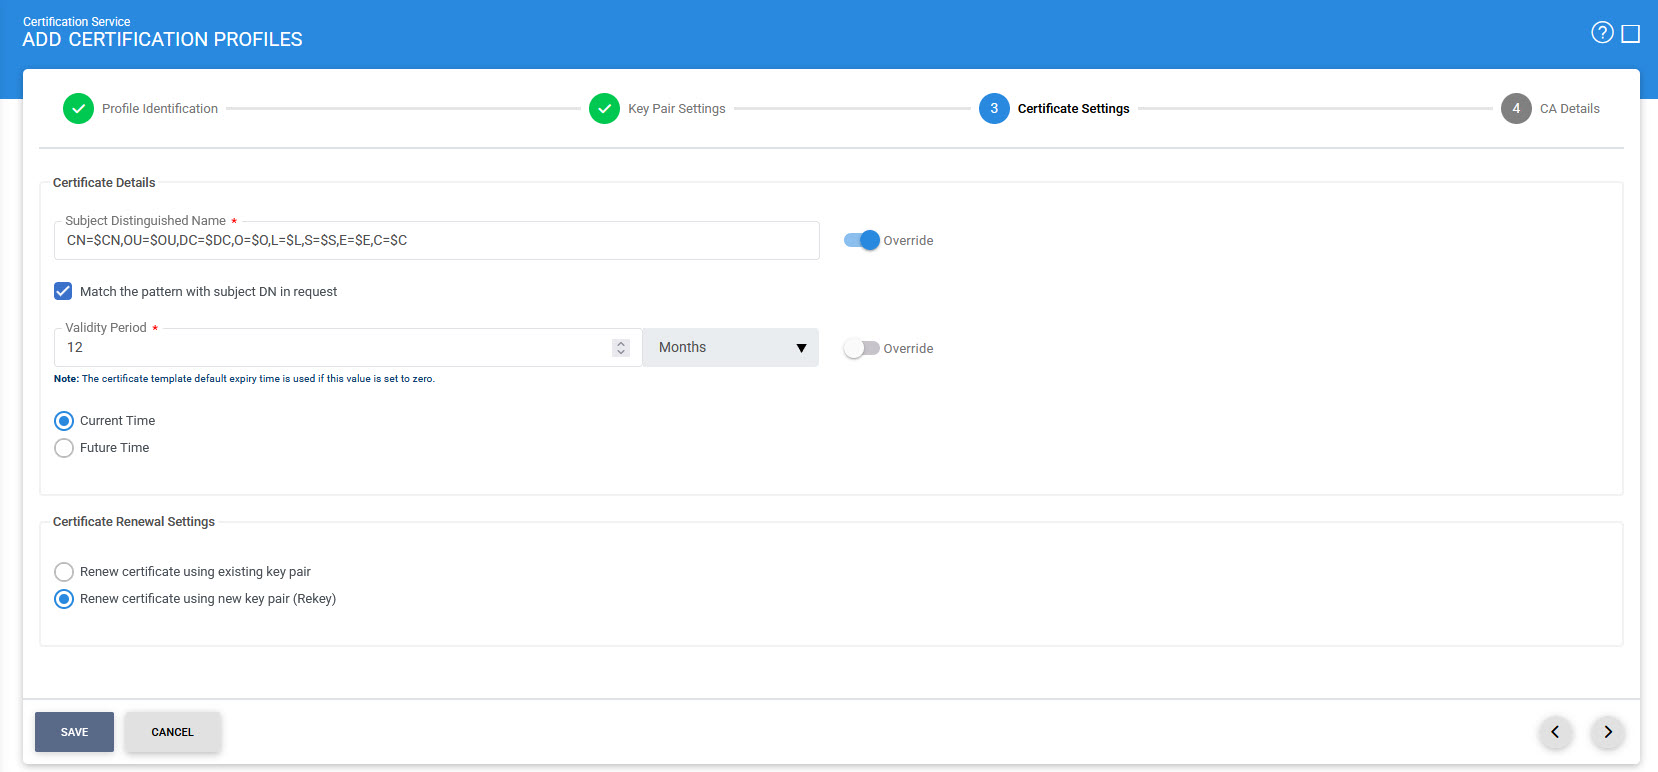
The configuration items are as follows:
|
Items |
Description |
||||||||
|
Subject Distinguished Name |
This item describes the default attributes and values to be used for Subject Distinguished Name(DName) during certificate generation. ADSS Certification service provides a flexible format for specifying the DName. Possible values are:
The full Subject Distinguished Name can be provided to the certification service: (a) In the certificate request message (b) OR in the PKCS#10 / CSR data (c) OR via both certificate request messages and PKCS#10 / CSR data. To configure the DN structure correctly follow these rules:
|
||||||||
|
Match the pattern with subject DN in request |
Select this option if you want to generate certificates using the exact RDN pattern defined in the certification profile. If this option is enabled and the RDN pattern is not matched in the certificate request data or PKCS#10/CSR then the request will be rejected. |
||||||||
|
Validity Period |
Set the validity period and select the time unit from the drop-down (minute(s), hour(s), day(s), month(s) and year(s)) to set the certificate validity period. |
||||||||
|
Current Time |
Select this option if you want to issue the certificates whose "Valid From" is from the date of issuance. |
||||||||
|
Future Time |
Select this option if you want to issue the certificates whose "Valid From" is in future e.g. you issue a certificate whose "Valid From" is two days onward from the date of issuance then you can set the value 2 in "After Days" field. You also need to set the "Valid From" time in the "Valid From" field. Use the time control to set the time. Time format is HH:MM AM/PM. |
||||||||
|
Renew certificate using existing key pair |
Select this option when certificate renewal is required using existing key pair. |
||||||||
|
Renew certificate using new key pair (Rekey) |
Select this option when certificate renewal is required using new key pair |
CA Details
The last step is to define the CA Details for Certification Profile. See the below image:
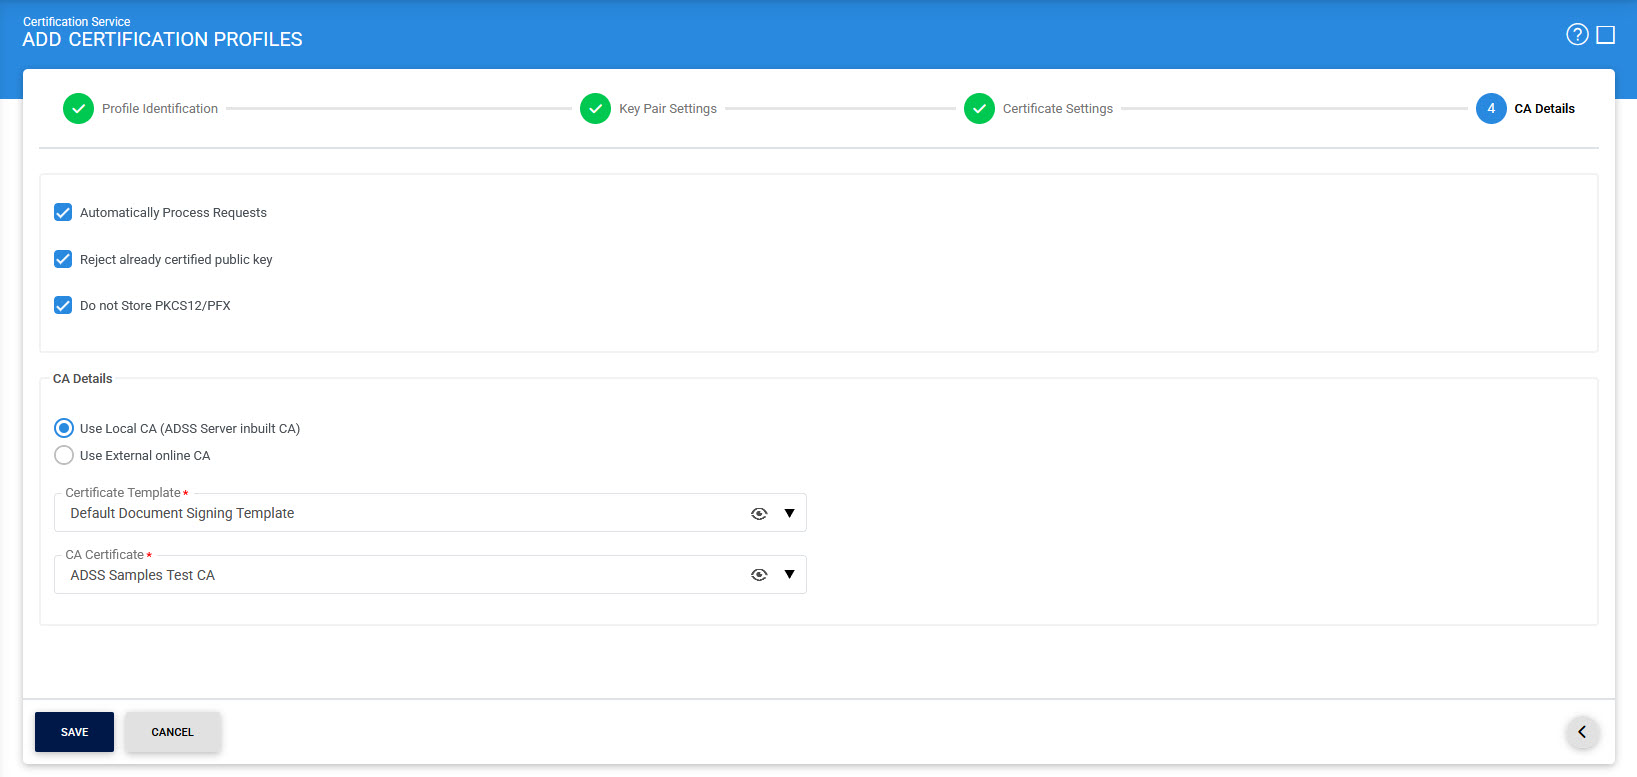
The configuration items are as follows:
|
Items |
Description |
||
|
Automatically process requests |
Unselect this option if you want to generate certificates in asynchronous mode i.e. CSR is generated and shown in Pending. ADSS Server admin can certify this CSR:
|
||
|
Reject already certified public key |
If this checkbox is enabled, the ADSS Server will check the public key in the database. If the public key is already certified, the ADSS Server will not allow to certify the public key again, whether it is present in the CSR or individually sent in a certification request in the case of a create or rekey request. |
||
|
Do not store PKCS12/PFX |
This option controls whether the PKCS#12 (PFX) file generated during certificate issuance is stored in the system database. When disabled (default setting), the ADSS Certification Service will store the generated PKCS#12 file, containing the private key and certificate, as well as the associated encryption password. This allows the system to retain the PFX file for future access or backup. When enabled, the system will not retain the PKCS#12 file or its password after the certificate is issued. This ensures that the file is delivered once and then discarded, hence aligning with enterprise security policies or Trust Service Provider (TSP) requirements. |
||
|
Use Local CA |
This checkbox is selected by default. Select this radio button, if the internal ADSS Manage CAs module to be used, will enable the following configuration:
CA Certificate |
||
|
External CA |
Select this radio button to use an External online CA that is configured to service the certification requests from the ADSS Certification Service. The ADSS Certification Service will send PKCS#10 certificate request messages as well as public keys to this External CA.
|
The list of existing certification profiles can be sorted in either ascending or descending order by selecting a table column from the drop down list.
Clicking on the Advance Search button on the Certification Profile main page will display following screen:
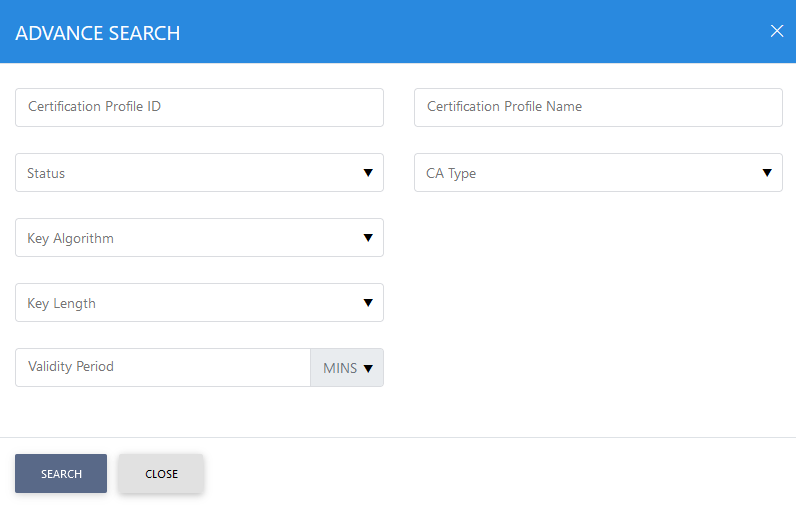
This helps to locate a particular type of certification profile generated in the Certification Service. The profile can be searched based on Status, Certificate Profile ID, Certificate Profile Name, CA Type, Key Algorithm, Key Length, Security Level and Validity Period. The Security Level field will only be available if ML-DSA or ML-KEM is selected in the Algorithm field.
|
|
The Copied profile will be created without the "Name" and "Description" of the selected Profile. The Unique ID generates automatically or the next available ID will be assigned to the Profile |
See also


