
TLS Server Requests
This section explains how to create TLS / Server based certificate requests in the Web RA application.
Certificate Transparency (CT) Log Configuration
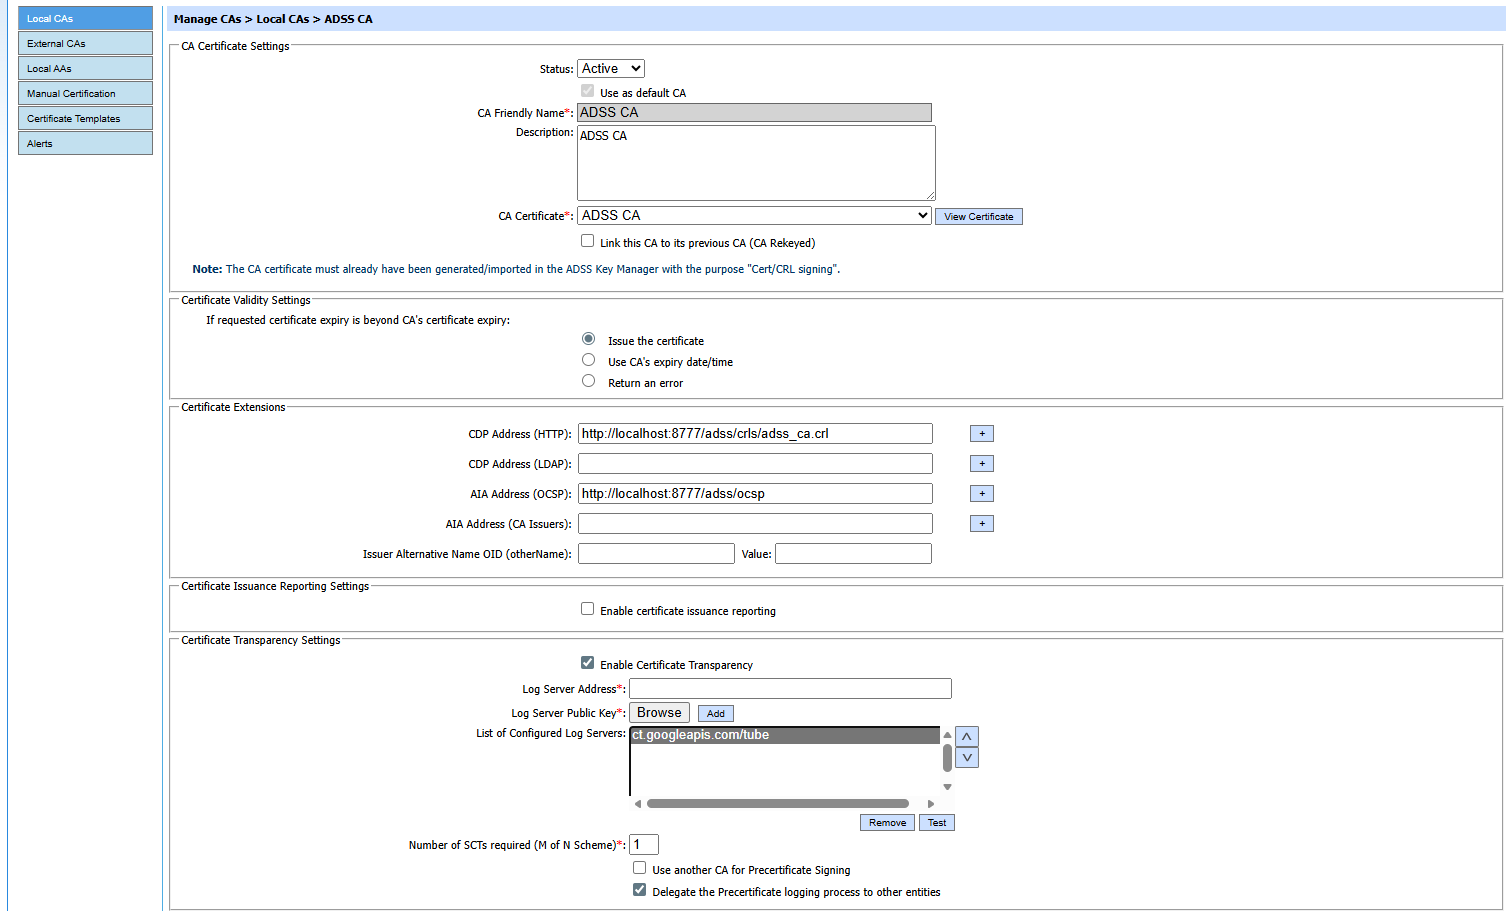
In the above screenshot, a Certificate Transparency (CT) log server is configured.
When Web RA submits a TLS server certificate request to the ADSS Server, ADSS first checks whether the “Delegate the Precertificate Logging Process to Other Entities” option is enabled for the issuing CA under the Certificate Transparency Settings.
If precertificate logging delegation is enabled, ADSS generates a precertificate and returns the following information to Web RA:
- Configured CT log server details
- The precertificate along with its certificate chain
At this stage, ADSS pauses the certificate issuance workflow and waits for the Signed Certificate Timestamps (SCTs).
Web RA then submits the received precertificate chain to the configured CT log server(s) in accordance with the Certificate Transparency process defined for publicly trusted TLS certificates.
The CT log server validates and logs the precertificate, and returns the SCT response. After receiving the SCTs from the CT log server(s), Web RA forwards the SCT information back to ADSS. ADSS then embeds the SCTs into the final TLS certificate and completes the certificate issuance process.
Following are a few things to remember with respect to SDNs, SANs and RDNs:
- When a user creates a new certificate request, the SDNs and SANs will be rendered as configured in the certification profile and its values will be auto-filled from the certificate details.
- A user will not be able to change the values of the RDNs if an operator has configured them in the certificate details.
- An operator will see the rendered values in a disabled form.
- If there is an RDN that is added in certification profile but has not been configured in the user's certificate details, it will be shown as editable in the request form and the user can update its value.
- If no RDN is configured in the user certificate details then the request will be generated.
- In case of an error, the user will not be allowed to move to the next step.
Second Factor Authentication
If second-factor authentication is enabled for certificate requests, the configured authentication mechanism operates accordingly. When the user clicks Generate, an authentication window appears. After the selected method is successfully verified, the certificate is generated.
The authentication mechanism can be one of the following:
- SMS OTP Authentication
- Email OTP Authentication
- Email & SMS Authentication
- SAML Authentication
- Active Directory Authentication
- Azure Active Directory Authentication
- OIDC Authentication
Request Notes
If an operator has added a customized Request Note to certificate requests for a specific enterprise, it will appear in all types of certificates requests -- issued, rekey, revoked, renewed and reissued. The Request Notes appear only on the screens against which the operator has customised them.
An operator can configure Request Notes from the Enterprise Request Notes section in the Admin portal.
The following steps describe how to create a certificate request for the “TLS Server Auth / SDNs / DV SSL” certificate type.
In the web portal, expand the ‘Certificate Center’ tab from the left menu pane and click on the ‘Certificate Requests’ option.
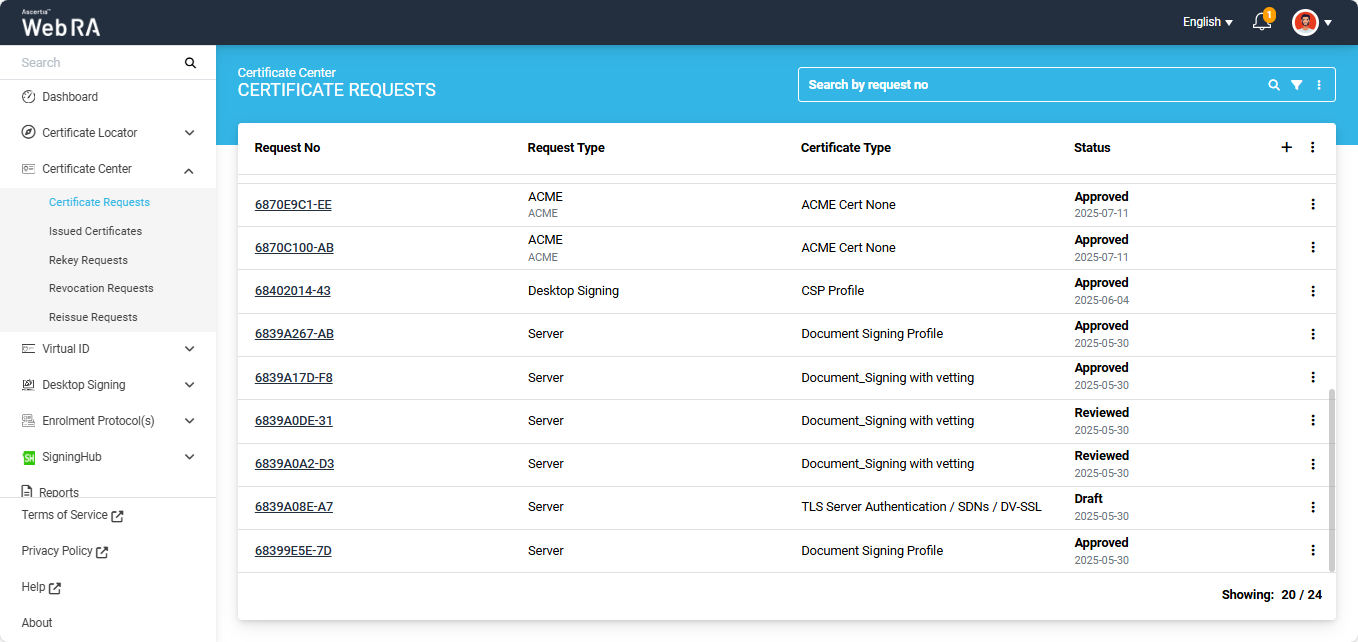
Click on the ‘+’ plus button in the listing header to create a new certificate request. The system will display the ‘Create Request’ screen.
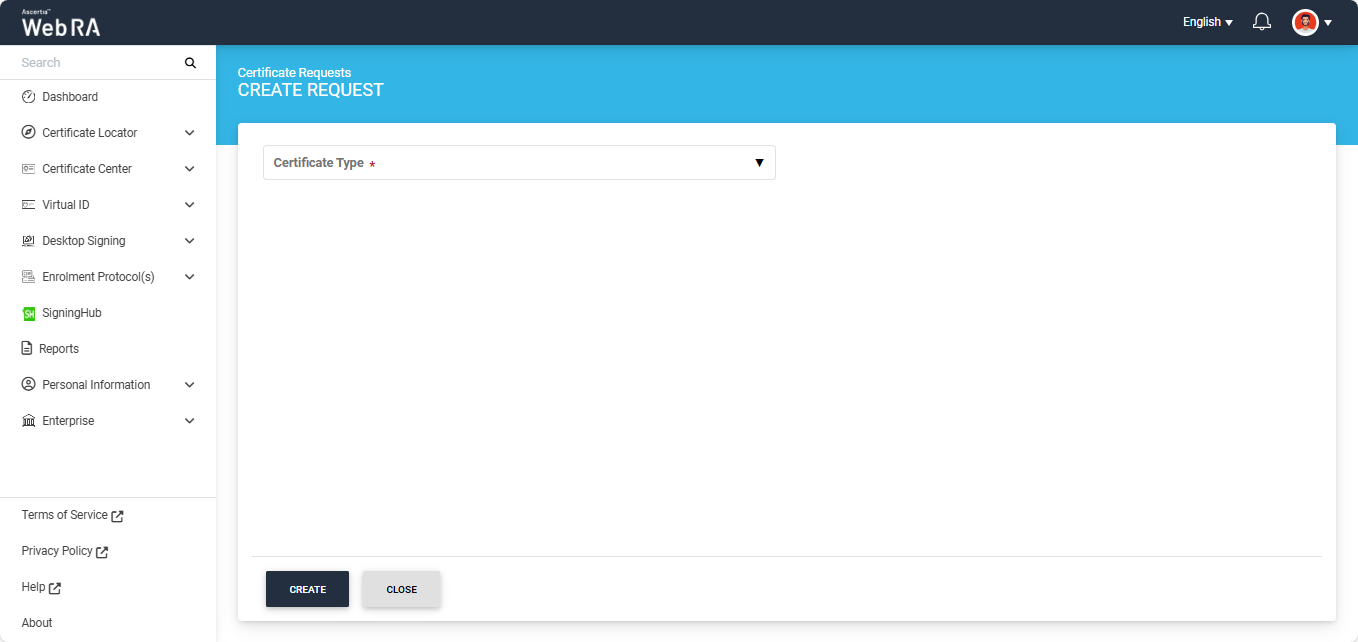
On this screen, select the ‘Certificate Type’ from the given dropdown.
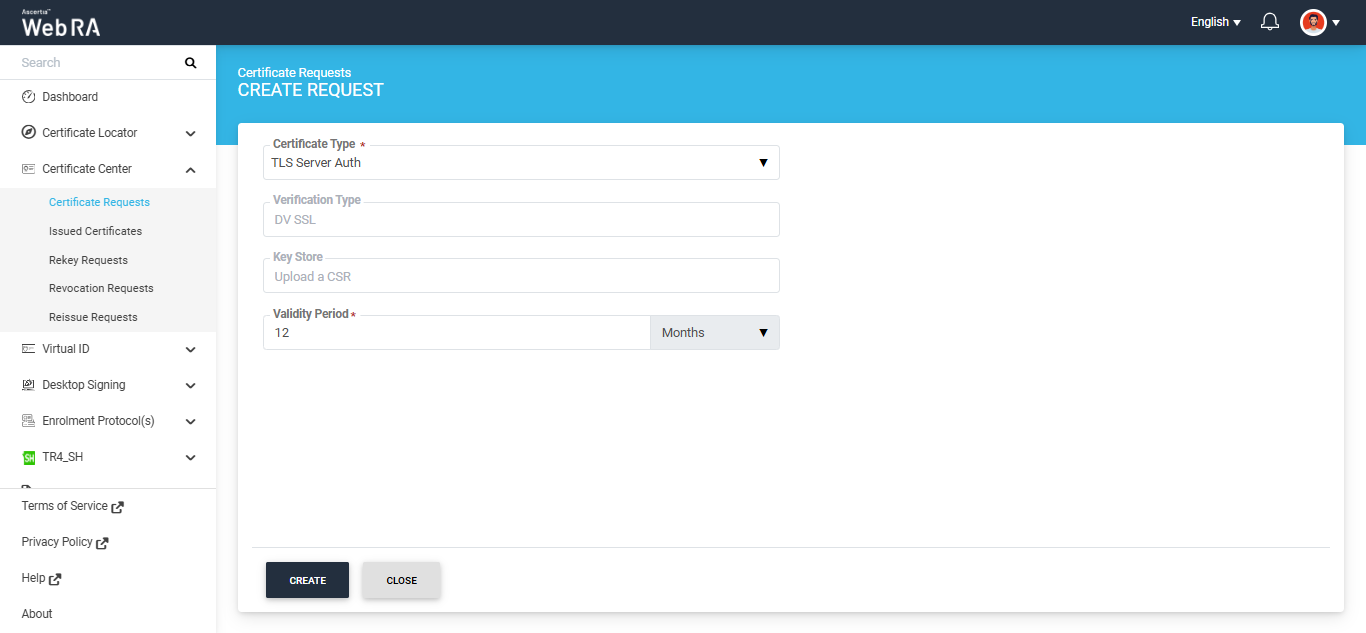
After selecting the profile, click the 'Create' button. The system will display the 'Certificate Signing Request (CSR)' screen.
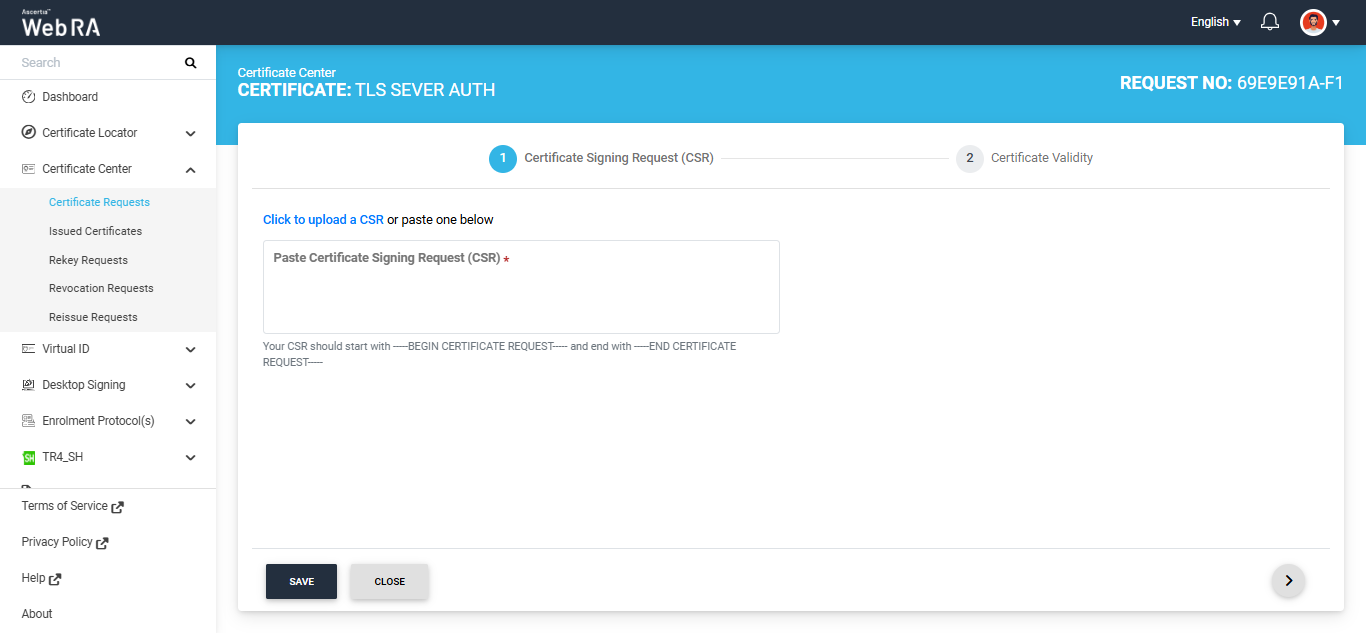
On this screen, either upload the CSR through 'Click to upload a CSR' heperlinked option or paste the CSR in the box below.Once the CSR is uploaded, it will appear on the screen and the system will also display additional tabs in the Create Request window.
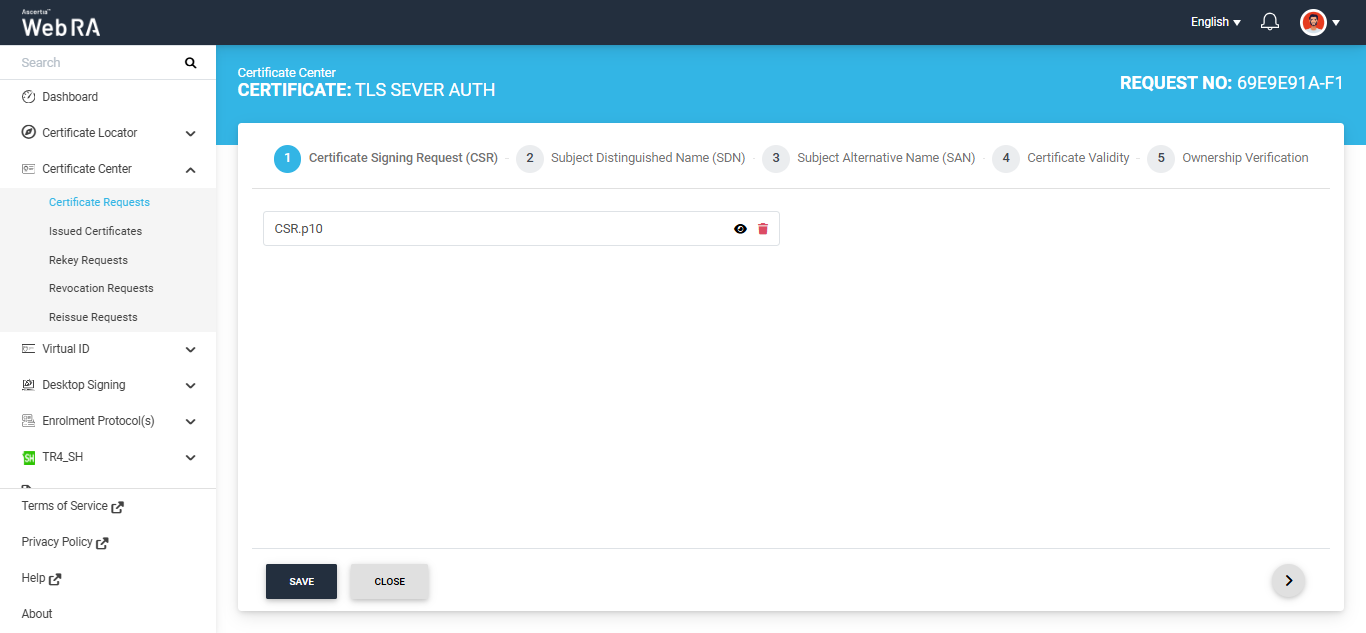
Click the '>' button to navigate to the ‘Subject Distinguished Name (SDN)’ screen.
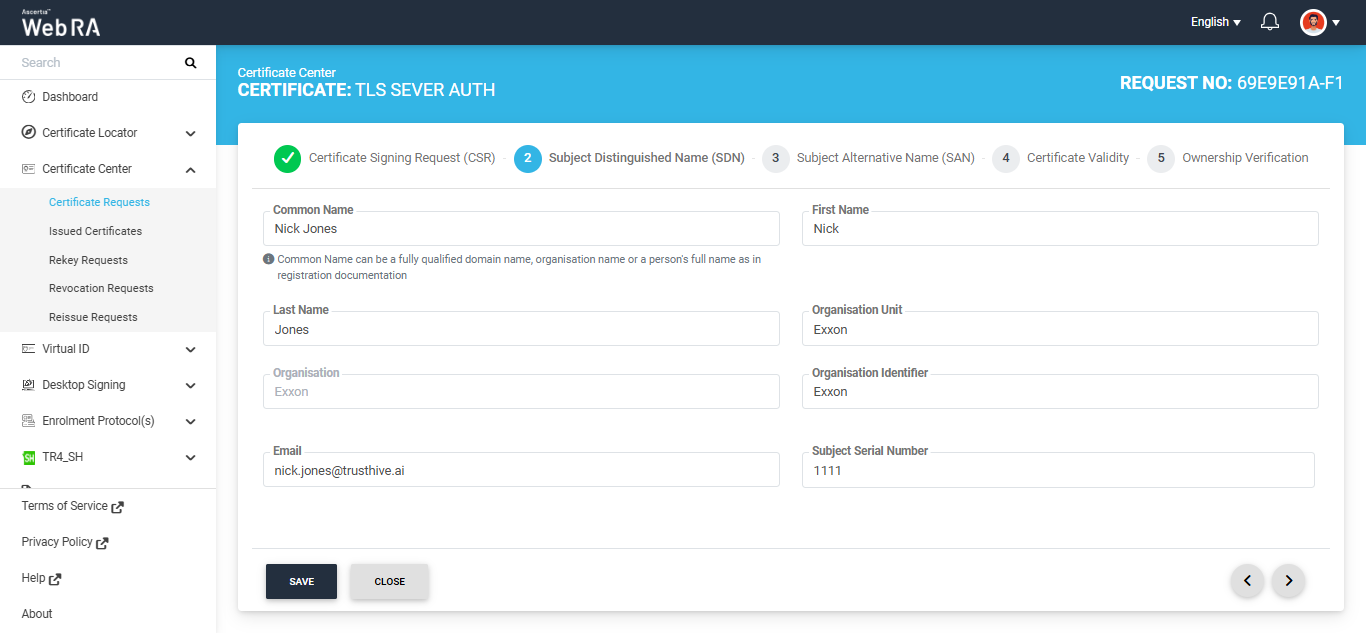
Note: If the 'Enable Document ID Pairing with Emails' policy is enabled in the Configurations module, and both the Email and Subject Serial Number fields are included in the Subject Distinguished Name (SDN), the system automatically associates the email address with the subject serial number when they are used together for the first time.
After an email address has been associated with a subject serial number, all future certificate requests using that email address must include the same subject serial number. If a different subject serial number is entered, the certificate request is rejected and an error is displayed. The following error will appear on the screen:
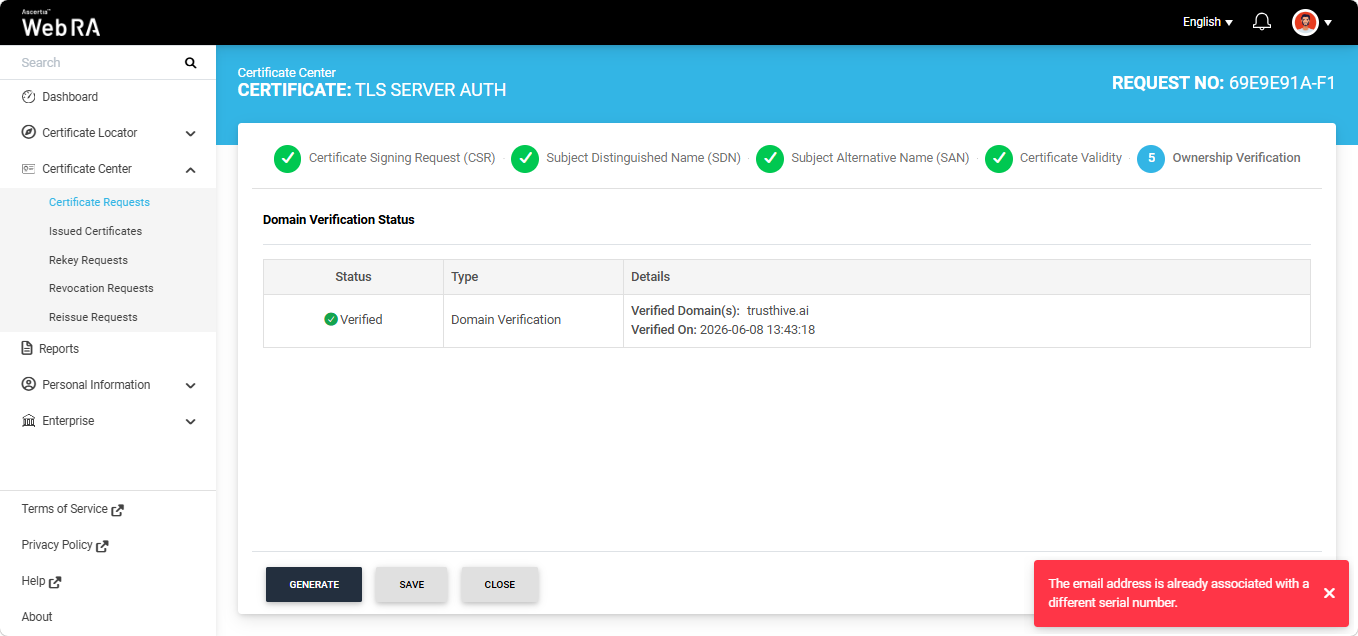
A single subject serial number can be associated with multiple email addresses; however, each email address can only be associated with one subject serial number.
If the 'Enable Document ID Pairing with Emails' policy is enabled and the Subject Distinguished Name (SDN) contains either multiple Email fields or multiple Subject Serial Number (SSN) fields, the system does not process the certificate request and displays an error.
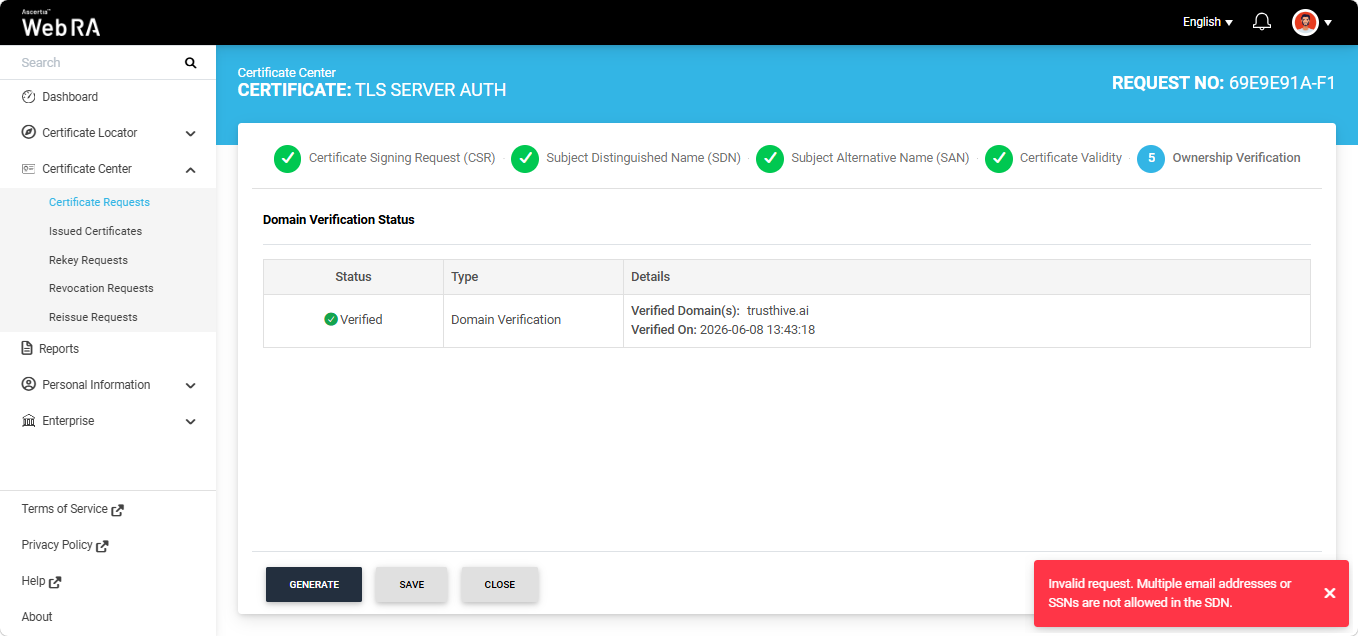
After entering the required information in the given fields click the next ‘>’ button to navigate to the ‘Subject Alternative Screen (SAN)’ screen.
On this screen, the behaviour of the Domain Names (DNS) field depends on the configured Enterprise Policy settings.
If the 'Allow Only Enterprise-Approved Domains' policy is enabled in the Enterprise, the Domain Names (DNS) field is displayed as a dropdown list. In this case, users can only select an enterprise-approved domain from the available options. The dropdown list displays only active and verified domains configured for the Enterprise.
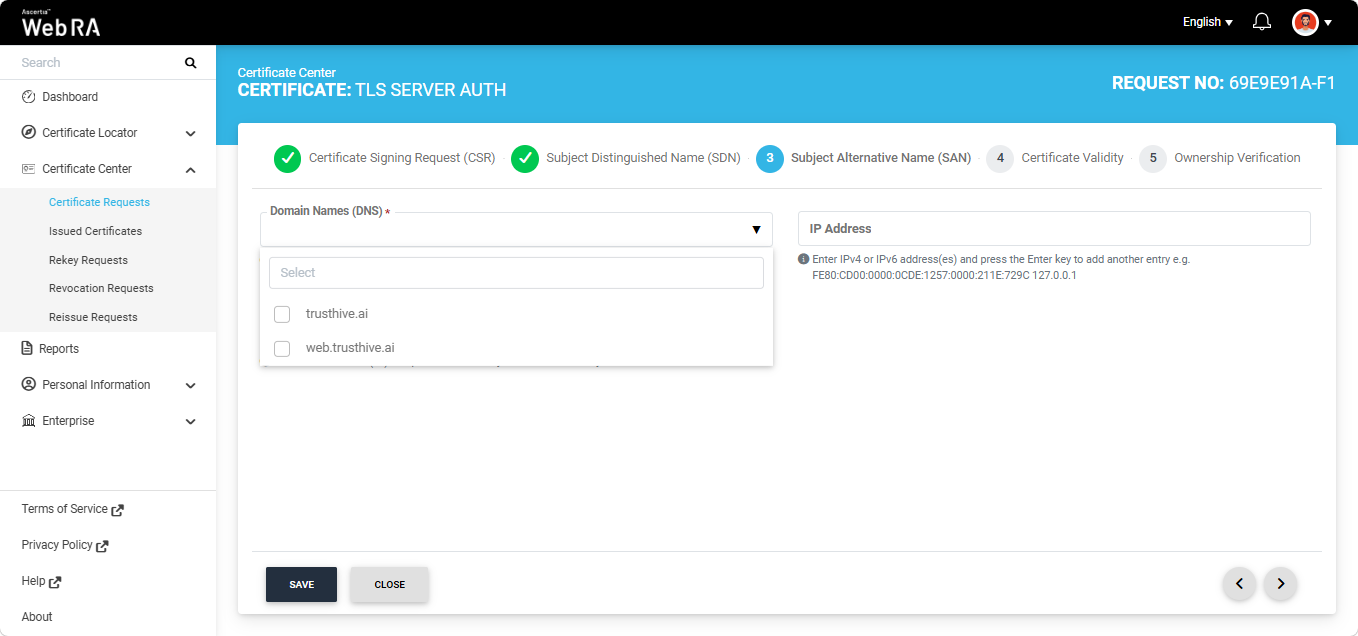
Alternatively, if the 'Assign Each Domain to a Single User' policy is enabled in the Enterprise, users can either select an enterprise-approved domain or enter a new domain in the Domain Names (DNS) field.
To select a pre-approved domain, click the Domain Names (DNS) field and select the required domain from the list. Alternatively, to enter a new domain, type the domain name in the field and press Enter.
|
|
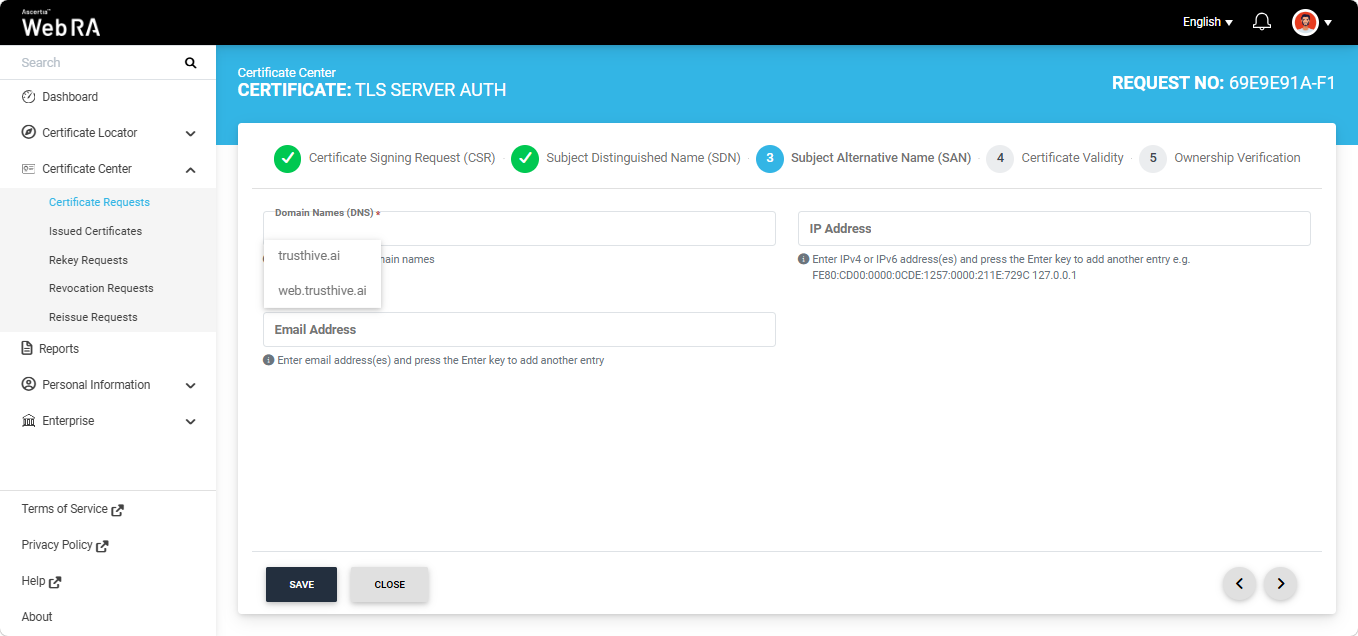
If both checkboxes are unchecked in the Enterprise Policy settings, the user can only select enterprise-approved domains when creating a certificate request. The Domain Names (DNS) field appears as a dropdown, displaying all active and verified domains in the Enterprise. |

|
|
You can only specify a single domain and its associated subdomains in the DNS field. If you attempt to enter a different domain, the system displays an error message and prevents you from proceeding. |
|
|
If Email Validation checkbox is enabled in Configurations module and email address is present in the RFC822Name field of the Subject Alternative Names (SAN), the ownership verification screen will require you to complete email validation before generating the certificate. |
After providing the required information in SAN, click the next ‘>’ button to proceed to the 'Certificate Validity' screen.
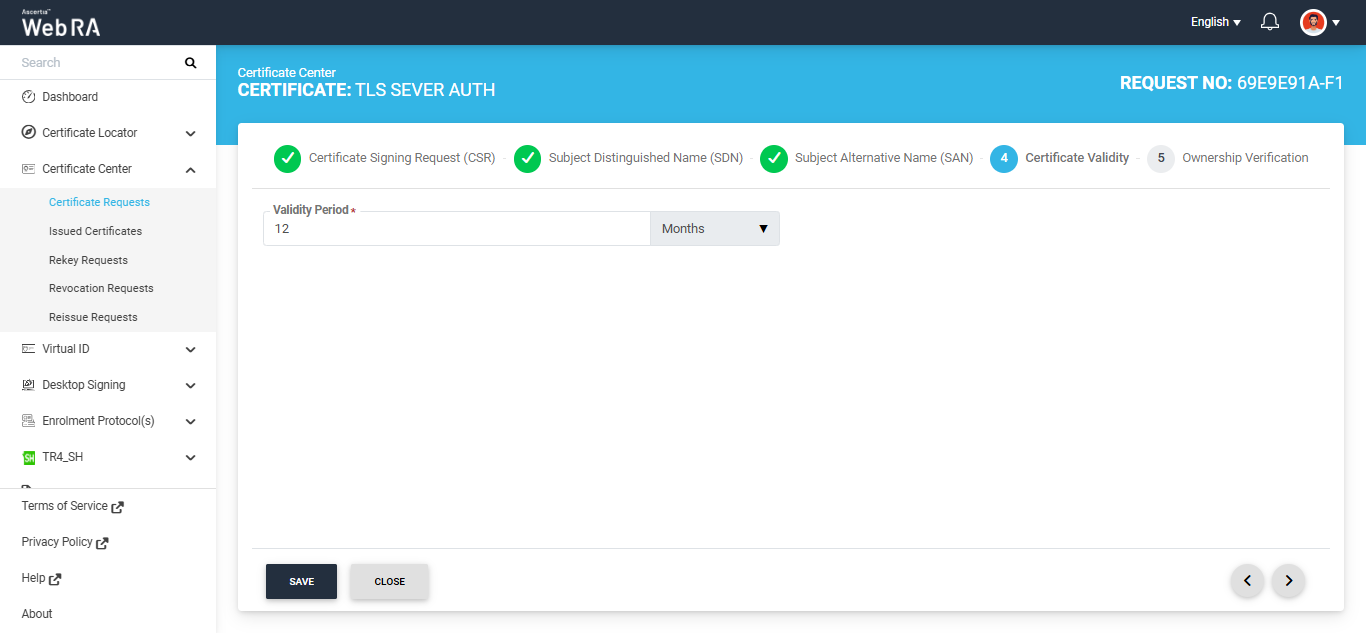
Click the '>' next button to navigate to the ‘Ownership Verification’ screen.
Note: If you selected an enterprise-approved domain in the SAN section, you are not required to perform domain validation on the Ownership Verification screen. For enterprise-approved domains, the system automatically displays a Verified status, allowing you to proceed directly with certificate generation by clicking Generate.
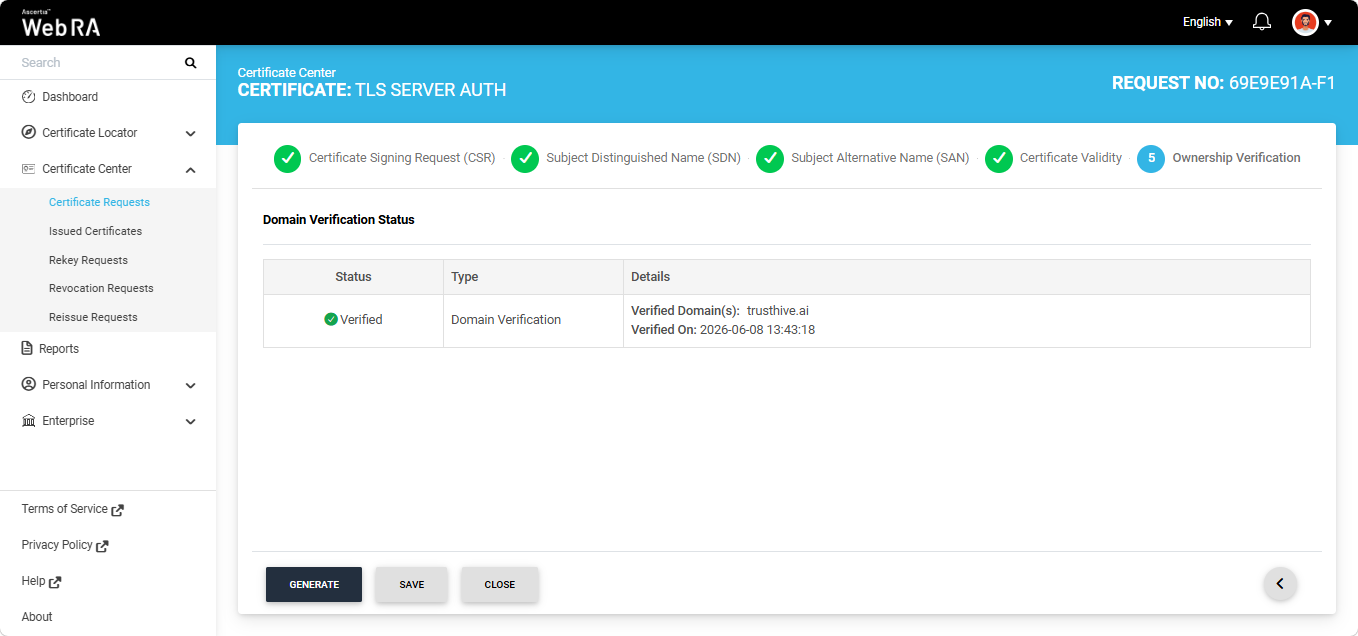
However, if you entered a new domain in the SAN section, you must complete the domain validation process before the certificate can be generated.
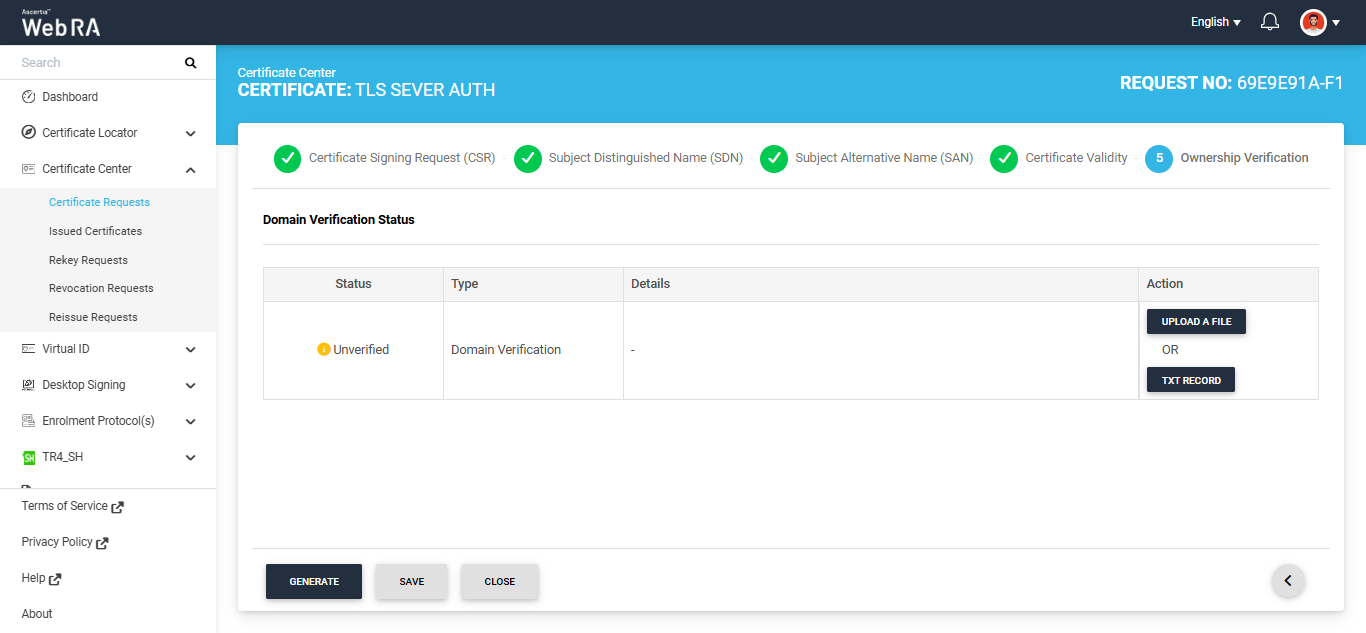
Domain verification can be performed either by uploading a file or by adding a TXT record.
Note: The action (Upload a File or TXT Record) through which domain verification can be performed is configured in the certification profile. The operator may select one or both methods for domain verification. If both methods are selected in the profile, you can use any of the method to verify your domain during certificate request creation. For more details about how the method is selected, navigate to the ‘Certification Profiles’ section.
Upload a File
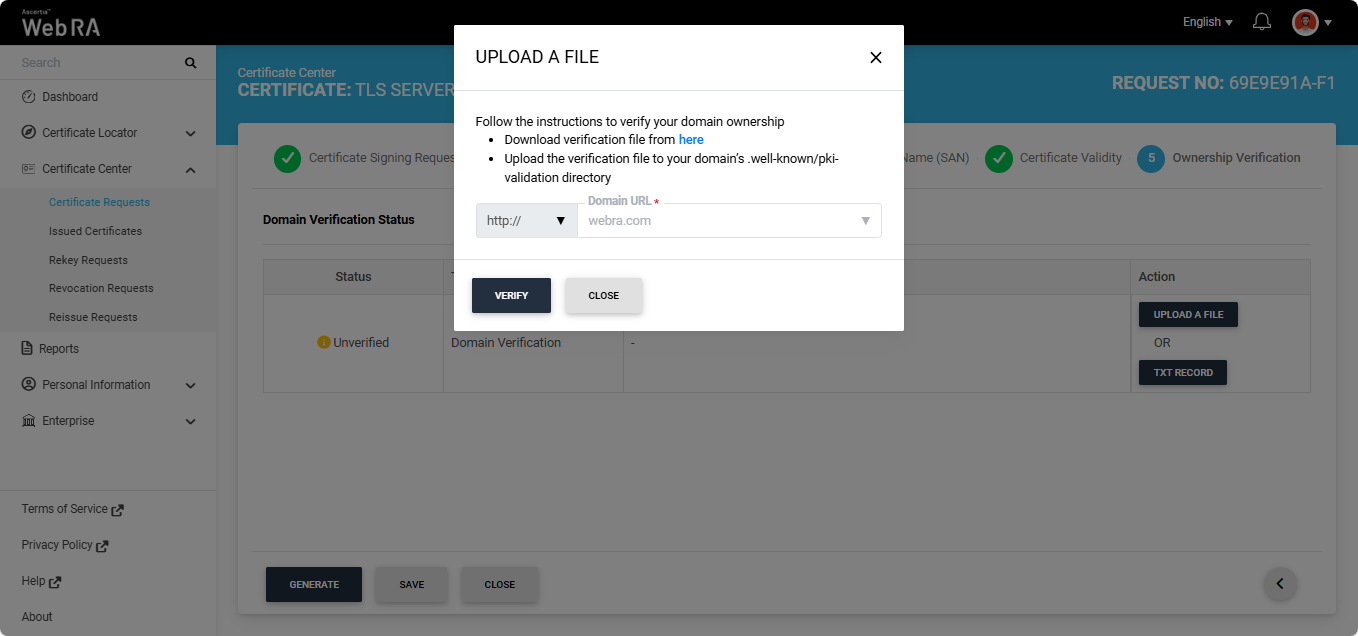
Click the ‘Upload a File’ button. The system will display the ‘Upload a File’ dialog, which contains instructions on how to verify the domain using this method.
TXT Record
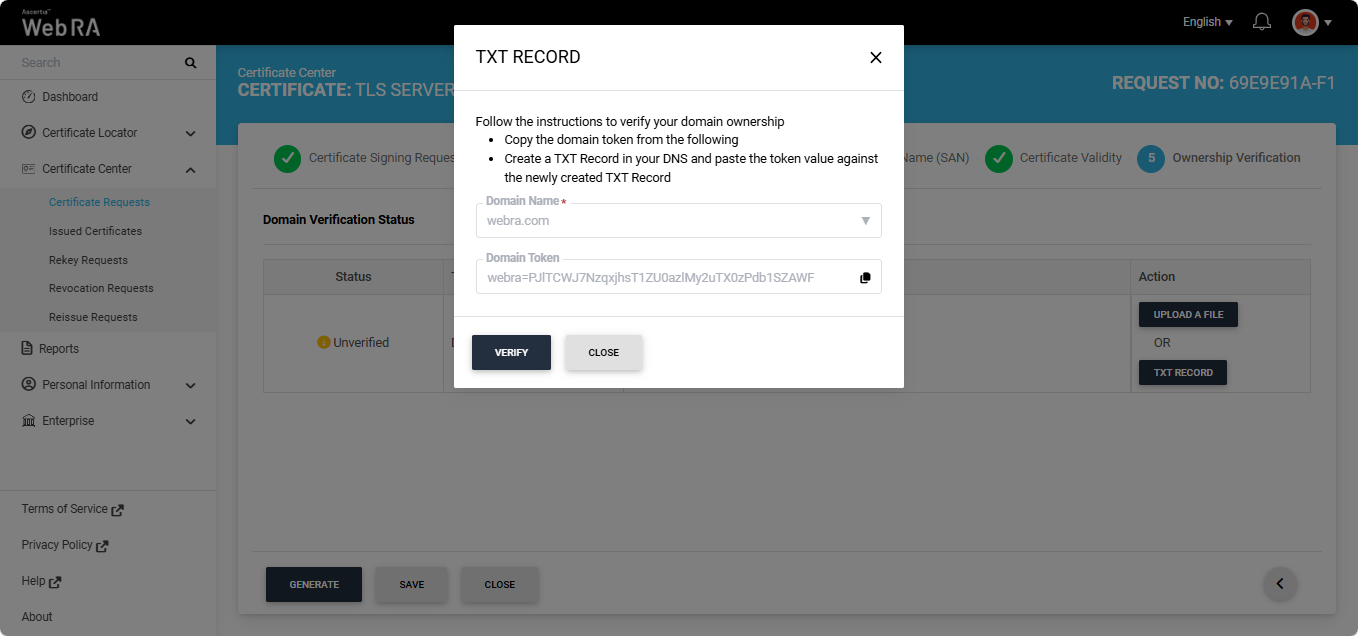
Click the ‘TXT Record’ button. The system will display the ‘TXT Record’ dialog, which contains instructions on how to verify the domain using this method.
|
|
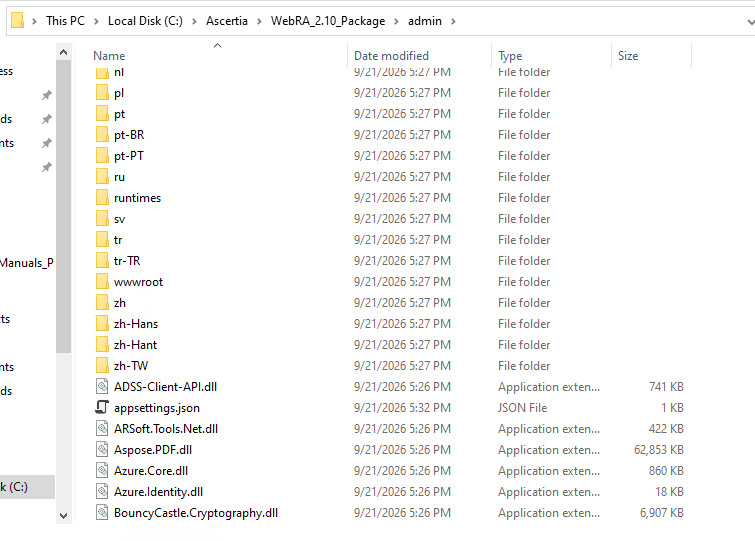
Note: Before validating the domain from the Web RA system, the DNS resolver being used for domain validation must be configured in the "appsettings.json" file. The "appsettings.json" file is available in the folder of each Web RA module within the Web RA package. The DNS resolver configuration must be added to the "appsettings.json" file of the Web RA module from which the domain validation is being performed. For example, if you are validating a domain from the Admin Portal, navigate to the "WebRA_Package > admin" folder and open the "appsettings.json" file in Notepad++ or Notepad. Add the DNS resolver entry to the "appsettings.json" file in the following format: "DnsSettings": { "DNSResolveAddress": "1.1.1.1" } Save the json file after configuring the DNS resolver. |
After selecting the required method from the two mentioned above, click the 'Verify' button. If all steps are completed correctly, the ‘Verified’ status will appear for the entered domain.
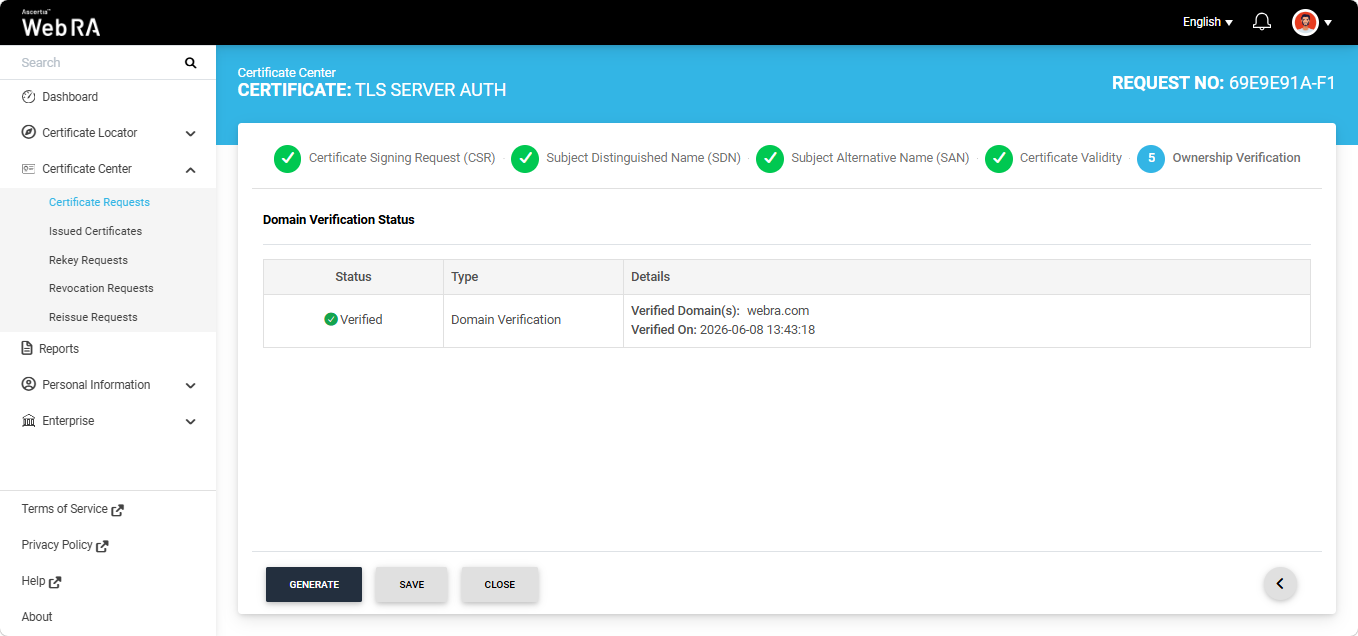
After the verification is complete you can click the 'Generate' button to create the certificate request.
Note: The steps mentioned above for creating a certificate request apply to the ‘DV SSL’ verification type. The same steps can be followed to generate certificate requests for ‘OV SSL’ and ‘EV SSL’ verification types.
Note: If Certification Authority Authorisation (CAA) Records is enabled from the Admin Policy Configurations or Enterprise Domain Settings, the system will perform CAA record verification in the Ownership Verification section as well. The CAA record verification row will appear below Domain Verification. If you want to see how certificate request with CAA record verification is generated, navigate to CAA Record Verification section.
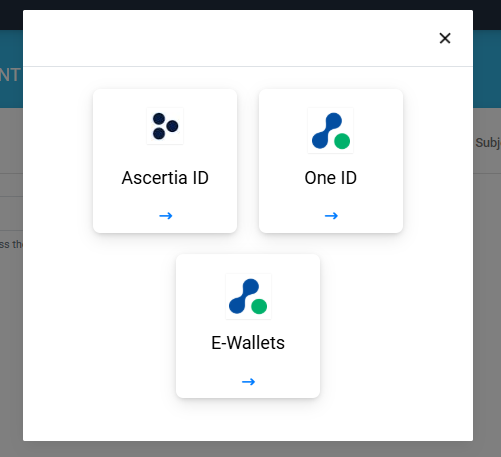
Note: If the setting for Digital Onboarding is enabled in the Certification Profile, clicking the 'Generate' button displays a dialog containing the providers configured in the selected Digital Onboarding connector.
Select the required provider from the given options.
The system then displays a QR code. Scan the QR code using the Digital Onboarding mobile application.
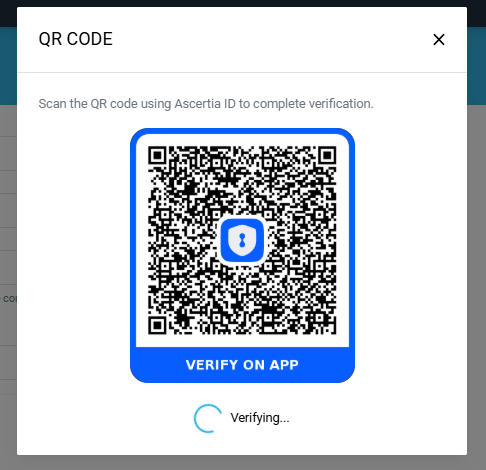
After scanning the QR code, complete the identity verification process by providing the required documents as configured in the Digital Onboarding policy.
Once the identity verification process is completed successfully, the QR code will disappear and the certificate request will be generated.
DNSSEC Verification
An additional check for DNSSEC verification has been enabled for all certificate types in Web RA. This feature is automatically enabled in the system and adds a DNSSEC check for domain validation and Certificate Authority Authorisation (CAA) verification during certificate request creation.
If DNSSEC is enabled and correctly configured for the domain, the system validates the domain’s DNSSEC signature during certificate request processing. If the signature is valid and the domain verification is successful, the certificate request is processed successfully and the system displays a ‘Verified’ status for DNSSEC verification. You can generate the certificate request after successful verification.
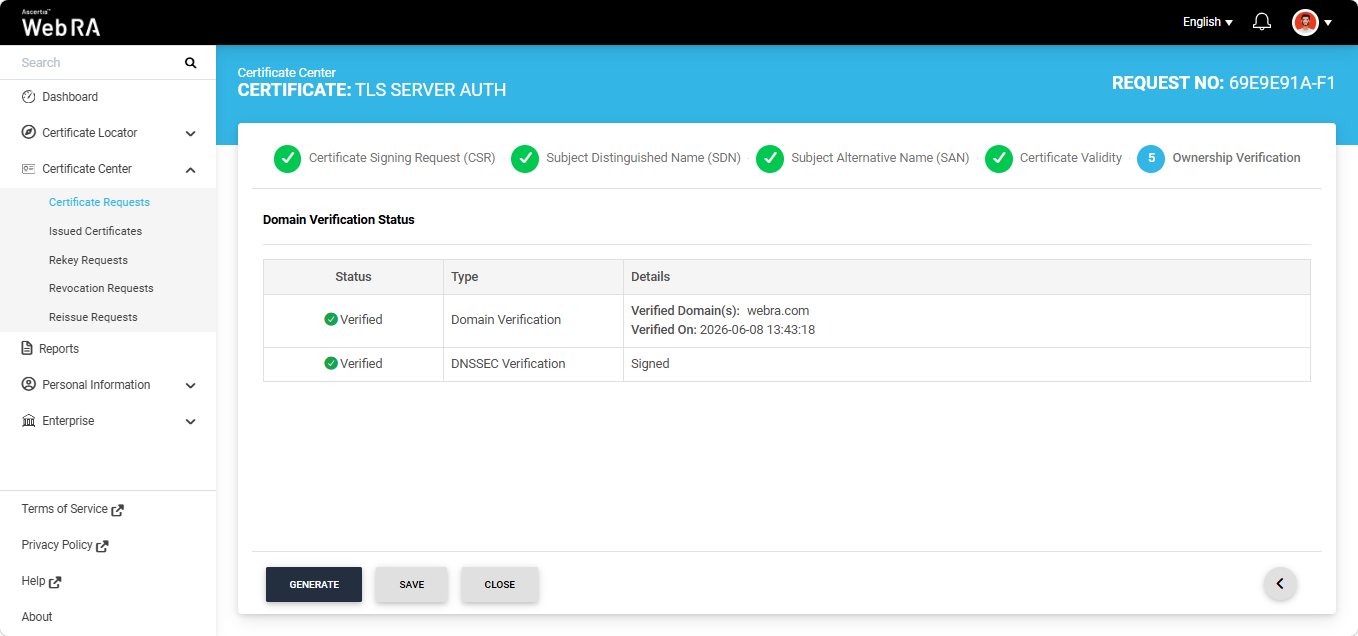
If DNSSEC is not enabled for the domain, DNSSEC verification will not be performed and the certificate will be generated without it.
However, if DNSSEC is enabled but the verification fails, the system displays an error on the screen.
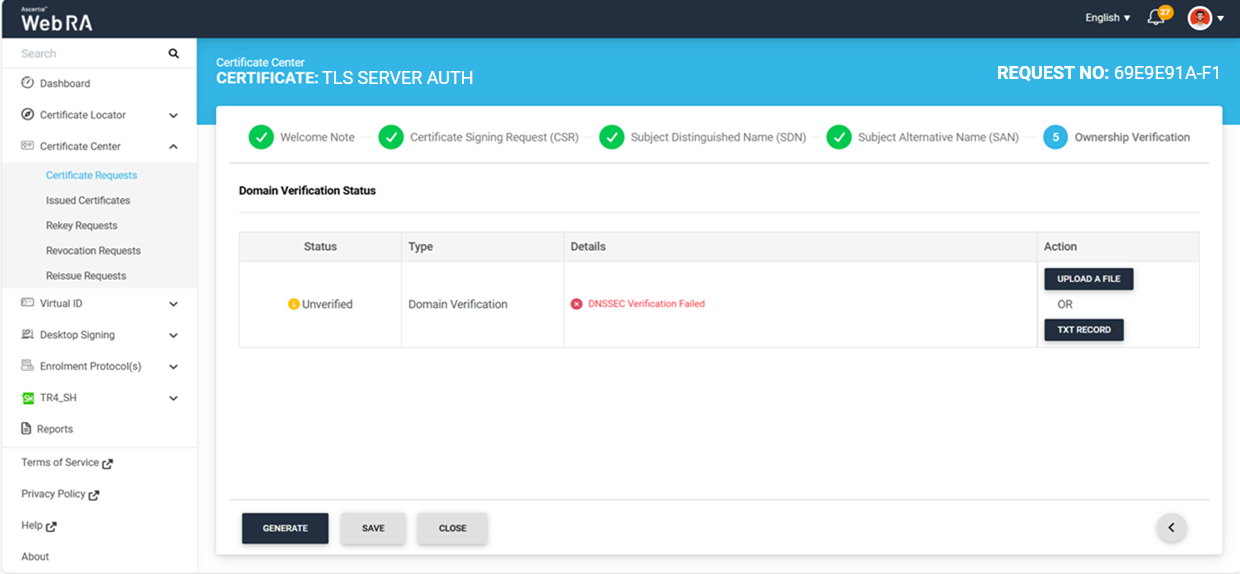
Open MPIC Validation
If Open MPIC Validation is enabled in the certification profile, Open MPIC will also perform domain validation and CAA verification (if enabled in Enterprise domain settings) during certificate generation.
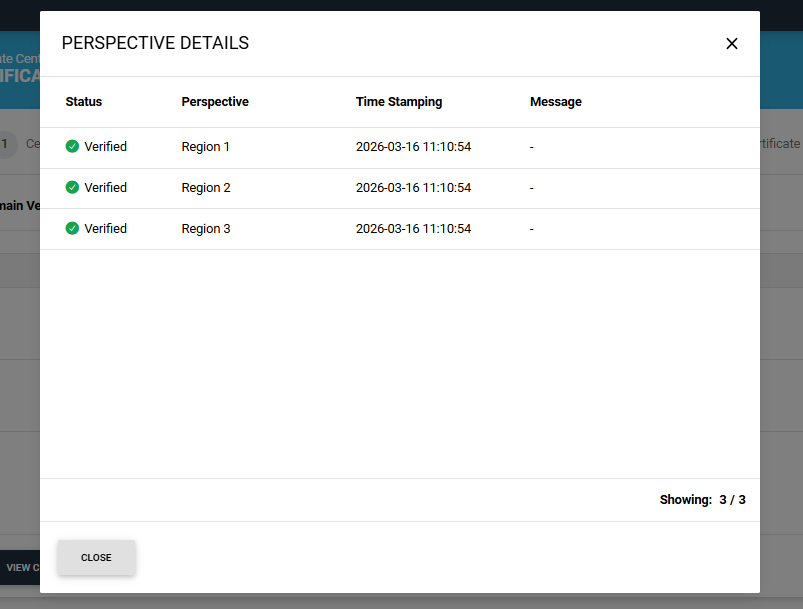
The domain will be verified by the Open MPIC perspectives. If the domain verification meets the minimum quorum count specified in the Open MPIC connector, the user will be able to generate the certificate. For more details about Open MPIC connector, refer to the Connectors section.
After domain verification is performed by Open MPIC, the system will display a Verified status for the specified domain. You can generate the certificate request after successful verification.
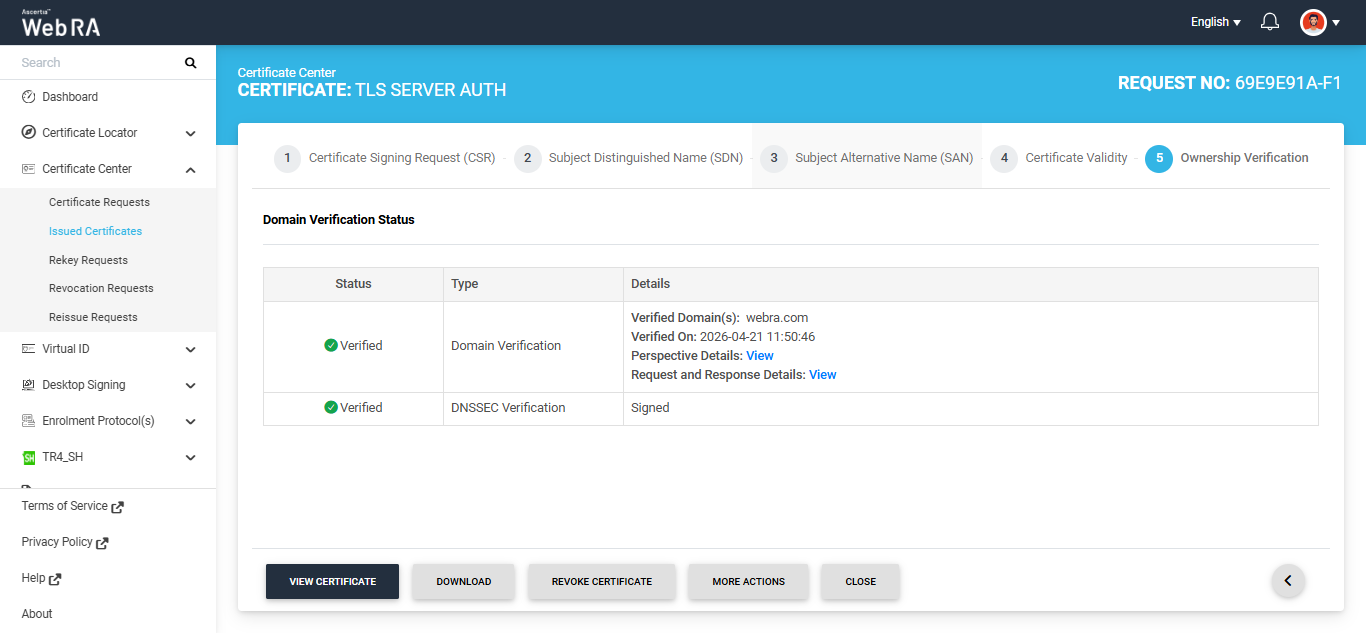
To view the Open MPIC perspective details, click the ‘View’ button next to 'Perspective Details'. The system will display the ‘Perspective Details’ dialog on the screen.
To view the Request and Response details, click the 'View' button. The system will display the 'Request and Reponse Details' dialog. You can view both Request and Response details from their respective tabs.
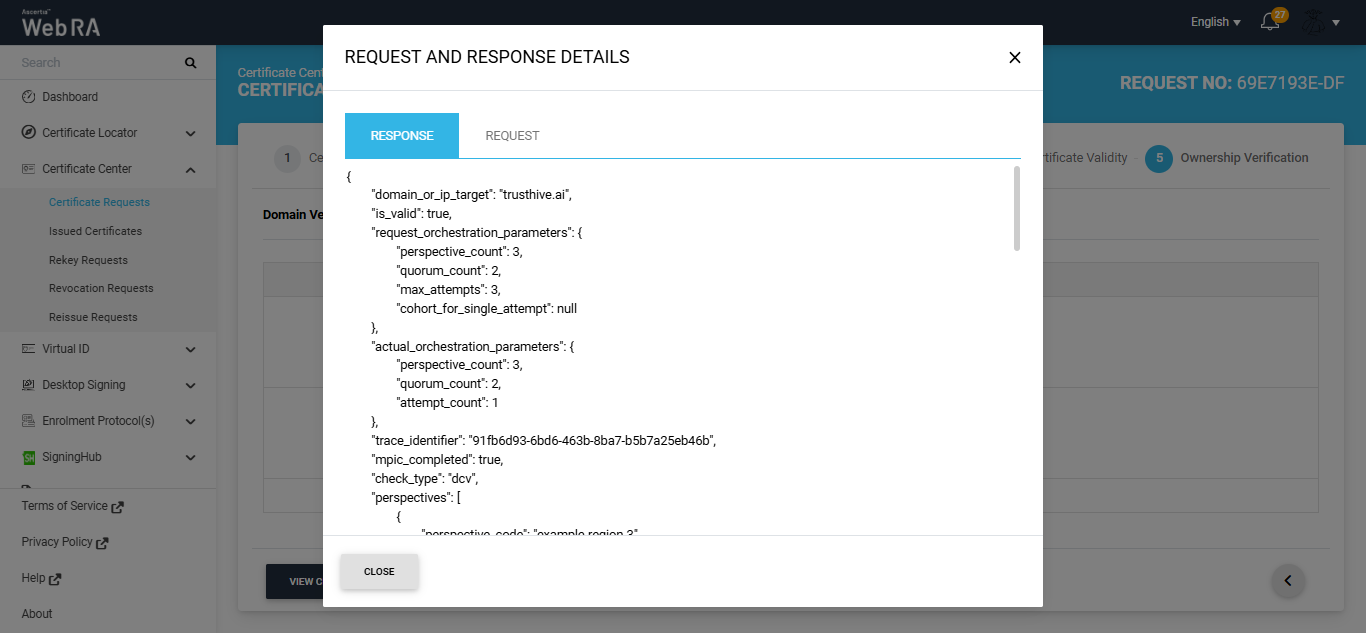
Note: If Open MPIC is enabled and DNSSEC Verification fails, the error will be displayed on the screen as shown in the image below.
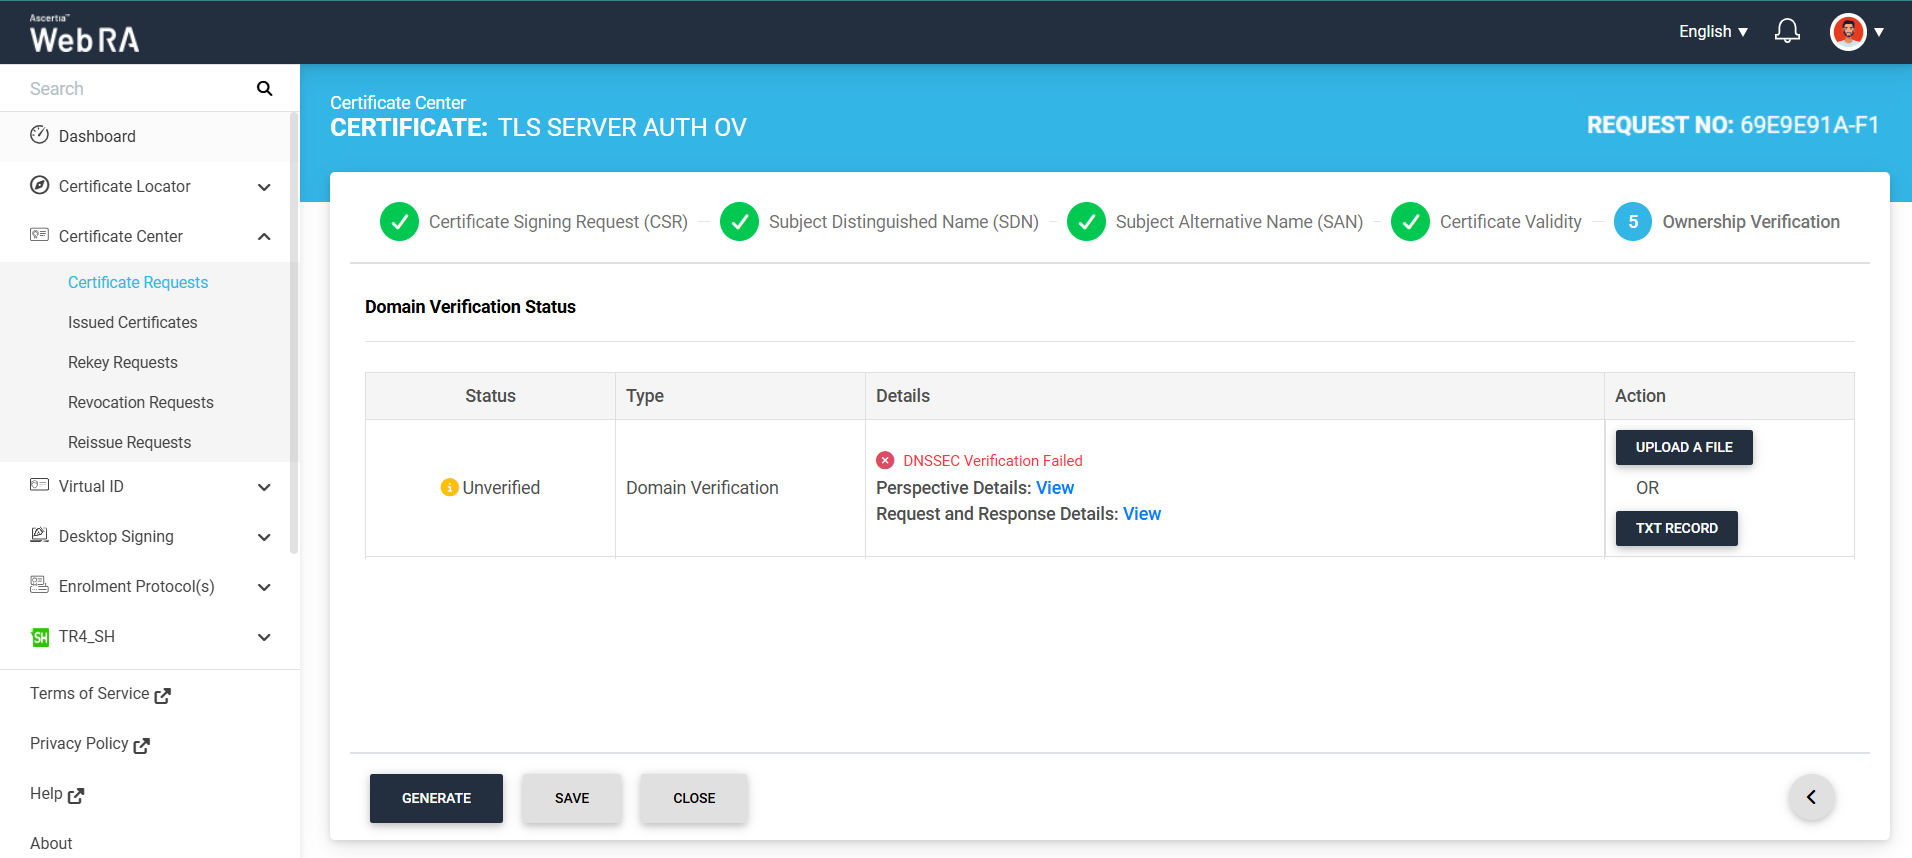
You can view the Perspective Details and Request and Response Details by clicking the respective 'View' button.
Note: If the setting for Digital Onboarding is enabled in the Certification Profile, clicking the 'Generate' button displays a dialog containing the providers configured in the selected Digital Onboarding connector.
Select the required provider from the given options.
The system then displays a QR code. Scan the QR code using the Digital Onboarding mobile application.
After scanning the QR code, complete the identity verification process by providing the required documents as configured in the Digital Onboarding policy.
Once the identity verification process is completed successfully, the QR code will disappear and the certificate request will be generated.
How to Renew a Certificate
To renew a certificate before its expiration, you need to first open the certificate request generated from the Web RA system.
To do this, expand Certificate Center > Certificate Requests from the left-tree menu in the Web Portal.
Then, click the request number of the certificate that you want to renew. Alternatively, click the three-dot button next to the certificate request entry and select the 'View Request' option.
The system will then open the certificate request in View mode.
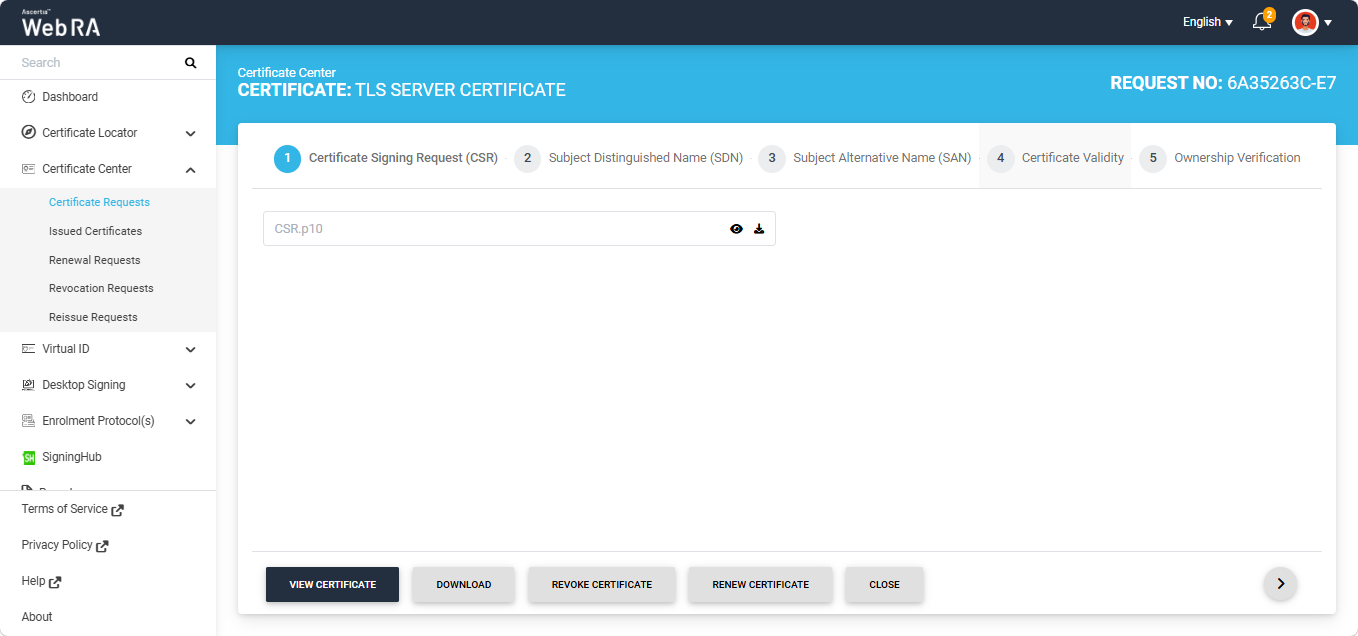
To renew the certificate, click the 'Renew Certificate' button.
Note: The 'Renew Certificate' button appears only if the 'Renew Certificate' policy is selected in Configurations > Policies > Requests section under the certificate renewal settings.
The Certificate Signing Request (CSR) screen will appear again, as displayed in the image below.
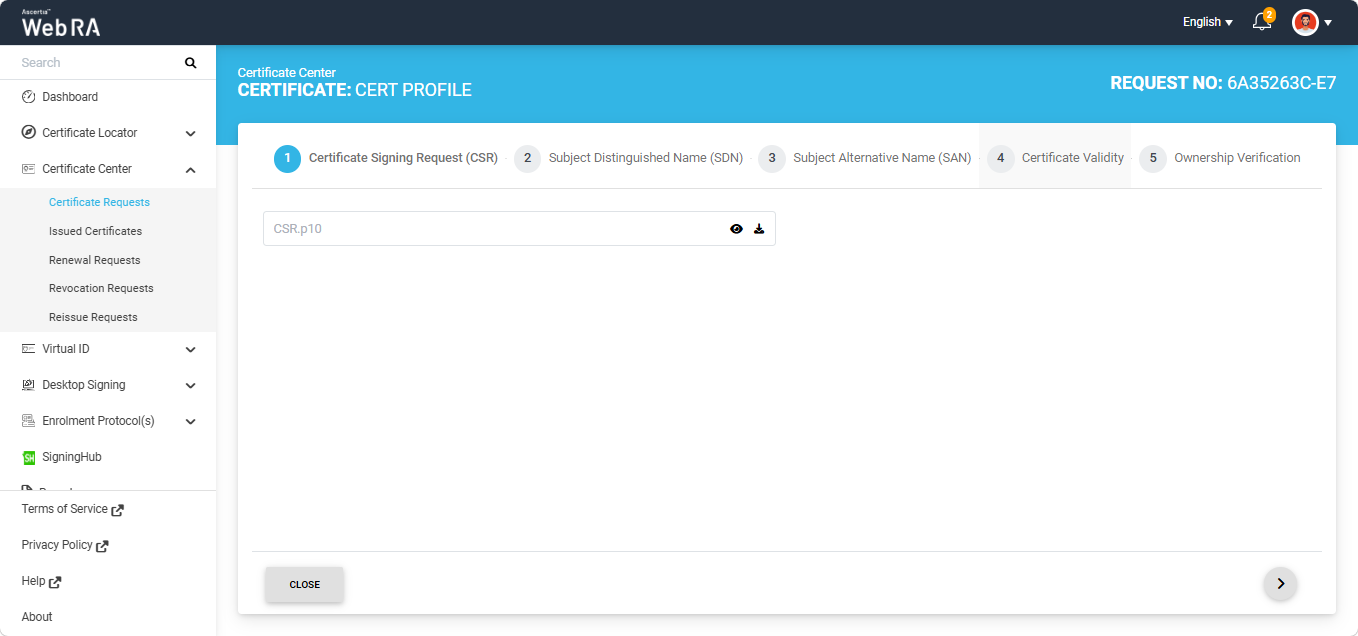
Click the next '>' button to navigate to the 'Ownsership verification'' screen. Here, click the 'Renew' button to renew the certificate.
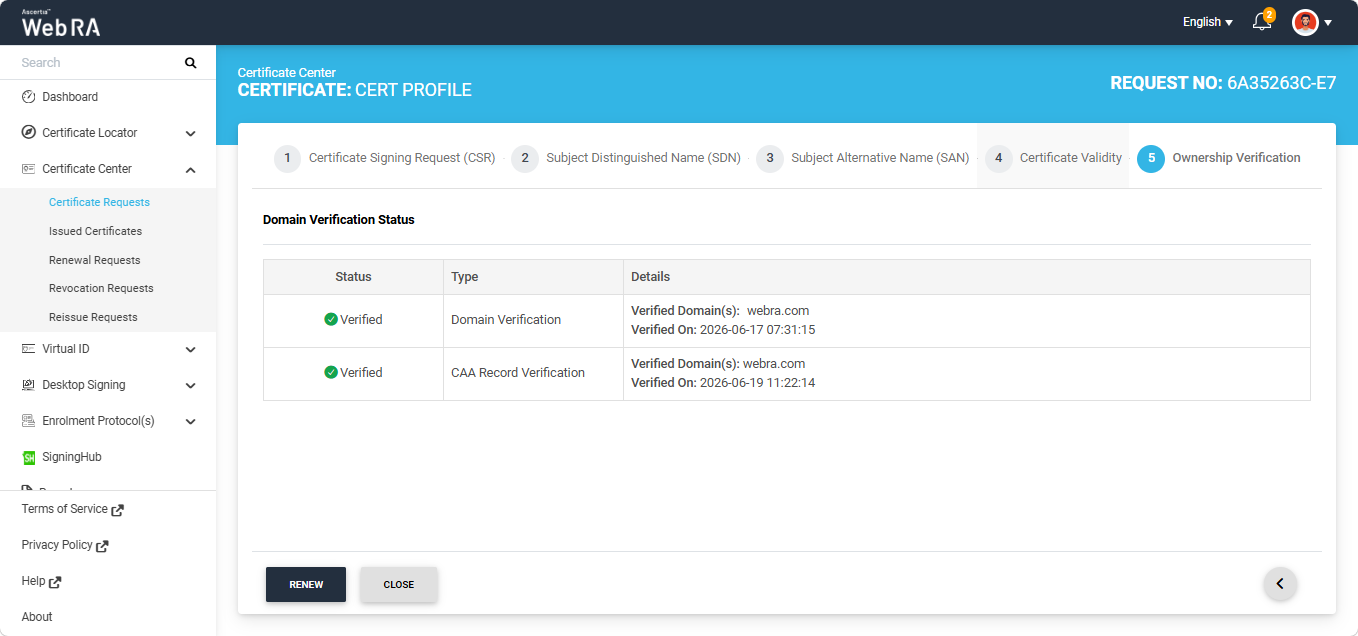
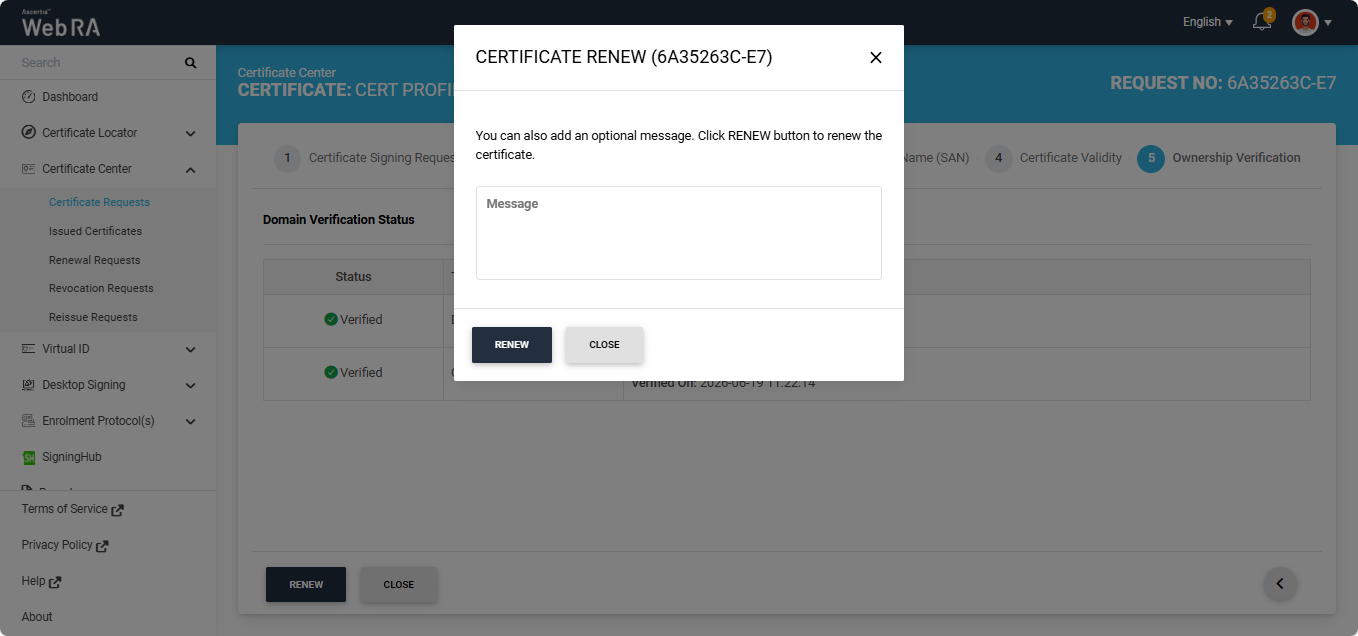
The system will display the Certificate Renew dialog on the screen. Here, you can optionally enter a message in the Message box.
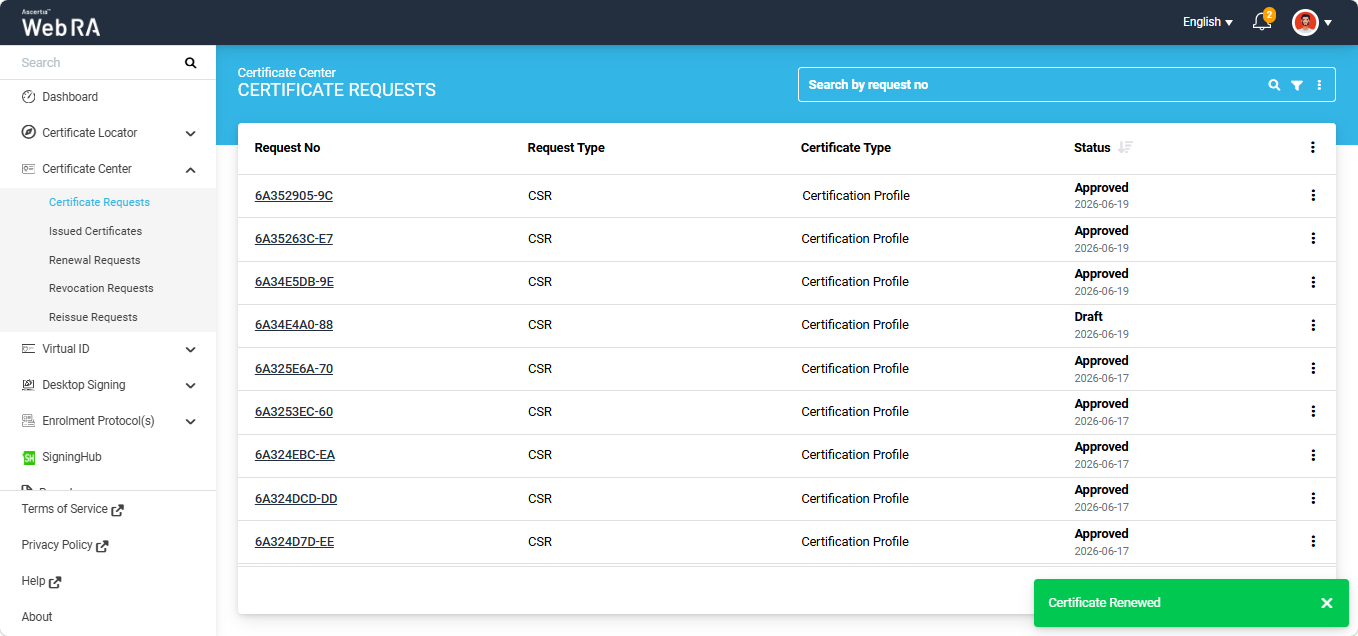
Click the Renew button. The certificate will be renewed, and a Certificate Renewed alert will appear on the screen.
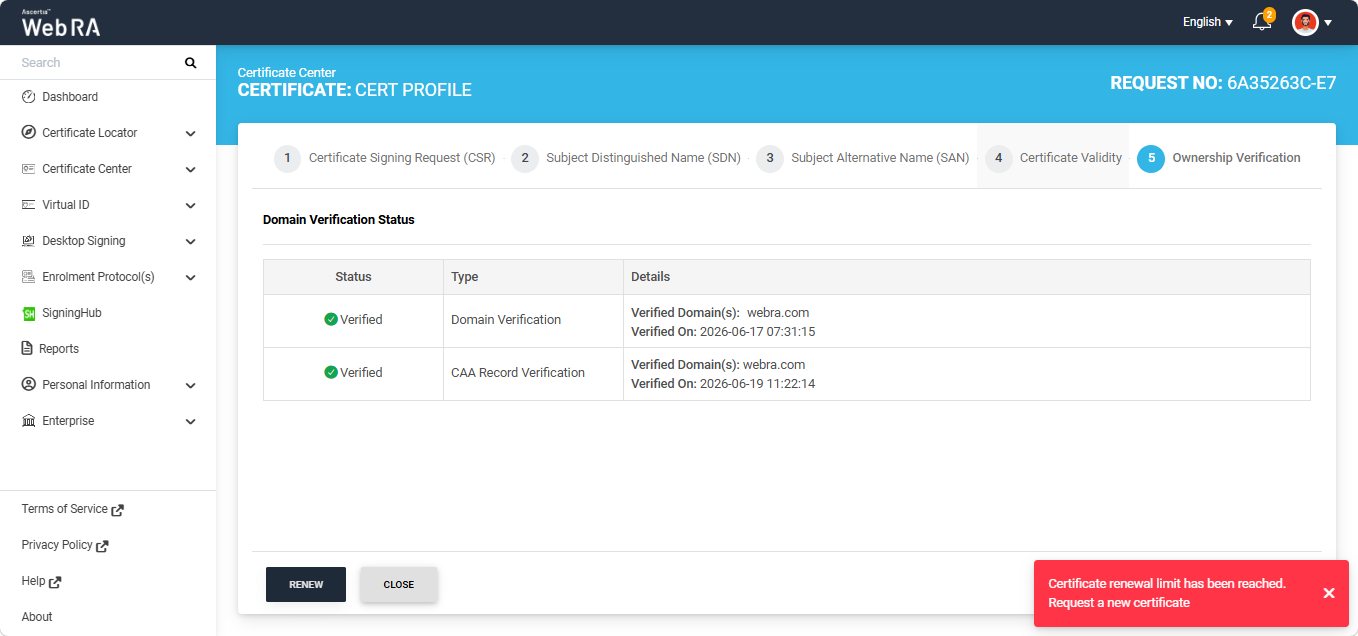
Each certificate can be renewed only up to the renewal limit configured in the certification profile. For example, if a renewal limit of 1 is configured in the certification profile, a certificate can only be renewed once. Any subsequent attempt to renew the same certificate will result in an error being displayed by the system.
The following error will appear on the screen if you attempt to renew a certificate after the renewal limit has been reached.
Note: If the renewal limit is set to zero in the certification profile, certificates generated under that certification profile cannot be renewed.
The following steps describe how to create a certificate request for ‘TLS authentication with DV as none (CAA Records)’ certificate type.
In the web portal, expand the ‘Certificate Center’ tab from the left menu pane and click on the ‘Certificate Requests’ option.
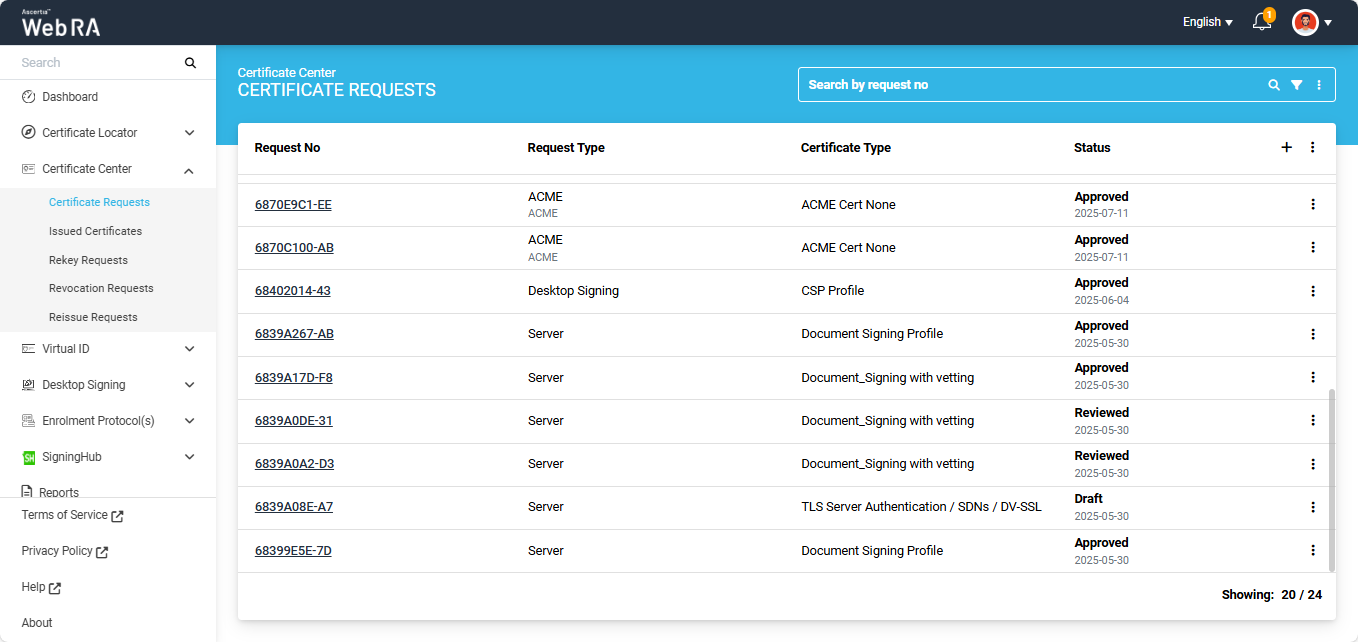
Click on the ‘+’ plus button in the listing header to create a new certificate request. The system will display the ‘Create Request’ screen.
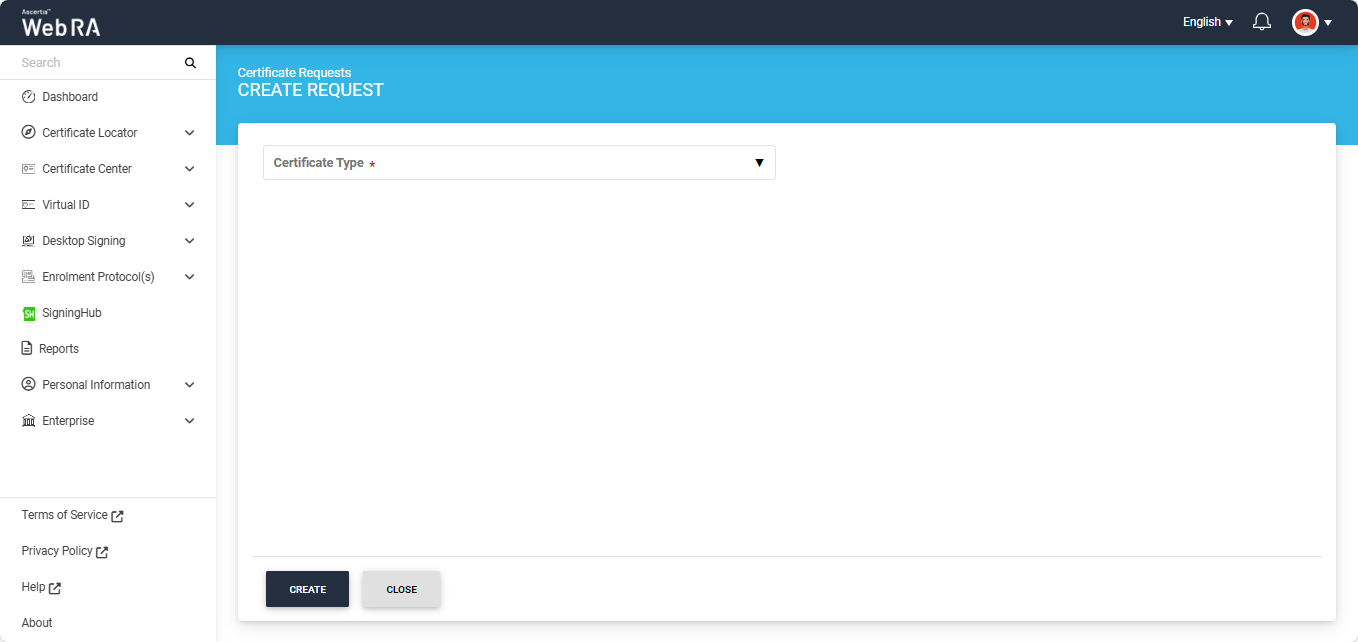
On this screen, select the ‘Certificate Type’ from the given dropdown field.
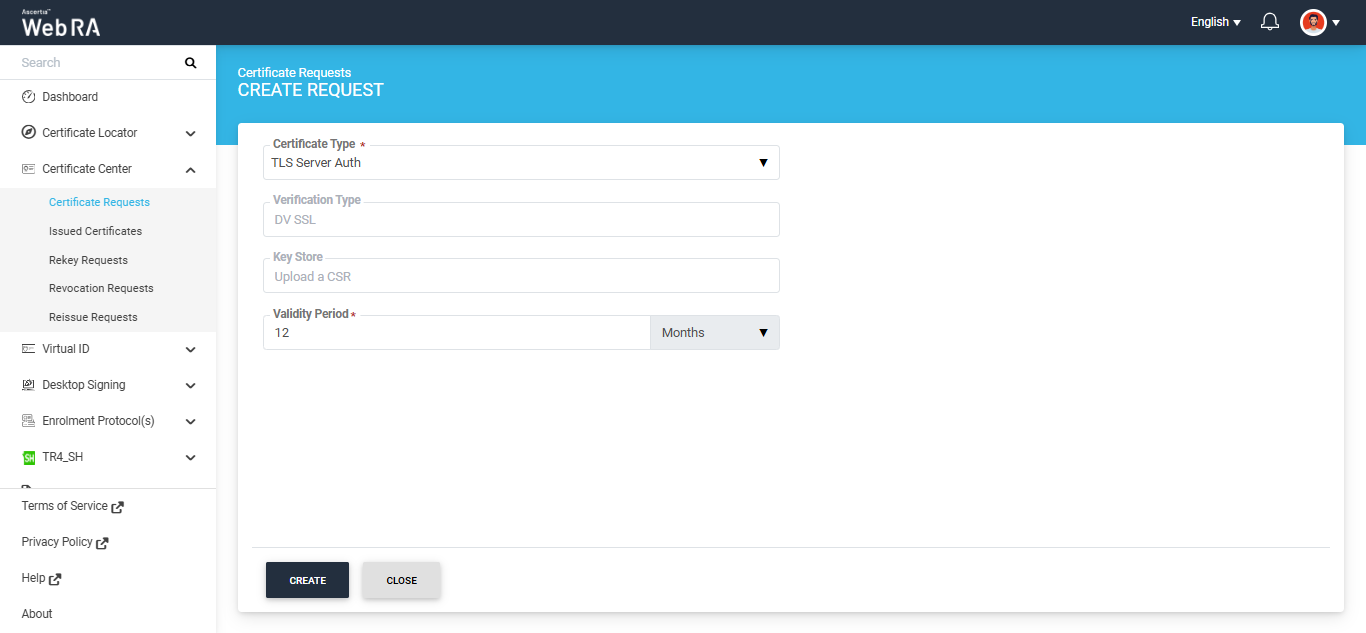
After selecting the profile, click the 'Create' button. The system will display the 'Certificate Signing Request (CSR)' screen.
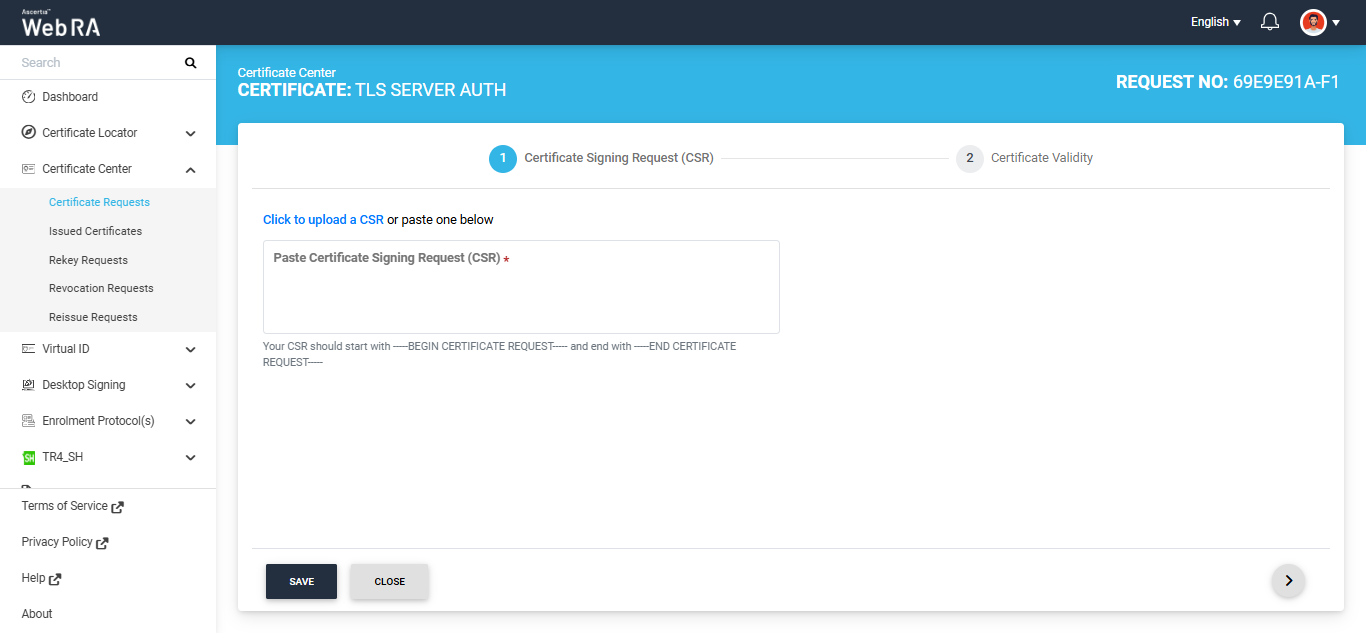
On this screen, either upload the CSR through 'Click to upload a CSR' heperlinked option or paste the CSR in the box below.Once the CSR is uploaded, it will appear on the screen and the system will also display additional tabs in the Create Request window.
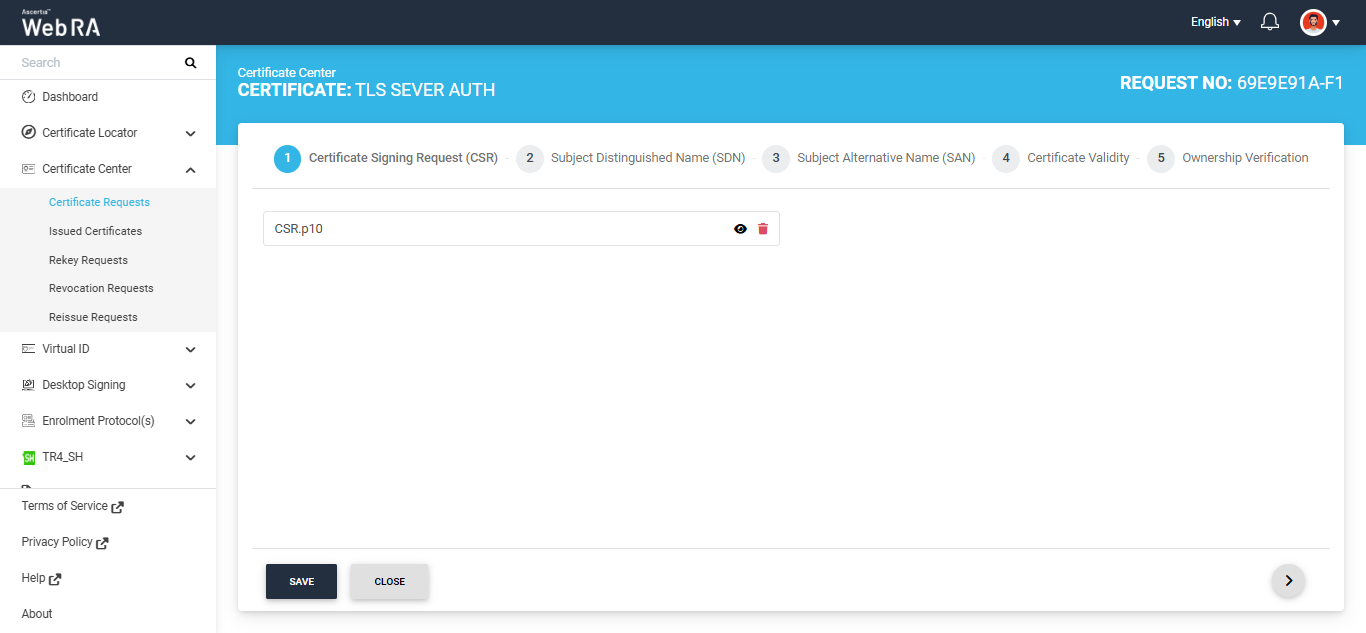
Click the '>' button to navigate to the ‘Subject Distinguished Name (SDN)’ screen.
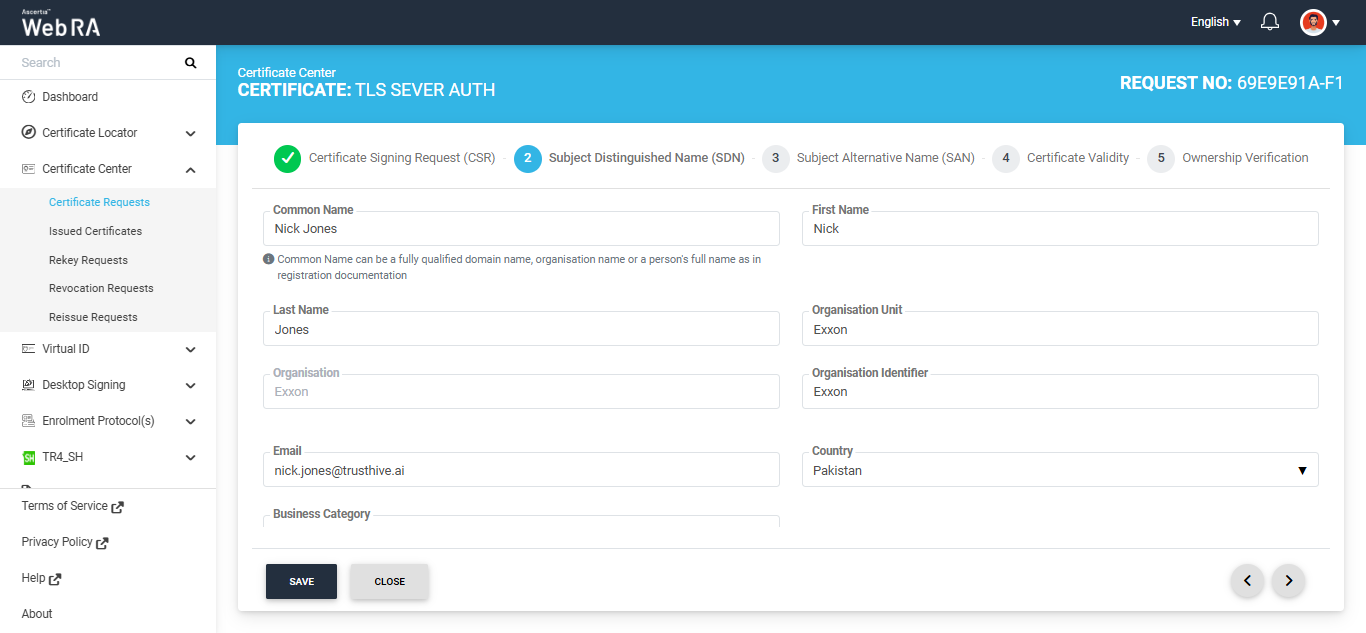
After entering the required information in the given fields click the next ‘>’ button to navigate to the ‘Subject Alternative Screen (SAN)’ screen.
Note: ADSS Web RA supports the configuration of domain names at both the Admin and Enterprise level. The operator can set domain names and sub domain names to be associated to enterprises. The DNS name will be used in the certificate request form for its utilization while generating certificates exclusively from the domains pre-configured within their enterprise.
Note: If Email Validation checkbox is enabled in Configurations module and email address is present in the RFC822Name field of the Subject Alternative Names (SAN), the ownership verification screen will require you to complete email validation before generating the certificate.
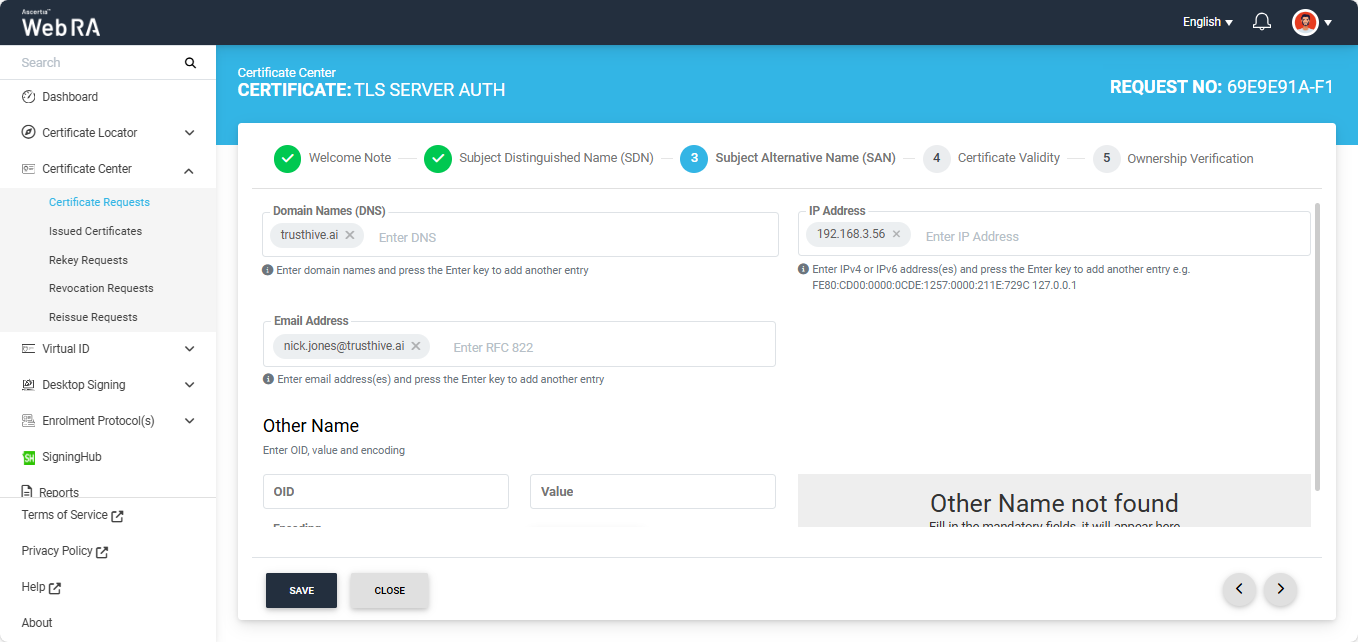
Enter the required details in the given fields. Then, click the '>' button to navigate to the 'Certificate Validity' screen.
Click the '>' next button to navigate to the ‘Ownership Verification’ screen.
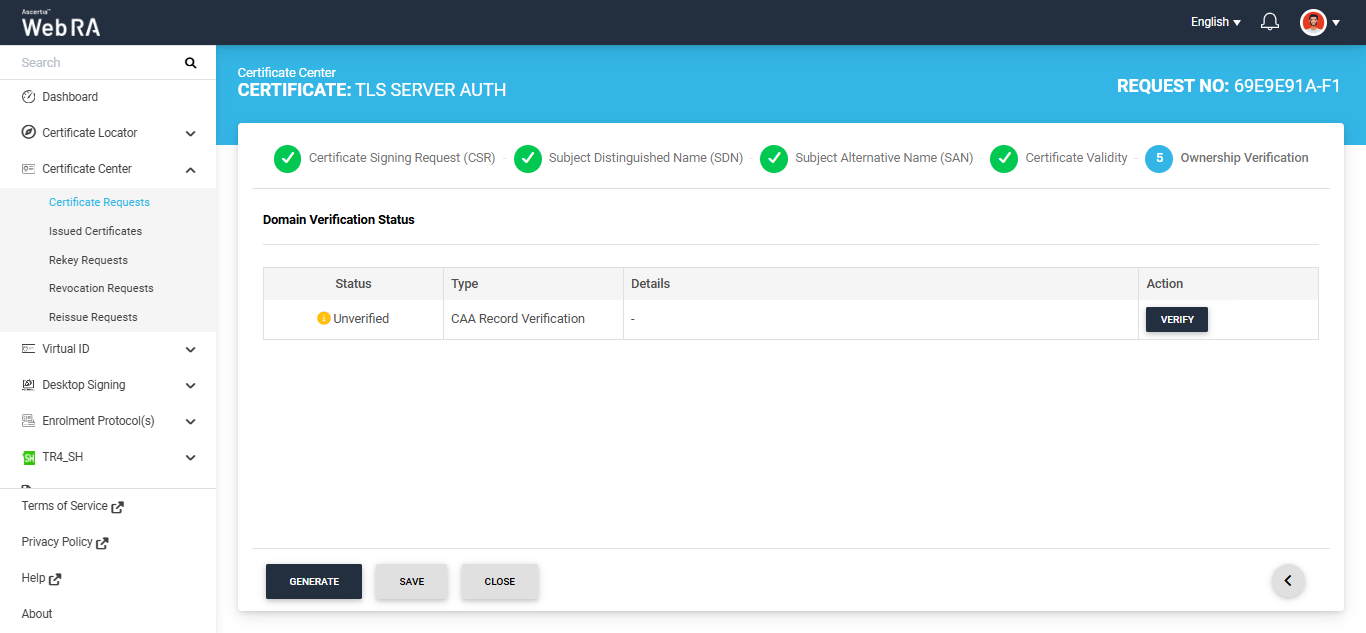
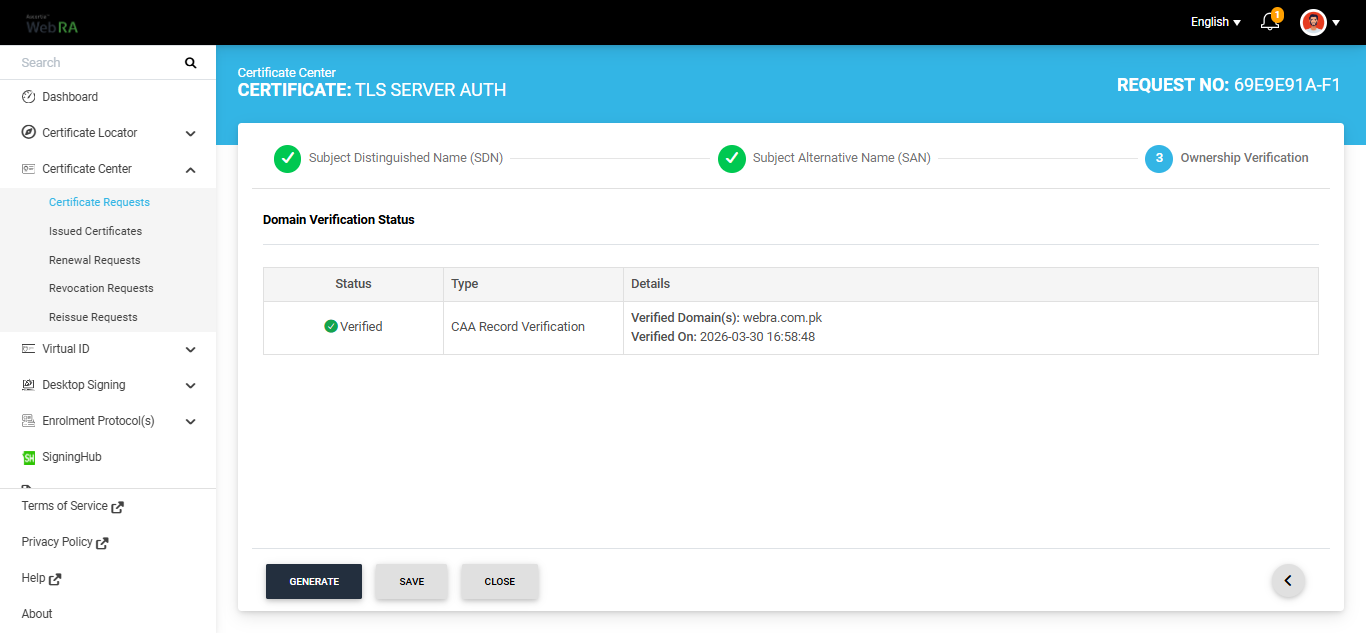
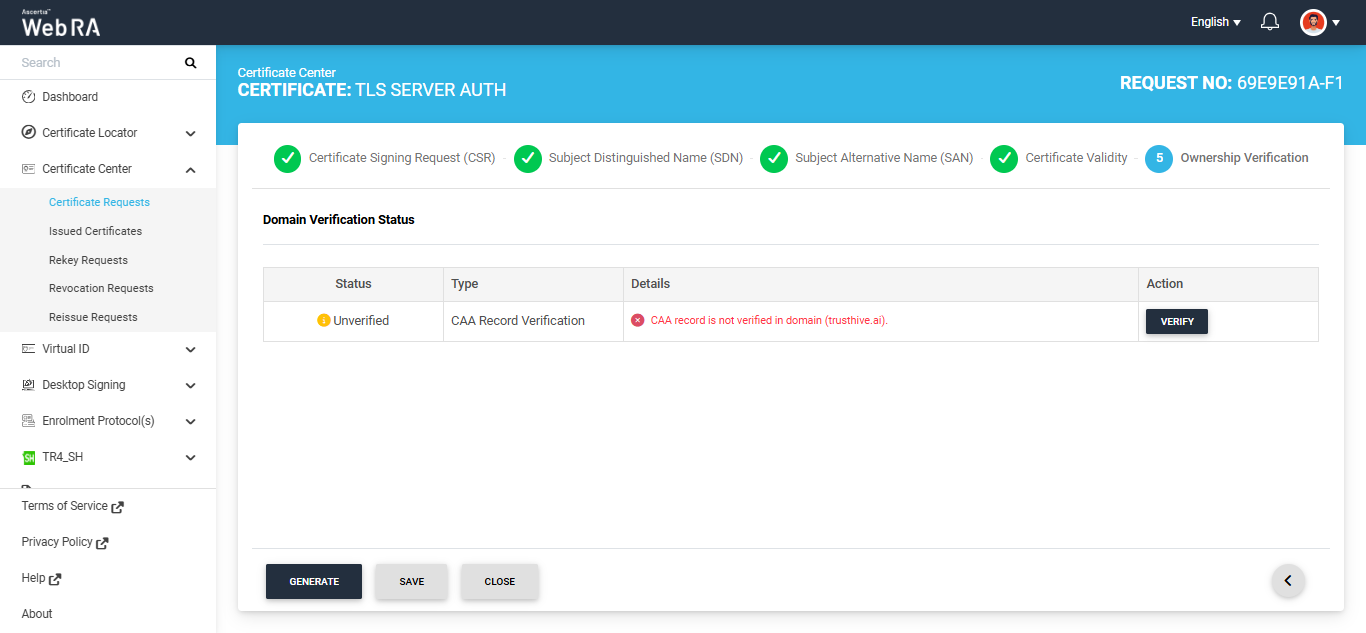
The ‘Domain Verification Status’ will appear unverified. Click the ‘Verify’ button.
If the CAA records you configured in the Enterprise Domain configurations matches the CA record you entered in the DNS entry, the Domain Verification Status will appear Verified, as displayed below:
If the CAA records you configured in the Enterprise Domain configurations does not match the CA record you entered in the DNS entry, the system will display an error.
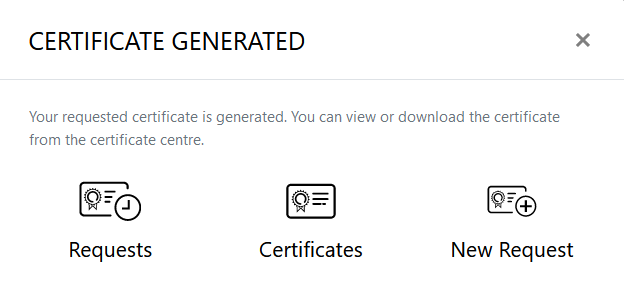
In case of Verified status, click 'Generate' to process a certificate. The Certificate Generated confirmation message will appear, as displayed below:
DNSSEC Verification
An additional check for DNSSEC verification has been enabled for all certificate types in Web RA. This feature is automatically enabled in the system and adds a DNSSEC check for domain validation and Certificate Authority Authorisation (CAA) verification during certificate request creation.
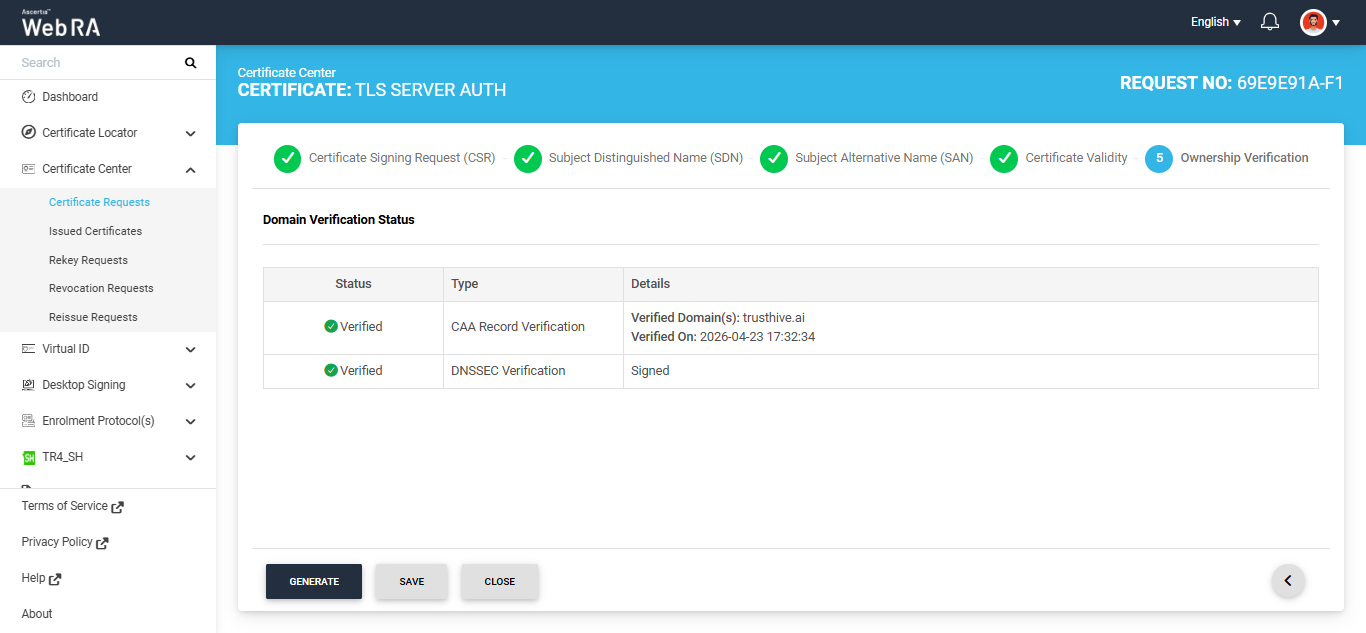
If DNSSEC is enabled and correctly configured for the domain, the system validates the domain’s DNSSEC signature during certificate request processing. If the signature is valid and the domain verification is successful, the certificate request is processed successfully and the system displays a ‘Verified’ status for DNSSEC verification.
If DNSSEC is not enabled for the domain, DNSSEC verification will not be performed and the certificate will be generated without it.
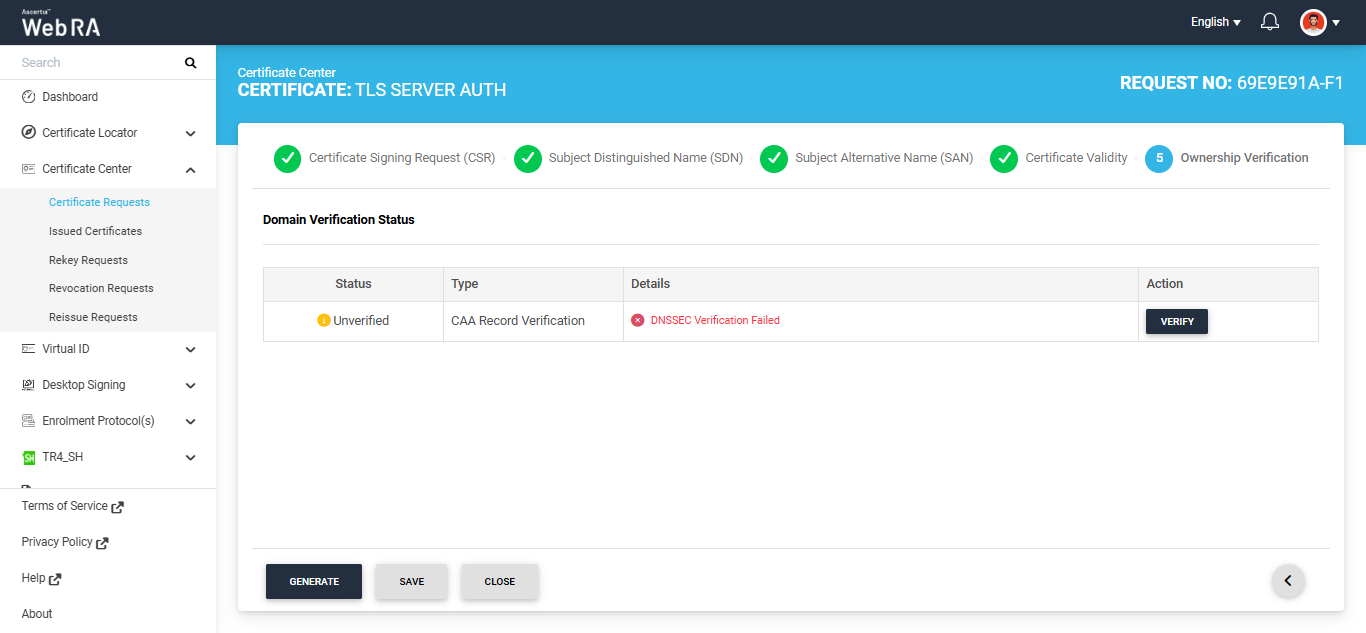
However, if DNSSEC is enabled but the verification fails, the system displays an error on the screen.
Open MPIC Validation
If Open MPIC Validation is enabled in the certification profile, Open MPIC will also perform domain validation and CAA verification (if enabled in Enterprise domain settings) during certificate request generation.
The domain will be verified by the Open MPIC perspectives. If the domain verification meets the minimum quorum count specified in the Open MPIC connector, the user will be able to generate the certificate. For more details about Open MPIC connector, refer to the Connectors section.
After domain verification is performed by Open MPIC, the system will display a Verified status for the specified domain.
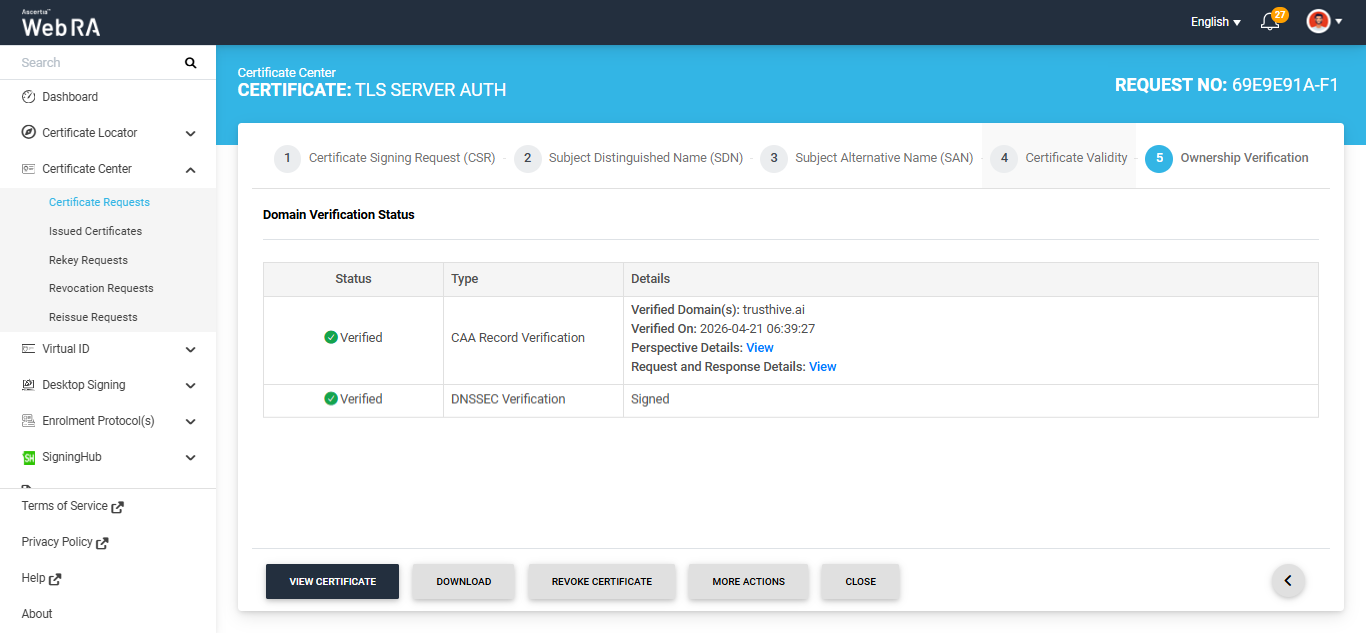
To view the Open MPIC perspective details, click the ‘View’ button next to 'Perspective Details'. The system will display the ‘Perspective Details’ dialog on the screen.
To view the Request and Response details, click the 'View' button. The system will display the 'Request and Reponse Details' dialog. You can view both Request and Response details from their respective tabs.
Note: If Open MPIC is enabled and DNSSEC Verification fails, the error will be displayed on the screen as shown in the image below.
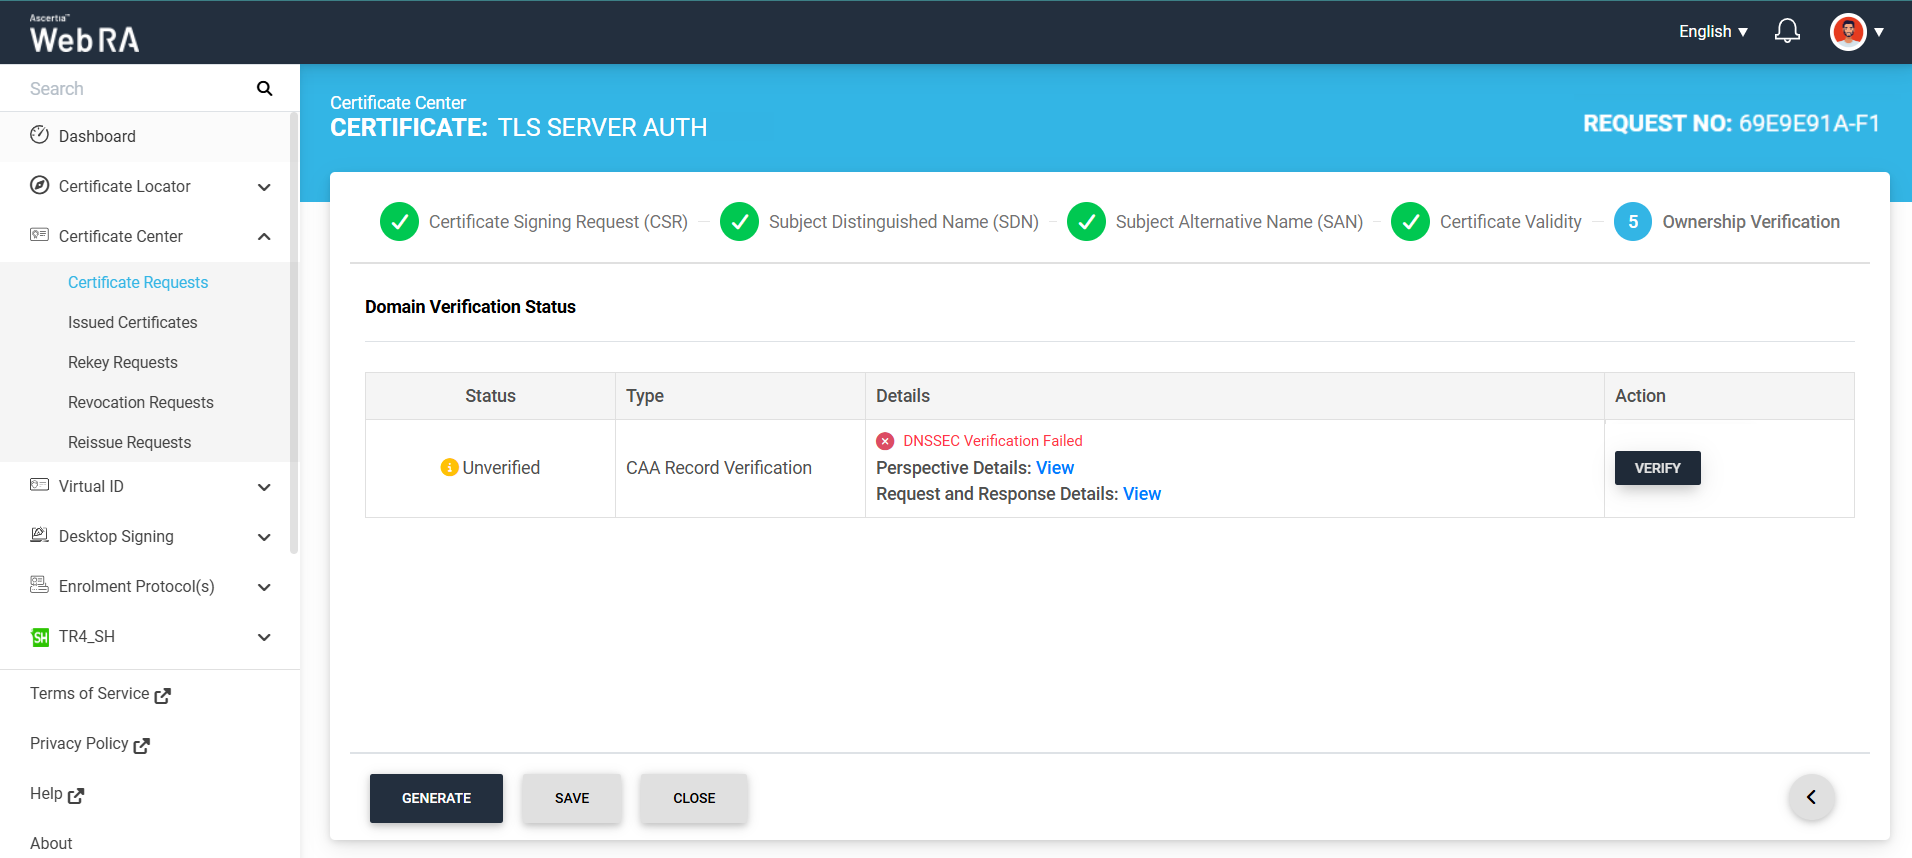
You can view the Perspective Details and Request and Response Details by clicking the respective 'View' button.
Note: If the setting for Digital Onboarding is enabled in the Certification Profile, clicking the 'Generate' button displays a dialog containing the providers configured in the selected Digital Onboarding connector.
Select the required provider from the given options.
The system then displays a QR code. Scan the QR code using the Digital Onboarding mobile application.
After scanning the QR code, complete the identity verification process by providing the required documents as configured in the Digital Onboarding policy.
Once the identity verification process is completed successfully, the QR code will disappear and the certificate request will be generated.
How to Renew a Certificate
To renew a certificate before its expiration, you need to first open the certificate request generated from the Web RA system.
To do this, expand Certificate Center > Certificate Requests from the left-tree menu in the Web Portal.
Then, click the request number of the certificate that you want to renew. Alternatively, click the three-dot button next to the certificate request entry and select the 'View Request' option.
The system will then open the certificate request in View mode.
To renew the certificate, click the 'Renew Certificate' button.
Note: The 'Renew Certificate' button appears only if the 'Renew Certificate' policy is selected in Configurations > Policies > Requests section under the certificate renewal settings.
The Certificate Signing Request (CSR) screen will appear again, as displayed in the image below.
Click the next '>' button to navigate to the 'Ownsership verification'' screen. Here, click the 'Renew' button to renew the certificate.
The system will display the Certificate Renew dialog on the screen. Here, you can optionally enter a message in the Message box.
Click the Renew button. The certificate will be renewed, and a Certificate Renewed alert will appear on the screen.
Each certificate can be renewed only up to the renewal limit configured in the certification profile. For example, if a renewal limit of 1 is configured in the certification profile, a certificate can only be renewed once. Any subsequent attempt to renew the same certificate will result in an error being displayed by the system.
The following error will appear on the screen if you attempt to renew a certificate after the renewal limit has been reached.
Note: If the renewal limit is set to zero in the certification profile, certificates generated under that certification profile cannot be renewed.