
Certification Service Profile
Certification Profile for Certification Service
Expand External Services > Certification Profiles from the left menu. The system will display the certification profiles listing screen.
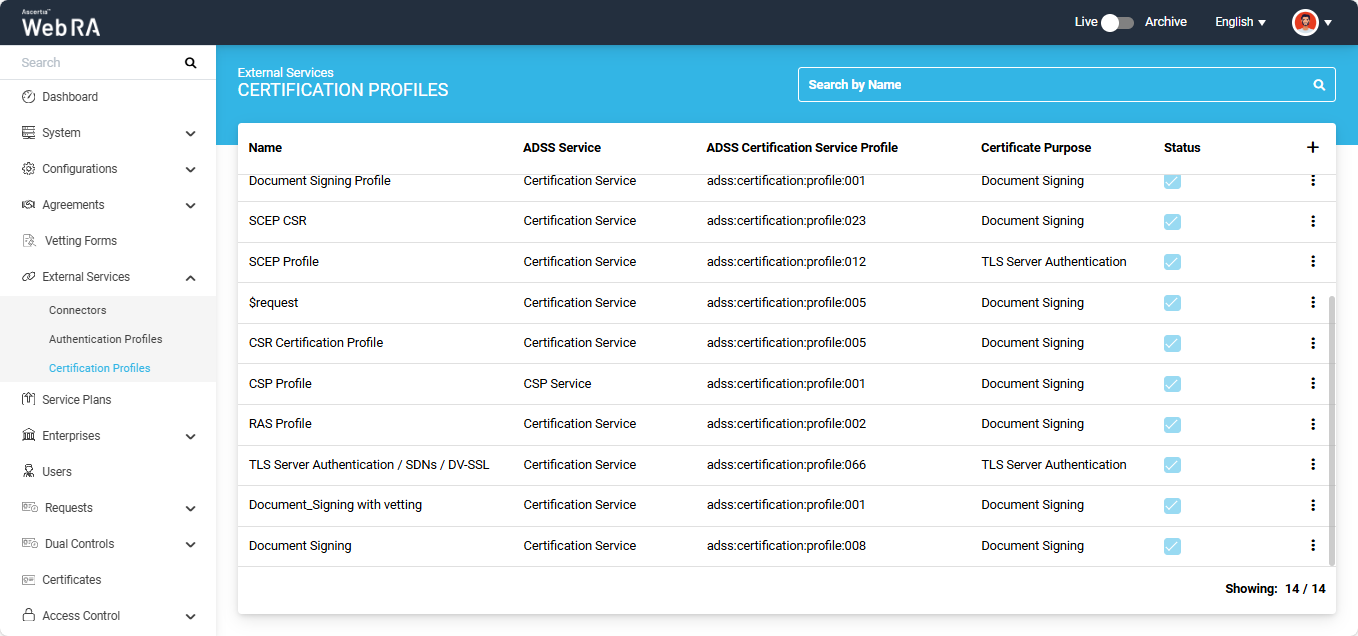
To add a new certification profile, click the ‘+’ button on the left side of the table header. The system displays the ‘Profile’ screen.
The Profile screen consists of the following two sections:
- Basic Information
- Service
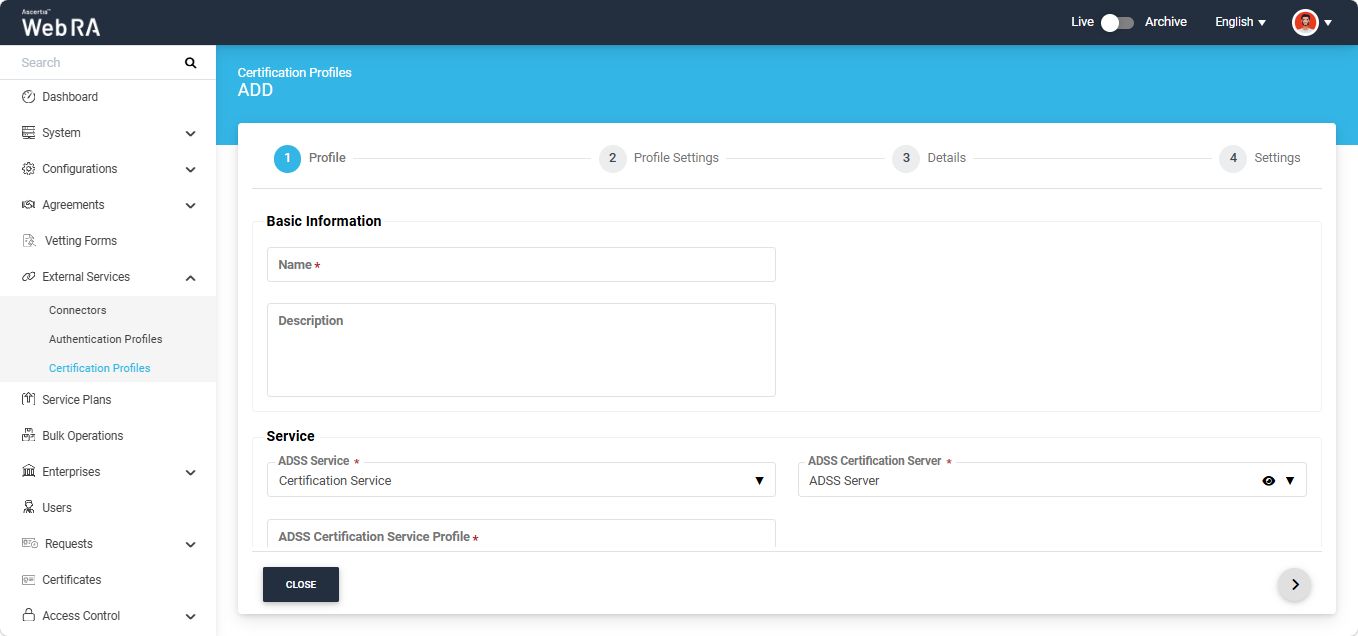
Basic Information
The Basic Information section displays the following fields:
|
Field |
Description |
|
Name |
Specify a unique name for this profile. |
|
Description |
Specify any description related to this certification profile. (Optional) |
Service
The Service section displays the following fields:
|
Field |
Description |
|
ADSS Service |
This field will display the ADSS Services (i.e. Certification Service and CSP Service) that are available for ADSS Web RA. Select the ‘Certification Service’ option from the dropdown. |
|
ADSS Certification Server |
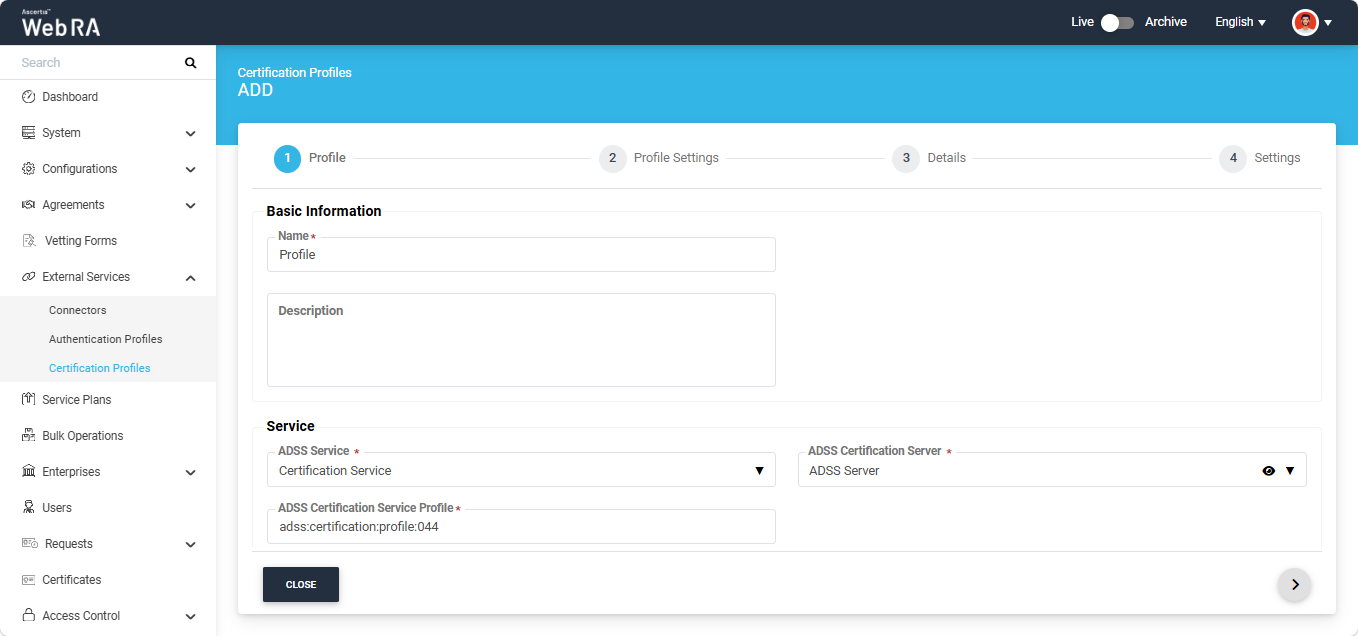
This field will display the list of active ADSS connectors in ADSS Web RA. Select the one to use for this certification service profile, for example: 192.168.2.64. |
|
ADSS Certification Service Profile |
In this field, enter the certification profile that you created on the ADSS Sever, for example: adss:certification:profile:001. |
|
Active |
Select this checkbox to make the profile active. |
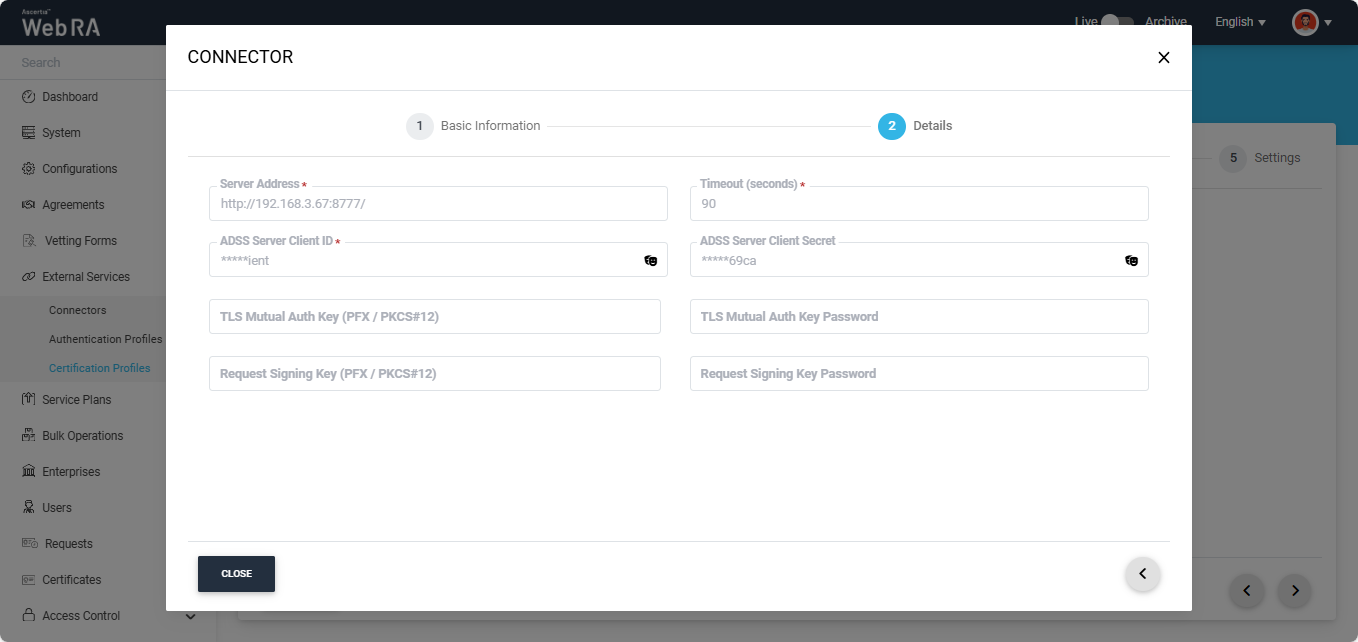
You can view the details of the selected ADSS connector by clicking the ‘Eye’ icon next to the connector name. When you click the icon, the system displays the ‘Connector’ dialog on the screen containing the information.
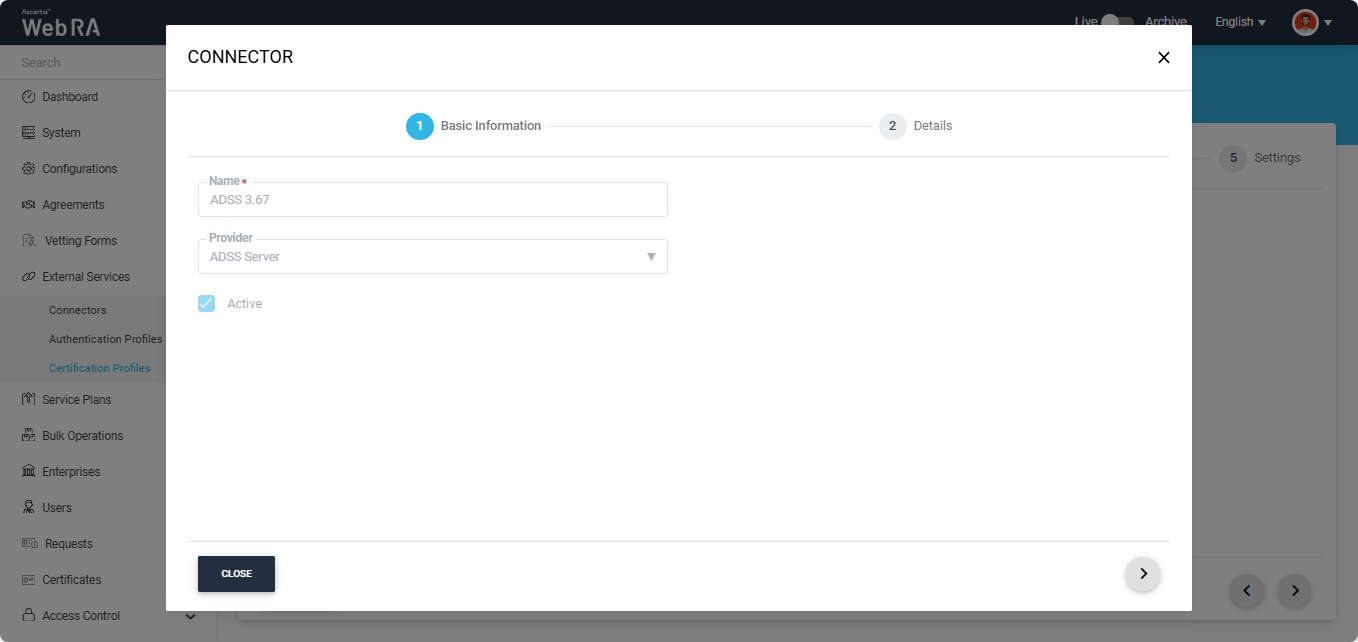
To view complete details of the connector, navigate to the ‘Details’ tab.
After providing the required information on the 'Profile' screen, click the next ‘>’ button to proceed to the ‘Profile Settings’ screen.
Profile Settings
The Profile Settings screen consists of the following sections:
- Certificate Information
- ADSS Server Client Secret
- Certificate Enrolment
- Verification
- Open MPIC
- Go Sign Token
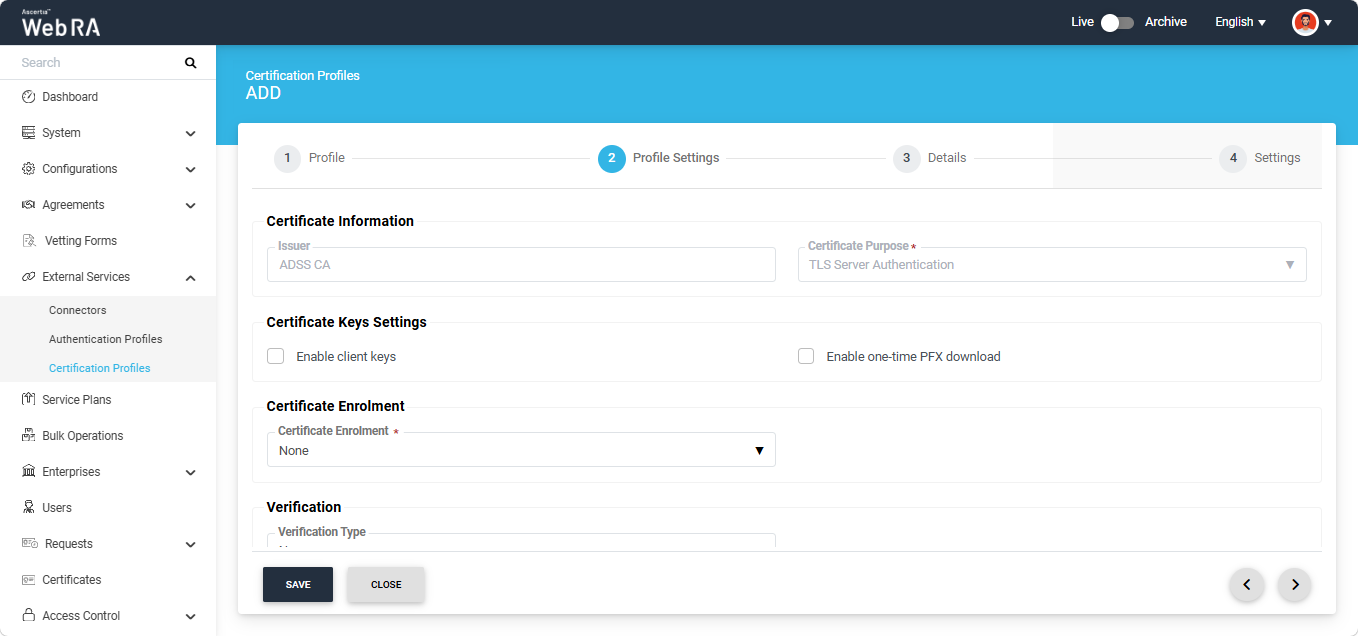
- Certificate Information
The Certificate Information section displays the following fields:
|
Field |
Description |
|
Issuer Name |
It will display the issuer CA name. (This field will appear in disabled form) |
|
Certificate Purpose |
This field contains the list of standard certificate purposes, which come from ADSS based on the selected certification profile. A certificate is generated based on the provided certification profile ID, and it will be in a disabled form as it is configured in the ADSS Sever under that ADSS Certification Service Profile. Possible certificate purposes could be Document Signing, TLS Server Authentication, Code Signing etc. ADSS Web RA supports the following types of TLS certificates:
When an EV TLS Server authentication certificate is revoked, ADSS Web RA will support only the following six revocation reasons:
In case of external CA this field will be enabled and operator can select certificate purpose. |
Certificate Key Settings
|
Field |
Description |
|
Enable Client Keys |
Enabling the client keys option will require public key to generate the certificate. The Subject Distinguished Names (SDNs) in the certificate request will be populated based on what is configured in the ADSS certification profile and the data provided in the CSR (Certificate Signing Request)’. |
|
Enable one-time PFX download |
If enabled, users can download the PFX file only once from the Web Portal. After that, the PFX download option will not be available. Additionally, when this option is enabled, the operator will not be able to download the PFX from the admin portal. |
Certificate Enrolment
The Service section displays the following fields:
|
Field |
Description |
|
Certificate Enrolment |
This dropdown displays the following options:
|
|
Enrolment Protocol(s) > Select Enrolment Protocol(s) |
This dropdown displays the following enrolment protocols:
You can choose an enrolment protocol according to your specific requirements. |
|
Windows Enrolment > Active Directory Profile |
It allows a user to select an active directory profile which is required for Windows Enrolment. |
|
Active Directory Profile > Certificate Template |
This drop down will fetch the list of certificate template fetched from the active directory selected above. |
|
Windows Enrolment > Windows Device Certificate |
By enabling this setting, user will not be required to upload an authentication certificate while creating an account. |
Verification
The Service section displays the following fields:
|
Field |
Description |
|
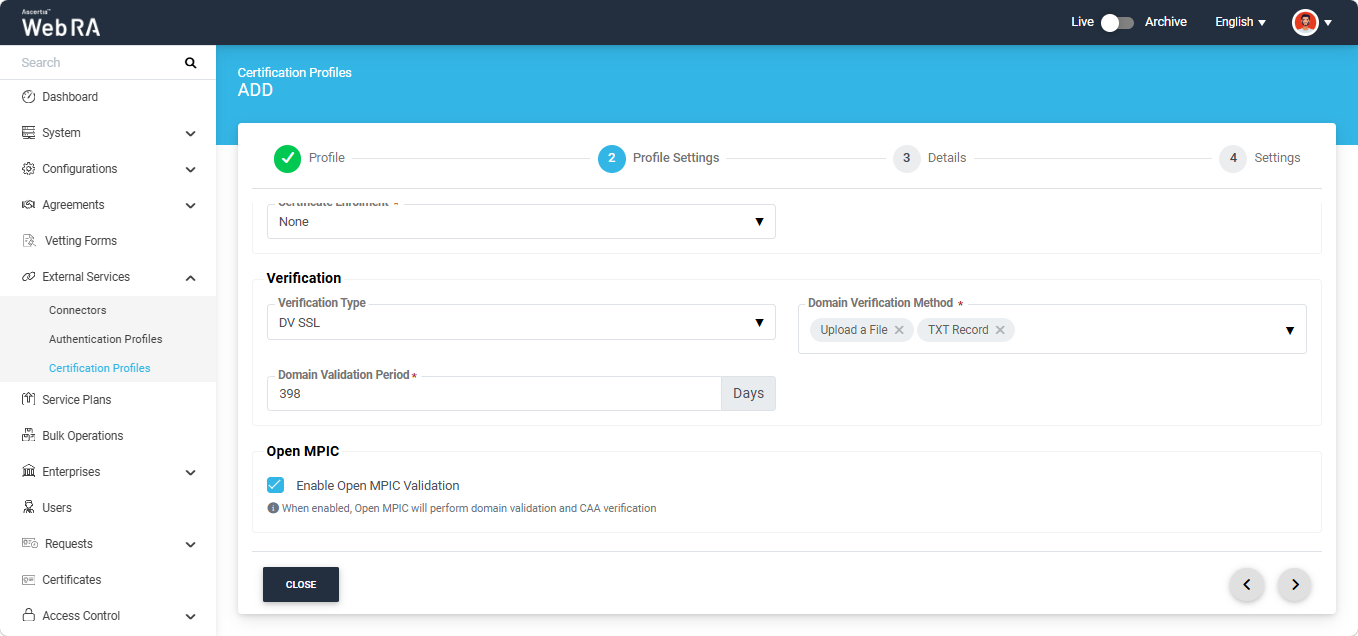
Verification Type |
Select an option from the following:
If you select any option other than ‘None’, the system will display the ‘Domain Verification Method’ dropdown field on the screen. |
|
Domain Verification Method |
From this dropdown, you can select the method that will be used to verify the domain. The available verification methods include:
You can either choose one option or select all options depending on your requirement. |
|
Domain Validation Period (Days) |
This field will appear if the selected Verification Type is DV SSL, EV SSL, or OV SSL. In this field, you can define the validity period of the domain verified during the creation of the certificate request. The default value of the validity period is 398 days and the configured value must not exceed 398 days. Note: If you set the domain validity period to 0 days, the user will be required to verify the domain each time a certificate request is generated.
Note: The domain validity period configured in the certification profile will only be applicable for new domains added and validated by the users while creating the certificate request. If the user has selected any enterprise-validated domain, the enterprise-level domain validation validity period will override the certificate profile validation period. |
Open MPIC
The Service section displays the following fields:
|
Field |
Description |
|
Enable Open MPIC Validation |
If this checkbox is enabled, Open MPIC will perform domain validation and CAA verification. Note: This option will only appear if the “Open MPIC Connector” is selected in the Configurations > Policies > Requests section. To learn more about this, navigate to the “Requests” section. Furthermore, the Open MPIC Validation option is only available when the certificate purpose is ‘TLS Server Authentication’ or ‘Email Signing’. |
Go Sign Token
|
Field |
Description |
|
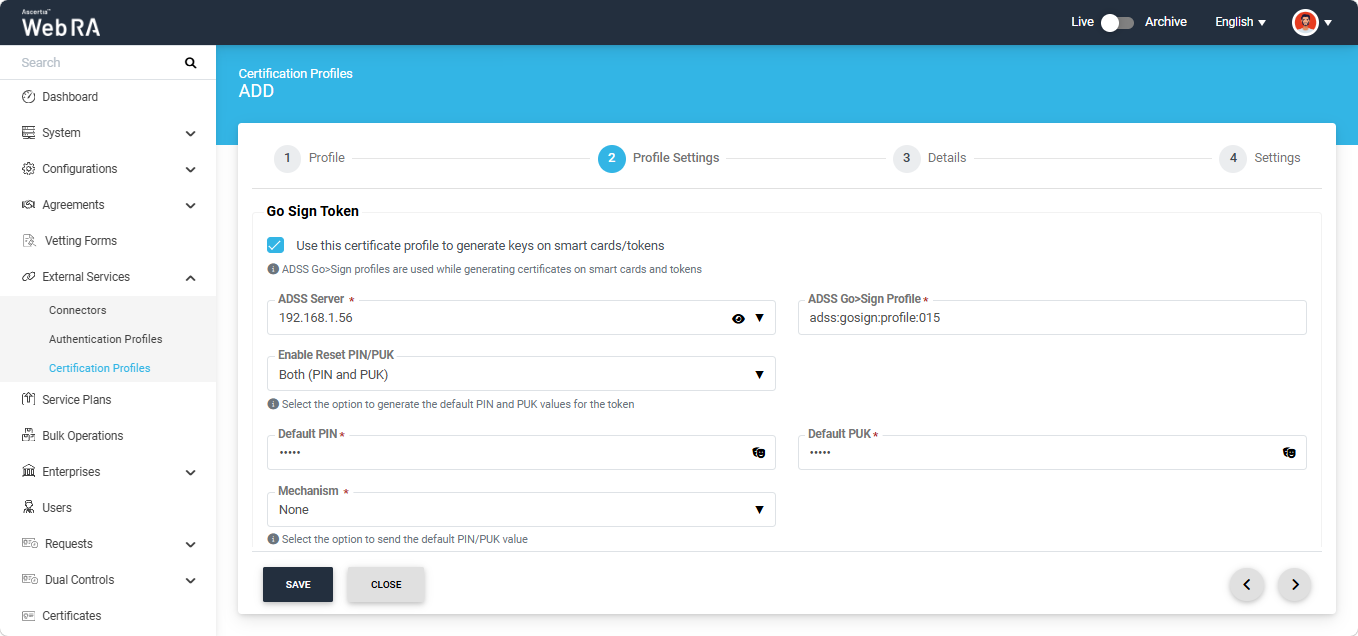
Use this certificate profile to generate keys on smart cards/tokens |
Enable this option if this profile will be used to generate the certificates in the smart card/ token. After enabling this checkbox, the administrator must provide the ADSS Server details along with the ADSS Go>Sign Profile. The system will also display the ‘Enable Reset PIN/PUK dropdown’, allowing the administrator to reset default PIN and PUK values for the token. The following options are available in the dropdown:
The operator has the option to reset default value for either PIN or PUK by selecting the respective option from the dropdown. If Both (PIN and PUK) option is selected, the system will display both fields for Default PIN and Default PUK, where the administrator can reset the default values. Note: By default, ‘None’ option will be selected for the From the “Mechanism” dropdown, the administrator can choose how the default PIN and PUK values will be shared. The available options are:
If Both (Email and SMS) is selected, the entered PIN and PUK values will be shared with the user via both email and SMS. |
After providing the required information on the 'Profile Settings' screen, click the next ‘>’ button to navigate to the ‘Details’ screen.
Details
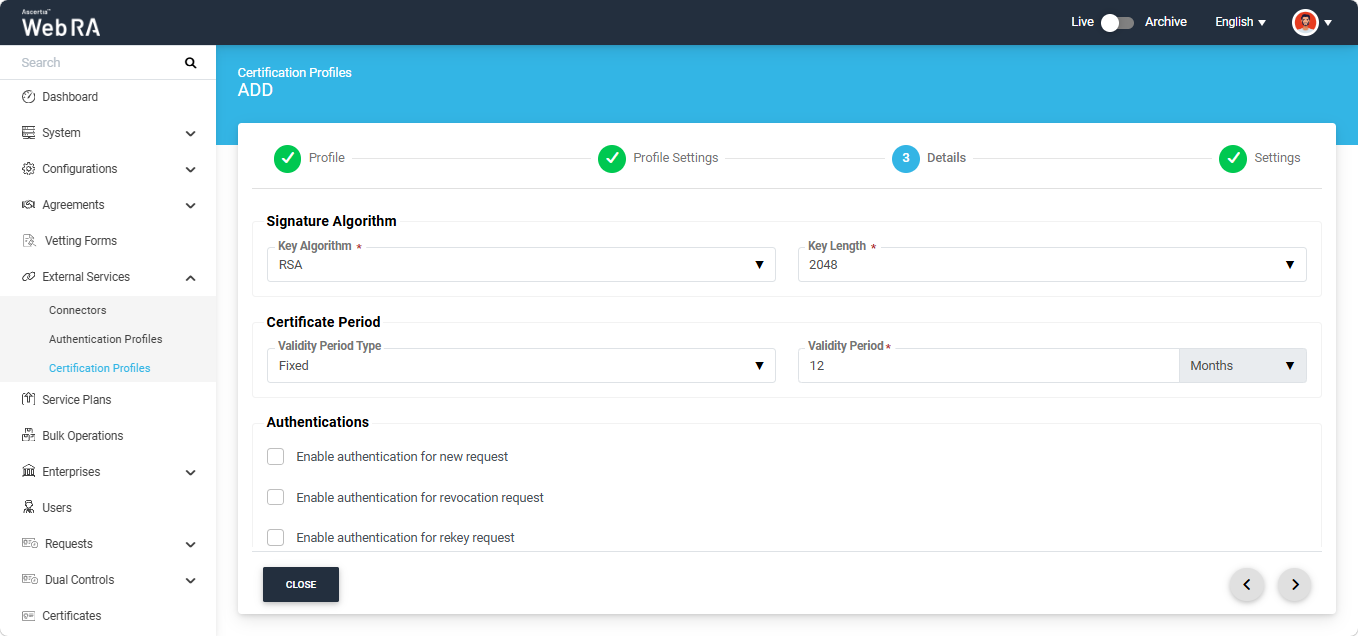
The Details screen consists of the following sections:
- Signature Algorithm
- Certificate Period
- Authentications
Signature Algorithm
This section consists of the following fields:
|
Field |
Description |
|
Key Algorithm |
The Key Algorithm that will be used to generate the key pair in the smart card/token. |
|
Key Length |
The Key Length that will be used to generate the key pair in the smart card/token. |
Certificate Period
This section consists of the following fields:
|
Field |
Description |
|
Validity Period Type |
The validity period type can be configured as Fixed to prevent the enterprise user from changing the certificate validity period. Alternatively, it can be set to Custom to allow the enterprise user to define the validity period when creating a certificate request. The Fixed and Custom values can only be used in the ADSS Web RA Admin if the selected ADSS Certification Profile has the overridable option enabled for 'Certificate Validity' in the ADSS Server. Otherwise, the validity period type will be shown as Fixed. |
|
Validity Period |
In this field, you can specify a numeric value for the validity period. If the ADSS Certification Profile is configured to use its own time duration instead of taking the validity period from the certificate request, this value will be ignored by the CA server. |
|
Validity Duration |
The time unit of the validity period. It could be minutes, hours, days, months and years. |
Authentications
From the Authentications section, the operator has the option to enable second-factor authentication for new certificate requests, revocation requests, and rekey requests.
If you enable any checkbox, the system displays the ‘Authentication Profiles’ dropdown, from which the operator can select the required profile for second-factor authentication. The available authentication methods include OTP, SAML, Active Directory, Azure Active Directory, and OIDC.
|
|
By default, the first authentication profile in the dropdown list appears as selected. You can change the profile by clicking the dropdown field and selecting an option from the list. |

|
|
Only those profiles for which secondary authentication has been configured during profile creation will appear in the Authentication Profiles dropdown. |
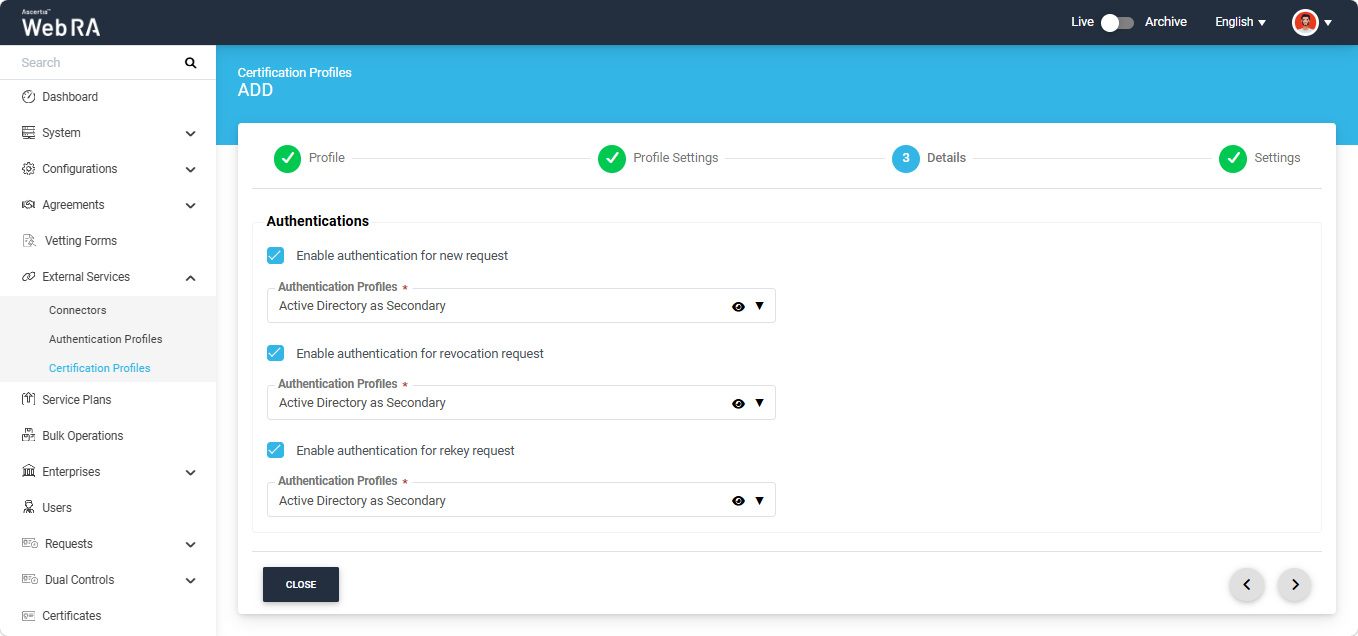
To view the details of an authentication profile, click the ‘Eye’ icon next to the profile name. The system will open the ‘Authentication Profile’ dialog, displaying the Basic Information.
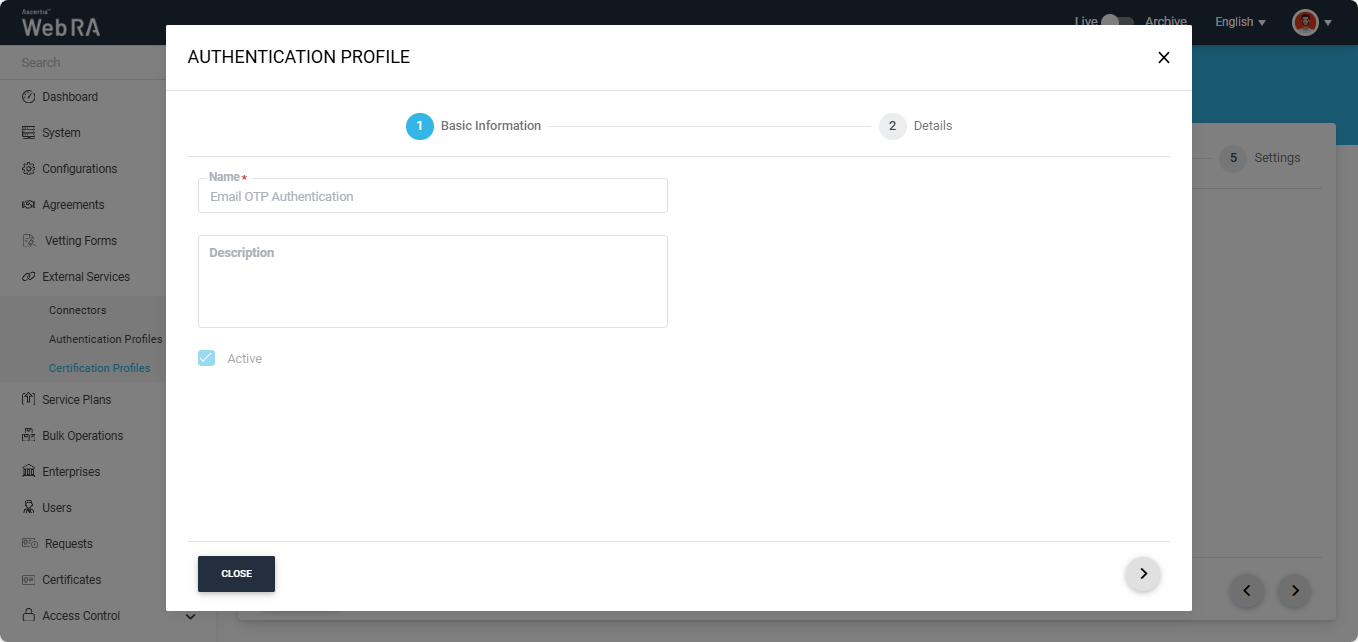
To view the details of the profile, click the ‘Details’ tab.
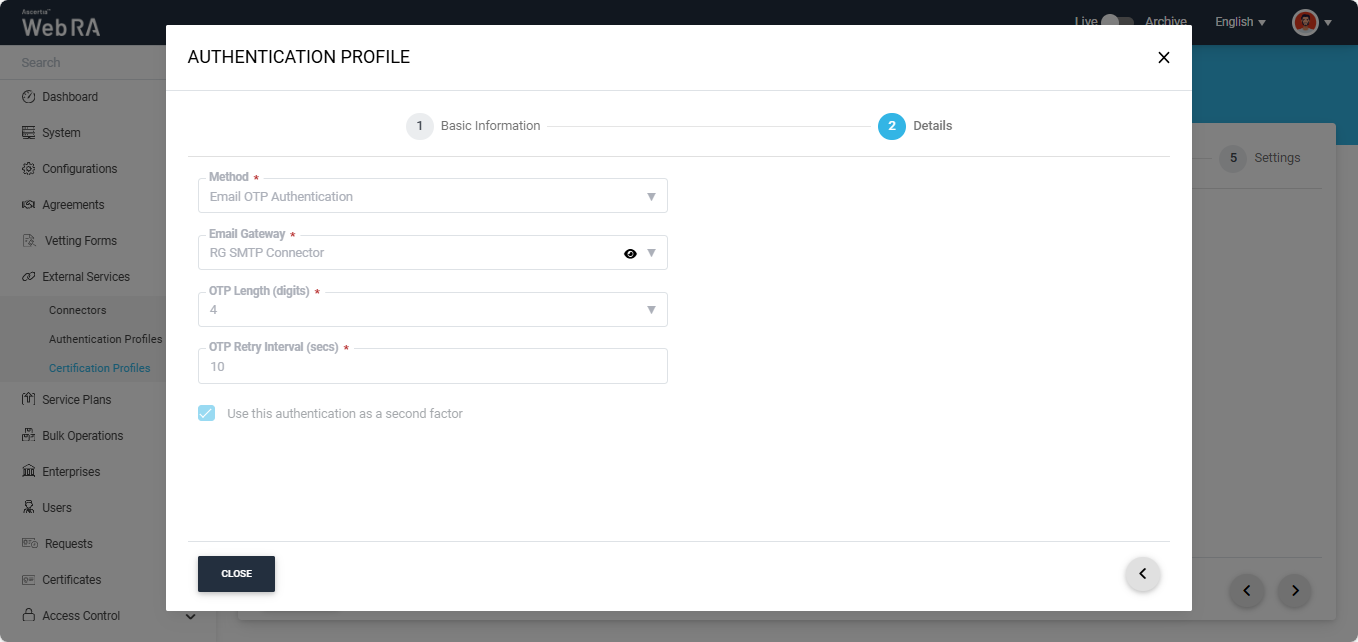
After providing all the required information on the 'Details' screen, click the next ‘>’ button to navigate to the ‘Settings’ screen.
Settings
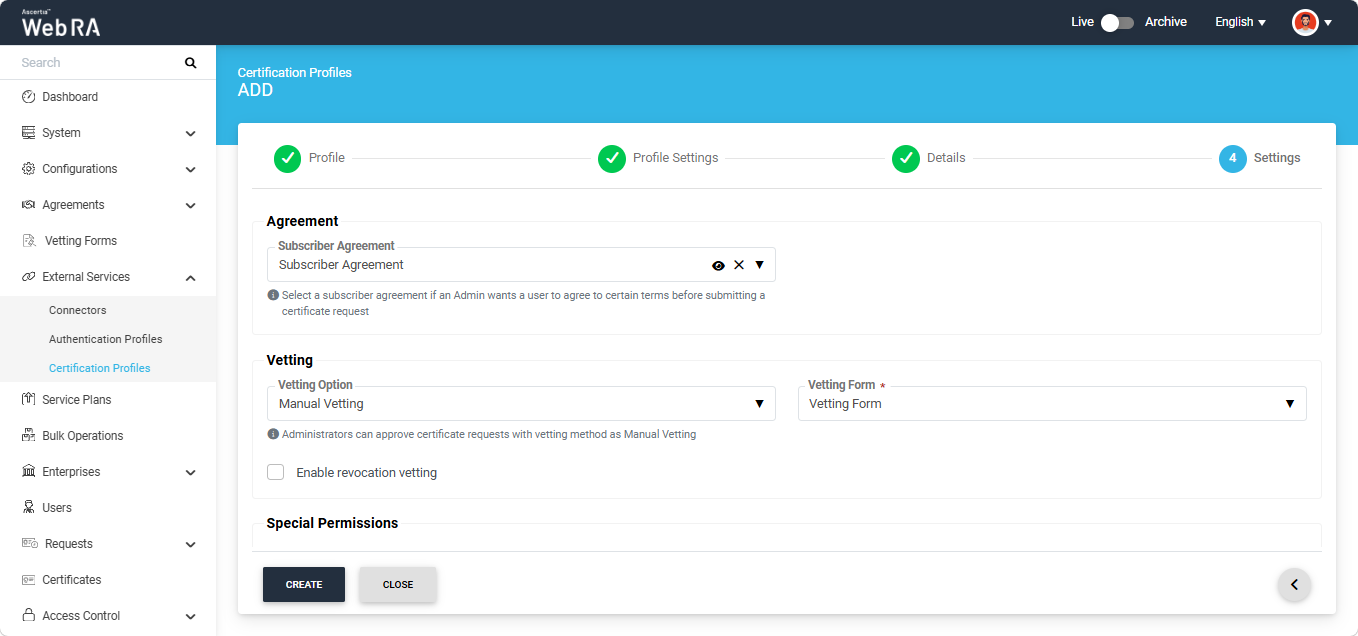
The 'Settings' screen consists of the following sections:
- Agreement
- Vetting
- Special Permissions
- Digital Onboarding
- Mandatory Fields
Agreement
This section consists of the following fields:
|
Field |
Description |
|
Subscriber Agreement |
From this dropdown the administrator can select a subscriber agreement. A subscriber agreement is selected in a certification profile if the admin wants the user to agree on certain terms before submitting a certificate request. |
Vetting
This section consists of the following fields:
|
Field |
Description |
|
Vetting Option |
This dropdown allows the administrator to choose whether vetting is required for certificate requests generated in the system. By default, the None option is selected. To require vetting for a certificate request, select the Manual Vetting option from the dropdown. |
|
Vetting Form |
This dropdown field appears only when ‘Manual Vetting’ option is selected in the 'Vetting Option' dropdown. It displays a list of all active vetting forms. Select the required form from the list to configure it with the certification profile. |
|
Enable Revocation Vetting |
Select this checkbox to enable vetting for revocation requests. |
Special Permissions
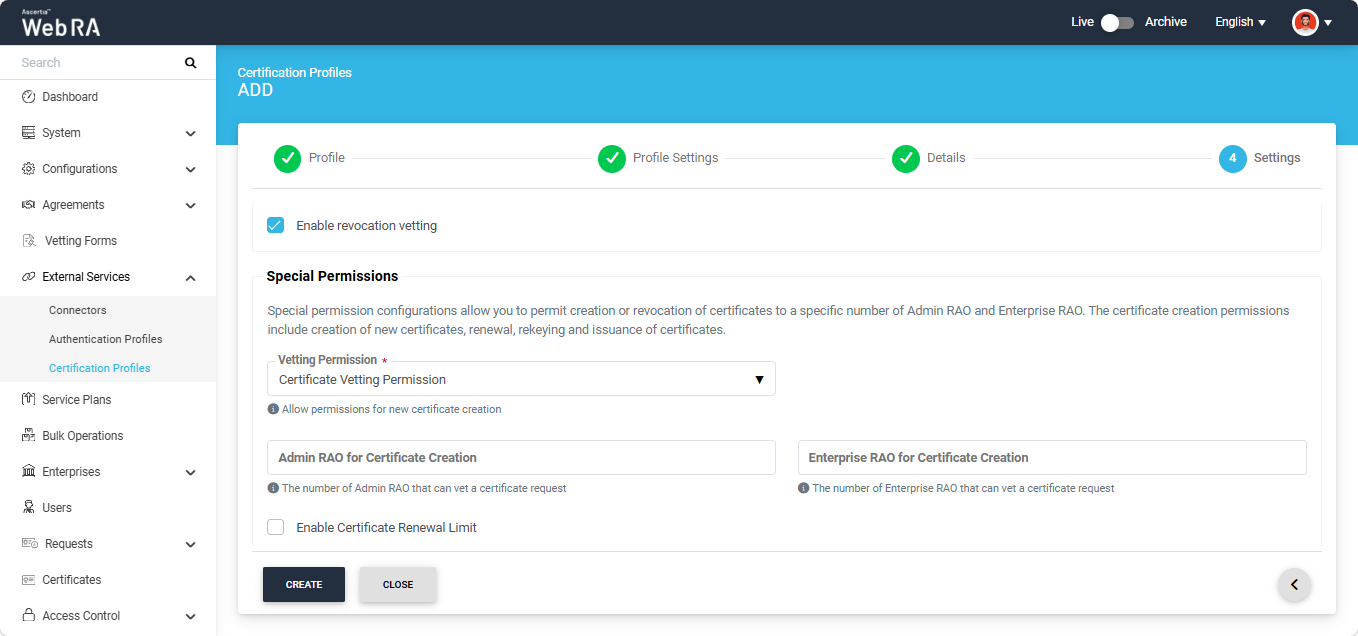
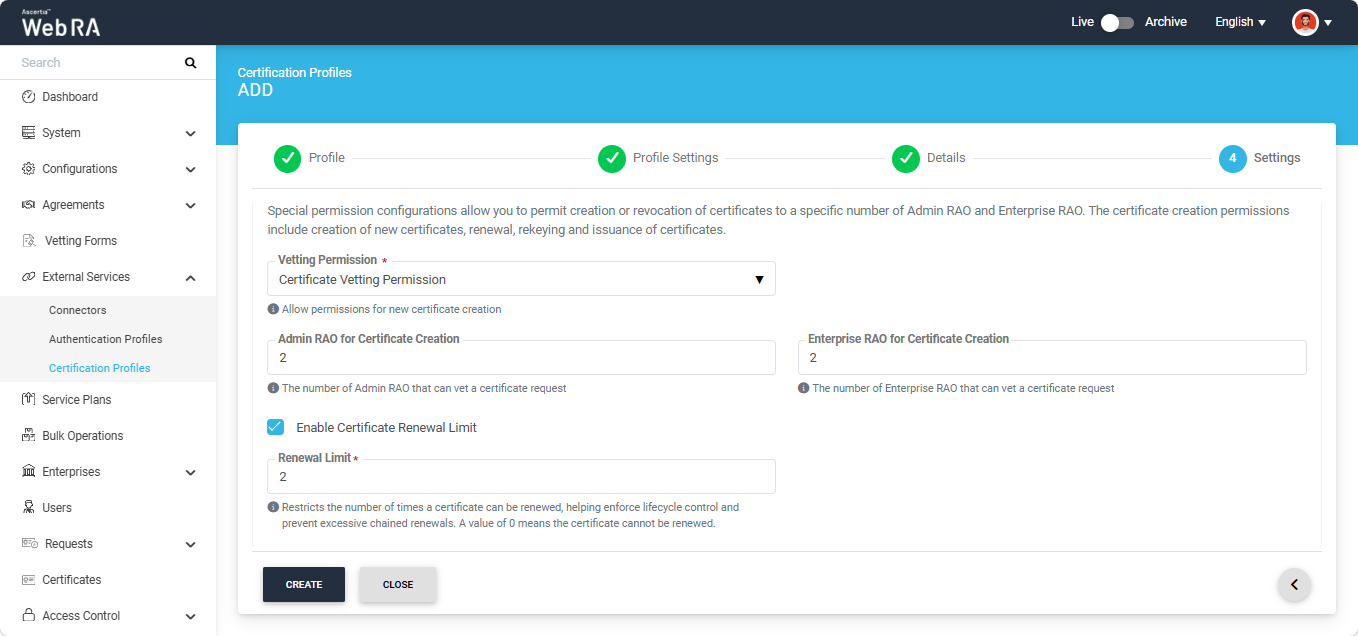
This section displays the following two fields:
- Vetting Permission
- Enable Certificate Renewal Limit
- Vetting Permission
Note: The 'Vetting Permission' dropdown appears only when the 'Manual Vetting' option is selected in the 'Vetting Option' dropdown under the 'Vetting' section.
ADSS Web RA allows an operator to configure the number of Admin RAOs and Enterprise RAOs required to approve the following types of requests submitted under the certification profile:
- Creation of a new certificate
- Renewal of a certificate
- Certificate rekeying
- Certificate reissuance
The permissions can be assigned to Admin RAOs, Enterprise RAOs, or both, depending on the approval requirements.
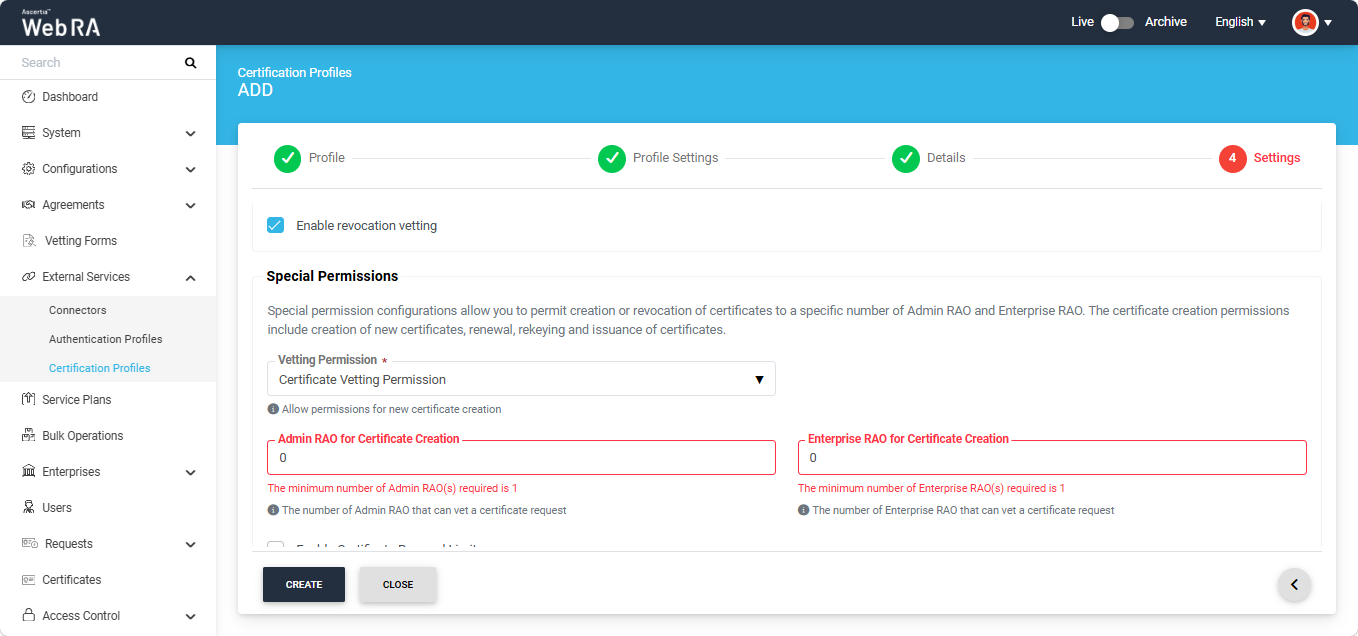
Minimum number of Admin RAO/Enterprise RAO required
The operator must permit at least one Admin RAO or Enterprise RAO for the special permissions. If both fields are set to 0, the following error message will appear on the screen:
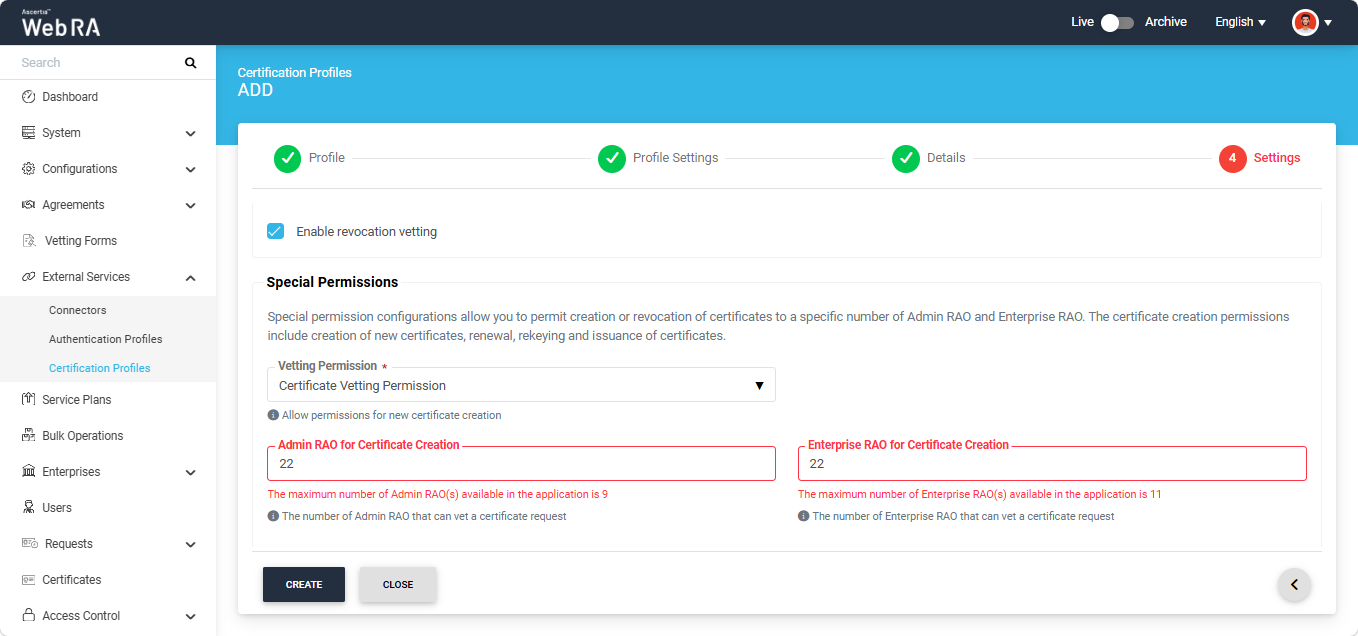
Maximum Limit on the Number of Admin RAOs / Enterprise RAOs
If the operator enters a number greater than the total number of available Admin RAOs or Enterprise RAOs in the application, the following error message will appear on the screen:
Certificate and Revocation Vetting Permission
Note: This option will only appear in the 'Vetting Permission' dropdown if 'Enable Revocation Vetting' is selected in the 'Vetting' section.
If the operator has selected the ‘Certificate and Revocation Vetting Permission’ option in the Vetting Permission dropdown, the following two additional fields will appear on the screen:
- Admin RAO for Certificate Revocation
- Enterprise RAO for Certificate Revocation
The operator needs to specify the number of RAOs (Admin or Enterprise) that have permission for this action according to the system rules mentioned above.
After making all the required selections, click the ‘Create’ button to finalise the certification profile.
- Enable Certificate Renewal Limit
Note: This checkbox is displayed on this screen only when the 'Renew Certificate' option is selected under 'Certificate Renewal Settings' in the Configurations > Policies > Certificates module.
This section allows the operator to set a limit on the number of times a certificate can be renewed in the Web RA system. The configured limit is applied individually to each certificate generated in the system.
For example, if a Renewal Limit of 1 is configured in the certification profile, a certificate can only be renewed once. Any subsequent attempt to renew the same certificate will result in an error being displayed by the system.
Note: If 0 is entered in the Renewal Limit field, certificates generated under this certification profile cannot be renewed.
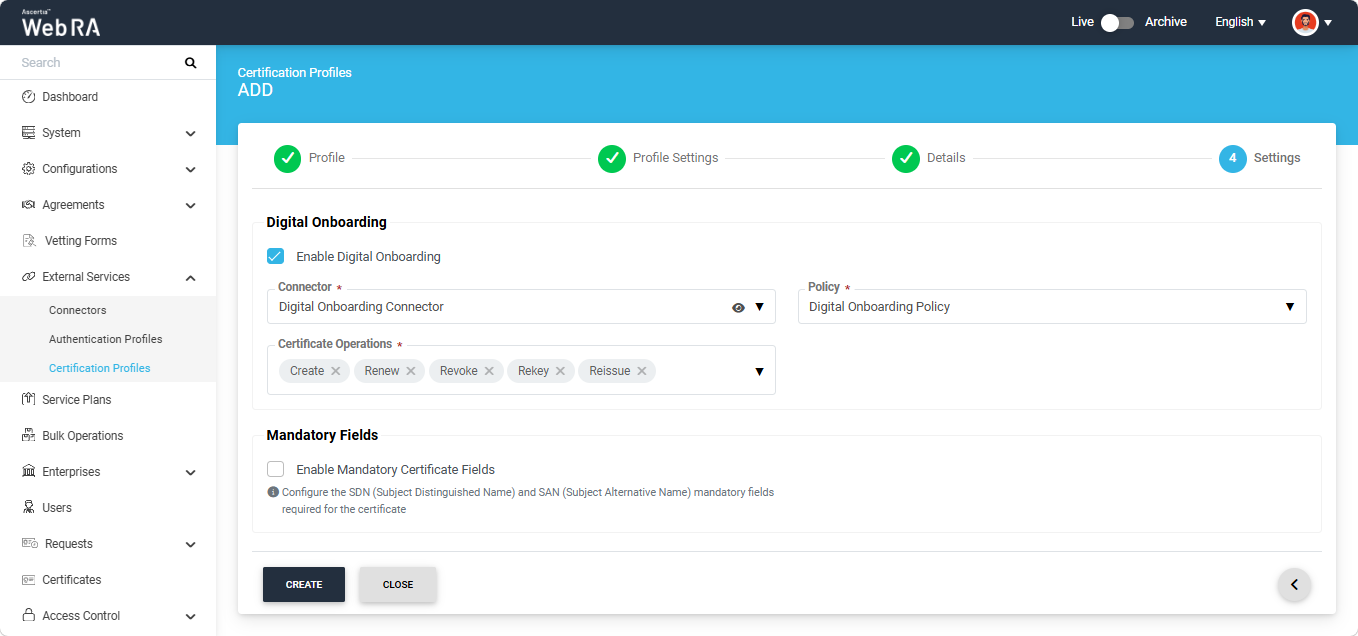
Digital Onboarding
Select the 'Enable Digital Onboarding' checkbox to ensure that users complete the digital onboarding process before performing certificate-related operations in the Web RA system.
When this option is selected, the following fields appear on the screen:
|
Field |
Description |
|
Connector |
Select the connector to be used for the digital onboarding process. |
|
Policy |
Select the digital onboarding policy to be applied during the onboarding process. |
|
Certificate Operations |
Select the certificate operations for which the digital onboarding process is required. Users must complete the digital onboarding process before they can proceed with the selected operation(s). |
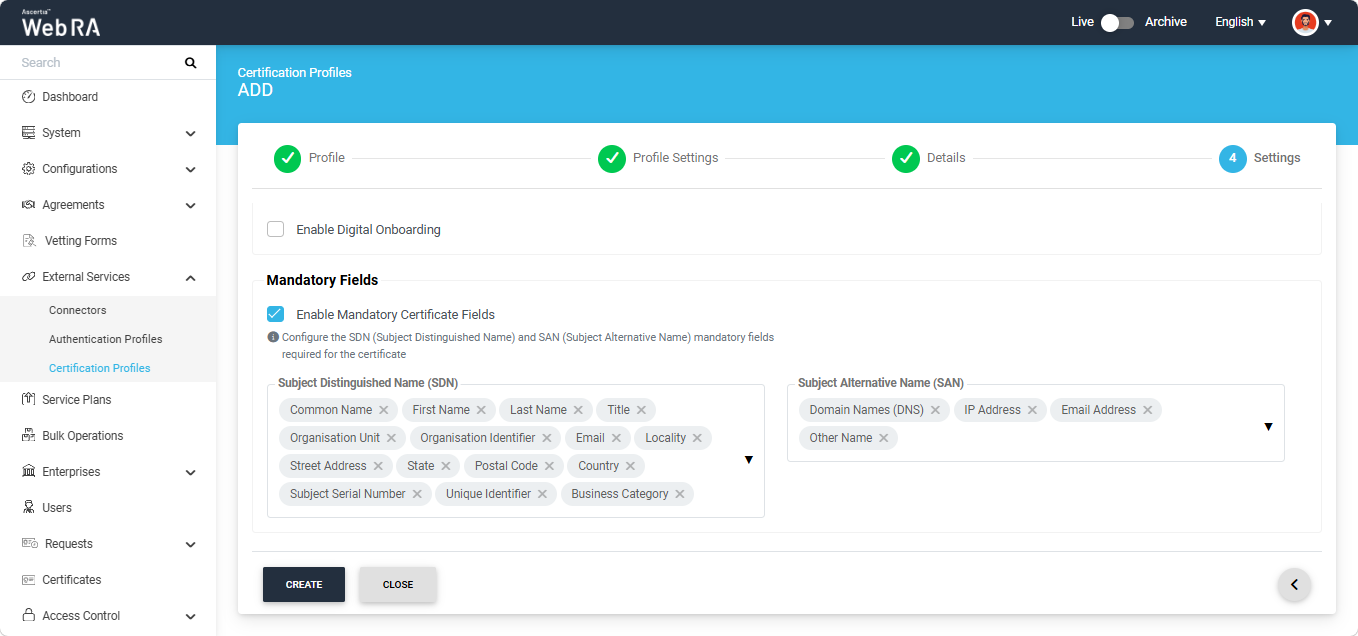
Mandatory Fields
This section consists of the following fields:
|
Field |
Description |
|
Enable Mandatory Certificate Fields |
If enabled, this option allows the administrator to define which Subject Distinguished Name (SDN) and Subject Alternative Name (SAN) fields must be mandatory when generating a certificate. Enabling this checkbox will display the SDN and SAN dropdowns, allowing the administrator to select the required mandatory fields while leaving the optional ones unchecked. |
After configuring the required Settings, click the ‘Create’ button to finalize the creation of the certification profile.