SigningHub allows you to add signatures in a workflow, Read more about the types of signatures as per level of assurances. Adding signatures for a recipient/ placeholder will consume signatures quota of your (document owner's) account, after being signed by the recipient.

Once you add a signature field, the signature field is marked with "Signature". You can also add multiple signature fields for a recipient in a document. 
Adding a signature field is subject to your assigned enterprise user role. If you wish to use this provision, ask your Enterprise Admin to enable the respective signature field in your Role>Document Settings.

Upon adding a signature field, a level of assurance will be set for a signature field which is set by default as per the configured default level of assurance under Personal Settings>Signature Settings. Level of assurance options for a signature field is subject to your assigned enterprise user role, If you are wish to use more options, ask your Enterprise Admin to enable the respective level of assurances in your Role>Document Settings.

After you have:


Add a signature field

  1. Select the document from the left side of document viewer screen, on which signature is required from a signer. Click the settings icon  (on the left side of the screen) if you want to manage the added documents.
  2. Select the recipient (signer/ electronic seal/ placeholder) from the right side of document viewer screen, for whom you want to add a signature field. Click the settings icon  (on the right side of the screen) if you want to manage the added recipients.
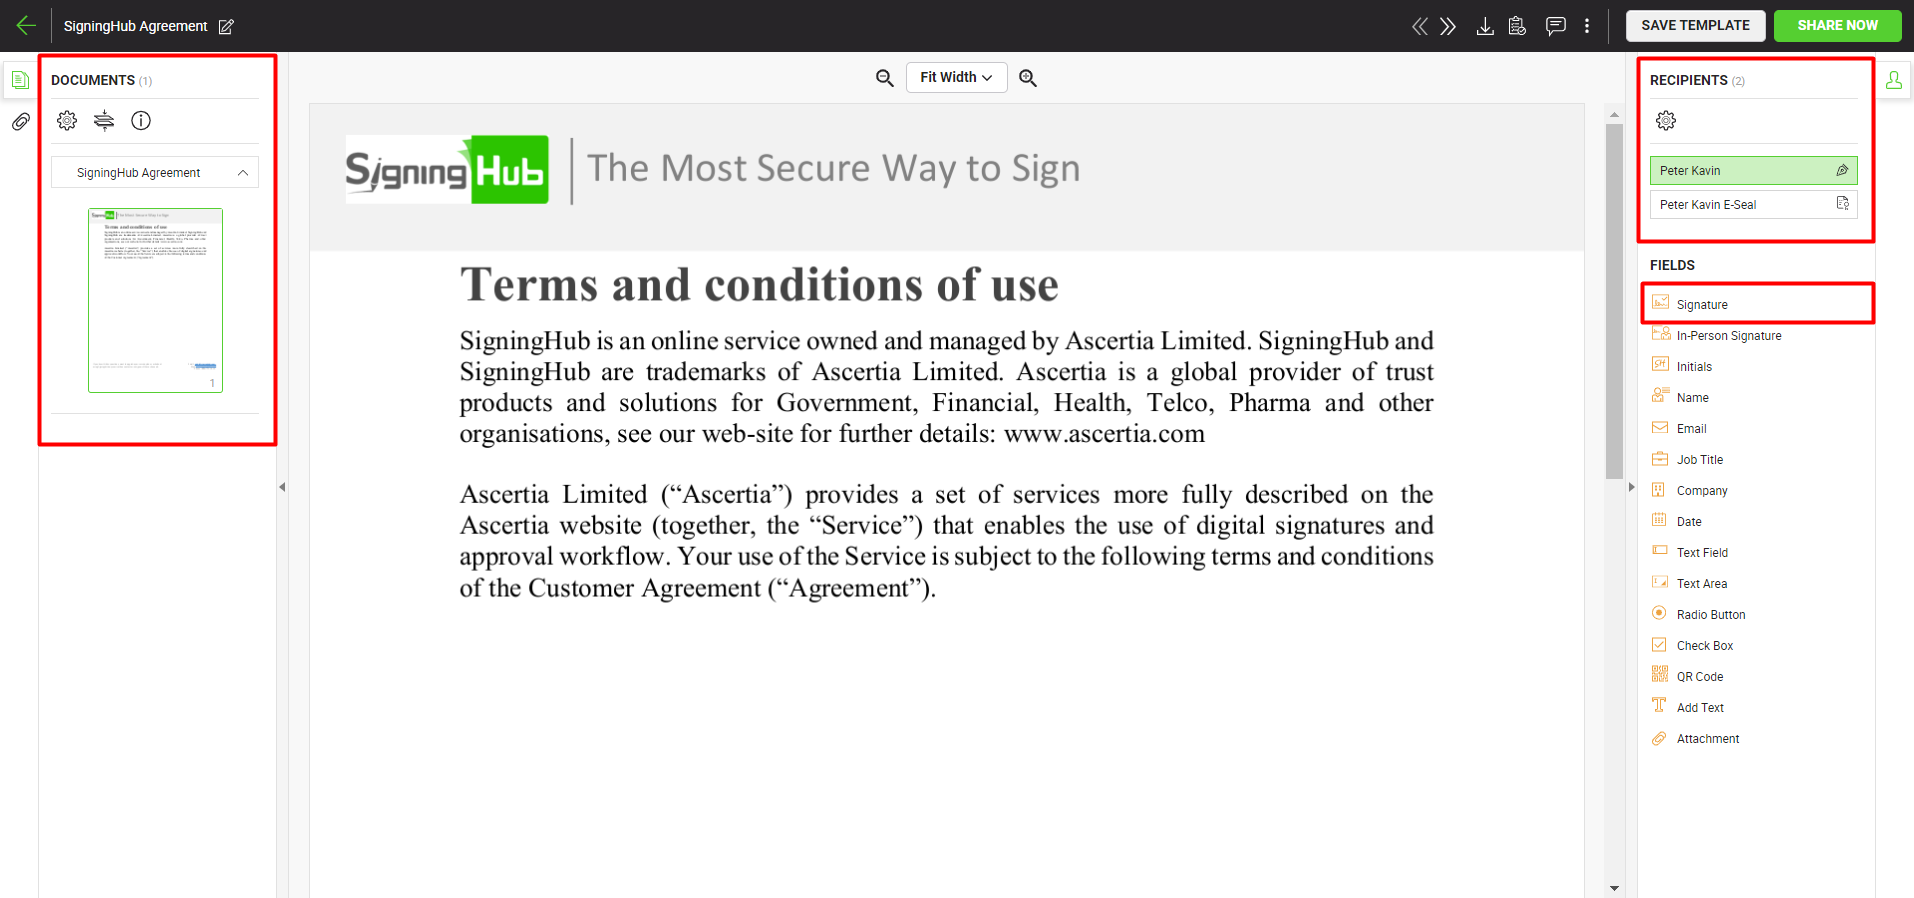
     
         
  3. Drop the "Signature" field on the required location on the document. By default, upon dropping the "Signature" field, the "Edit Signature Field" dialog is displayed.
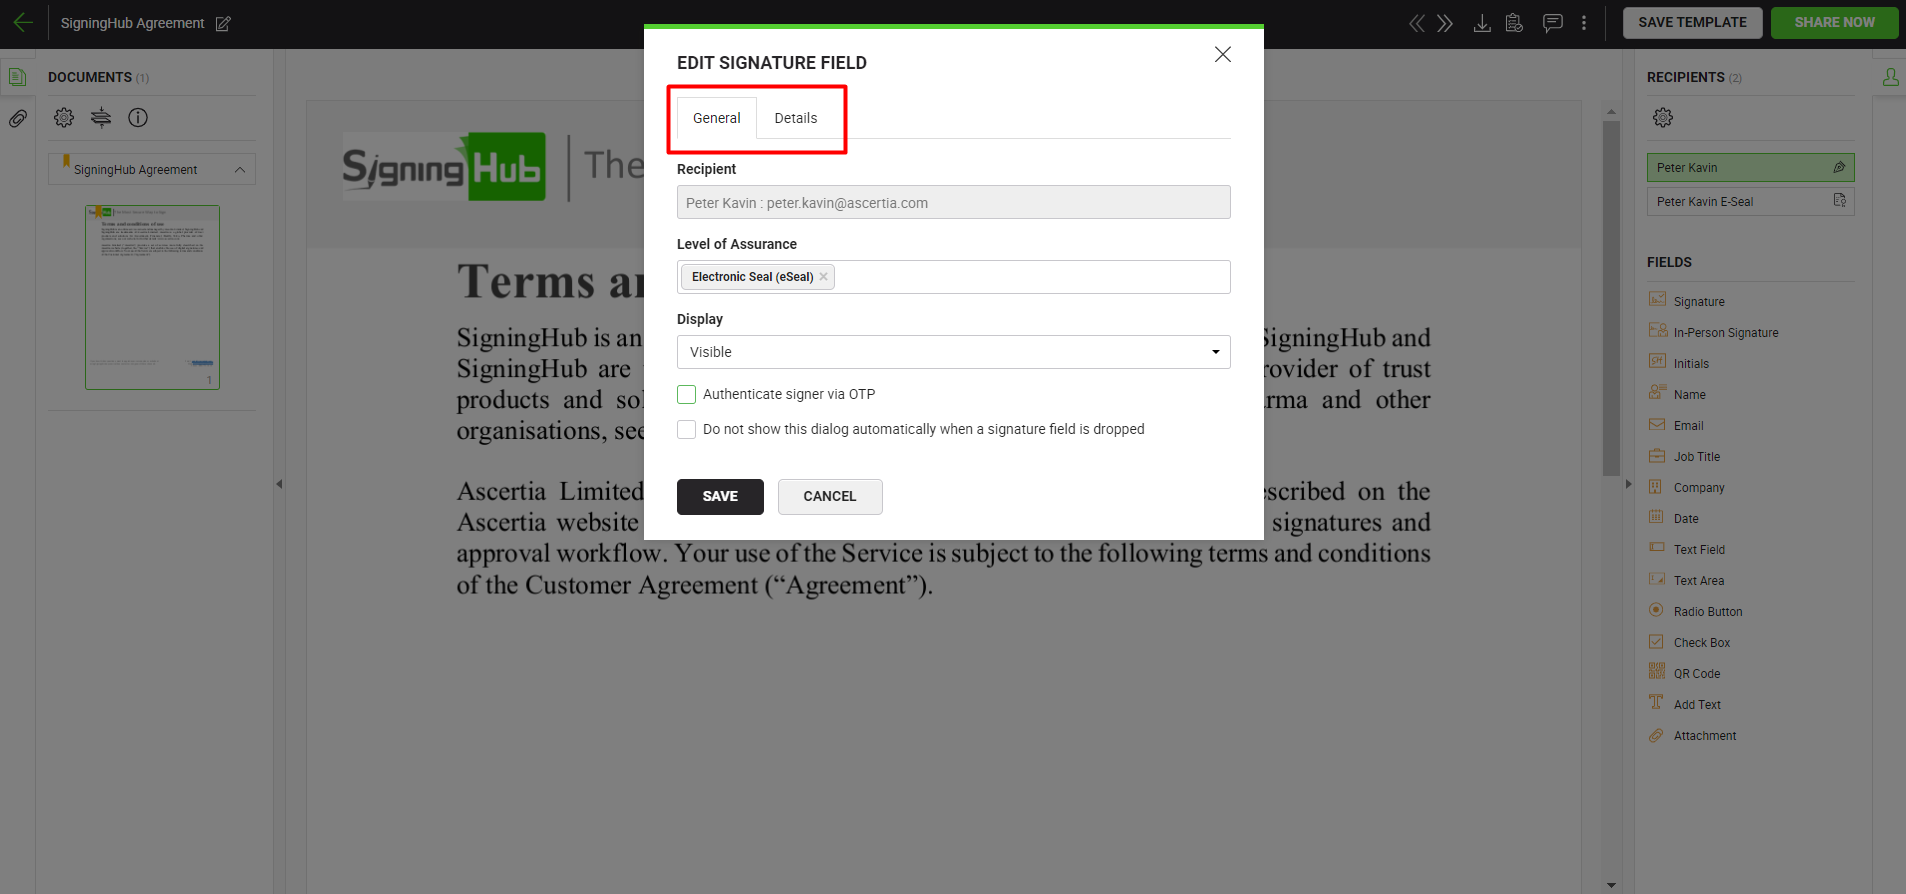


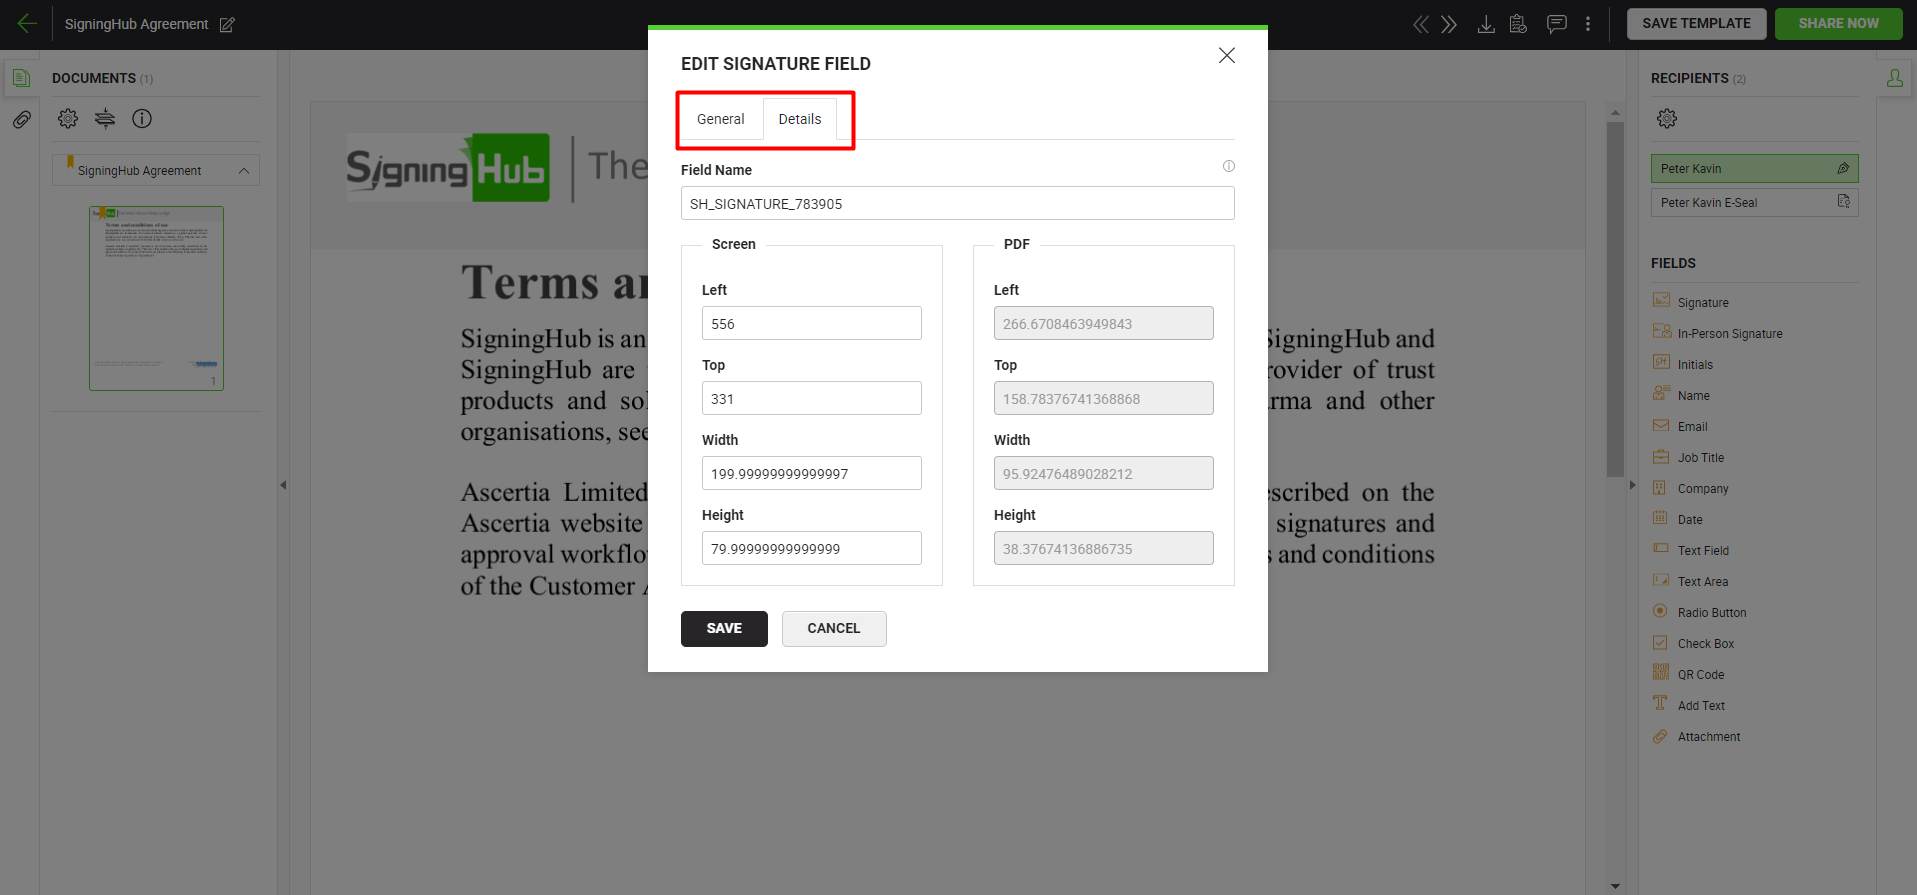
  4. Specify the details under "Details" and "Dimensions" tab as needed. See the "Signature Fields" table below for the description of the fields.


​In case you do not need to automatically display the "Edit Signature Field" dialog for the Signature fields that you will drop on the Viewer, then select the "Do not show this dialog automatically when a signature field is dropped" check box. 


  1. Click "Save".
    The field is placed. Once dropped, you can resize the field by changing its height and width using the bottom right corner to resize it diagonally as needed. The system will remember the field size and its display preferences (i.e., visible or invisible) for adding new signature fields of the same group accordingly i.e., all digital signature fields on the same documents package.
  2. To add multiple signature fields, repeat the above steps.


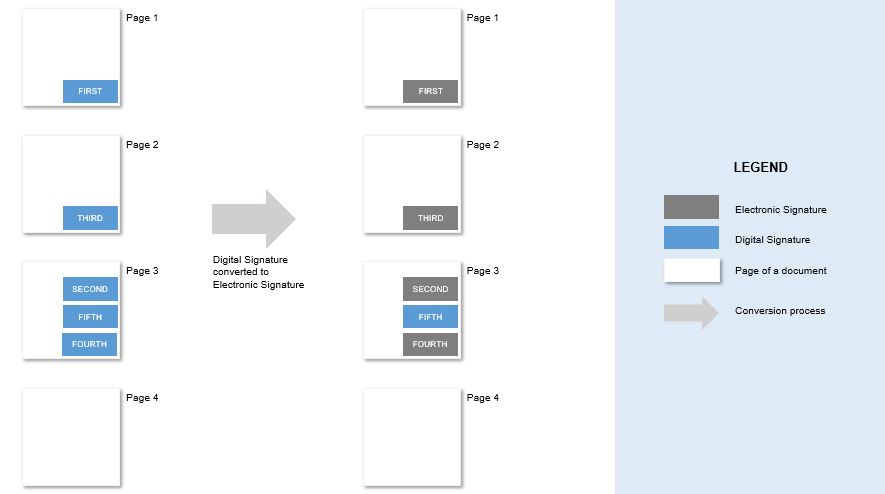
  1. To prevent bloating of a document with multiple Digital Signatures, if more than one Digital Signature fields are dropped against a single signer, only the last dropped signature field will be retained as a Digital Signature field, and the rest of the dropped signature fields will be converted to Simple Electronic Signature. 
  2. This conversion of Level of Assurance is individually applicable to each document with in a package i.e. each document can retain one digital signature field.
  3. This conversion of Level of Assurance is applicable regardless of whether or not Simple Electronic Signature is allowed against a user's role settings, the system will still retain only the last dropped signature field as a Digital Signature field, and convert the rest of the dropped signature fields to Simple Electronic Signature, and the user will be able to sign it as well.  
  4. After the conversion of Level of Assurance:
    • if the user deletes the last added signature field, the system will update the Level of Assurance of the second-last added signature field to match the Level of Assurance of the deleted field.
    • if the user manually updates the Level of Assurance of a field which was converted to Simple Electronic Signature, the system will retain the updated Level of Assurance.
  1. Let's understand this with an example:


    In this example, five Digital Signature fields have been dropped on multiple pages of a document, against a single signer. The last page (page 4) of the document has no signature for this signer. Only the last dropped signature field (fifth, on page 3) will be retained as a Digital Signature field, and the system will automatically convert the Level of Assurance of the rest of the dropped signature fields to Simple Electronic Signature (i.e. annotation).


Sign a signature field

  1. Take the cursor to the signature field assigned to you in the document, and click the sign icon  appearing on it. 
    A signing dialog will appear to sign the field, only if this field is assigned to you and it is your turn to sign in the workflow.
  2. Add your signature as required.
    Your signature field will be signed before sharing the document.


  1. In case the user has been assigned two signature fields:
    • the first one, any Digital Signature, and
    • the second one, a Simple Electronic Signature

At the time of signing, if the user tries to sign the digital signature field first, the system will generate an error as all the annotations including; Initials, In-person signatures, and Simple Electronic Signatures need to be filled before moving onto a digital signature. 
(To complete the case: In order to sign the digital signature field, the user needs to sign the simple electronic signature field first.)


Delete a signature field

Take the cursor to the signature field in the document to delete, and click the delete icon  appearing on it. 


The signature field will be removed from the document.


Signature Fields

Fields

Description

General Tab

Recipient

A read-only field to display the signer's name and email ID for whom this signature field is being configured.

Level of Assurance

A mandatory field to be selected to perform signing for a user. Levels of assurance will be available as allowed in the role assigned to you.

Level of assurance will be set for a signature field by default as per the configured default level of assurance under Personal Settings>Signature Settings. Level of assurance options for a signature field is subject to your assigned enterprise user role and can be changed under Role>Document Settings.


The terms for a level of assurance are as per the eIDAS Standards. For details of these terms click here. Possible values are:

  • Simple Electronic Signature (SES)
  • Electronic Seal (eSeal)
  • Advanced Electronic Seal (AdESeal)
  • Qualified Electronic Seal (QESeal)
  • Advanced Electronic Signature (AES)
  • High Trust Advanced (AATL)
  • Qualified Electronic Signature (QES)

In case the Document Owner tries to add a higher Level of Assurance in combination with Simple Electronic Signature (SES), then Simple Electronic Signature (SES) will be removed.

For a smoother workflow, while adding more multiple signature fields on the document, the system will simply use the level(s) of assurance of the last field for the latest one instead of asking for every signature field. You can always modify the level of assurance for each field manually.

Display

For a signature, this field will be available when you are allowed (in your user role) to add invisible signatures on a document.
 
When available:

  • Select the "Visible" option, if you require a visible signature from the signer in this field. This signature will have a proper appearance on the document as configured in the signer's Signature Appearance settings.
  • Select the "Invisible" option,  if you require an invisible signature from the signer in this field.
    An invisible signature entails all the characteristics of a signature and is duly verifiable like a visible signature. However, it does not have any appearance on the document.
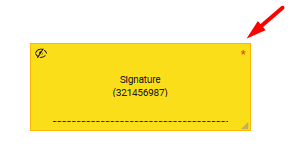
    When a signature field is marked as invisible, an eye icon is placed in the signature field (as shown with the red arrow):
     

​This display property is not available in case the Level of Assurance of the Signature field is set to "Electronic Signature".

Authenticate signer via OTP

Select this check box to enable field level authentication through OTP process when attempting to sign the document. By default, this option is unselected. This option will be available for the document owner in Draft, In-Progress, and Pending modes.
On selecting the "Authenticate signer via OTP" checkbox, the following options will be displayed: 

  • OTP authentication

This option will let the document owner send an OTP to the recipient that will used for the purpose of signing authentication. Whenever the recipient will try to sign this document an OTP will be sent to the recipient's email, mobile number, or both depending upon the document owner's service plan configuration. When the service plan allows "SMS OTP", a field to specify the mobile number of a recipient to send an OTP will be displayed. The document will be signed only upon providing the correct OTP. By default, the specified number is displayed partially masked to comply with the GDPR policy. Click  to view the complete number.


  • Time based One Time Password

This authentication option will let the recipient sign the document after they have entered the Time based One Time Password. Whenever the recipient will try to sign this document they will be prompted to enter the Time based One Time Password from the authenticator app configured on their mobile device. In case the recipient has not configured two factor authentication (2FA), upon trying to sign a document that requires Time based One Time Password, an email will be sent to their email address to configure two factor authentication (2FA). The document will be signed only upon providing the correct Time based One Time Password.


  1. In the following cases, the "Authenticate signer via OTP" option is not available:
    • If recipient is a group signer or a placeholder.
    • If One Time Password (OTP) and Time based One Time Password options are disabled in the service plan.
    • In case of an Individual workflow type.
  1. If there is an unprocessed signature/in-person signature field with the "Authenticate signer via OTP" option configured, the user will not able to "Bulk Sign" and "Bulk Sign and Share" the document. 
  2. This OTP authentication option will only be displayed if the "Enable One Time Password (OTP)" option is enabled in the document owner's service plan. If you cannot find this option in your account, upgrade your service plan.
  3. The OTP method for "Authenticate signer via OTP" will be the same as per the configured OTP method in the document owner's service plan.
    • "(Email)", in case only "Email OTP" is configured in the service plan
    • "(SMS)", in case only "SMS OTP" is configured in the service plan
    • "(SMS and Email)", in case both "Email OTP" and "SMS OTP" are configured in the service plan
  1. In the "Mobile Number" field, enter the recipient's mobile number on which the OTP will be sent via SMS. The full international number must be entered in the  00 44 234334334 or +44 234334334 format. By default, the specified mobile number is displayed partially masked to comply with the GDPR policy. Click  to view the complete number.
  2. The Time based One Time Password option will only be displayed if the "Enable Time based One Time Password (TOTP)" option is enabled in the document owner's service plan. If you cannot find this option in your account, upgrade your service plan.
  1. If the user does not have two factor authentication (2FA) configured, they will be sent an email to set up and to provide a Time based One Time Password. If the user has already configured two factor authentication (2FA) they will be prompted to provide the Time based One Time Password from the authenticator app configured on their mobile device.
  2. To configure the two factor authentication (2FA) the user will need to install an authenticator app (Google Authenticator, Microsoft Authenticator, etc.) on their mobile device. The email sent to the user to configure two factor authentication (2FA) will contain:
    • QR Code
    • Manual Key
    • Recovery Codes

To set up, the user can either scan the "QR Code" or manually input the "Manual Key" in the Authenticator app. Once the registration is successful, the user can provide the automatically generated Time based One Time Password from the Authenticator app to SigningHub in order to proceed. The list of recovery codes included in the configuration email can be used in place of a Time based One Time Password, once each recovery code, to regain access to your SigningHub account, in case you lose access to your mobile device. It is advised to save the recovery codes in a safe place. The user can however, regenerate a new list of the recovery codes from the Manage Two Factor Authentication (2FA) option. In case enterprise user loses access to your mobile device and recovery codes, or have used all of the recovery codes, you can ask your enterprise admin to reset the two factor authentication (2FA) against your account.

  1. In case a recipient is changed and the "Authenticate signer via OTP" option was configured, the system will require the mobile number of the new recipient.
  2. The following OTP preference will be followed while signing, in case of configuration of field-level OTP, Document Signing OTP Authentication, and Secondary Authentication against the Signing Server:

Field-level OTP is configured

Document Signing OTP Authentication OTP is configured

Secondary Authentication against the Signing Server is configured

OTP preference

No

No

No

-

Yes

Yes

Yes

Field-level OTP

Yes

No

No

Field-level OTP

Yes

Yes

No

Field-level OTP

Yes

No

Yes

Field-level OTP

No

Yes

No

Document Signing OTP Authentication

No

Yes

Yes

Document Signing OTP Authentication

No

No

Yes

Secondary Authentication against the Signing Server


Do not show this dialog automatically when a signature field is dropped

Select to automatically apply the "Level of Assurance" of the current signature field to the ones that you will drop afterwards.

This option is helpful when you need to drop several signature fields on the document without making an extra effort to manually set the same Level of Assurance for each of the signature fields separately. 

Details Tab

Field Name

An auto-generated (unique) field name which is used when you need to sign this form field through the API calls. You can change the name as required, but make sure the uniqueness of a field name is not compromised i.e., two or more fields in a document cannot have the same field name. This field is only available when the status of a document is Draft. 

Dimensions

Use this section to relatively set the on-screen and PDF coordinates/position (Left, Top, Width and Height) of the signature field. However, you can also manually move the field to the desired position in a document using drag and drop and these coordinates will be updated accordingly. These coordinates are only available when the status of a document is Draft.


You can only edit the on-screen dimensions but not the PDF dimensions.

Save and Cancel buttons

Click the "Save" button to save the configurations, or click the "Cancel" button to close this dialog.


  1. A signature field's level of assurance once set as eSeal, QESeal, and AdESeal, is generated by using a certificate which is a public signing certificate as configured under certification profile.
  2. The availability of OTP security features is subject to your subscribed service plan. If you cannot find this option in your account, upgrade your service plan.
  3. The OTP length is based on your subscribed service plan. SigningHub currently supports 4, 6, and 9 digits OTP.\
  4. In invisible signature doesn't have any visible appearance on a document. However it entails all other verifiable characteristics of signing, i.e., Time Stamping, Certificate Chain, Certificate Status, etc.
  5. You can also add a signature field on a previously signed document, if the document is not certified or locked.
  6. The document owner (and the shared space collaborator, if any) can update the level of assurance of a "Signature" field, while the status of the document is, "In-Progress" or "Pending".
    • In case of the document owner is an enterprise user, they can set any level of assurance as allowed in the Enterprise Role.
    • In case of the document owner is an individual user, they can set any level of assurance as allowed in the Service Plan.
    • In the "EDIT SIGNATURE FIELD" dialog, only the "Level of Assurance" field will be editable, the rest of the fields will be read-only.
    • The level of assurance of a signature field can not be updated if a read-only template has been applied.
    • Only the level of assurance of unprocessed fields can be updated.
    • Where previously, the level of assurance of a signature field was set to "Simple Electronic Signature (SES), the system will not allow updating the level of assurance.
    • Where previously, the level of assurance of a signature field was any other than "Simple Electronic Signature (SES), the system will not allow updating the level of assurance to "Simple Electronic Signature".


See Also