Fresh Installation
Before starting the SigningHub installation, make sure the following:
|
|
|

SigningHub Enterprise installer generates all the required database tables and populates the default data required to run the system. Therefore, there is no requirement for separate SQL scripts or equivalent for non-SQL databases.
Once the above conditions are satisfied, launch the installer by right-clicking the file [SigningHub-Installation-Dir]/setup/install.bat and selecting Run as administrator from the menu will present the welcome screen.
Note there is a ‘back’ arrow towards the top left of the installer dialogue window. Use this button if you wish to return to previous screens and modify your input values/ configuration choices. Note that the SigningHub installer will show the following screens during the installation process:
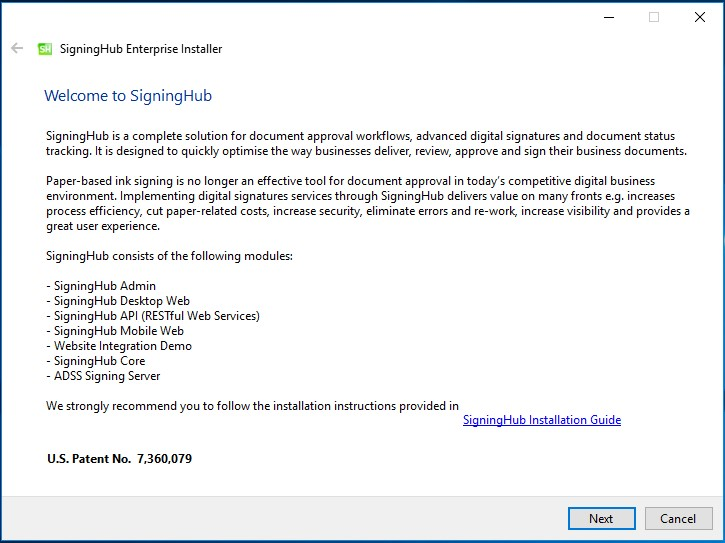
Welcome
Click the Next button to continue.
System Requirements
A check of various operating system requirements is performed to check if the required prerequisites are installed or not. If any of the SigningHub Enterprise system dependencies is not found, or not functioning, then this will be reported on the this screen.
You can only proceed with the installation once all issues related to system dependencies are resolved as shown here:
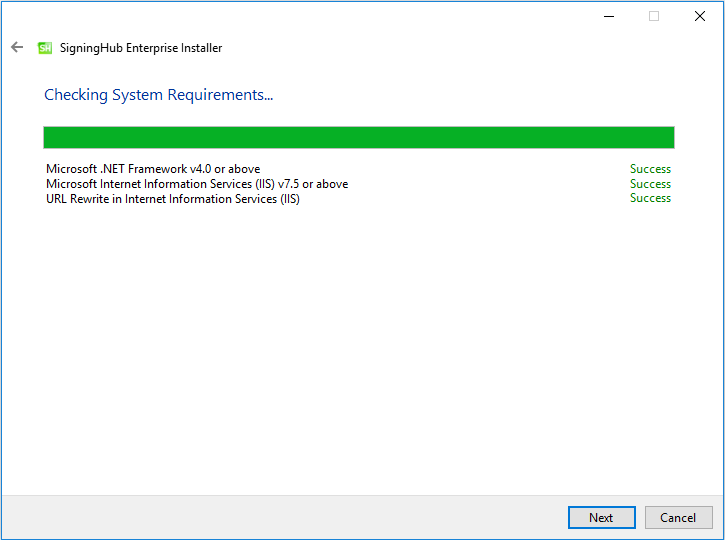
Click the Next button to select an installation type.
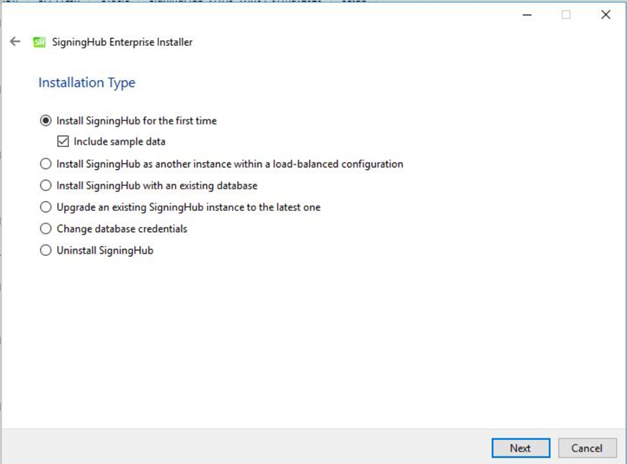
Installation Type & License Agreement
|
|
|

Select the option Install SigningHub for the first time and click the Next button to show the License Agreement:
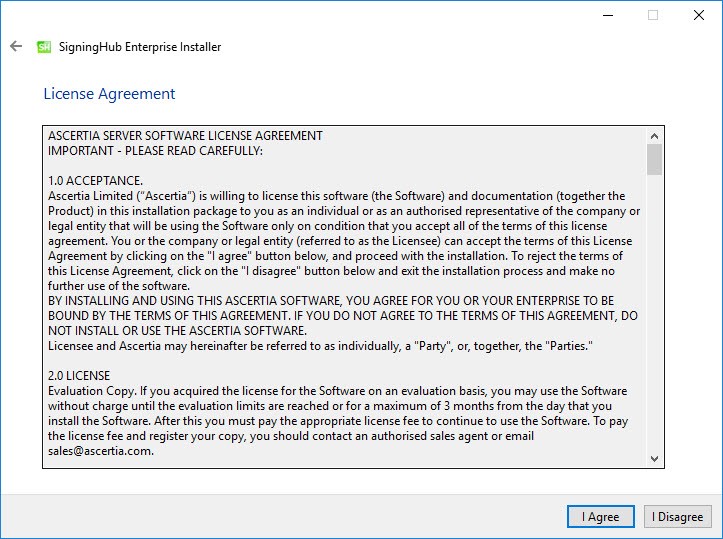
Click the I Agree button to proceed.
Database Configurations
The following screen for database details is displayed: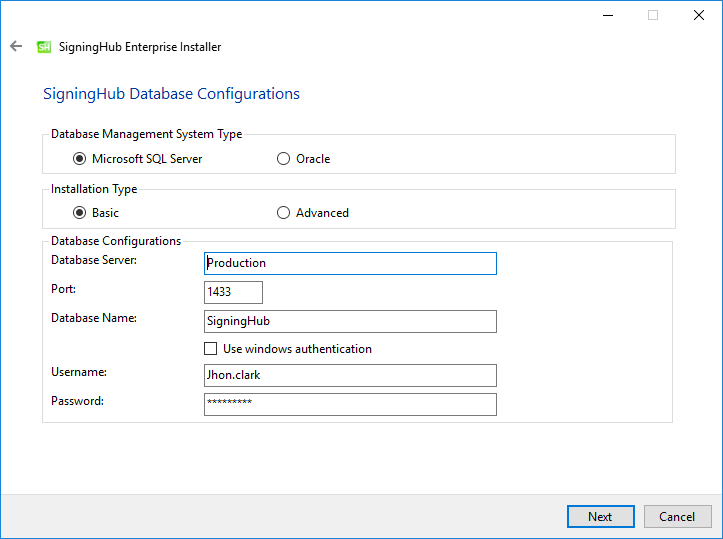
|
|
|

On the SigningHub Database Configurations screen you can either choose a Microsoft SQL Server or Oracle Database Management System.
Further you can either choose to do a basic installation or use an advanced one. If this is a basic installation, then use the first option Basic and provide the appropriate SigningHub database credentials.
The information displayed above is an example and you should configure the relevant settings for your own environment.
Note that once you enter the database credentials and select Next, the installer uses the information to test the connectivity to the database. If the installer can establish the connection with the database, then it will proceed with the installation.
Basic Installation
The following table details the configuration options:
|
Configurations |
|||
|
Item |
Description |
||
|
Database Server / |
Database server IP or DNS name. |
||
|
Port |
Database listening port. For SQL Server the default port is 1433 and for Oracle the default port is 1521. |
||
|
Database Name / |
Name of the database instance. Note this must exist prior to the installation. Provide Service Name/SID for Oracle database management system. |
||
|
Use Windows Authentication
|
If enabled, installer will use the Windows logged in user to communicate with database. You are required to enter password because it will be used in Application Pool to set the Identity against this user for all websites. By default, the current logged in user will be configured in the Application Pool Identity. If you wish to run SigningHub Enterprise under a different Windows user, then you need to change it manually. If your requirement is to use SQL Server authentication, then type SQL Server Username and Password in the underneath fields without enabling this option.
|
||
|
Username |
Name of the database user. Note this must exist prior to the installation. It is not required in the case of Windows Authentication. |
||
|
Password |
Password credential of the database user.
|
||


Advanced Installation
If this is not a basic installation and you choose the second option to Advanced then the following screen is shown:
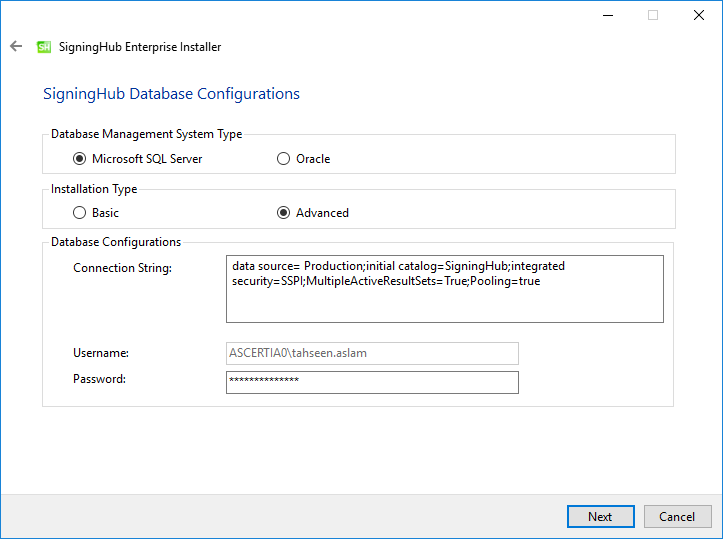
The information displayed above is an example and you should configure the relevant settings for your own environment.
Once you complete the options and select Next, the installer uses the information provided to test the connectivity to the database. If the installer can establish the connection with the database, then it will proceed with the installation.
The following table details the configuration options:
|
Configurations |
|
|
Item |
Description |
|
SigningHub Connection String |
The following are sample connection strings for SQL Server:
The following are sample connection strings for Oracle Server:
|
|
Username |
Field will only be shown in case of Windows Authentication while for SQL Server Authentication/Oracle, username will be provided in the connection string. |
|
Password |
In case of Windows Authentication, type the password of domain user shown in the Username field to configure the Application Pool Identity in IIS Server for successful communication with SQL Server. In case of SQL Server authentication/Oracle, password will be provided in the connection string. |
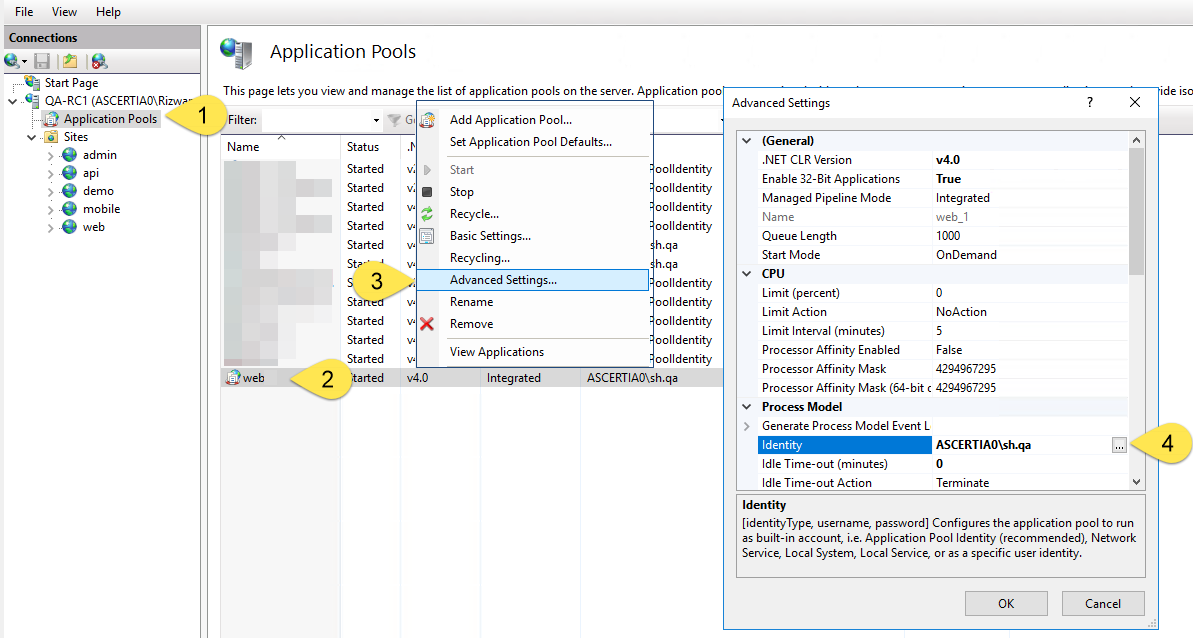
If windows authentication is enabled in connection string, installer will use the Windows logged in user to communicate with database upon clicking the Next button. You are required to enter password because it will be used in Application Pool to set the Identity against this user for all websites.
By default, the current logged in user will be configured in the Application Pool Identity. If you wish to run SigningHub Enterprise under a different Windows user, then you need to change it manually as shown in the following screen:
|
|
You have to change the user for the Admin, API, Core and Desktop Web modules. |

Click the Next button to select the SigningHub data storage directory:
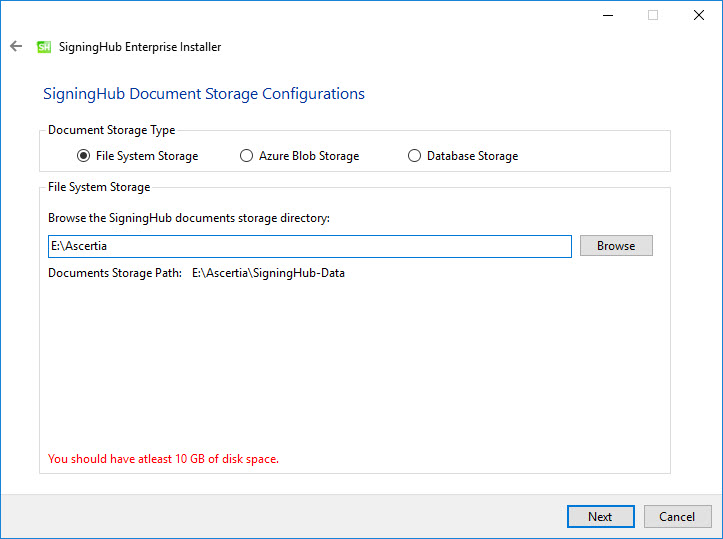
Document Storage Configurations
On the SigningHub Document Storage Configurations screen you can either choose a File System Storage, Azure Blob Storage or Database Storage.
If the Document Storage is either on local file system or on the local network path, then select the option File System Storage.
|
|
The information displayed above is an example and you should configure the relevant settings for your own environment. |

Document Storage path can be a local drive, a network drive or an Azure blob. If the path is on a local drive, then the installer will automatically assign the read/write permissions to the IIS_IUSRS user group.
If the path is on a network/Azure drive, then the permissions should be assigned manually to a user before continuing the installation process. To add the permissions on a network drive, follow these instructions:
- Create a domain/Azure user with read/write permissions.
- Add the read/write permissions on the directory [Document Storage Path] and complete the installation process.
- Now go to IIS Manager and add the user created in step 1 in Application Pool against all SigningHub websites one by one as shown below (Skip this step if
SigningHub Enterprise is installed by using Windows Authentication):
File System Storage
Click Browse and specify a storage path to store the SigningHub data.

Azure Blob Storage
If this is not a File System Storage and you choose the second option to Azure Blob Storage then the following screen is shown: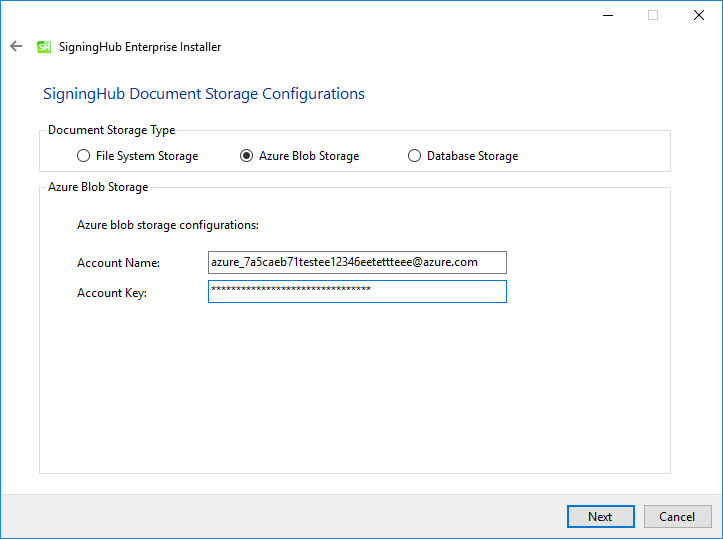
The information displayed above is an example and you should configure the relevant settings for your own environment.
The following table details the configuration options:
|
Configurations |
|
|
Item |
Description |
|
Account Name |
Account Name of the Azure. Note this must exist prior to the installation. |
|
Account Key |
Account Key of the Azure. Note this must exist prior to the installation. |
|
|
Document Storage path can be a local drive, a network drive or an Azure blob. If the path is on a local drive, then the installer will automatically assign the read/write permissions to the IIS_IUSRS user group. |

If the path is on a network/Azure drive, then the permissions should be assigned manually to a user before continuing the installation process. To add the permissions on a network drive, follow these instructions:
- Create a domain/Azure user with read/write permissions.
- Add the read/write permissions on the directory [Document Storage Path] and complete the installation process.
- Now go to IIS Manager and add the user created in step 1 in Application Pool against all SigningHub websites one by one as shown below (Skip this step if SigningHub Enterprise is installed by using Windows Authentication)

Database Storage
If this is not a File System Storage and you choose the third option to Database Storage then the following screen is shown: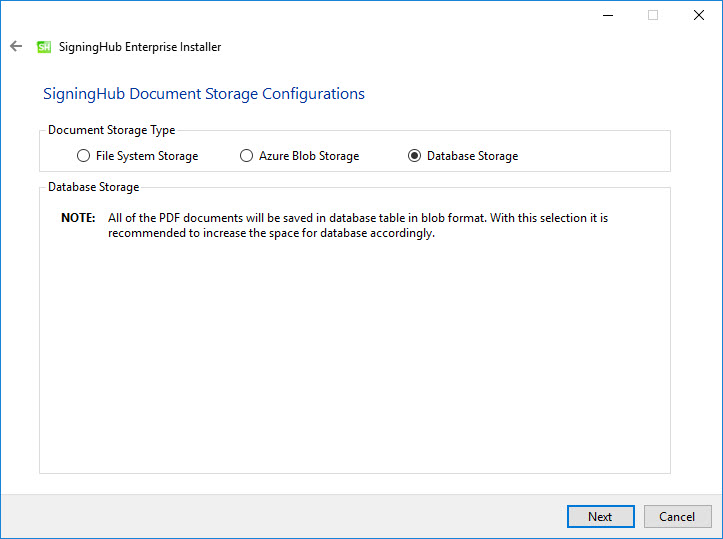
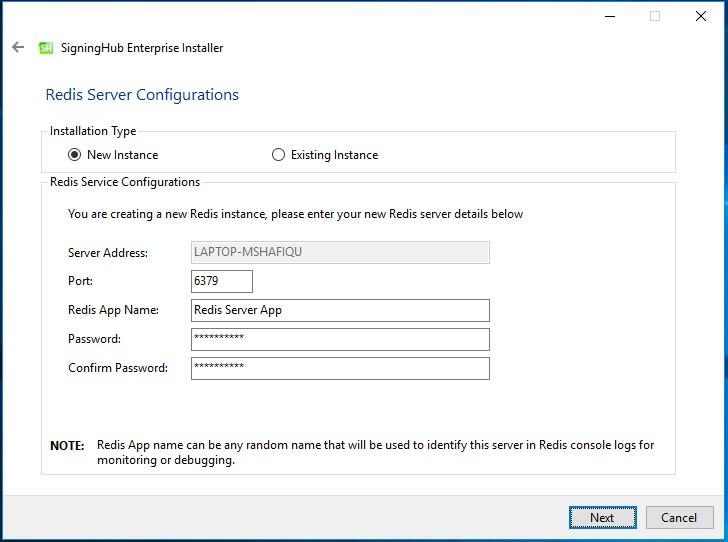
Click the Next button to proceed. The following screen for Redis Server will appear:
|
|
Redis is a light weight server, which works as back plane and message broker for SigningHub application over an HTTP/s port. It is bundled within the SigningHub package, and is used for message popup notifications in SigningHub when a user is already logged in to SigningHub.
|

On the Redis Server Configurations screen you can either choose a New Instance or Existing Instance option. If this is a new instance, then use the first option i.e. New Instance and provide the appropriate Redis server configurations. The information displayed above is an example and you should configure the relevant settings for your own environment.
The following table details the configuration options:
|
Item |
Description |
|
Server Address |
Specify the Redis server address. This server is used to send real-time on-screen notifications for document sharing. |
|
Port |
Specify the service port for the Redis server. |
|
Redis App Name |
Specify the name of Redis App. This can be any random name that will be used to identify this server in Redis console logs for monitoring or debugging. |
|
Password |
Specify the password to authenticate the Redis server. |
|
Confirm Password |
Specify the same password again as provided in the above password field to confirm it. |
Redis can enforce password-based security to save or read the key value pairs from the Redis server. To enable password-based security, follow these instructions:
- Go to [SigningHub Installation Directory]/Redis
- Run the Redis command line interface by click on redis-cli application in administrator mode
- Run the command CONFIG SET requirepass "[password]"
- Sign into SigningHub Administrator account
- Go to Configurations>Redis and change the password in Redis Server Connection String
- Update the settings and Restart IIS
Redis can disable asking for password for saving and reading the key value pairs from the Redis server. To turn off the password, follow these instructions:
- Go to [SigningHub Installation Director]/Redis
- Run the Redis command line interface by click on redis-cli application in administrator mode
- Run the command CONFIG SET requirepass ""
- Sign into SigningHub Administrator account
- Go to Configurations>Redis and change the password as empty in Redis Server Connection String
- Update the settings and Restart IIS
|
|
For Load balanced deployments, only one instance of Redis is needed for SigningHub to work with. Rest of the instances of SignignHub will communicate with Redis using HTTP/s address and Port configured in SigningHub Admin. |

If this is not a new instance, and you are choosing the second option i.e. Existing Instance then the following screen will appear:
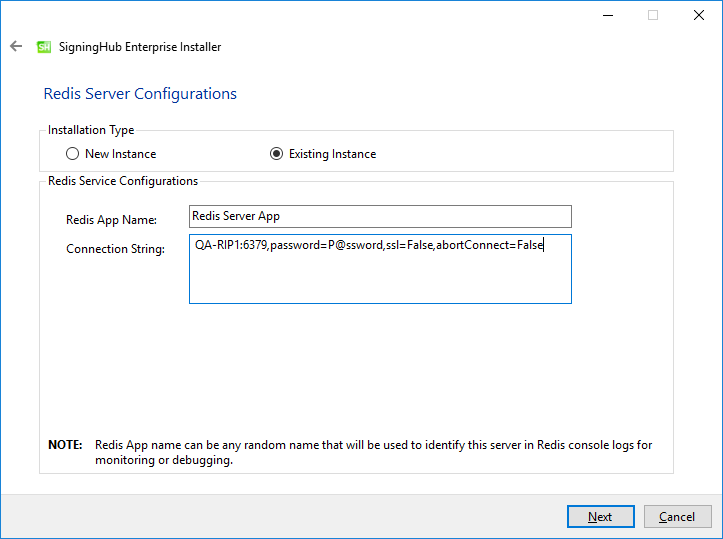
The information displayed above is an example and you should configure the relevant settings for your own environment.
The following table details the configuration options:
|
Item |
Description |
|
Redis App Name |
Specify the name of Redis App. This can be any random name that will be used to identify this server in Redis console logs for monitoring or debugging. |
|
Connection String |
The following is a sample connection string for a Redis Server: |
Click the Next button to select specific modules:
SigningHub Modules Selection
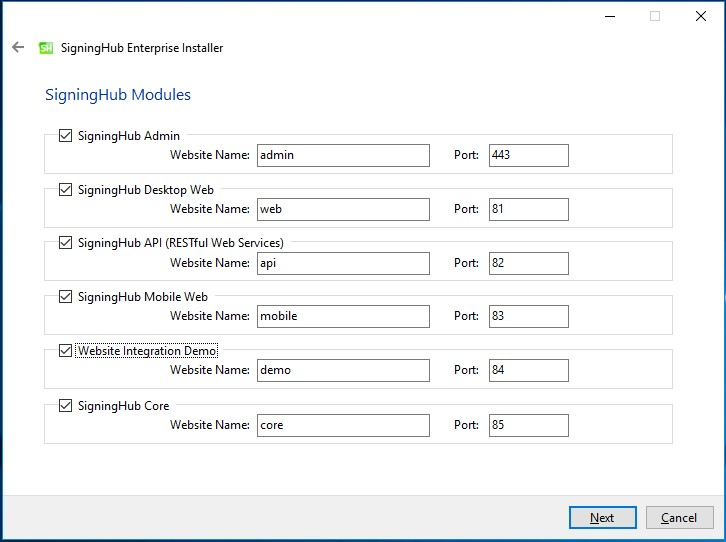
Select the appropriate modules to install the required features. For each selected application, provide the web application name and port. A typical in-house installation of SigningHub Enterprise should only include Admin, Core, Desktop Web and Mobile Web. Where tight integration through Web Services API is required, then the API Web Services option must also be installed.
The information displayed above is an example, which you may change to suit your environment and organisation preferences. However, the example shown is sufficient. The names will appear as websites under IIS.
The following table details the modules options:
|
Item |
Description |
|
SigningHub Enterprise Admin |
SigningHub Enterprise Admin console is used by the administrators to manage the system wide configurations, service plans, user accounts, billing, access control etc. |
|
SigningHub Enterprise Desktop Web |
SigningHub Enterprise Desktop Web is used to create workflows, share documents, create digital/electronic signatures etc. |
|
SigningHub Enterprise API |
REST API provides the functionality to communicate with SigningHub Enterprise server to create workflows, upload documents, apply templates, share documents etc. from business applications. |
|
SigningHub Mobile Web |
Web application for mobile browsers; it provides the client-facing functionality for document workflow approval/sign-off and user account management. |
|
SigningHub Enterprise Website Integration Demo |
A demo application to illustrate SigningHub Enterprise and business application integration. |
|
SigningHub Enterprise Core |
SigningHub Enterprise Core is used to manage backend processes, e.g. send emails, delete documents, auto reminders for pending documents and many others. This is a mandatory module for SigningHub Enterprise. |
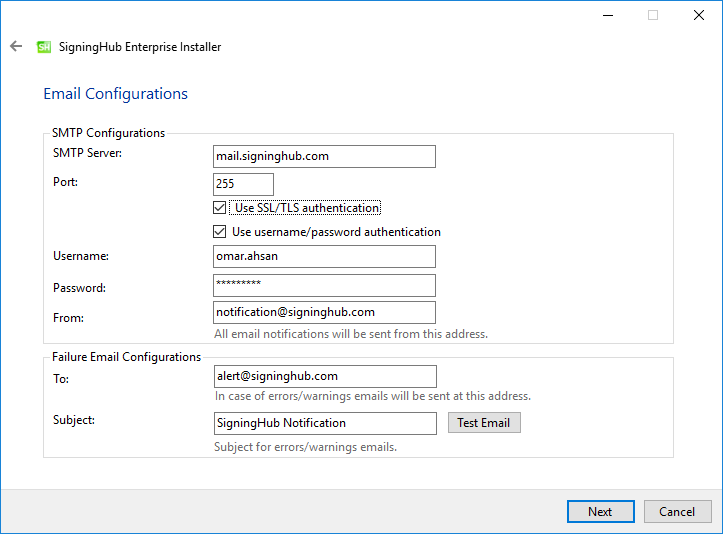
SMTP Configurations
Click the Next button to configure the SMTP server and email settings:
|
|
Configure the SMTP Server and email settings for your environment. SigningHub Enterprise must have access to a suitable SMTP server. Without which users will not be able to receive registration emails that are required to complete the sign-up process. In addition, administration notification and alert emails will also not be sent. Although the latter will not prevent functionality, but it is not a recommended approach. The information displayed above is an example and you should configure the relevant settings for your own environment. |

The configuration items are explained in the following table:
|
Configurations |
|
|
Item |
Description |
|
SMTP Server |
Defines the email server address. This email server is used to send email notifications to users as required, such as for account registration, document sharing, and workflow completion. It is also used for sending notification emails to SigningHub Enterprise administrators. |
|
Port |
Define the service port for the SMTP mail server. |
|
Use SSL/ TLS authentication |
Select this option if the SMTP mail server requires SSL/TLS. |
|
Username |
Configure the SMTP mail server username that is used to send SigningHub Enterprise generated emails. |
|
Password |
Define the password to authenticate the SMTP server. |
|
From |
Configure the From email address that should be used to send notification emails to users and administrators. |
|
To |
Configure the email address where error notifications should be sent. |
|
Email Subject |
Define a subject line for the notification emails that are sent to the administrator, e.g. SigningHub Enterprise Issue Alert. |
After configuring these SMTP settings, click the Test Email button to verify that SMTP configurations are valid.
Click the Next button to proceed.
Installing ADSS Server
Now its time to install the ADSS Signing Server engine that powers SigningHub Enterprise.
The following screen is shown:
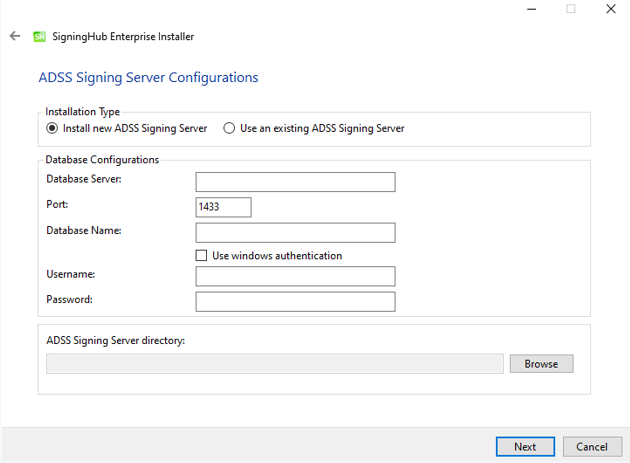
On the ADSS Signing Server screen you can either choose to do a fresh installation of the ADSS Signing Server along with SigningHub Enterprise installation or use an existing ADSS Signing Server installation.
If this is a fresh installation of SigningHub Enterprise, then use the first option “Install New ADSS Signing Server”, provide the appropriate ADSS Signing Server database credentials and specify your ADSS directory in the browsing option for “ADSS Signing Server directory”.
The information displayed above is an example and you should configure the relevant settings for your own environment.
This table details the configuration options:
|
Configurations |
|||
|
Item |
Description |
||
|
Database Server |
Database server IP address or DNS name. |
||
|
Port |
Database listening port. For SQL Server the default port is 1433 and for Oracle the default port is 1521. |
||
|
Database Name |
Name of the database instance. Note this must exist prior to the installation. Provide Service Name/SID for Oracle database management system. |
||
|
Use Windows authentication |
If enabled, the installer will use the Windows logged in user to communicate with database. If your requirement is to use SQL Server authentication, then type SQL Server user name and password in the underneath fields without enabling this option.
|
||
|
Username |
Name of the database user. Note this must exist prior to the installation. |
||
|
Password |
Password credential of the database user. Note this must exist prior to the installation. |
||
|
ADSS Signing Server directory |
Browse for your ADSS Server directory. |
||

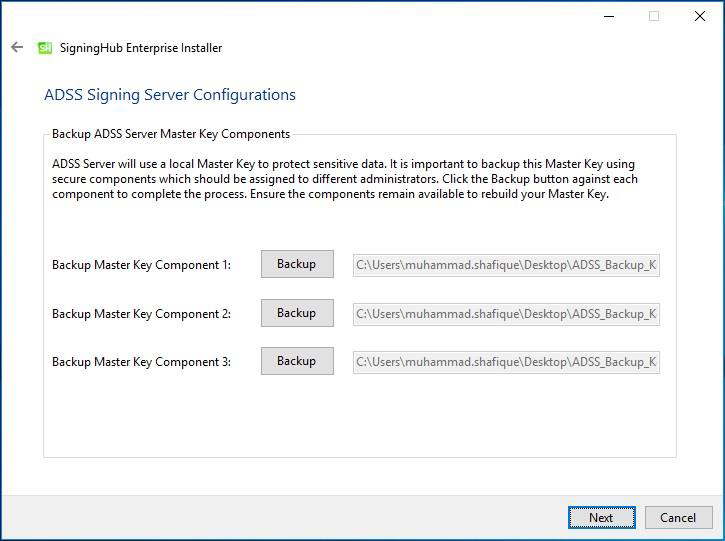
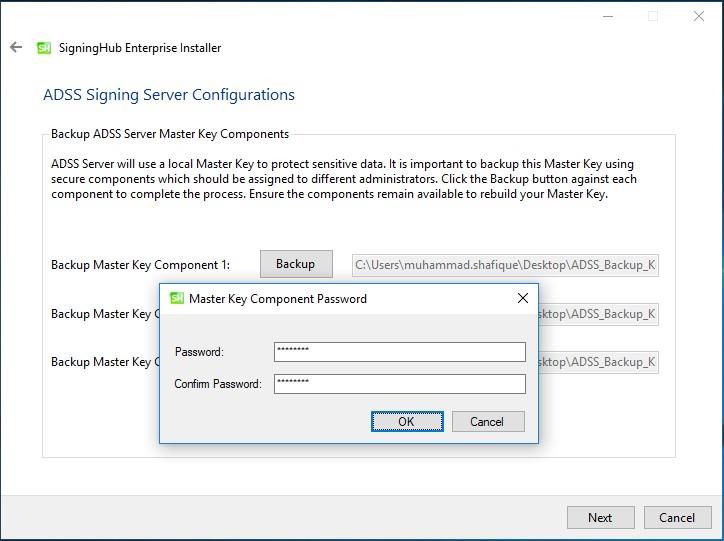
When you select the Install New ADSS Signing Server option, then from the next screen you need to generate a Master Key to encrypt the database data and take a backup of the Master Key in the form of three components. Use the Backup buttons one by one to take the backup of each Master key component. The installer will prompt to provide a password for each Master Key component and encrypt it with the provided password before saving on the disk:
The following dialog will appear to input password and confirm password for backup keys:
|
|
Keep all the Master key components secure and remember their passwords. For any reason, if you lose these keys/ passwords then you cannot upgrade this ADSS Server to the next versions and even Ascertia cannot help you to recover these keys. |

If this is not a fresh installation and you choose the second option to Use an existing ADSS Signing Server then the following screen is shown: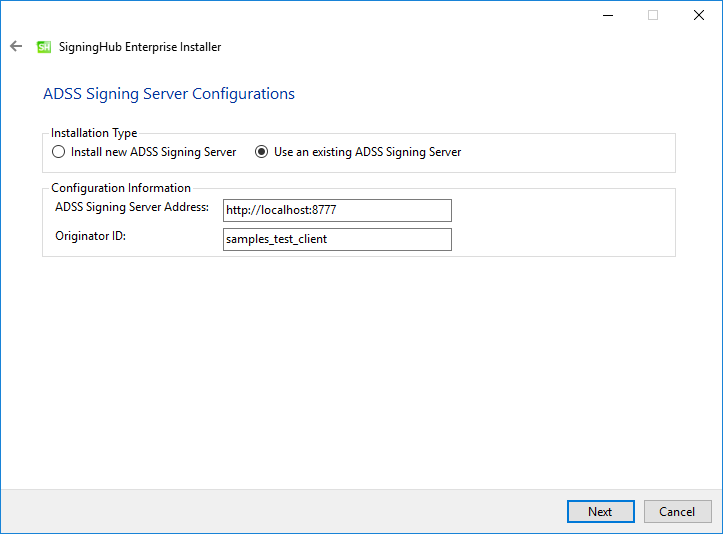
Configure the ADSS Signing Server Address and Originator ID. The ADSS Signing Server administrator will be able to provide this information. The Originator ID shown above is the default one when installing ADSS Signing Server with sample data. Ascertia recommends configuring a dedicated Originator ID for the use of SigningHub Enterprise.
Every client of ADSS Signing Server requires an Originator ID to identify itself, click here to get details as how to obtain it from ADSS Signing Server. This is like well-known APIs keys of Google, etc. Note this Originator ID will be created automatically if you chose to install a fresh ADSS Signing Server via the installer.
Click the Next button to see the summary and complete the installation:
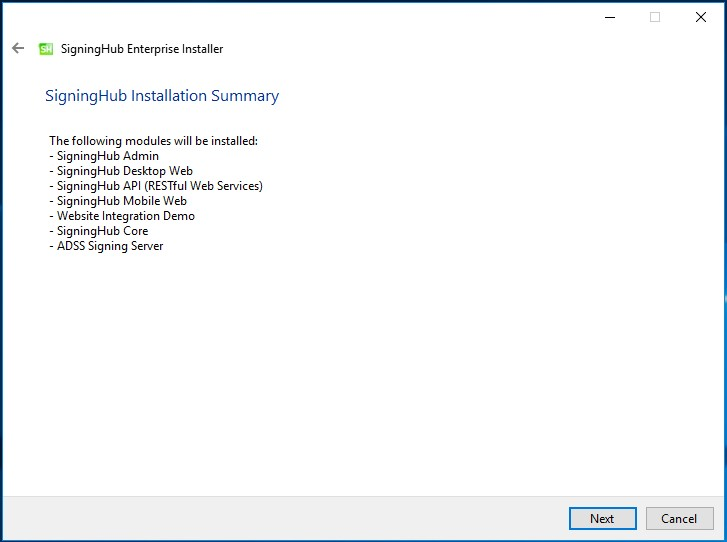
This screen shows the installation summary by listing the different product modules that will be installed.
If you think any listed item is incorrect then use the Back button (arrow towards the top-left of the dialogue box) to correct your choices before proceeding ahead.
Otherwise, click the Next button to continue with the installation.
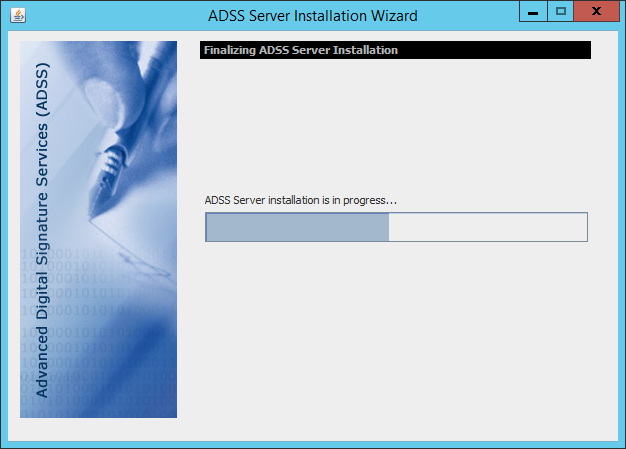
The following screen may also occur to show the ADSS Signing Server installation progress if its a fresh installation:
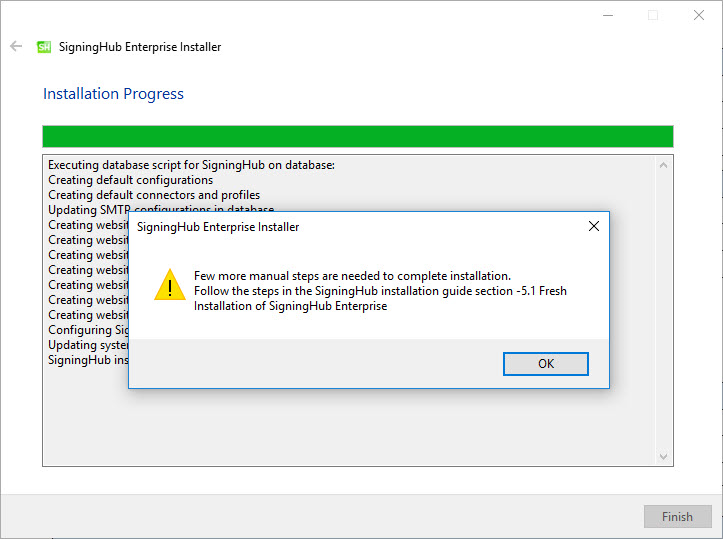
Installation Progress and Completion

Click Finish to complete the installation process.
|
|
Note that Local Signing will not be available by using State Session. However, if users still require performing Local Signing, then please follow this step to replace sessionState mode with InProc:
<sessionState mode="SQLServer" allowCustomSqlDatabase="true" sqlConnectionString="AdocsEntities" cookieName="SH_ID" timeout="60" compressionEnabled="true"> </sessionState> <sessionState mode="InProc" timeout="60" cookieName="SH_ID" cookieSameSite="None" /> You can configure an AJP Connector as mentioned in Appendix A |

|
|
You must execute some scripts manually when SigningHub Enterprise is installed with Oracle Database Management System:
sqlplus
SQL>@InstallAllOracleASPNETProviders.sql; |
