Step 1 - Configuring Unity Profile
A Unity profile defines the format and characteristics of the SAM Service configurations (e.g. which SAM Service address, profile ID and Client ID to be used) and defines characteristics of user authentication settings (Basic and OAuth2) that will be used when this profile is referenced in a user keys generation, device registration and signing request from a client application.
Furthermore, the user has the option to specify configurations for the input document received by the Unity Service for signing. They can also set certificate preferences for the certificate to be used for signing purposes.
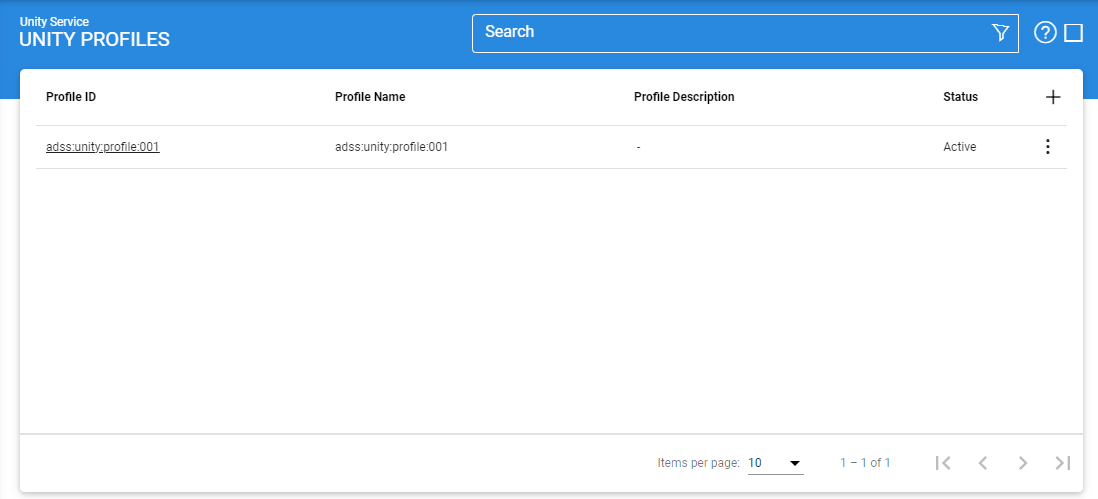
To create or edit a Unity Profile, click on Unity Service > Unity Profiles and the following screen is shown:
Identification
A new profile can be created by clicking the '+' button. An existing profile can be edited by clicking the Edit button. If you want to create a new profile by copying large part of an existing profile then click Make a Copy. The following screen is shown:
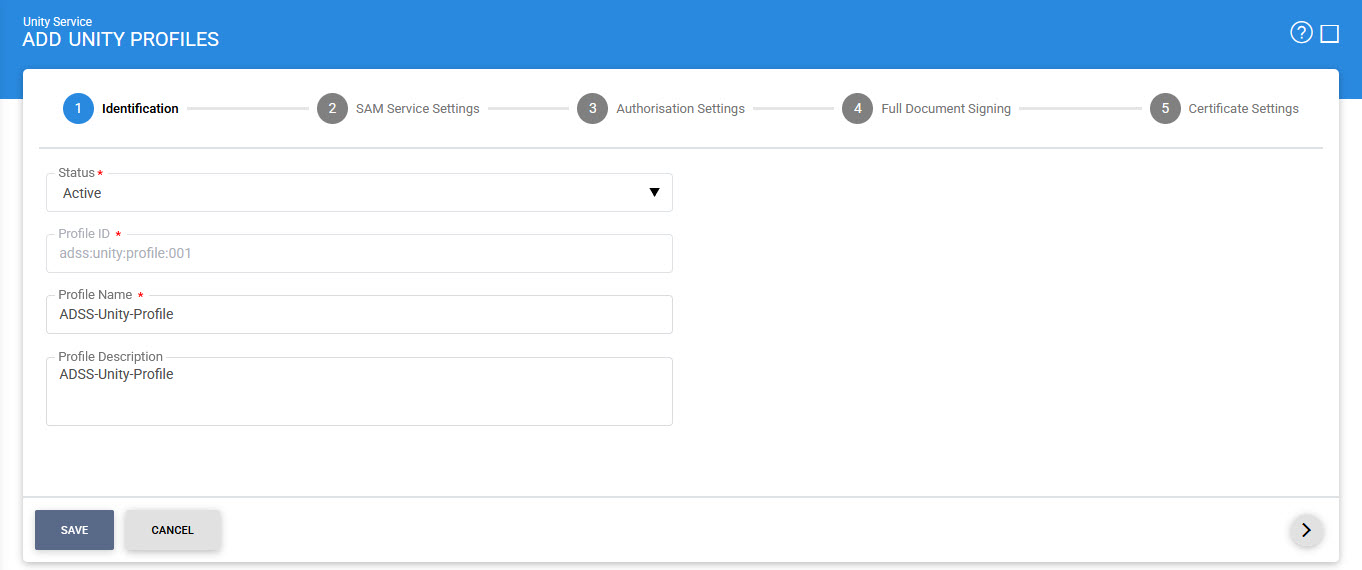
The configuration items are as follows:
|
Items |
Description |
|
Status |
A Unity profile may be marked Active or Inactive. Note that an inactive profile will not be used to process requests generated by client application. |
|
Profile ID |
A mandatory field which provides a system-defined unique identifier for this profile. |
|
Profile Name |
A mandatory unique name defined by the ADSS Server Administrator for easier recognition of the profile within the ADSS Unity Console. |
|
Profile Description |
This can be used to describe the profile in more detail (e.g. in which circumstances will this Unity profile be used). This is for information purposes only. |
SAM Service Settings
After configuring Identification settings of Unity Profile, the next step is to configure SAM Service settings. Click on the Next arrow (>), it will display the following screen:
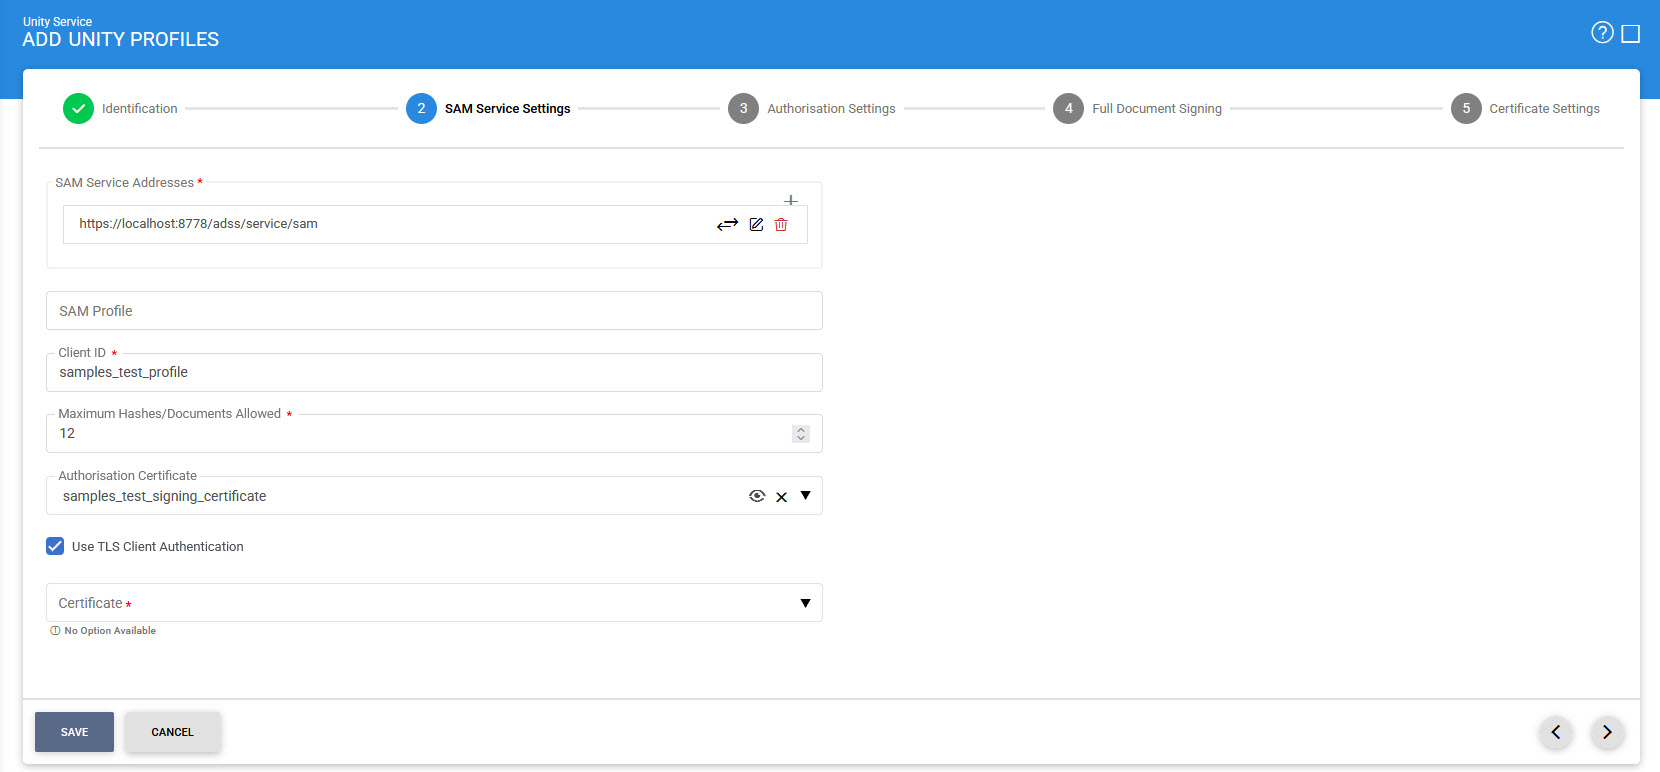
The configuration items are as follows:
|
Items |
Description |
||
|
SAM Server Settings |
This section defines the configuration required for requests forwarding to SAM Service. |
||
|
SAM Service Addresses |
This field shows the SAM Service addresses that can be used to generate user keys, register user devices within SAM Service. Multiple service addresses can be added. The Test button checks that the ADSS SAM Service is available. The Remove button deletes a configured SAM Service address. |
||
|
SAM Profile |
Specifies the SAM profile to be used for this Unity profile. |
||
|
Client ID |
Shows the Client ID of SAM Service. Unity Service will send this Client ID while communicating with SAM service. SAM service verifies that this is a registered Client ID within the Client Manager module before granting access to this service. |
||
|
Maximum Hashes/Documents Allowed |
This field specifies the maximum number of documents/hashes that can be sent to ADSS Unity Service. Note: The value '0' means unlimited. |
||
|
Authorisation Certificate |
The Authorisation Certificate field shows a list of certificates configured with 'Document Signing' purpose. The Unity Service uses this certificate to sign the SAD (Signature Activation Data). Normally the SAD is signed by the Go>Sign mobile application but there are cases when the SAD could be signed by Unity Service using this authorisation certificate.
|
||
|
Use TLS Client Authentication |
If this option is enabled, then Unity Service will communicate with SAM Service using TLS client authentication. By default, it is disabled. |
||
|
Certificate |
Select the Client TLS Certificate which pre-exists in the Key Manager. Note: It is required to register the Issuer CA of the Client TLS certificate in Trust Manager with the CA for verifying TLS client certificates purpose. |

Authorisation Settings
After configuring SAM Service settings of Unity Profile, the next step is to configure Authorisation settings. Click on the Next arrow (>), it will display the following screen:

While selecting the 'Delegated user authentication via external IdP' radio button, below screen will be displayed:
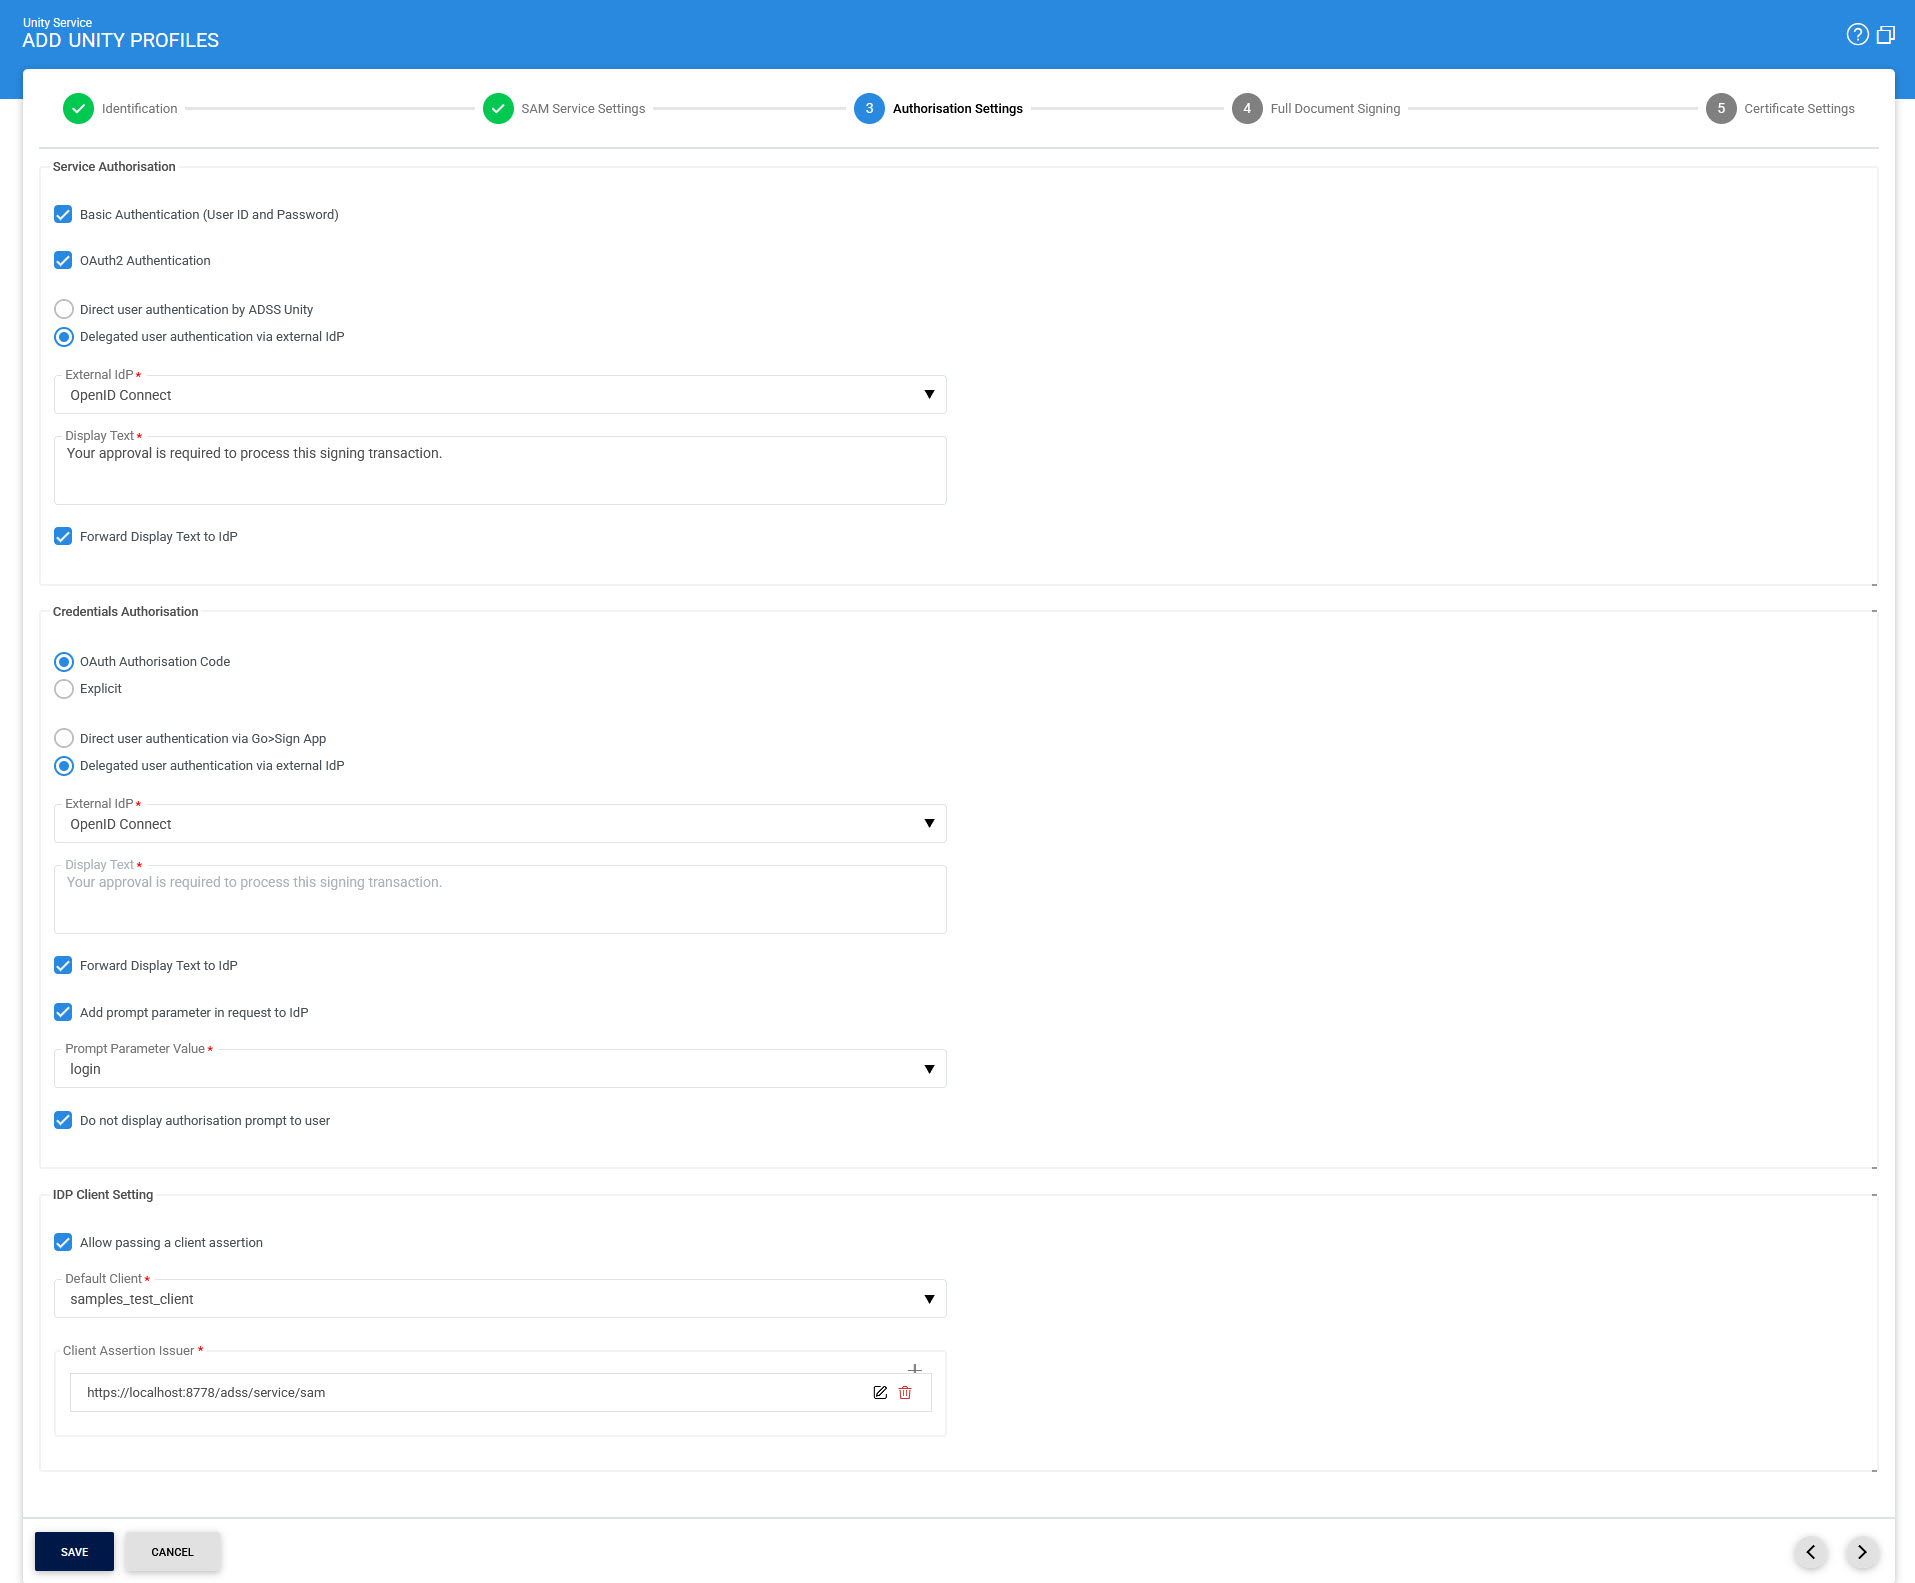
The configuration items are as follows:
|
Items |
Description |
||||
|
Service Authorisation |
This section defines the configuration required for user authentication mechanism for business application. |
||||
|
Basic Authentication (User ID and Password) |
Using Basic Authentication, the user is authorized by providing UserID and password, the Unity Service will return a user access token to the client application for the subsequent communication. Note: By default, it is disabled. |
||||
|
OAuth2 Authentication |
The user is authenticated using OAuth2.0 mechanism. the authentication of user can be performed in multiple ways. It includes 'Direct user authentication by ADSS Unity and 'Delegated user authentication via external IdP'. Both of these methods are explained below:
Note: Keep the below points under consideration while operating with checkbox:
|
||||
|
Credentials Authorisation |
This section defines the configuration required for credentials authorisation mechanism. A business application can request Unity Service to provide the supported credentials authorisation methods using a CSC v2 API (credentials/info) and configurations made in this section are returned to business application as a result. |
||||
|
OAuth2 Authorisation Code |
The authorisation for the user to access the signing key will be done by OAuth 2.0 authorisation code flow. The authorisation is returned in the form of an authorisation code, which the application shall then use to obtain SAD (Signature Activation Data). In OAuth 2.0 authorisation, the authentication of user can be performed in multiple ways. It includes 'Direct user authentication via Go>Sign App' and 'Delegated user authentication via external IdP'. Both of these methods are explained below:
Note: When this option will be selected in Unity Profile, SCAL2 should be selected in SAM Profile. |
||||
|
IDP Client Setting |
This section defines the configuration required for IDP Client Setting: |
||||
|
Allow passing a client assertion |
Enable this option if you want to allow clients that have already been authenticated by an external Identity Provider (IDP) to access the Unity Service. Instead of using the usual client ID and secret for authentication, these clients can send a JWT-based client assertion in the OAuth2/token request. When this checkbox is selected, the system will accept and validate that assertion, so the client ID won’t be needed. This is especially useful when dealing with a large number of external clients that can't all be registered in ADSS. By default, this checkbox will be disabled. Note: This checkbox under the IDP Client Setting section is only visible when OpenID Connect is selected as the external Identity Provider (IDP). It will not appear if SAML is selected instead. |
||||
|
Default Client |
Select the default client profile that the Unity Service should use when no client ID is provided in the request. This default client works as a backup identity, making sure that any access token generated still includes a valid client ID internally. This helps the system properly validate tokens and keep API access secure. This configuration is particularly important when using external IDPs that issue tokens for clients not registered in the ADSS Server. |
||||
|
Client Assertion Issuer |
In this field, add trusted Client Assertion Issuers, each representing an external IDP, allowed to send signed JWT assertions for authentication. For each issuer, you’ll need to provide a valid URL. The Unity Service uses this URL to download the signing certificate and check the authenticity of the JWT assertion received in token requests. Make sure all issuers listed here are also properly registered in the Unity Profile. This setup ensures that only approved IDPs can authenticate clients, keeping the integration secure and keeping control over which entities are permitted to authenticate clients in the ADSS Server. |
||||
|
Explicit |
In explicit authorisation, the user can either provide authorisation on Go>Sign mobile app, or the user can authorise the credentials by providing PIN or OTP (One Time Password) under the 'Other' option. When "Go>Sign App" will be selected in Unity Profile, only following options should be configured in SAM Profile:
When Other option is selected, the user can authorise the credentials by providing PIN or OTP. Details of both these mechanisms are explained below:
|
||||
|
Enable Polling |
This checkbox will be available if Go>Sign App is selected for Explicit Credentials Authorisation. It defines whether the polling is currently enabled or disabled for the credentials authorisation for Go>Sign Mobile application. If polling is enabled, the credentials/authorize API will return HTTP 202. Clients need to poll the state of the authorisation via credentials/authorizeCheck API. |
||||
|
User Authentication Settings for Mobile Application |
This section defines the configuration required for user authentication mechanism for mobile application. |
||||
|
Authenticate User with OTP(s) |
User is authenticated (at time of login and device registration) using the OTPs that are delivered to user’s mobile or email. By selecting any check box user can received the OTPs on any of the selected option. |
||||
|
Authenticate User with QR Code |
The Go>Sign mobile app sends a request to the Unity Service to authenticate the user. The Unity Service then notifies the mobile app that the user will be authenticated via a QR code. Subsequently, the Go>Sign mobile app prompts the user to use their mobile device's camera to scan the QR code. Additionally, it instructs the user to log in to their business application account to obtain the QR code. |
||||
|
No Authentication |
No authentication is required for a user at time of login and device registration. |
Full Document Settings
After configuring Authorisation settings of Unity Profile, the next step is to configure Full Document signing. Click on the Next arrow (>), it will display the following screen:
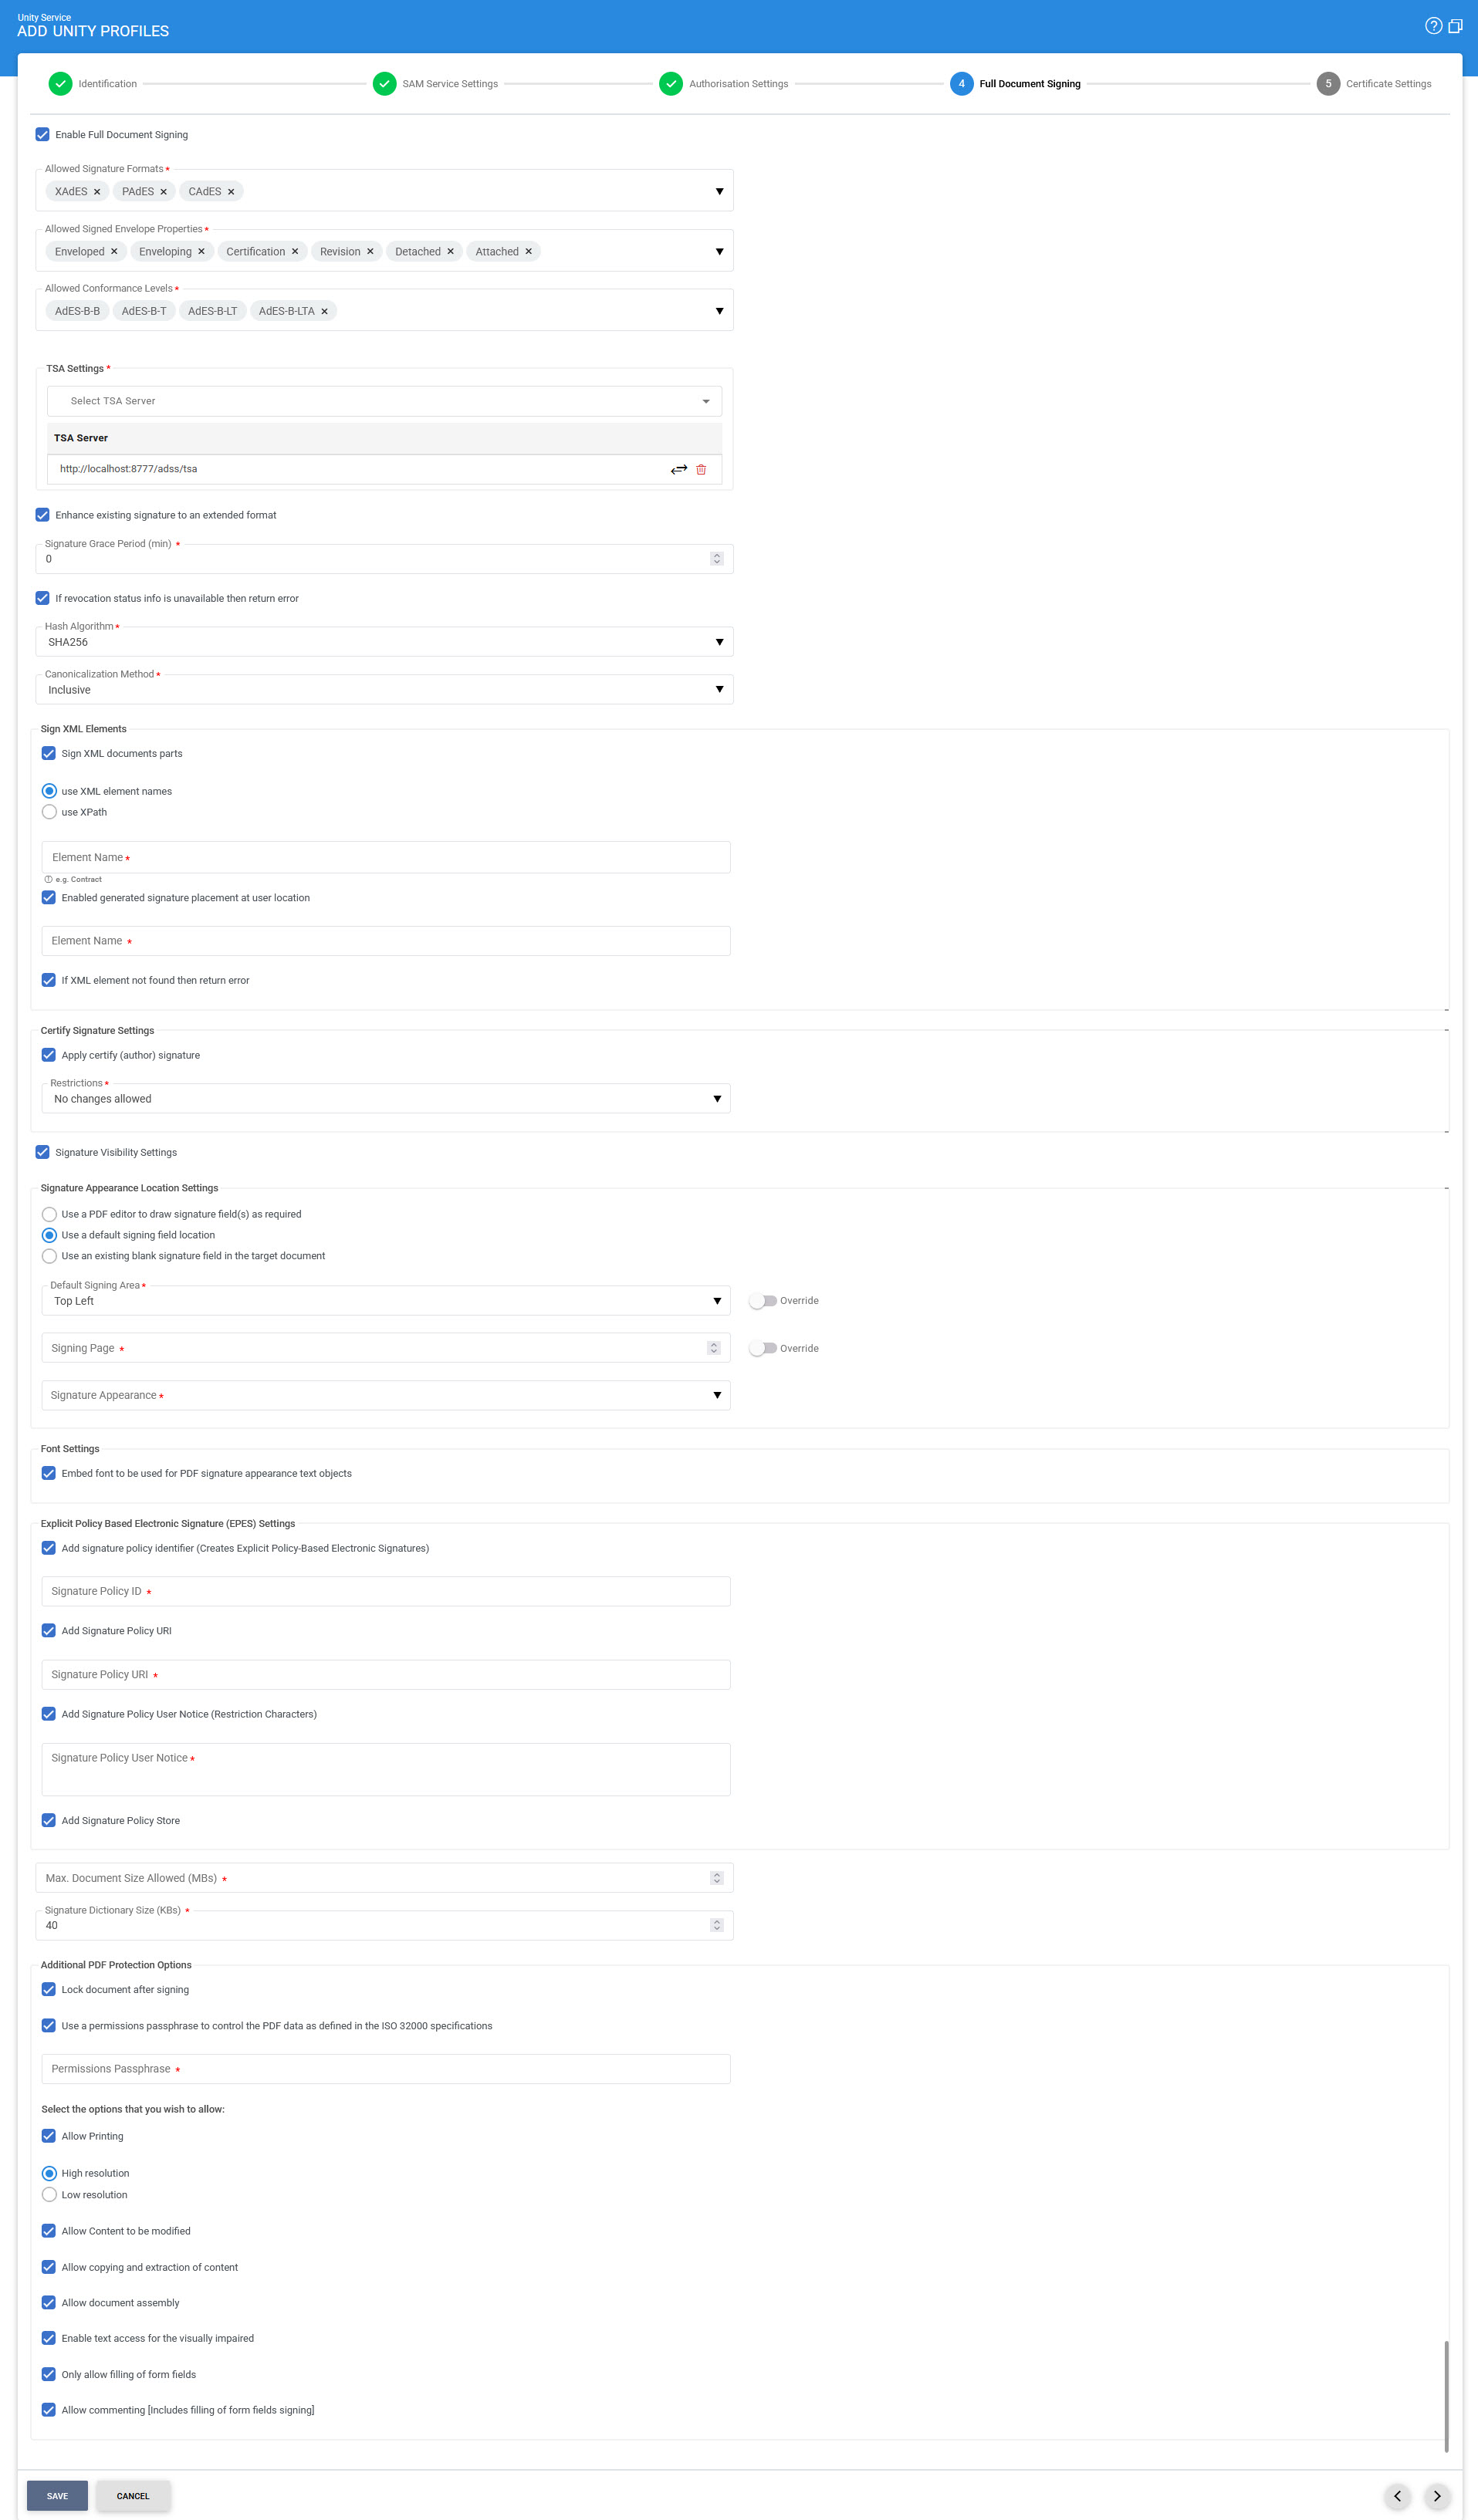
The configuration items are as follows:
|
Items |
Description |
||
|
Enable Full Document Signing |
This checkbox will be enabled if the user intends to perform configurations for Full Document Signing. |
||
|
Allowed Signature Formats |
This drop-down allows the user to select the signature formats to be applied on the full document. The list of allowed signature formats includes:
|
||
|
Allowed Signed Envelope Properties |
This drop-down allows the user to select the signed enveloped properties on the basis of signature formats added in the Allowed Signature formats field. See the details:
|
||
|
Allowed Conformance Levels |
This drop-down allows the user to select the allowed conformance levels to be applied on the full document. The list of allowed conformance level includes:
|
||
|
TSA Settings |
This section will only be available if conformance level with a timestamp is added in the Allowed Conformance Level field i.e. AdES-B-T, AdES-B-LT or AdES-B-LTA. It allows the user to select a configured TSA server from the drop-down. |
||
|
Enhance existing signature to an extended format |
This checkbox will only be available if 'CAdES' or 'XAdES' are selected in Allowed Signature Formats field, as well as 'AdES-B-T', 'AdES-B-LT' or 'AdES-B-LTA' are added in Allowed Conformance Level field. This option is specifically intended for use when the business application submits data with a basic signature to the service with the intention of having it converted into a long-term format. Note:
|
||
|
Signature Grace Period |
This option will only be visible if 'Enhance existing signature to an extended format' checkbox is enabled. This field will define how long ADSS Server should wait after the signing time indicated in the signature (either by TSA or by signer's local time) before converting the basic signature to an advanced signature. Note: The default value set to '0'. The value '0' indicates that do not consider signature grace period while converting to advanced signature type. |
||
|
If revocation status info is unavailable then return error |
If 'AdES-B-T' or 'AdES-B-LTA' are added in Allowed Conformance Level, then an extra check box is offered to decide if Unity Console should return an error if it cannot embed the revocation information when creating the Long-Term signature. Such signatures require embedded status/ revocation information for the signer's certificate chain. This is useful to stop basic signatures being created when a communication failure prevents revocation information being obtained from external resources. If this check box is not selected, then the signature will be produced but it may not contain the embedded revocation if this was unavailable at the time of signing, e.g. if the relevant OCSP is not responding or if the dynamic CRL is unavailable. ADSS Server is generally configured to cache CA CRLs locally and it also has a short-life cache for dynamic CRLs and OCSP responses. Note: It is recommended you always tick this box. |
||
|
Hash Algorithm |
The SignDoc API prioritizes the Hash Algorithm based on the request. First, it checks if the algorithm is specified in hashAlgorithmOID or implicitly provided in signAlgo/signAlgoParam. If not found there, it resorts to the hashAlgorithm from the SAM Profile. If the SAM's hash computation at signing time is disabled, it then resorts to the hash algorithm specified in the Unity Profile.
|
||
|
Canonicalization Method |
This checkbox will only be available if 'XAdES' is added in Allowed Signature Formats field. The user will select the Canonicalization algorithm that will be used to canonicalize the XML before computing the hash. One of the following algorithms can be selected:
Note: By default, 'Inclusive' will be selected. |
||
|
Sign XML document parts |
This section will only be available if 'XAdES' is selected in Allowed Signature Formats field, as well as 'Enveloped' is added in Allowed Signed Enveloped Properties field. This defines how a specific element can be signed in the XML document. Element can be defined individually or via XPath. Multiple signing elements can also be added. XPath uses path expressions to select nodes or node-sets in an XML document. XPath uses path expressions to navigate in XML documents. XPath can be set in number of ways. If checkbox is enabled and the system is unable to find the defined XML signing element then it will return an error. If signature/document relationship is Enveloped then XML part signing settings will be enabled. Xpath Examples: /root/books/author //publisher |
||
|
Apply certify (author) signature |
This section will only be available if 'PAdES' is selected in Allowed Signature Formats field. A certify signature option is very useful to lock the document against further unauthorised changes. These options are presented:
Note: Keep the below points under consideration while operating with checkbox:
|
||
|
Signature Visibility Settings |
If this checkbox is enabled, the signature visibility settings become visible to the user. |
||
|
Signature Appearance Location Settings |
This section will only be available if 'PAdES' is selected in Allowed Signature Formats field, as well as 'Signature Visibility Settings' is checked. This section allows the user to set the appearance and location of the signature. |
||
|
Use a PDF editor to draw signature fields(s) as required |
If this option is selected, then signing location(s) can be defined by opening the target PDF in the PDF editor. |
||
|
Use a default signing field location |
If selected then following option are shown: 1. Default Signing Area This option allows you to select a default location on the page where the signature appearance will be stamped. You have choices of:
If this does not adequately position the signature field on a document (e.g. engineering drawings have specific requirements where the signature field should go) then use the precise locations option. 2. Signing Page This defines which page of the document to sign on when using a default signing location. 3. Signature Appearance Select one of the PDF Signature Appearances already generated as mentioned in the section PDF Visible Signatures.
|
||
|
Use an existing blank signature field in the target document |
If selected then following options are shown: 1. Signing Field If the document already has a blank signature field, then the name of the signature field can be specified using this option. When ADSS Server signs a PDF document using this signing profile it will then search for this signing field and embed the signature details within that field. This is also a good way of positioning the signature in an exact location rather than just the default locations mentioned above. Note: Signature field names are case-sensitive so ensure you enter a valid field name as used in your documents, e.g. field1 and Field1 are not the same. 2. Signature Appearance Select one of the PDF Signature Appearances already generated as mentioned in the section PDF Visible Signatures.
|
||
|
Embed font to be used for PDF signature appearance text objects |
This section will only be available if 'PAdES' is selected in Allowed Signature Formats field, as well as 'Signature Visibility Settings' is checked. It selects the fonts used in the signature appearance to be embedded in the signed PDF document. |
||
|
What to Include in the Signature |
This section will only be available if 'PAdES' is selected in Allowed Signature Formats field, as well as 'Signature Visibility Settings' is unchecked. It defines the elements that are to be included in the signature. The user needs to define values in the below mentioned fields: 1. Signing Reason In this field, the user can define the reason of the signing, that will become the part of signature. 2. Signing Location In this field, the user can define the location of the signing, e.g. London, UK. 3. Contact Information In this field, the user can provide its contact information.
|
||
|
Explicit Policy Based Electronic (EPES) signature settings |
By enabling the check box Add Signature Policy Identifier, the signing profile can be used to produce (EPES) signatures where a signature policy OID, URI, user notice and policy store are added in the digital signature as specified below: 1. Signature Policy Object ID A Mandatory field Provide the Signature Policy OID to be added for EPES signatures. 2. Signature Policy URI A Mandatory field. Provide the Signature Policy URI to be added for EPES signatures. If there is no Policy URI defined inside the signing profile then EPES configurations should be made in policy.properties file located at: [ADSS Installation Directory]/service/ Open this file in any text editor and enter policy OID and path to the policy document e.g. 1.2.3.4.5 = "F:/Policy_File" 3. Signature Policy User Notice Provide the user notice to be added to the EPES signatures. 4. Signature Policy Store Provide the user policy store to be added to the EPES signatures. This option is ignored in case of PAdES signature format. |
||
|
Maximum Document Size Allowed |
This field allows the user to set the maximum size of the document that is be signed. The size of the document is set in MBs. |
||
|
Signature Dictionary Size (KBs) |
This section will only be available if 'PAdES' is selected in Allowed Signature Formats field. The signature dictionary size is the allocated signature dictionary that is used to embed signature in the PDF document. Default size is 40 KB, however, user can change it accordingly based on the signature size. |
||
|
Lock the Document After Signing |
This checkbox enables the user to lock the PDF document after the final signature, preventing any further changes such as digital signing, form-filling, or annotations. Note: This option is not available for PAdES-B-LT, PAdES-B-LTA and PAdES-E-LTV signature types. |
||
|
Use a permission passphrase to control the PDF data as defined in the ISO 32000 specifications |
Enable this option to set the document level permissions on PDF files as defined in ISO 32000 specification. Note: These permission settings are ignored for PAdES Signature Format as well as AdES-B-LT and AdES-B-LTA Conformance Levels. Once this checkbox is enabled the below fields become visible to the user. The details of fields are explained below:
|
Use a PDF editor to draw signature field(s) as required
Going back to how to define a precise signing location for your documents, enabling the radio button "Use a PDF editor to draw signature field(s) as required" shows the following screen:
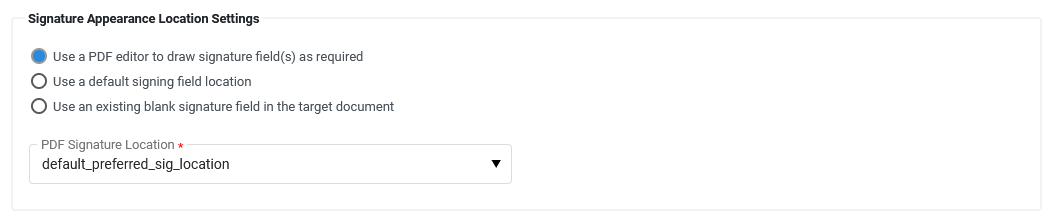
PDF Signature Location drop down will list all configured preferred signature locations. For more details please see the PDF Sig. Locations sub-module, you can also create new signature appearance(s) there if none of the already available signature appearances meets user needs. Multiple signature fields can be created in this way. ADSS Server will sign all fields with the associated signature appearance when this signature profile is referenced by client applications.
Use an existing blank signature field
Enabling the radio button "Use an existing blank signature field in the target document" shows the following screen:
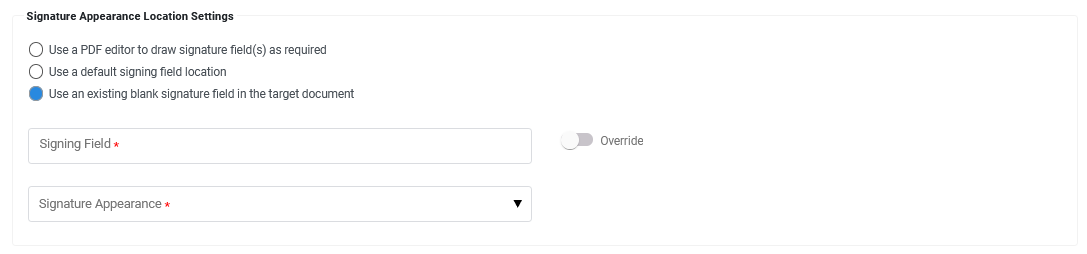
The configuration items are as follows:
|
Items |
Description |
|
Signing Field |
If the document already has a blank signature field, then the name of the signature field can be specified using this option. When ADSS Server signs a PDF document using this unity profile, it will then search for this signing field and embed the signature details within that field. This is also a good way of positioning the signature in an exact location rather than just the default locations mentioned above. Note: Signature field names are case-sensitive so ensure you enter a valid field name as used in your documents, e.g. field1 and Field1 are not the same. |
|
Signature Appearance |
Select one of the PDF Signature Appearances already generated as mentioned in the section PDF Visible Signatures. |
|
Overridable |
This flag indicates whether the details configured in the unity profile can be amended by the client application by passing parameters in the unity service request message. Select the check boxes for those values that the client application is able to override in this unity profile. This provides a great deal of flexibility to the client application to override the unity profile settings at the time of sending the request to ADSS Server. |
Certificate Settings
After configuring Full Document Signing of Unity Profile, the next step is to configure Certificate Settings. Click on the Next arrow (>), it will display the following screen:
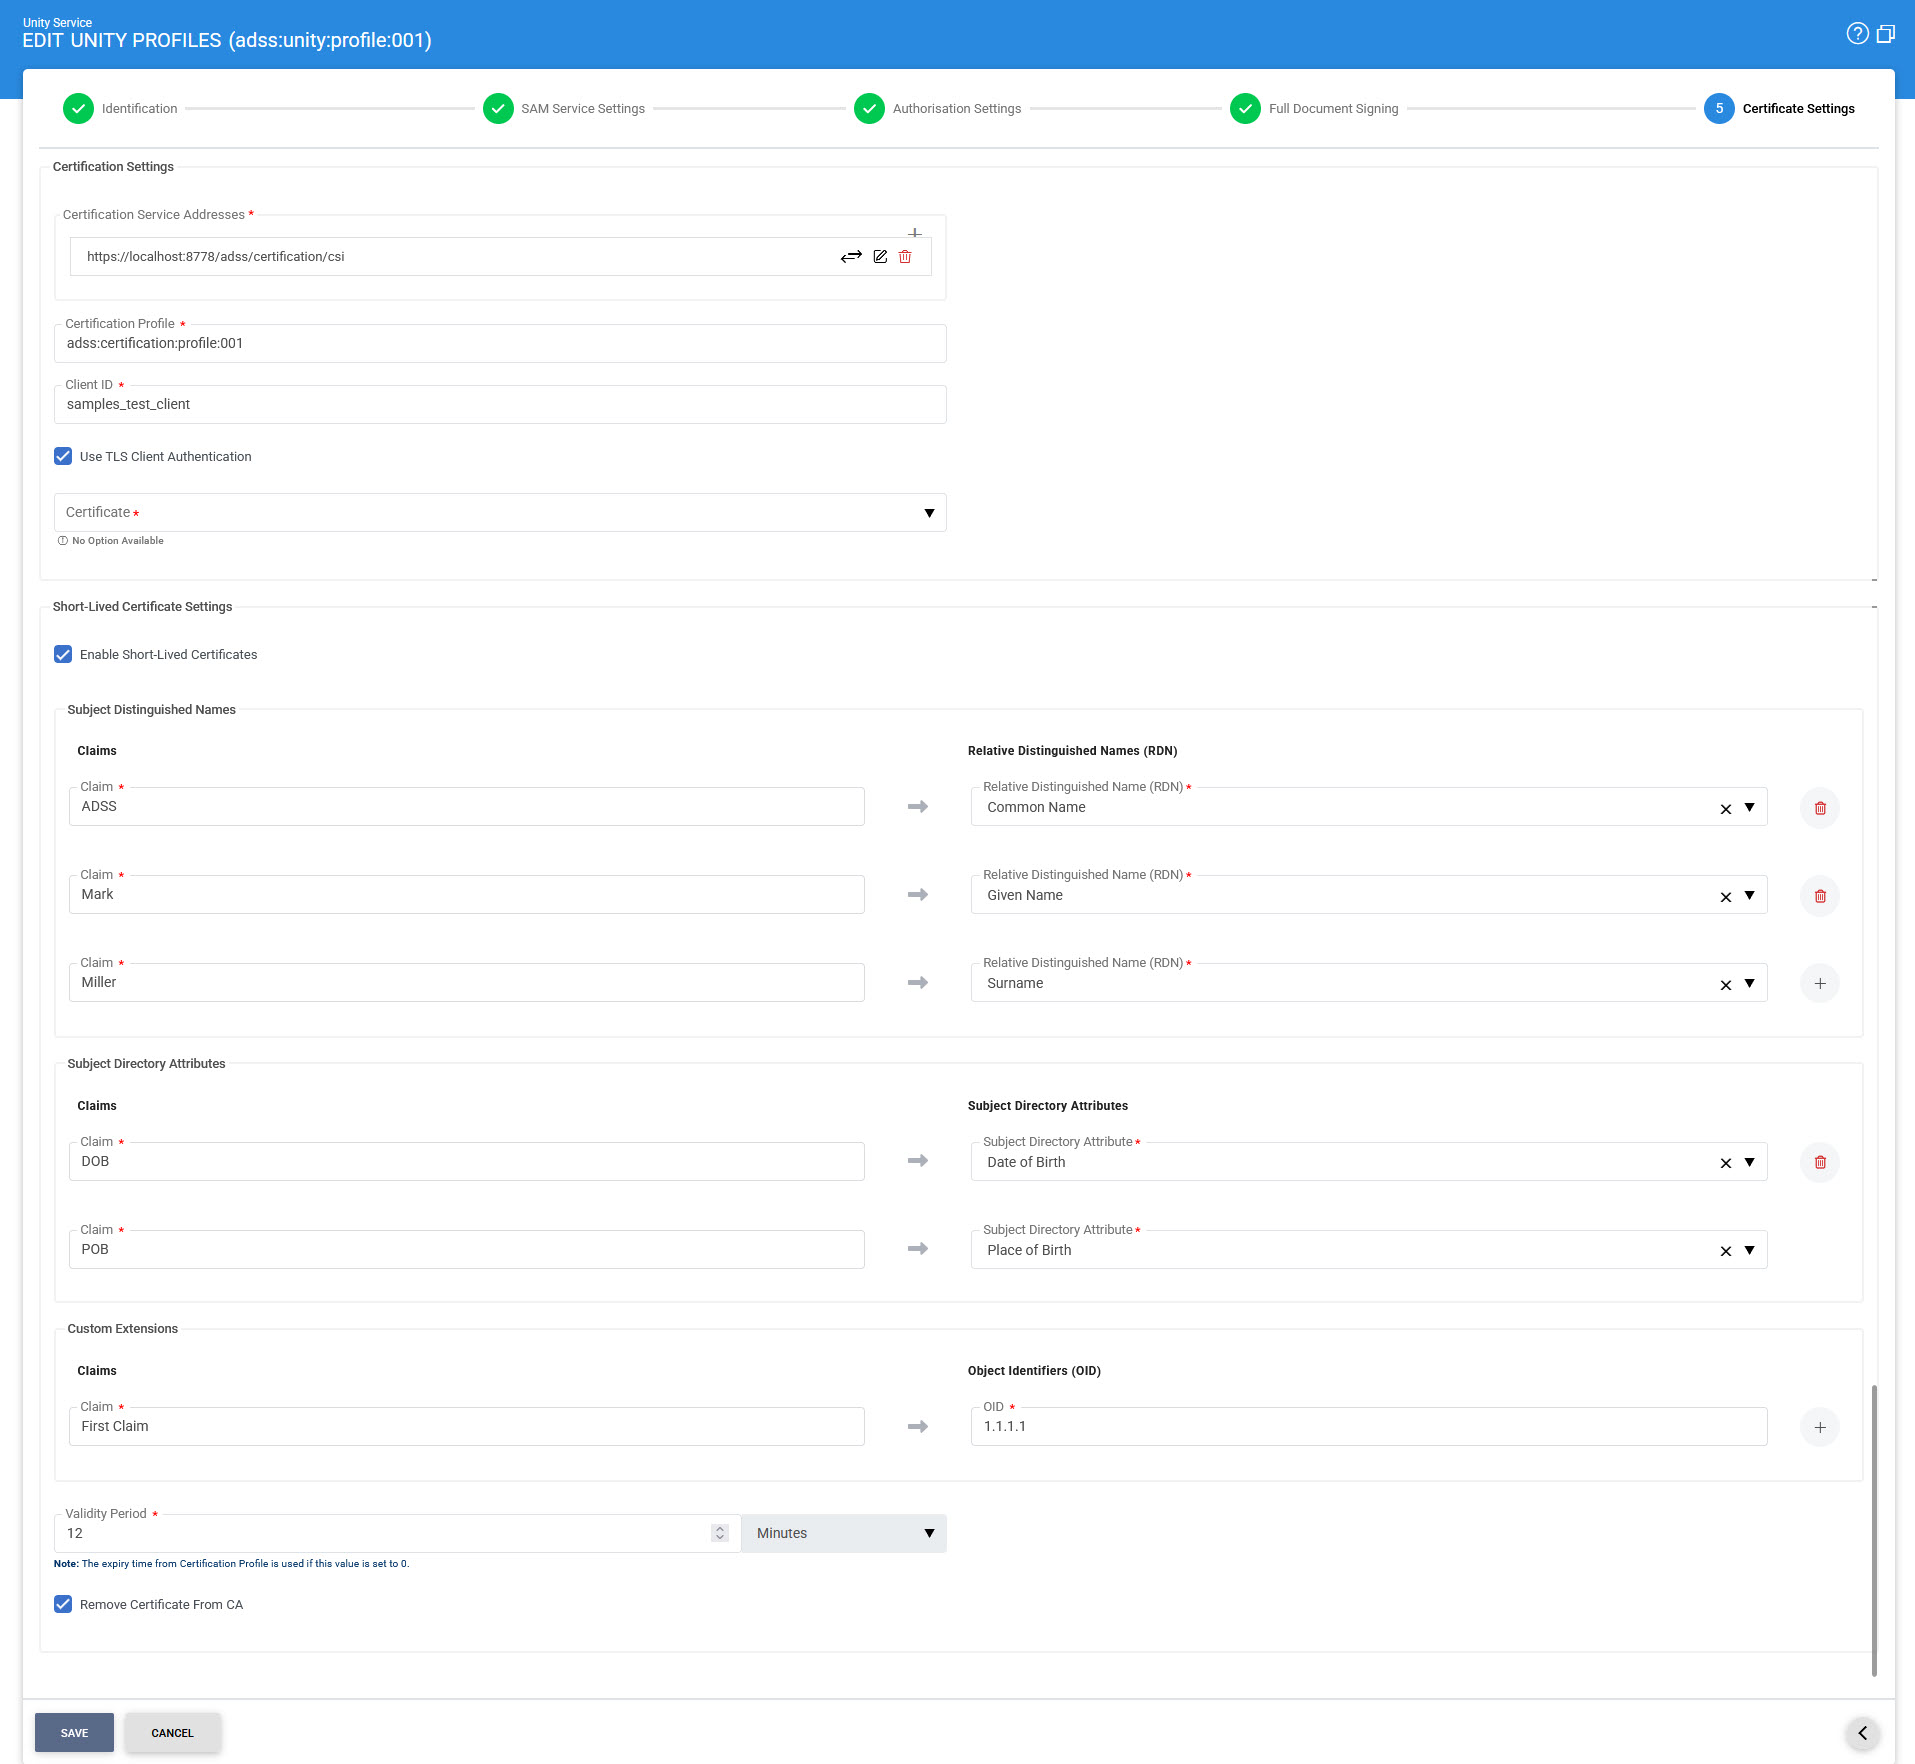
The configuration items are as follows:
|
Items |
Description |
||||||||||||
|
Certificate Settings |
This section defines the configuration required for certificate creation at Certification Service. |
||||||||||||
|
Certificate Service Addresses |
This field shows the Certificate Service addresses that can be used to generate user keys, register user devices within SAM Service. Multiple service addresses can be added. |
||||||||||||
|
Certificate Profile |
Specifies the Certification profile to be used for this Unity profile. A Certification Profile defines the type of digital certificate issued to a user during the authentication process. The type of certificate, either Qualified or Advanced, depends on the Level of Assurance (LoA) received from the identity provider (IDP). In the Unity Profile configuration, the Certification Profile is a mandatory setting. However, the system is designed to adjust this setting automatically based on the client application's input. The system follows the steps below to decide which Certification Profile to use: 1. From the ID Token: After the user is authenticated by the IDP (e.g., Auth0 or WSO2), an ID token is returned. If this token contains a Certification Profile, the system will use it first. 2. From the Credentials List API: If the Certification Profile is not available in the ID token, the system will check the request sent by the client application to retrieve the credentials list. If the profile is provided in this request, it will be used. 3. From Unity Profile Settings (Default) If no Certification Profile is found in the token or the credentials list request, the system will use the one already configured in the Unity Profile. This acts as a backup to make sure the process can still continue. This flexible mechanism allows the system to dynamically switch between Qualified and Advanced certificates depending on the assurance level of the user’s authentication session. |
||||||||||||
|
Client ID |
Shows the Client ID of Certification Service. Unity Service will send this Client ID while communicating with Certification service. Certification service verifies that this is a registered Client ID within the Client Manager module before granting access to this service. |
||||||||||||
|
Use TLS Client Authentication |
If this option is enabled, then Unity Service will communicate with Certification Service using TLS client authentication. By default, it is disabled. |
||||||||||||
|
Certificate |
Select the Client TLS Certificate which pre-exists in the Key Manager. Note: It is required to register the Issuer CA of the Client TLS certificate in Trust Manager with the CA for verifying TLS client certificates purpose. |
||||||||||||
|
Short-Lived Certificate Settings |
This is a license based feature and will only be available to the user if enabled in license. The short-lived certificates will stay active unless document signing is performed. After that, the user and it's relevant keys are deleted. The below sections become available to the user after enabling 'Enable Short-Lived Certificates' checkbox.
The claim includes user information and is linked to external Identity Providers (IdPs). Users have the ability to match the IdP claims they receive with the corresponding Relative Distinguished Names (RDNs). It's possible for the same RDN to be added multiple times against different claims. Note: The supported Relative DNs values are:
Subject Directory Attribute:
The claim includes user information and is linked to external Identity Providers (IdPs). Users have the ability to match the IdP claims they receive with the corresponding OIDs.
. Custom Extensions:
The claim includes user information and is linked to external Identity Providers (IdPs). Users have the ability to match the IdP claims they receive with the corresponding Subject Directory Attributes.
|
||||||||||||
|
Validity Period |
Set the validity period and select the time unit from the drop-down (minute(s), hour(s), day(s)) to set the certificate validity period. Note: If the value in the field is set to '0', then the expiry time set in the Certification Profile will be utilized. |
||||||||||||
|
Remove Certificate from CA |
If this checkbox is enabled, the user certificate will be deleted from configured Certification Service after document signing is completed. |
The table of Unity profiles can be sorted in either Ascending or Descending order by selecting a table column from the drop down list. The list can be sorted by Profile ID, Profile Name, Profile Description or Status.
Clicking on the Advance Search icon on Unity Profiles main page will display following screen:
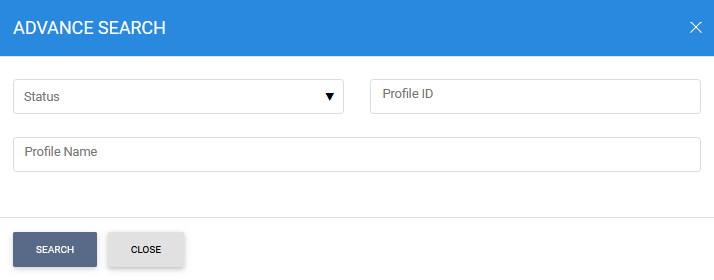
This helps to locate a particular Unity profile, the Unity Service may have configured. The Unity profile can be searched based on "Status", "Profile ID", "Profile Name". If a search is based on multiple values, then these will be combined together using the “AND” operand, and thus only records that meet all the criteria will be presented.
|
|
The Duplicate profile will be created without the Name and Description of the selected Profile. The Unique ID generates automatically or the next available ID will be assigned to the Profile. |
See also
Step 1 - Configuring Unity Profile
Step 2 - Registering Business Applications
Step 3 - Configuring Notification Settings
Step 4 - Using the Service Manager