Step 4 - Using the Service Manager
General Tab
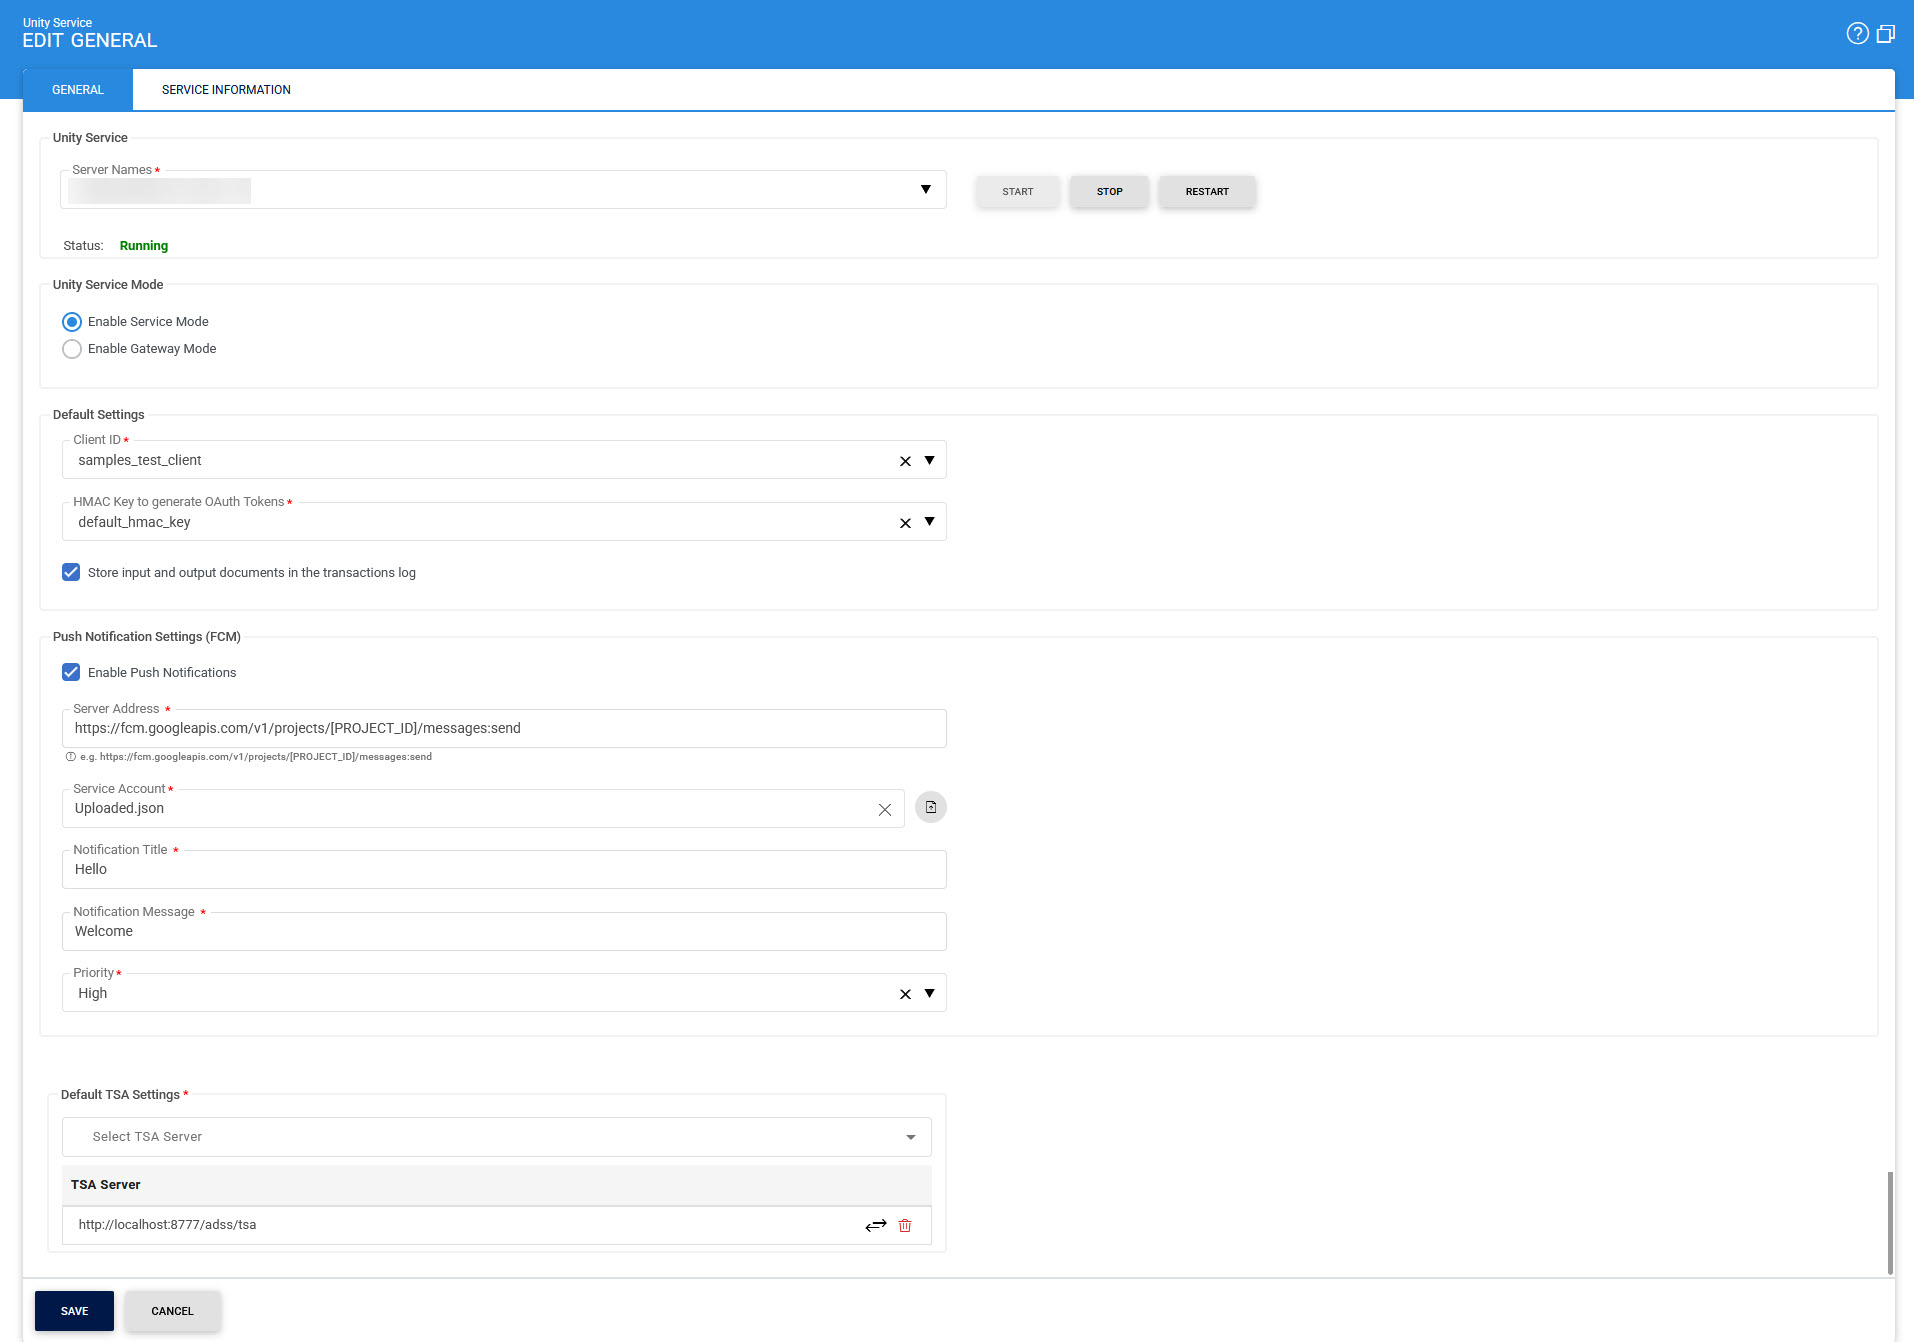
After finalizing the configuration changes within the Unity Service, it must be restarted to make the changes effective. The Unity Service Manager module allows users to start, stop or restart the Unity Service and also make changes to service related configurations. Also, it provides the user to select either to run the Unity Service in Service Mode or Gateway Mode by selecting the respective radio button from Unity Service Mode section. By default, Enable Service Mode option is selected.
Follow the link Service Manager > General, it will show the following screen:
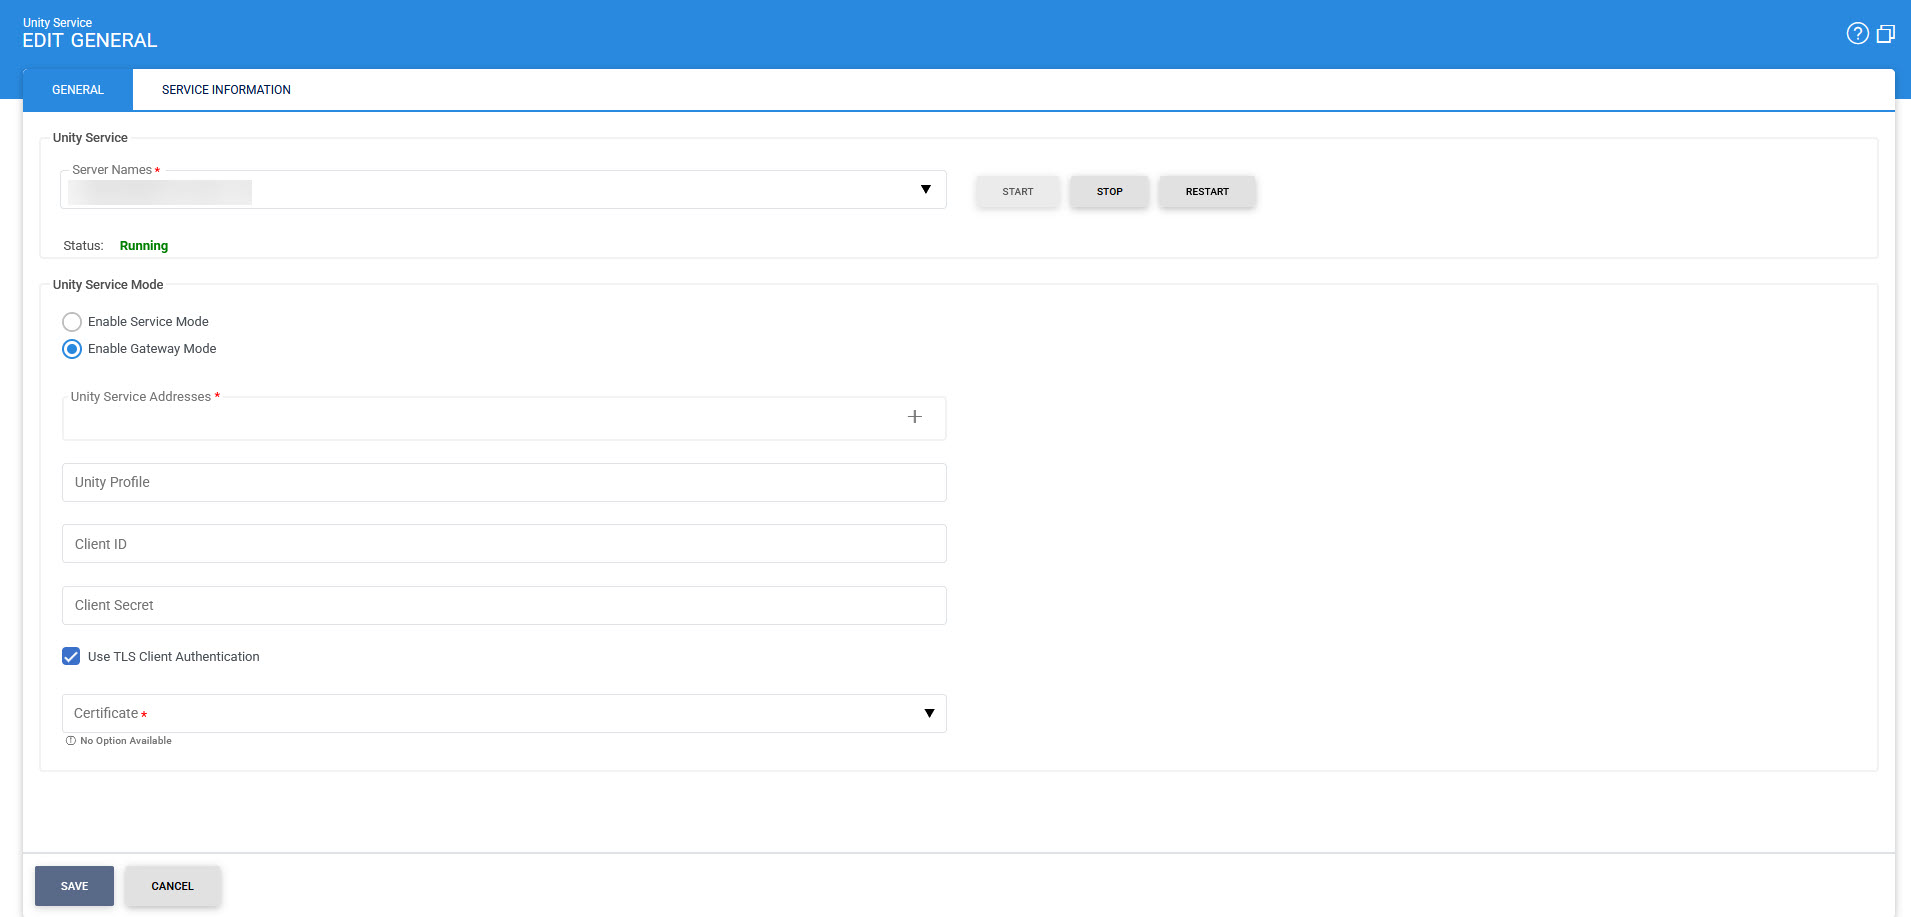
If user selects the Enable Gateway Mode option then following screen is show:
The configuration items are as follows:
|
Items |
Description |
||
|
Server Names |
The address of Unity Service being controlled from this Service Manager. Ensure the address points to the correct service URL, i.e. if you are running the service on multiple machines in a load-balanced configuration, then ensure the (selected) name is correct for the particular instance that needs to be started/stopped/restarted. By default, it will display the URL of local machine. |
||
|
Start |
Start the service. Status will change to “Running” after a successful start. |
||
|
Stop |
Stop the service. Status will change to “Stopped” after the service is stopped. |
||
|
Restart |
Stop and then start the service in one go, Status will change to “Running” after a successful restart. |
||
|
Unity Service Mode |
This section provides the user with two modes i.e. Service Mode and Gateway Mode. User can select respective radio button to either configure the Unity as a service or gateway to a remote Unity Server. |
||
|
Enable Service Mode |
When this radio button is selected, Unity Service will run in Service Mode. |
||
|
Default Settings |
This sections define the configurations required by a Client to access Unity Service. |
||
|
Client ID |
Shows the Client ID of Unity Service. Client applications where Client ID is not available Unity Service will use this Client ID as default client. Unity service verifies that this is a registered Client ID within the Client Manager module before granting access to this service. This Client ID will be use for request from Go>Sign Mobile app or requests to Unity service via CSC protocol.
|
||
|
HMAC key to generate OAuth Tokens |
Select a HMAC key that, which pre-exists in the Key Manager, will be used by ADSS Unity Service to generate the OAuth tokens. A default HMAC key comes pre-bundled with the ADSS Server installation. This can be replaced with user generated HMAC keys that may either exist in software (database) or on a PKCS#11 device e.g. an HSM. |
||
|
Store input and output documents in the transaction logs |
If this checkbox is enabled, the input and output documents (i.e. the documents received by Unity Service for signing purposes) will be stored in transaction logs. |
||
|
Push Notification Settings |
This section defines the configurations required for push notifications using third party Firebase platform. It allows ADSS Server to send push notifications to Go>Sign Mobile App. For this purpose, ADSS Server needs to be registered with the Firebase platform. |
||
|
Server Address |
Specify the server address that has been provided by Firebase during account configuration, e.g. https://fcm.googleapis.com/fcm/send |
||
|
Service Account |
This field allows the user to upload a JSON file from the file system. |
||
|
Notification Title |
Specifies the title for push notification being send to the Go>Sign Mobile App. |
||
|
Notification Message |
Specifies the message for push notification being send to the Go>Sign Mobile App. |
||
|
Priority |
This drop-down allows the user to select the priority of the push notification to either High or Normal. If the priority is set to Normal and application is running in foreground, then push notifications will be received immediately by the Mobile Application, else there will be delay. If the priority is set to High, then push notification will be received by Mobile Application even if the application is operating in background or idle mode.
|
||
|
Default TSA Settings |
This drop-down allows the user to configure the default Timestamp Authority Server available in the drop-down list. |
||
|
Enable Gateway Mode |
When this radio button is selected, Unity Service will run in Gateway Mode to communicate with a remote Unity Server. |
||
|
Unity Service Address |
Use this field to add Unity Service address(es). |
||
|
List of Unity Service Addresses |
This field shows the Unity Service addresses that can be used to communicate with remote Unity Servers. Multiple service addresses can be added. The "Test" button checks if the selected Unity Server is available for communication. The "Remove" button deletes a configured Unity Service address. |
||
|
Unity Profile |
Optionally specifies the Unity profile to be used for back-end Unity Service request. When using client assertion, the Unity Profile becomes conditionally required based on the following scenarios:
Note: If a Unity Profile is not configured and the request does not use client assertion (i.e., it uses client ID and client secret), then the request will be forwarded to the back-end Unity Service without a Unity Profile. In that case, the Unity Server will use the default Unity Profile associated with the client in the Client Manager. However, in the case of client assertion, this fallback mechanism does not apply, and a Unity Profile must be provided either in the console or within the request. |
||
|
Client ID |
Define the Client ID registered in back-end Unity Service. Unity Service will use this Client ID while communicating with back-end Unity Service. The back-end Unity service verifies that this is a registered Client ID within the Client Manager module before granting access to the service. Note:
|
||
|
Client Secret |
Provide the Client Secret generated against above configured Client when it was registered in back-end Unity Service.
|
||
|
Use TLS Client Authentication |
If this option is enabled then Unity Service will communicate with back-end Unity Service using TLS client authentication. Note: By default, it is disabled. |
||
|
Certificate |
Select the client TLS certificate which pre-exists in the Key Manager. Note: It is required to register the Issuer CA of the client TLS certificate in Trust Manager with the purpose CA for verifying TLS client certificates. |

Service Information Tab
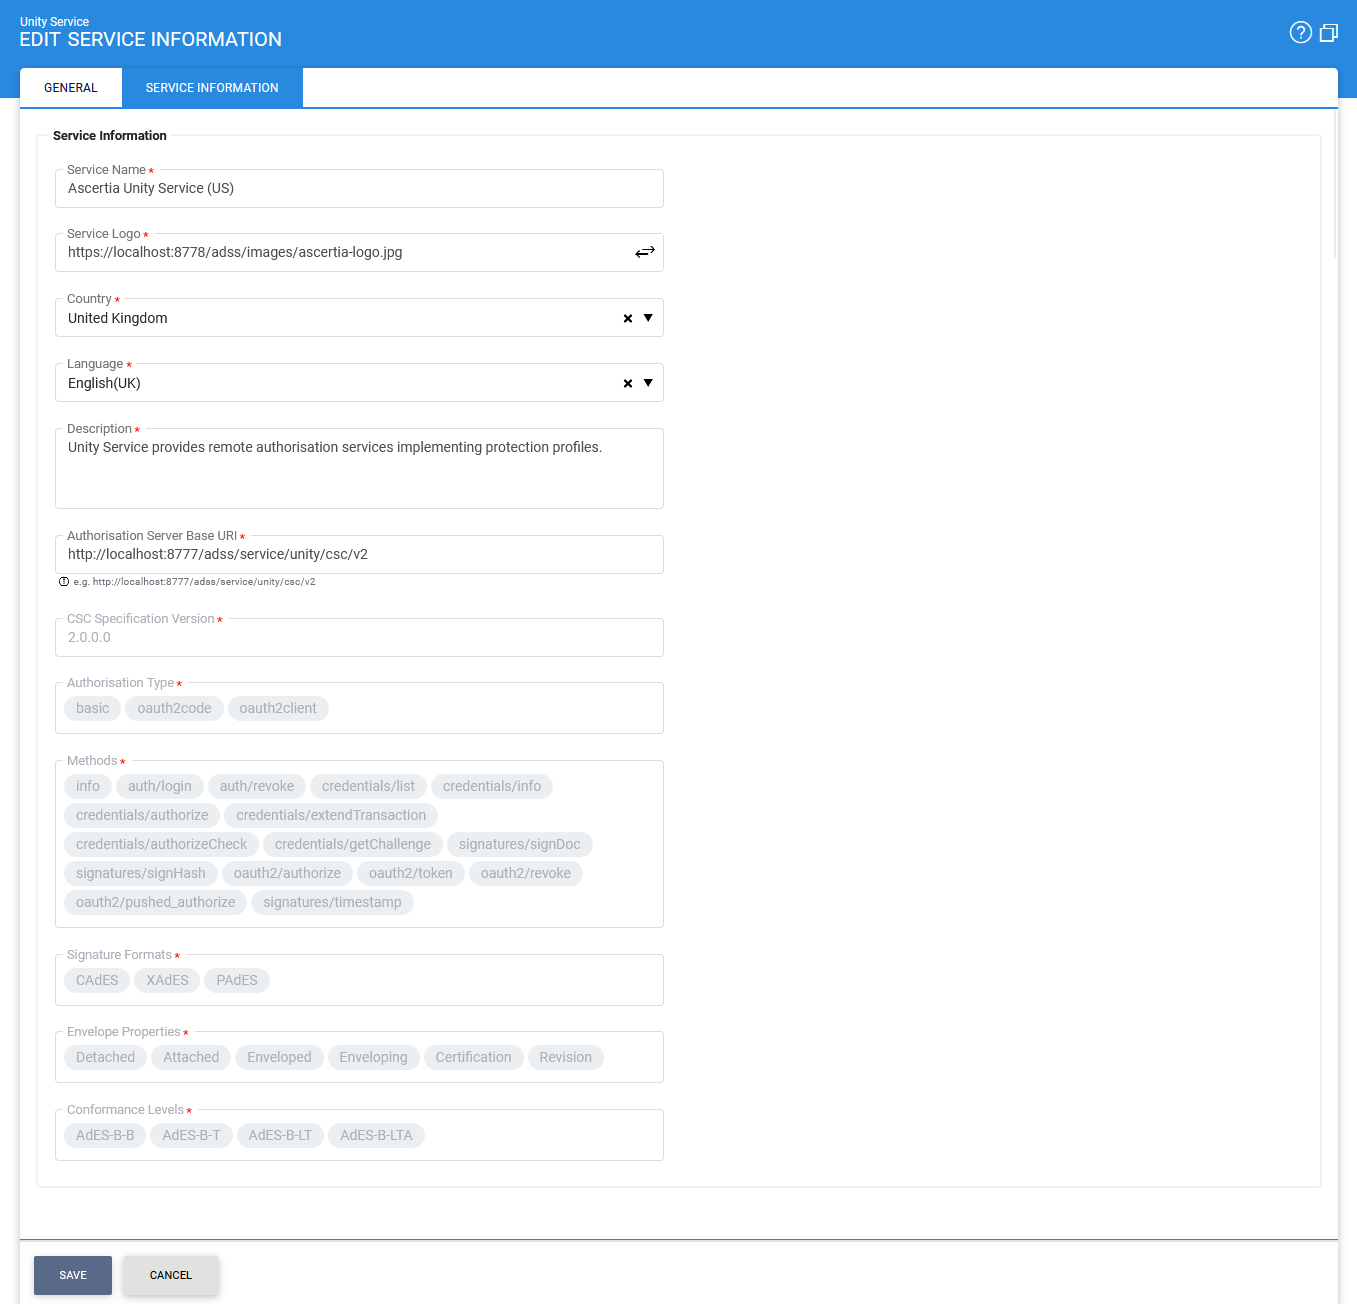
This tab displays information about Unity Service and its capabilities. The clients can retrieve this information by invoking "/info" API of CSC Protocol and the information configured on this screen will be returned in response. All the information on this tab is configured according to the CSC specification.
Follow the link Service Manager > Service Information, it will show the following screen:
The configuration items are as follows:
|
Items |
Description |
|
Service Name |
This field shows the remote service that will have a default value as shown in the image above. The user can change the service name as per his/her choice. Note: Maximum 255 characters are allowed. |
|
Service Logo |
This field contains the URI of the logo image of the service. The user can change its value as required. |
|
Country |
This field represents the country where the service is operating. The drop-down will list the countries and the user can update its value by selecting the required country. |
|
Language |
This field represents the language supported by the service. The user can select the required language from the drop-down list in order to update its value. |
|
Description |
This filed represent the description of the service. The default value is shown in the image above. The user can change its value to their own description as required. Note: Maximum 255 characters are allowed. |
|
Authorisation Server Base URI |
This field defines the Base URI of the OAuth2 interface of Unity Service. Business Applications can use this base URI to invoke OAuth2 APIs of Unity Service. |
|
CSC Specification Version |
This field shows the CSC specification version that is being currently supported i.e. 1.0.4.0. |
|
Authorisation Type |
This field represents the authorisation types supported by Unity Service. The supported types that are shown in the above image as default are:
Note: This is a read only field and the user cannot change its value. |
|
Methods |
This field shows the CSC v2 methods (APIs) supported by Unity Service. The supported methods include:
Note: This is a read only field and the user cannot change its value. |
|
Signature Formats |
This field shows the signature formats supported by Unity Service. The supported formats that are shown in the above image as default are:
Note: This is a read only field and the user cannot change its value. |
|
Envelope Properties |
This field shows the list of envelope properties supported by Unity Service. The supported properties that are shown in the above image as default are:
Note: This is a read only field and the user cannot change its value. |
|
Conformance Levels |
This field shows the conformance levels supported by Unity Service. The supported types that are shown in the above image as default are:
Note: This is a read only field and the user cannot change its value. |
|
|
Ensure all the changes are saved by clicking the Save button and restart the service to take changes effect. |
See also
Step 1 - Configuring Unity Profile
Step 2 - Registering Business Applications
Step 3 - Configuring Notification Settings
Step 4 - Using the Service Manager