Real Time Revocation
ADSS Server has licensed options to enable real-time revocation checking. There are two types of real-time revocation checking supported by ADSS Server.
Option1: Full Certificate Status Checking (Allowed List Checking)
The first and newest option (available from v4.7.4 onwards) is to use a Full Certificate Status Table option in which a CA or a utility application creates a database table for a CA that contains information on all issued certificates. ADSS Server Trust Manager defines the validation policy for each CA and it is here that Full Certificate Status checking can be selected. The database that stores this table is configured using this Global Settings option (Ignore the Revocation Publisher Utility (RPU) options - this is for the second type of real-time revocation). This option provides positive confirmation that a certificate was actually issued by the CA and helps prevent false certificates being trusted if the CA environment has been compromised. If a status request is received for a certificate that is not defined in the Full Certificate Status Table then a response of "revoked" is provided as defined by the CA/B Forum. This default response can be changed to "unknown" here: Advanced Settings > OCSP:

Option 2: Extended CRL Status Checking (Advanced Denied List checking for UniCERT and Entrust CAs)
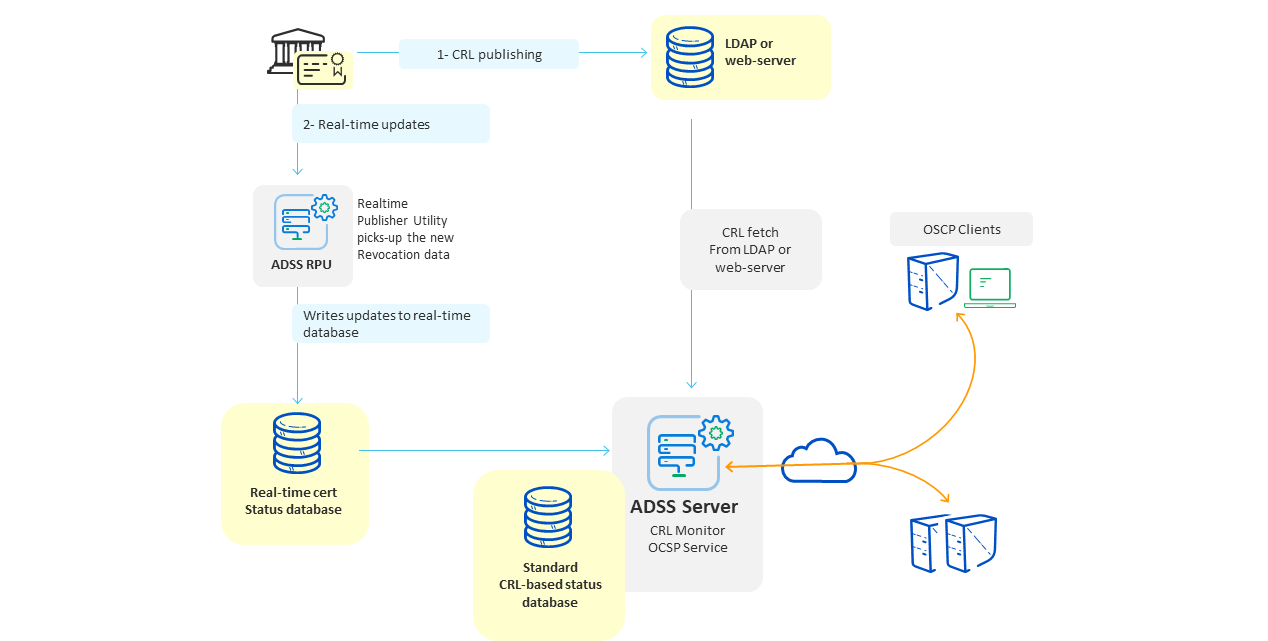
The second real-time revocation checking option (available since v3.7) provides a real-time revocation information link. When a certificate's status is updated (revoked, suspended or un-suspended) by its CA, then typically the CRL is not published at the same time (it is published at a fixed interval defined by the CA's CRL publishing policy). This means that there is a time delay between a certificate being revoked and this information becoming available to relying parties unless CRLs are issued immediately upon every revocation, which is uncommon. In such cases ADSS CRL Monitor will have out-of-date information until the next CRL is published. To cope with this problem ADSS Server offers a licensed option that provides an external certificate revocation information database table. To work with UniCERT CA status tickets ADSS Server provides a Real-time Publishing Utility (RPU) to populate this database. Entrust CAs using Oracle can also populate this table using database triggers:

With this up-to-date information on certificate revocation information in place, ADSS Server can provide real-time information on certificate revocation status. The process flow is as follows:
- If the target certificate is permanently revoked (i.e. reason is not onHold) in the latest CRL in the ADSS Server CRL database, the result will be returned as REVOKED. The real-time revocation database is not checked.
- If the target certificate is revoked with the reason onHold in the latest CRL, the real-time revocation database is checked for the latest information about the certificate.
- If the certificate is not found the result will be returned as REVOKED.
- If the certificate is found but with reason removedFromCRL, the result returned is GOOD.
- If the certificate is found with the reason removedFromCRL and onHold, the result returned is REVOKED.
- If the target certificate is not found in the ADSS Server CRL database (i.e. its status is GOOD) then the real-time revocation database is checked for the latest information about the certificate.
- If the certificate is not found the result returned is GOOD.
- If the certificate is found with any revocation reason, the result returned is REVOKED (together with an appropriate reason code).
The ADSS Real Time Revocation module is used to configure/attach the Revocation Publishing Utility (RPU) with ADSS Server as explained below.
|
|
It is assumed that you have installed the RPU utility according to the guide which is shipped within the RPU setup. Ask Ascertia Support for details about this support@ascertia.com. |
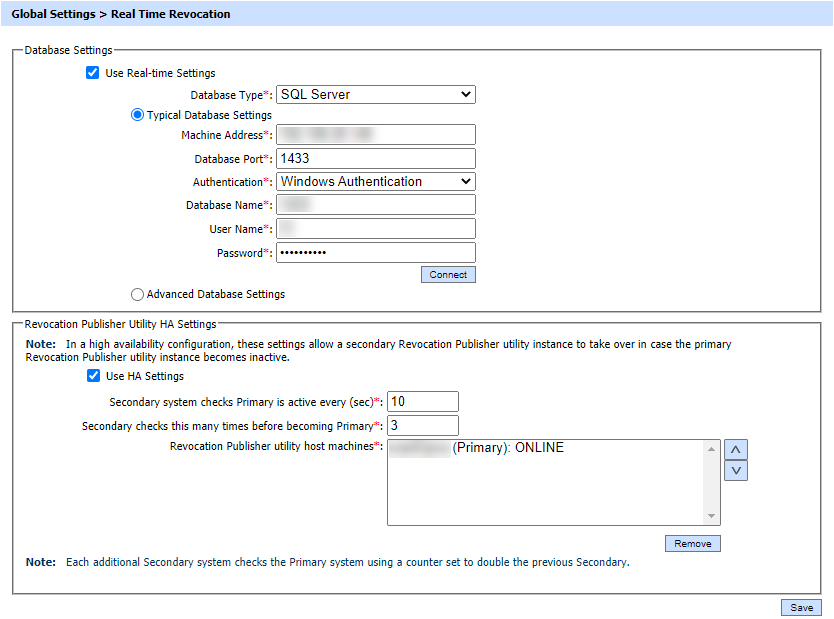
Clicking the Real Time Revocation button within Global Settings displays the following page:

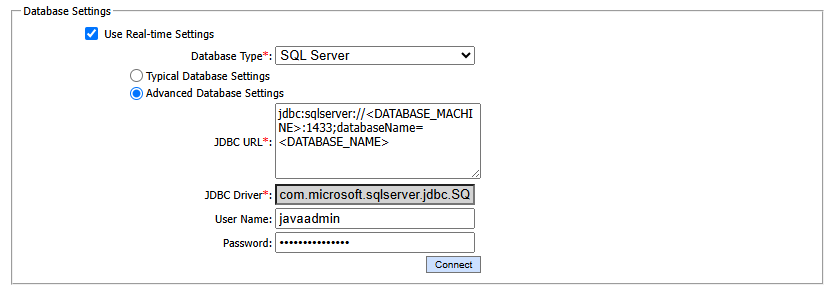
For Advance Database Settings, the following screen will be displayed:

Configuration items for the Database Settings are as follows:
|
Items |
Description |
|
Use Real-time Settings |
Enable this checkbox to configure the ADSS real-time certificate status database. |
|
Database Type |
Select the type of database used. The databases supported are:
|
|
Typical Database Settings |
It is always suggested to use the Typical Database Settings and provide the credentials as described above. If it is needed to use some special parameters for the database connection string then you can opt for Advanced Database Settings. |
|
Machine Address |
Enter the machine address (IP, Name of the machine) where the database server is installed and ADSS real-time certificate status database is created. |
|
Database Port |
Once you select the database type, this field will be populated automatically with default port number of the selected database server. If the database is not configured on the default port, then change it to the relevant port number for your database server. |
|
Authentication |
In case of ADSS Server installation with SQL Server as Database, user can be authenticated by two ways i.e.:
For SQL Server Authentication, user needs to enter the User Name and Password of SQL Server. Whereas in Windows Authentication, these fields will be disabled and user will be authenticated by the logged-in user Windows/Domain credentials. |
|
Database Name |
Provide the name of the ADSS real-time certificate status database. |
|
User Name |
Provide the user name used by ADSS Server to connect to the ADSS real-time certificate status database. Ensure that this user exists and has the appropriate privileges to create and access tables. |
|
Password |
Provide the corresponding password for the user name to connect with the ADSS real-time certificate status database. |
|
Advanced Database Settings |
The Advanced Configuration allows configuration of the low-level database drivers, URL, JARs etc. |
|
JDBC URL |
Enter the JDBC URL is a database connection string. This is useful for configuring a connection string manually or for database connection pooling i.e. the connection string provides details of the individual database server name, port, user ID and password running in a database pooled environment. To configure JDBC URL for connecting to SQL server using Windows Authentication, use the below connection string:
To configure JDBC URL for connecting to SQL server using SQL server Authentication, use the below connection string:
To configure JDBC URL for connecting to Azure SQL, use the below connection string:
For more information, refer to [ADSS-Installation-Directory]/docs/ADSS-Server-Installation-Guide.pdf |
|
JDBC Driver |
Shows the name of the driver used to communicate with the database. |
Now, click the "Connect" button to establish the connection with the external database.
For the Revocation Publisher Utility HA Settings option, once a successful connection is established with the database, a success message will be shown and the HA Setting fields will be populated with the default values and the machine name on which the RPU is installed. High Availability (HA) configurations of RPU work similarly to HA configurations of CRL Monitor. To get more information about HA configuration click here.
Configuration items for the HA (High Availability) Settings are as follows:
|
Items |
Description |
|
Secondary should check Primary active status every (sec) |
Defines how often a Secondary RPU will check if the Primary RPU instance is still active in seconds, the default is 10 secs. |
|
Number of times secondary should re-check before becoming Primary |
If the Secondary finds Primary to be inactive, then this parameter defines how many times it should recheck the Primary’s online status before promoting itself to become the new Primary. |
|
Up, Down |
Use these buttons to re-arrange the ordering of Primary and Secondary instances. |
|
Remove |
Use this button to remove an offline RPU Host from the High Availability configuration. |
Click the Save button to save the settings (Database Information and RPU HA configurations).
See also
NTP Time Monitoring
Timestamping
Connectors
Notification Settings
System Alerts
High Availability
System Security
Authentication Profiles
Authorisation Profiles
Import/Export Settings
License Manager
Advanced Settings
Miscellaneous Settings

