SAM Service
The following configurations relating to the SAM Service can be made within Client Manager:
- Allow the client to access the ADSS SAM Service
- Assign the SAM Profiles which can be accessed by this client
- Configure a default SAM Profile for this client
Once a client is registered, permissions to access the SAM service can be granted by editing this client. On the edit screen, clicking on the SAM Service link at the top of the page shows the following screen:
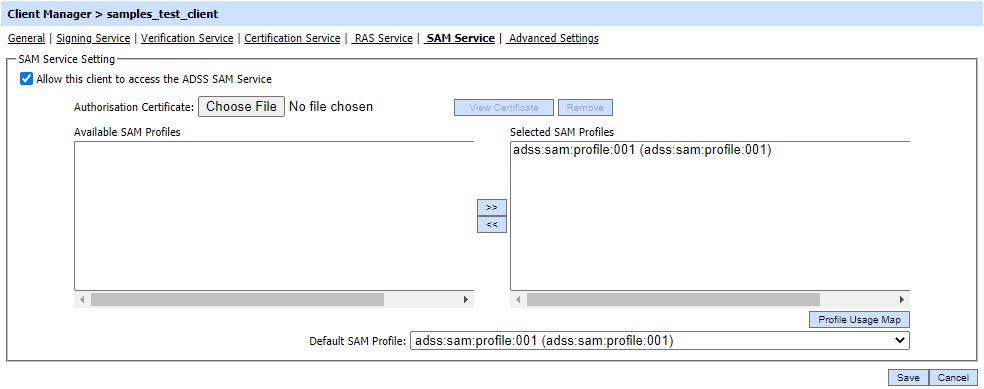
Select the "Allow this client to access the ADSS SAM Service" checkbox. This ensures that the client can make SAM Service requests to ADSS Server. If the application also needs to access other ADSS services (e.g. verifying signed documents or generating and certifying user signing keys) then the relevant links (Verification Service, Certification Service etc.) should be followed to allow permissions for these services.
The Authorisation Certificate field allows the operator to upload the authorisation certificate from the file system. This certificate is used to verify the SAD signature computed by a business application e.g. RAS Service or any other client.
Normally the SAD is signed by the Go>Sign mobile application but there are cases when the SAD could be signed by a key under possession of the business application. These cases include:
- When an external IdP is used to authorise the request instead of Go>Sign mobile application.
- When a PIN/OTP is used to authorise the request in case of SCAL1.
- In e-sealing cases where first request is authorised by user using Go>Sign mobile application, an external IdP or a PIN/OTP and for rest of the requests the user's involvement is not required. Business Application gets the first SAD renewed by SAM and sign the new SAD using its own key.
The next action is to define which SAM profiles (configured within the ADSS SAM Service) are to be made available to this client. By default all the existing SAM profiles will be made available to each newly registered client. Different clients may need to have access to different SAM profiles. In order to allow access to a particular SAM profile, simply move that profile from the left-hand group box labeled Available SAM Profiles to the right-hand group box labeled Selected SAM Profiles using the >> button shown in the screenshot above. Clients can only reference those SAM profiles that are shown in the Selected SAM Profiles. To remove access to a particular profile use the opposite << button to move the relevant profile back to the right-hand box.
The Profile Usage Map button provides an overview of which profiles are being used by which clients.
The Default SAM Profile defines which profile to use in case the request message from this client does not reference any specific SAM profile.
Click the Save button when the list is updated to store the changes.
Whenever configurations are updated on this page remember to restart the SAM Service and have the changes take effect
See also