S/MIME Certificate Requests
This section explains how to create certificate requests for S/MIME Certificate type in the Web RA application.
S/MIME certificate requests with Mailbox Validation
S/MIME certificate requests with Domain Validation
S/MIME certificate requests with Domain and Mailbox Validation
S/MIME certificate requests with CAA records verification
S/MIME certificate requests with Mailbox Validation
The following steps describe how to create an S/MIME certificate request when Mailbox Validation is selected in the certification profile.
0Expand Requests > Certificate Requests from the Admin portal to navigate to the Certificate Requests listing screen.
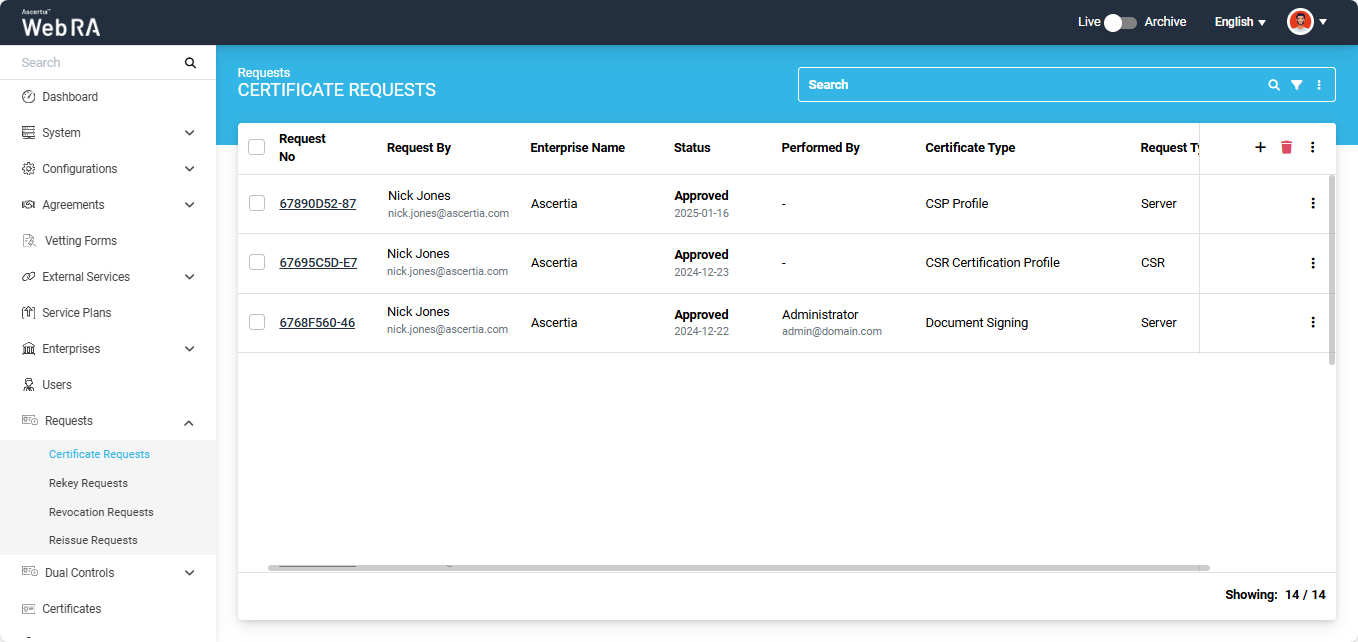
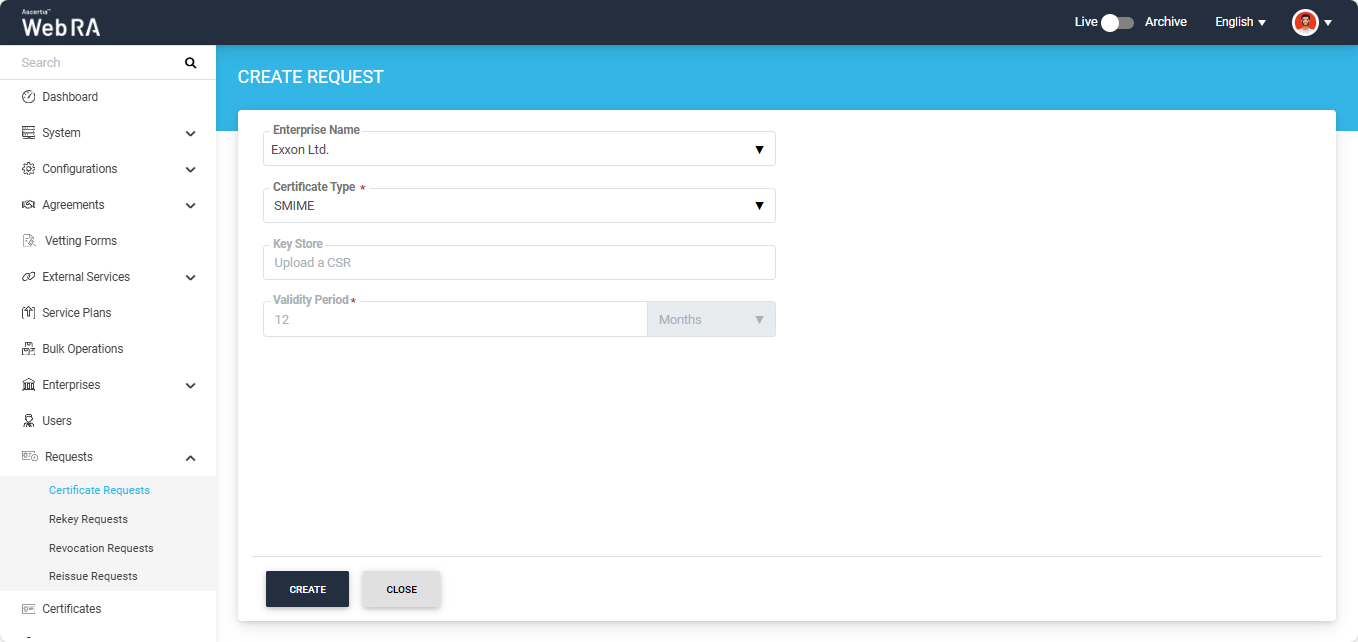
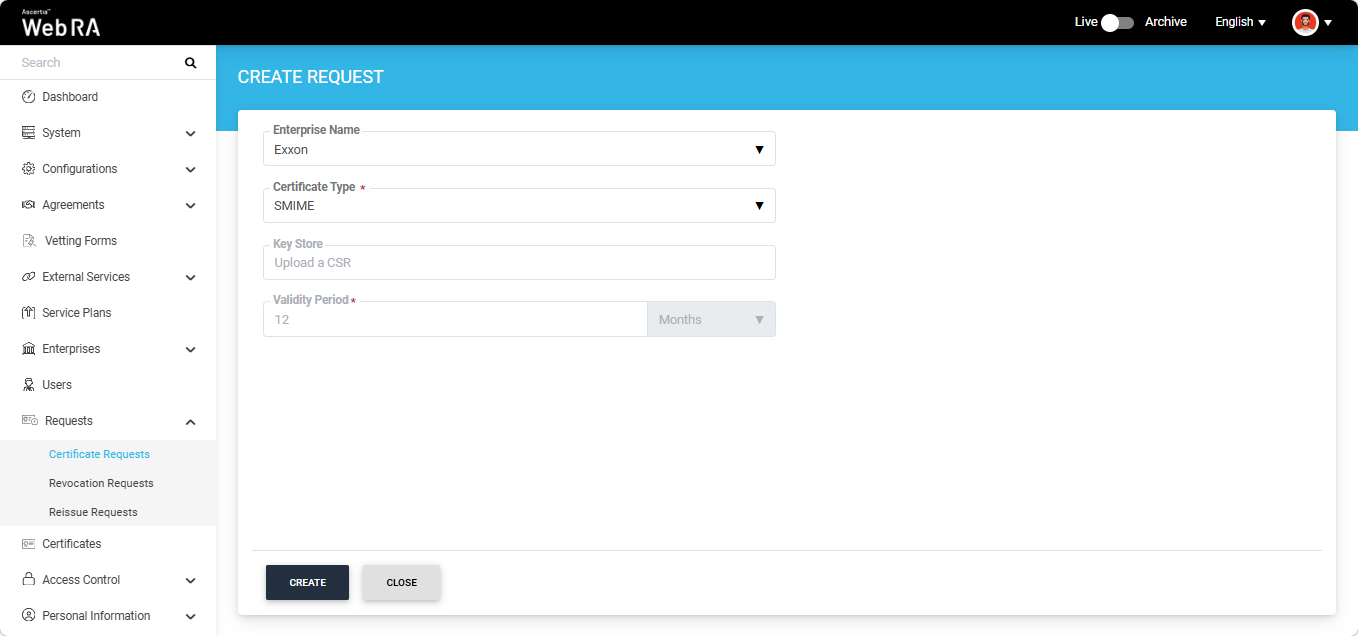
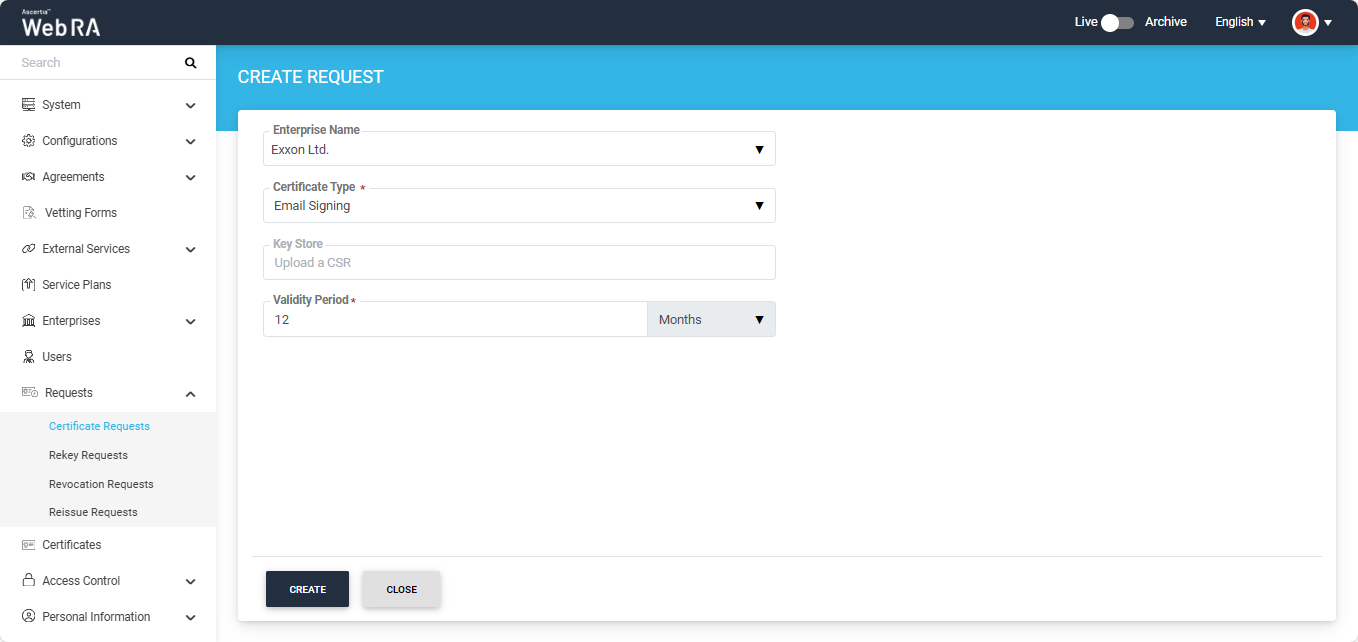
Click the + button in the grid header to access the Create Request screen. Select the Enterprise name from the dropdown, choose the Certificate Type.

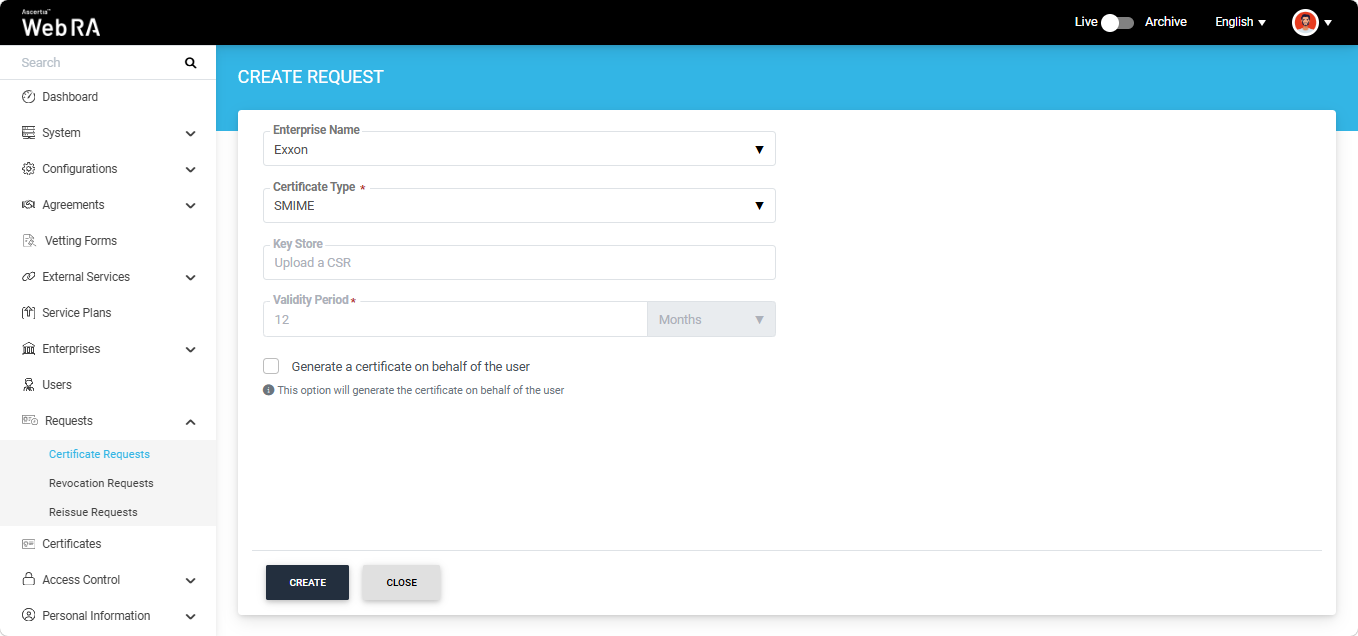
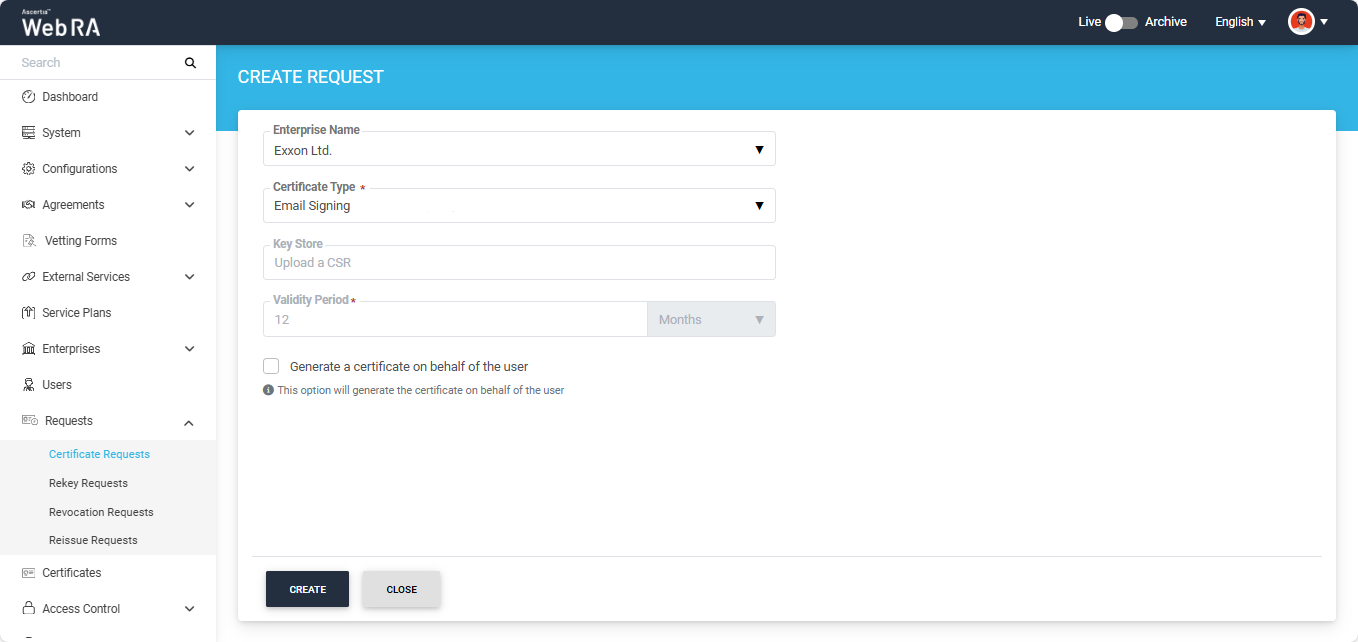
Note: A checkbox titled ‘Generate a certificate on behalf of the user’ will appear on this screen if the policy for this option is enabled in the Enterprise > Policies > Requests section. Enabling this checkbox will allow the operator to generate a certificate on behalf of the user.

After making the required selections, click 'Create'.
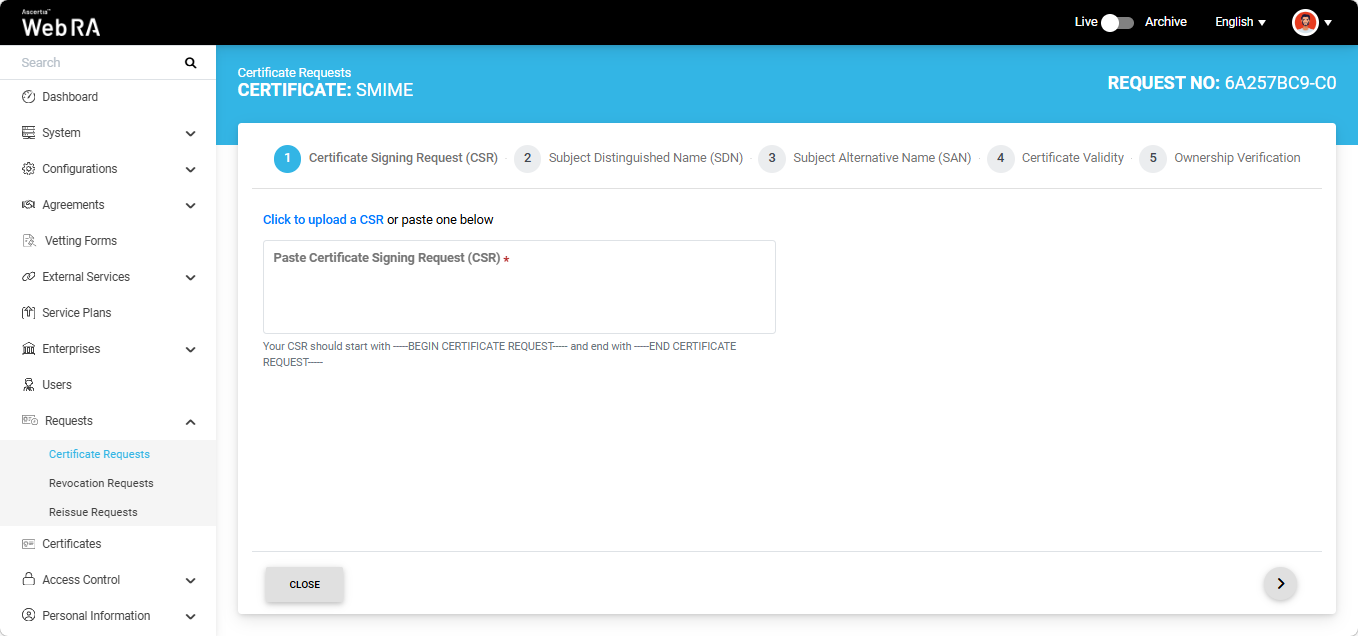
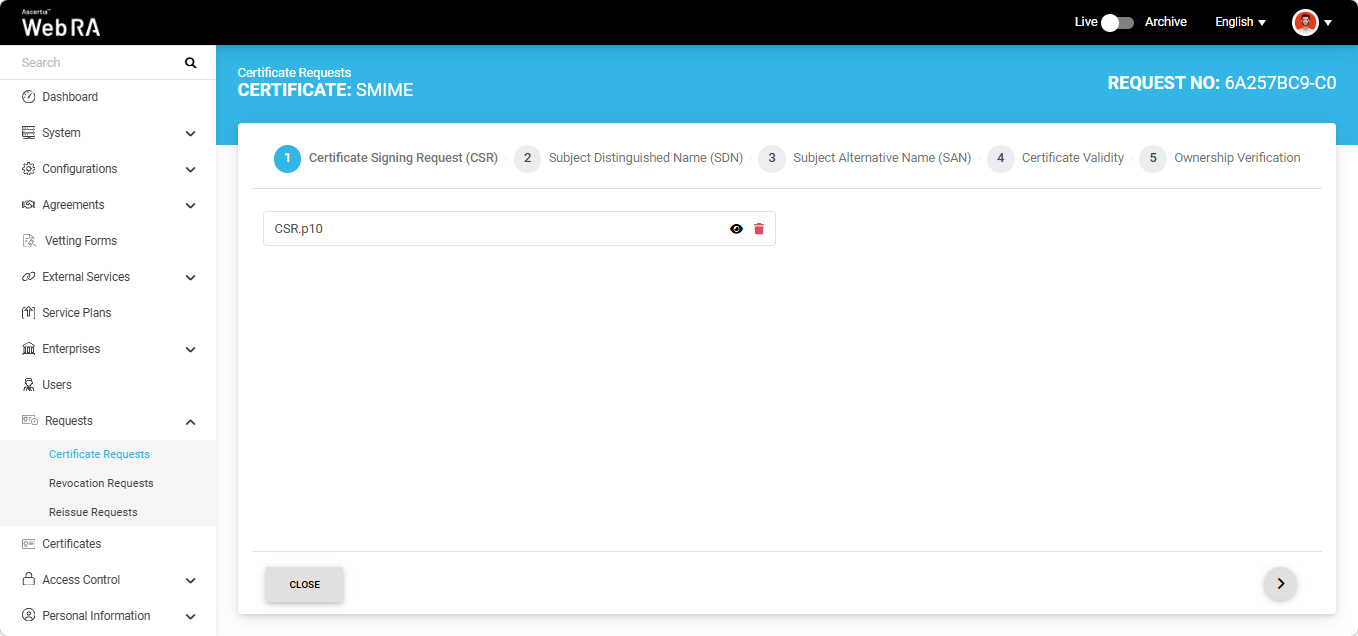
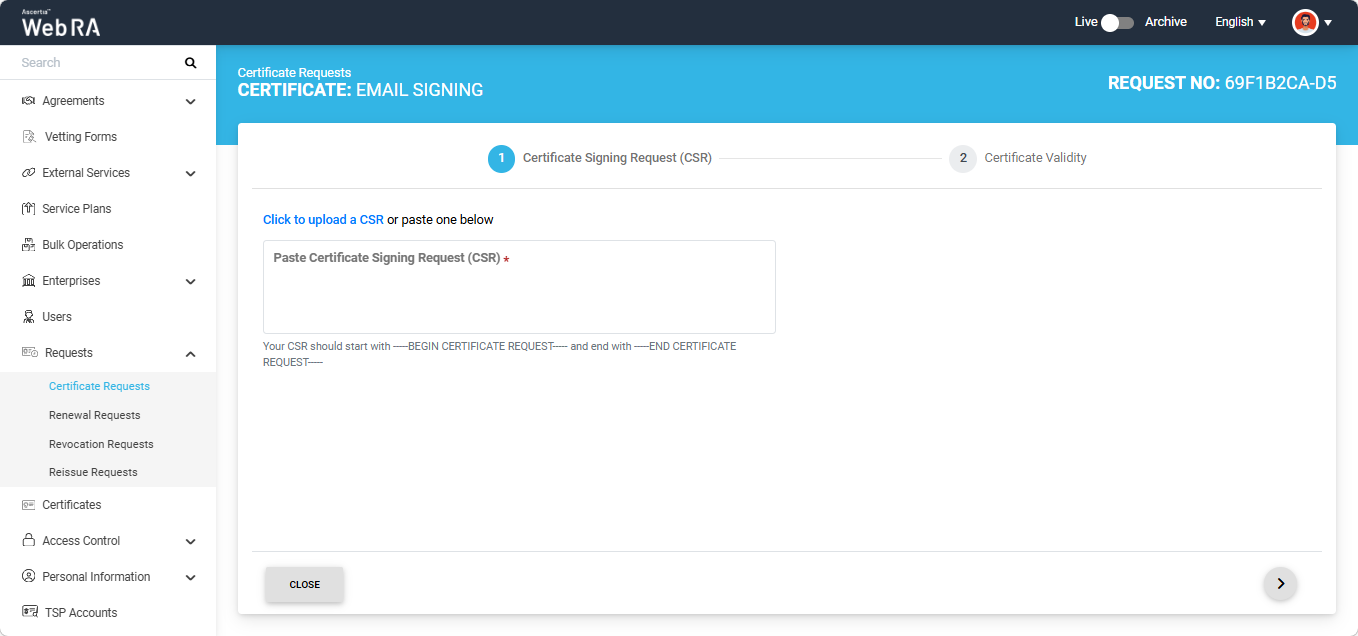
The system will display the Certificate Signing Request (CSR) screen. Here, you can either upload a CSR or paste it into the ‘Paste Certificate Signing Request (CSR)’ box.

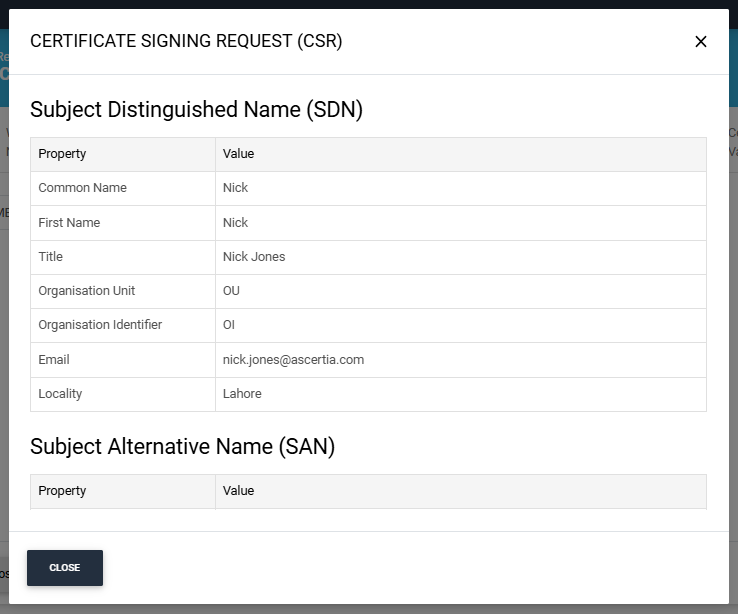
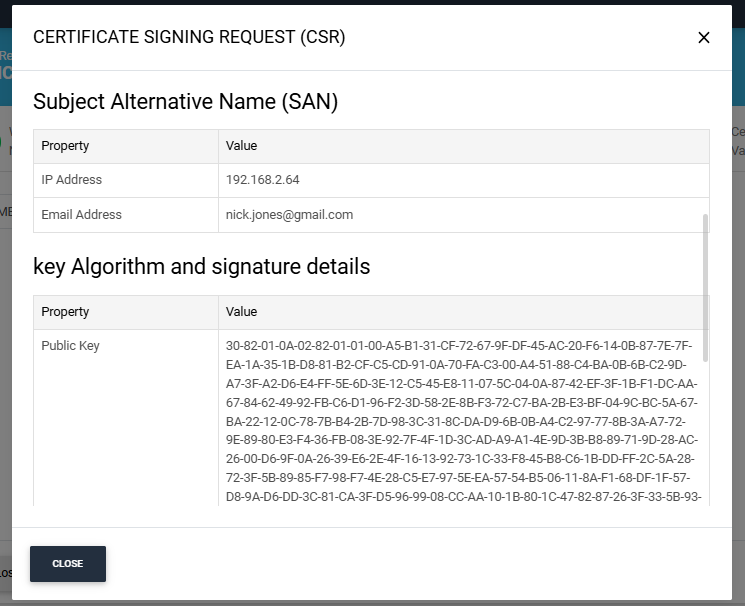
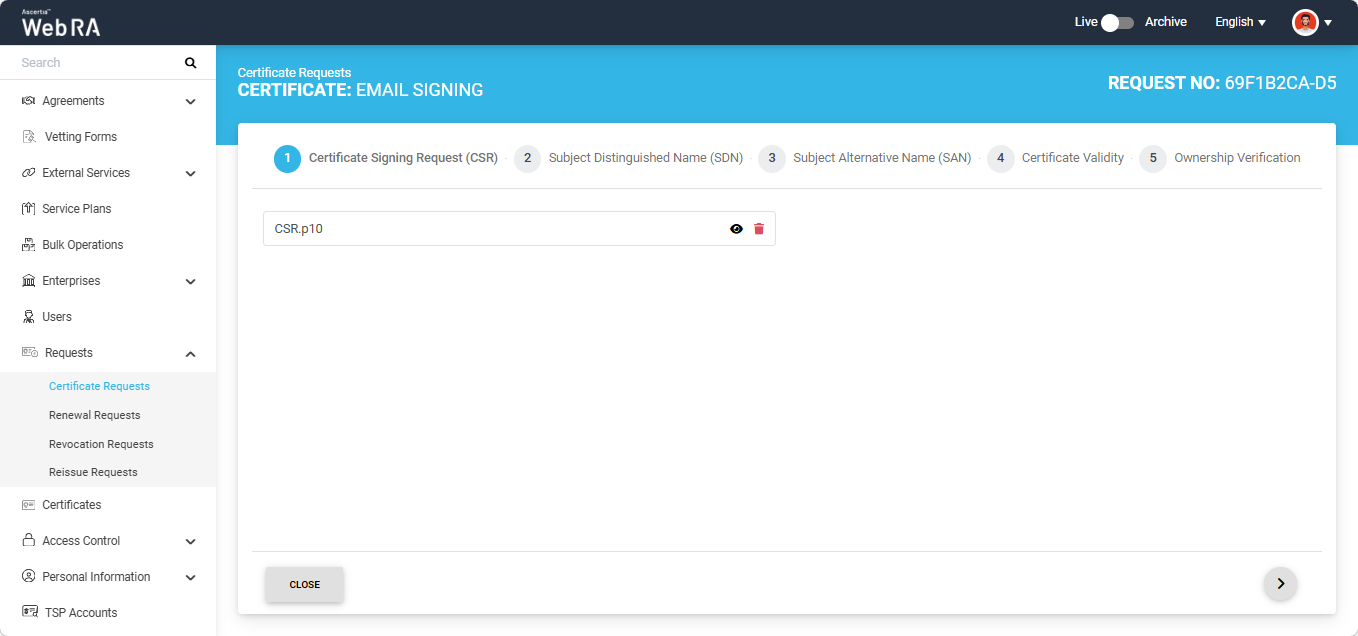
Once the CSR is uploaded, it will appear in the CSR field. You can view the details of the CSR by clicking the Eye icon. It contains all the SDNs, SANs, etc.
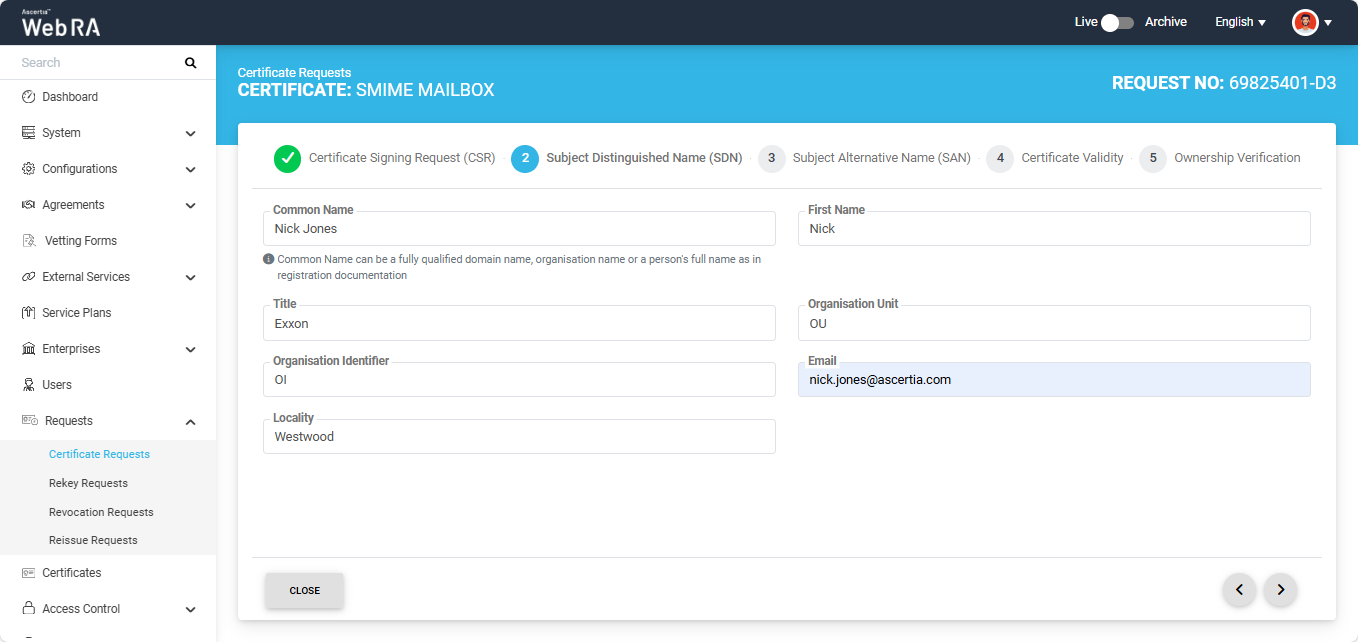
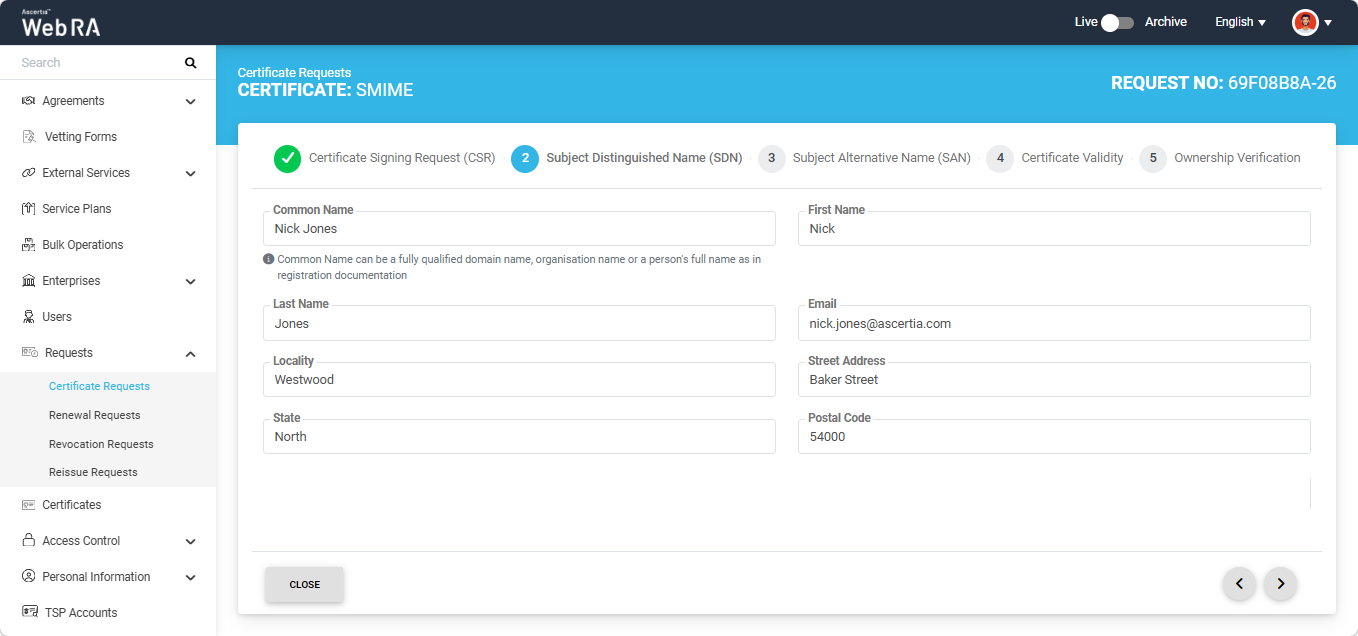
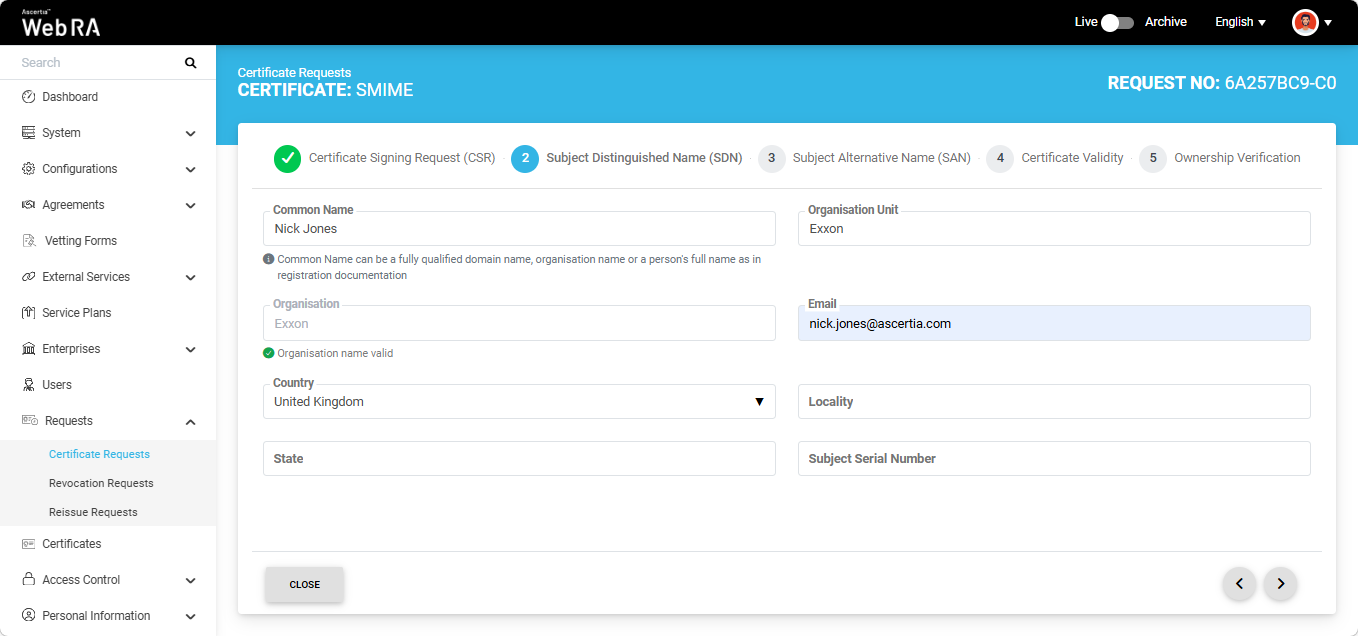
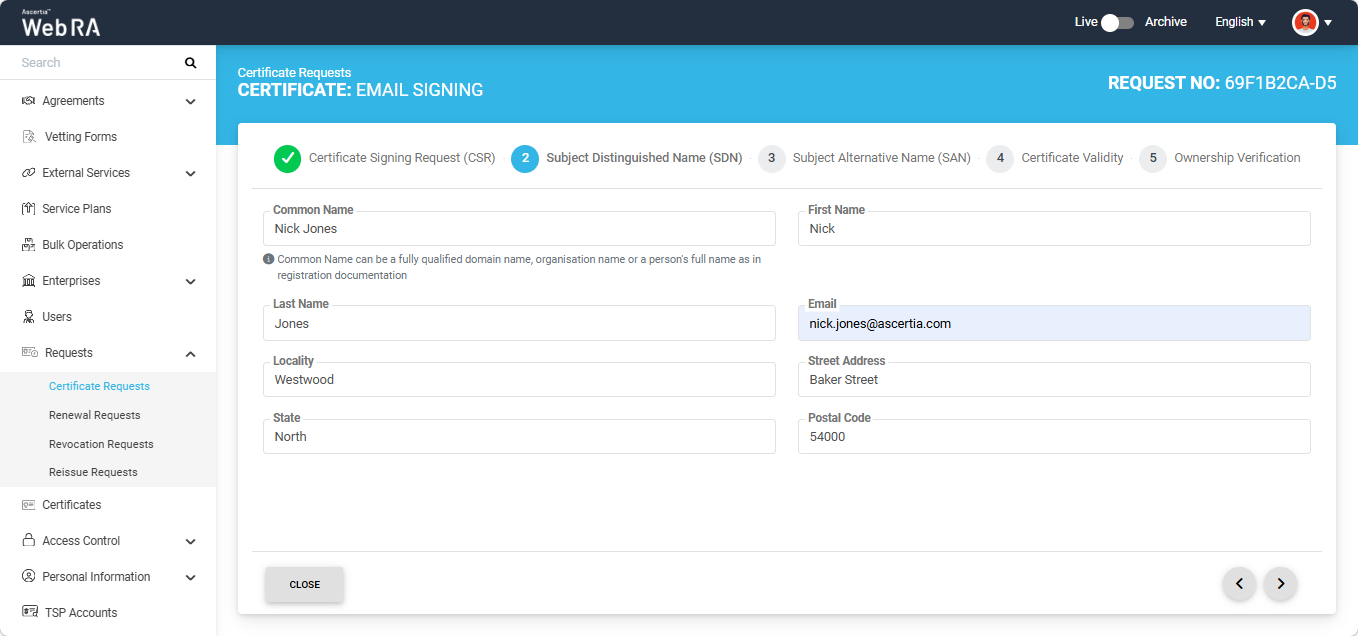
Click the next '>' button to navigate to the 'Subject Distinguished Name (SDN)' screen. Here, review or update the information in the fields as required, then click the next ‘>’ button to proceed.
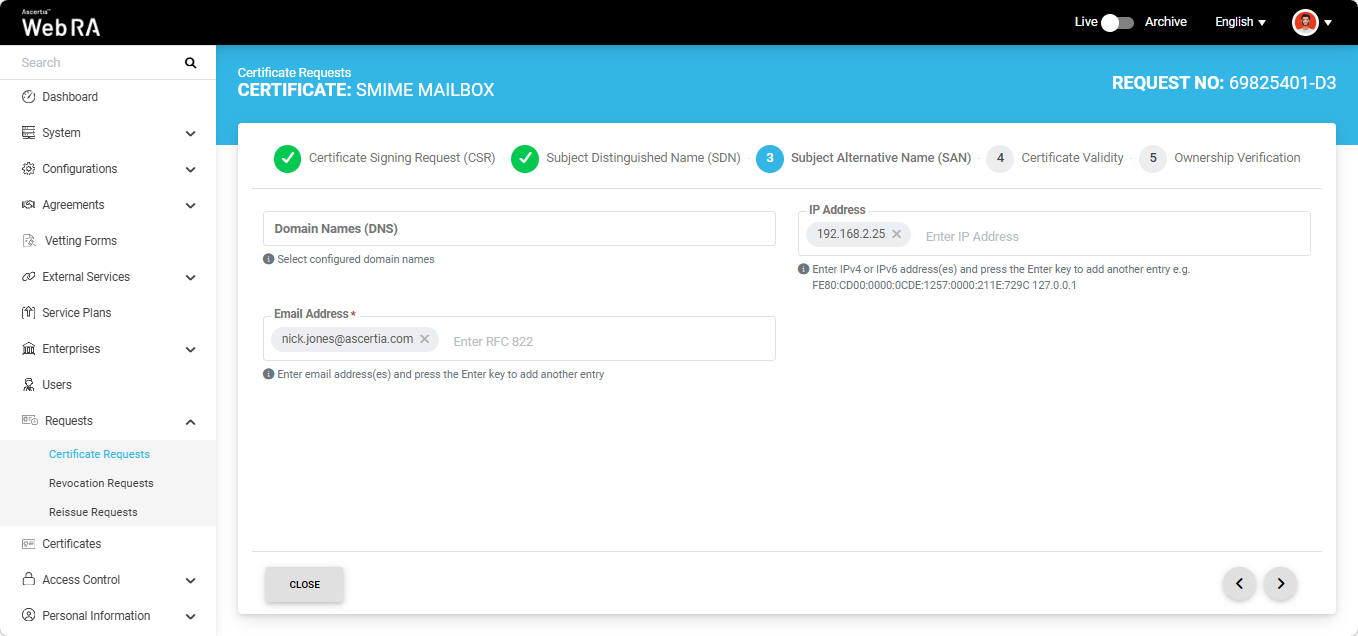
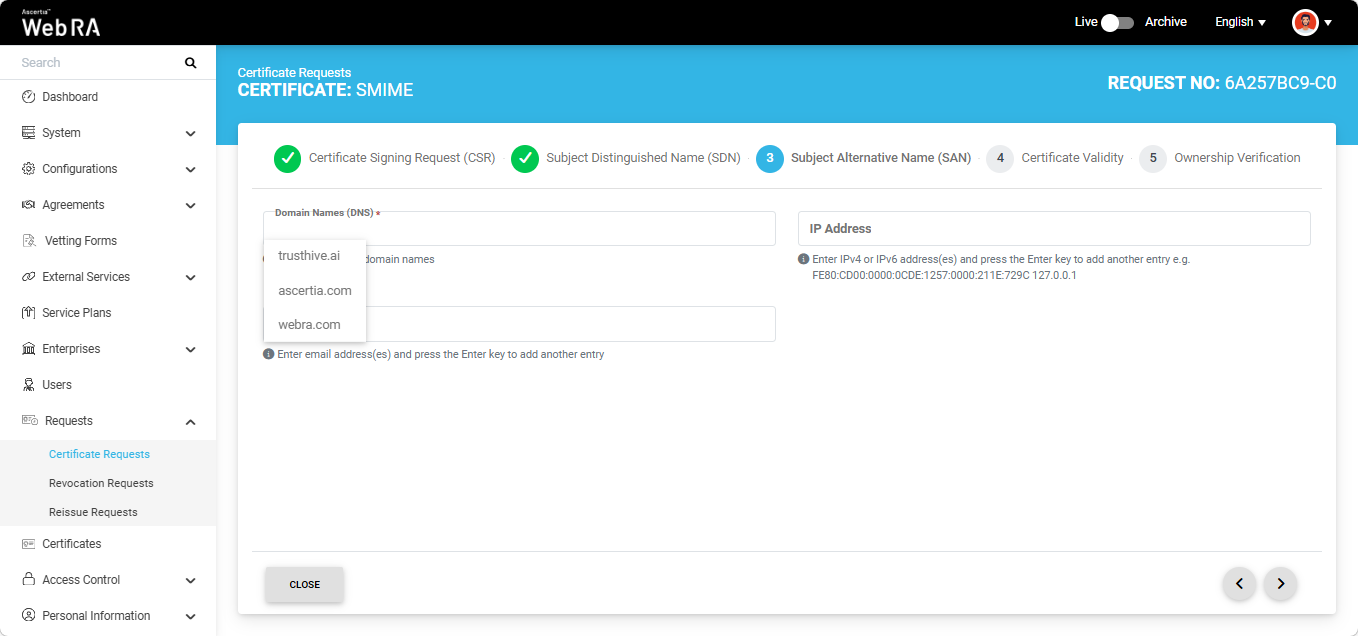
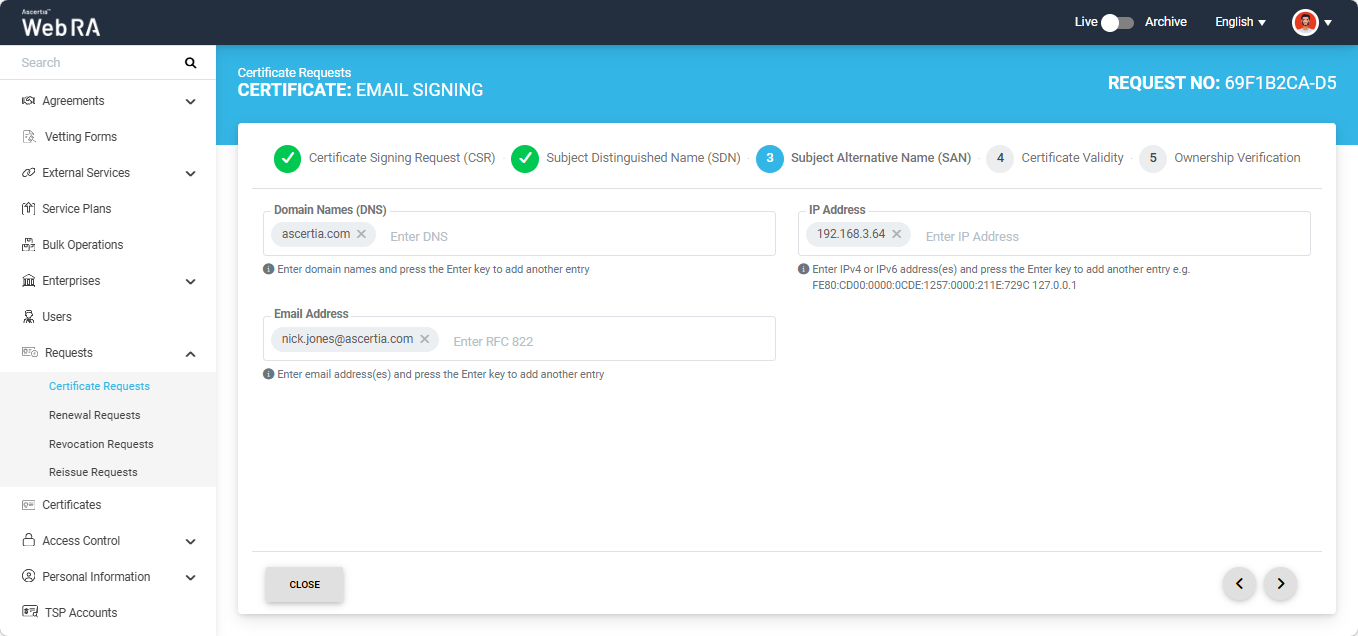
The Subject Alternative Name (SAN) screen will appear.
Enter the email address in the mandatory field. If you need to add multiple email addresses, enter each address and press Enter. Populate any other available fields as required.
After completing the SAN section click the next ‘>’ button to proceed. The 'Certificate Validity' screen will appear.
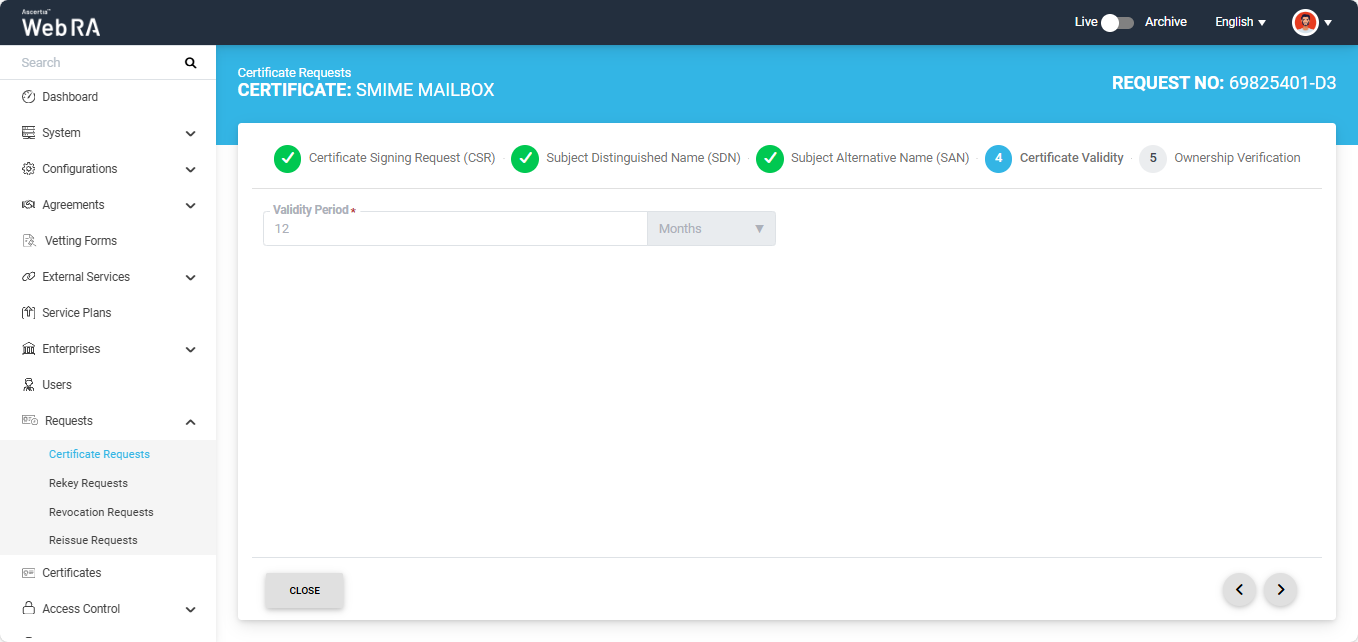
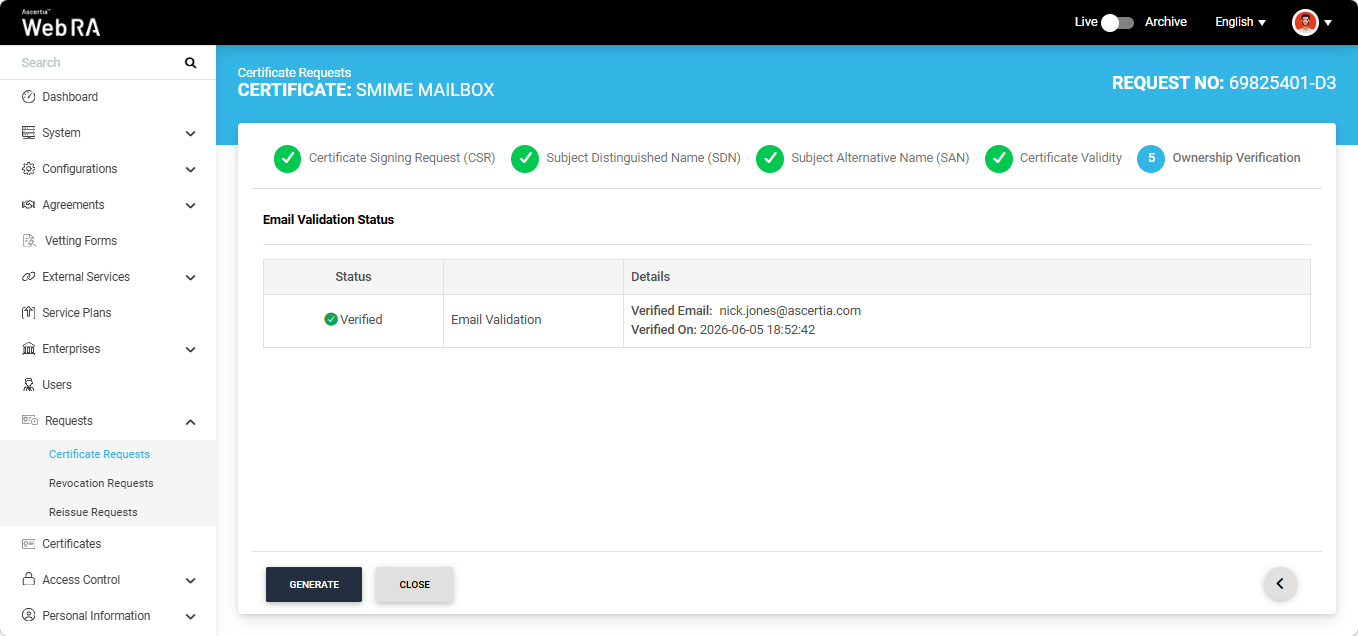
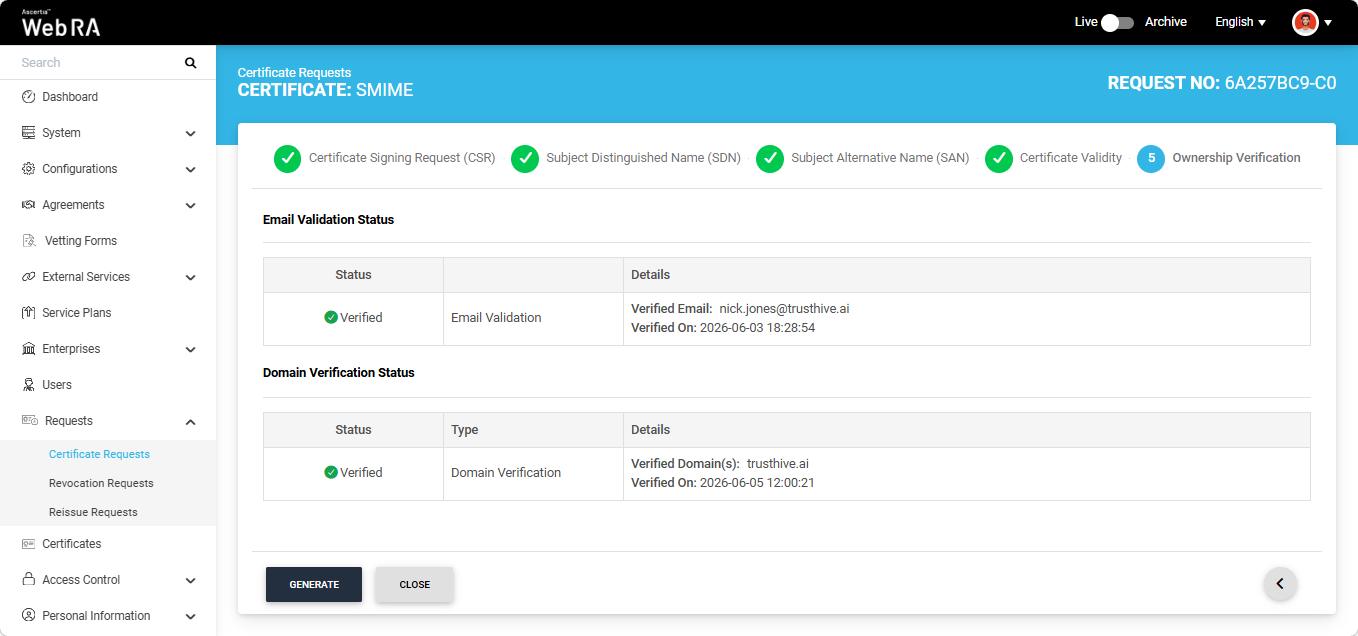
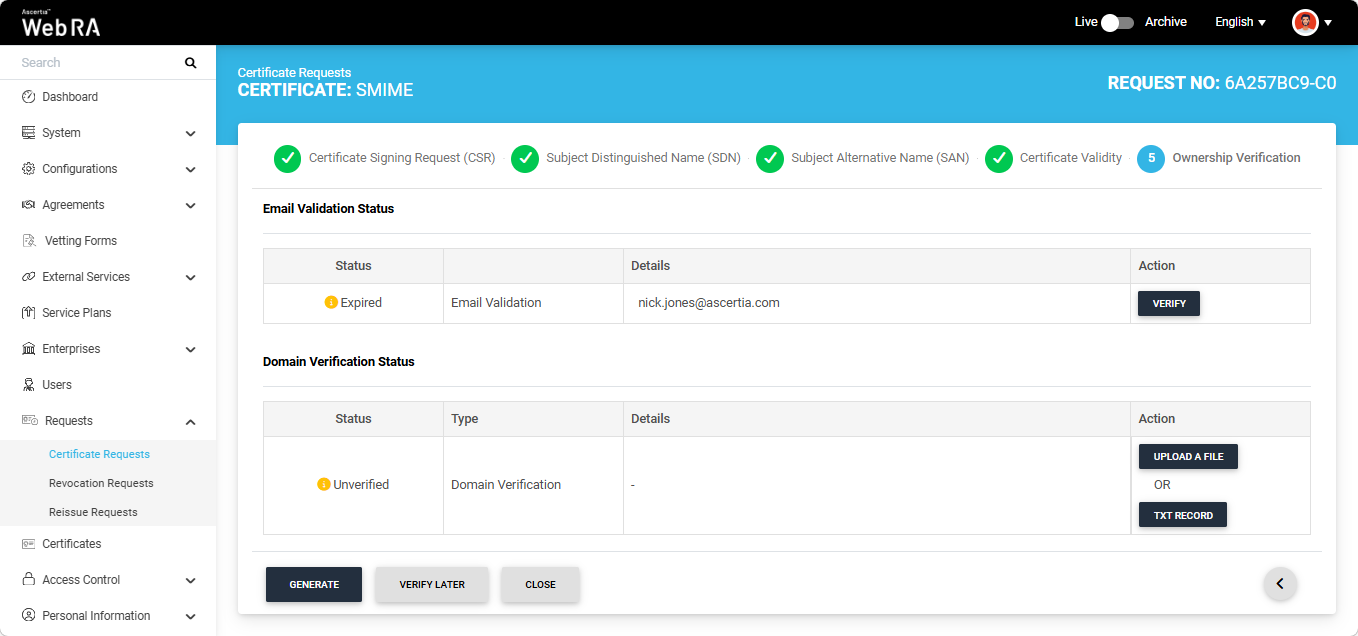
Click the next '>' button to navigate to the 'Ownership Verification' screen.
Note: If you enter an email address that has already been validated, the Ownership Verification screen displays a Verified status for that email address. You are not required to verify the email address again until its validation period expires, as defined by the configured Mailbox Validation Period in the Certification Profile.
However, if you enter an email address that has not been previously validated, you must complete the ownership verification process before the certificate request can proceed.

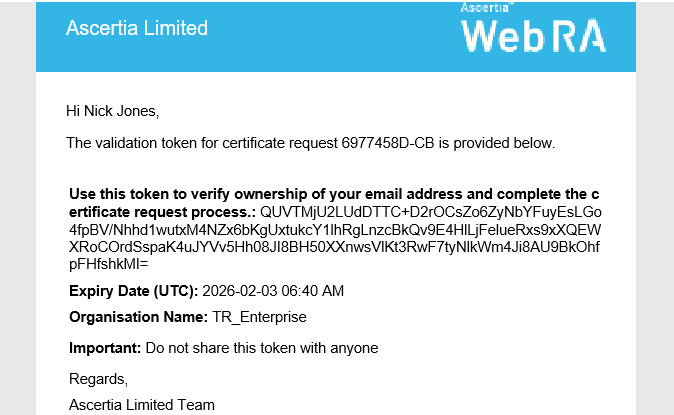
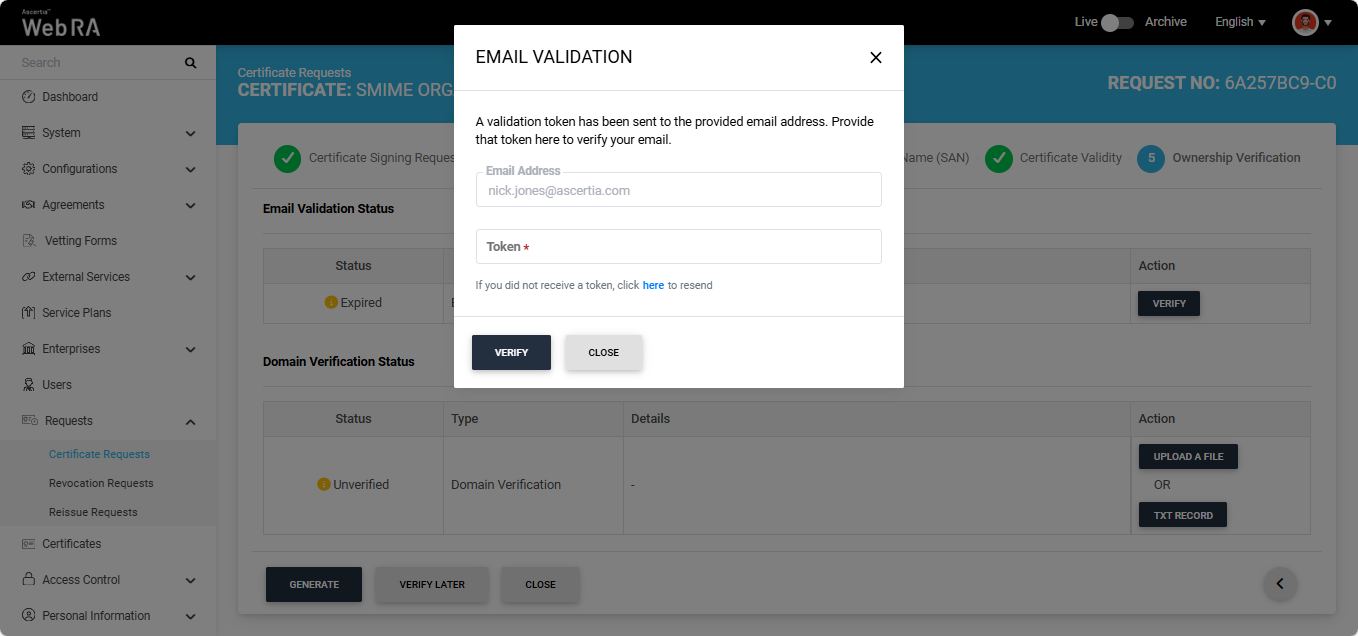
To verify the email address, click the ‘Verify’ button in the Action column. An ‘Email Validation’ dialog will appear on the screen, and a Token will be sent to the specified email address.
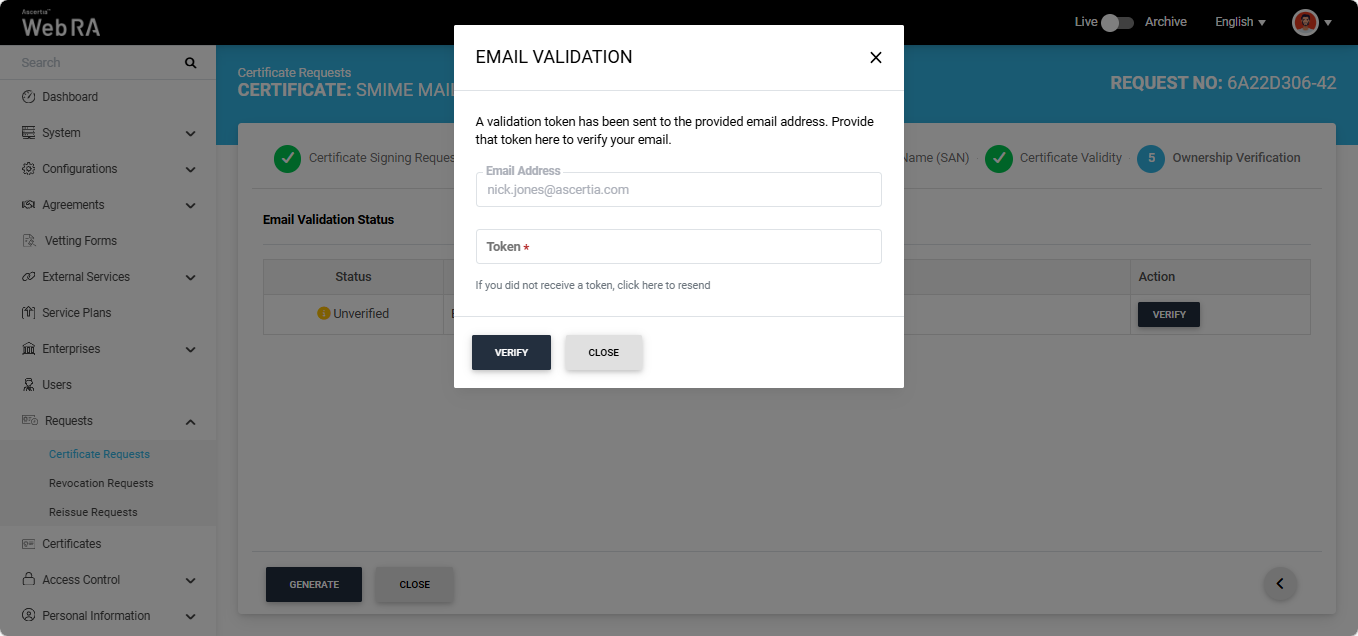
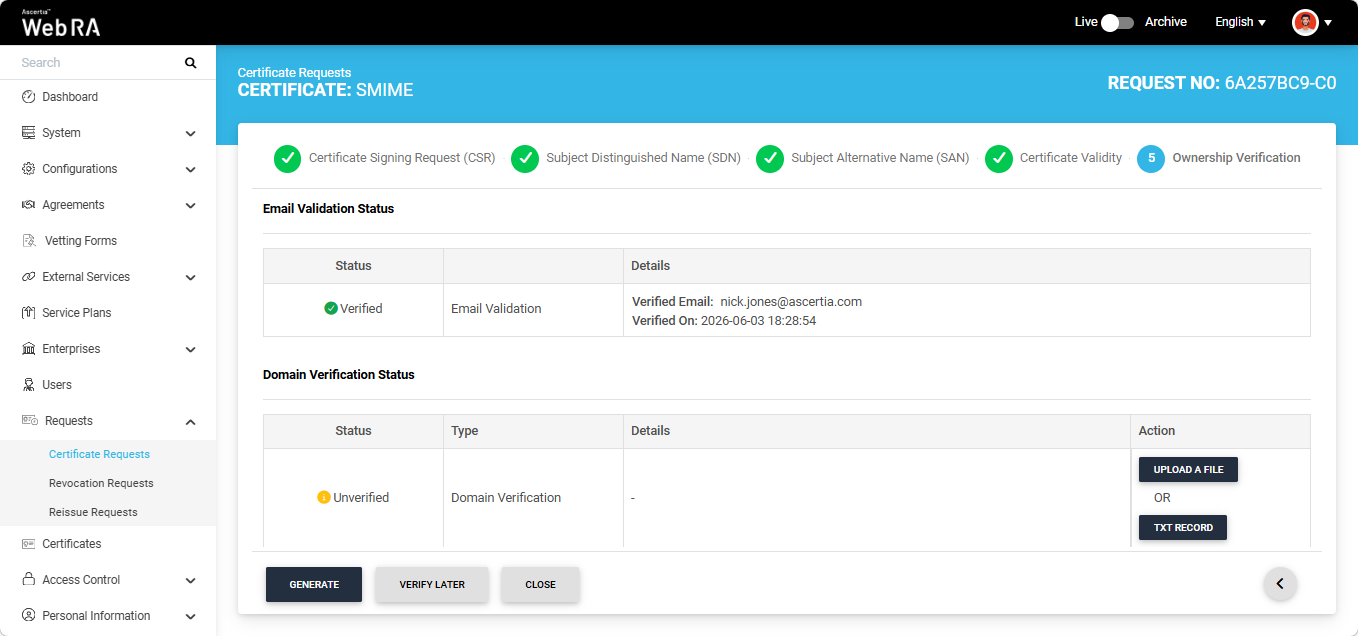
Enter the token you received in your email in the ‘Token’ field, then click ‘Verify’. If the provided token is correct, the system will display the ‘Verified’ status for the email address.
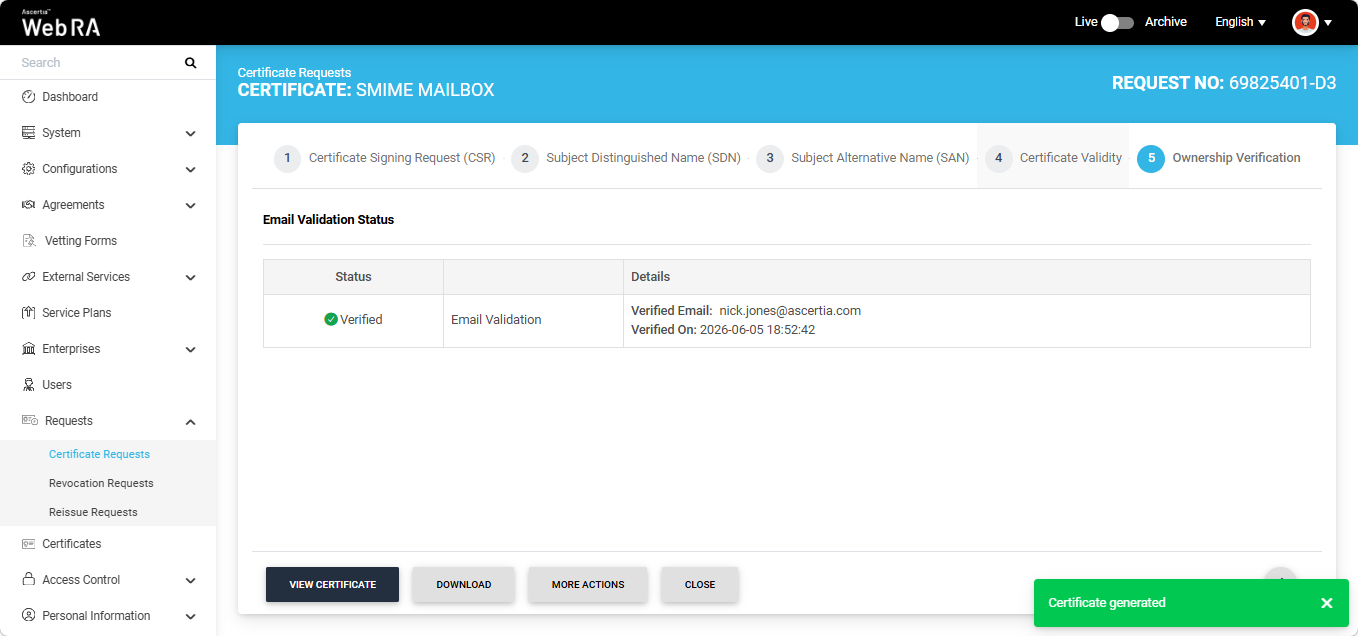
After successful verification, click the ‘Generate’ button to create the certificate. The system will create the certificate and display the 'Certificate generated' alert on the screen.
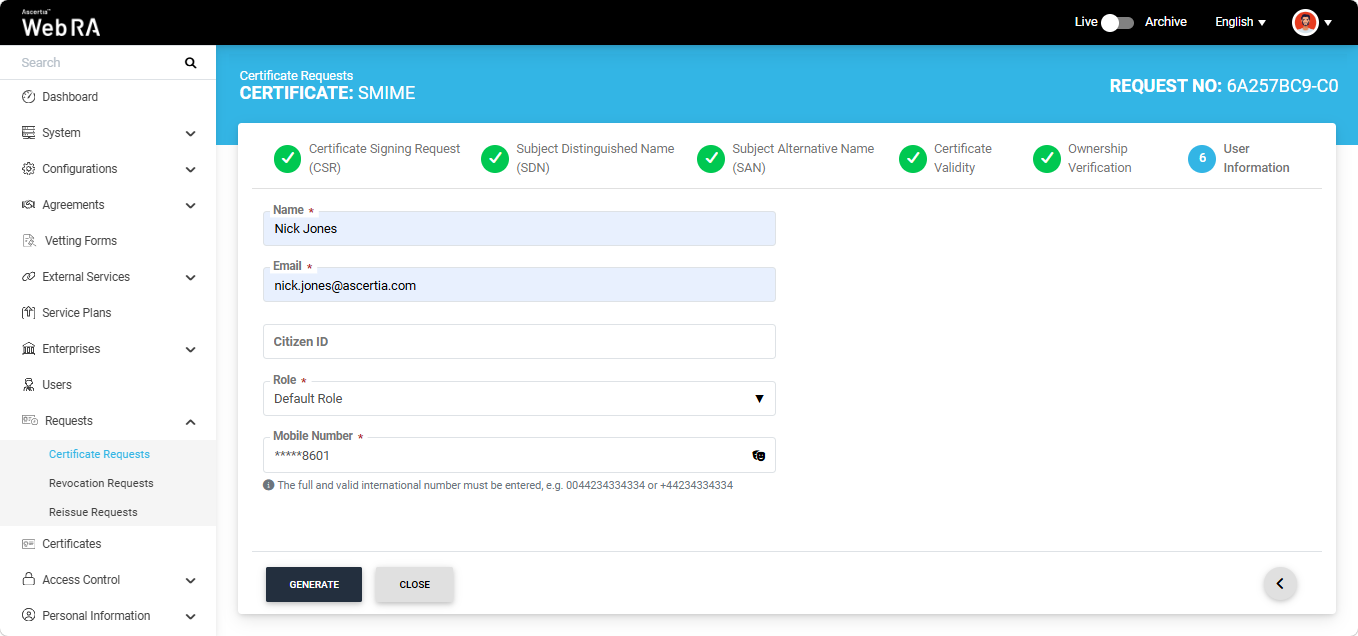
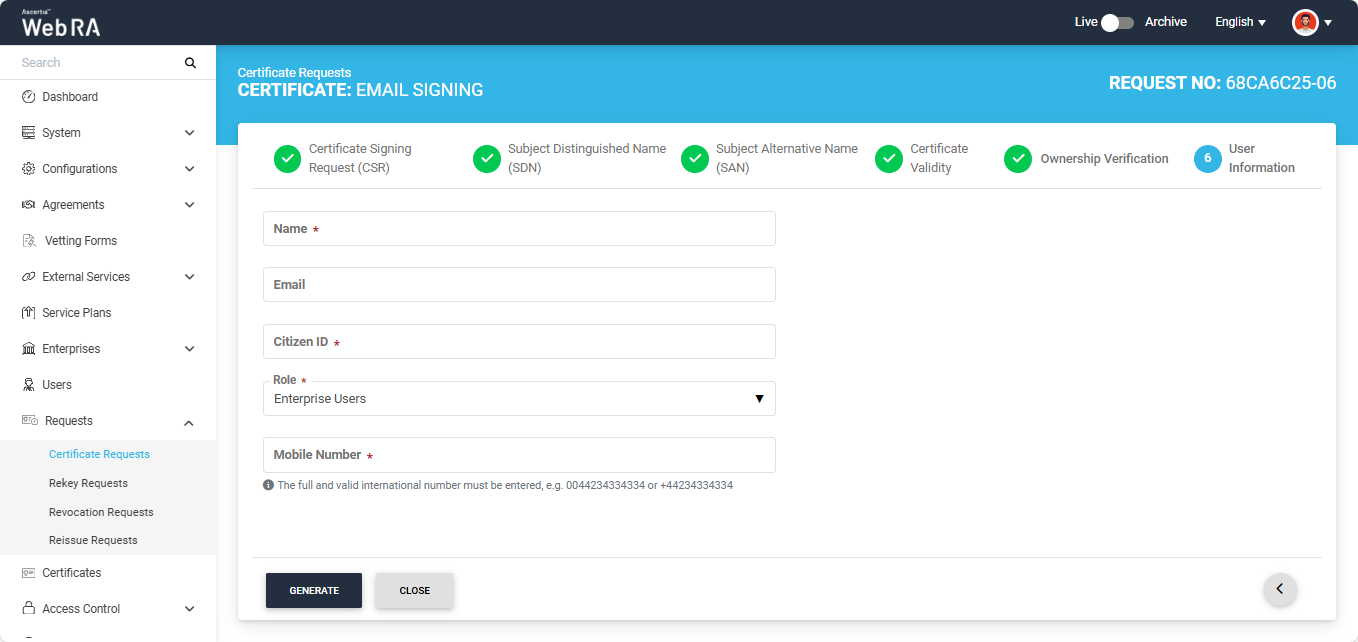
Note: If the ‘Generate a certificate on behalf of the user’ checkbox is enabled, the system will display an additional section titled ‘User Information’ next to the Ownership Verification section.

On this screen, enter the Name, Email Address, Citizen ID, and Mobile Number, and select the Role of the user for whom the certificate is being generated.
After entering the details, click ‘Generate’. The system will create an account for the user and generate the certificate. The user will receive an email regarding the account and certificate creation and is prompted to activate their account.
|
|
If the certificate is being created for a user who does not exist in the system, a new account will be created for the user along with the certificate.
If the user already has a registered account in the Web RA system, only the certificate will be created. The user will be notified via email about the certificate generation.
Meanwhile, if the user exists in the system but is not part of the enterprise where the certificate is being created, the system will send an invitation for the user to join that enterprise and will generate the certificate as well. |

|
|
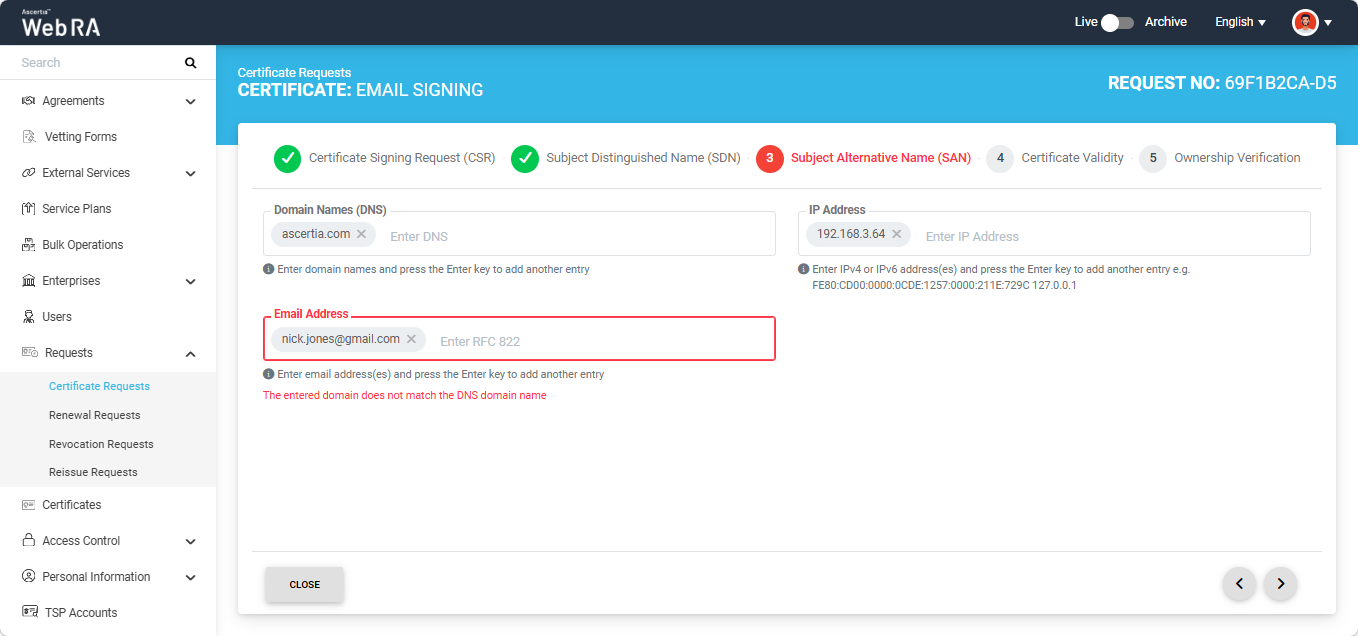
If Certification Authority Authorisation (CAA) Records is enabled in the Enterprise Domain Settings, CAA record verification is required in the Ownership Verification section. When CAA record verification is enabled and the Mailbox validation type is selected, the system performs both Email validation and CAA record verification before generating the certificate. Ensure that the domain in the DNS and Email Address fields of the SAN are the same. If they differ, the system displays an error on the SAN screen and does not allow you to proceed. For more details, see how CAA Record Verification is performed.well. |
S/MIME certificate requests with Domain Validation
The following steps describe how to create an S/MIME certificate request Domain Validation is selected in the certification profile
Expand Requests > Certificate Requests from the Admin portal to navigate to the Certificate Requests listing screen.
Click the + button in the grid header to access the Create Request screen. Select the Enterprise name from the dropdown and the Certificate Type.
Note: A checkbox titled ‘Generate a certificate on behalf of the user’ will appear on this screen if the policy for this option is enabled in the Enterprise > Policies > Requests section. Enabling this checkbox will allow the operator to generate a certificate on behalf of the user.

After making the required selections, click 'Create'.
The system will display the Certificate Signing Request (CSR) screen. Here, you can either upload a CSR or paste it into the ‘Past
e Certificate Signing Request (CSR)’ box.

Once the CSR is uploaded, it will appear in the CSR field.

You can view the details of the CSR by clicking the Eye icon. It contains all the SDNs, SANs, etc.
Click the next '>' button to navigate to the 'Subject Distinguished Name (SDN)' screen. Here, review or update the information in the fields as required, then click the next ‘>’ button to proceed.
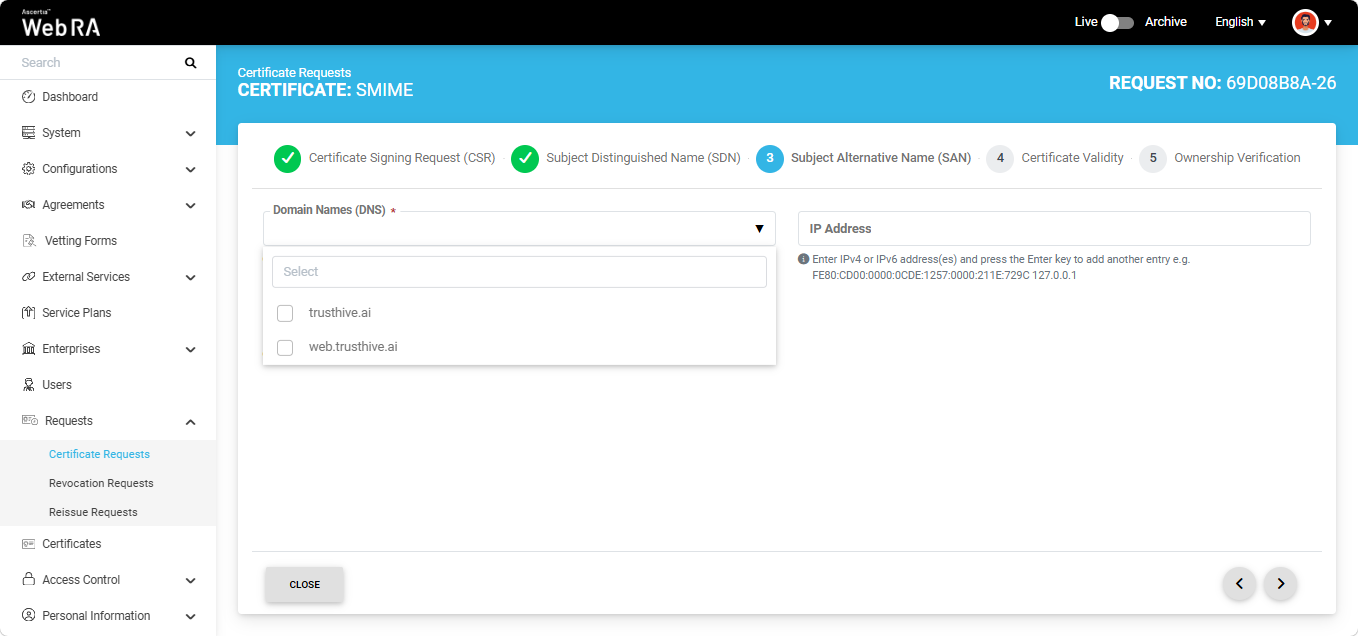
The Subject Alternative Name (SAN) screen appears. On this screen, the behaviour of the Domain Names (DNS) field depends on the configured Enterprise Policy settings.
If the 'Allow Only Enterprise-Approved Domains' policy is enabled in the Enterprise, the Domain Names (DNS) field is displayed as a dropdown list. In this case, users can only select an enterprise-approved domain from the available options. The dropdown list displays only active and verified domains configured for the Enterprise.
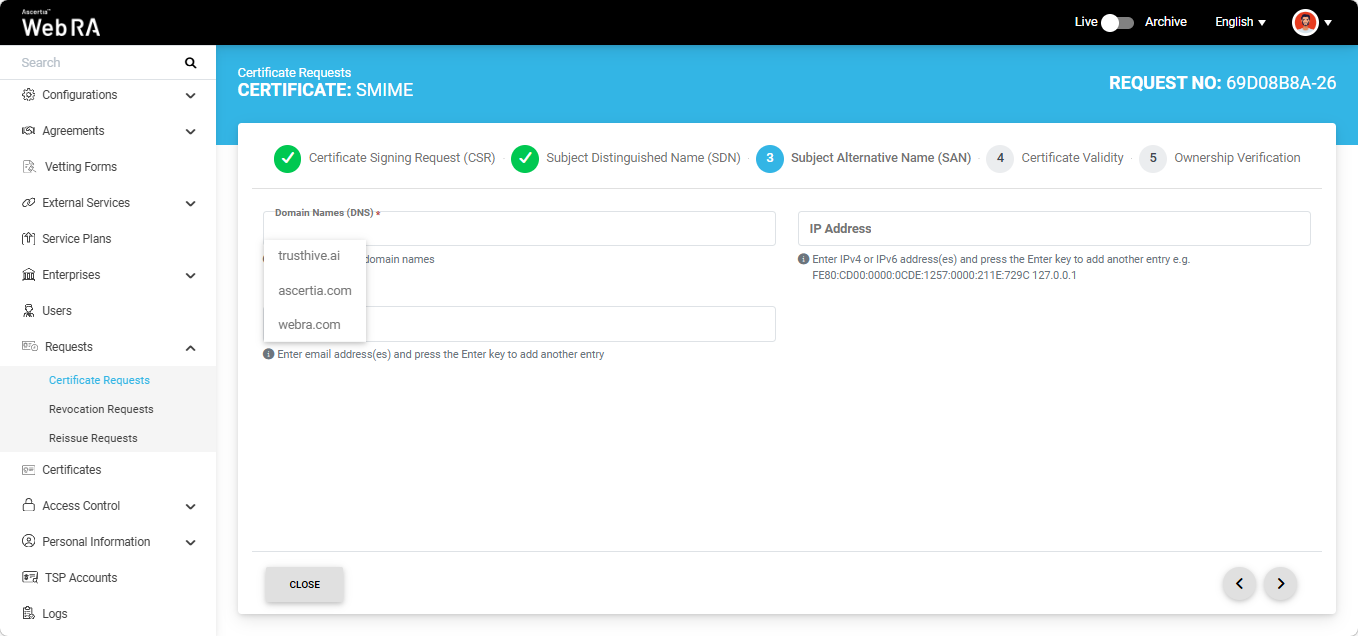
Alternatively, if the 'Assign Each Domain to a Single User' policy is enabled in the Enterprise, users can either select an enterprise-approved domain or enter a new domain in the Domain Names (DNS) field.
To select a pre-approved domain, click the Domain Names (DNS) field and select the required domain from the list. Alternatively, to enter a new domain, type the domain name in the field and press Enter.
Note: If both checkboxes are unchecked in the Enterprise Policy settings, only enterprise-approved domains can be selected when creating a certificate request.
Note: You can only specify a single domain and its associated subdomains in the DNS field. If you attempt to enter a different domain, the system displays an error message and prevents you from proceeding.
After specifying the required domain name, enter the information in the remaining fields as per your requirements.
Note: If the Email Address field is present in the SAN, the domain of the email address must match the domain entered or selected in the DNS field.
After providing the required information in SAN, click the next ‘>’ button to proceed to the 'Certificate Validity' screen.
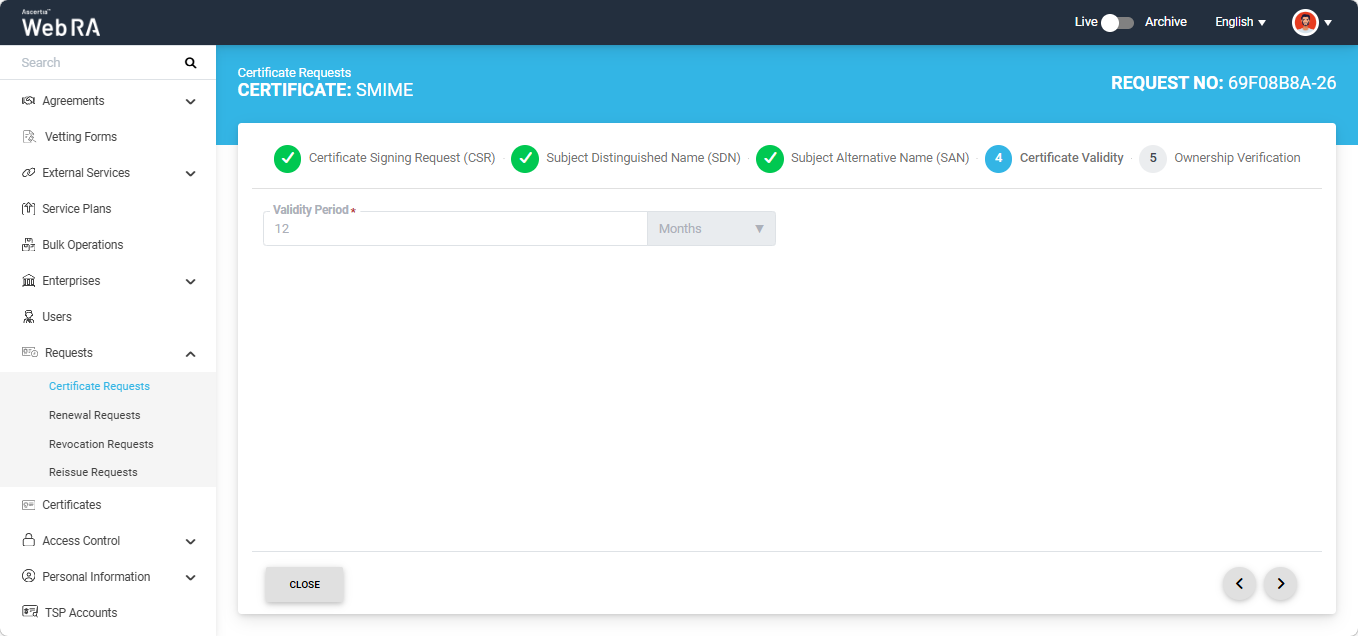
Click the next '>' button to navigate to the 'Ownership Verification' screen. The system will display the 'Domain Verification' section on the screen.
Note: If you selected an enterprise-approved domain in the SAN section, you are not required to perform domain validation on the Ownership Verification screen. For enterprise-approved domains, the system automatically displays a Verified status, allowing you to proceed directly with certificate generation by clicking Generate.
However, if you entered a new domain in the SAN section, you must complete the domain validation process before the certificate can be generated.
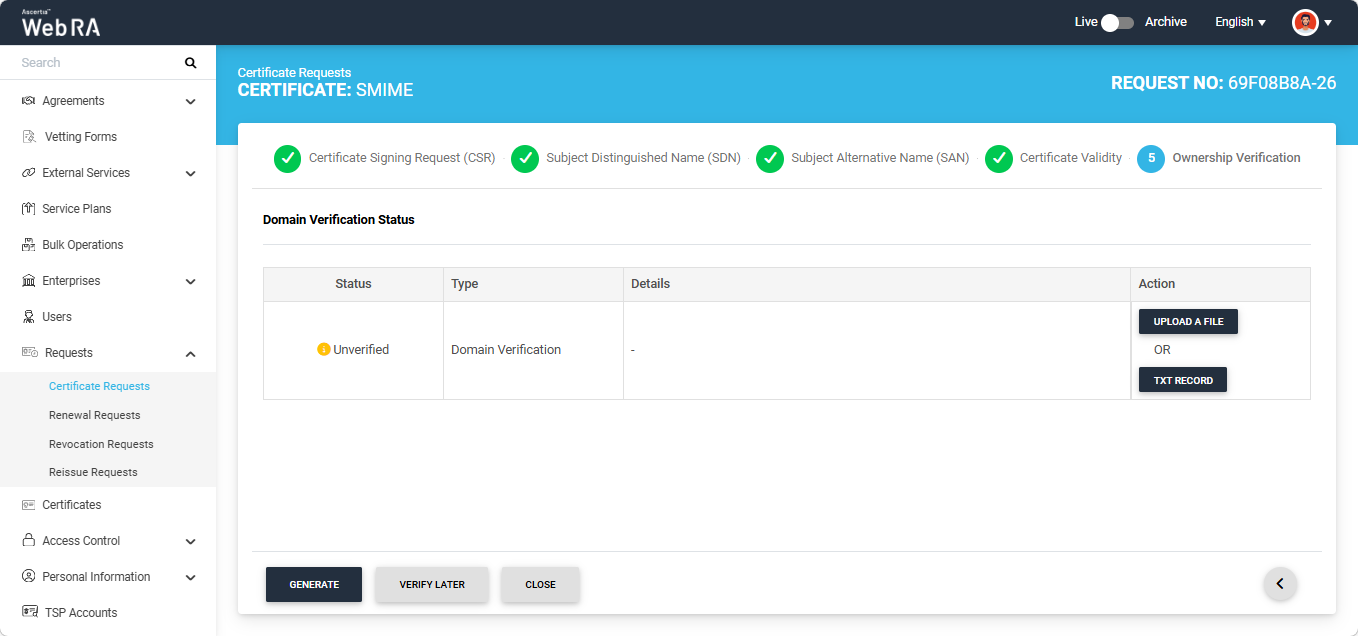
Domain verification can be performed either by uploading a file or by adding a TXT record.
Note: The action (Upload a File or TXT Record) through which domain verification can be performed is configured in the certification profile. The operator may select one or both methods for domain verification. You can use any of the method to verify your domain. For more details about how the method is selected, navigate to the ‘Certification Profiles’ section.
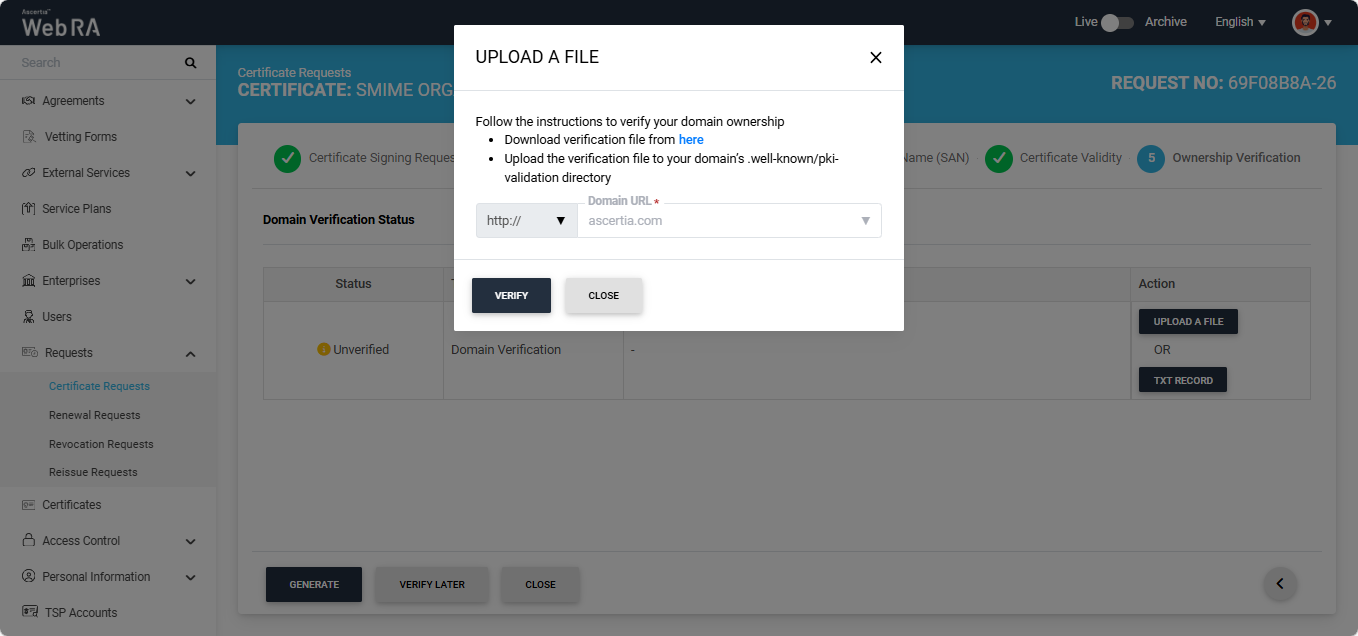
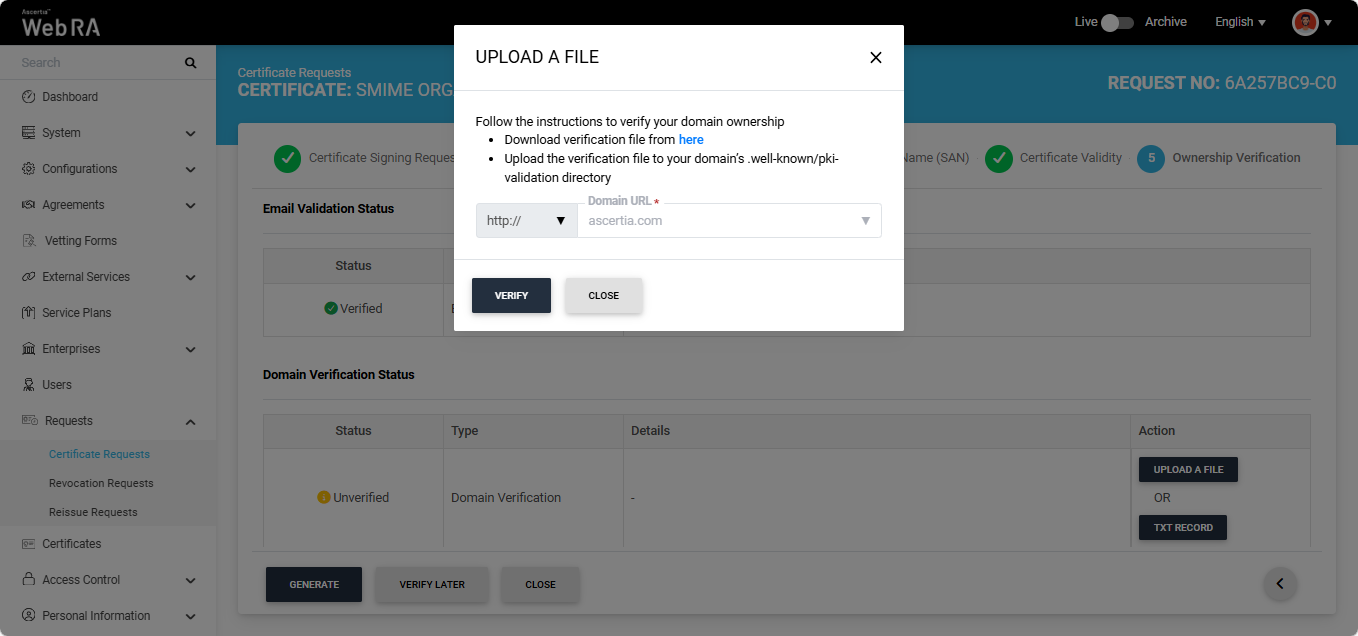
Upload a File
Click the ‘Upload a File’ button. The system will display the ‘Upload a File’ dialog, which contains instructions on how to verify the domain using this method.
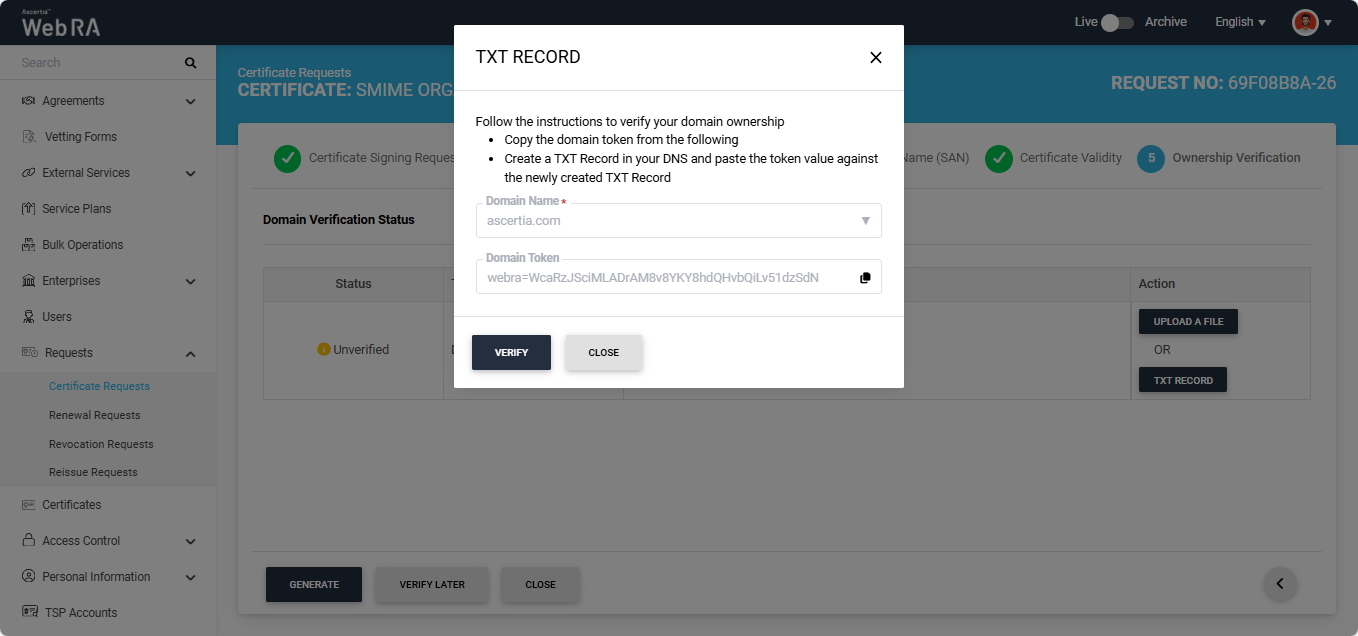
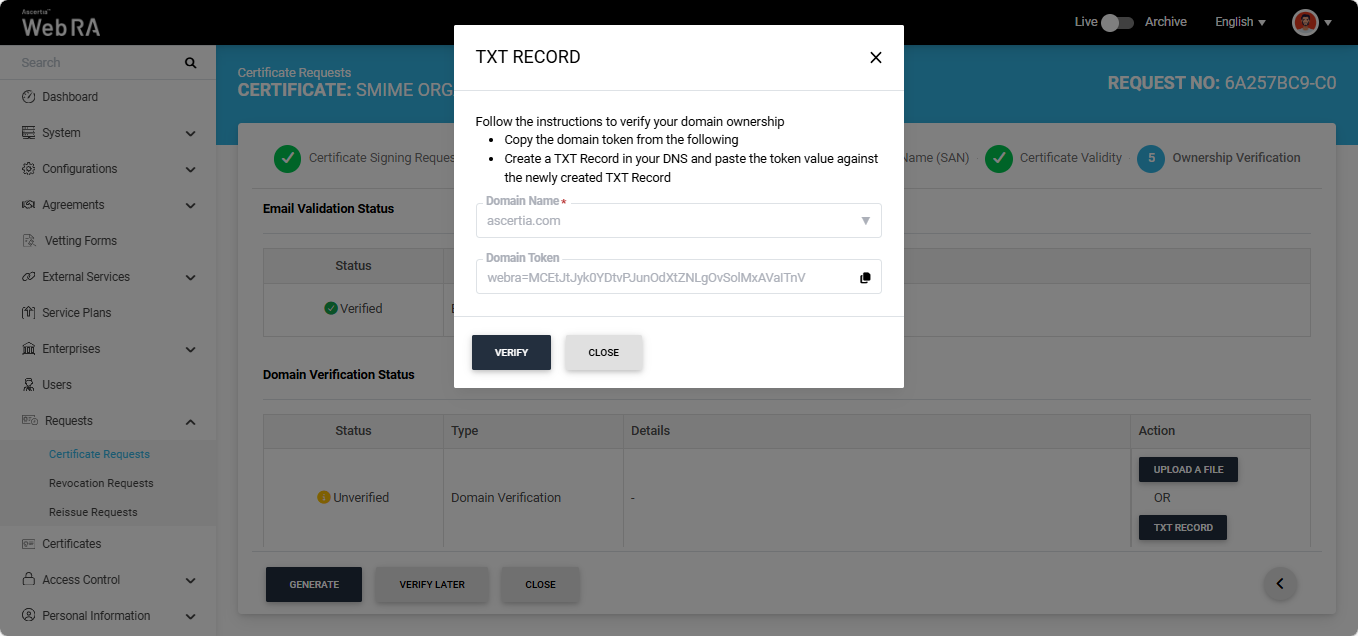
TXT Record
Click the ‘TXT Record’ button. The system will display the ‘TXT Record’ dialog, which contains instructions on how to verify the domain using this method.
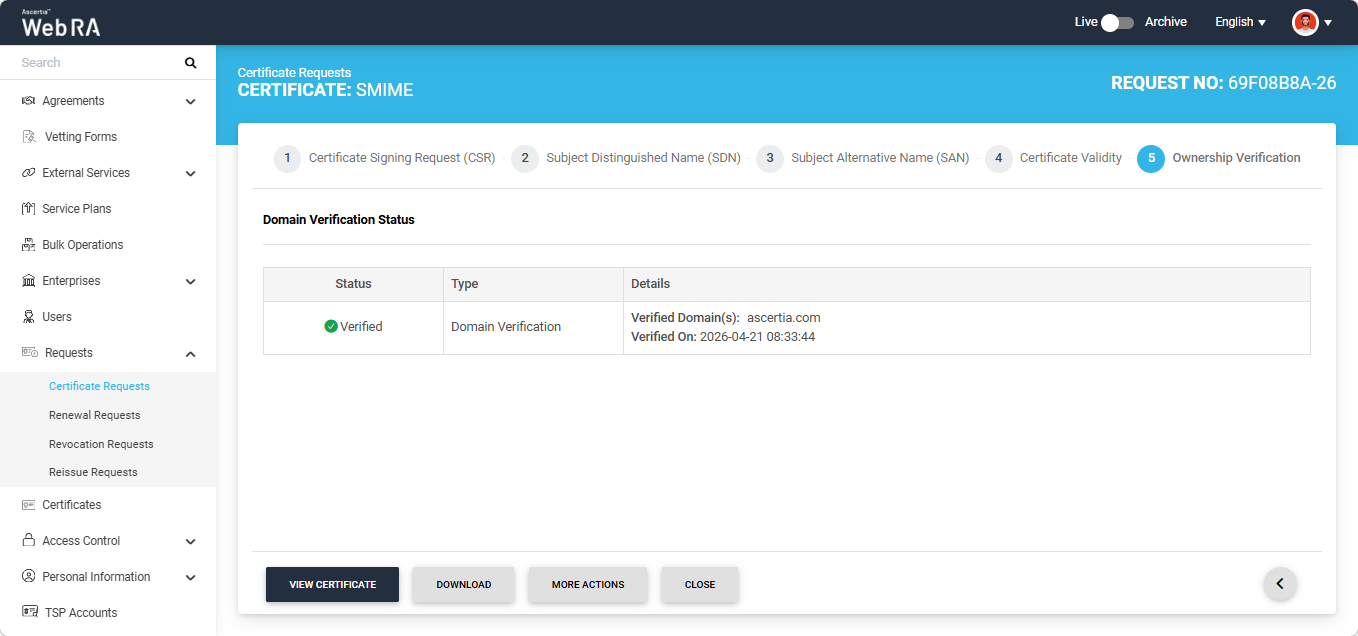
After selecting the required method from the two mentioned above, click the 'Verify' button. If all steps are completed correctly, the ‘Verified’ status will appear for the entered domain. You can then generate the certificate by clicking the 'Generate' button.
Note: If Certification Authority Authorisation (CAA) Records is enabled in the Enterprise Domain Settings, CAA record verification is required in the Ownership Verification section. When CAA record verification is enabled and the Organisation validation type is selected, the system performs both domain verification and CAA record verification before generating the certificate. Ensure that the domain in the DNS and Email Address fields of the SAN are the same. If they differ, the system displays an error on the SAN screen and does not allow you to proceed. For more details, see how CAA Record Verification is performed.
DNSSEC Verification
An additional check for DNSSEC verification has been enabled for all certificate types in Web RA. This feature is automatically enabled in the system and adds a DNSSEC check for domain validation and Certificate Authority Authorisation (CAA) verification during certificate request creation.
If DNSSEC is enabled and correctly configured for the domain, the system validates the domain’s DNSSEC signature during certificate request processing. If the signature is valid and the domain verification is successful, the certificate request is processed successfully and the system displays a ‘Verified’ status for DNSSEC verification.

If DNSSEC is not enabled for the domain, DNSSEC verification will not be performed and the certificate will be generated without it.
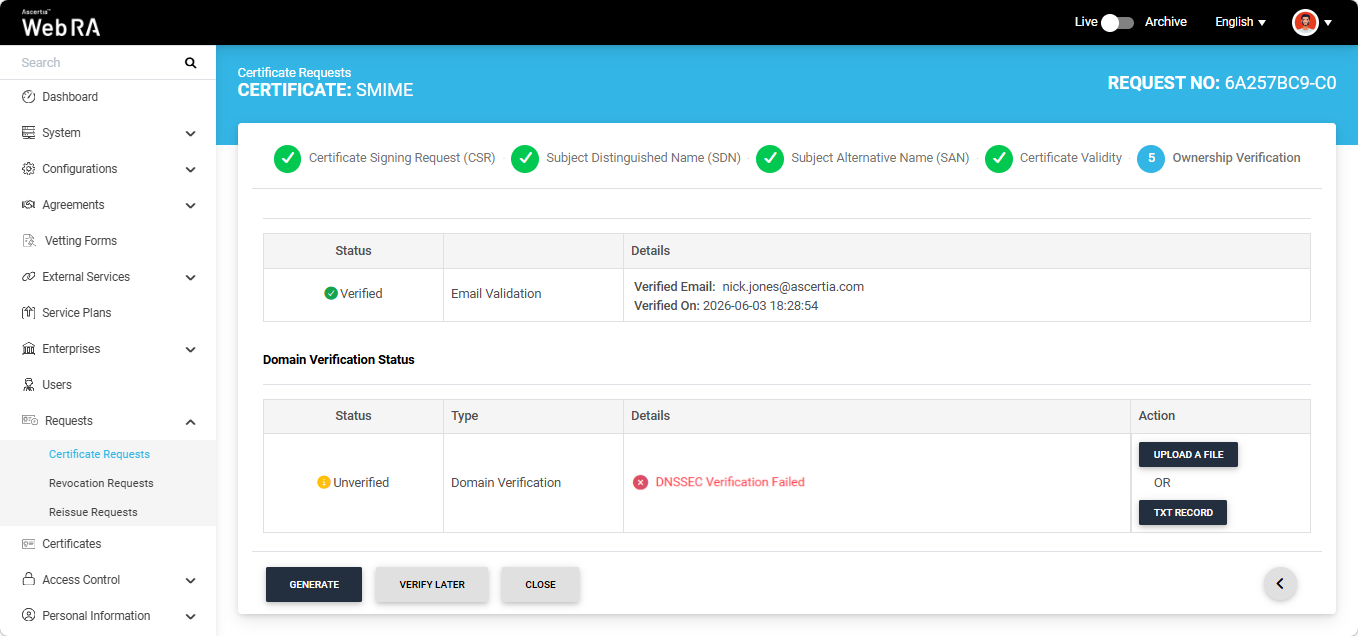
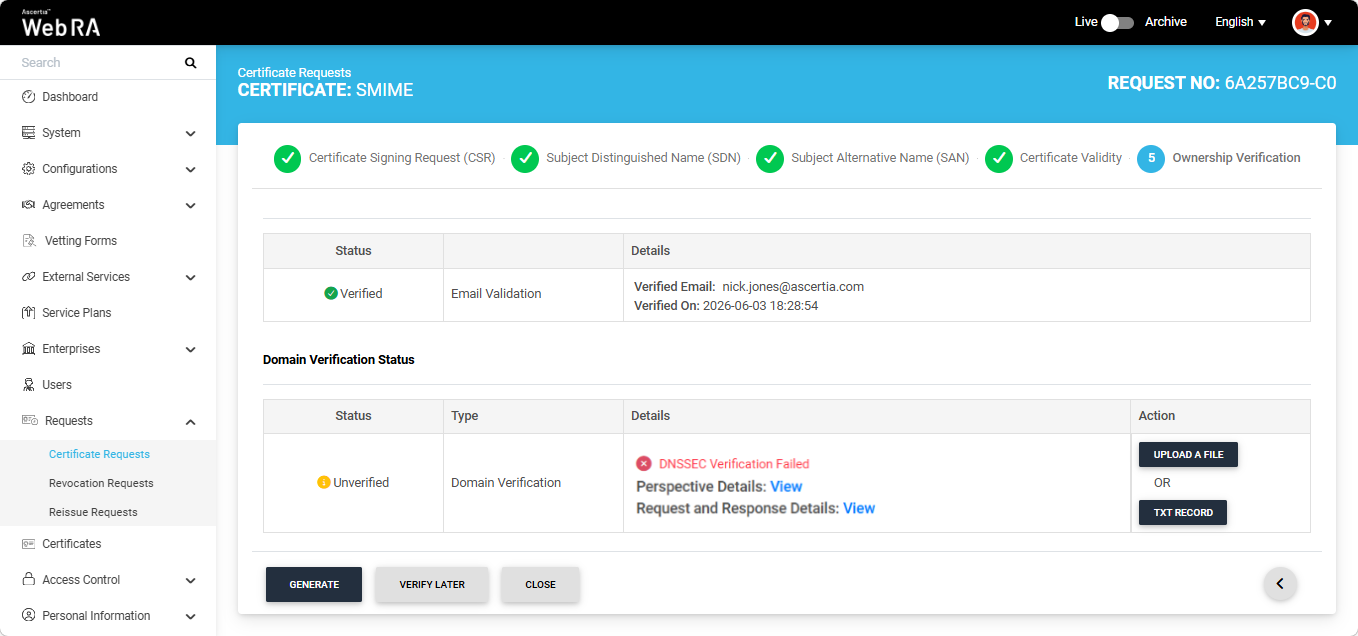
However, if DNSSEC is enabled but the verification fails, the system displays an error on the screen.
Open MPIC Validation
If Open MPIC Validation is enabled in the certification profile, Open MPIC will also perform domain validation and CAA verification (if enabled in Enterprise domain settings) during certificate generation.
The domain will be verified by the Open MPIC perspectives. If the domain verification meets the minimum quorum count specified in the Open MPIC connector, the user will be able to generate the certificate. For more details about Open MPIC connector, refer to the Connectors section.
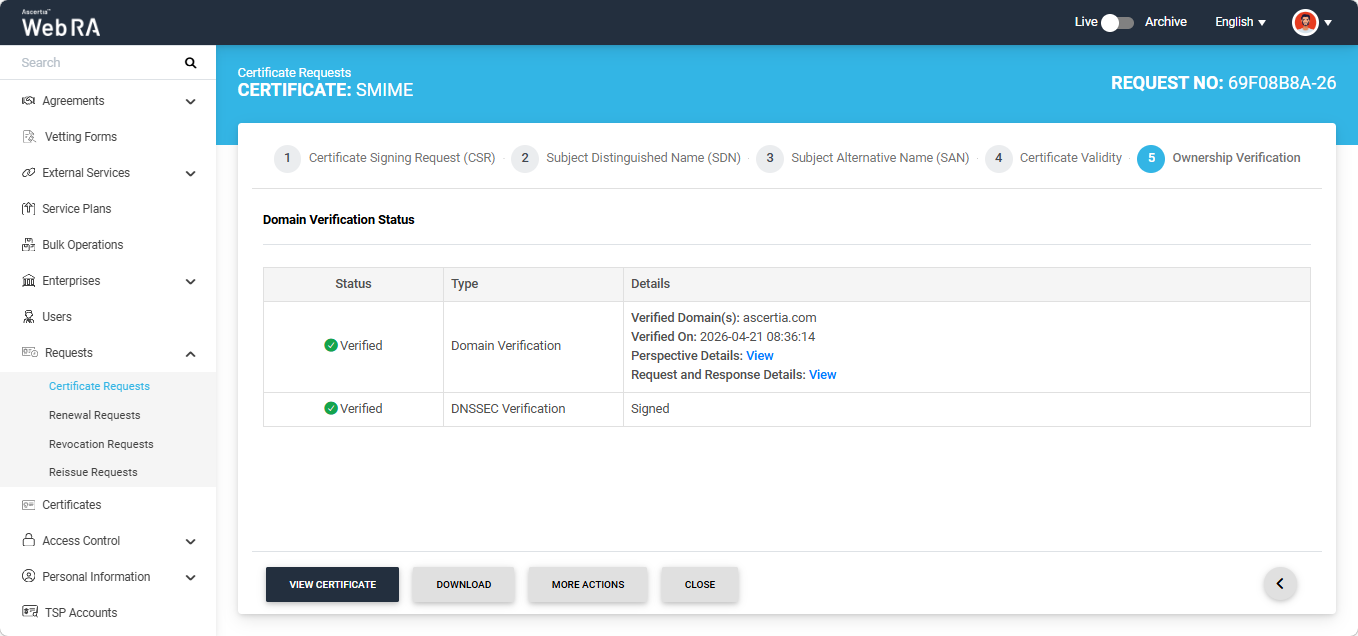
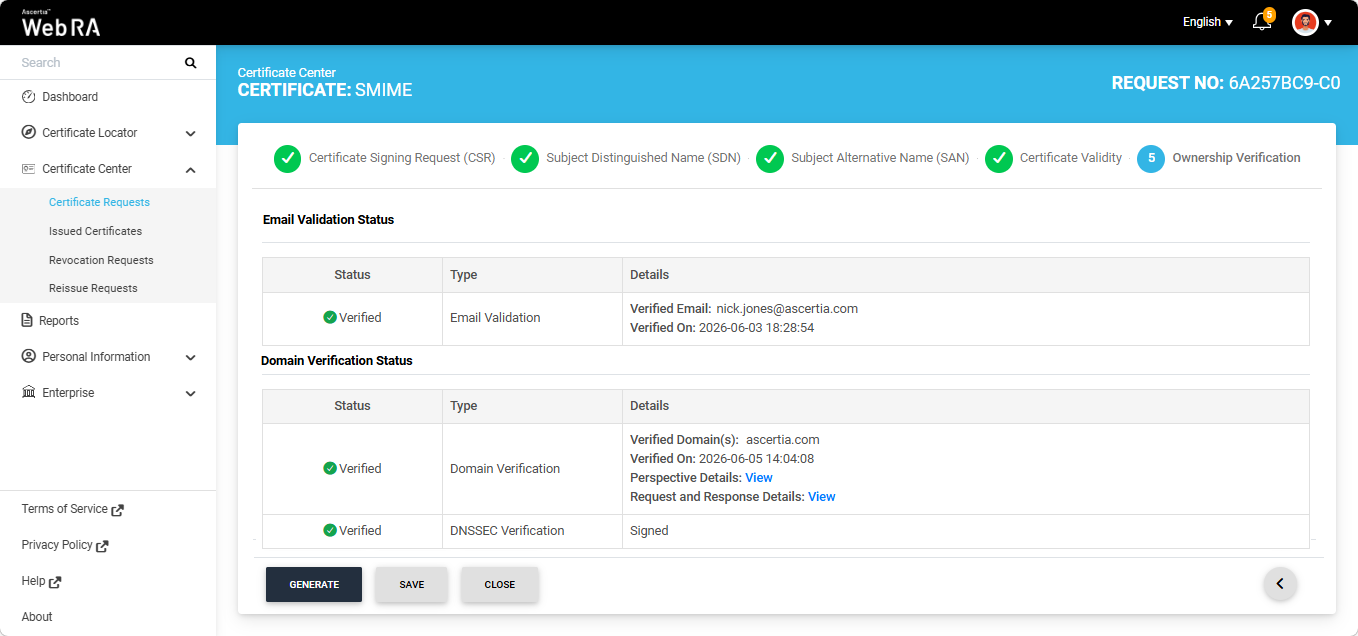
After domain verification is performed by Open MPIC, the system will display a Verified status for the specified domain.
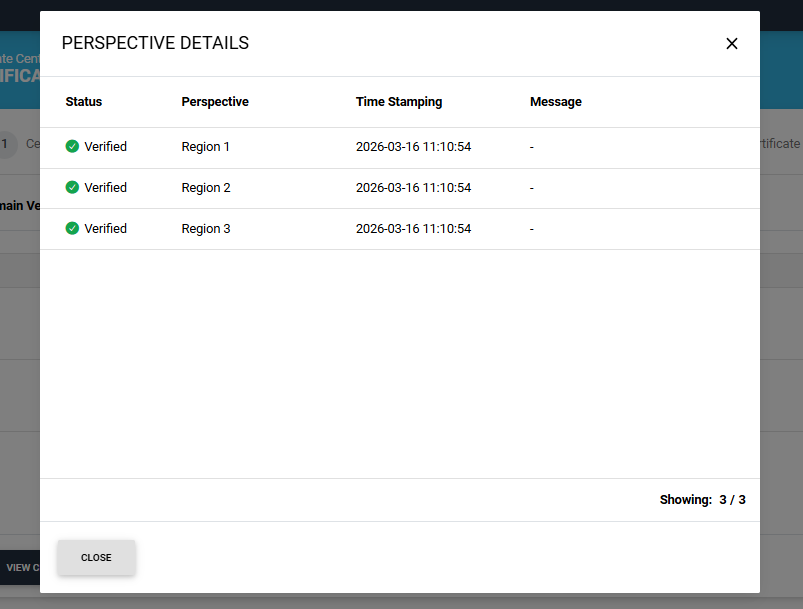
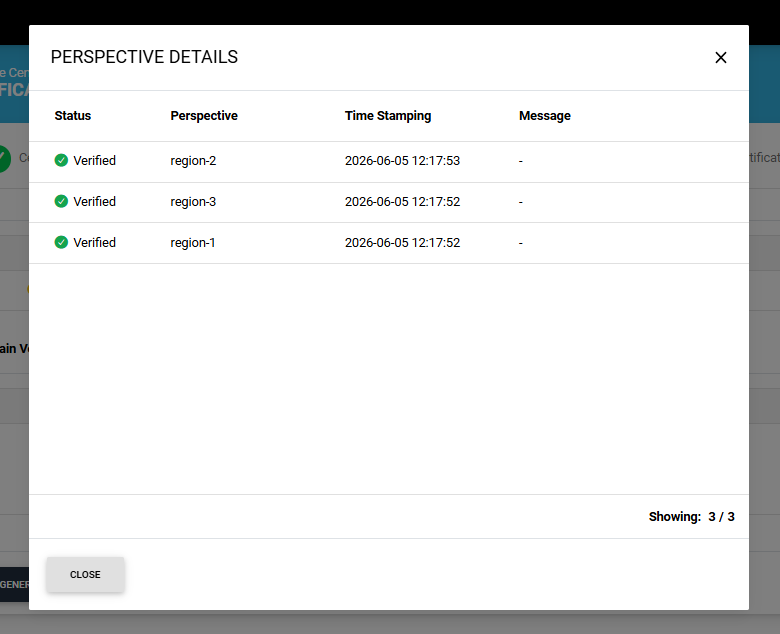
To view the Open MPIC perspective details, click the ‘View’ button next to 'Perspective Details'. The system will display the ‘Perspective Details’ dialog on the screen.
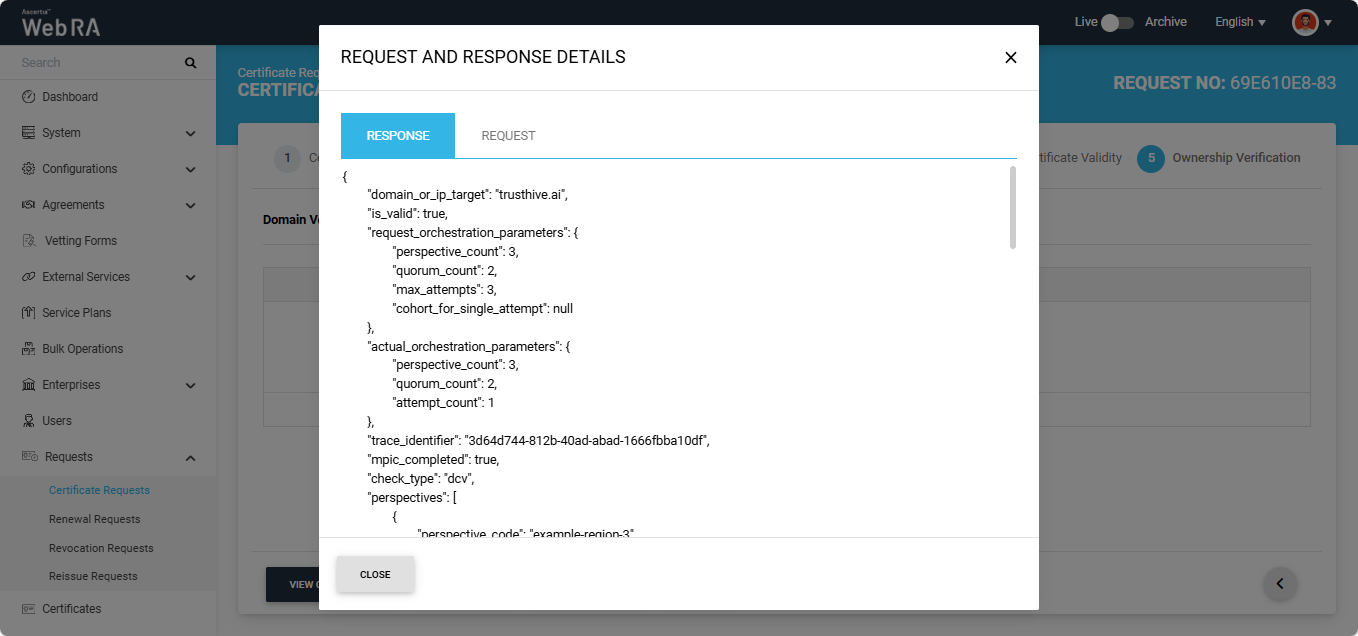
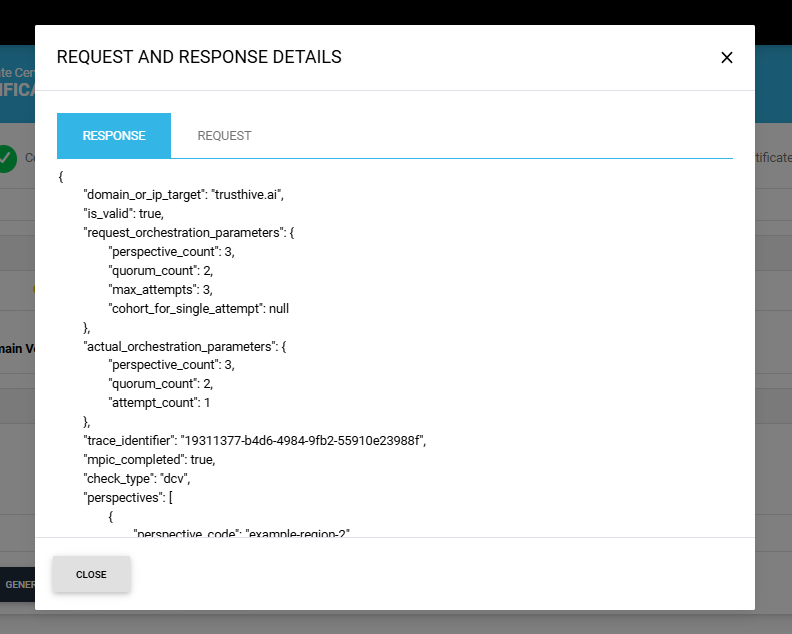
To view the Request and Response details, click the 'View' button. The system will display the 'Request and Reponse Details' dialog. You can view both Request and Response details from their respective tabs.
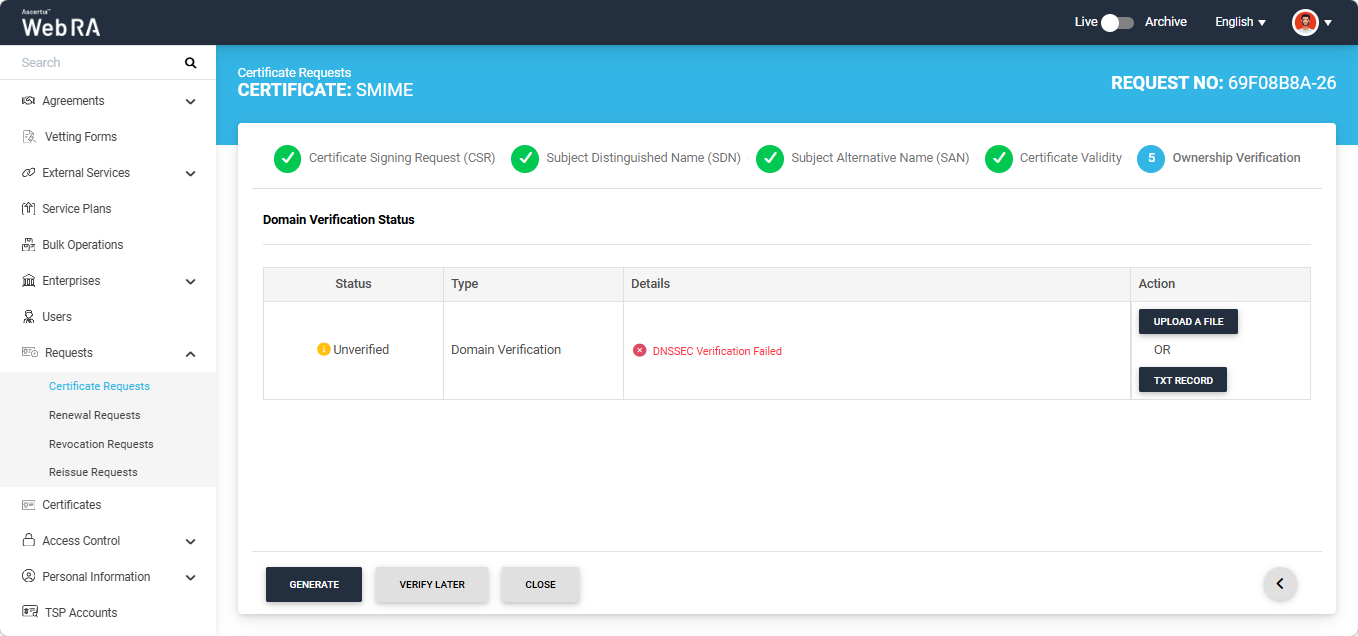
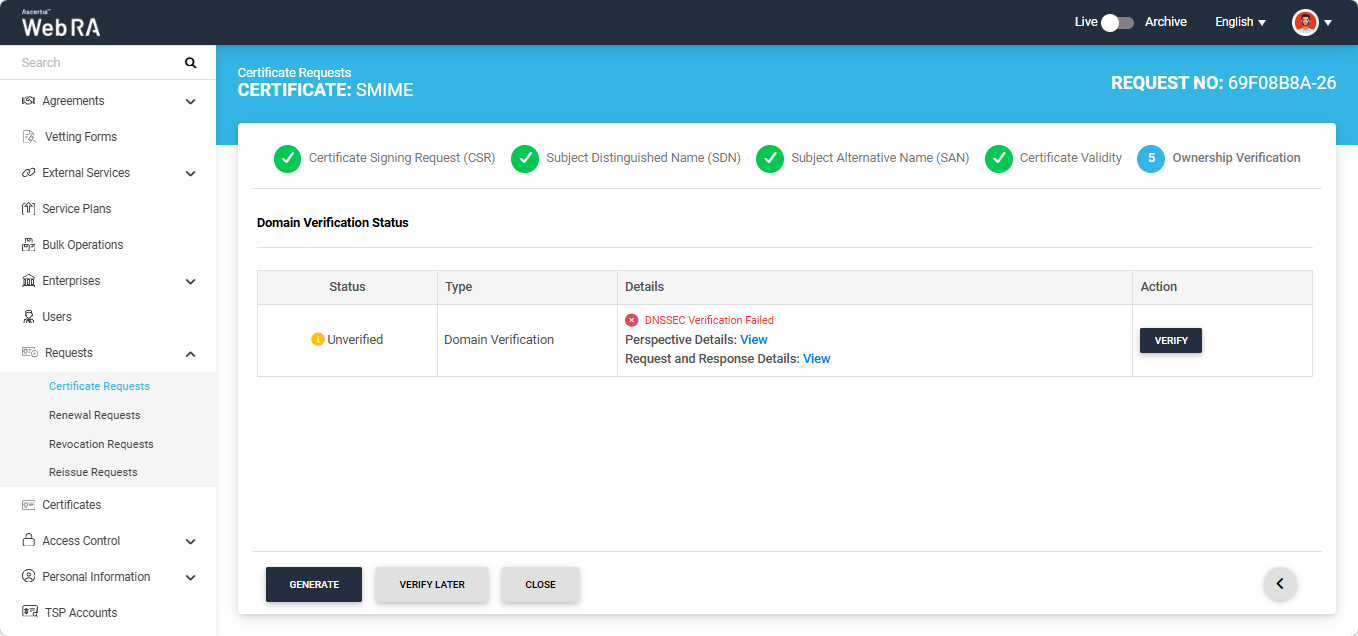
Note: If Open MPIC is enabled and DNSSEC Verification fails, the error will be displayed on the screen as shown in the image below.
Note: If the ‘Generate a certificate on behalf of the user’ checkbox is enabled, the system will display an additional section titled ‘User Information’ next to the Ownership Verification section.

On this screen, enter the Name, Email Address, Citizen ID, and Mobile Number, and select the Role of the user for whom the certificate is being generated.
After entering the details, click ‘Generate’. The system will create an account for the user and generate the certificate. The user will receive an email regarding the account and certificate creation and is prompted to activate their account.
|
|
If the certificate is being created for a user who does not exist in the system, a new account will be created for the user along with the certificate.
If the user already has a registered account in the Web RA system, only the certificate will be created. The user will be notified via email about the certificate generation.
Meanwhile, if the user exists in the system but is not part of the enterprise where the certificate is being created, the system will send an invitation for the user to join that enterprise and will generate the certificate as well. |
|
|
If Certification Authority Authorisation (CAA) Records is enabled in the Enterprise Domain Settings, CAA record verification is required in the Ownership Verification section. When CAA record verification is enabled and the Sponsor validation type is selected, the system performs email validation, domain verification and CAA record verification before generating the certificate. Ensure that the domain in the DNS and Email Address fields of the SAN are the same. If they differ, the system displays an error on the SAN screen and does not allow you to proceed. For more details, see how CAA Record Verification is performed. |
S/MIME certificate requests with Domain and Mailbox Validation type
The following steps describe how to create an S/MIME certificate request when both Domain and Mailbox Validation are selected in the certification profile.
Expand Requests > Certificate Requests from the Admin portal to navigate to the Certificate Requests listing screen.
Click the + button in the grid header to access the Create Request screen. Select the Enterprise name from the dropdown, choose the Certificate Type, and click 'Create'.
Note: A checkbox titled ‘Generate a certificate on behalf of the user’ will appear on this screen if the policy for this option is enabled in the Enterprise > Policies > Requests section. Enabling this checkbox will allow the operator to generate a certificate on behalf of the user.
After making the required selections, click 'Create'.
The system will display the Certificate Signing Request (CSR) screen. Here, you can either upload a CSR or paste it into the ‘Paste Certificate Signing Request (CSR)’ box.
Once the CSR is uploaded, it will appear in the CSR field.
You can view the details of the CSR by clicking the Eye icon. It contains all the SDNs, SANs, etc.
Click the next '>' button to navigate to the 'Subject Distinguished Name (SDN)' screen. Here, review or update the information in the fields as required, then click the next ‘>’ button to proceed.
The Subject Alternative Name (SAN) screen will appear. On this screen, the Domain Names (DNS) and Email Address fields are mandatory.
The behaviour of the Domain Names (DNS) field depends on the configured Enterprise Policy settings.
If the 'Allow Only Enterprise-Approved Domains' policy is enabled in the Enterprise, the Domain Names (DNS) field is displayed as a dropdown list. In this case, users can only select an enterprise-approved domain from the available options. The dropdown list displays only active and verified domains configured for the Enterprise.

Alternatively, if the 'Assign Each Domain to a Single User' policy is enabled in the Enterprise, users can either select an enterprise-approved domain or enter a new domain in the Domain Names (DNS) field.
To select a pre-approved domain, click the Domain Names (DNS) field and select the required domain from the list. Alternatively, to enter a new domain, type the domain name in the field and press Enter.
Note: If both checkboxes are unchecked in the Enterprise Policy settings, the user can only select enterprise-approved domains when creating a certificate request.
Note: You can only specify a single domain and its associated subdomains in the DNS field. If you attempt to enter a different domain, the system displays an error message and prevents you from proceeding.
Enter the email address in the designated field. The domain of the email address must match the domain entered or selected in the DNS field. After specifying the domain(s) and email address, enter the information in the remaining fields as per your requirements.

After completing the SAN section click the next ‘>’ button to proceed. The 'Certificate Validity' screen will appear.

Click the next '>' button to navigate to the 'Ownership Verification' screen. The system will display the Email Validation and the Domain Verification sections on the screen.
Note: If you selected an enterprise-approved domain in the SAN section, you are not required to perform domain validation on the Ownership Verification screen. For enterprise-approved domains, the system automatically displays a Verified status, allowing you to proceed directly with certificate generation by clicking Generate.
Similarly, if you enter an email address that has already been validated in the system, the Ownership Verification screen displays a Verified status for that email address. You are not required to verify the email address again until its validation period expires, as defined by the configured Mailbox Validation Period in the Certification Profile.
However, if you entered a new domain and email address in the SAN section, you must complete the email validation and domain verification process before the certificate can be generated.
Email Validation
To verify the email address, click the ‘Verify’ button in the Action column. An ‘Email Validation’ dialog will appear on the screen, and a Token will be sent to the specified email address.
Enter the token you received in your email in the ‘Token’ field, then click ‘Verify’. If the provided token is correct, the system will display the ‘Verified’ status for the email address.
After verifying the email address, you must verify the domain. The steps for verifying the domain - either by uploading a file or by adding a TXT record - are provided below.
Domain verification can be performed either by uploading a file or by adding a TXT record.
Note: The action (Upload a File or TXT Record) through which domain verification can be performed is configured in the certification profile. The operator may select one or both methods for domain verification. You can use any of the method to verify your domain. For more details about how the method is selected, navigate to the ‘Certification Profiles’ section.
Upload a File
Click the ‘Upload a File’ button. The system will display the ‘Upload a File’ dialog, which contains instructions on how to verify the domain using this method.
TXT Record
Click the ‘TXT Record’ button. The system will display the ‘TXT Record’ dialog, which contains instructions on how to verify the domain using this method.
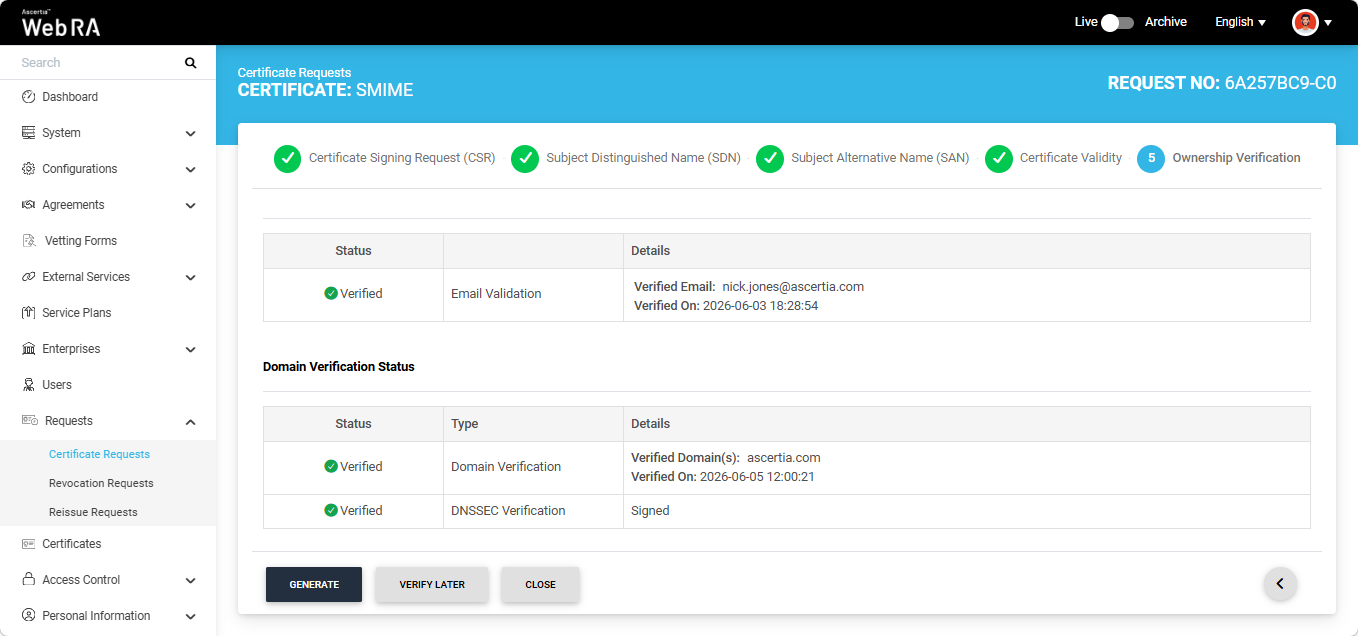
After selecting the required method from the two mentioned above, click the 'Verify' button. If all steps are completed correctly, the ‘Verified’ status will appear for the entered domain.

After the verification is complete you can click the generate button to create the certificate.
DNSSEC Verification
An additional check for DNSSEC verification has been enabled for all certificate types in Web RA. This feature is automatically enabled in the system and adds a DNSSEC check for domain validation and Certificate Authority Authorisation (CAA) verification during certificate request creation.
If DNSSEC is enabled and correctly configured for the domain, the system validates the domain’s DNSSEC signature during certificate request processing. If the signature is valid and the domain verification is successful, the certificate request is processed successfully and the system displays a ‘Verified’ status for DNSSEC verification.
If DNSSEC is not enabled for the domain, DNSSEC verification will not be performed and the certificate will be generated without it.
However, if DNSSEC is enabled but the verification fails, the system displays an error on the screen.
Open MPIC Validation
If Open MPIC Validation is enabled in the certification profile, Open MPIC will also perform domain validation and CAA verification (if enabled in Enterprise domain settings) during certificate generation.
The domain will be verified by the Open MPIC perspectives. If the domain verification meets the minimum quorum count specified in the Open MPIC connector, the user will be able to generate the certificate. For more details about Open MPIC connector, refer to the Connectors section.
After domain verification is performed by Open MPIC, the system will display a Verified status for the specified domain. You can generate the certificate request after successful verification.
To view the Open MPIC perspective details, click the ‘View’ button next to 'Perspective Details'. The system will display the ‘Perspective Details’ dialog on the screen.
To view the Request and Response details, click the 'View' button. The system will display the 'Request and Reponse Details' dialog. You can view both Request and Response details from their respective tabs.
Note: If Open MPIC is enabled and DNSSEC Verification fails, the error will be displayed on the screen as shown in the image below.
Note: If the ‘Generate a certificate on behalf of the user’ checkbox is enabled, the system will display an additional section titled ‘User Information’ next to the Ownership Verification section.
After entering the details, click ‘Generate’. The system will create an account for the user and generate the certificate. The user will receive an email regarding the account and certificate creation and is prompted to activate their account.
|
|
If the certificate is being created for a user who does not exist in the system, a new account will be created for the user along with the certificate.
If the user already has a registered account in the Web RA system, only the certificate will be created. The user will be notified via email about the certificate generation.
Meanwhile, if the user exists in the system but is not part of the enterprise where the certificate is being created, the system will send an invitation for the user to join that enterprise and will generate the certificate as well. |
|
|
If Certification Authority Authorisation (CAA) Records is enabled in the Enterprise Domain Settings, CAA record verification is required in the Ownership Verification section. When CAA record verification is enabled and the Sponsor validation type is selected, the system performs email validation, domain verification and CAA record verification before generating the certificate. Ensure that the domain in the DNS and Email Address fields of the SAN are the same. If they differ, the system displays an error on the SAN screen and does not allow you to proceed. For more details, see how CAA Record Verification is performed. |
If Certification Authority Authorisation (CAA) Records is enabled in the Enterprise Domain Settings, CAA record verification is required in the Ownership Verification section.
The following steps describe how CAA record verification is performed during S/MIME certificate request creation.
Expand Requests > Certificate Requests from the Admin portal to navigate to the Certificate Requests listing screen.
Click the + button in the grid header to access the Create Request screen. Select the Enterprise name from the dropdown, choose the Certificate Type, and click 'Create'.
|
|
A checkbox titled ‘Generate a certificate on behalf of the user’ will appear on this screen if the policy for this option is enabled in the Enterprise > Policies section. |
The system will display the Certificate Signing Request (CSR) screen. Here, you can either upload a CSR or paste it into the ‘Paste Certificate Signing Request (CSR)’ box.
Once the CSR is uploaded, it will appear in the CSR field. You can view the details of the CSR by clicking the Eye icon.
Click the next '>' button to navigate to the 'Subject Distinguished Name (SDN)' screen. Review or update the information in the fields as required, then click the next ‘>’ button to proceed.
The Subject Alternative Name (SAN) screen will appear. Here, review or update the information in the fields as required.
|
|
Ensure that the domain in the Domain Names (DNS) and Email Address fields are the same. If the domains differ, the system displays an error and does not allow you to proceed. |
After completing the SAN section click the next ‘>’ button to proceed. The 'Certificate Validity' screen will appear.

Click the next '>' button to navigate to the 'Ownership Verification' screen.
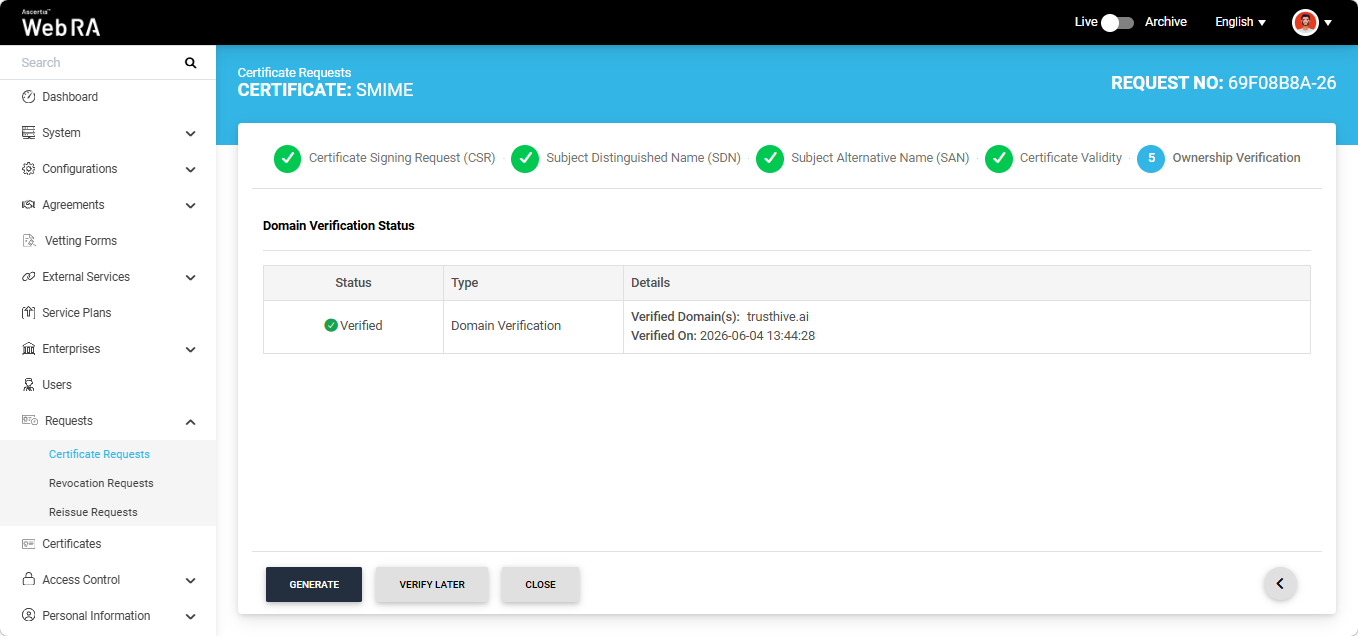
The Domain Verification Status will appear 'Unverified'. Click 'Verify' to proceed.

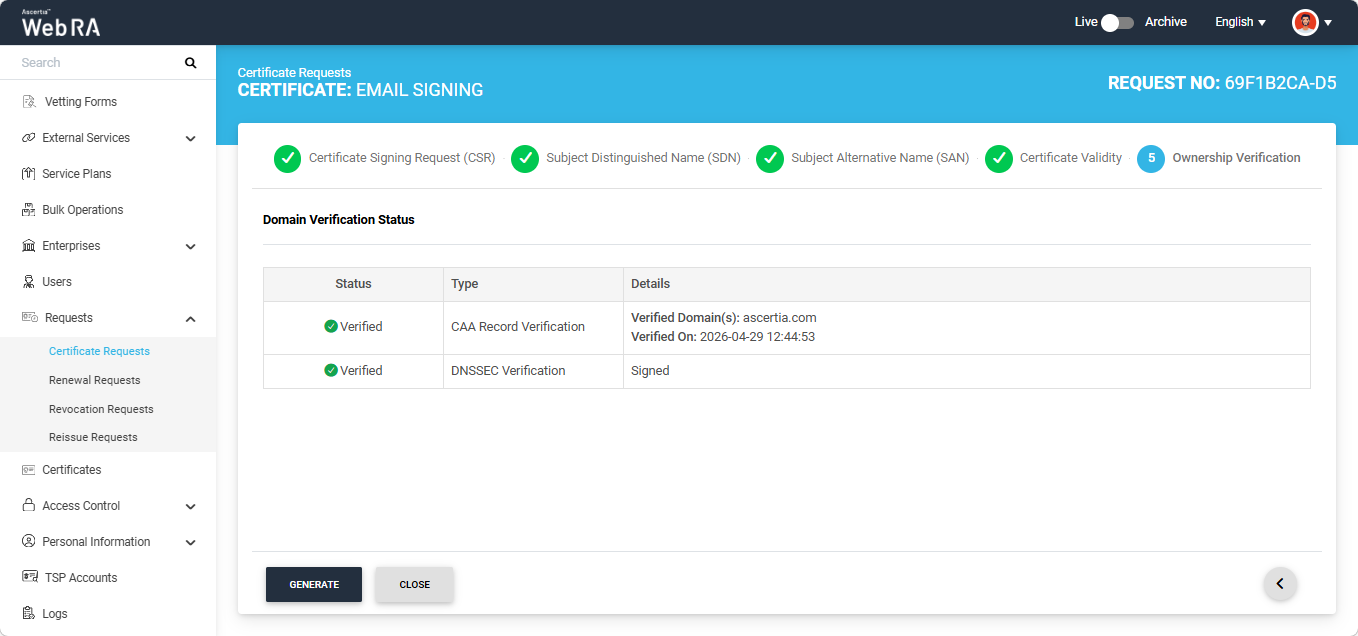
If the CAA records configured in the Enterprise Domain configurations match the domain of the entered email, the Domain Verification Status will appear as Verified, as displayed below.
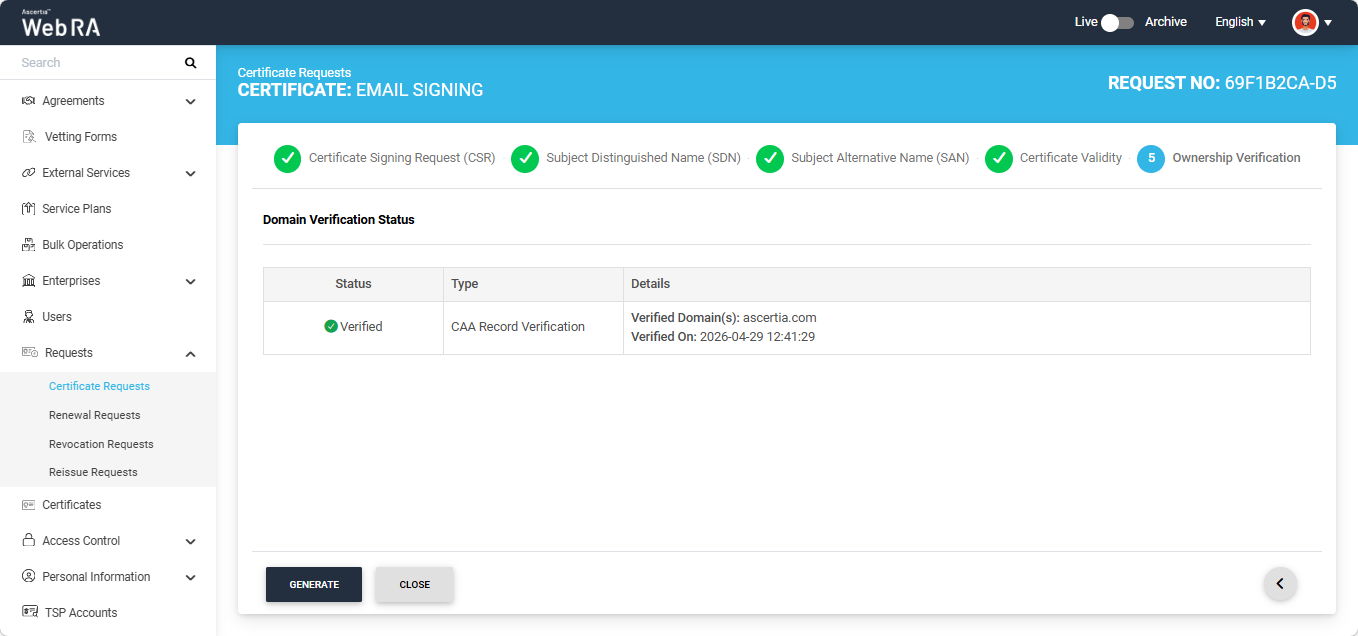
In case of Verified status, click 'Generate' to process a certificate. The certificate will be generated and downloaded in your computer.
Meanwhile, if the CAA records configured in the Enterprise Domain configurations do not match with the domain of any entered email, the Domain Verification Status will appear as ‘Unverified’.
The unverified domain name will appear in red text under the ‘Details’ column.
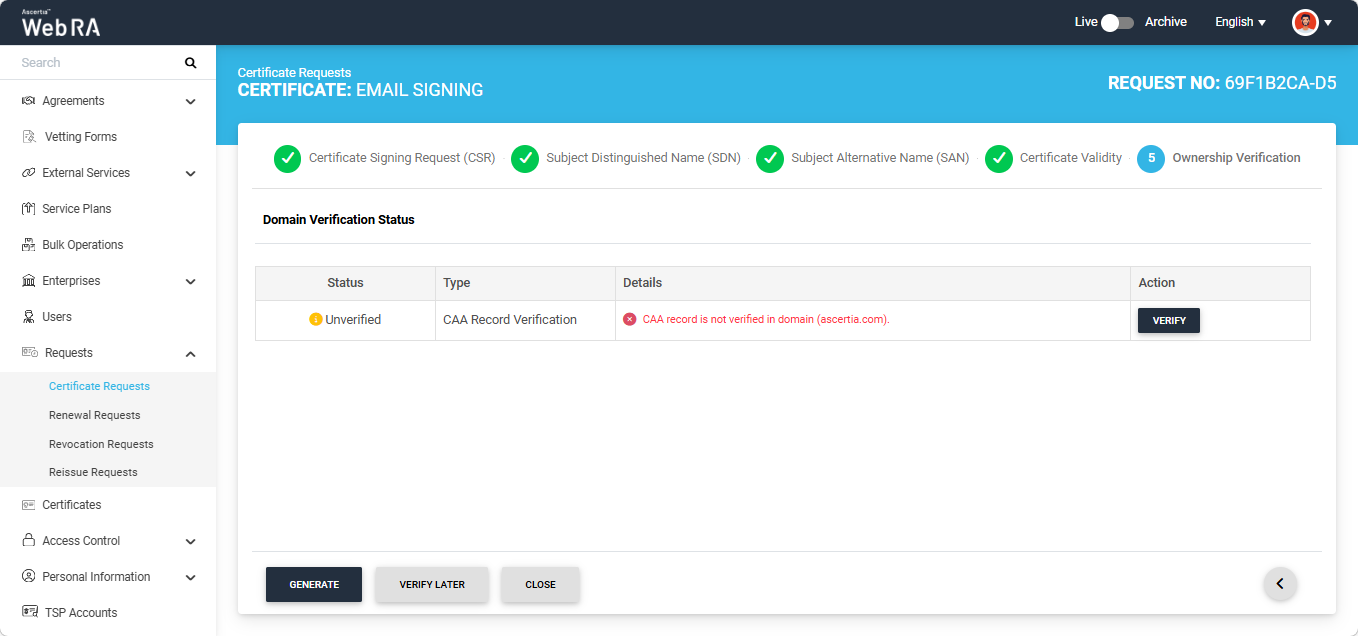
If no CAA record is present, any CA is allowed to issue a certificate for the domain. If a CAA record is present, only the CAs listed in the record(s) are allowed to issue certificates for that hostname.
DNSSEC Verification
An additional check for DNSSEC verification has been enabled for all certificate types in Web RA. This feature is automatically enabled in the system and adds a DNSSEC check for domain validation and Certificate Authority Authorisation (CAA) verification during certificate request creation.
If DNSSEC is enabled and correctly configured for the domain, the system validates the domain’s DNSSEC signature during certificate request processing. If the signature is valid and the domain verification is successful, the certificate request is processed successfully and the system displays a ‘Verified’ status for DNSSEC verification.
If DNSSEC is not enabled for the domain, DNSSEC verification will not be performed and the certificate will be generated without it.
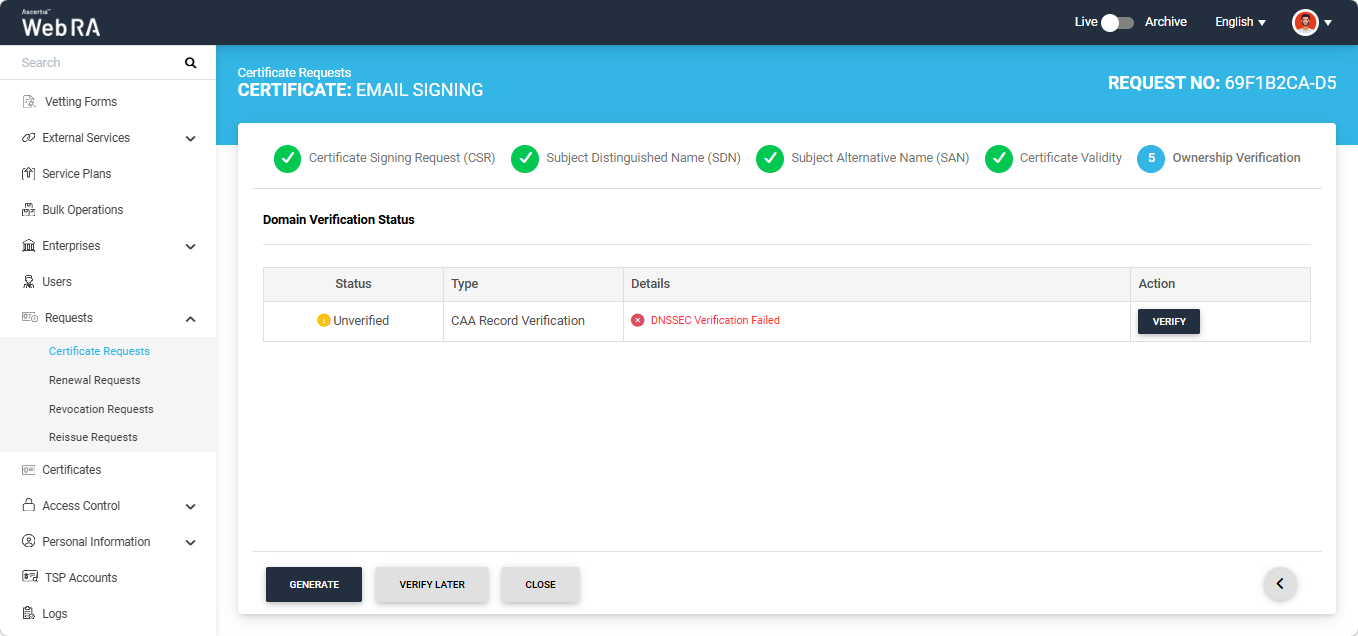
However, if DNSSEC is enabled but the verification fails, the system displays an error on the screen.
Open MPIC Validation
If Open MPIC Validation is enabled in the certification profile, Open MPIC will also perform domain validation and CAA verification (if enabled in Enterprise domain settings) during certificate generation.
The domain will be verified by the Open MPIC perspectives. If the domain verification meets the minimum quorum count specified in the Open MPIC connector, the user will be able to generate the certificate. For more details about Open MPIC connector, refer to the Connectors section.
After domain verification is performed by Open MPIC, the system will display a Verified status for the specified domain.
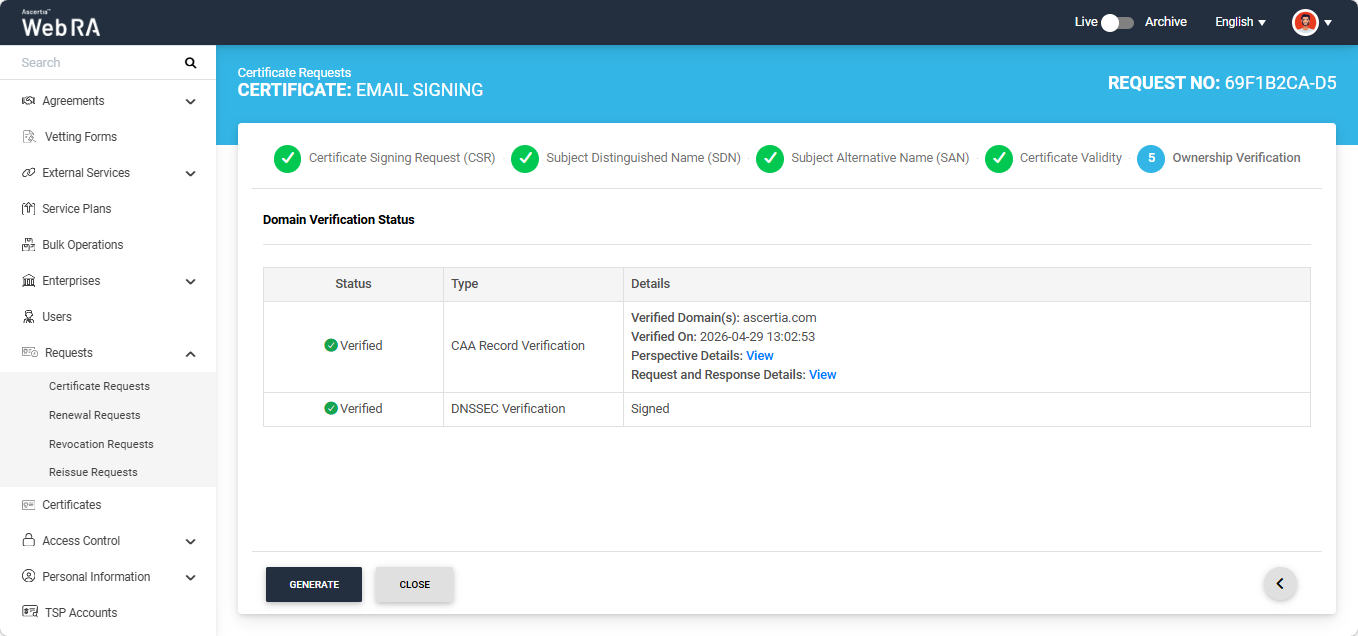
To view the Open MPIC perspective details, click the ‘View’ button next to 'Perspective Details'. The system will display the ‘Perspective Details’ dialog on the screen.
To view the Request and Response details, click the 'View' button. The system will display the 'Request and Reponse Details' dialog. You can view both Request and Response details from their respective tabs.
Note: If Open MPIC is enabled and DNSSEC Verification fails, the error will be displayed on the screen as shown in the image below.

|
|
If the ‘Generate a certificate on behalf of the user’ checkbox is enabled, the system will display an additional screen titled ‘User Information’ next to the 'Ownership Verification' screen. |
On the 'User Information' screen, you will be required to enter/select the Name, Email, Citizen ID, Mobile Number, and Role of the user for whom the certificate is being generated.
After entering the details, click ‘Approve’. The system will then display a subscriber agreement configured for this user's profile.
When you agree to the subscriber agreement, the system will create an account for the user and generate the certificate. The user will receive an email regarding the account and certificate creation and is prompted to activate their account.
|
|
If the certificate is being created for a user who does not exist in the system, a new account will be created for the user along with the certificate. If the user already has a registered account in the WebRA system, only the certificate will be created. The user will be notified via email about the certificate generation. Meanwhile, if the user exists in the system but is not part of the enterprise where the certificate is being created, the system will send an invitation for the user to join that enterprise and will generate the certificate as well. |