Register enterprise users via CSV file
Home > Configure Enterprise Settings > Manage your enterprise users > Register enterprise users via CSV file
Register enterprise users via CSV file
You can register your enterprise users in bulk through a CSV file. The CSV file must have the valid email addresses of the contacts. SigningHub supports three different types of email headers (i.e. Primary Email, E-mail Address, and Email Address) to pick up the email addresses from a CSV file.
This is a smart way for the enterprise admins to directly register multiple users into their enterprise account through a single click, without even following the default registration and activation steps. Moreover, you can also enable/ disable the system access of your enterprise users as required.
|
System Access |
|
|
User Status |
Description |
|
Activated & Enabled |
This status implies that a user's account is activated and their access is enabled in SigningHub. These users can log into their SigningHub accounts and use the system. |
|
Activated & Disabled |
This status implies that a user's account is activated but their access has been suspended in SigningHub. These users cannot log into their SigningHub accounts till their access is enabled again by your (enterprise admin). |
|
Enabled |
This status implies that a user has been directly registered by enterprise admin with enabled access in SigningHub (by using the "Send Activation Email" option), however the user has not activated their account as yet. |
Register the users through a CSV file
- Login with your enterprise admin credentials.
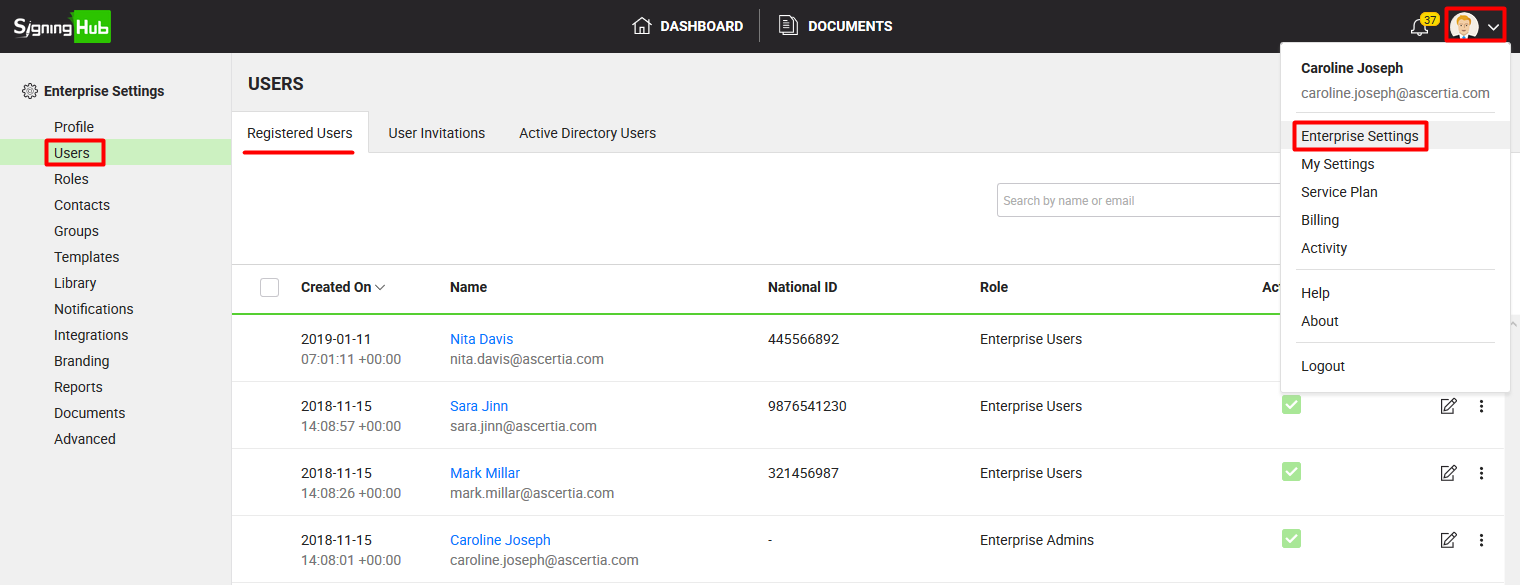
- Click your profile drop down menu (available at the top right corner).
- Click the "Enterprise Settings" option.
- Click the "Users" option from the left menu.
The "User" screen will appear listing all your registered enterprise users.

- Click
 from the grid header.

- The "Register User" dialog will appear. Click the "Bulk Register" tab.
- Select the role for all the users to be registered. The default role is automatically selected for the new registrations, change it as required.
- From the "Send Email" field, choose when to send the notification email to the newly added user:
- None: select this option when you want the user to be auto activated without receiving any email. This option is recommended when the user needs to use an external IDP (i.e. Active Directory, Salesforce, Linked-in, etc) for system authentication.
- Send Registration Email: select this option when you want the user to be auto activated without receiving the activation email. Only the registration email will be sent (to the user) that contains the information like Enterprise Admin name who has registered the user, and the Enterprise name in which the user has been registered. This option is recommended when the user needs to use an external IDP (i.e. Active Directory, Salesforce, Linked-in, etc) for system authentication.
- Send Activation Email: select this option when you want the user to receive the activation email and activate their account through it. This option is recommended when the user needs to use the SigningHub ID for system authentication.
- Tick the "I agree to the Terms of Service and Privacy Policy" option.
- Click
 to locate and select the required CSV from your system.

All those users (with valid email addresses in the CSV file) that are not available in system, or available in system as guest, or have been marked as deleted, will be registered and auto activated in your enterprise with the enabled SigningHub access.
How to get a CSV file?
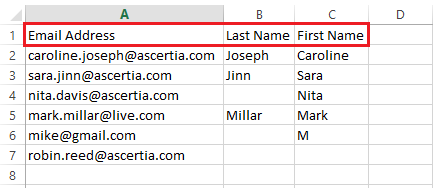
There are multiple ways to get a CSV file. You can create a CSV file using any word processing, database, spreadsheet or text edit applications. When creating a CSV file, the first row must be the header row that shows the field names for the file. Each subsequent row can then represent a unique user email id along with the user's names (i.e. first name and last name).
A CSV file should contain the following information:
|
|
You can also export your contacts (in a CSV file) directly from Outlook, Thunderbird, or any other email service provider. Since SigningHub is mainly concerned with the email column header of a CSV file, therefore three types of headers are supported, i.e. Primary Email, E-mail Address, and Email Address.
- You can edit any content inside a CSV file as required.
- In case the contact names are specified in a CSV file (i.e. First Name and/ or Last Name), they will be populated accordingly in the name fields of a contact.
- In case a contact name is not specified in any name field, then the contact username (portion of email address before the "@" symbol) will be shown as contact name.
- The rest of the column headers inside a CSV file are not related to SigningHub, so they will be ignored when you import the file.

1. The activated users can also log into SigningHub with their non-SigningHub Ids, if it is allowed in their subscribed service plan.
2. When the newly registered users try to log into SigningHub by using the SigningHub IDs, they will be sent the activation emails to activate their accounts.
3. When users are registered via CSV file, the user certificates are generated as per the user names, i.e. User name and their certificate name will be the same. However these names (User and Certificate) can be updated later as required.
4. The CSV file being used for registering the enterprise users in bulk must have the valid email addresses of the contacts. SigningHub supports three different types of email headers of a CSV file, i.e. Primary Email, E-mail Address, and Email Address. You can export your contacts (in CSV) from Outlook, Thunderbird, or any other email service provider that supports these email headers.
See also
Register an enterprise user
Edit Enterprise User Details
Reset the password of your enterprise user
View activities of your enterprise users
Set service quota of your enterprise user
Invite an enterprise user
Invite enterprise users via CSV file
Pre-authorize Active Directory users
Disable an enterprise user
Search an enterprise user
Add Certificate
Update Certificate
Delete Certificate
