SigningHub Admin Configuration
SigningHub Admin Configuration
The following sections illustrate the changes that the installer configures automatically and highlight the manual steps that still need to be executed by the system administrators.
Certification Profiles
Two new configurations are added to the Certification Profiles.
- Level of Assurance
- Key Protection
A Level of Assurance indicates the level of trust that the certificates will introduce when it is used to sign the document. The available selections are: Electronic Seal (eSeal), Advanced Electronic Seal (AdESeal), Qualified Electronic Seal (QESeal), Advanced Electronic Signatures (AES), High Trust Advanced Electronic Signatures (AATL) and Qualified Electronic Signatures (QES). These values are pulled from “Configurations -> Document Settings -> Signature Types -> Level of Assurance”.
Certification Profiles are used to create certificates dynamically. Administrators need to manually set the Level of Assurance in the profile to indicate the level of trust attached to that particular Certificate Profile.
|
|
|

Every certificate that is created using the Certification Profile has key pairs created on the remote server. The Key Protection indicates the protection method of the private key on the remote server. This means that the private key can be protected with a user password, a system-generated password or by remote authorisation controlled by the end user through a mobile device.
|
|
|
In the previous versions of SigningHub, Witness Signing was configured using Signing Profiles. In SigningHub 8.x.x, all Certificate Profiles that are configured with an Electronic Seal (eSeal) Level of Assurance can be used to sign e-Signature fields. In SigningHub 8.x.x, the terms Witness Signing and e-Signatures have been replaced by Electronic Seal (eSeal) Level of Assurance and the recipients will be able to use only those certificates that are set to the corresponding Level of Assurance to sign the document.
|
|
|
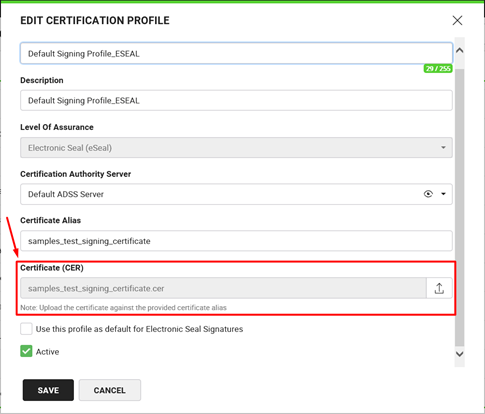
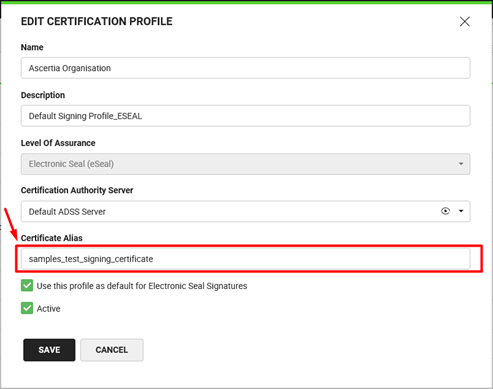
See the details on configuring a Certification Profile (or Electronic Seal (eSeal) particularly in the image below.
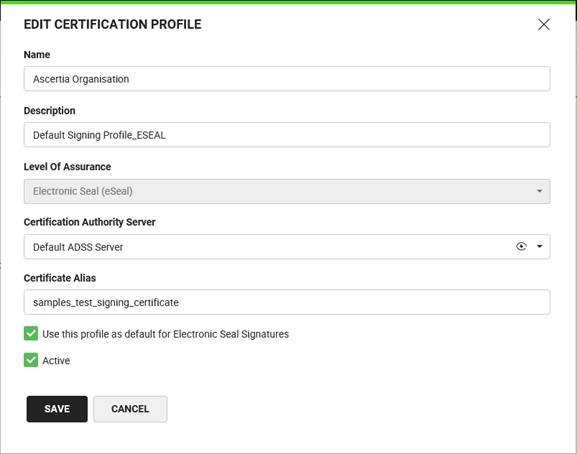
Reconfigure Certification Profiles for eSeal
Automatically Import the eSeal Certificate from ADSS Server
If you are upgrading to SigningHub 8.x.x with Ascertia ADSS Server 6.9, then you can configure an eSeal based Certification Profile to automatically import the required certificate for eSeal signatures from ADSS Server.
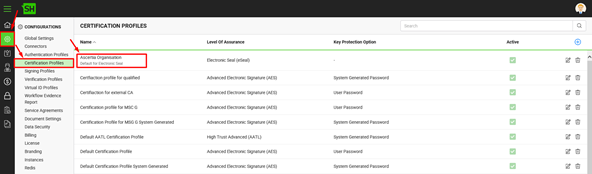
- Go to SigningHub Admin > Certification Profiles.
- Edit an existing eSeal based Certification Profile or create a new one.
- From the dialog, select the “Auto Download Certificate” field.

|
|
|
Why do we need a certificate for eSeals?
SigningHub’s new design for applying eSeals requires the eSeal signing certificate to be imported into the SigningHub Certification Profile. In previous releases, this function was performed by ADSS Server.
How to get the certificate from ADSS Server when connecting to ADSS Server 6.8 or below?
To export the certificate for Electronic Seal (eSeal) from ADSS Server, log into the ADSS Server Console with an Administrator account.

- Go to Key Manager > Service Keys, select the intended Key Alias and click on Certificates. The list of certificates will appear as shown below.
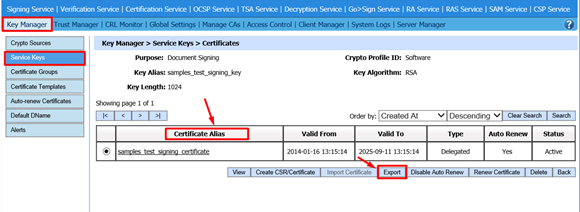
- Select the required Certificate Alias and click on the Export button.
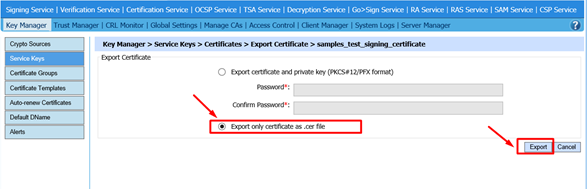
- Select the Export only certificate as a .cer file, and click on the Export button to save the certificate file. This will download the certificate.
The SigningHub’s Certification Profile (for eSeal) needs to be reconfigured to have the eSeal certificate imported to the defined certificate alias. This is mandatory, once upgraded to SigningHub 8.x.x, to perform eSeal signatures when connecting to an ADSS Server 6.8 or below. Within the SigningHub’s Certification Profile, browse to the certificate that was exported from ADSS Server in the above steps, click SAVE to apply the eSeal certificate to the Certification Profile.
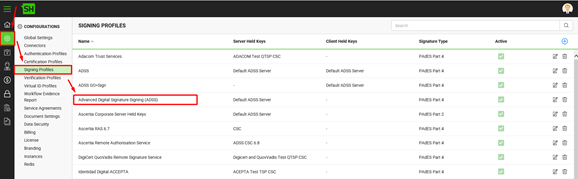
Signing Profiles
In the previous versions of SigningHub, the same Signing Profile could be configured for client-held keys and server-held keys. In SigningHub 8.x.x, separate Signing Profiles should be configured for server and client-held keys.
|
|
|
Signature appearance design and text-based signature font are removed from the user’s Signing Profile. Signature Appearance designs can now be configured in the Service Plan and under Enterprise Roles. For the text-based Signature font, the enterprise administrators can now only configure it in the Enterprise Roles.
|
|
|
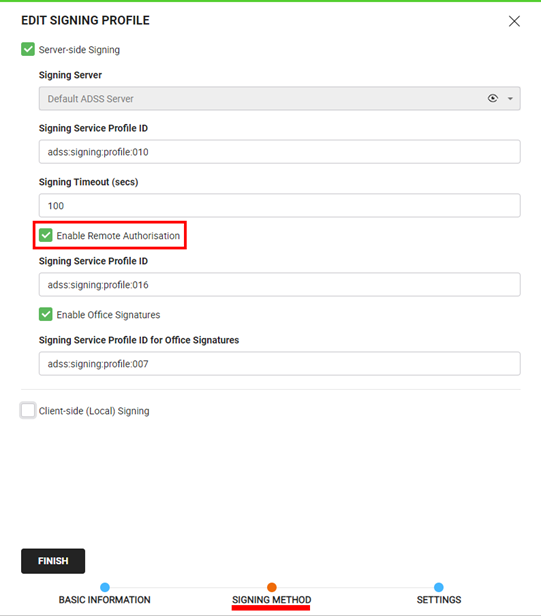
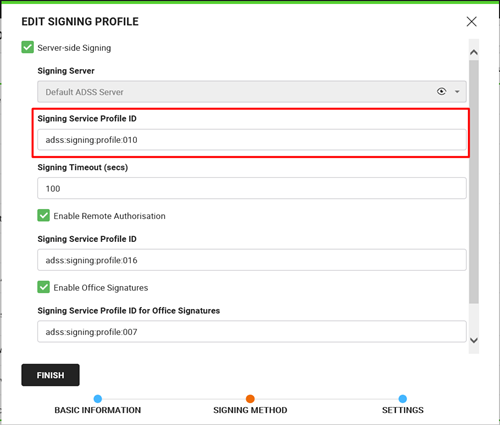
Remote authorisation can now be configured in a Signing Profile. For this, an option to “Enable Remote Authorisation” must be configured manually by providing ‘Signing Service Profile ID” in the already existing Signing Profile for RAS. In previous versions, it was configured separately in a Service Plan. By moving the configuration to Signing Profiles, users can configure multiple remote authorisation servers. This can be configured in Signing Profiles in the same way an office Signing Profiles would be configured.
The following images illustrate the configuration of a Signing Profile.
Reconfigure Signing Profiles for PKCS#1 Changes
- From SigningHub 8.x.x onwards, all users can upload XMLs using the SigningHub API. SigningHub will no longer need a separately configured XML Signing Profile to perform XML Signing. Instead, the Signing Profile configured for Server-side signing will be used. The Enable XML Signing option has been removed from the Signing Profile.

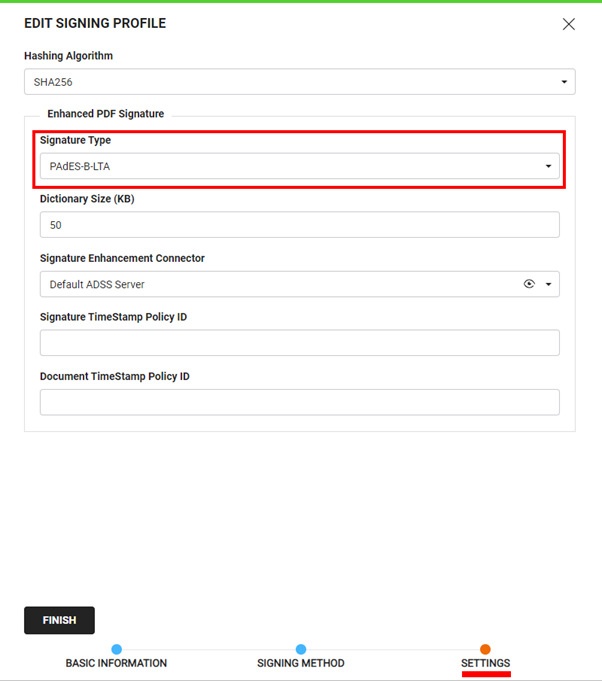
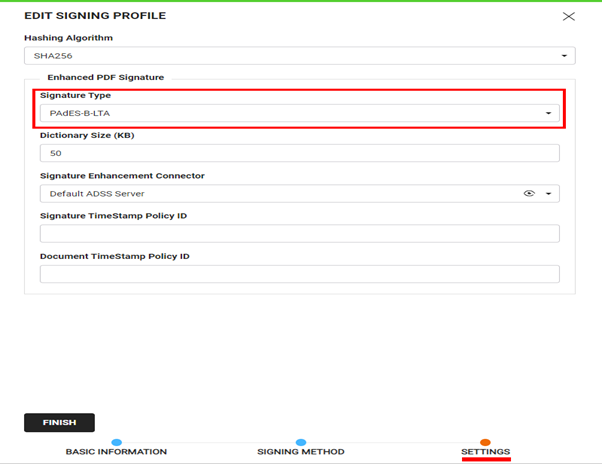
- SigningHub now produces Long Term Validation (LTV) signatures by default; this no longer requires any additional LTV configuration in ADSS Server Signing Profiles. However, to enhance signatures, the signature type (i.e. PAdES-B-LT or PAdES-B-LTA) configured under SigningHub Admin will be used as shown below.
Witness Signatures
New features in SigningHub 8.x.x
Another major change introduced in SigningHub 8.x.x is related to the Witness Signing Capacity and its management within the SigningHub web application.
In the previous versions of SigningHub, witness signatures were managed in Signing Profiles and a default alias was set within the ADSS Server, which was used for witness signatures. This same configuration has been aligned with the rest of the certificates in SigningHub 8.x.x. This configuration is now available in Certification Profiles instead of Signing Profiles.
In SigningHub 8.x.x, the installer will now automatically create new Certification Profiles against all existing witness signature profiles. The installer will also add the “_ESEAL” suffix at the end of the profile name for identification purposes. This will help the administrator to search and shortlist the Certification Profiles.
Manual Configuration
The following manual configuration steps are easy to follow if you have the previous version of SigningHub accessible on the localhost URLs:
- Take the Certification Profile name from the SigningHub 8.x.x instance and search the same name in the previous version of SigningHub’s Signing Profiles. Remember to leave out the “_ESEAL” term while searching on the older version as this term is added by the system installer to easily identify the profiles, which require manual configuration.
- Once you find the profile name in the previous version of SigningHub, copy this ADSS Signing Profile name/ID and search for this same ADSS profile name/ID in ADSS Server.
- Go to Ascertia ADSS Server -> Signing Service and select the corresponding ADSS Signing Profile and copy the Default Signing Certificate configured in this Signing Profile. (This default certificate is created under ADSS Server Key Manager. In Key Manager, go to Key Manager > Service Keys > Search to view the key alias that is configured for selected “Default Certificate Alias” and copied from the ADSS Signing Profile).
- Now paste the certificate alias in the SigningHub 8.x.x Certification Profile that you initially selected in the first step.
- Select the ADSS server from the drop-down list, where the certificate alias resides.
|
|
|
See the details on configuring certificate alias for all of three eSeal Levels of Assurance (as above) under Certification Profile as shown in the image below. The Certificate Alias parameter is the Default Signing Certificate, copied from ADSS Signing Profile.

- From SigningHub 8.x.x onwards, all users can upload XMLs using the SigningHub API. SigningHub will no longer need a separately configured XML Signing Profile to perform XML Signing. Instead, the Signing Profile configured for server-side signing will be used. The Enable XML Signing option has been removed from the Signing Profile.
- SigningHub now produces Long Term Validation (LTV) signatures by default; this no longer requires any additional LTV configurations in ADSS Server Signing Profiles. However, to enhance signatures the signature type (i.e. PAdES-B-LTor PAdES-B-LTA) configured under SigningHub Admin will be used as shown below.
Service Plans
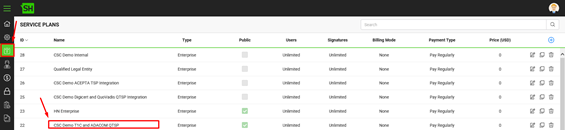
SigningHub 8.x.x has significant changes to Service Plan configurations. It is recommended to review the Service Plans for the below changes.
The following options are either completely removed from the Service Plan or their location has been changed on the UI/UX:
- Protect server-side signing keys with user password: This option has been removed from the Service Plan. It is now handled in the Certification Profile > Key Protection Option configuration.
- Push newly created certificates to ADSS CSP: This option has been moved to Service Plans > Singing Servers.
- Add witness signature to e-signatures: This option has been completely removed from the Service Plan configurations and Electronic Seal (eSeal) is now being used in its place for witness signatures.
- Remote Authorised Signing via ADSS Server SAM: This option has been moved to the Signing Profile.
- Signing Capacities: This option has been moved to Service Plan > signing servers.
- Default Signing Capacity: This option has been removed from the Service Plan configurations and is now only available under Enterprise Roles.
The following new options have been introduced:
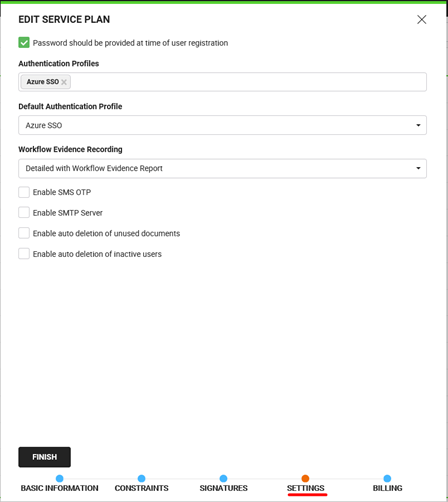
- Password should be provided at the time of user registration: If this option is enabled, then the user must set up a password while registering. This is necessary to be turned on if the Certification Profiles selected are configured with the key protection level of “user password”.
- More than one signing server can be configured that can be used to sign the document
- Signing Profiles are mapped to represent a signing server; administrators can add multiple Signing Profiles in a Service Plan ensuring that the recipients using the Service Plan will be able to use these servers to sign the document.
- Each Signing Profile is defined against a server; it can be a CSC protocol-based signing server or an ADSS server.
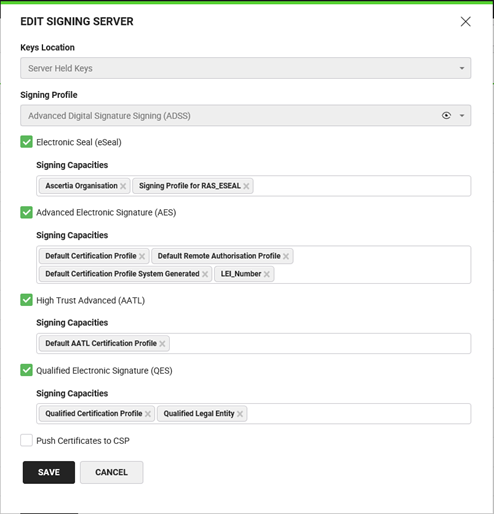
- For ADSS based signing servers, administrators can configure multiple capacities (Certification Profiles) based on the Level of Assurance that is needed by the end-users.
- All Levels of Assurance are now available by default under a new tab named “Documents” under Service Plan. Administrators have to manually remove the unnecessary level of assurances as per their needs.
- Signature Appearances Design is now available under Service Plan only. These are no more available under signing profiles.
|
|
|
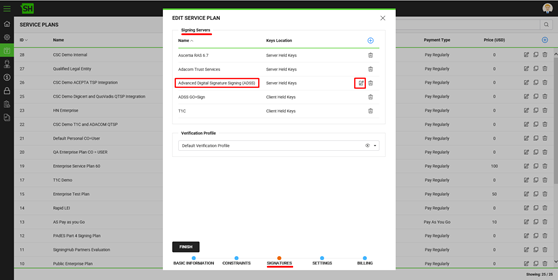
See the details on configuring a Service Plan after the upgrade. This configuration is in a sequence as highlighted in the images below.
Remote Authorisation
The Enable Remote Authorisation option previously associated with a Service Plan is now part of the Signing Profile to have all the signature types including RAS, XML, or Office Signatures available in one location.
The Signing Profile should be RAS enabled in the ADSS server.
|
|
|
Workflow Evidence Report Configuration
After upgrading to SigningHub 8.x.x, the Signing Server is no longer required to be selected separately for adding an invisible signature in the evidence report. The Signing Server and Signing Service Profile ID for ADSS Server have been replaced with a Signing Profile under the Workflow Evidence Report and Document Settings (Lock PDF Fields) in SigningHub Admin configurations.
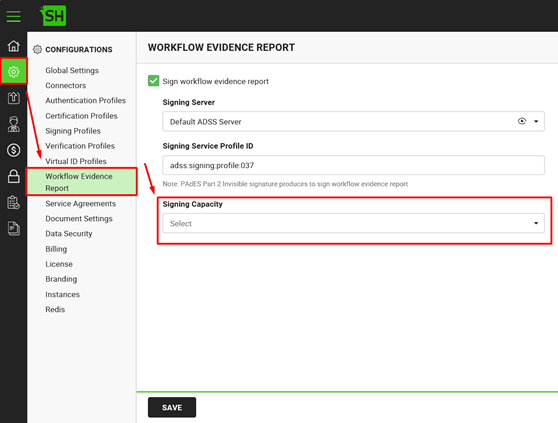
Workflow Evidence Reports can now be digitally signed using eSeals. A correctly configured eSeal signing capacity must be selected, to make the Workflow Evidence Report configurations workable.
Within SigningHub Admin, select “Configurations > Workflow Evidence Report”, set the Signing Capacity drop down to the eSeal certificate you would like the Workflow Evidence Report signed with, click save once the certificate has been selected.
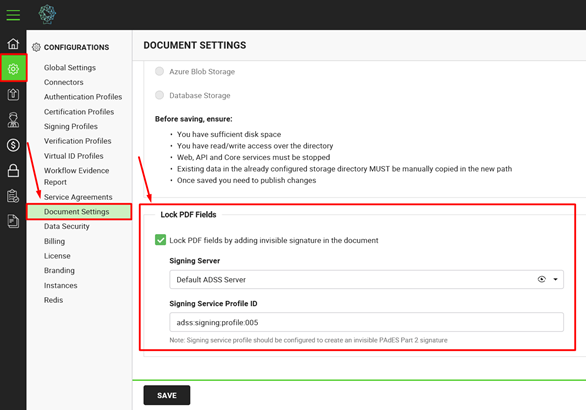
Configure Document Settings (Lock PDF Fields)
To add an invisible signature in a document to lock the PDF fields, the Signing server is no longer required to be selected separately, the signing server and signing service profile ID have now been replaced with a Signing Profile, where the selected Signing Profile will be used to obtain the signing server related information.
Below is an example of an existing configuration for the Document Settings (Lock PDF Fields), where the Signing Server and Signing Service Profile ID has to be provided.
See also