What's new in SigningHub 8.x.x
What’s new in SigningHub 8.x.x
Enterprise Roles
Enterprise administrators will encounter significantly different UI/UX, especially when creating and managing roles. The features of the Service Plan, as highlighted earlier in this document, can be controlled for the end-users by the enterprise administrators using roles. Login with an enterprise administrator account and go to Enterprise Settings to perform the configurations explained in the following sections.
New Feature in SigningHub 8.x.x
- Go to Enterprise Settings > Roles > Document Settings > Allowed Signature Fields. The Advanced Electronic Signature (AES) is set as the default Level of Assurance. If a document owner specifies a Level of Assurance other than Advanced Electronic Signature and it is not configured in the role, the end-user will not be able to sign that signature field. The selected level offers the assurance provided by the Certification Authority (CA) issuing the certificate against a particular Certification Profile.
|
|
|

Features Removed/Replaced
- Go to Enterprise Settings > Roles > Signature Appearance. Previously configured signature appearances will be set and PhontPhreaks will be set as the default. The Signature Appearance and Allowed Signature Fonts can be selected.
- Go to Enterprise Settings > Roles > Signature Settings:
- The Witness Signing Capacities and Default Witness Signing Capacity options have been removed from Enterprise Roles. Witness signing is now covered under the Electronic Seal (eSeal) Level of Assurance.
- The Default Signing Method has been removed; it is now dependent upon the signing capacity that is configured by the document owner requesting a signature from the recipient.
- All the Signing Capacities are now moved under Singing Servers, which are now categorised as per the Level of Assurance. The Default Signing Capacity is also available on the Signing Server.
- The authentication method is now applied based on the selected Signing Capacity. This can be configured under Certification Profiles in Admin configurations. There will be four major categories of Signing Capacities including:
- Electronic Signature (eSignature)
- Electronic Seal (eSeal)
- Advanced Electronic Seal (AdESeal)
- Qualified Electronic Seal (QESeal)
- Advanced Electronic Signature (AES)
- High Trust Advanced Signature (AATL)
- Qualified Electronic Signature (QES)
The authentication method will depend on the signing capacity. For instance, Signing Capacities selected for Remote Authorisation will have the authentication method set to "Authorisation via Mobile App" and cannot be updated.
- The OTP via SMS option will only appear under the authentication method if the OTP has been enabled in the Service Plan previously, otherwise, it needs to be configured under the Service Plan. OTP via SMS is no longer available under Primary authentication and it can now only be used as a secondary authentication method. It is not possible to set "No Authentication" as a primary Authentication Method and "OTP vis SMS" as a Secondary Authentication to only use OTP authentication.
- Options for web browsers and mobile apps are no longer available. The signing server settings will reflect these components.
Personal Settings
Users will also see new options available in their personal settings.
New Features in SigningHub 8.x.x
Default Level of Assurance is the new option that can have two different cases:
- For Enterprise users:
- If “Electronic and Digital Signatures” were allowed before the upgrade (i.e. 778x), then the “eSeal” and “AES” will be allowed under personal settings where eSeal will be set as the default Level of Assurance.
- If only “Electronic Signature” was allowed before the upgrade (i.e. 778x), then the “eSeal” will be allowed under personal settings and set as the default Level of Assurance.
- If only “If Only “Digital Signature” was allowed before the upgrade (i.e. 778x), then the “AES” will be allowed under personal settings and also set as the default Level of Assurance.
- If “Electronic and Digital Signatures” both were not allowed before the upgrade (i.e. 778x), then the “eSeal” will be allowed under personal settings and set as default Level of Assurance.
- For Individual users:
- All the Levels of Assurance will be allowed (configured under SigningHub Admin), and “Electronic Signature” will be set as a default under personal settings.
|
|
|
Features Removed/Replaced
Go to Personal Settings > Signature Details. Signing Methods for web browsers and Mobile Apps are no longer available and are now applicable as per the signing server configurations.
Document Owner View: Document in Draft Mode
As a document owner, when a user drops a signature field on the document the field will have the same Level of Assurance as it’s set in the user’s personal settings. You can change or add further assurance levels that will be allowed to a recipient to sign with. Click  Manage Recipients in the signature field and select these from the available list.

Document Recipient View: Document in Pending Mode
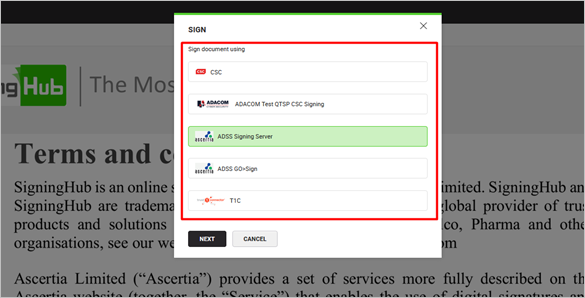
Once a document is shared with the recipient, the recipient will be able to sign the document with only those certificates whose Level of Assurance matches with the configured Level of Assurance in the signature field. The Signing Server options will appear as configured in the recipient’s Service Plan and Enterprise Roles settings.
Signing Capacities will appear for the user as per the Level of Assurance set by the document owner. Selecting the Singing Server will display all the singing servers including Servers and Client Held Keys.
After selecting a signing server, the next window will display the Singing Capacity.
These are categorised based on the Level of Assurance.
- Select the required Signing Capacity from the list.

- Click on the SIGN NOW button to sign a document and complete the Workflow.
An authentication window may appear if it was set against your selected signing capacity.
Summary
Once SigningHub is upgraded to version 8.x.x and all required configurations have been performed, a signing Workflow can be executed.
A document owner will create a new Workflow, upload the document to be signed, and then add a signature by assigning the Level of Assurance according to the Enterprise Role configured under Document Settings.
The document recipient can sign the document by selecting a Signing Server from the multiple servers available. The recipient will also choose a Signing Capacity based on the assigned Level of Assurance and is subject to the Service Plan/Enterprise Role of the recipient. The Workflow concludes once a document is signed.
The document owner can use the Workflow History to view the Signing Capacity and Level of Assurance that were selected while signing a document.
Frequently Asked Questions
How to reconfigure RAS after upgrade from 778x to 8.x.x?
The Enable Remote Authorisation option previously associated with a Service Plan is now part of the Signing Profile to have all the signature types including RAS, XML, or Office Signatures available in one location.
Signing Profile should be RAS The enabled in ADSS server.
- Previously configured Remote Authorisation Signing (RAS) configurations will not work until a System administrator has reconfigured the profiles. Now a new Certification Profile has to be configured using “Remote Authorisation” as a “Key Protection Option” and “QES” as a “Level of Assurance”. There must be a new Signing Profile that has to be configured for RAS. Set this newly created certification and Signing Profiles under the intended Service Plan.
- With the deprecation of Virtual Profiles, previously generated user certificates for Remote Authorisation Signing (RAS) will be converted to Custom Signing Certificates, so the users can use their already generated certificates for Remote Authorisation Signing. Previously configured Virtual ID profile name will be set as the Certificate Friendly Name in the database.
How will the “Witness Signatures” feature work once it’s upgraded to SigningHub 8.x.x?
- In the previous versions of SigningHub, witness signatures were managed in Signing Profiles and a default alias was set within the ADSS Server, which was used for witness signatures. This same configuration has been aligned with the rest of the certificates in SigningHub v8.x.x. These configurations are now available in Certification Profiles instead of Signing Profiles.
- In SigningHub 8.x.x the installer will now automatically create new Certification Profiles against all existing witness signature profiles. The installer will also add the “_ESEAL” postfix at the end of the profile name for identification purposes. This will help the administrator to search and shortlist the Certification Profiles.
Here are the steps to manually reconfigure eSeal that replaced Witness Signatures, which are easy to if you have the previous version of SigningHub accessible on the localhost URLs:
- Take the Certification Profile name from the SigningHub 8.x.x instance and search the same name in the previous version of SigningHub’s Signing Profiles. Remember to leave out the “_ESEAL” term while searching on the old version as this term is added by the system installer to easily identify the profiles, which require manual configuration.
- Once you find the profile name in the previous version of SigningHub, copy this ADSS Signing Profile name/ID and search for this same ADSS profile name/ID in ADSS Server.
- Go to Ascertia ADSS Server -> Signing Service and select the corresponding ADSS Signing Profile and copy the default certificate configured in this Signing Profile.
- This default certificate is created under ADSS Server Key Manager. In Key Manager, go to Service Keys > Search to view the key alias that was copied from the ADSS Signing Profile. Click on the key alias and copy the value of the certificate alias.
- Now paste the certificate alias in the SigningHub 8.x.x Certification Profile that you initially selected in the first step.
|
|
|
Which Levels of Assurance will be available for an individual user?
For Individual Users, all the Levels of Assurance will be allowed under personal settings (that are configured under SigningHub Admin), and “Electronic Signature (eSignature)” will be set as a default under personal settings.
To make the witness signatures workable for the individual users, the system admin has to remove Electronic Signature (eSignature) and allow Electronic Seal (eSeal) under the user’s Service Plan.
How to set up Signature Appearance Designs for an individual user?
For an individual user, all the signature appearances will be available. The System Admin needs to remove those signature appearances from the Service Plan, which are not required for the individual users.
|
|
|