How to Obtain the Dropbox Integration Key
A Dropbox connector can be configured in SigningHub Admin by providing two integration keys, i.e. App key and App secret.
https://docs.pingidentity.com/bundle/dropboxConn20_sm_quickConnect/page/dropboxConn_t_obtainAppKeySecretFromDropbox.html
Obtain the Dropbox Integration Key
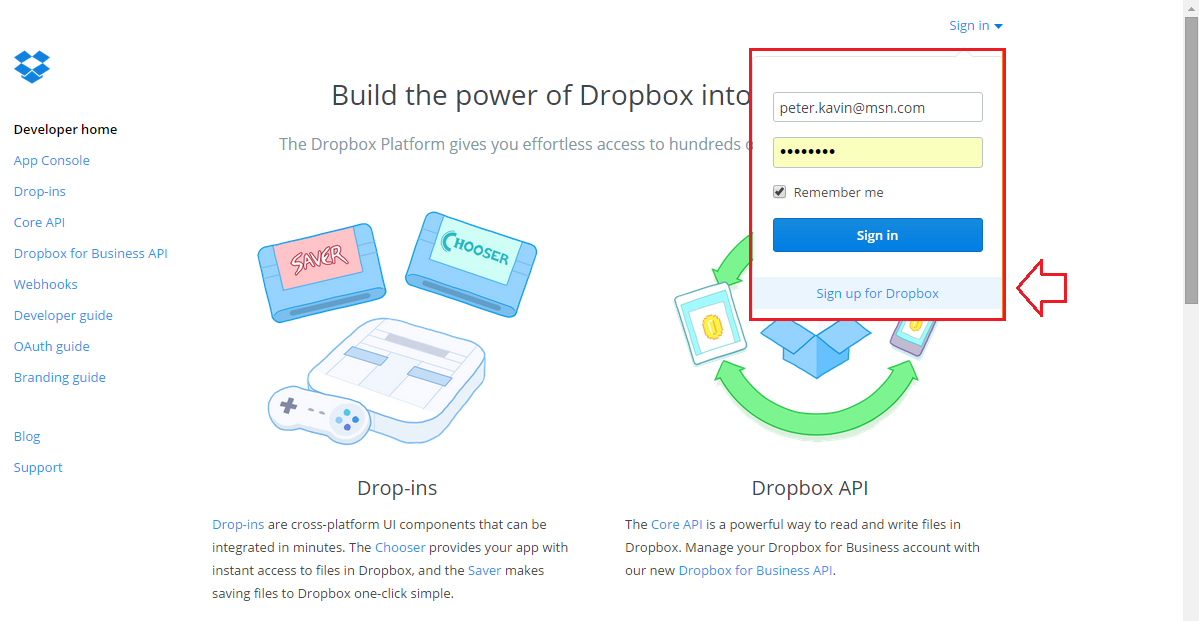
- Browse https://www.dropbox.com/developers to open the Dropbox developer console.
- Log into your Dropbox account.
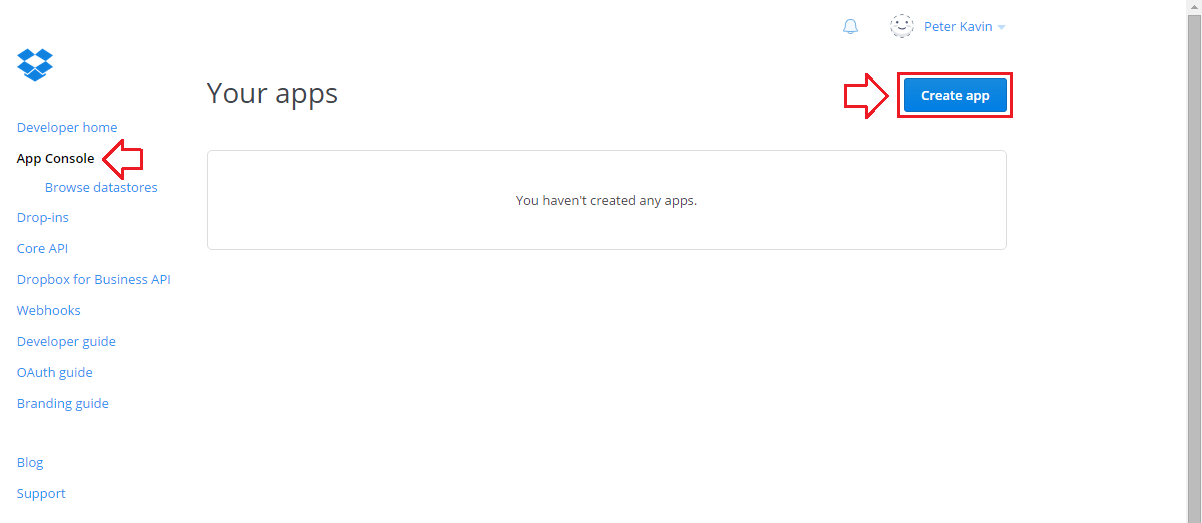
- Click the "App Console" option from the left menu, and then click the "Create app" button.
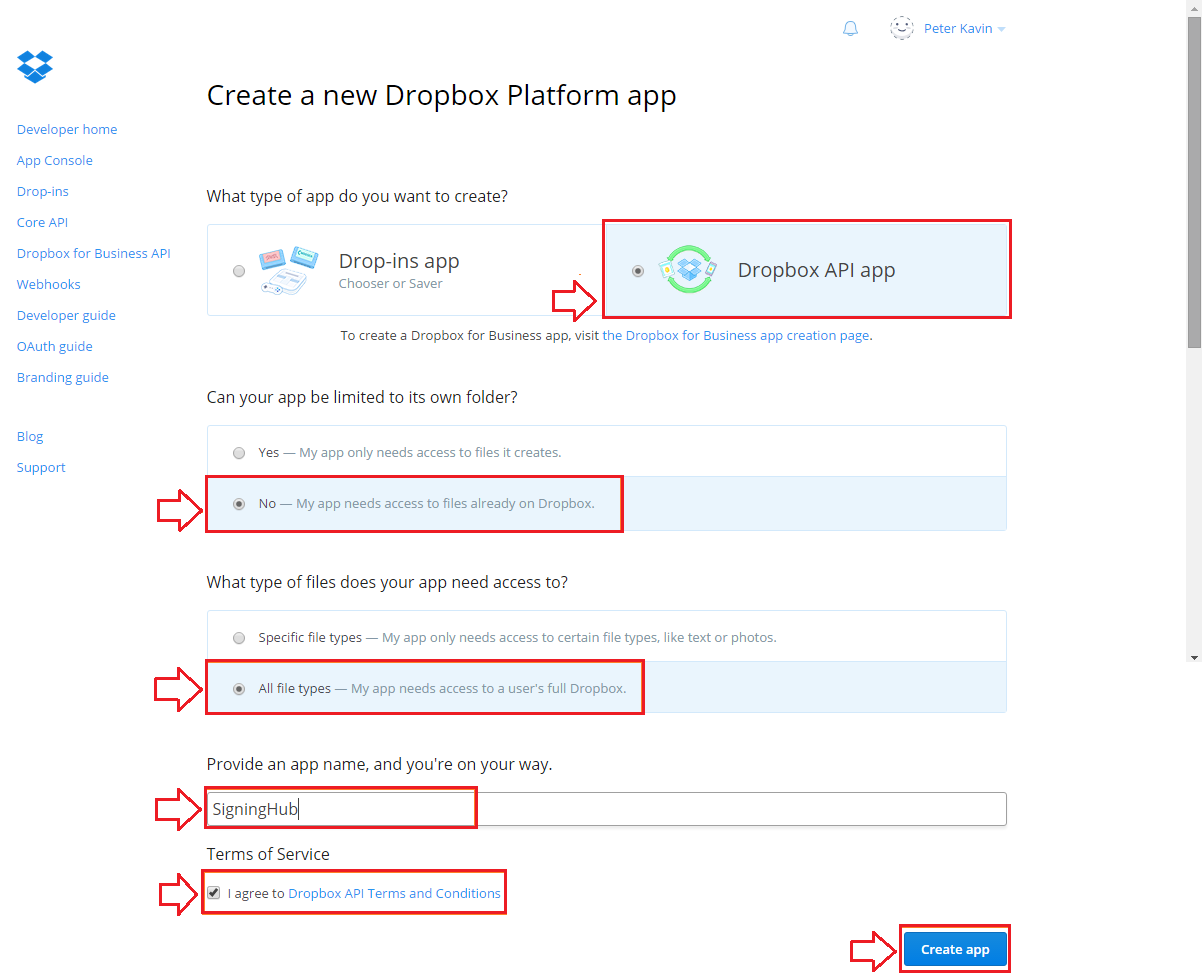
- Select the "Dropbox API app" option, then select the "No - My app needs access to files already on Dropbox." option, and then select the "All file types - My app needs access to a user's full Dropbox." option from the respective preferences. Specify your app name, i.e. SigningHub, agree to Dropbox API terms and conditions, and click the "Create app" button.
- A new Dropbox API app will be created with the specified name. The App key and App secret of newly created app are shown on the screen. Add these values in your Dropbox Connector.
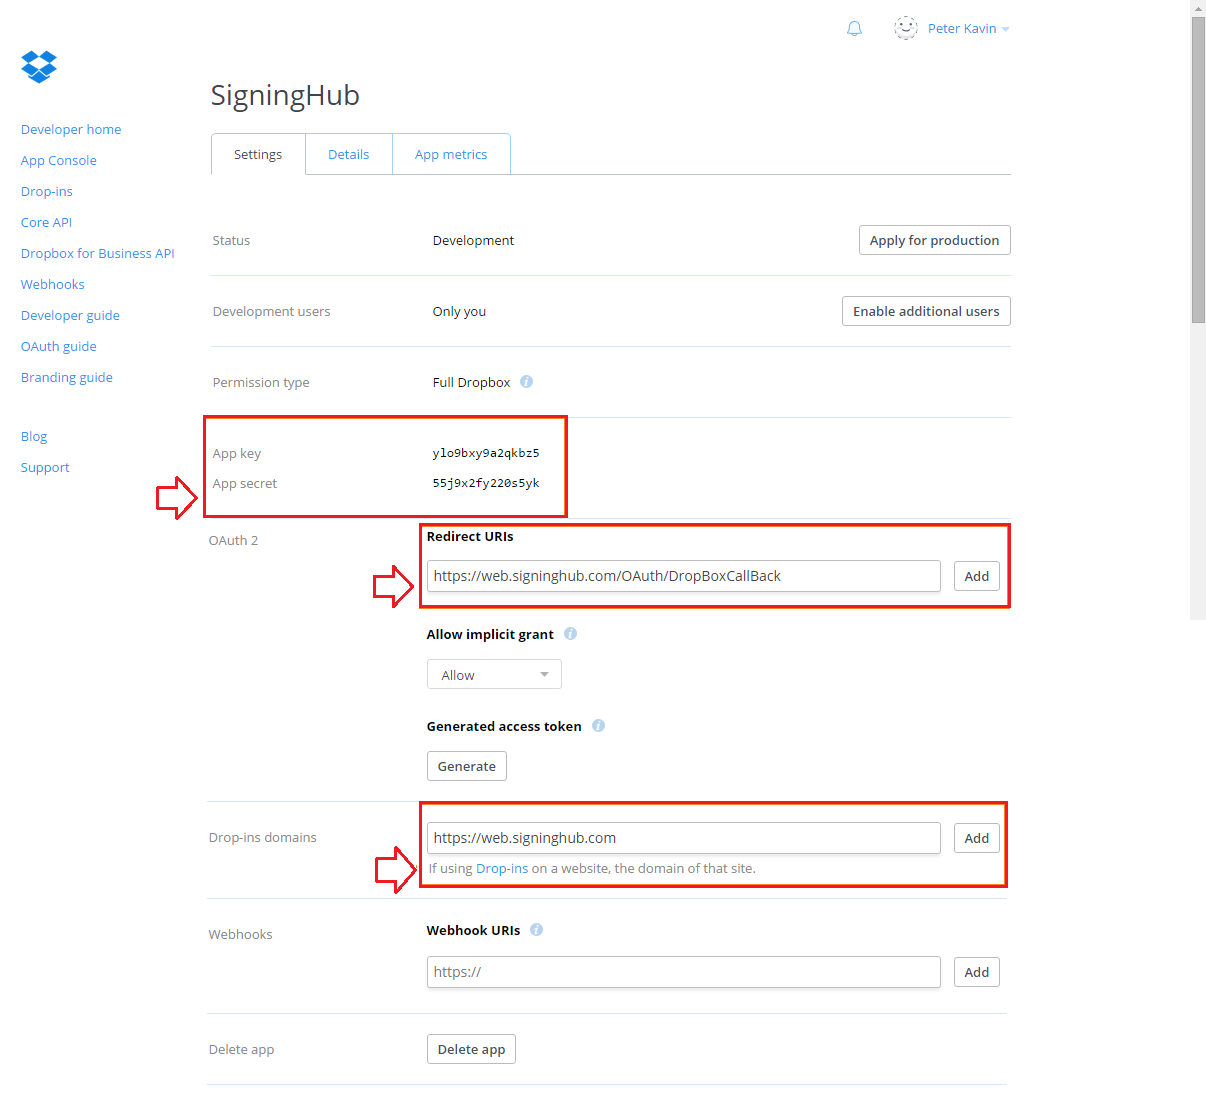
- The "Redirect URIs" field is used to push the documents from your SigningHub site to Dropbox. Specify the callback URL of your SigningHub site and click the "Add" button.
|
|
|
Create a Dropbox connector
- Access the SigningHub Admin portal.
- Click the "Configurations"section from the left menu.
- Click the "Connectors" tab. The "Connectors" screen will appear.
- Click
 from the grid header.
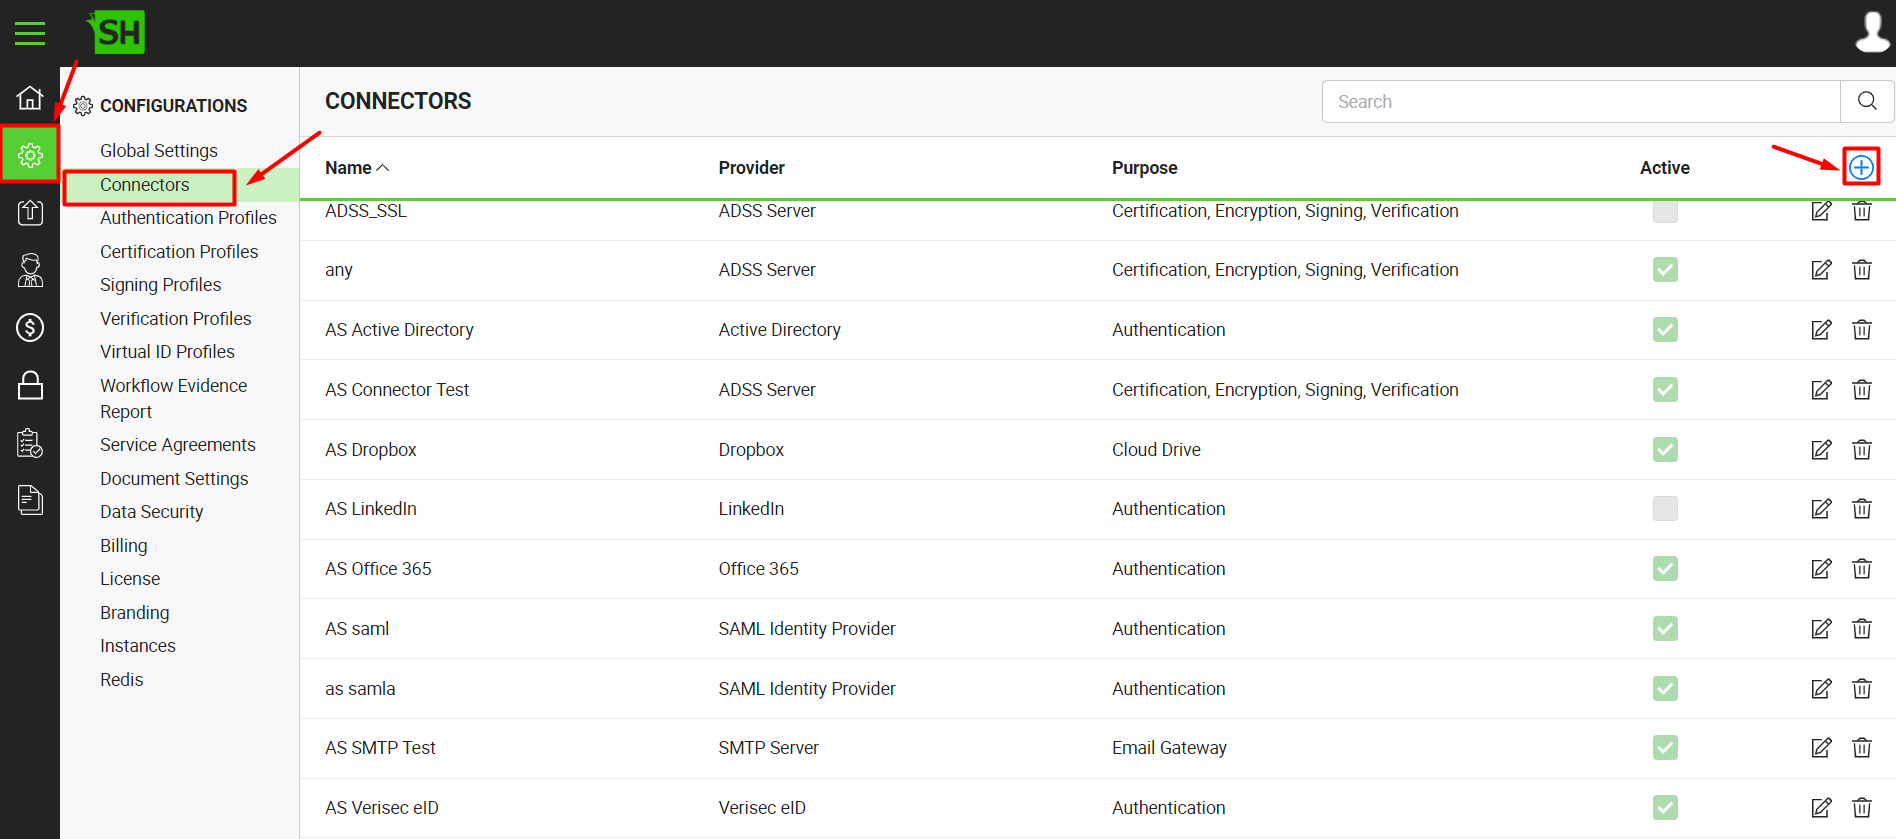
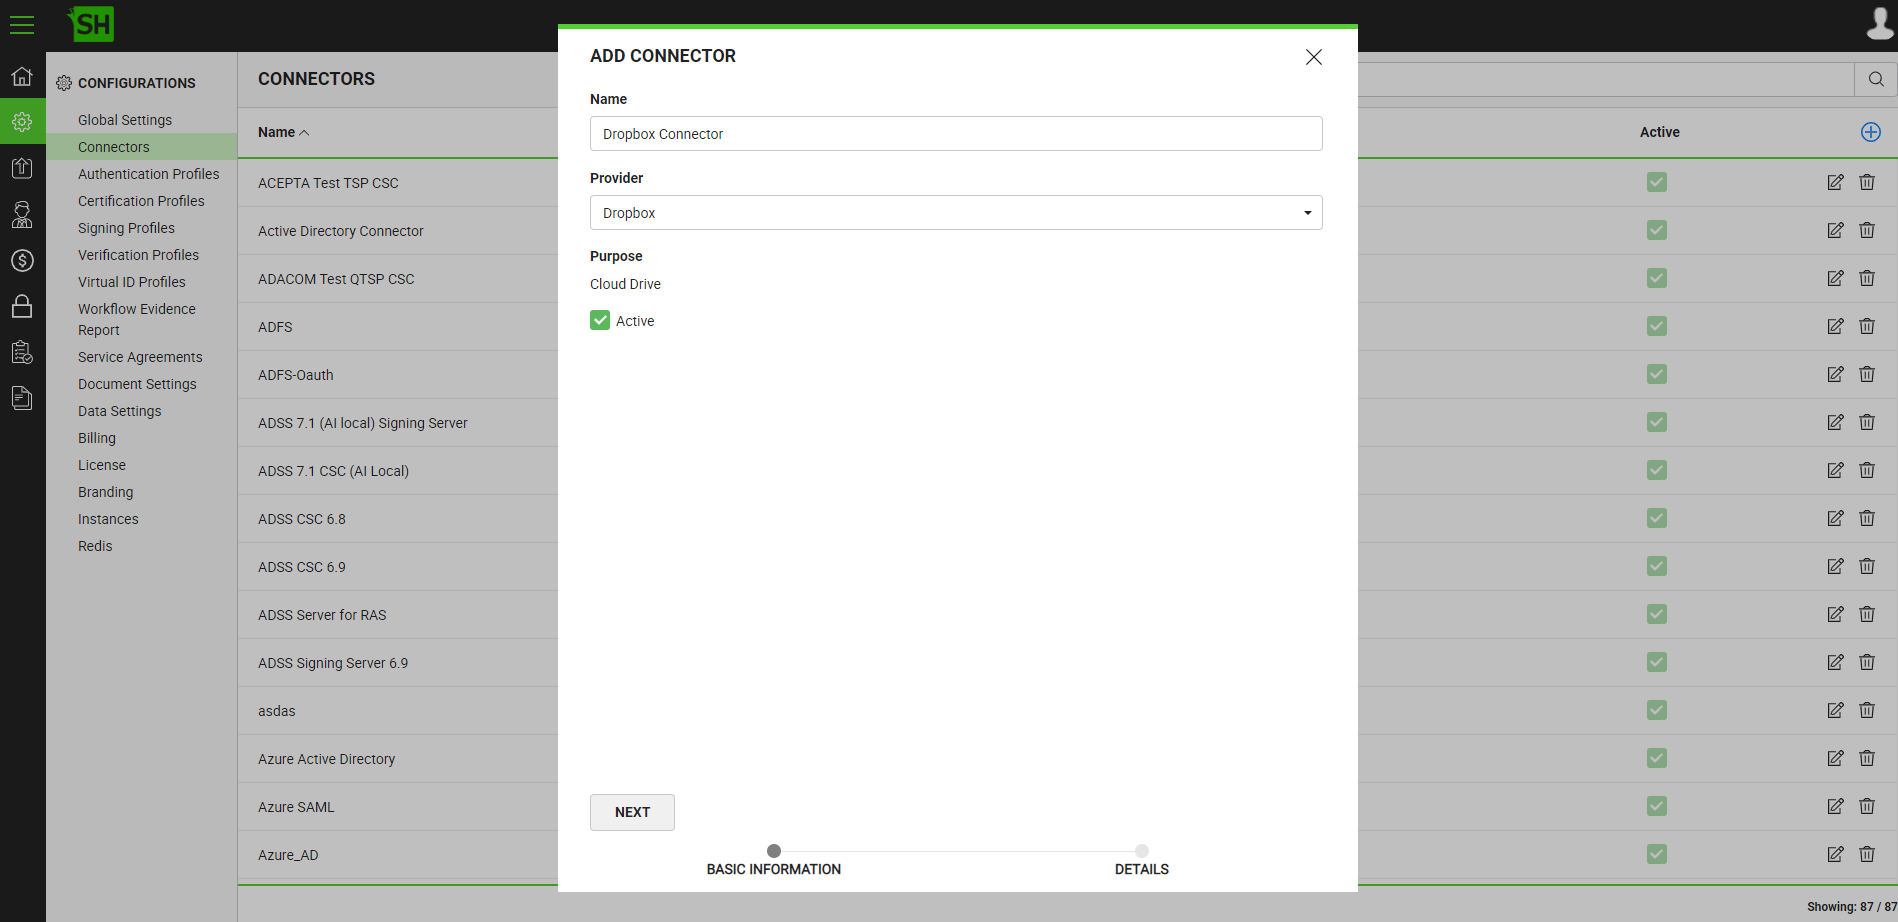
- A dialog will appear to add the connector details. The connector dialog is comprised of two screens, i.e. Basic Information and Details. Specify the basic information and click the "Next" button to provide the respective connector details. See the below table for fields description.
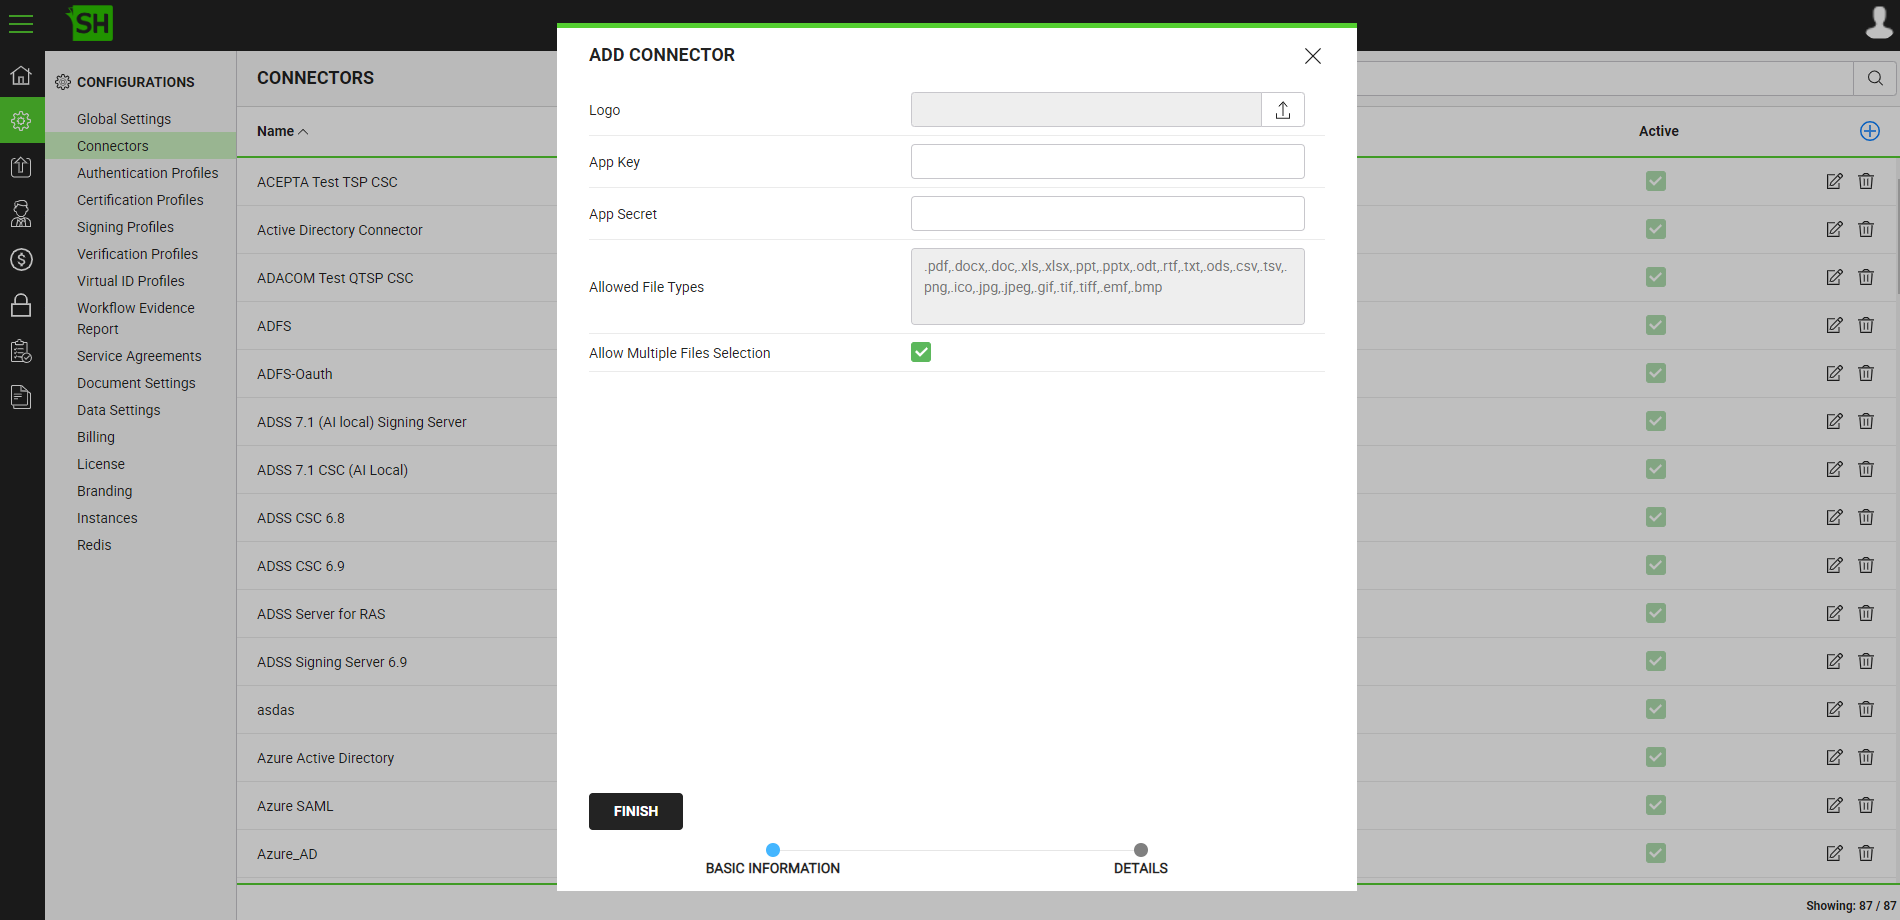
- Click the "Finish" button. A new connector will be saved and displayed in the list.
|
Basic Information |
|
|
Fields |
Description |
|
Name |
Specify a unique name for this connector, i.e. My Dropbox. This connector will be used in the configuration of Global Settings. |
|
Provider |
Select the provider for this connector, i.e. "Dropbox". |
|
Purpose |
This field will display the purpose of the selected provider above, i.e. the purpose of "Dropbox" is "Cloud Drive". |
|
Active |
Tick this check box to make this connector active. Inactive connectors cannot be configured in the Global Settings. |
|
Details |
|
|
Fields |
Description |
|
Logo |
Select an appropriate image in the jpeg, jpg, gif or png format for the connector's logo that will be displayed on the login screen. |
|
App Key |
Specify the registered app ID that has been provided by Dropbox to connect to the Dropbox server, e.g. "94zt9tmbyeedsxh". See details as how to get the App Key. |
|
App Secret |
Specify the registered app secret that has been provided by Dropbox to connect to the Dropbox server, e.g. "92yeroxz1kbg3dls".See details as how to get the App Secret. |
|
Allow Multiple Files Selection |
Tick this check box to enable the end users to import multiple files from Dropbox. |
Configure the Dropbox Connector as Default in the SigningHub Global Settings
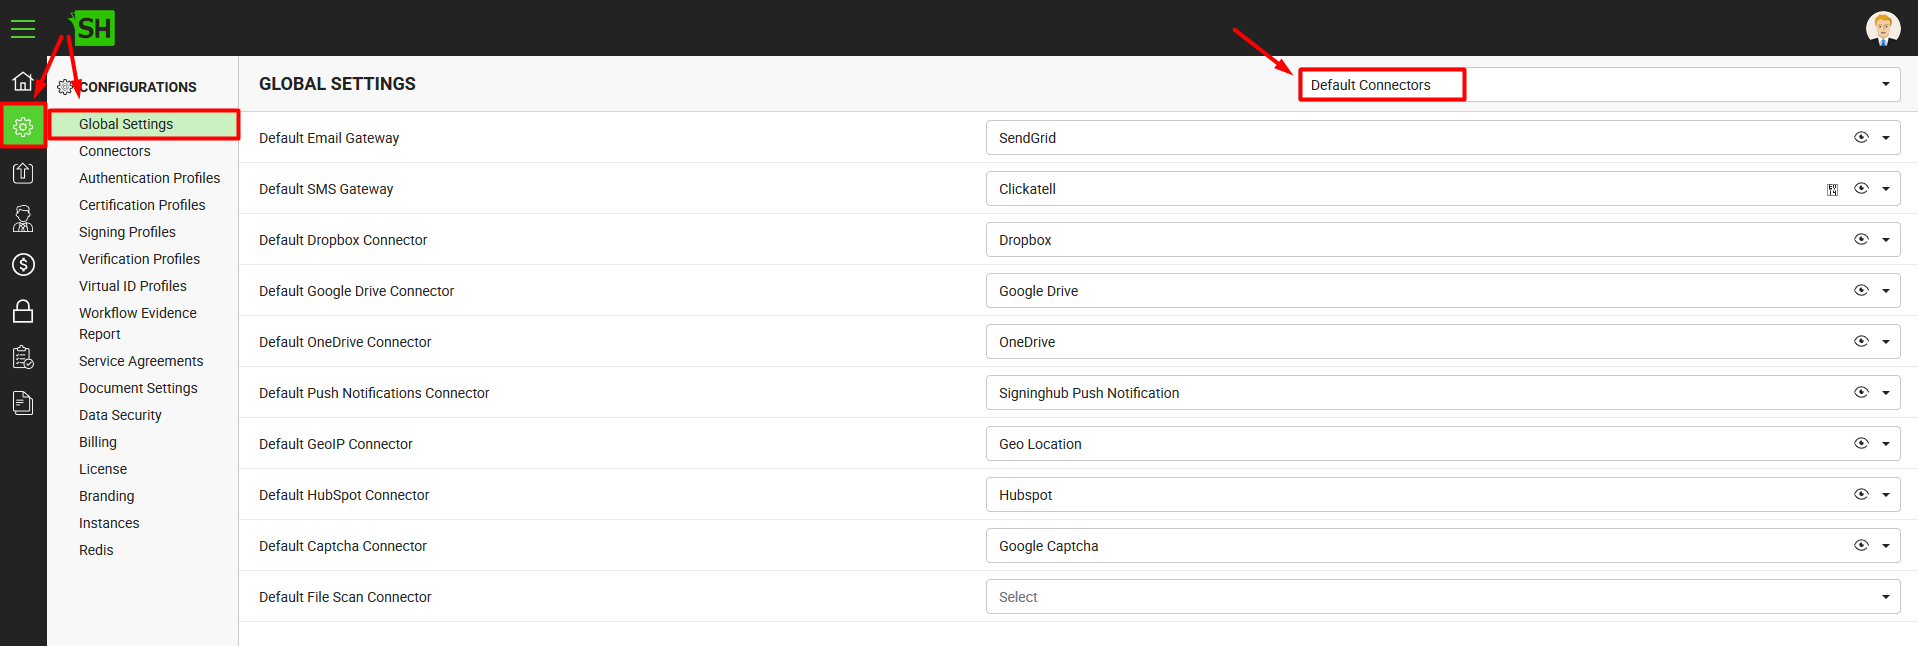
- Click the "Configurations" option from the left menu.
- Click the "Global Settings" option.
- Global Settings will appear, select the "Default Connectors" option from the top right drop down.
- Configure these settings as required and click the "Save" button from the screen bottom.
- Select the default Dropbox connector for SigningHub Desktop Web. The selected connector will be used to pull the Dropbox content (documents) directly into SigningHub Desktop Web. The Dropbox connectors are managed through the connectors section, see details.
Enable your cloud drives
- Access the SigningHub Web portal.
- Click your profile drop down menu (available at the top right corner).
- Click the "My Settings" option.
- Click the "Cloud Drives" option from the left menu.
- Click the "Enable" option against the Dropbox cloud drive.
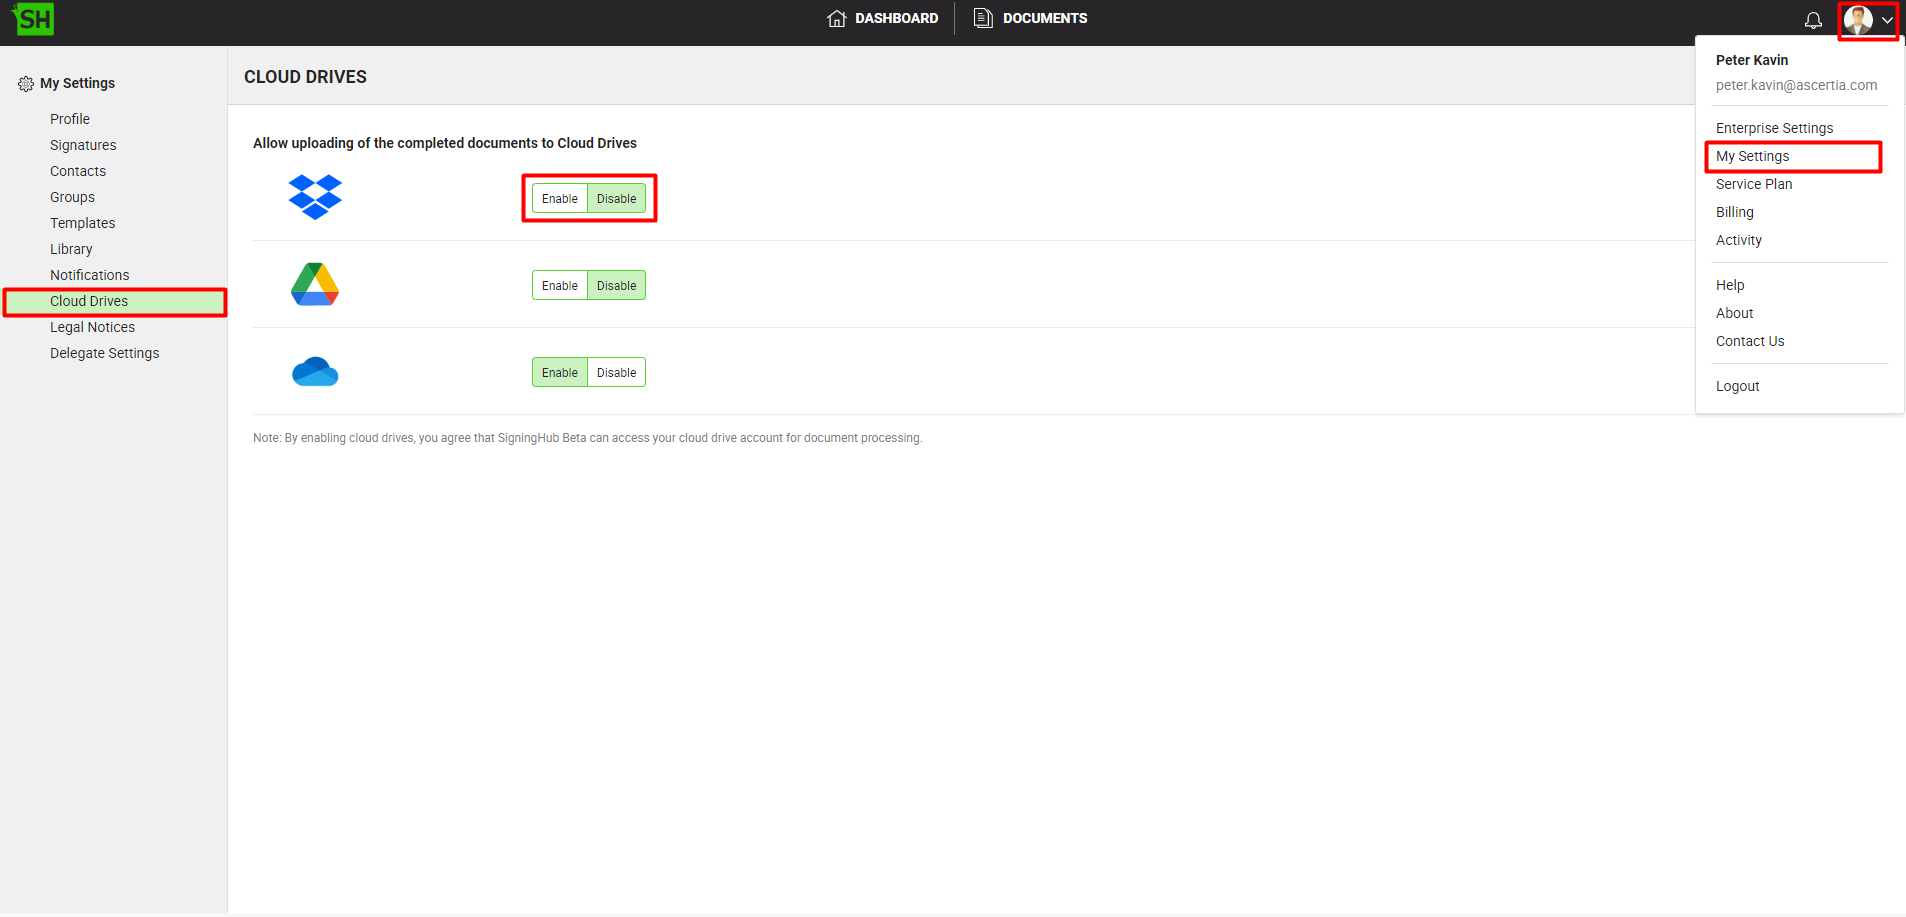
- A pop-up will appear asking for the authentication of the Dropbox cloud drive. Provide your credentials and click Login.
- Upon successful authentication, the cloud drive will be enabled, and will start appearing in the Post Processing screens.
- To pull document from Dropbox, go to “Start New Workflow” and click on the Dropbox icon to upload document.
- Document will be pushed to the Dropbox account (if post processing was set during workflow) that has been configured, once a workflow will be completed.
See Also
- How to Obtain the Azure AD Integration Key
- How to Obtain the Office 365 Integration Key
- How to Obtain a Salesforce Consumer Key
- How to Obtain the Google Drive Integration Key
- How to Obtain the OneDrive Integration Key
- How to Obtain the HubSpot Integration Key

