To create a new Service Plan:
- Choose the "Service Plans" option from the left menu. The "Service Plans" screen will appear.
- Click on the add icon
 in the grid header.
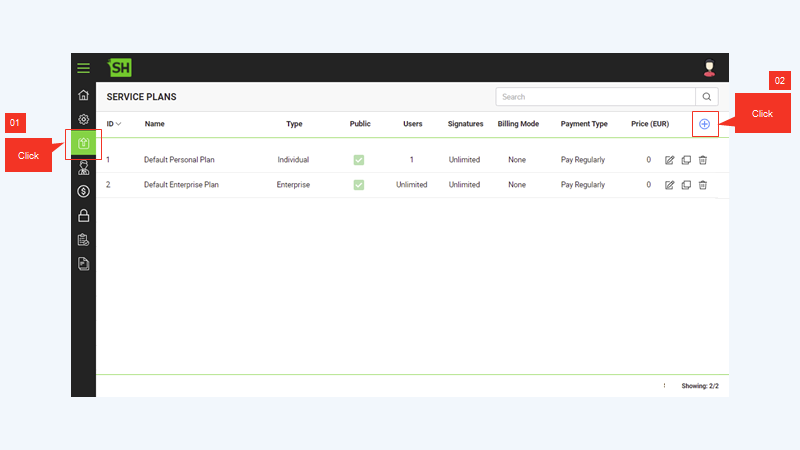
- A dialog wizard (consisting of 6 sequential screens, i.e. Basic Information, Constraints, Documents, Signatures, Settings and Billing) will appear which you will use to configure the service plan details. The availability of "Billing" dialog box is based on your license, if you are unable to find it, contact support for assistance.
- Enter the required details in each screen accordingly and click the "Next" button. Click the "Finish" button in the last dialog box (i.e. Billing). A new service plan will be created and displayed in the list. See the following table for the description of the fields.
The following sections separately explain the "Basic Information", "Constraints", "Signatures", "Settings" and "Billing" tabs on the Add Service Plan dialog.
Basic Information
The following image illustrates the default view of the "Basic Information" tab on the Add Service Plan dialog.
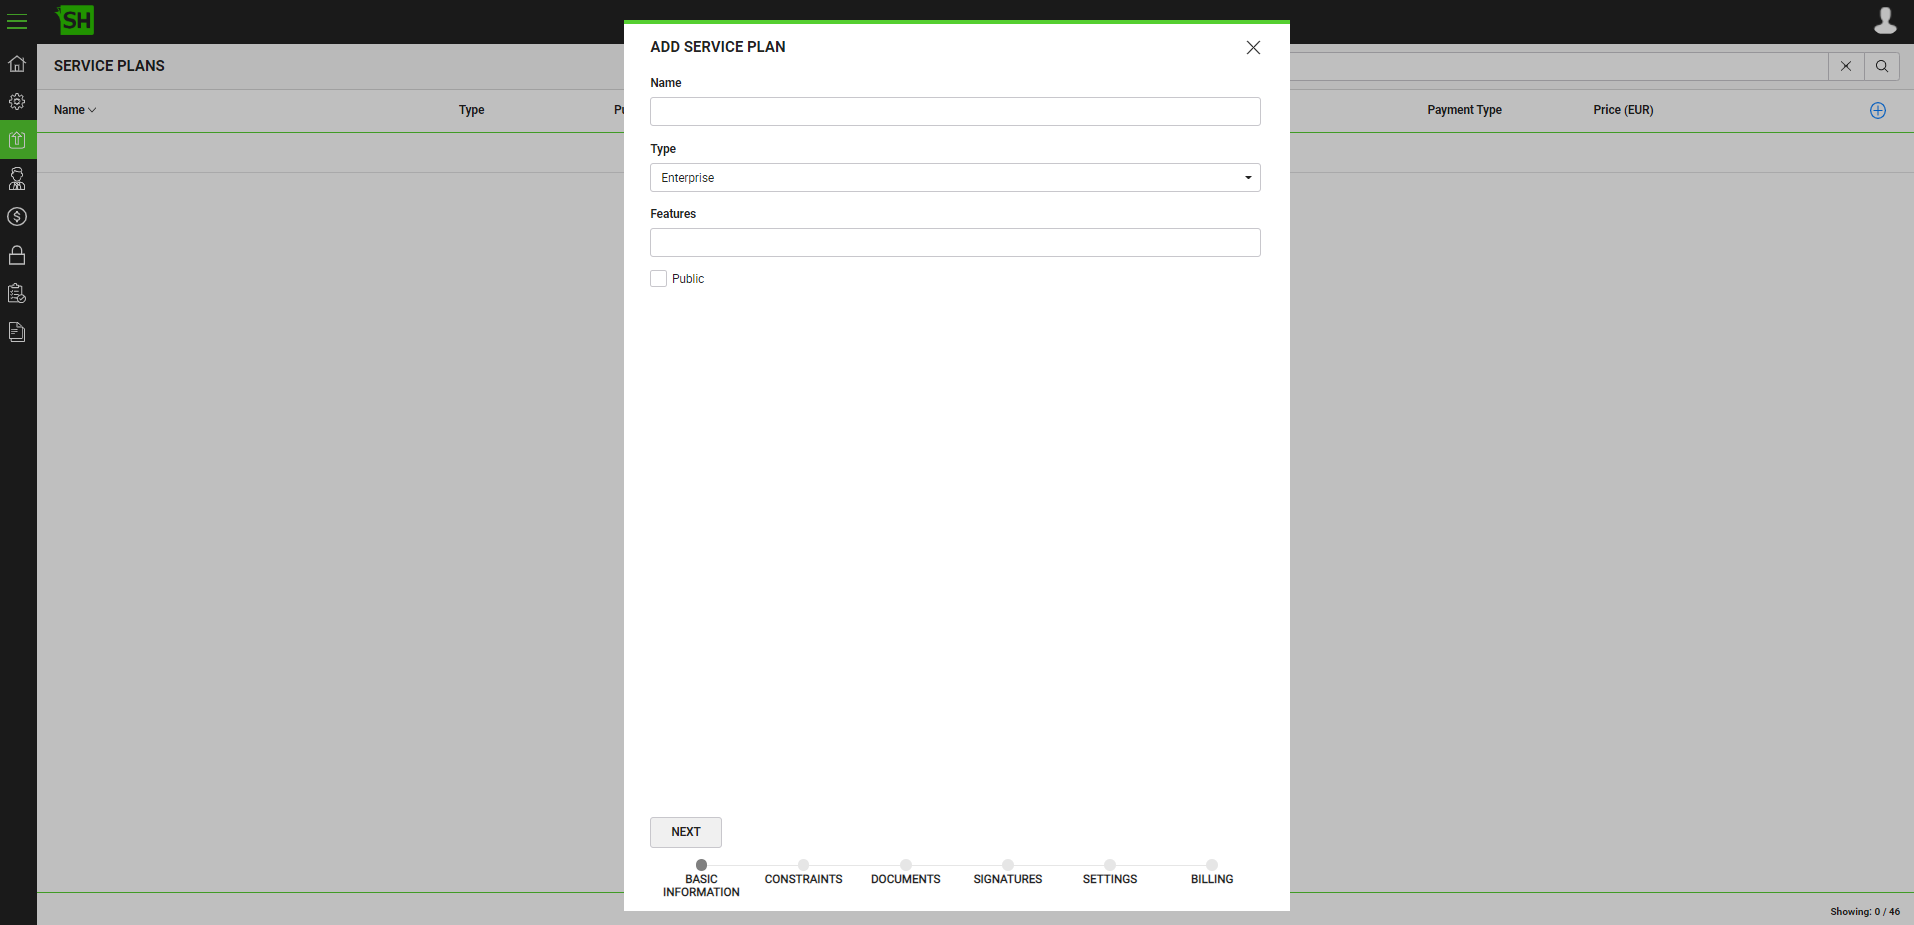
The following table illustrates the fields and definitions of the "Basic Information" tab on the Add Service Plan dialog.
|
Basic Information tab
|
|
Fields
|
Description
|
|
Name
|
Specify a unique name for this service plan, e.g. My Service Plan.
|
|
Type
|
Select whether this service plan is for "Individual" or "Enterprise" based subscriptions. An individual subscription is acquired by an individual entity, while an enterprise subscription can be acquired by an organization or any group of people (team).
|
|
Features
|
Select the SigningHub services/ features to include in this service plan, i.e. Attachments, Bulk Signing, Form Fields, Initials, In-person Signing, Workflow Completion Report, Reviewers, Integrations, and Cloud Drives. Consult SigningHub Web Help for the relevant descriptions of these features.
|
|
Public
|
Tick this check box to make this service plan available for public access or keep it unticked to make it a private service plan. The public service plans are created for cloud based deployments, while private service plans are created for on-premises deployments.
|
|
Next
|
Click to move to the "Constraints" tab.
|
Constraints
The following image illustrates the default view of the "Constraints" tab on the Add Service Plan dialog.
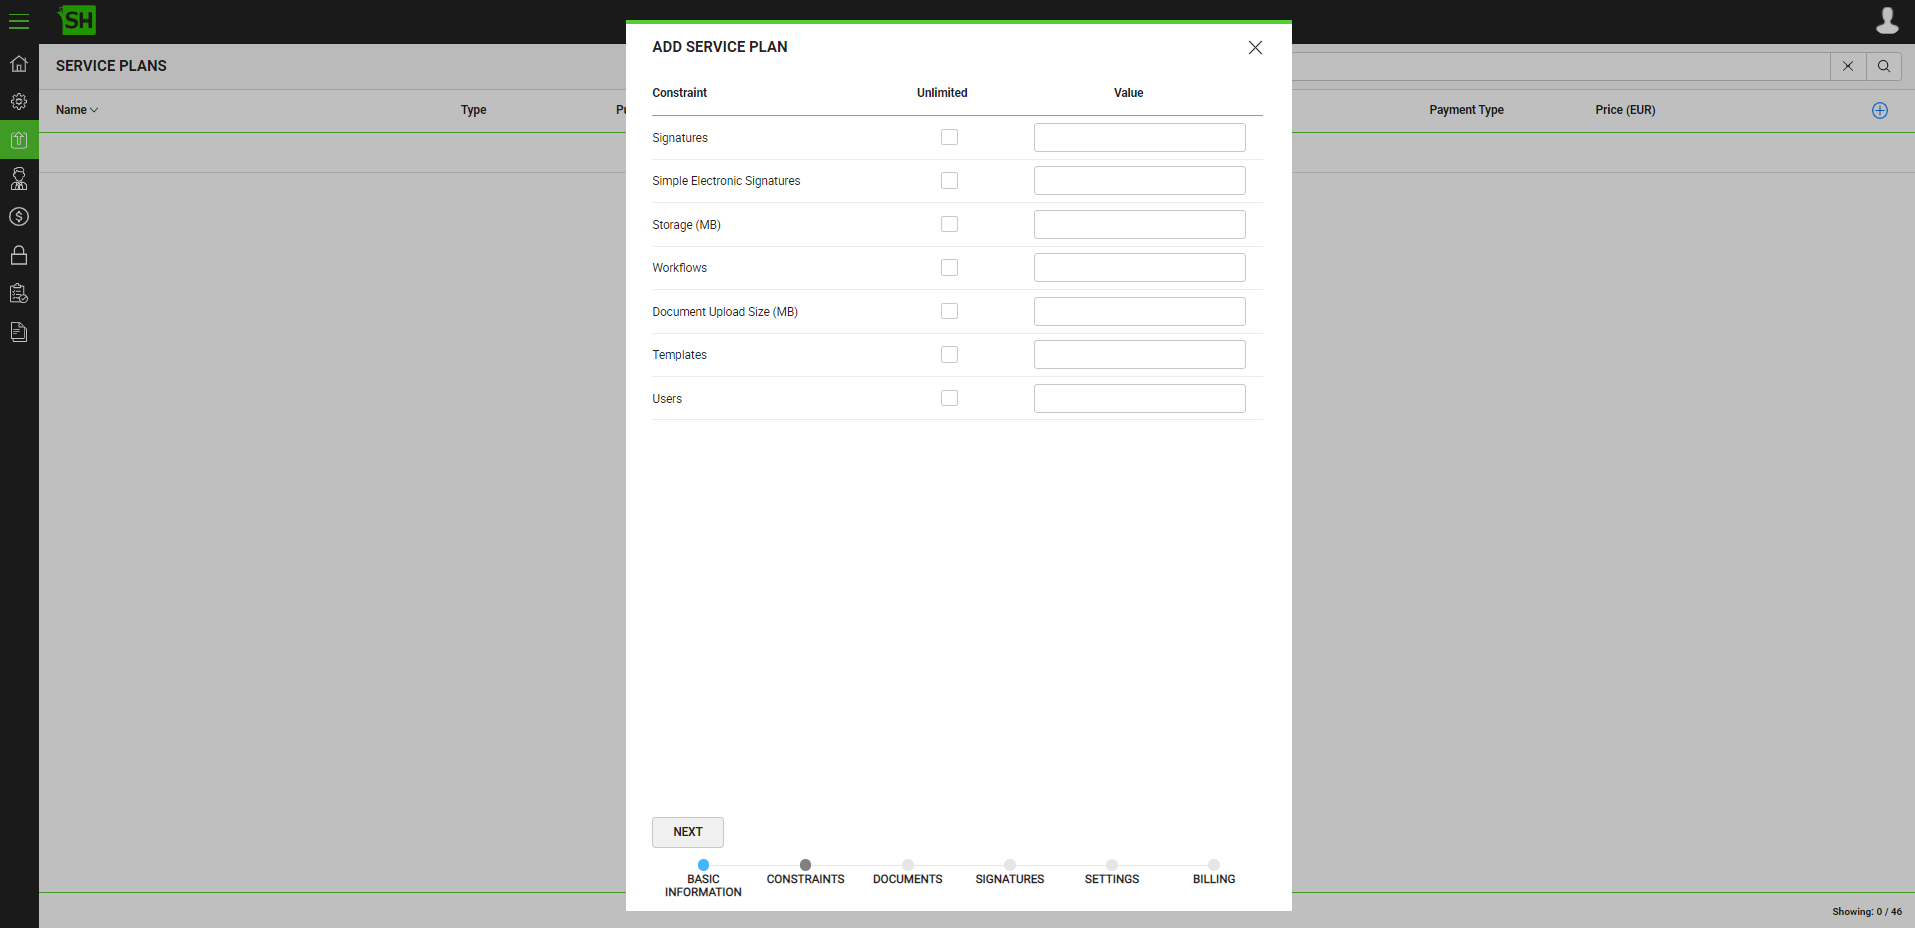
The following table illustrates the fields and definitions of the "Constraints" tab on the Add Service Plan dialog.
|
Constraints tab
|
|
Fields
|
Description
|
|
Signatures
|
Specify the number of signatures allowed for this service plan. Or select the adjacent "Unlimited" check box to remove this constraint and allow unlimited number of signatures for the subscribers.
|

|
- Signatures specify digital signatures (PKI signatures) performed using all level of assurance except Simple Electronic Signature (eSignature) if "SIMPLE_ELECTRONIC_SIGNATURES" module is enabled in the license. If "SIMPLE_ELECTRONIC_SIGNATURES" module is disabled in the license then the system will work as of today and specify signatures (PKI or Non-PKI) performed using any level of assurance.
|
|
|
Simple Electronic Signatures
|
Specify the number of Non-PKI signatures that are Simple Electronic Signatures (eSignature) allowed for this service plan. Or select the adjacent "Unlimited" check box to remove this constraint and allow unlimited number of simple electronic signatures for the subscribers.
|
|
- "Simple Electronic Signatures" constraint option will only be displayed, if the "SIMPLE_ELECTRONIC_SIGNATURES" module is enabled in the license.
|
|
|
Storage (MB)
|
Specify the document storage limit (in MBs) allowed for this service plan. Or select the adjacent "Unlimited" check box to remove this constraint and allow unlimited document storage capacity for the subscribers.
|
|
Workflows
|
Specify the number of workflows allowed in this service plan. Or select the adjacent "Unlimited" check box to remove this constraint and allow unlimited number of workflows for the subscribers.
|
|
Document Upload Size (MB)
|
Specify the document upload limit (in MBs) allowed in this service plan. Or select the adjacent "Unlimited" check box to remove this constraint and allow unlimited document uploading size for the subscribers.
|
|
Templates
|
Specify the number of document templates allowed in this service plan. Or select the adjacent "Unlimited" check box to remove this constraint and allow unlimited number of document templates for the subscribers.
|
|
Users
|
Specify the number of enterprise users for an enterprise account, allowed in this service plan. Or select the adjacent "Unlimited" check box to remove this constraint and allow unlimited number of enterprise users for the subscribers. This field will be visible when the type of service plan is "Enterprise".
|
|
Next
|
Click to move to the "Signatures" tab.
|
Documents
The following image illustrates the default view of the "Documents" tab on the Add Service Plan dialog.
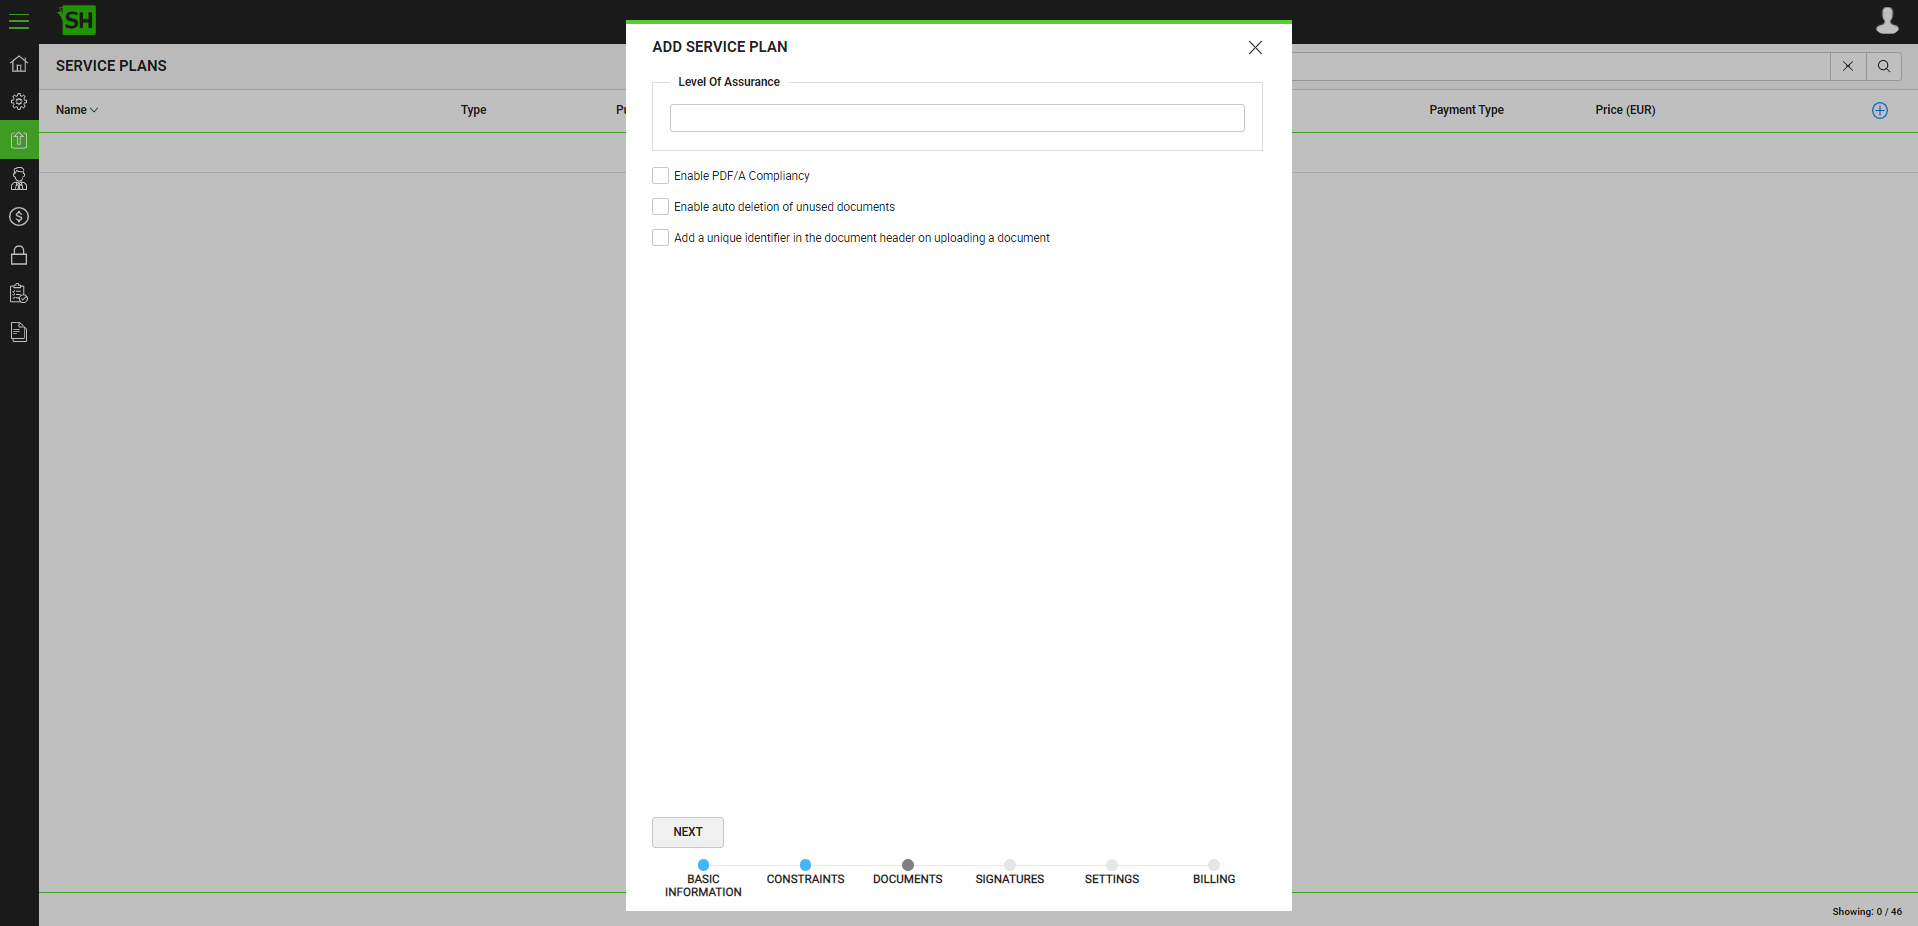
The following table illustrates the fields and definitions of the "Documents" tab on the Add Service Plan dialog.
|
Documents tab
|
|
Fields
|
Description
|
|
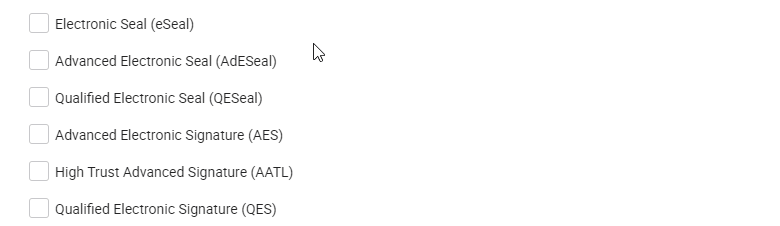
Level of Assurance
|
Select the levels of assurance which you want your certification profile to feature, while producing a signing key for a user. These Level of Assurance terms are as per the eIDAS Standards. For details of these terms click here. Possible values are:
- Simple Electronic Signature (SES)
- Electronic Seal (eSeal)
- Advanced Electronic Seal (AdESeal)
- Qualified Electronic Seal (QESeal)
- Advanced Electronic Signature (AES)
- High Trust Advanced Signature (AATL)
- Qualified Electronic Signature (QES)
Only the Levels of Assurance selected in the Service Plan will be available for the Individual Users (My Settings > Signatures) and Enterprise Users (Enterprise Roles > Document Settings).
|

|
- If the user has added "In-Person Signing" as a feature in the service plan, then in the "Level of Assurance" field the user will have to add at least one of the following levels of assurance for the In-Person Signatures:
- Simple Electronic Signature (SES)
- Electronic Seal (eSeal)
- Advanced Electronic Seal (AdESeal)
- Qualified Electronic Seal (QESeal)
|
|
|
Enable PDF/A Compliancy
|
Select to enable PDF/A compliancy for all the documents that are uploaded to SigningHub. In this case, SigningHub implements the following rules for any uploaded documents:
- A non-PDF document (like image or text file) will be converted to PDF document with PDF/A-2a compliance.
- A PDF document with no PDF/A conformance will be upgraded to conform with PDF/A-2a compliance.
- A signed PDF document with no conformance to PDF/A compliance will display the following error.

|

|
- In order to ensure if signature string size conforms to PDF/A compliance, see how to configure the Signing Profiles above.
- Font color will not be applicable in Signature Appearance while perform signature on any PDF/A document with "CMYK" color space in order to ensure PDF/A compliance.
|
Keep the check box empty to disable PDF/A compliancy for the documents uploaded to SigningHub. In this case, SigningHub implements the following rules for any uploaded documents:
- A non-PDF document (like text or image file) will be converted to a PDF document with no conformance.
- No changes will be made to a PDF document with no PDF/A conformance.
- A signed PDF document with no conformance to PDF/A compliance will not display any non-compliancy error.
|
|
- Whether the Service Plan has the PDF/A Compliancy enabled or not, if the uploaded documents are PDF/A compliant, their conformance level will remain intact.
|
|
|
Enable Auto-deletion of unused documents
|
Tick this check box to enable the auto deletion utility for unused documents. SigningHub will automatically delete unused documents of a user from their SigningHub account.
The unused documents refer to those Draft/Updated/Approved/Signed/Declined/Completed documents that the user have not been accessed over a certain time period. Any action that is performed on a document that warrants a log activity will reset the document deletion counter (days). The In Progress and Pending documents do not come under the unused documents category and hence they will not be deleted through the auto deletion utility.
When this option is enabled, the following will appear:
- The "Delete documents which are unused for (days)" field, to specify the number of days after which SigningHub should delete an unused document.
- The "When deleting a document, notify user before (days)" check box, to send a notification email to the respective document owner before deleting their unused documents.
- When the "When deleting a document, notify user before (days)" check box is checked, a field will appear to specify number of days. SigningHub should send this notification, the specified number of days before deleting such documents.
- Keep this check box unselected, if you don't want to notify document owners before deleting their unused documents.
- The "Email the deleted document as attachment" check box, if you require SigningHub to send the deleted documents as attachments to document owners in their notification emails. The sending of document as email attachment will depend on its size as configured in the Bulk Actions settings.
- When the "Email the deleted document as attachment" check box is checked, SigningHub emails as an attachment, the document being auto-deleted. When this checkbox is checked, the "Email the workflow evidence report as part attachment of the completed document" check box will appear.
- When the "Email the workflow evidence report as an attachment of the completed document" check box is checked SigningHub will send as an email attachment, the Workflow Evidence Report of the document that is being auto-deleted.
- Keep the "Email the workflow evidence report as an attachment of the completed document" check box unselected, if you do not want to send the Workflow Evidence Report of the document being auto-deleted.
- Keep the "Email the deleted document as attachment" check box unselected, if you do not want to email, as an attachment, the document being auto-deleted.
|
|
- When the "Email the workflow evidence report as an attachment of the completed document" check box is checked, SigningHub will send the Workflow Evidence Report, only if the Workflow Evidence Report for the document being auto-deleted was already generated.
- If the workflow has a single document:
- Where only the document being auto-deleted is being sent as an attachment of an email, the document will be sent as a pdf file.
- Where both the document being auto-deleted and its Workflow Evidence Report are being sent as an attachment of an email, a ZIP file containing; the document as a pdf file and the workflow evidence report as a pdf file, will be sent.
- If the workflow has a multiple documents:
- Where only the documents being auto-deleted are being sent as an attachment of an email, a ZIP file containing the documents as pdf files, will be sent.
- Where the documents being auto-deleted and the Workflow Evidence Report are being sent as an attachment of an email, a ZIP file containing; the documents as pdf files and the workflow evidence report as a pdf file, will be sent.
|
|
|
Add a unique identifier in the document header on uploading a document
|
Tick this checkbox to allow the SigningHub Desktop Web users to add a unique identifier in the document header. SigningHub will automatically add a unique identifier while users upload a PDF document from their SigningHub account.
However when configured, this condition can be overridden through the Enterprise Default Settings, in the case of an enterprise account, see details.
If you do not want SigningHub to add a unique identifier on the uploaded document, keep this check box unselected.
When allowed, the unique identifier field will be available on a document in the following areas:
|
|
Next
|
Click to move to the "Signatures" tab.
|
Signatures
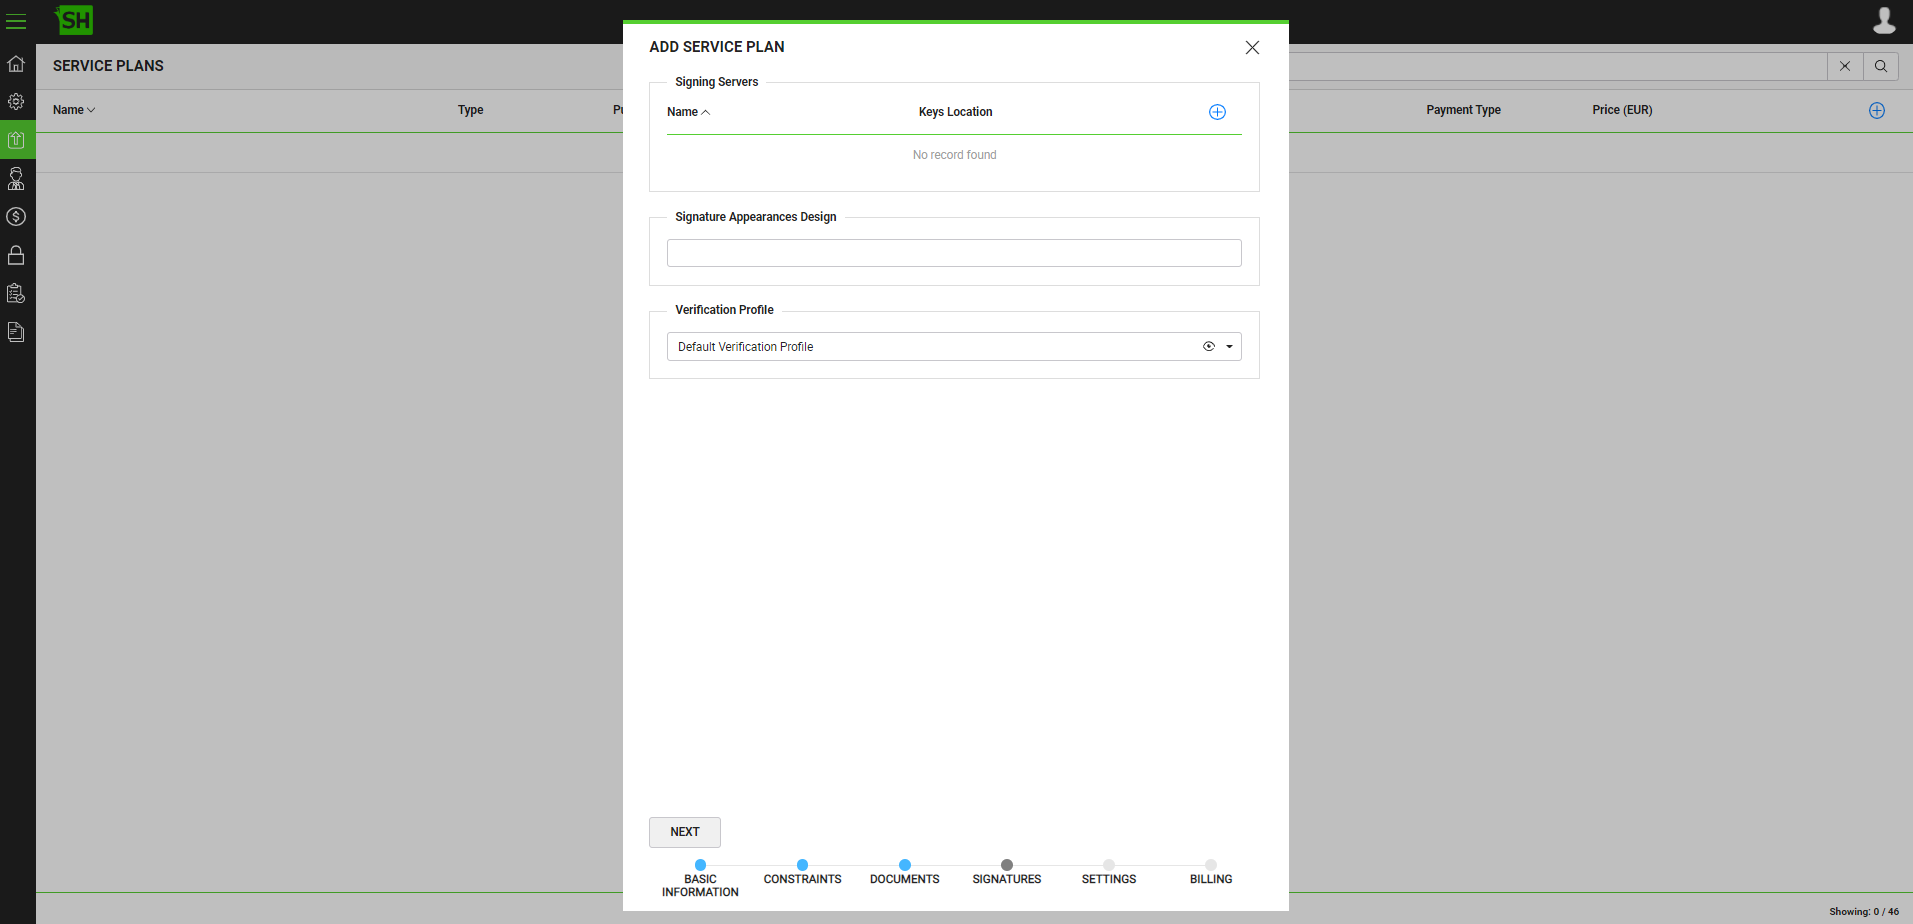
The following image illustrates the default view of the "Signatures" tab on the Add Service Plan dialog.
|

|
- You can configure multiple signing servers under service plan for Server or Client Held Keys, at least one signing server must be configured under a service plan to perform signing.
- You can click on the add icon
 to add a signing server. to add a signing server.
|
The following table illustrates the fields and definitions of the "Signatures" tab on the Add Service Plan dialog.
|
Signatures tab
|
|
Fields
|
Description
|
|
Keys Location
|
Select "Server Held Keys" for server side signing and "Client Held Keys' if the signing server to be configured to perform client side signing. On selection of either option only the related signing servers will be shown in the list.
|
|
Signing Profile
|
Select a signing profile for this service plan. Only the active signing profiles are listed for selection. Signing profiles list appears on the basis of Keys Location selection, if server held keys option is selected then only the server side signing related signing profiles will appear and for client held keys only those signing profiles will appear for which at least client side signing is configured.
The selected profile will be used to create a document signature on SigningHub Desktop Web. Click the eye icon  to view the details of the selected profile. Signing profiles are managed through the signing profiles section. See details. to view the details of the selected profile. Signing profiles are managed through the signing profiles section. See details.
|
|
Level of Assurances
|
Select the level of assurance which you want your certification profile to feature, while producing a signing key for a user. These level of assurance terms are as per the eIDAS Standards. For details of these terms click here. Possible values are:
- Electronic Seal (eSeal)
- Advanced Electronic Seal (AdESeal)
- Qualified Electronic Seal (QESeal)
- Advanced Electronic Signature (AES)
- High Trust Advanced Signature (AATL)
- Qualified Electronic Signature (QES)
Upon selection of Electronic Seal (eSeal), Advanced Electronic Seal (AdESeal) and Qualified Electronic Seal (QESeal), the feature will enable the end-users to add their in-person and e-signatures in the documents as witness digital signatures by using the specified witness signing certificate.
You can also select multiple signing capacities to allow an enterprise user to add in-person and e-signatures in different positions/capacities within their organisation. These selected signing capacities will be available in the "Signature Settings" tab of an enterprise role.
One of the level of assurances can be set as default under enterprise role.
Advanced Electronic Signature (AES), High Trust Advanced (AATL) and Qualified Electronic Signature (QES), are fully supported in SigningHub. These level of assurances provide the highest level of trust and assurance because these use unique signing keys for every signer. This directly links the user’s identity to the signed document such that anyone can verify it on their own using an industry standard PDF reader.
Furthermore, as the signer has sole control of their unique private signing key this ensures non-repudiation, i.e. even the service provider cannot be held responsible for creating the signature. SigningHub complies with eIDAS regulations for AES and QES using locally held credentials, such as a National eID card, or importantly remote signing where the user’s key is held securely, server-side. Remote signing has many benefits including the ability to sign from any machine without use of specialist devices like smartcards, hardware tokens and readers.
The advantage of using AES/QES is that they show exactly who signed the document.
QES are more trusted version of AES because they require the highest levels of security for the protection of the user’s signing key and also a formal registration process for the user to verify their identity by a qualified Certificate Authority. From a legal perspective QES can be considered even stronger than handwritten signatures as the burden of proof shifts to the signer to prove that they did not sign.
|
|
Signing Capacities
|
Select one or more Signing Capacities for the respective Level of Assurance.
- This field is hidden by default and, upon selecting a Level of Assurance, it is displayed under the selected Level of Assurance. The following image illustrates the field behaviour.
- The menu options display only those Signing Capacities that have the respective Level of Assurance configured with it. For example all Signing Capacities that have "Advanced Electronic Seal" as a Level of assurance will be shown under Advanced Electronic Seal (AdeSeal).
The selected Signing Capacities will be used to generate the certified asymmetric key pairs for server side signing. You can also select multiple Signing Capacities to allow an Enterprise User to sign in different positions/capacities within their organisation. The Signing Capacities selected here will be available under the "Signature Settings" tab of an Enterprise Role.
|
|
Push Certificates to CSP
|
Select this option to enable the CSP provisioning, which allows SigningHub to automatically register the users and push their certificates in the ADSS CSP Service, when they sign a document.
ADSS CSP Service provides the capability to manage users and sign data while acting as a bridge between SigningHub and the Signing Service. It provides the required API interface for SigningHub to register and manage users, send signing requests, push user certificates, check status of signing requests and get the signatures (i.e. PKCS#1 signature). See details.
To use this feature, select the "Push newly created certificates to ADSS CSP" option. Select a CSP profile from the "Virtual ID Profile" drop-down list. This profile is used to manage users, certificates and their signing operations in the ADSS CSP Service. Only the active CSP profiles are listed for selection. Click the eye icon  to view the details of the selected profile. The CSP profiles are managed through the Virtual ID Profiles section; see details. to view the details of the selected profile. The CSP profiles are managed through the Virtual ID Profiles section; see details.
If you want SigningHub to delete a user including all associated certificates from ADSS CSP then select the "Automatically delete certificates and users from CSP when user is removed" option, when a user is deleted either through SigningHub Admin or Enterprise Admin.
|

|
- If only Electronic Seal (eSeal) is selected under Signing Server, then Push Certificates to CSP option will not appear.
|
|
|
Verification Profile
|
Select a verification profile for this service plan. The selected profile will be used to verify document signatures. Click the eye icon  to view the details of the selected profile. Verification profiles are managed through the verification profiles section; see details. to view the details of the selected profile. Verification profiles are managed through the verification profiles section; see details.
|
|
Next
|
Click to move to the "Settings" tab.
|
|

|
- When adding a Signing Server for CSC, there is no signing capacities or level of assurance related information appears.
- When adding a Signing Server for Client Held Keys using either ADSS or CSC, there will be no further options appears.
|
Settings
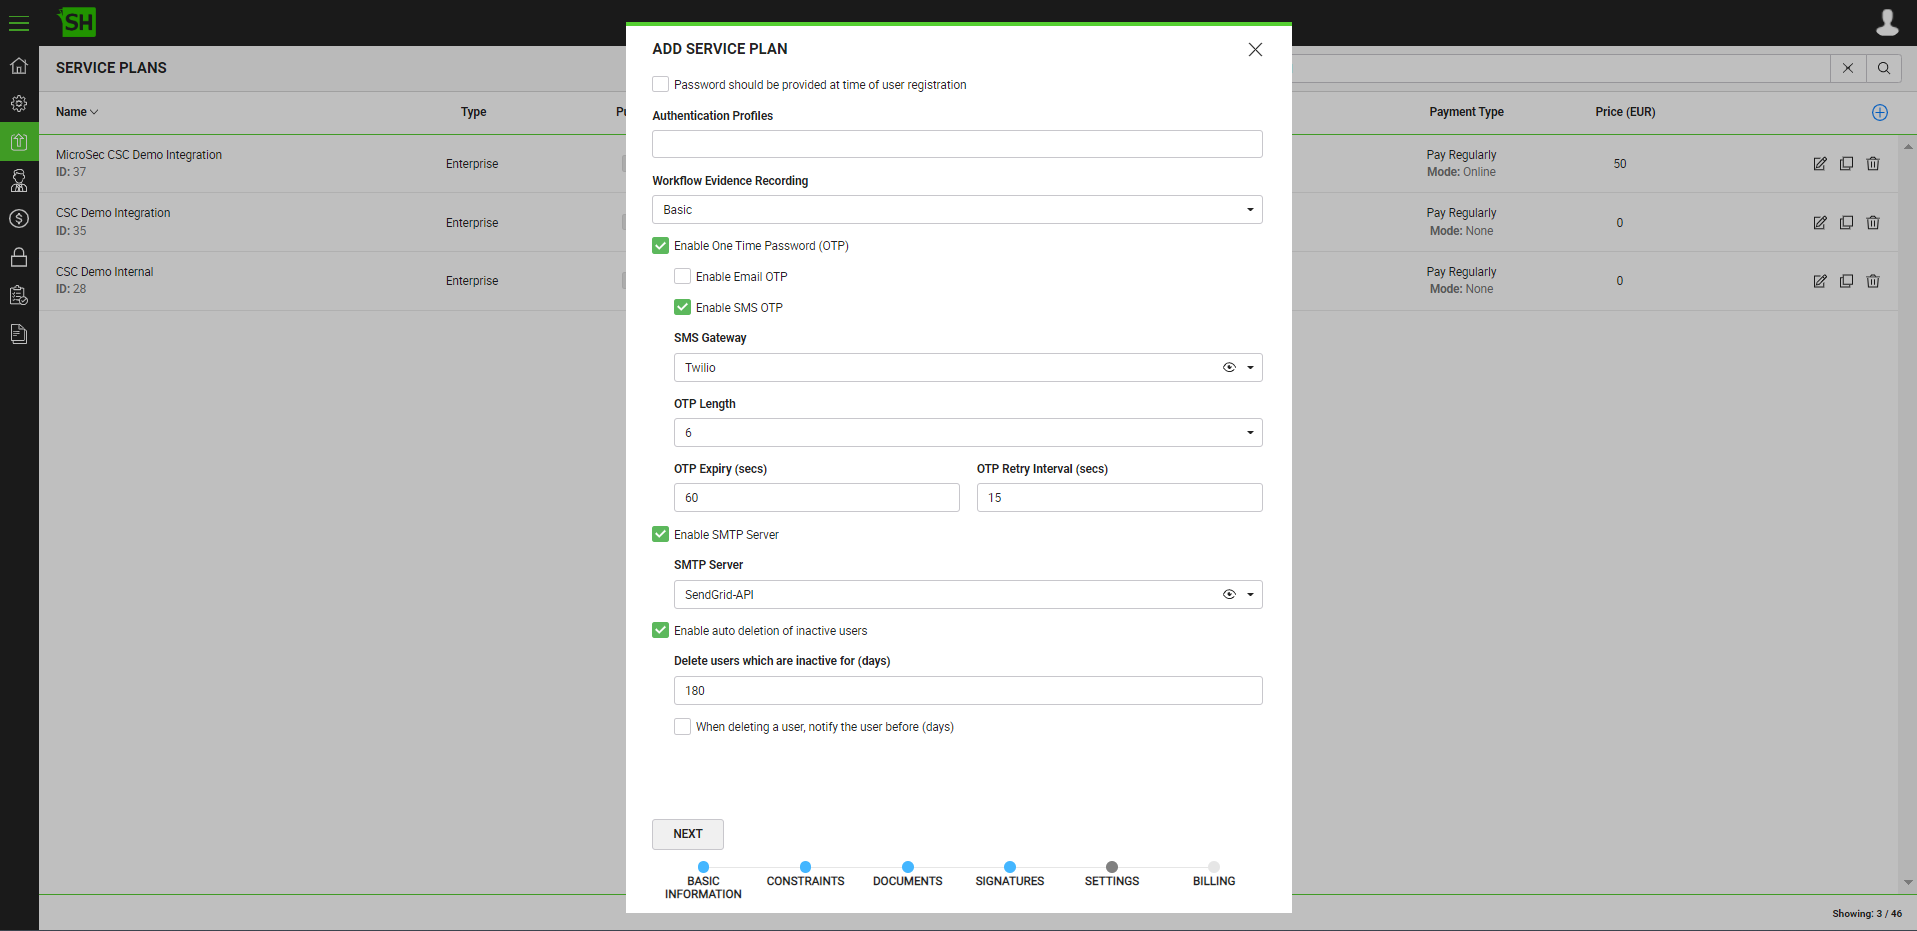
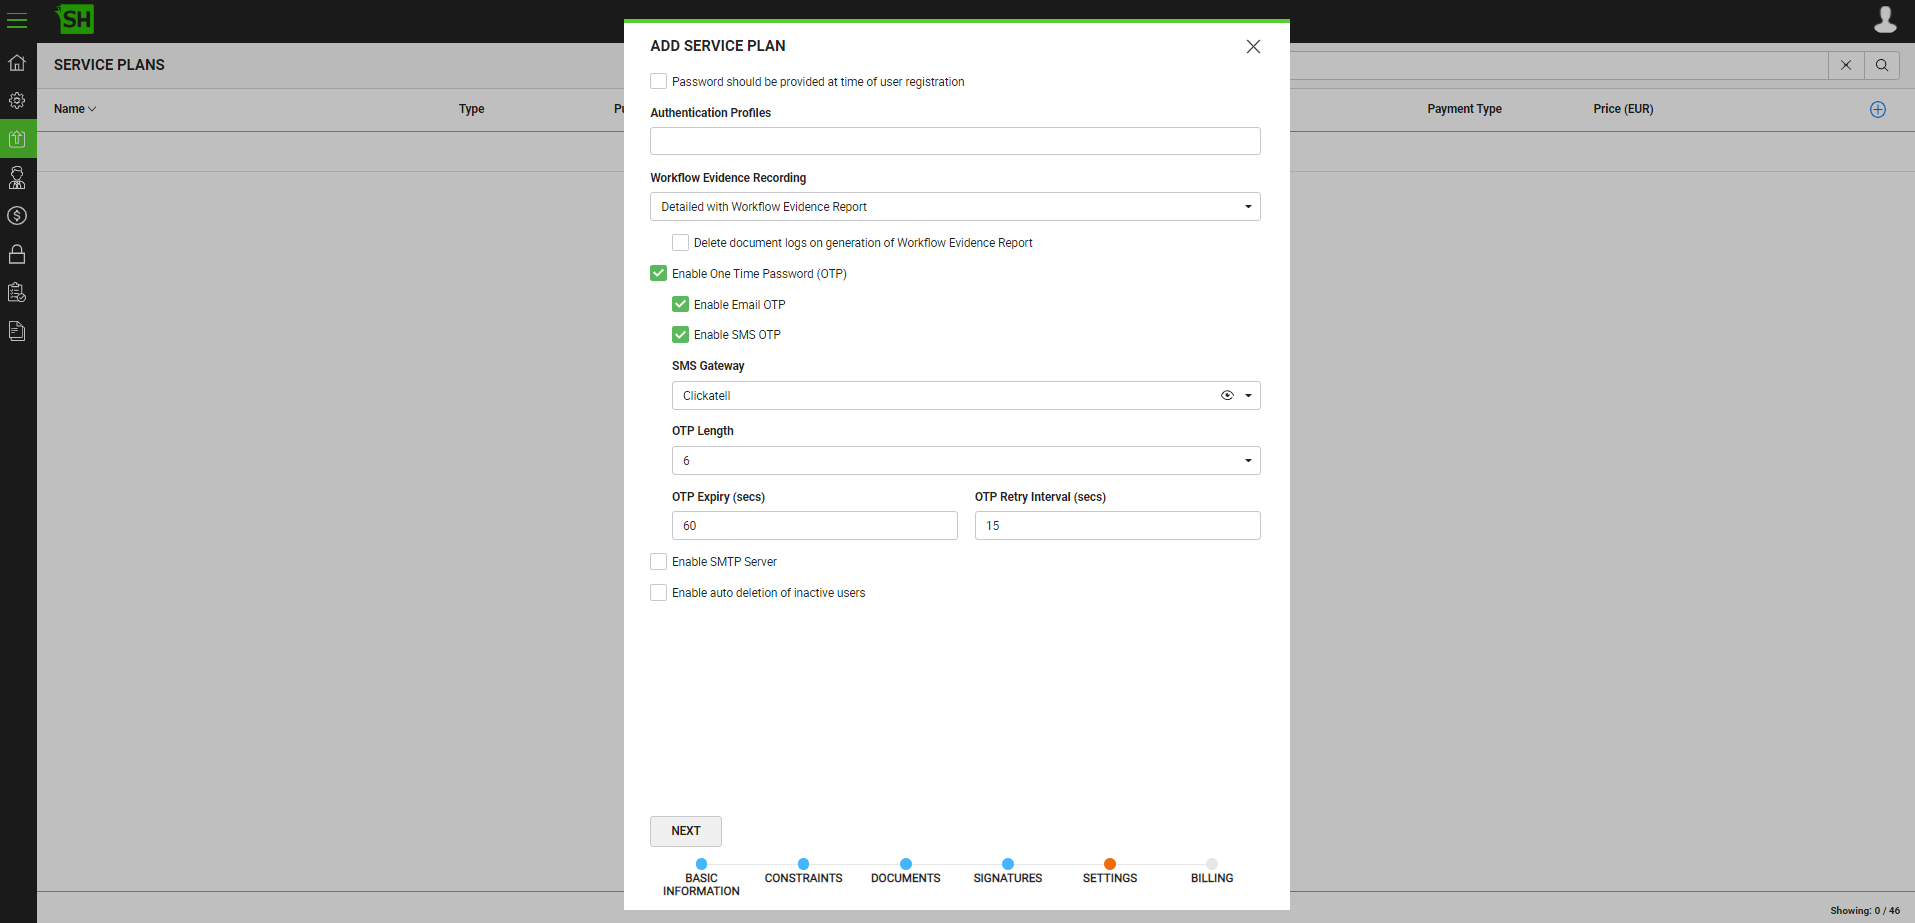
The following image illustrates the default view of the "Settings" tab on the Add Service Plan dialog.
The following table illustrates the fields and definitions of the "Settings" tab on the Add Service Plan dialog.
|
Settings tab
|
|
Fields
|
Description
|
|
Password should be provided at time of user registration
|
When selected:
- It will allow SigningHub ID based authentication only (i.e., SigningHub ID & password) and a password must be set at the time of registration.
- It will add a couple of additional password related settings i.e. "User must change password at next login" and "Enable Password Expiry Duration" under the Enterprise Password Strength Policy; see details.
When deselected:
- It is not required to set a user password at the time of registration. A user can be auto-activated while registering via authentication methods other than SigningHub ID (i.e. Active Directory, Salesforce, Google, Office 365, Linked-in, OTP, itsme, etc.).
|
|
Authentication Profiles
|
This field will load private authentication profiles, which are specifically used for corporate logins.
Select the required authentication profile(s) for this service plan, to allow multiple modes of authentication to the corporate users. The selected profile(s) (from here) will be available to the Enterprise Admins in SigningHub Desktop Web, under the "Authentication" tab of Enterprise Roles. An Enterprise Admin can then configure these profiles with their enterprise users roles to facilitate corporate logins for their enterprise.
In case of selecting multiple profiles, the "Default Authentication Profile" field will appear below the (selected) private authentication profiles list. Choose an authentication profile that could be shown as the default authentication method to the Enterprise Admins, under the "Authentication" tab of Enterprise Roles.
|
|
Workflow Evidence Recording
|
Select the process evidence information level for this service plan, i.e. "Basic" or "Detailed with Workflow Evidence Report".
The "Basic" level lets the SigningHub web user to view limited reporting information, i.e. Document Logs and Activity Logs only. However, the "Detailed with Workflow Evidence Report" level allows the SigningHub user to view every bit and byte of the workflow process in the form of a detailed Workflow Evidence Report, in addition to viewing the normal Document Logs and Activity Logs.
In case you select "Detailed with Workflow Evidence Report", the option to delete document logs on generation of Workflow Evidence Report is displayed.

Delete Document logs on generation of Workflow Evidence Report
As the field label says, on selecting the check box, system will delete the document logs from the Workflow History dialog when the workflow is marked "Completed" and the Workflow Evidence Report is successfully generated. These detailed document logs will then only be available in the downloaded PDF of Workflow Evidence Report under the "Audit Trail" section.
|

|
- The following will not become part of the details log under the "Workflow History" dialog:
- Preview of email notification sent to document owner
- Preview of signature image
|
|
|
Enable One Time Password (OTP)
|
Check this check box to enable One Time Password (OTP) for server-side signing, login and document opening, if allowed in the service plan.
OTP is a security system that requires a new password every time a user authentication occurs, thus protecting users from any intruders replaying an intercepted password.
When the "Enable One Time Password (OTP)" is enabled, the following fields will appear:
- Check the "Enable Email OTP" check box; to get one time password via Email.
- Check the "Enable SMS OTP" check box; to get one time password via SMS. When the "Enable SMS OTP" option is check box is checked, the "SMS Gateway" field will appear.
- The "SMS Gateway" field to select an SMS gateway for sending SMS OTP from SigningHub to the users' mobile phones. Only the active SMS gateways are listed for selection. Click the eye icon
 to view the details of the selected gateway. SMS gateways are managed through the connectors section, see the Clickatell, Twilio, or SMS connectors. to view the details of the selected gateway. SMS gateways are managed through the connectors section, see the Clickatell, Twilio, or SMS connectors.
- The "OTP Length" field to specify the OTP length (total number of OTP digits required). SigningHub currently supports 4, 6, and 9 digits OTP and the default value for this field is 6.
- The "OTP Expiry (secs)" field to specify the auto-expiration time of the OTP for end users. SigningHub allows the value between 30-300 seconds and the default value for this field is 60 seconds.
- The "OTP Retry Interval (secs)" to specify the interval for OTP retry in case of failure. SigningHub allows the value between 5-300 seconds and the default value for this field is 15 seconds.
|
|
- The gateway used for sending Email OTP is configured under Enable SMTP Server. If SMTP server is down, inactive or disabled in service plan then the default SMTP server will be used as a fallback gateway.
- When the "Enable One Time Password (OTP)" check box is checked, the user must select at least one OTP method i.e., "Enable Email OTP" or "Enable SMS OTP".
- SigningHub sends OTP via both Email and SMS, simultaneously, when both "Enable Email OTP" and "Enable SMS OTP are checked.
|
|
|
Enable SMTP Server
|
Select this check box to enable SMTP server for this service plan.
SMTP server provides the email gateway service to the SigningHub Desktop Web. If this option is not enabled then the default SMTP server will be used to send the email notifications.
When enabled, the "SMTP Server" field will appear from where you can select an SMTP server for sending-off the email notifications from the SigningHub Desktop Web. All the active/inactive SMTP Servers are available here for selection. However when you select an inactive SMTP Server, then the default SMTP server will be used as a fallback approach.
Click the eye icon  to view the details of the selected server. The email gateways are managed through the connectors section; see details. Important points to note: to view the details of the selected server. The email gateways are managed through the connectors section; see details. Important points to note:
- If emails are to be sent on behalf of a document owner, then the SMTP server configured in the document owner's service plan will be used.
- If emails are to be sent on behalf of a recipient, then the SMTP server configured in the recipient's service plan will be used. However, if the recipient is not a registered user (i.e. Guest user) then the SMTP server configured in the document owner's service plan will be used.
- If the email notifications are related to system health, license expiry and other parts of the system, then the default SMTP server will be used.
- If the selected SMTP server is down or inactive, then the default SMTP server will be used as a fallback gateway to send-off all types of email notifications.
|
|
Enable auto deletion of inactive users
|
Select this check box to enable the auto deletion utility for inactive users. SigningHub will automatically delete the inactive users (belonging to this service plan) along with their respective information (i.e., activity logs, documents and associated data, enterprise and all associated data etc.) from the system. Inactive users are those users who have not performed any activity on SigningHub over a certain (definable) number of days.
When this option is enabled, the following fields will appear:
- The "Delete users which are inactive for (days)" field to specify the number of days, a user must have been inactive for, after which SigningHub should auto delete an inactive user. This is the time-period during which the user should not have perform any activity on SigningHub.
- Tick the "When deleting a user, notify the user before (days)" check box to send a notification email to the respective user prior to deleting their details. A field will appear to specify the number of days SigningHub should send this notification before, deleting such users.
Keep this check box deselected, if you don't want to notify the users before deleting their details.
|
|
- SigningHub auto deletes inactive guest users from the system after 60 days, without sending them notification emails, irrespective of their service plan.
|
|
|
Next
|
Click to move to the "Billings" tab.
|
Billing
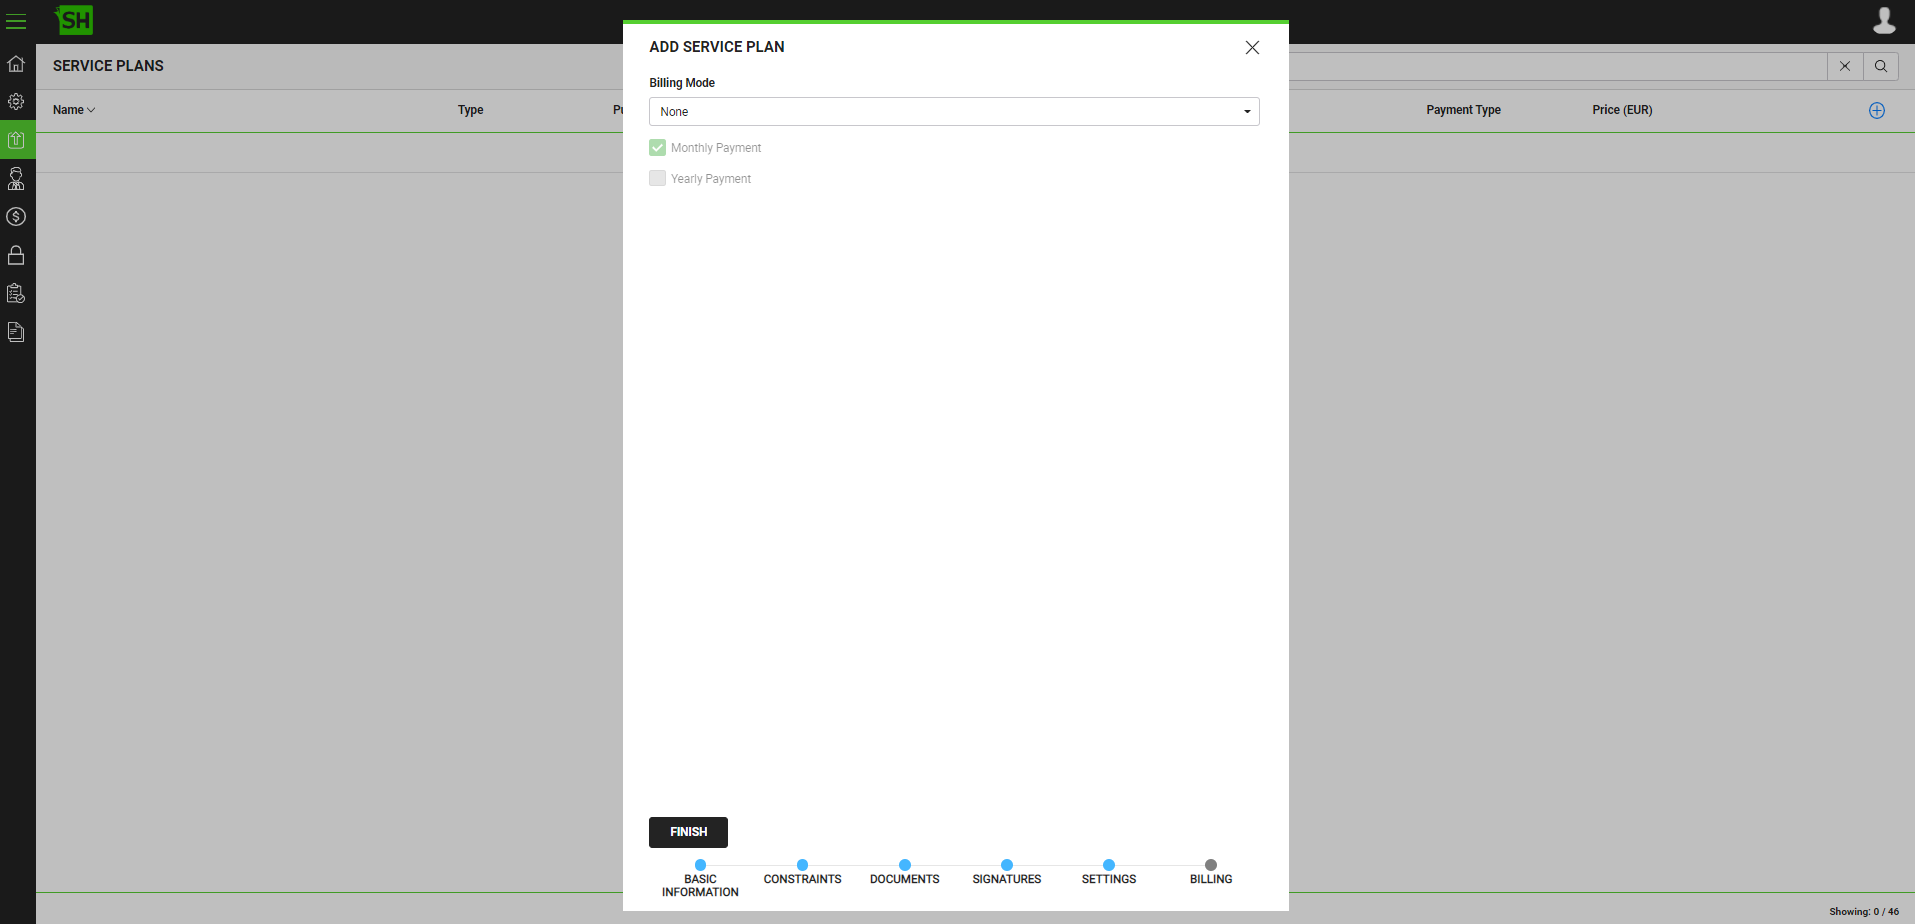
The following image illustrates the default view of the "Billing" tab on the Add Service Plan dialog.
The following table illustrates the fields and definitions of the "Billing" tab on the Add Service Plan dialog.
|
Billing tab
|
|
Fields
|
Description
|
|
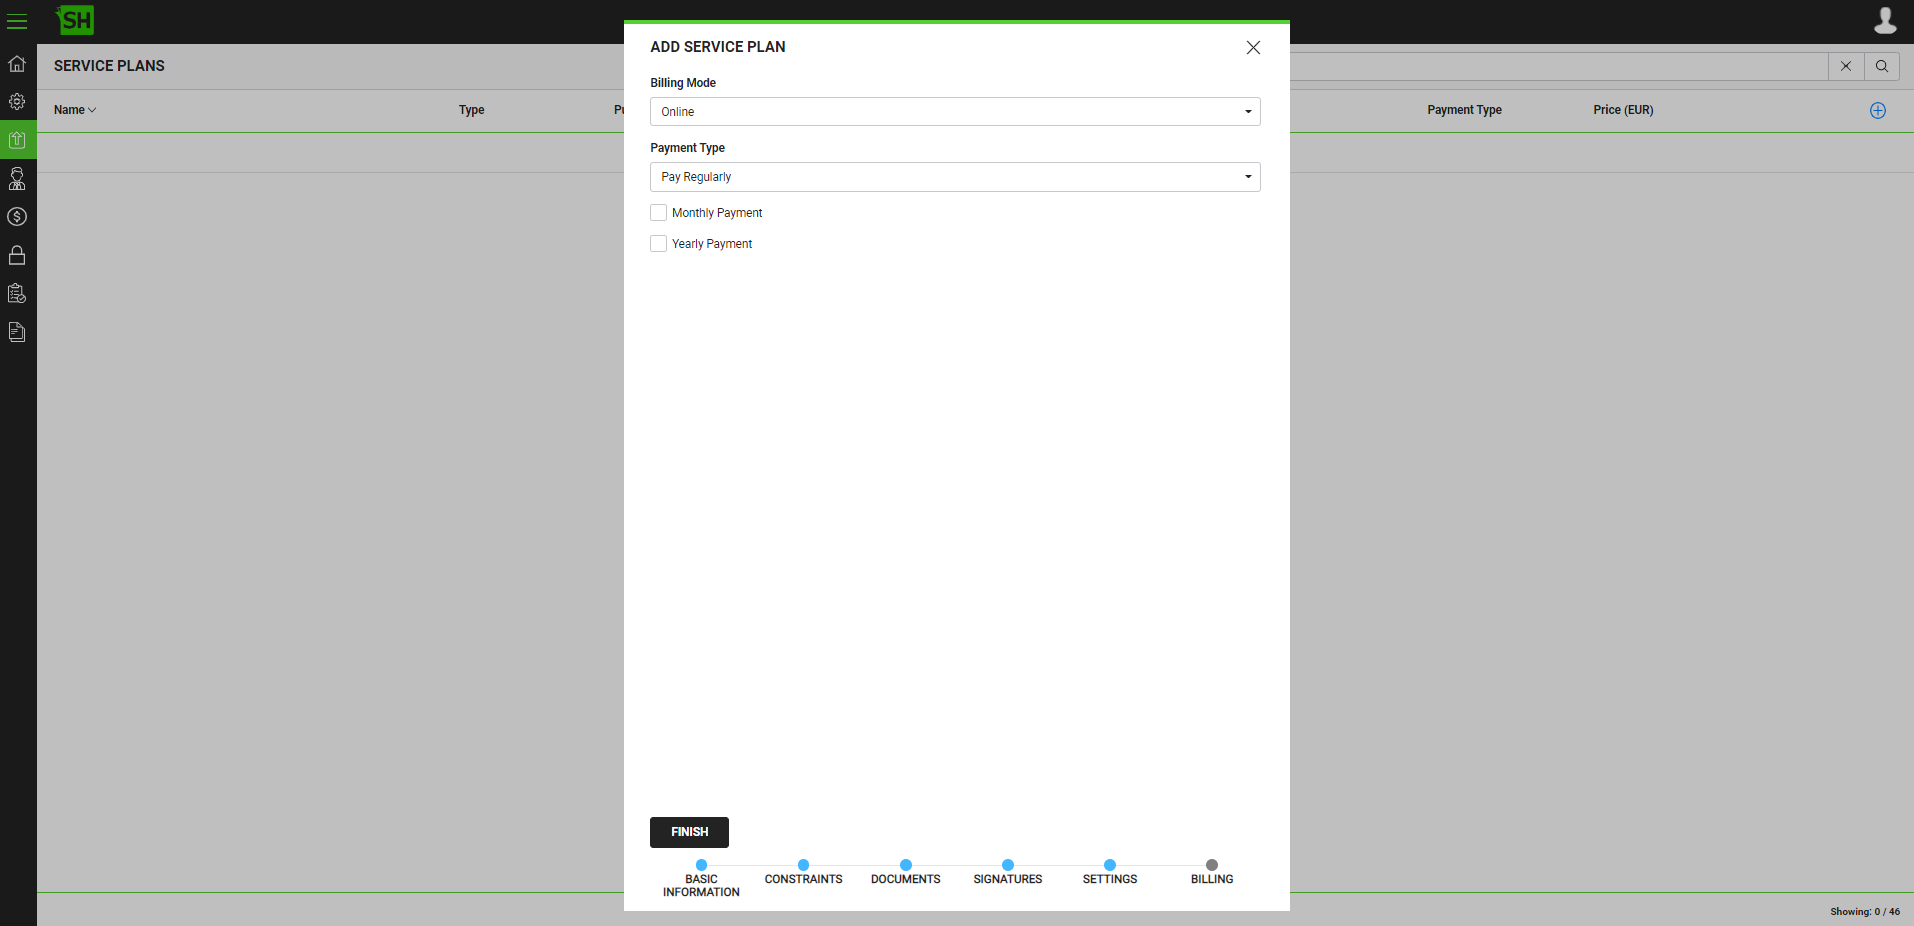
Billing Mode
|
Select a billing mode for this service plan, i.e. "Online", "Offline", "None" or "Trial".
- "Online" billing implies that payment is to be made through a payment gateway as configured in Billing settings. This mode is recommended for public service plans. The quota (i.e., signatures and workflows) is reset when the recurrent payment is made on the billing date.
- "Offline" billing implies that payment is to be added manually in the system through SigningHub Admin. This mode is recommended for custom/private service plans, and is also useful in the cases where online payments may fail due to any technical reason. In this case, once the manual payment has been made, the quota (i.e., signatures and workflows) will reset as usual when the recurrent payment is made on the billing date.
- "None" implies that the billing is not enabled. The accounts related to this service plan will be free of charge and will never expire. They can consume the allowed number of signatures and workflows. This option is usually selected for the on-premises deployments of SigningHub. You can reset the quota (i.e., signatures and workflows) manually from the Accounts page using the Reset User Statistics option.
- "Trial" implies that this service plan is for trial/ testing purpose. The accounts related to this service plan will be free of charge. It further provides an option to configure two different settings including;
- Select the "Auto Reset" check box to reset the allowed number of signatures and workflows on monthly basis. This way the users related to this service plan can continue using their SigningHub accounts as they will get a fresh quota (i.e., signatures and workflows) on the beginning of every month.
- Keep the "Auto Reset" check box deselected to halt the SigningHub services after the allowed number of signatures and workflows have been consumed. This way the users related to this Service Plan will have to buy a Service Plan to continue using their SigningHub accounts. As they can login to their accounts, but will not get a free quota of signatures and workflows each month.
|
|
Payment Type
|
For Online and Offline billing modes, the payment type can either be "Pay Regularly" or "Pay As You Go".
- The "Pay Regularly" payment type is recommended, when payment is to be made on a regular basis (monthly/ annually) against a continuous service plan.
- The "Pay As You Go" payment type is recommended, when payment is to be made after consuming the allowed signature pack.
|
|
Monthly/Yearly
|
This field only appears when "Pay Regularly" has been configured in the "Payment Type" field above. For the "Pay Regularly" payment type, specify the monthly and/or yearly price in the default currency, as set in the Billing configurations.
- The monthly payment will be made automatically on the 31st day from the subscription date and the signature pack of the subscribers will be reset.
- Similarly, the yearly payment will be made automatically on the 366th day from the subscription date and the signature pack will be reset accordingly. Special discounts can also be offered on annual payments.
|
|
Price
|
This field only appears when "Pay As You Go" has been configured in the "Payment Type" field above. For the "Pay As You Go" payment type, specify signature pack price in the default currency, as set in the Billing configurations.
|
|
Finish
|
Click to save the information entered on the Add Service Plan dialog and create a new Service Plan accordingly.
|
|

|
- When a new user subscribes to a service plan, they will see a welcome document in their inbox for test signing. The signature field inside the welcome document will have eSeal as a level of assurance and will produce witness digital signature.
- The "Pay As You Go" plans do not support recurrent payments.
- Choose "Pay As You Go" as the "Payment Type", when "SSLCommerz" is configured as the payment gateway.
|
Example
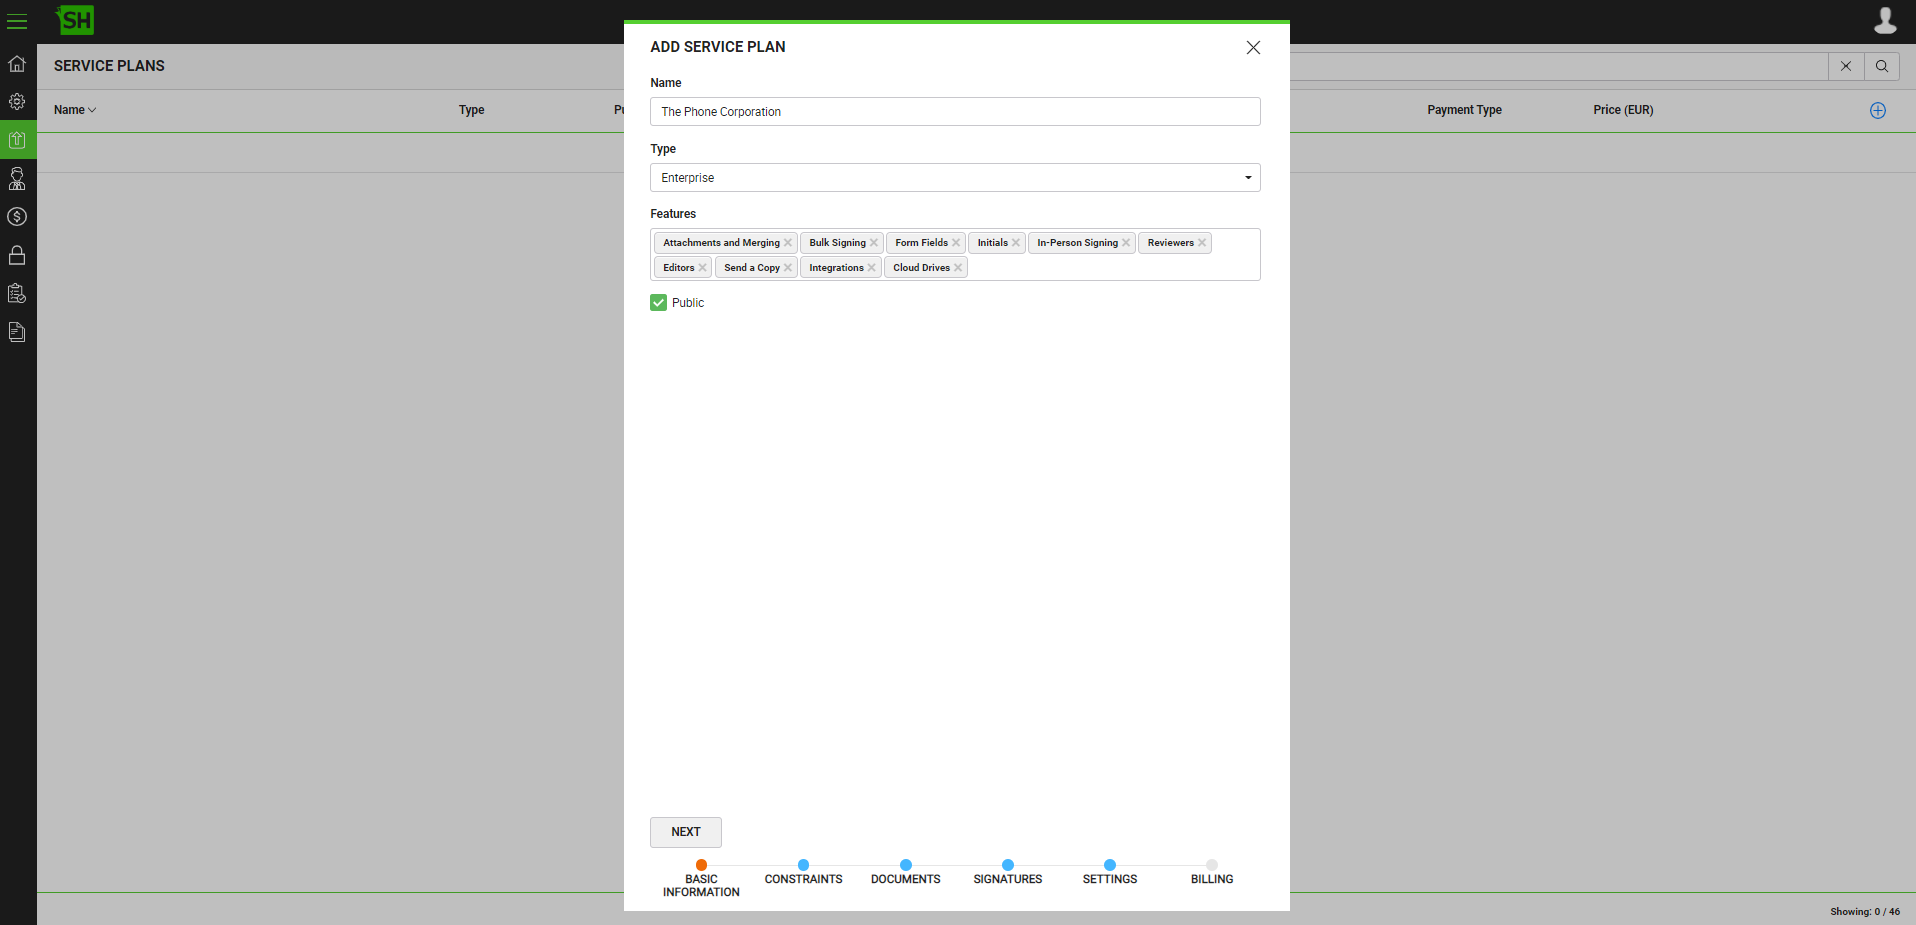
Let's take an example of a fictitious smartphone manufacturing company, named "The Phones Corporation", for which we need to create a service plan. The following image illustrates the example entries on the "Basic Information" tab.
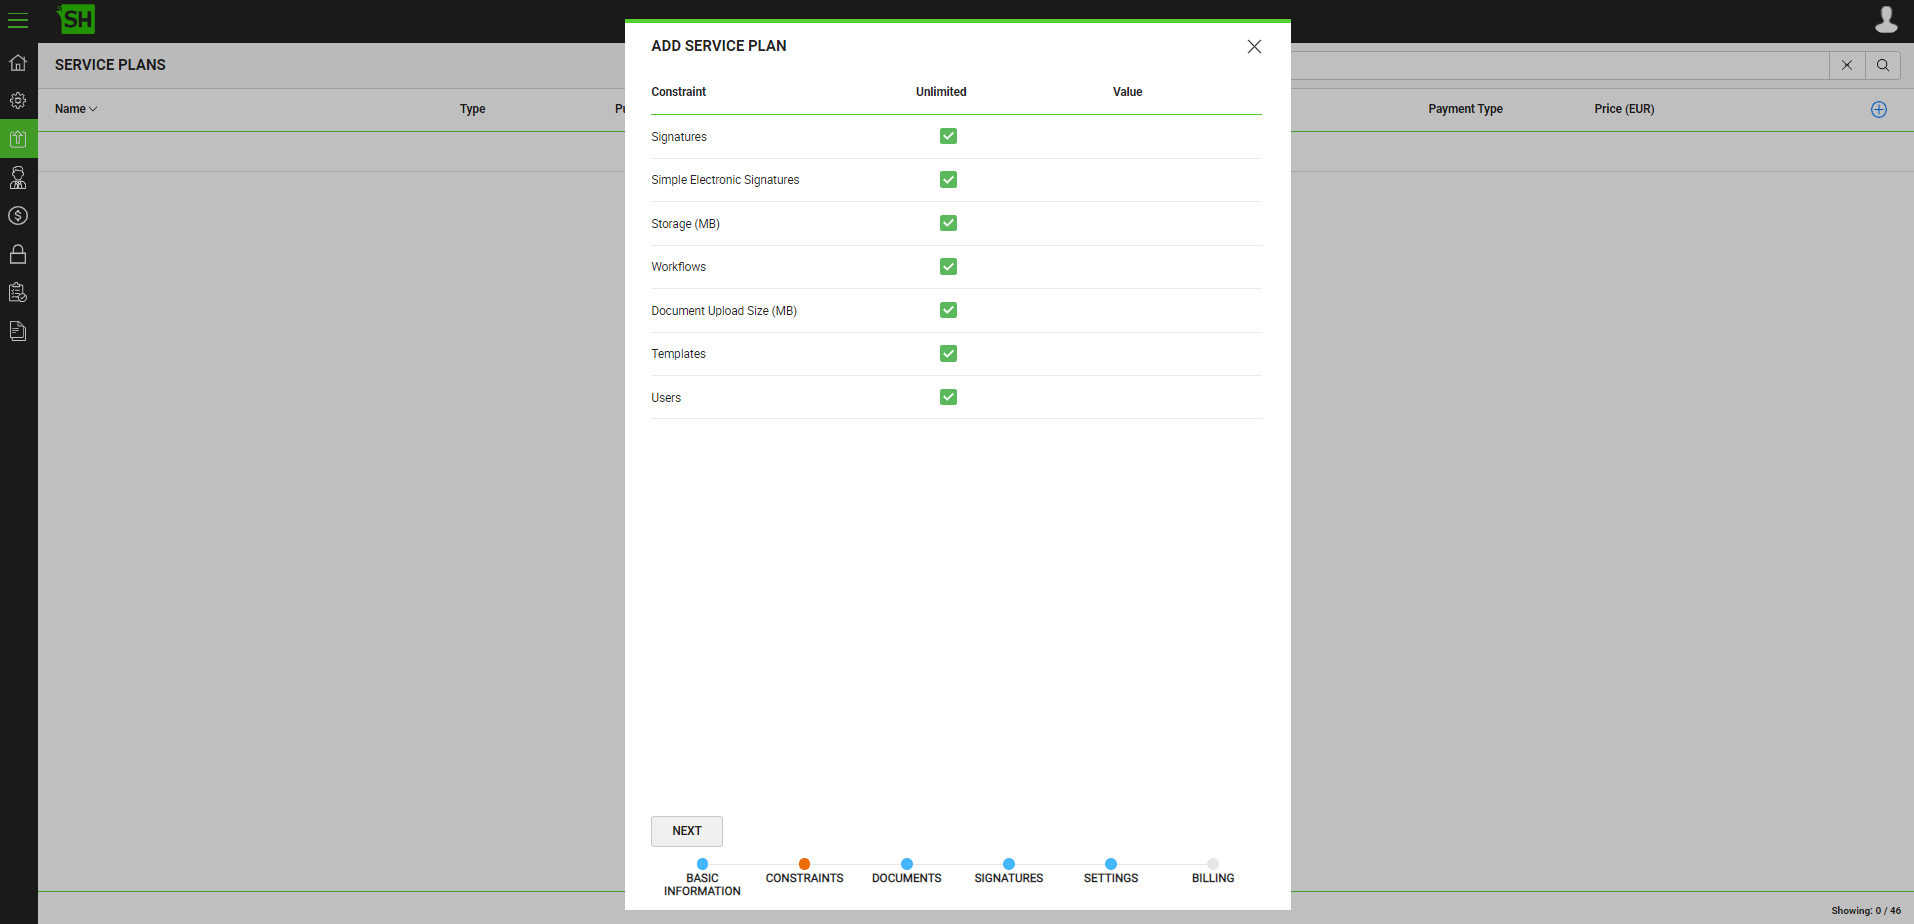
In the "Constraints" tab, "The Phones Corporation" is allowed unlimited access to the SigningHub features as shown in the image below.
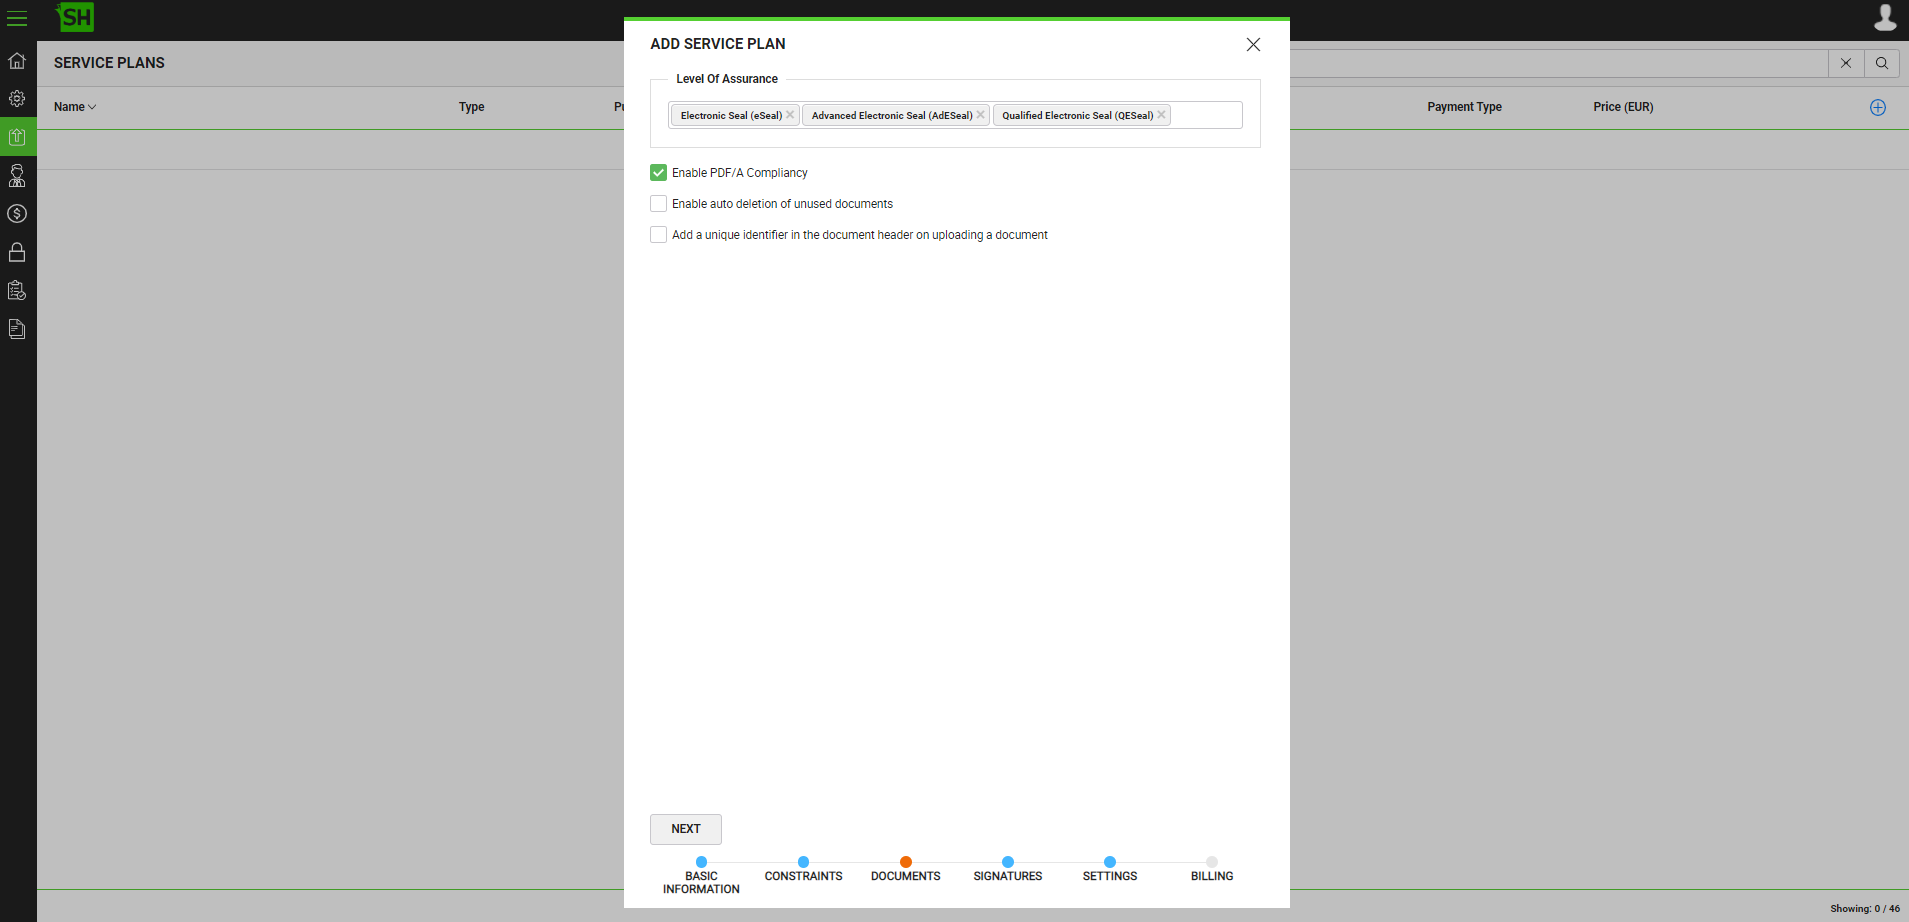
In the "Documents" tab, a set of Levels of Assurance has been selected that we need the Enterprises to have. In addition, PDF/A Compliancy has also been enabled.
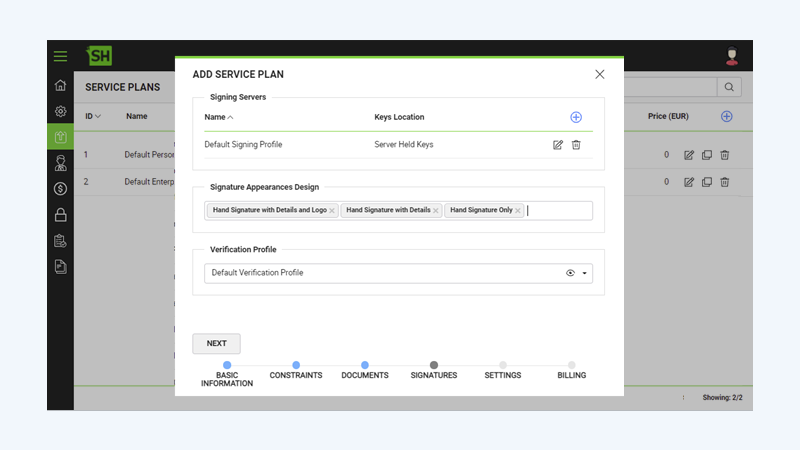
In the "Signatures" tab, "Default Signing Profile" is used and configured for server side signing along with Electronic Seal Demo (eSeal), Advanced Electronic Seal Demo (AdESeal), Qualified Electronic Seal Demo (QESeal), Advanced Electronic Signature Demo (AES), High Trust Advanced Signature Demo (AATL), and Qualified Electronic Signature Demo (QES) level of assurances and their respective signing capacities. In addition, we will select the signature appearances and default verification profile for this service plan. The following image illustrates this configuration.
In the "Settings" tab, the Service Plan has Workflow Evidence Recording, and Enable OTP options configured.
We know that this use case of a fictitious company, "The Phones Corporation" will be used for demo purposes; therefore, in the "BIlling" tab the billing is set to "None". The billing preferences of your service plan will be subject to your needs.
See Also