Step 7 - Using the Service Manager
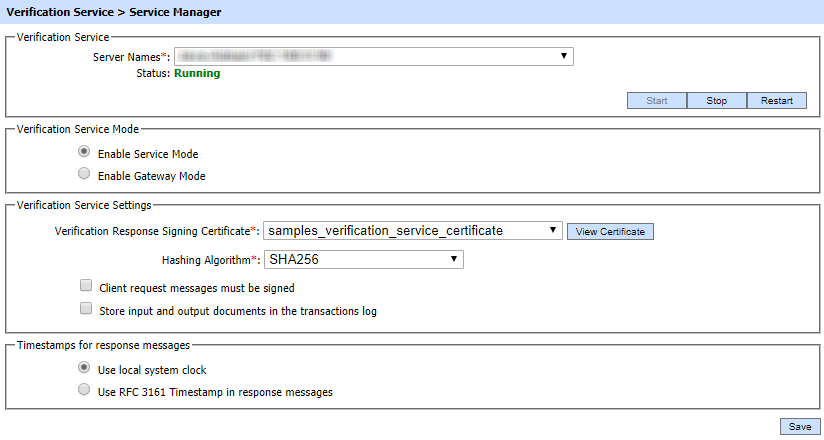
After making configuration changes within the ADSS Verification Service, the service must be restarted for the changes to take effect. The verification service manager module allows operators to start, stop or restart the verification service and also make changes to service related configurations. Click on the "Service Manager" button and this screen is shown:
If operator selects the Enable Gateway Mode option then following screen is shown:

The configuration items are as follows:
| Item | Description |
| Service Address | The address of the verification service being controlled from this Service Manager. Ensure the address points to the correct service URL, i.e. if you are running the service on multiple machines in a load-balanced configuration then check that the name is correct for the particular instance that needs to be started/stopped/restarted.By default it will be that of the local machine. |
| Start | Start the service. Status will change to “Running” after a successful start |
| Stop | Stop the service. Status will change to “Stopped” after the service is stopped. |
| Restart | Stop and then start the service in one go, Status will change to “Running” after a successful restart. |
| Verification Service Mode | This section defines the configuration required for the Verification Service to entertain requests directly or behaving as gateway server for backend Verification Service |
| Enable Service Mode | When this option is enabled then Verification Service handles all the requests and responds accordingly. Note: Service Mode is enabled by default. |
| Verification Response Signing Certificate | All verification response messages are signed so that client applications can trust the ADSS Server responses. To specify the signing certificate (and private key) use the drop-down menu labeled Verification Response Signing Certificate. If such a key has not been generated and/or certified then do this via the Key Manager. |
| Hashing Algorithm | Hash algorithm would be used to digest verification response signing data to maintain the response integrity. Default value is SHA256. Possible values are:
|
| Client request messages must be signed | Select this check box to enforce the requirement that service request messages must be signed by the business application. The service checks the signature on the request message using the client’s certificate (registered within the Client Manager module) in order to authenticate the client application otherwise authentication fails and the request is rejected. |
| Store input and output documents in the transactions log | The ADSS Server administrator can select this checkbox to store the document to be verified/enhanced within the service request log record and the verified/enhanced document within the response log record. By default this option is disabled. Note: This option must be used with care! Depending on the size and volume of documents being verified/enhanced setting this option could dramatically increase the size of the ADSS Server log records and hence the database size requirements.
Note: We do not support to Store input and output documents in the transactions log when gateway mode is enabled. |
| Use local System Clock | All verification response messages include a time stamp. If this radio button is selected then the timestamp is based on the system clock of the ADSS Server machine. |
| Use RFC3161 timestamp | If this radio button is selected then the verification response message will include a cryptographically protected timestamp token issued by a TSA. |
| Verification Service Mode | This section defines the configuration required for requests forwarding to back-end Verification Service. |
| Enable Gateway Mode | If enabled, this Verification Service instance will behave as Gateway instance for backend Verification Server. Verification gateway verifies the request structure & validates the Client. Upon success, it relays the received request to the backend Verification Server using the provided configurations defined below. On failure, it returns error to the calling application. |
| Verification Service Address | Use this field to add Verification Service address(es). |
| List of Verification Service Address | This field shows the Verification Service addresses that can be used to forward requests to the back-end Verification Server. Multiple service addresses can be added. Test button checks that the service is available. The Remove button deletes a configured service address. |
| Verification Profile | Optionally specifies the Verification profile to be used for back-end Verification Service request. Note: If not configured then request will be forwarded to back-end Verification service without Verification profile and the back-end Verification Server will use the default Verification profile configured against the Client in Client Manager. |
| Client ID | Define the Client ID registered in back-end Verification Service. Verification Service will use this Client ID while communicating with back-end Verification Service. The back-end Verification service verifies that this is a registered Client ID within the Client Manager module before granting access to the service. |
| Use TLS Client Authentication | If this option is enabled then Verification Service will communicate with back-end Verification Service using TLS client authentication. Note: By default it is disabled. |
| Certificate | Select the TLS client certificate which pre-exists in the Key Manager. Note: It is required to register the Issuer CA of the TLS client certificate in Trust Manager with the purpose CA for verifying TLS client certificates. |
Ensure all the changes are saved by clicking the Save button and restart the service to take changes effect.
See also