Step 1 - Configuring RAS Profile
To make it easier for business applications to request management of users, keys and devices along with signing operations, the ADSS RAS Service uses RAS Profiles. A RAS profile defines the format and characteristics of the SAM Service configurations (e.g. which SAM Service address, profile ID, Client ID to be used) and define characteristics of user authentication settings (e.g. Basic or SAML) that will be used when this profile is referenced in a user keys generation, device registration and signing request from a client application.
To create or edit a RAS Profile click on RAS Profiles and the following screen is shown:

A new profile can be created by clicking the New button. An existing profile can be edited by clicking the Edit button. If you want to create a new profile by copying large part of an existing profile then click Make a Copy. The following screen is shown:
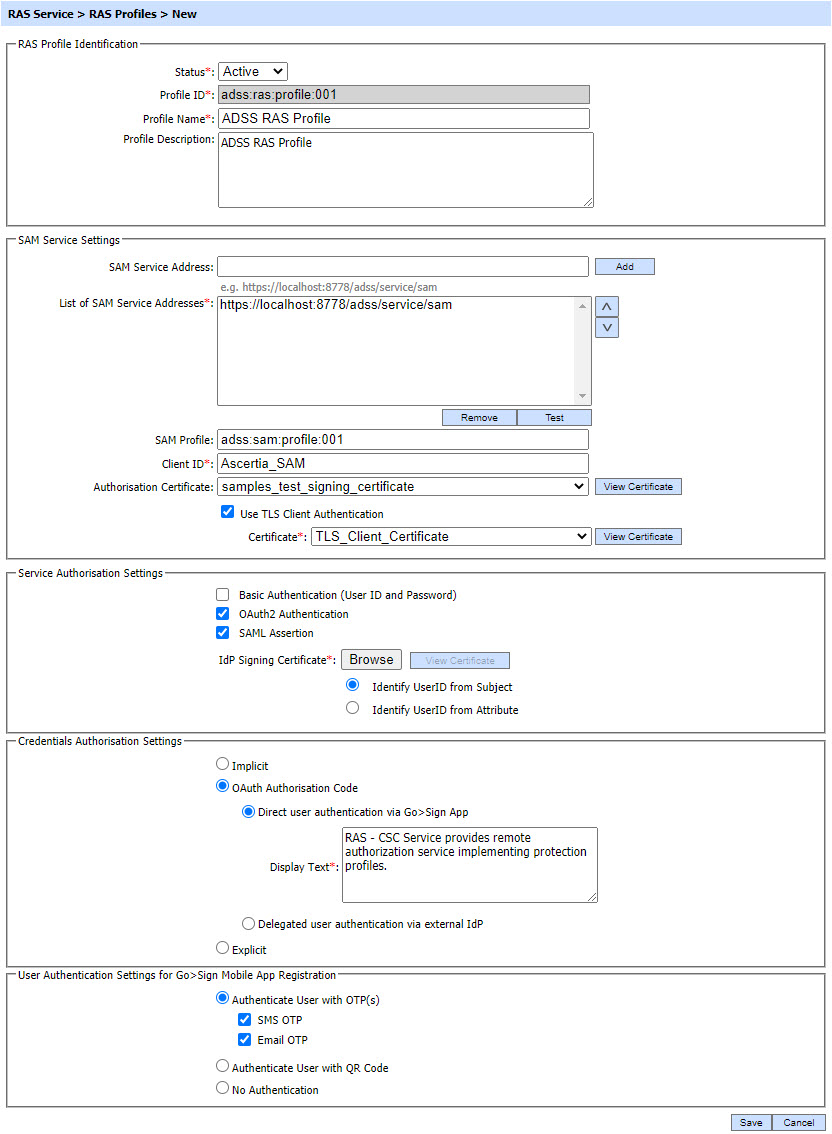
The configuration items are as follows:
| Item | Description |
| Status | A SAM profile may be marked Active or Inactive. Note that an inactive profile will not not be used to process requests generated by client application. |
| Profile ID | A mandatory field which provides a system-defined unique identifier for this profile. |
| Profile Name | A mandatory unique name defined by the ADSS Server Administrator for easier recognition of the profile within the ADSS Operator Console. |
| Profile Description | This can be used to describe the profile in more detail (e.g. in which circumstances will this RAS profile be used). This is for information purposes only. |
| SAM Service Settings | This section defines the configuration required for requests forwarding to SAM Service. |
| SAM Service Address | Use this field to add SAM service address(es). |
| List of SAM Service Addresses | This field shows the SAM Service addresses that can be used to generate user keys, register user devices within SAM Service. Multiple service addresses can be added. The Test button checks that the ADSS SAM Service is available. The Remove button deletes a configured SAM Service address. |
| SAM Profile |
Specifies the SAM profile to be used for this RAS profile. |
| Client ID |
Shows the Client ID of SAM Service. RAS Service will send this Client ID while communicating with SAM service. SAM service verifies that this is a registered Client ID within the Client Manager module before granting access to this service. |
| Authorisation Certificate | The Authorisation Certificate field shows a list of certificates configured with 'Document Signing' purpose. The RAS Service uses this certificate to sign the SAD (Signature Activation Data). Normally the SAD is signed by the Go>Sign mobile application but there are cases when the SAD could be signed by RAS Service using this authorisation certificate. These cases include:
|
| Use TLS client Authentication | If this option is enabled then RAS service will communicate with SAM service using TLS client authentication. By default it is disabled. |
| Certificate |
Note: It is required to register the Issuer CA of the Client TLS certificate in Trust Manager with the CA for verifying TLS client certificates purpose.
|
| User Authentication Settings for Business Application |
This section defines the configuration required for user authentication mechanism for business application. |
| Basic Authentication (User ID and Password) |
Using Basic Authentication, the user is authorized by providing UserID and password, the RAS Service will return a user access token to the client application for the subsequent communication.
Note: By default it is disabled.
|
| OAuth2 Authentication |
The user is authenticated using OAuth2.0 mechanism. In this case, an access token is provided by RAS service that can be used by business application for subsequent communication. Note: By default it is disabled. |
| SAML Assertion |
Using SAML Authentication, the user is authorised using a SAML assertion provided by an external IDP, the RAS Service will validate the provided assertion and will return a user access token to the client application for the subsequent communication.
Note: By default it is disabled.
|
| IDP Signing Certificate |
Specifies the certificate use to verify SAML Assertion. |
| Identify UserID from Subject |
If enabled RAS service will get UserID from Subject Element of SAML Assertion. |
| Identify UserID from Attribute |
If enabled RAS service will get UserID from Attribute in SAML Assertion. |
| Attribute Name |
Specifies the Attribute Name use to get UserID from SAML Assertion by RAS Service. |
| Credentials Authorisation Setting |
This section defines the configuration required for credentials authorisation mechanism.
A business application can request RAS Service to provide the supported credentials authorisation methods using a CSC API (credentials/info) and configurations made in this section are returned to business application as a result.
|
| Implicit |
Implicit authorisation means that the RAS service is taking care of the authorisation process autonomously, by engaging with the user without any intermediation from the business application. In this case, the user is required to provide authorisation on Go>Sign mobile app. Note: When "Implicit" will be selected in RAS Profile, only following options should be configured in SAM Profile: - SCAL2 should be selected for Sole Control Assurance Level - Delegated User authentication via external IdP should not be selected |
| OAuth Authorisation Code | The authorisation for the user to access the signing key will be done by OAuth 2.0 authorisation code flow. The authorisation is returned in the form of an authorisation code, which the application shall then use to obtain SAD (Signature Activation Data). In OAuth 2.0 authorisation, the authentication of user can be performed in multiple ways. It includes 'Direct user authentication via Go>Sign App' and 'Delegated user authentication via external IdP'. Both of these methods are explained below:
Note: When this option will be selected in RAS Profile, SCAL2 should be selected in SAM Profile.
|
| Explicit | In explicit authorisation, the user can authorise the credentials by selecting either PIN or OTP (One Time Password). The operator has the option to select either PIN or OTP or both type of authorisations. Details of both these mechanisms are explained below:
Note: CSC specification allows two types of OTPs i.e. 'offline' and 'online' but RAS Service only supports the 'online' OTPs that are generated by RAS and sent to user's mobile or email.
Note: When this option will be selected in RAS Profile, SCAL1 should be selected in SAM Profile. |
| User Authentication Settings for Mobile Application |
This section defines the configuration required for user authentication mechanism for mobile application. |
| Authenticate User with OTP(s) |
User is authenticated (at time of login and device registration) using the OTPs that are delivered to user’s mobile or email.
By selecting any check box user can received the OTPs on any of the selected option.
|
| Authenticate User with QR Code |
Go>Sign mobile app will send a request to RAS to authenticate the user, it will inform the mobile app, the user will be authenticated using a QR code. The Go>Sign mobile app will launch the mobile’s camera to scan the QR Code and ask the user to login to its Web RA account to get the QR Code. |
| No Authentication |
No authentication is required for a user at time of login and device registration. |
If both Basic Authentication (User ID and Password) and SAML Assertion are not enabled in the RAS profile then the RAS Service will authenticate the client with the provided Client ID and Client Secret and return a service access token to the Client Application for the subsequent communication.
The table of RAS profiles can be sorted in either Ascending or Descending order by selecting a table column from the drop down list. The list can be sorted by RAS Profile ID, RAS Profile Name, Created At time or Status.
Clicking on the Search button on RAS Profiles main page will display following screen:

This helps to locate a particular RAS profile, the RAS Service may have configured. The RAS profile can be searched based on "Status", "Profile ID", "Profile Name". If a search is based on multiple values, then these will be combined together using the “AND” operand, and thus only records that meet all the criteria will be presented.
If "_" character is used in the search then it will act as wildcard.
The Duplicate profile will be created without the Name and Description of the selected Profile. The Unique ID generates automatically or the next available ID will be assigned to the Profile.
See also