Local CAs
Configuring a CA
The local CAs configured in Manage CAs module can automatically certify the keys being generated by the certification service. The Local CAs can also certify keys which are manually generated by ADSS Server operators using the ADSS Key Manager module.
The following diagram illustrates the use of the local CA module in both cases:
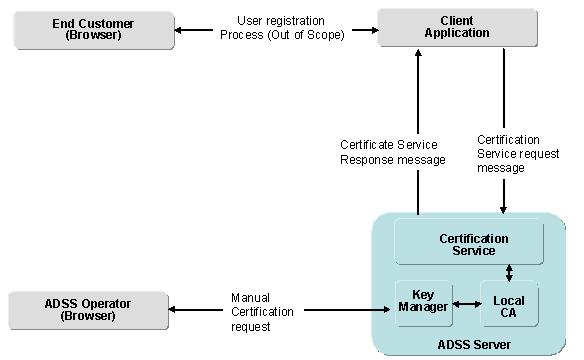
Note that when business client applications request certification services, it is assumed that there are end-users that are interacting with the application. The expected scenario is that as a user registers to use the business application for the first time, the application will then request the generation of a key and certificate for this end-user so they can for example in future sign transaction data or summary documents, etc. The interaction between end-users and the business application is a matter for the application and thus outside the scope of ADSS Server. The application may use a variety of means to authenticate the user, e.g. username/password, mobile phones, one-time password, two-factor tokens, even TLS certificates.
If it is required to generate certificates as per CA/B Forum and WebTrust Guidelines, then enable following properties in Global Settings > Advanced Settings > General page:
. Enable CA validation check
. Debian weak Keys
The ADSS Server Developers Guide explains the XML schema used for both the certification service request messages and certification service response messages. It also describes Java and .Net APIs that can be used to build the client application.To configure an ADSS Server local CA, first generate (or import) a key pair for use as a 'Local CA'. The key pair must be assigned the purpose Cert/CRL Signing within the ADSS Key Manager module. The Local CA public key will then need to be certified using either a self-signed certificate or a certificate issued by higher-level CA. This Local CA can then be configured for online certification using the Manage CAs module. The following is the screen where you can configure the CAs.

By clicking the New/Edit button, the following screen will be shown where you can configure your Local CAs:
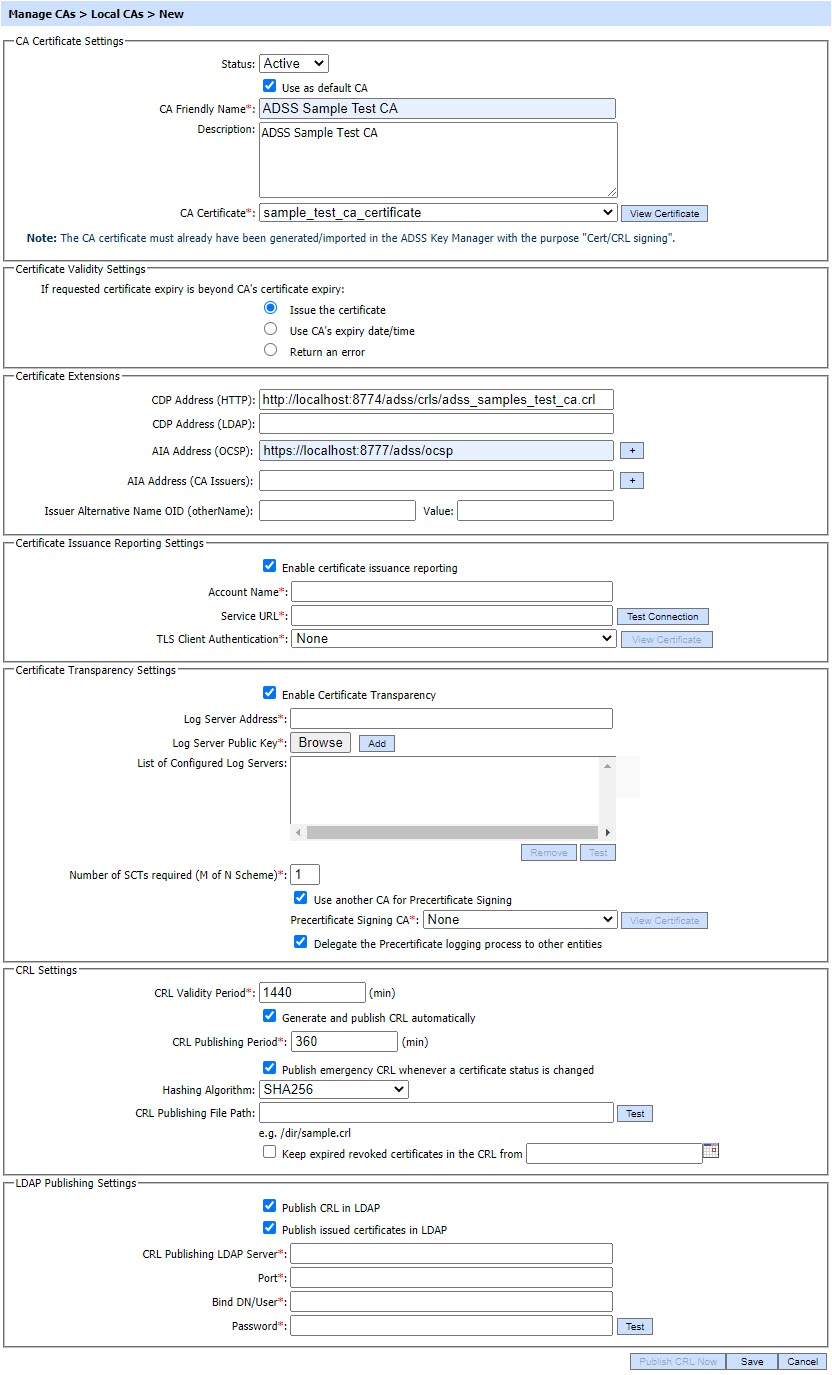
The items in the above screen are described below:
| Item | Description |
| CA Certificate Info: | Defines the following: |
| Status | A CA may be marked either Active or Inactive. As suggested by its name, an Inactive CA will not be used to issue/renew/revoke certificates until its status is later changed to Active. |
| Mark it the default CA | If selected, this identifies this Local CA as the default to be used for generating certificates within ADSS Server. |
| CA Friendly Name | An operator-defined unique name for easy management of certificate authorities within ADSS Server. This is only for human identification purposes and not used within the certification request/response messages. |
| Description | This can be used to describe the CA in more detail (e.g. in which circumstances will this CA will be used). This is for information purposes only. |
| CA Certificate |
The drop-down menu will only show the certificates within the ADSS Key Manager that have their key usage extension marked for Cert/CRL signing (i.e. Key Usage = cRLSign, keyCertSign). These certificates are the certificates for the keys that were given a purpose of Certificate/CRL Signing when they were created by Key Manager.
Select the certificate that you want to configure as a CA. This CA will be used as the Certificate and CRL issuer.
|
| Certificate Validity Settings: |
This option is used to define the validity time/date procedure of a certificate according to the issuer's certificate validity date/time. The possible values are:
Note: If the user provides a time period for target certificate that is not beyond the CAs expiry date/time then the target certificate will be generated using the user provided date/time regardless of which option is selected.
|
| Certificate Extensions: |
Defines the following:
If CA/B forum and WebTrust guidlines enabled in the ADSS Server then click here for instructions to configure allowed policies for the CAs.
|
| CDP Address (HTTP) |
The address configured here will be used within the CDP extension field of certificates issued by this CA.
Currently operator can configure only one CDP address for a CA, click here for more details on configuring more than one CDP Addresses for a CA.
|
| CDP Address (LDAP) |
The address configured here will be used within the CDP extension field of certificates issued by this CA. |
| AIA Address (OCSP) |
The address configured here will be placed within the AIA extension field of certificates issued by this CA and can be used to check the certificate revocation status over OCSP. Multiple addresses can be added by clicking on '+' button. |
| AIA Address (CA Issuers) |
The address configured here will be placed within the AIA extension field of certificates issued by this CA. It can be used to access certificates that were issued to this CA and other information about this CA (e.g. online validation services and CA Policy data). Multiple addresses can be added by clicking on '+' button. |
| Issuer Alternative Name OID (otherName) |
This field is used to define the Issuer Alternative Name of type otherName. Specify the OID in the first field and its value in the second (Value) field.
Make sure that the Issuer Alternative Name checkbox is checked in the respective certificate template in order to put this extension in the issued certificate.
There are multiple scenarios by which we can define the Issuer Alternative Name of type otherName. These are as follows:
|
| Certificate Issuance Reporting Settings: |
ADSS Server can report on the issuance and revocation of certificates. When the ADSS Server Local CA chains to an external CA e.g. GlobalSign CA then this option allows each issued and revoked certificate to be reported to the external CA e.g. GlobalSign Cert Safe service.
When this option is selected the following items are also shown:
|
| Account Name |
The Account Name issued for this CA. |
| Service URL |
The Issuer CA URL i.e. Cert-Safe URL. |
| TLS Client Authentication |
The TLS Client Certificate required for authentication with Issuer CA URL i.e. Cert-Safe service URL. |
| Certificate Transparency Settings: |
Certificate Transparency helps identifying TLS Server certificates which have been mistakenly issued by a certification authority or maliciously acquired from an otherwise unimpeachable certification authority. This approach requires CAs to publicly publish information about their issued certificates so that anyone can check whether a certificate has been properly issued. Certificate Transparency (CT) does not stop fraudulent certificates being created, but it enables them to be quickly and easily detected. When this license controlled option is enabled for a CA, it manages the TLS Server certificates issuance and interacts with certificate transparency log servers.
When this option is selected the following items are also shown:
|
| Log Server Address |
This specify the address of a log server. Log Servers are used to store information about the issued TLS Server Certificate by a particular CA. These accept a yet to be issued certificate from a CA and return an SCT (Signed Certificate Timestamp); a proof that the certificate has been received by the Log Server. |
| Log Server Public Key |
Log Server(s) generate the Signed Certificate Timestamp(SCT) against the CA request and log server public key is use to verify it. |
| List of Configured Log Servers |
Set the order for the addresses of log servers where the TLS Server Certificate will be stored. |
| Number of SCTs required |
This defines the number of log servers required to approve the request. The total number of log servers may be equal to or greater than this number. This number cannot be zero as at least one log server is required.
In case the number is 2 or greater, then at least two log servers must provide the SCTs.
|
| Use another CA for Pre-certificate Signing |
By enabling this option, a pre-signing certificate can be selected from the drop down menu. The drop-down menu will only show the certificates within the ADSS Key Manager that have certificate transparency in the certificate EKU (Extended key usage extension).
The pre-certificate is constructed from the certificate to be issued by adding a special poison extension. The pre-certificate are submitted to the log servers to get SCTs embedded in the real certificate.
|
| Delegate the Pre-certificate logging process to other entities |
By enabling this option, ADSS CA Server delegates a client application to interact with log server instead of interacting with the log server directly. Upon receiving a TLS Server Certification request from client application, ADSS CA Server creates a pre-certificate and returns this pre-certificate and its chain along with log server information to the client in order to get the required SCT (Signed Certificate Timestamp) from the log server. The client application will log this chain with the log server to get the SCT and provide it to ADSS Server that will embed it in the original certificate and return this certificate to the client application.
Note: This option is useful when ADSS CA Server is working in a highly secured environment and have no access to external servers.
|
| CRL Settings: | Defines the following: |
| CRL Validity Period | Specify the time in minutes to calculate the CRL validity period (Next Update). |
| Generate and Publish CRL Automatically | Specify the time in minutes after which the CRL will be published. This time must be less than the value specified in the "CRL Validity Period" field. |
| Publish Emergency CRLs |
Emergency CRLs are published immediately when a revocation/reinstatement event occurs rather than waiting for the next scheduled CRL e.g. when a certificate is revoked, an emergency CRL is published so that latest information is available to the CRL and OCSP responders. The ADSS OCSP Service can automatically pick-up the emergency CRLs and provide real-time certificate status information. |
| Hashing Algorithm | Select the Hashing Algorithm that will be used as part of the CRL signing. |
| CRL Publishing File Path | This is the path to the location where published CRLs will be stored. This is a mandatory field if one of the above check boxes are checked as you have to specify the address in the file system where you want to publish the CRL. Otherwise the field is optional. |
| Keep expired revoked certificates in the CRL from | If this option is enabled and a time is specified, the CA will keep all the revoked certificates in the CRL that were expired at the exact time (as specified) or after that time. |
ADSS supports the following extensions in a CRL:
|
|
| LDAP Publishing Settings: |
Defines the following:
Note: OpenLDAP and Apache DS v2.0.0.AM25 are tested.
|
| Publish CRL in LDAP | Enable this if it is required to publish the CRL on LDAP Server. |
| Publish Issued Certificates in LDAP | Enable this if it is required to publish the Issued certificate on LDAP Server. |
| CRL Publishing LDAP Server |
Set the LDAP Server URL e.g.
|
| Port |
Set the port number of the LDAP server - the default port is 10389. |
| Bind DN/User |
Set the username or Distinguished name (DN) that will be used to login to the LDAP server. |
| Password |
Set the password that will be used to authenticate the user to the LDAP server. |
| [BUTTON] Publish CRL |
This button provides an option to immediately manually publish a CRL to the configured file path. |
These settings can be saved by clicking the Save button.
As stated previously, the ADSS Local CA certificate may be a self-signed certificate (i.e. in this case the ADSS Local CA is a Root CA) or a delegated certificate issued by some external CA (i.e. in this case the ADSS Local CA is a Subordinate CA). The configured CA certificate can be viewed by selecting the CA and then by clicking on the View Certificate button. The configured CA certificate can be changed in edit mode to any other CA certificate having key Purpose Cert/CRL signing.
Configuring CRL Publishing Location using Tomcat
If you wish to create a CRL publishing location and immediately access this within different ADSS Server services then this can be done using Tomcat. This is recommended only for test purposes. For production systems an external web accessible folder is recommended.
1. Create a directory for CRLs at the following location within the ADSS Server installation area:
{drive}:\\{installation path}\console\server\webapps\console\crls
2. Configure this path in the CRL Publishing settings for the local CA:
{drive}:\\{installation path}\console\server\webapps\console\crls\CAname1.crl
3. Configure the following address for the CDP in the CRL Publishing Settings for the local CA:
Prerequisites to publish Certificates in an LDAP Directory
- Custom Partitions in LDAP: The partitions in LDAP directory should contain an entry/hierarchy similar to the Certificate's RDN Structure.
- Issuer Certificate DN: To publish Attribute Certificate with a BaseCertID, the Issuer Certificate/CRL must be published on its RDN partition of LDAP Directory.
- ExtensibleObject Class: This objectclass is defined in RFC 2252 to allow flexibility of adding and modifying attributes on the LDAP Server. The extensibleObject object class must be a part of LDAP schema of LDAP Server. The objectClass (extensibleObject) optionally hold all supported attributeTypes defined in LDAP schema of LDAP Server. ExtensibleObject Class is by default supported in LDAP release 3.
- attribute_cert_pmi Schema: LDAP Server doesn't support few attributes and object classes, attribute_cert_pmi schema defines the "attributeCertificate" attribute type which is required to publish the Attribute Certificates on the LDAP Directory. To import the schema/ldif file in configured LDAP Server, get the zip file "attribute_cert_pmi" from the path given below, [ADSS-Server-Installation-Dir]\support\attribute_cert_pmi.zip
OpenLDAP and Apache DS.
Issued Certificates
By clicking on the Issued Certificate button after selecting the CA, the following screen will be displayed where all the certificates issued by this CA are shown:
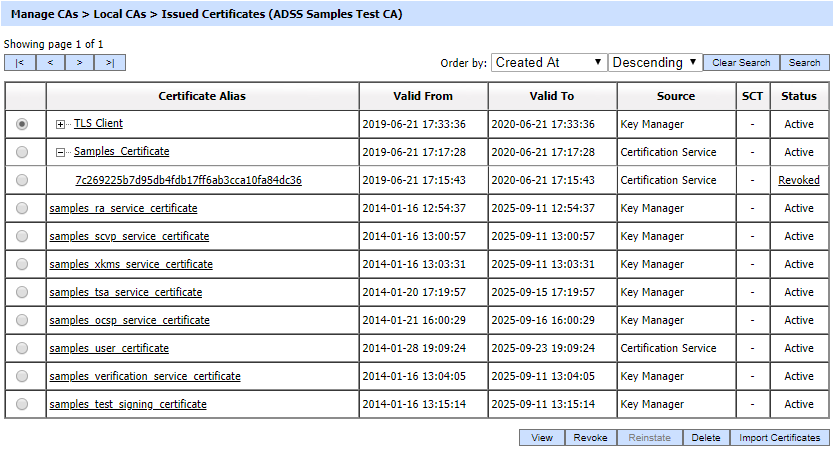
This screen shows certificates issued by Key Manager, Certification Service and Manual Certification while the Certification Service's Issued Certificate sub module only shows the certificates issued by the Certification Service.You can select a certificate, and then either View, Revoke or Delete it. A certificate revoked with the certificateHold instruction code can be activated later on by using the Reinstate button. Once a certificate is revoked, an instant revocation entry will be made in the database instead of issuing an emergency CRL on each revocation. Publishing CRLs is costly if they are published too frequently. To decrease the cost of resources, the idea of instant revocation is introduced. It works for the locally configured CA(s) only. Systems that are polling outside the ADSS Server, but using the CAs configured in ADSS Server, have to download the CRL in order the get the latest revocation information.
If a certificate got renewed then it's old certificate will be marked revoked and a new certificate will be generated, in order to check the latest and revoked certificates against a particular alias, just expand the certificate by clicking on '+' button then all the old revoked certificates will be shown as child.
If an issued certificate is required to be deleted and the same certificate alias is required to be used for the new certificate then operator need to restart the ADSS Core, Console and Service instances from Windows NT Services panel or UNIX daemon.
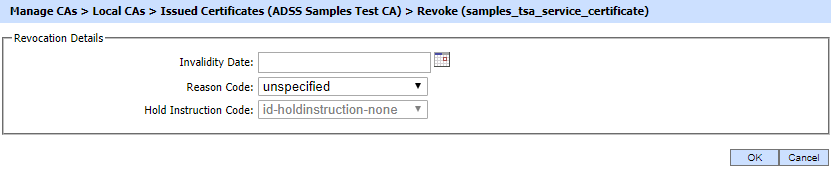
You can select a certificate, and then either View, Revoke or Delete it. Clicking on Revoke button will show the following screen where invalidity date, revocation code and hold instruction code can be provided before revoking the certificate:
By clicking on the Search button on Issued Certificates main page will display following screen:
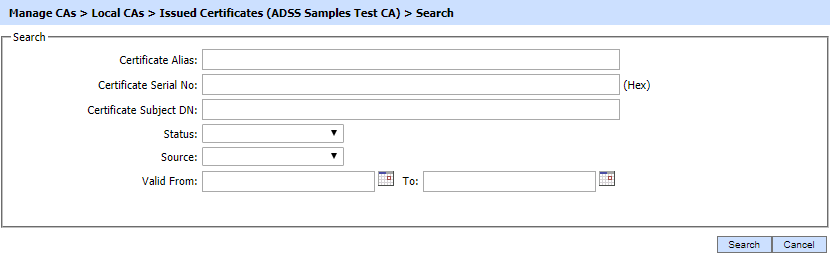
If "_" character is used in the search then it will act as wildcard.
By clicking on the Import Certificates button, the following screen will be displayed where user can browse to the issued certificate(s) detail file or to certificate(s) zip file issued by the selected Local CA:

Click here for detailed instructions on how to import a CA (as Local CA) and its issued certificates into ADSS Server along with the required structure of Certificate Detail file and Certificate ZIP file:
System Properties
Clicking on the Delete button on Issued Certificates main page will generate following scenarios :
- To delete valid certificates i.e. with
status (Valid, Revoked, NotYetValid) a new property ENABLE_VALID_CERTIFICATE_DELETION is introduced in
Global Settings > Advanced Settings > General. When this property is set to true the ADSS Server will delete any certificate irrespective of its status. If this property is set to FALSE, only expired certificates would be deleted and it also serves the backward compatibility. The default value of this property is
TRUE.
If a certificate deletion request comes through certification service interface, ADSS Server will check ENABLE_VALID_CERTIFICATE_DELETION property first and decide to take actions according to the value of the property. - To delete the key
pair and certificates from HSM a property
ENABLE_PKCS11_KEY_DELETION is introduced in Global Settings > Advanced Settings > Certification. If this property is set to TRUE, the key pair and relevant certificates would be deleted from HSM. If this property is set to FALSE, the key pair and certificates would only be deleted from ADSS Server database but not from HSM. Default value for this property is TRUE.
See also