Verification Service
The following configurations relating to the Verification Service can be made within Client Manager:
- Allow the client to access the ADSS Signature Verification Service
- Allow the client to access the ADSS Certificate Validation Service
- Assign which Verification Service profiles can be used by this client
Once a client is registered, permissions to access the Verification Service can be granted by editing this client. On the edit screen, clicking on the Verification Service link at the top of the page shows the following screen:
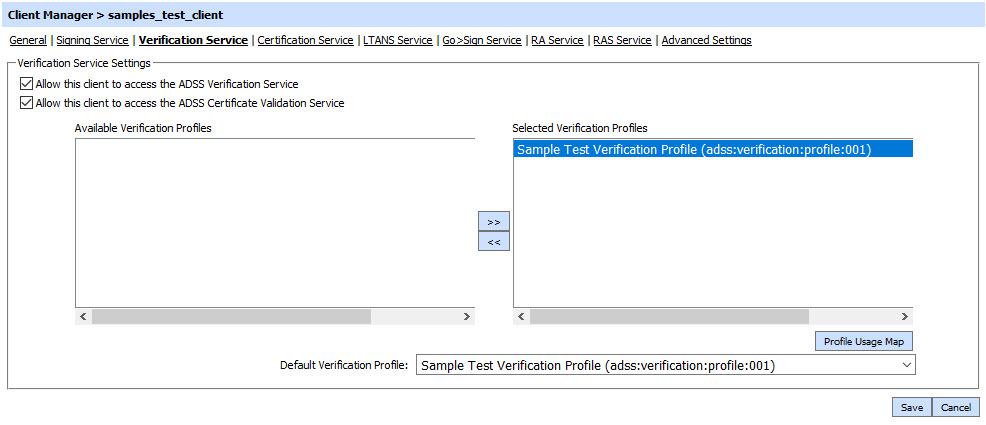
An initial configuration that needs to be made is whether this client can access the ADSS Signature Verification Service and/or Certificate Validation Service by selecting the appropriate checkbox at the top. Note it is possible to use the Verification Service to verify both signatures and also validate certificates. The difference between the two is as follows:
- Signature Verification: the signature and the signing certificate are both checked. The signature is only considered trusted if the signature is valid, meet minimum signature quality level, not expired, not revoked, issued by a trusted CA and meet the minimum certificate quality level defined for the client application according to the PEPPOL trust ratings.
- Certificate Validation: the certificate is validated to ensure it is not expired, not revoked, issued by a trusted CA and meeting the minimum certificate quality level defined for the client application according to the PEPPOL trust ratings.
It is up to the client application to specify which service is wanted, i.e. full signature verification or only certificate validation. This will depend on its capabilities and business requirements. It is important to ensure that the client application is configured for the correct service in the Client Manager. The XML schema for the two services is essentially very similar and described further in the ADSS Server Developer Guide.
The next action is to define which verification profiles (configured within the ADSS Verification Service) are to be made available to this client. Different clients may need to have access to different verification profiles. By default all the existing verification profiles currently configured within the ADSS Verification Service will be made available to each newly registered client. In order to allow access to a particular verification profile, simply move that profile from the left-hand group box labelled Available Verification Profiles to the right-hand group box labelled Selected Verification Profiles using the >> button shown in the screenshot above. Clients can only reference those verification profiles that are shown in the Selected verification Profiles. To remove access to a particular profile use the opposite << button to move the relevant profile back to the right-hand box.
The Profile Usage Map button provides an overview of which profiles are being used by which clients.
The Default Verification Profile defines which profile to use in case the request message from this client does not reference any specific verification profile.
Click the Save button when the list is updated to store the changes.
|
|
Whenever configurations are updated on this page remember to restart the Verification Service and have the changes take effect. |

See also
Verification Service
Certification Service
XKMS Service
LTANS Service
Decryption Service
Go-Sign Service
RA Service
RAS Service
SAM Service
CSP Service