SigningHub account settings are configured to integrate the SigningHub app with your Microsoft Dynamics CRM account. For this you need to have an active enterprise account in SigningHub.
These settings are done at SigningHub enterprise account level. Which implies that once an enterprise account is integrated by their enterprise admin, the same settings will be applicable to all their enterprise users.
These settings are done at SigningHub enterprise account level. Which implies that once an enterprise account is integrated by their enterprise admin, the same settings will be applicable to all their enterprise users.
Configure your SigningHub account settings
- Register an Enterprise account in SigningHub.
- In case of an on-premises deployment, log into your locally deployed Dynamics CRM instance through your domain user and password (active directory credentials).
OR
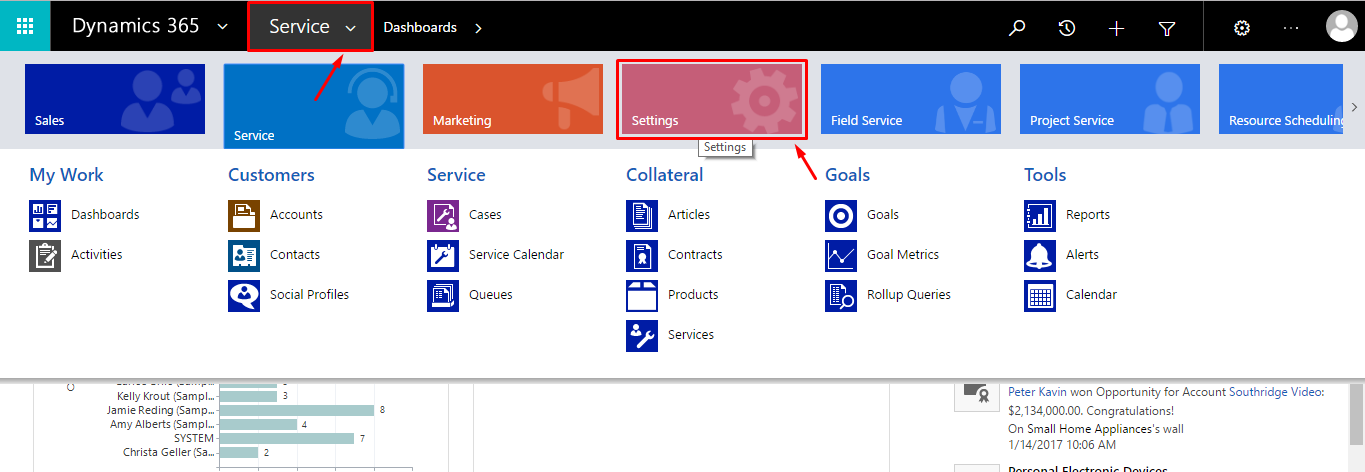
In case of an Office 365 installation, clear your browser cache and log into your Office 365 account. - Click the "Service" tab and then click the "Settings" module, as marked with red arrows on the below image.
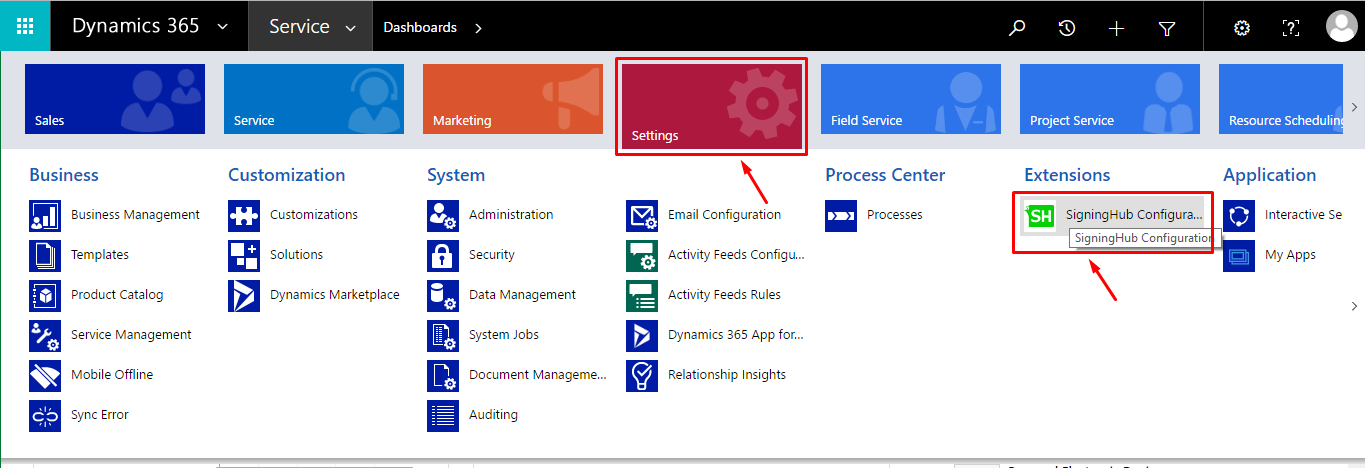
- From the next appearing "Settings" menu, click the "SigningHub Configuration" option being displayed under "Extensions".
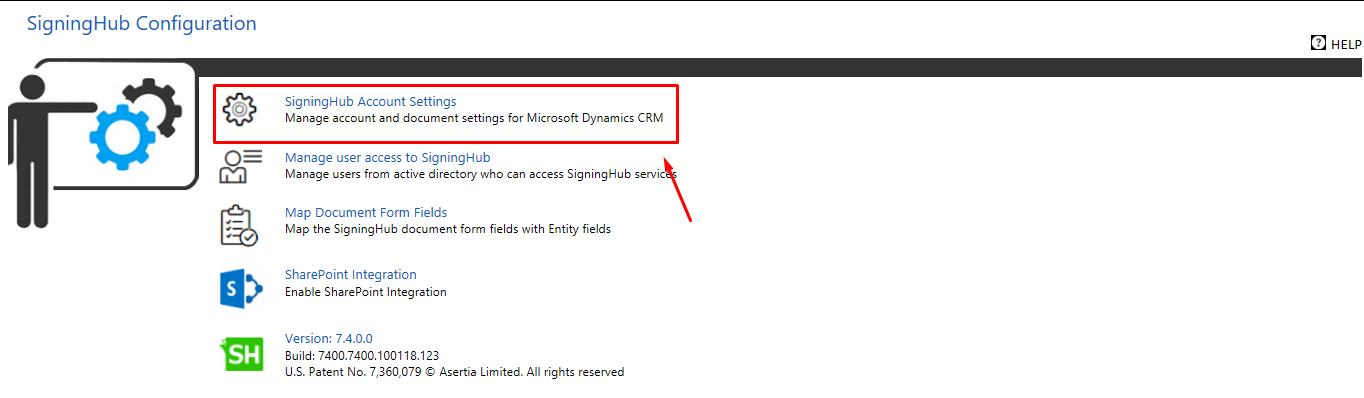
- Click the "SigningHub Account Settings" option, as marked with an arrow on the image below.
- The "SigningHub Account Settings" screen will appear, fill in the parameters as explained in the below table.
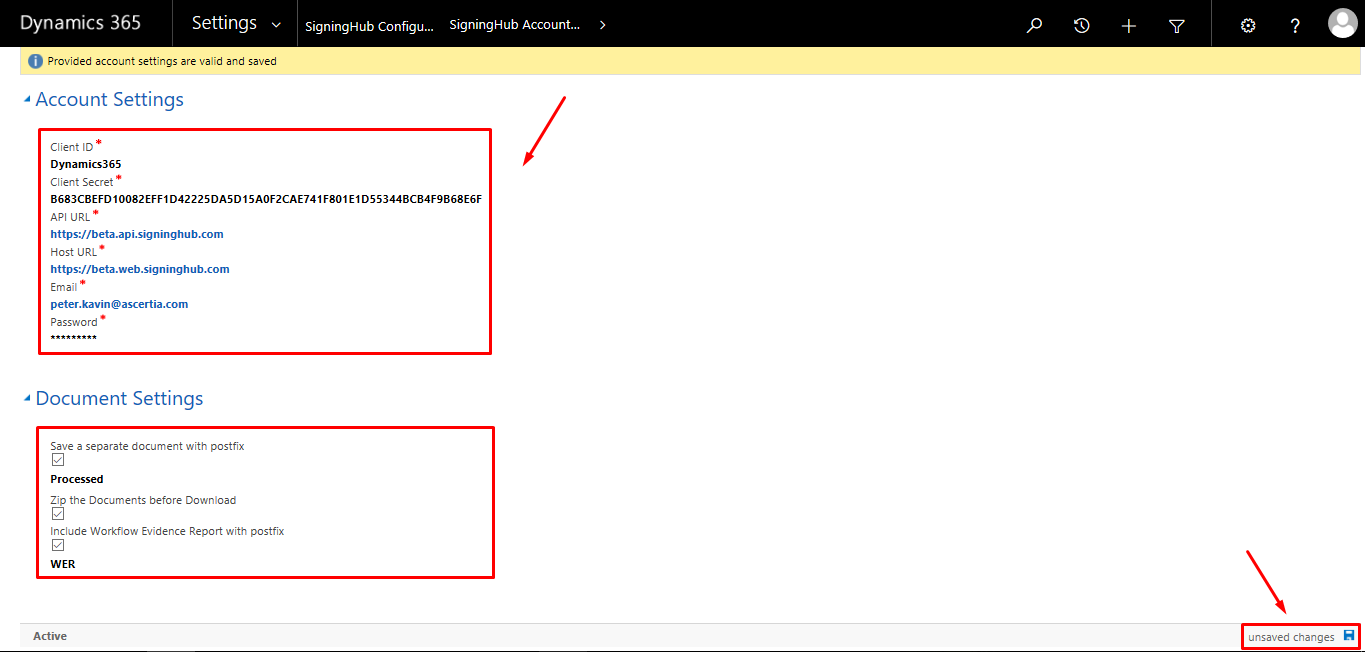
- Click the "Save" button available in the right bottom of screen.
The specified details will be validated and saved.
| SigningHub Account Settings | |
| Fields | Description |
| Account Settings | |
| Client ID |
Specify the client ID as specified in SigningHub>Enterprise Settings>Integrations>Application Integration>Step 6. |
| Client Secret |
Specify the client secret as generated in SigningHub>Enterprise Settings>Integrations>Application Integration>Step 6. |
| API URL |
Specify the URL of SigningHub API, i.e. "https://api.signinghub.com".
In case if your SigningHub deployment is on a server other than Signinghub.com, then you will have to specify this URL accordingly. |
| Host URL |
Specify the URL of SigningHub Host, i.e. "https://web.signinghub.com".
In case if your SigningHub deployment is on a server other than Signinghub.com, then you will have to specify this URL accordingly. |
| Email |
Specify the email of SigningHub Enterprise Admin account that needs to integrate with your Dynamics CRM account.
|
| Password |
Specify the password of Enterprise Admin account.
|
| Document Settings |
|
| Save a separate document with postfix |
Select this option to save the signed versions as new document copies, and specify a postfix (i.e. "processed") for them in the next appearing field. In this way when a workflow is finished, the completed documents will be saved with the specified postfix appended to their names. This configuration is helpful when you want to save your signed copies with a custom postfix. If you dont want to save your signed versions with a custom postfix, keep this option un-selected. In this way when a workflow is finished, SigningHub will save the completed documents by appending the respective package IDs to their names. The completed document copies can be seen along with the original documents under the respective "Notes" tab of the same Dynamics CRM entity (i.e. Opportunities, Leads, etc.), from where the documents were shared. |
| Zip the documents before download |
This option is only applicable when there are multiple documents in a package. Select it to save your signed documents in a zip file. When a workflow is finished, the completed documents package will be saved as a zip file. However when a package contains a single document, it is always downloaded in a PDF file. These zip files can be seen along with the original documents under the respective "Notes" tab of the same Dynamics CRM entity (i.e. Opportunities, Leads, etc.), from where the documents were shared. |
| Include Workflow Evidence Report with postfix |
This option will only appear if you have rights to view the Workflow Evidence Report in your subscribed SigningHub service plan. Select it to include these reports in your account, and specify a postfix (i.e. "WER") for them in the next appearing field. In this way when a workflow is finished, the Workflow Evidence Report will also be saved with the specified postfix appended to their names. These reports can be seen along with their completed documents under the respective "Notes" tab of the same Dynamics CRM entity (i.e. Opportunities, Leads, etc.), from where the documents were shared. This configuration is useful when you need to maintain full audit trail record of each workflow. |
1. In the "Callback URL" field of SigningHub integration screen
(i.e. SigningHub>Enterprise Settings>Integrations>Application Integration>Step 6), specify the URL:
(i.e. SigningHub>Enterprise Settings>Integrations>Application Integration>Step 6), specify the URL:
"https://System IP or Machine name or Domain URL /WebResources/sh_SigningHubCallBackWebResource?data=".
- The red portion is the system IP with port number or machine name (in case of configuring an on-premises deployment e.g. https://mysigninghub/) or domain URL (in case of configuring a cloud based deployment, e.g. https://mysigninghub.crm4.Dynamics.com) on which Microsoft Dynamics CRM is hosted.
It is subject to change with respect to each deployment of Microsoft Dynamics CRM. - The grey portion is the fixed value that needs to be appended to your callback URL for the integration purpose.
Here is an example of a complete callback URL:
https://192.168.0.28:8080/WebResources/sh_SigningHubCallBackWebResource?data=
Make sure the Callback URL is correctly configured in SigningHub, otherwise system will return an error upon sharing a document. Contact support in case of any query.
2. A Workflow Evidence Report entails the detailed logs of each SigningHub transaction performed within a document workflow. It is available to the respective document owner only and is downloaded in PDF file. The PDF is also digitally signed by Ascertia with an invisible PAdES Part 2 signature, and can be used as a legal proof outside SigningHub.
So in case a recipient in the workflow repudiates their signature, or if there is any query related to the workflow, this report can resolve all such issues.