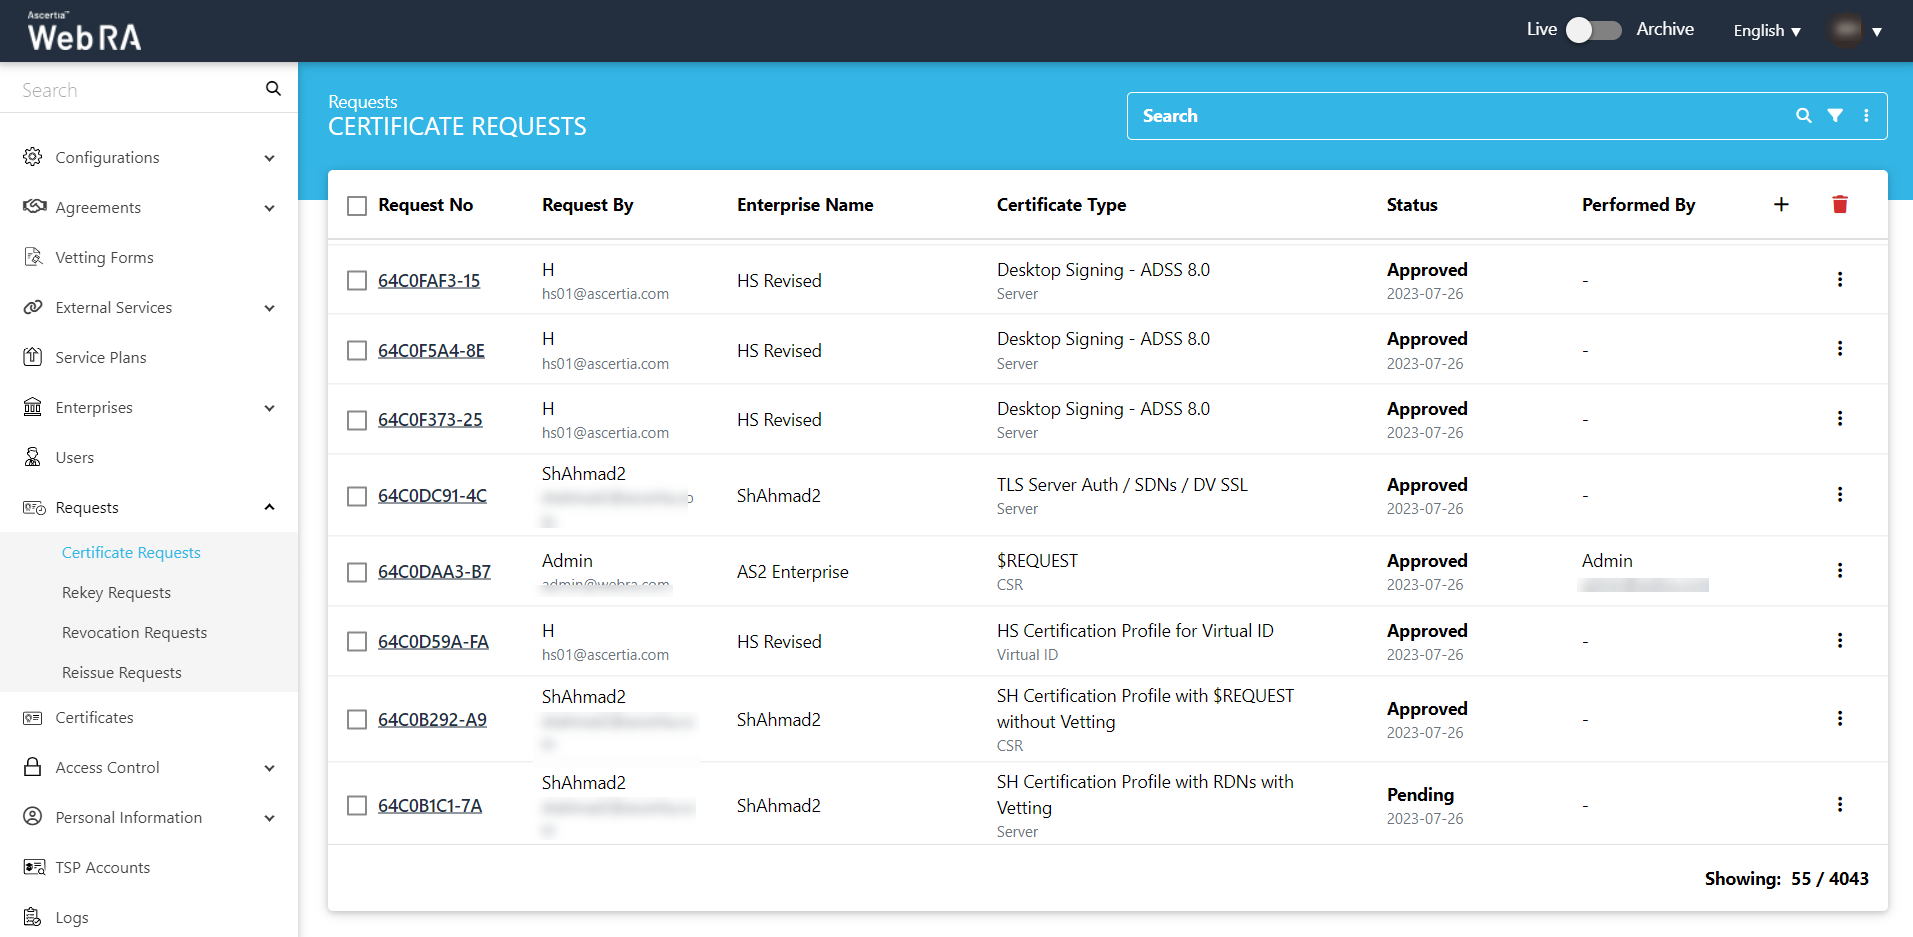
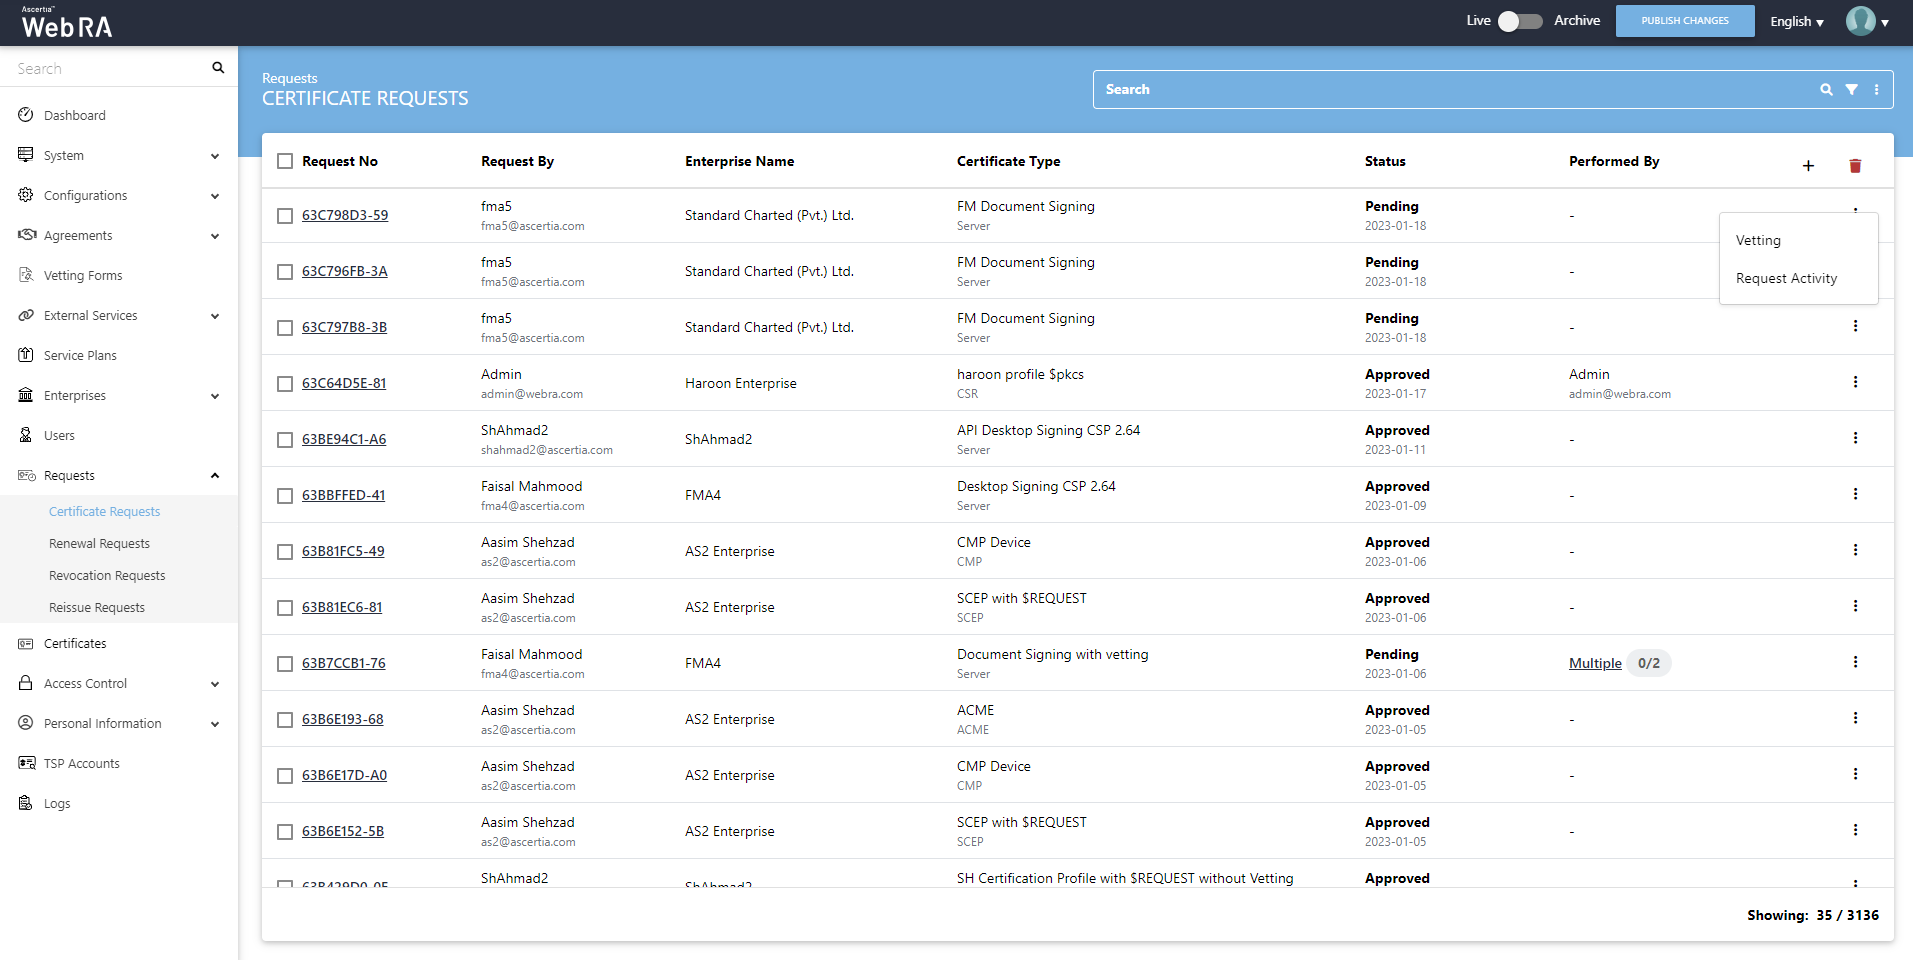
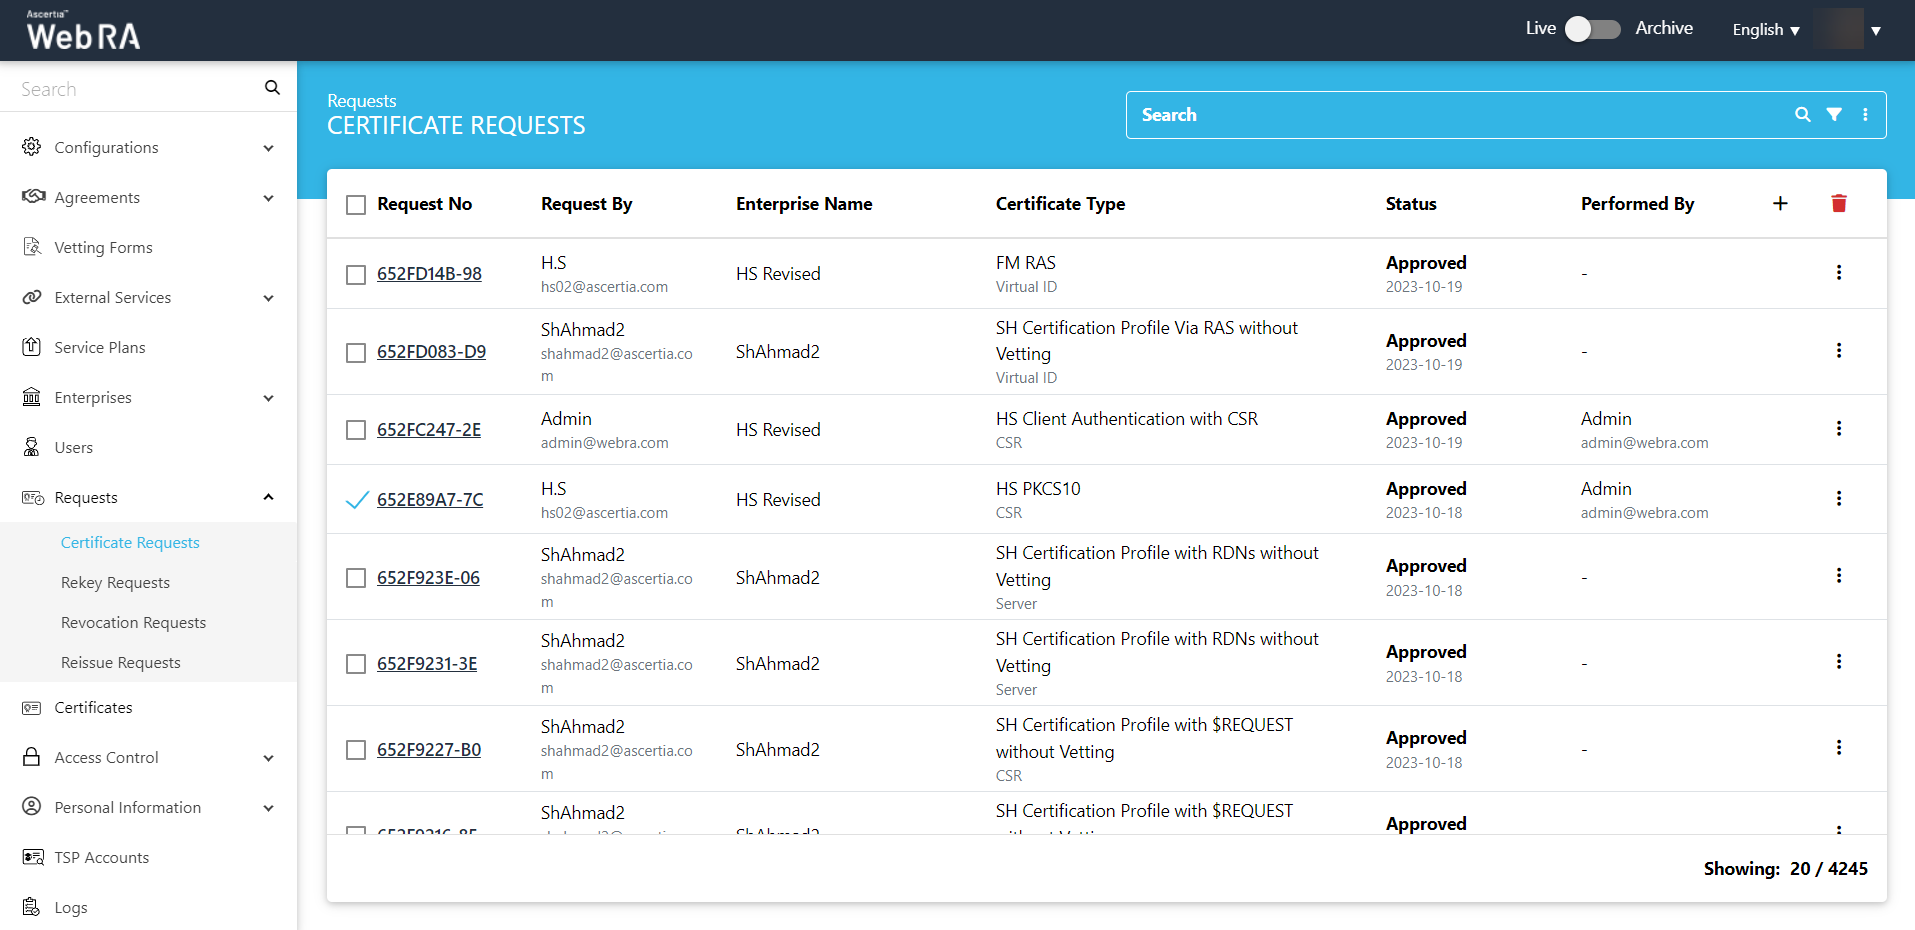
Certificate Requests
This section in the ADSS Web RA admin portal lists down all types of certificate requests, whether they are pending approval, in review or approved.
- Submit a Certificate Request based on client authentication with CSR.
- Submit a Certificate Request based on TLS Server Auth / SDNs / DV SSL / PKCS10 (Domain Names)
- Submit a Certificate Request based on TLS DV - None (CAA Records)
Expand Requests > Certificate Requests from the left menu pane. The certificate requests listing will appear. The Request By section will display Citizen ID below the user name if it is enabled in the Configurations > Default Settings.

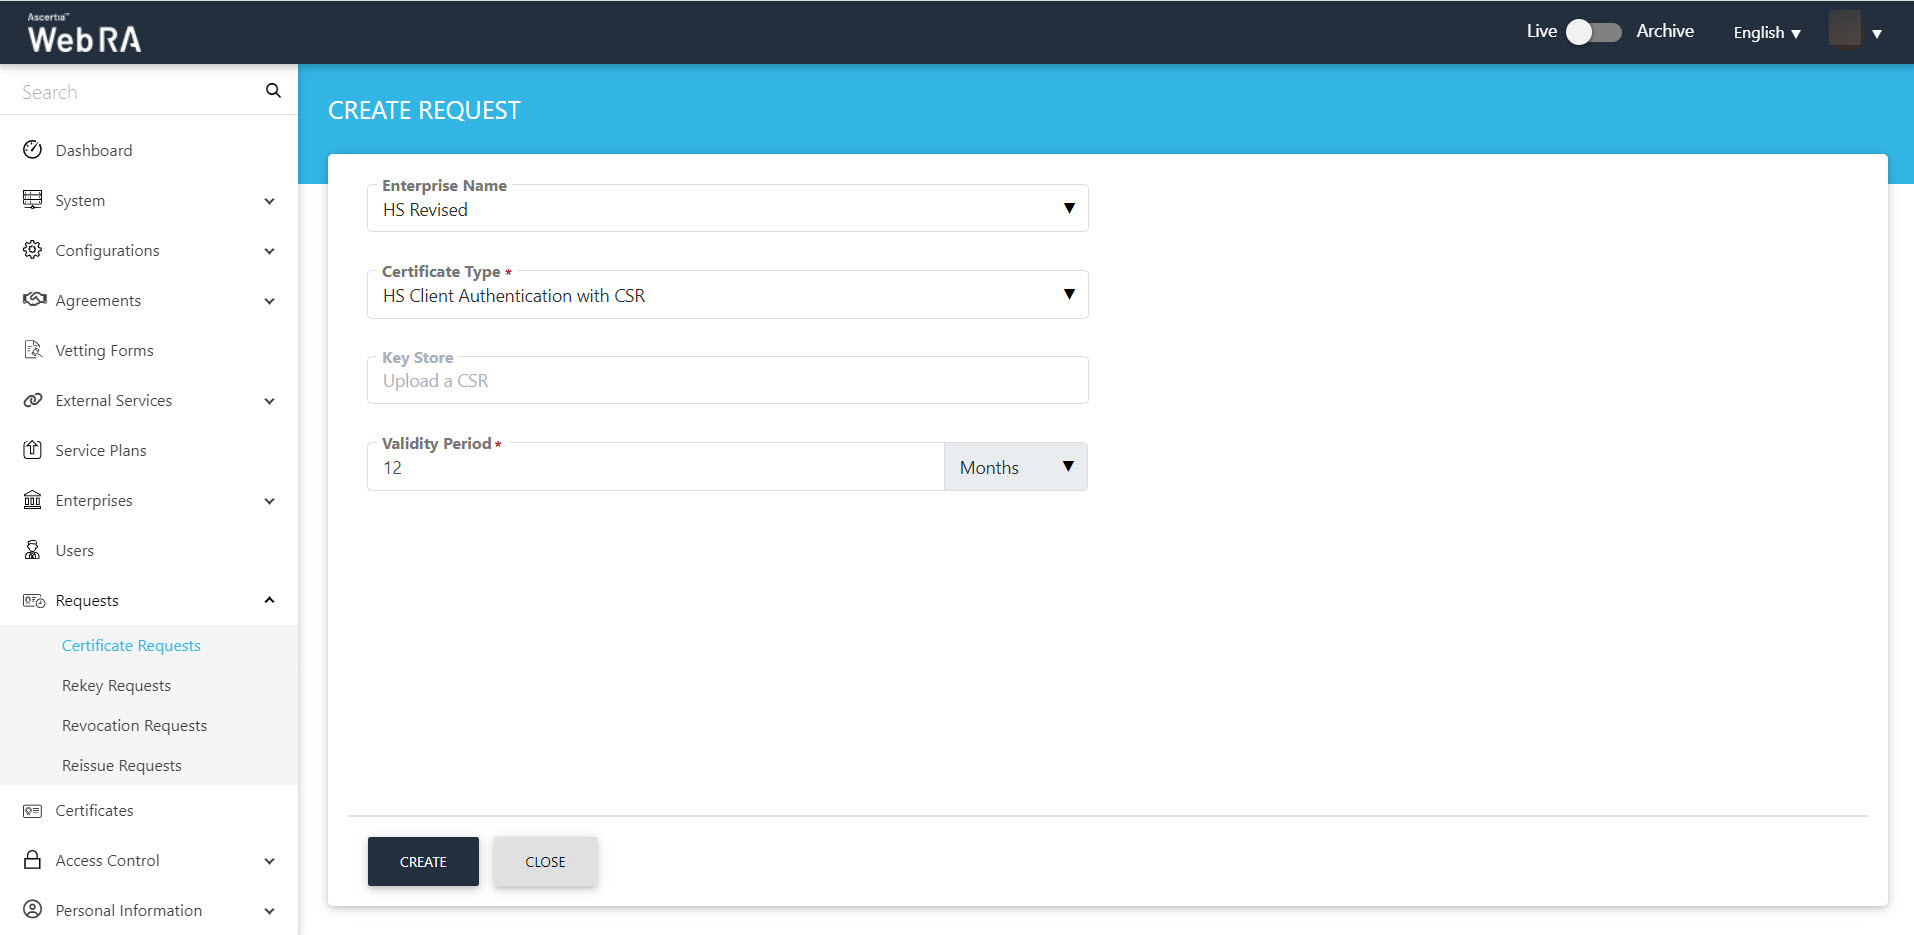
Submit a Certificate Request (Client Authentication with CSR certificate type)
- Expand Requests > Certificate Requests from the left menu pane, and then click
 from the grid header.
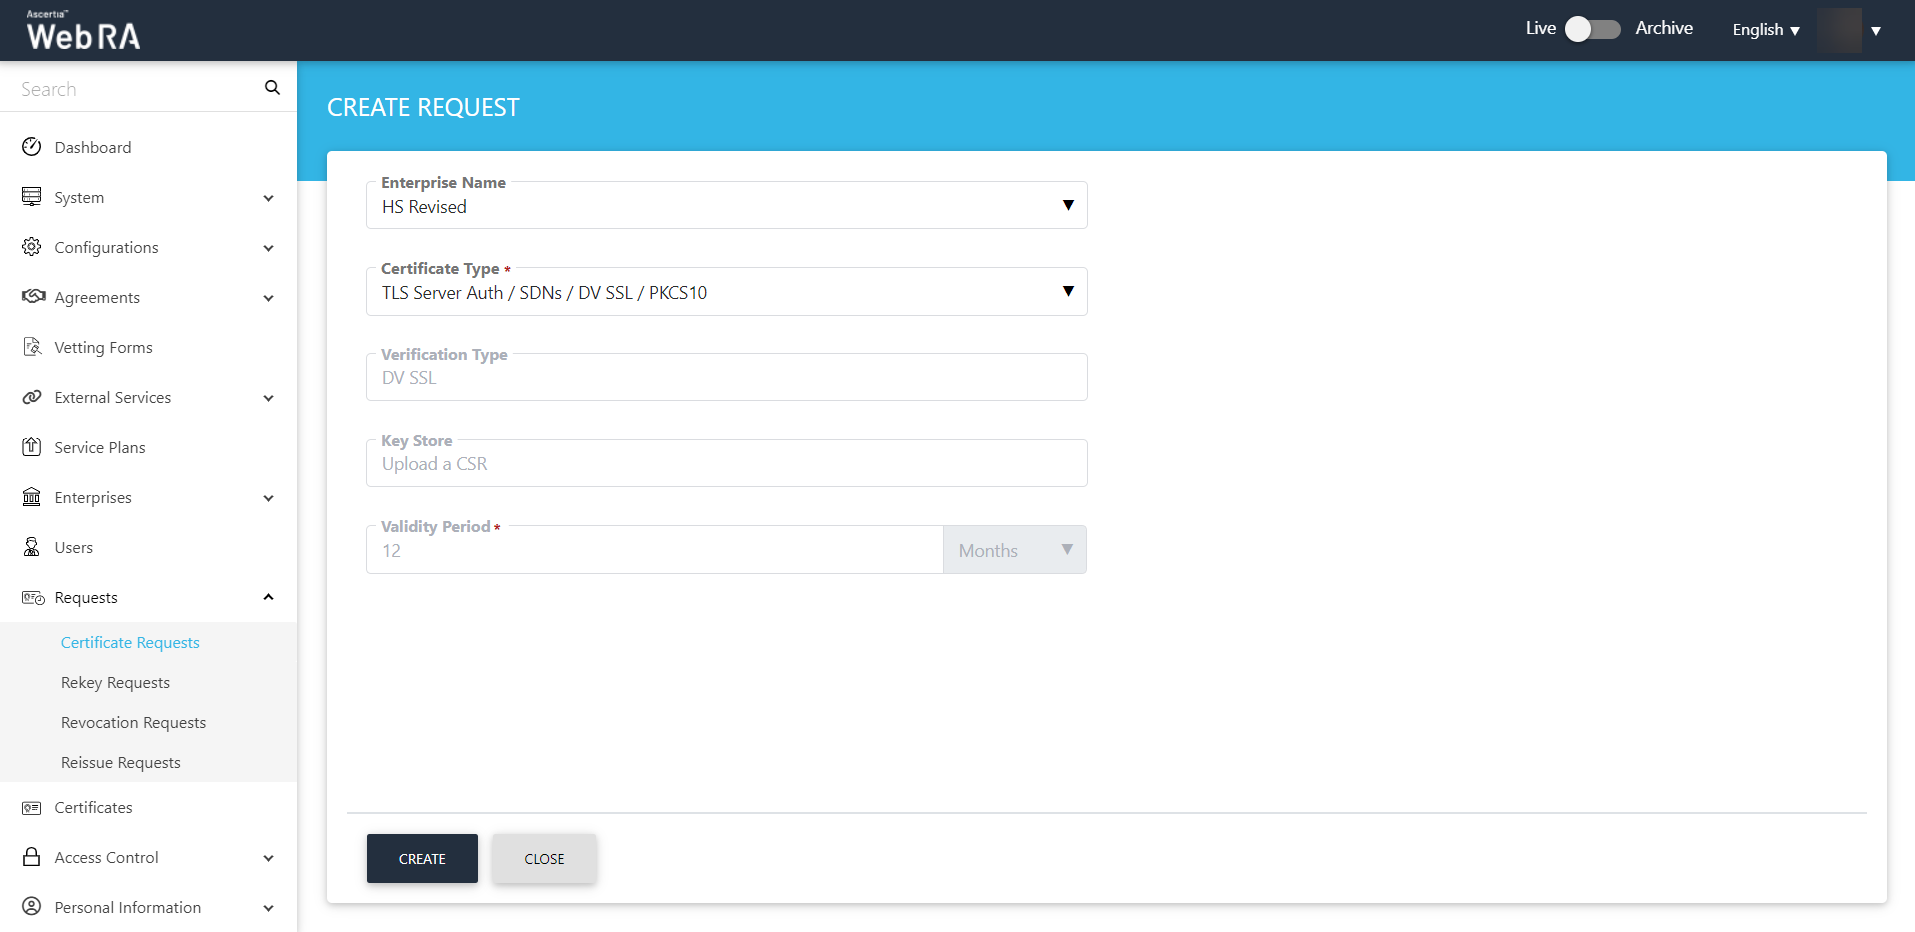
- Select your Enterprise Name from the drop down, then select the Certificate Type, set the Validity Period and click Create.
- The Welcome Note screen will appear.
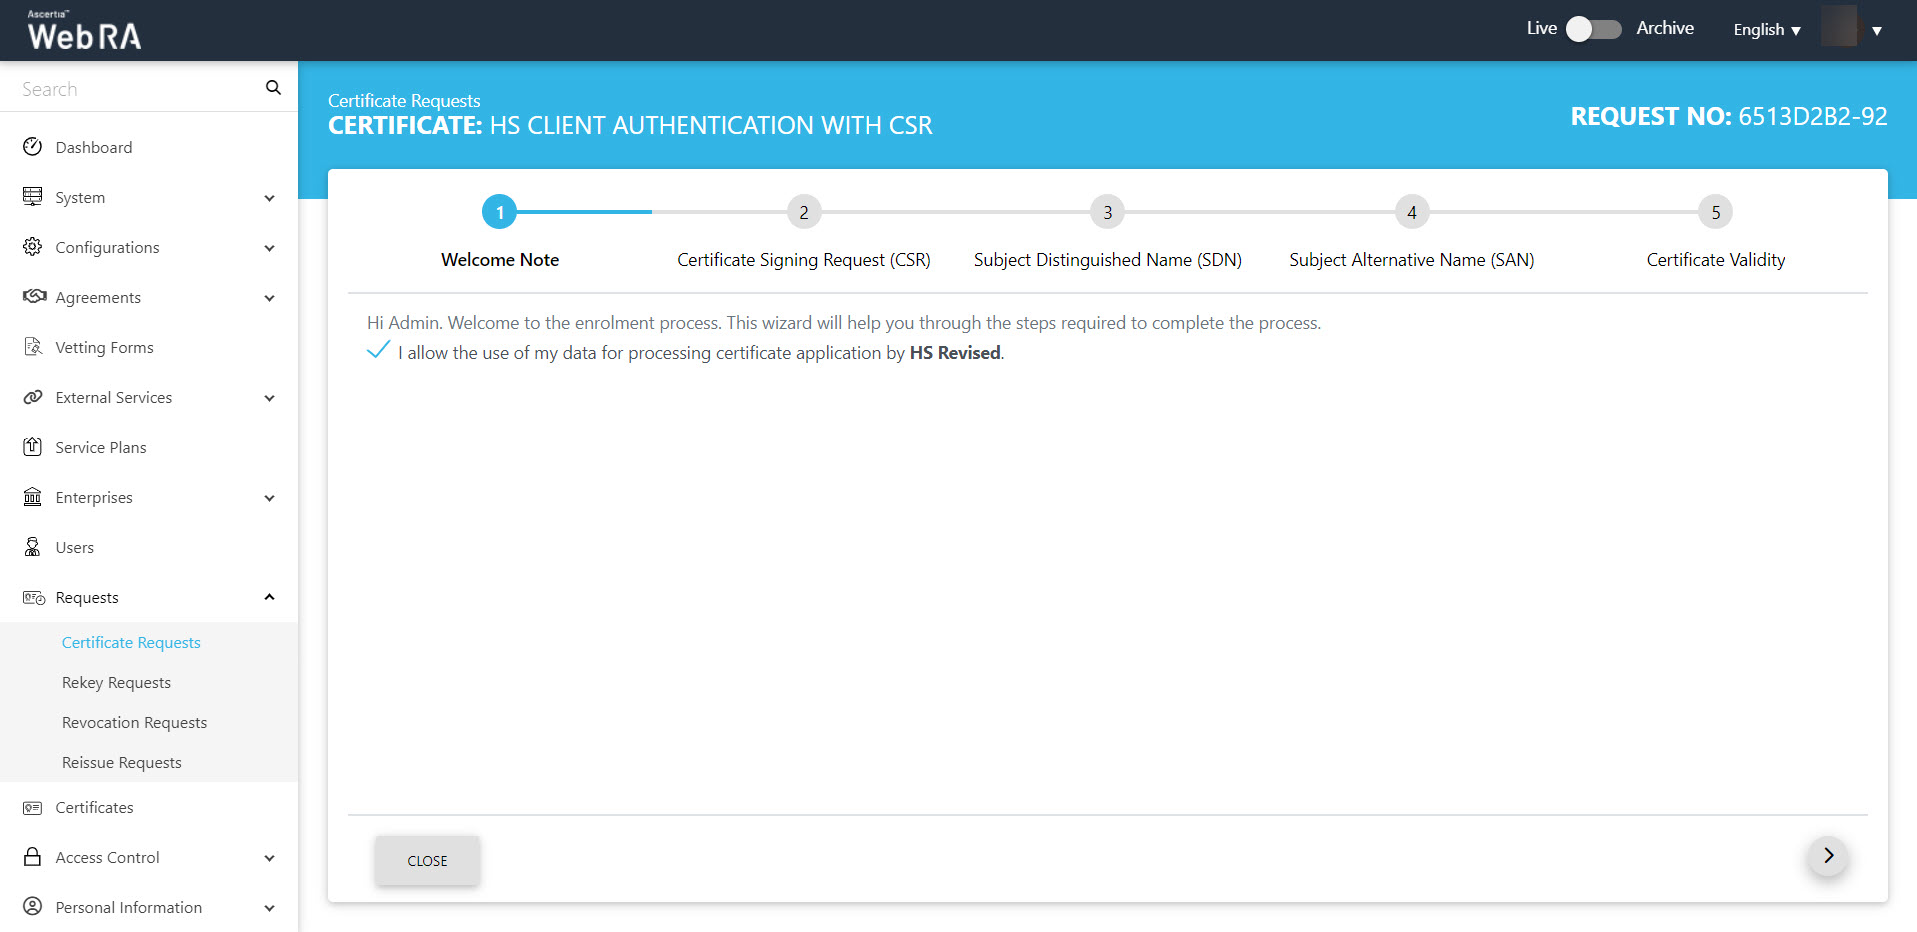
The welcome note will appear, select the checkbox I allow the use of my data for processing certificate application by Enterprise Name and click next.
- The second screen appearing will be requesting you to either upload a CSR or paste one below.
A customised text will appear here, if added in the admin portal.
Once you upload the file or paste the CSR, click next to proceed.
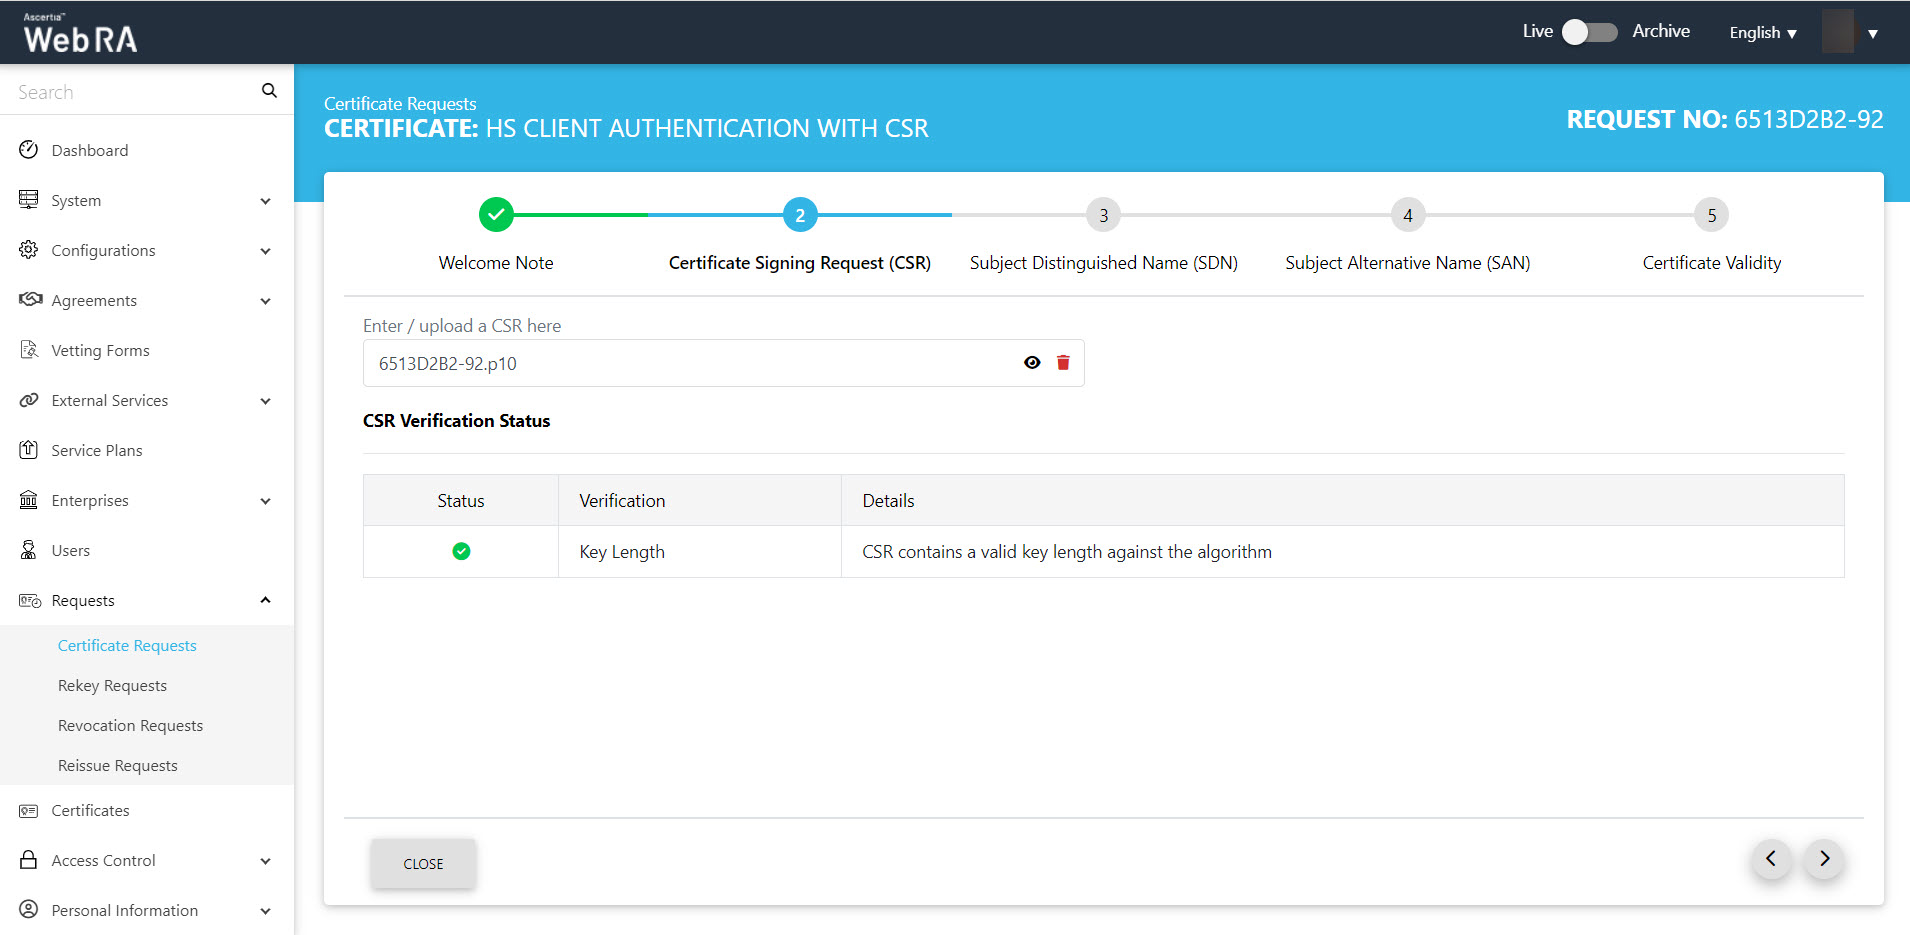
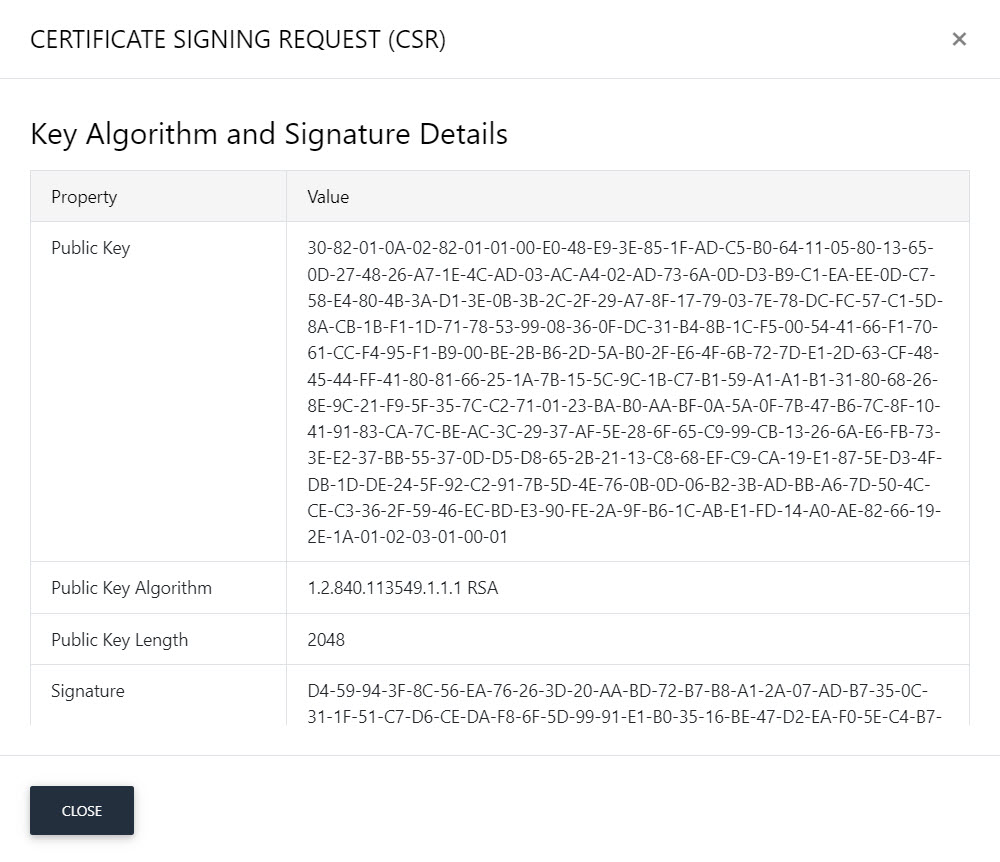
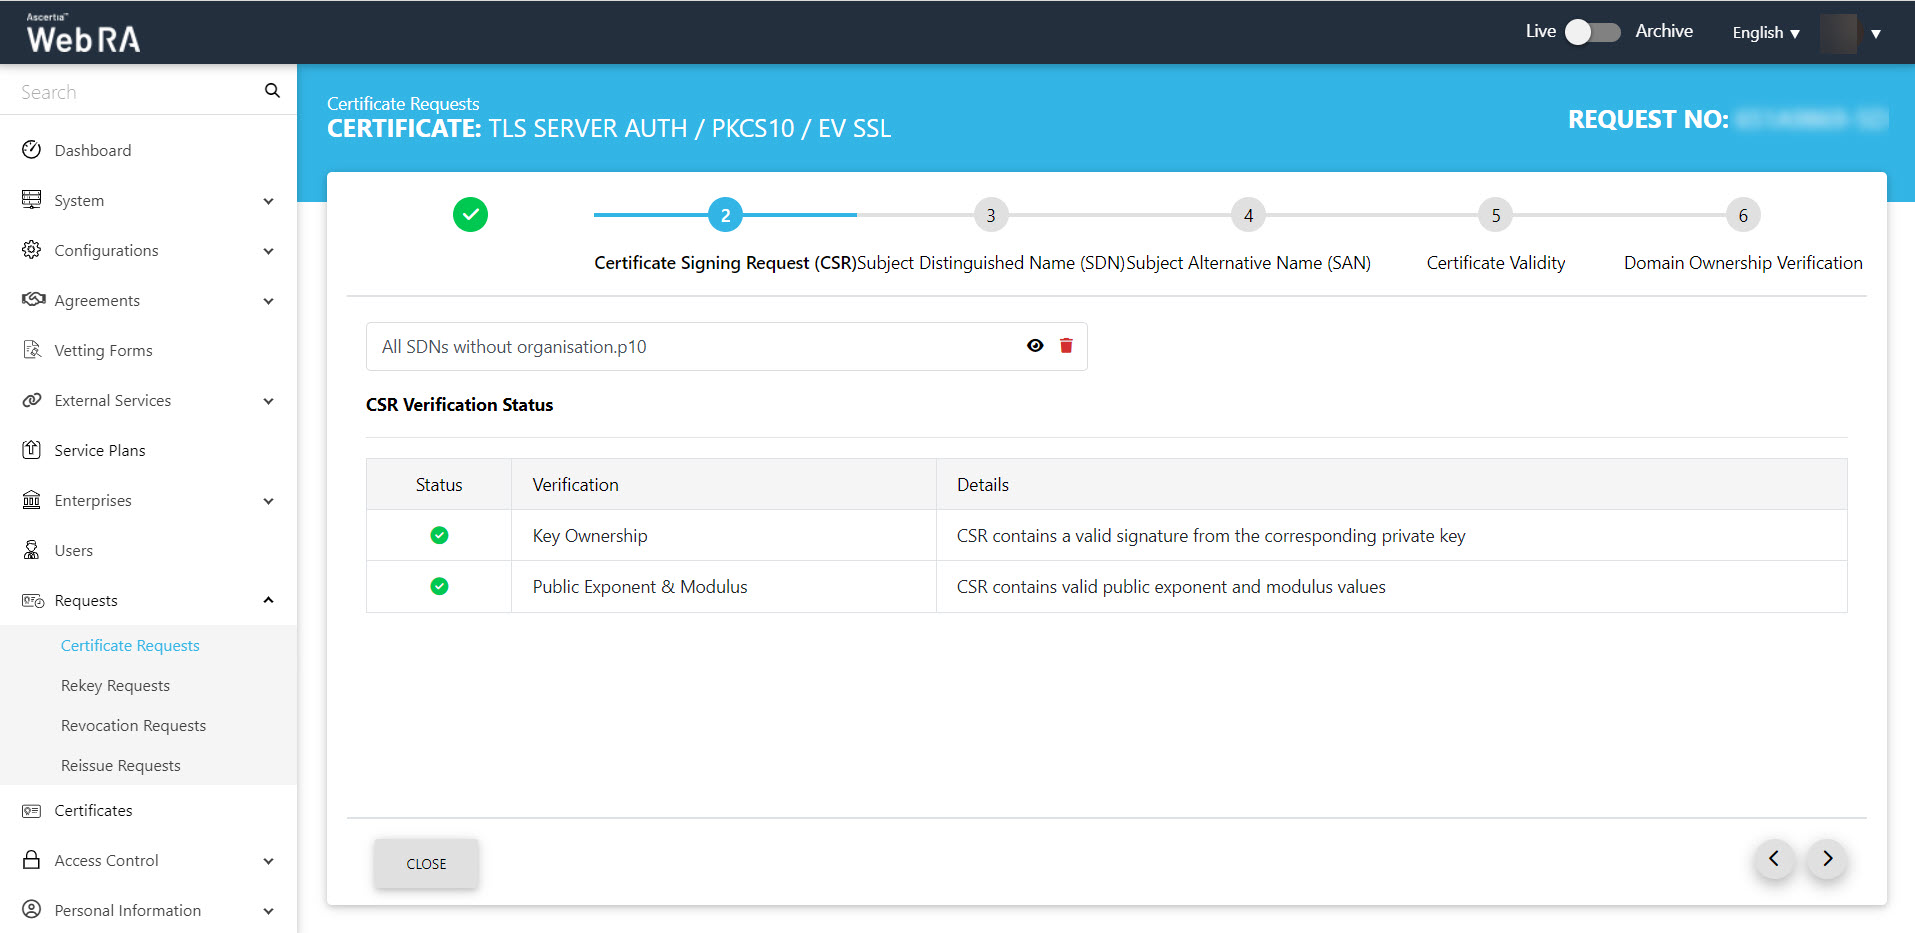
You can click the view icon button, to see the CSR. It contains all the SDNs, SANs, etc.
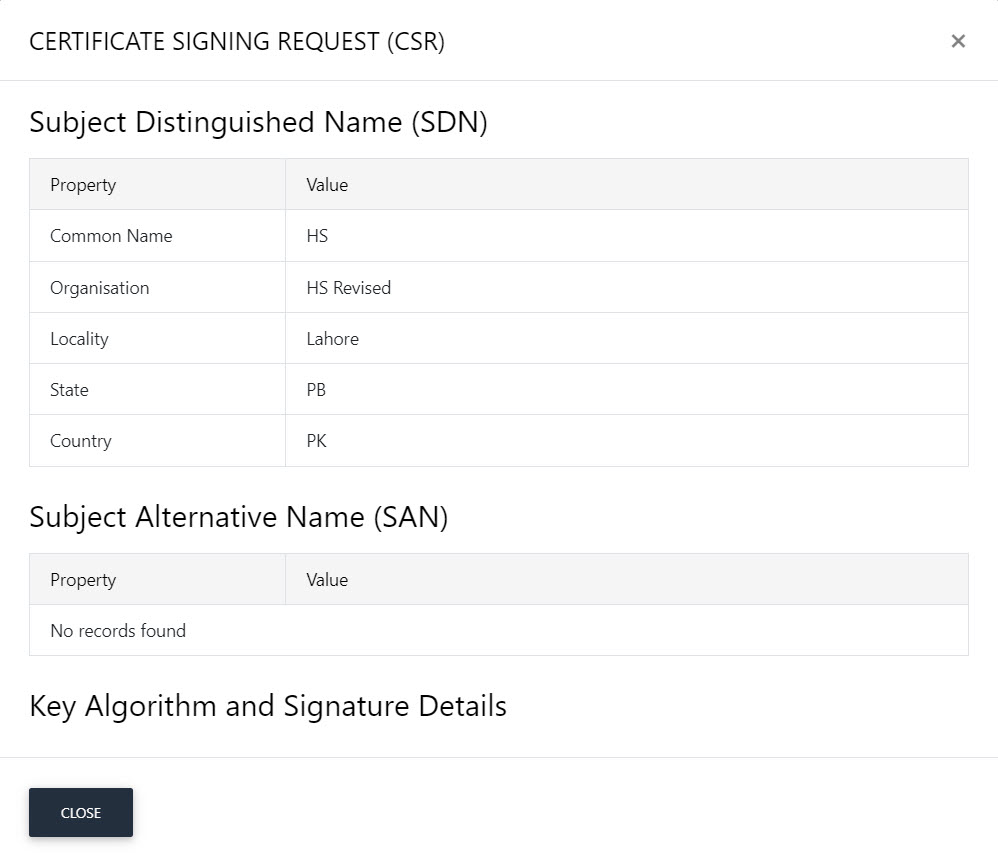
Scroll down to see the CSR in detail.
ADSS Web RA Server supports the following attributes in a CSR:
- Common Name
- First Name
- Last Name
- Title
- Organisation Unit
- Organisation Identifier
- Locality
- Street Address
- State
- Postal Code
- Country
- Subject Serial Number
- Business Category
- DNS Name
- IP Address
- Email Address
- Other Name
- Public Key
- Public Key Algorithm
- Public Key Length
- Signature
- Signature Algorithm
- Version
- Key Size
- Fingerprint (SHA-1)
- Fingerprint (MD5)
- SANS
ADSS Web RA Server does not supports the following attributes in a CSR:
- Exponent
- Certificate Extensions
- Key Id Hash(rfc-sha1)
- Key Id Hash(sha1)
- Key Id Hash(bcrypt-sha1)
- Key Id Hash(bcrypt-sha256)
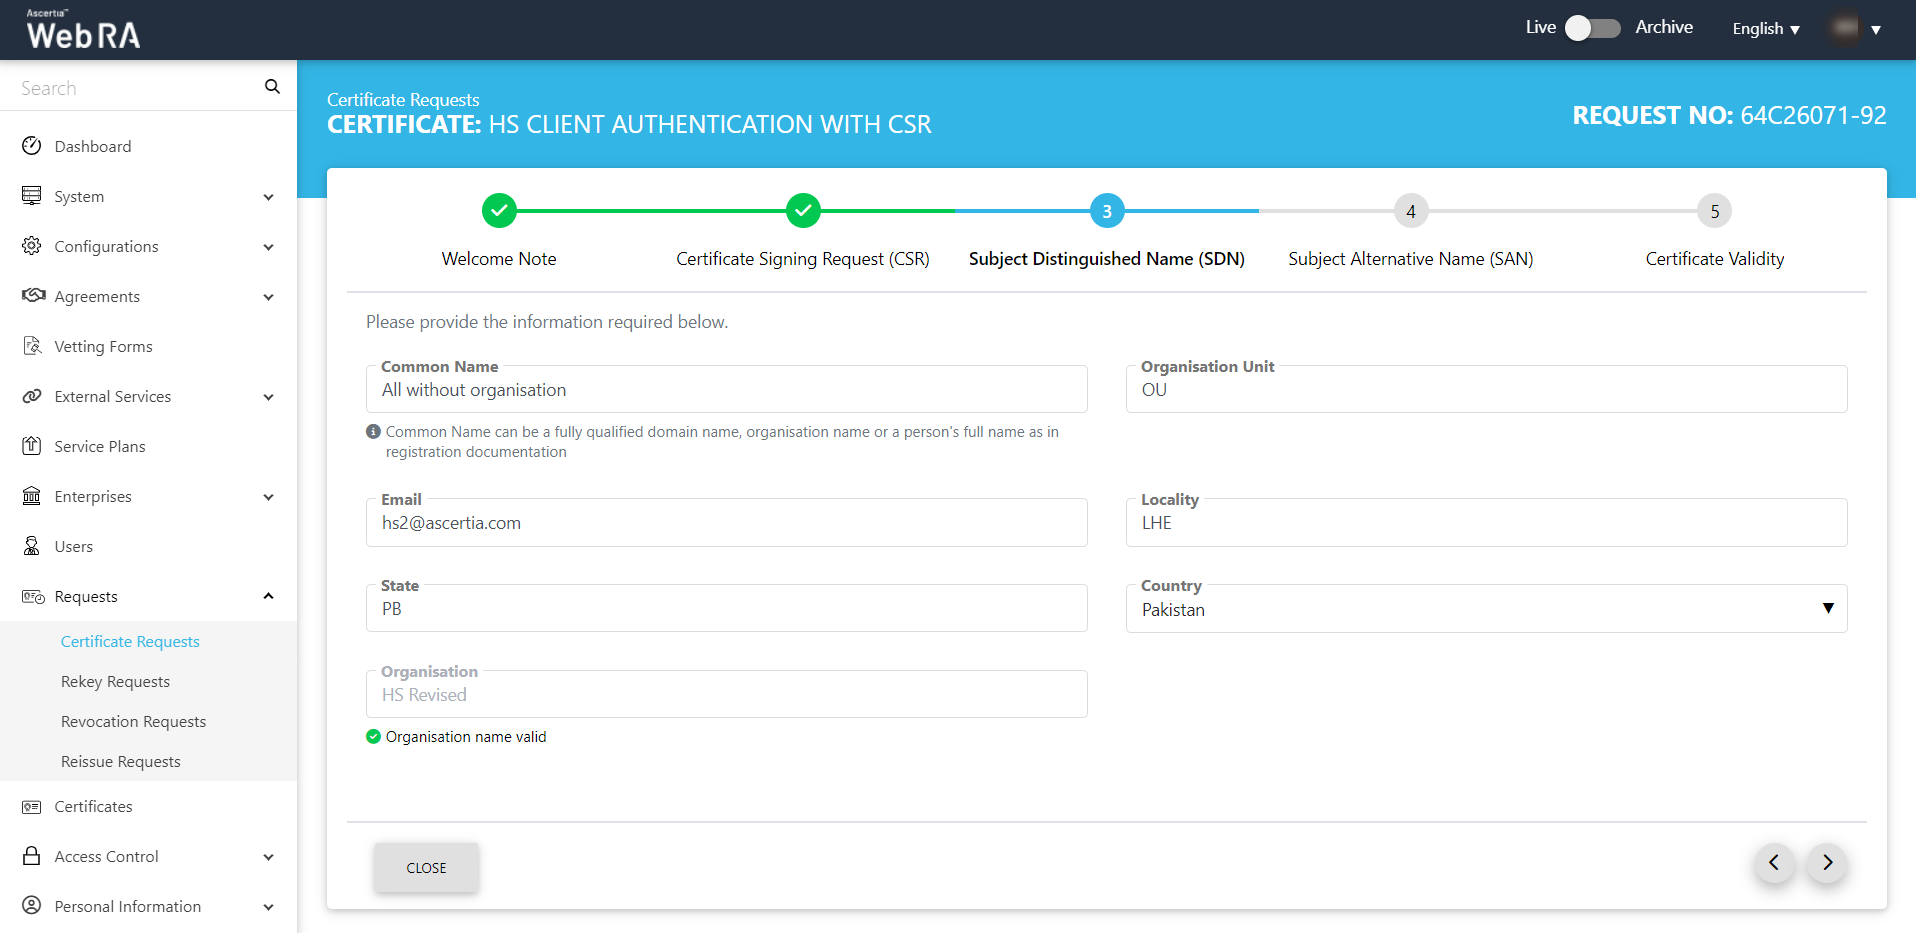
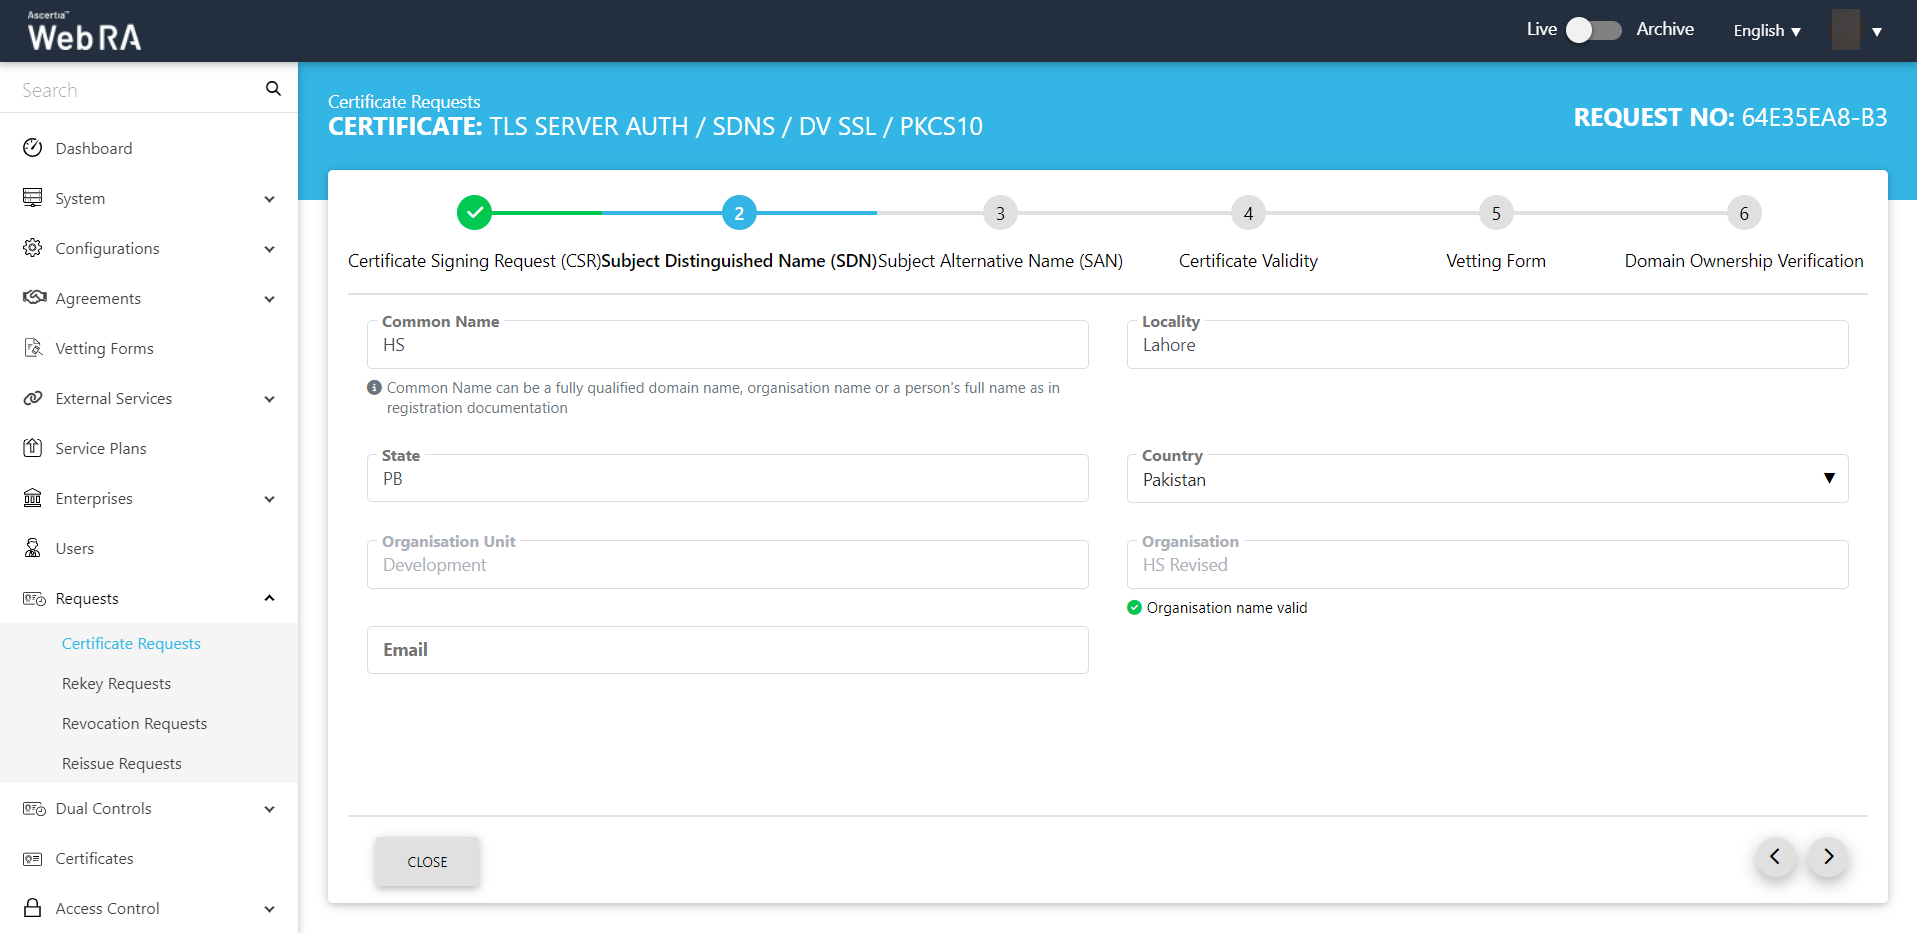
- Click next, the Subject Distinguished Name (SDN) screen will appear.
The customised request note will appear, if it is added. Then, the SDN fields will be auto-filled as per CSR.
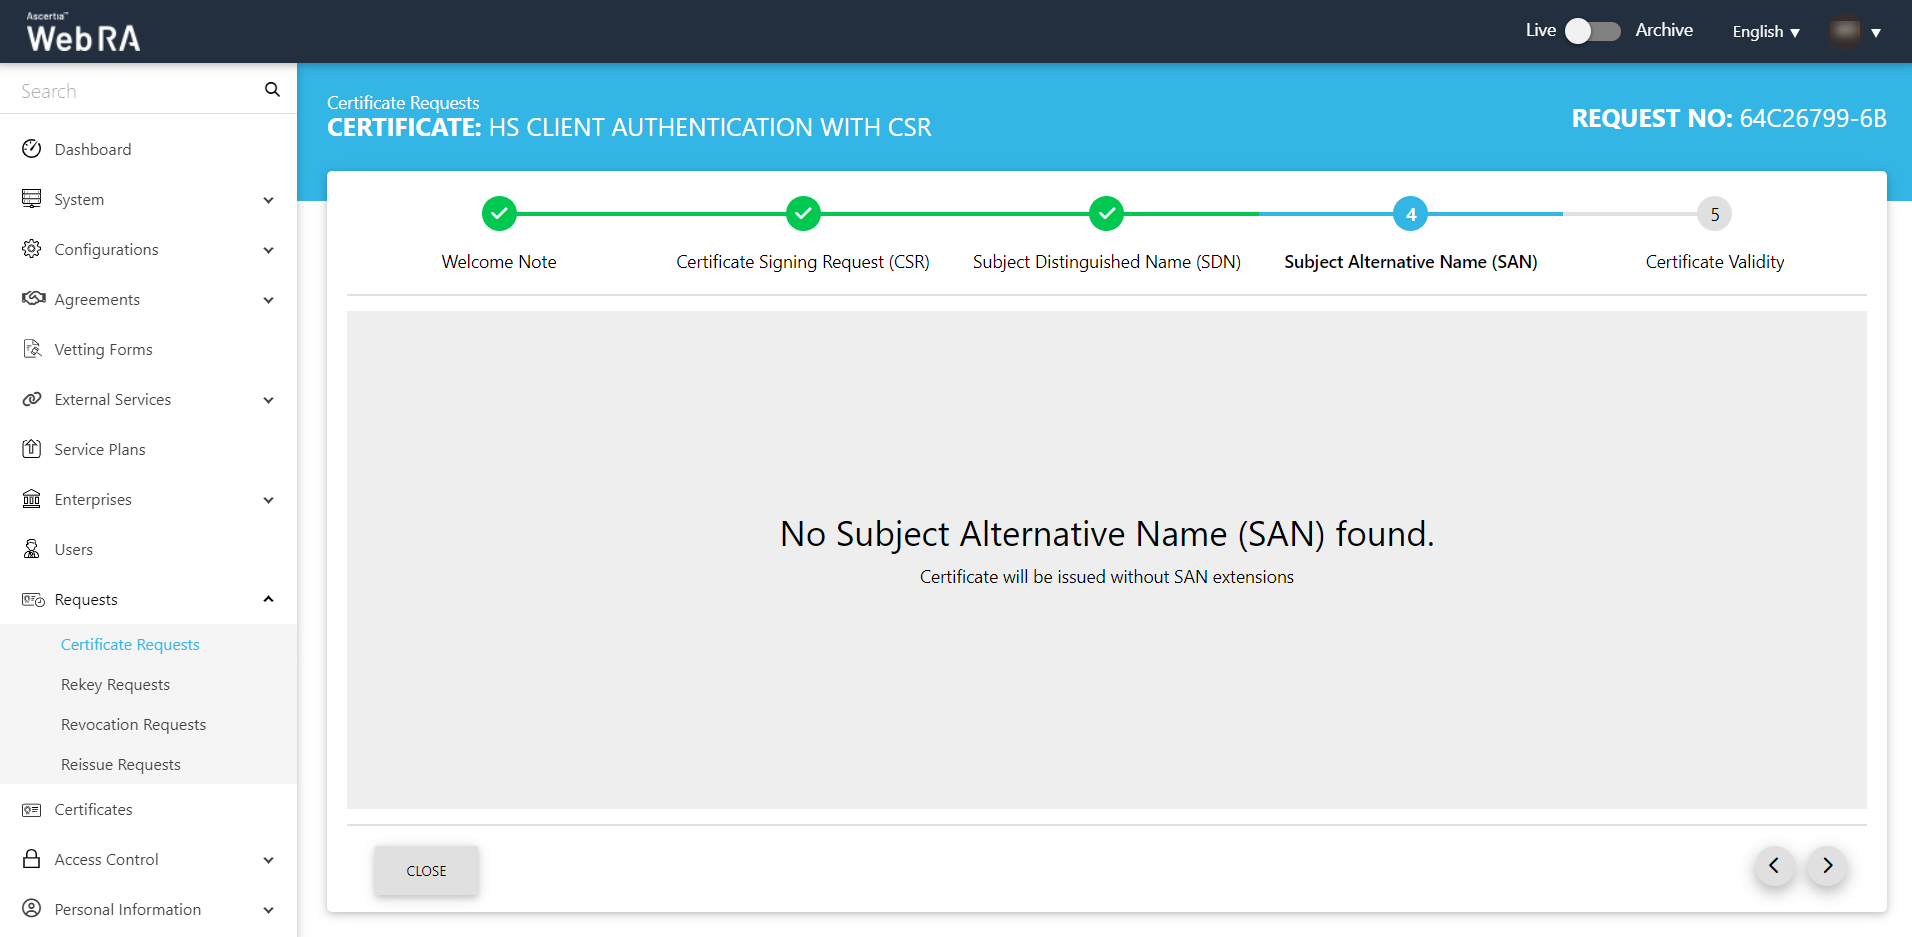
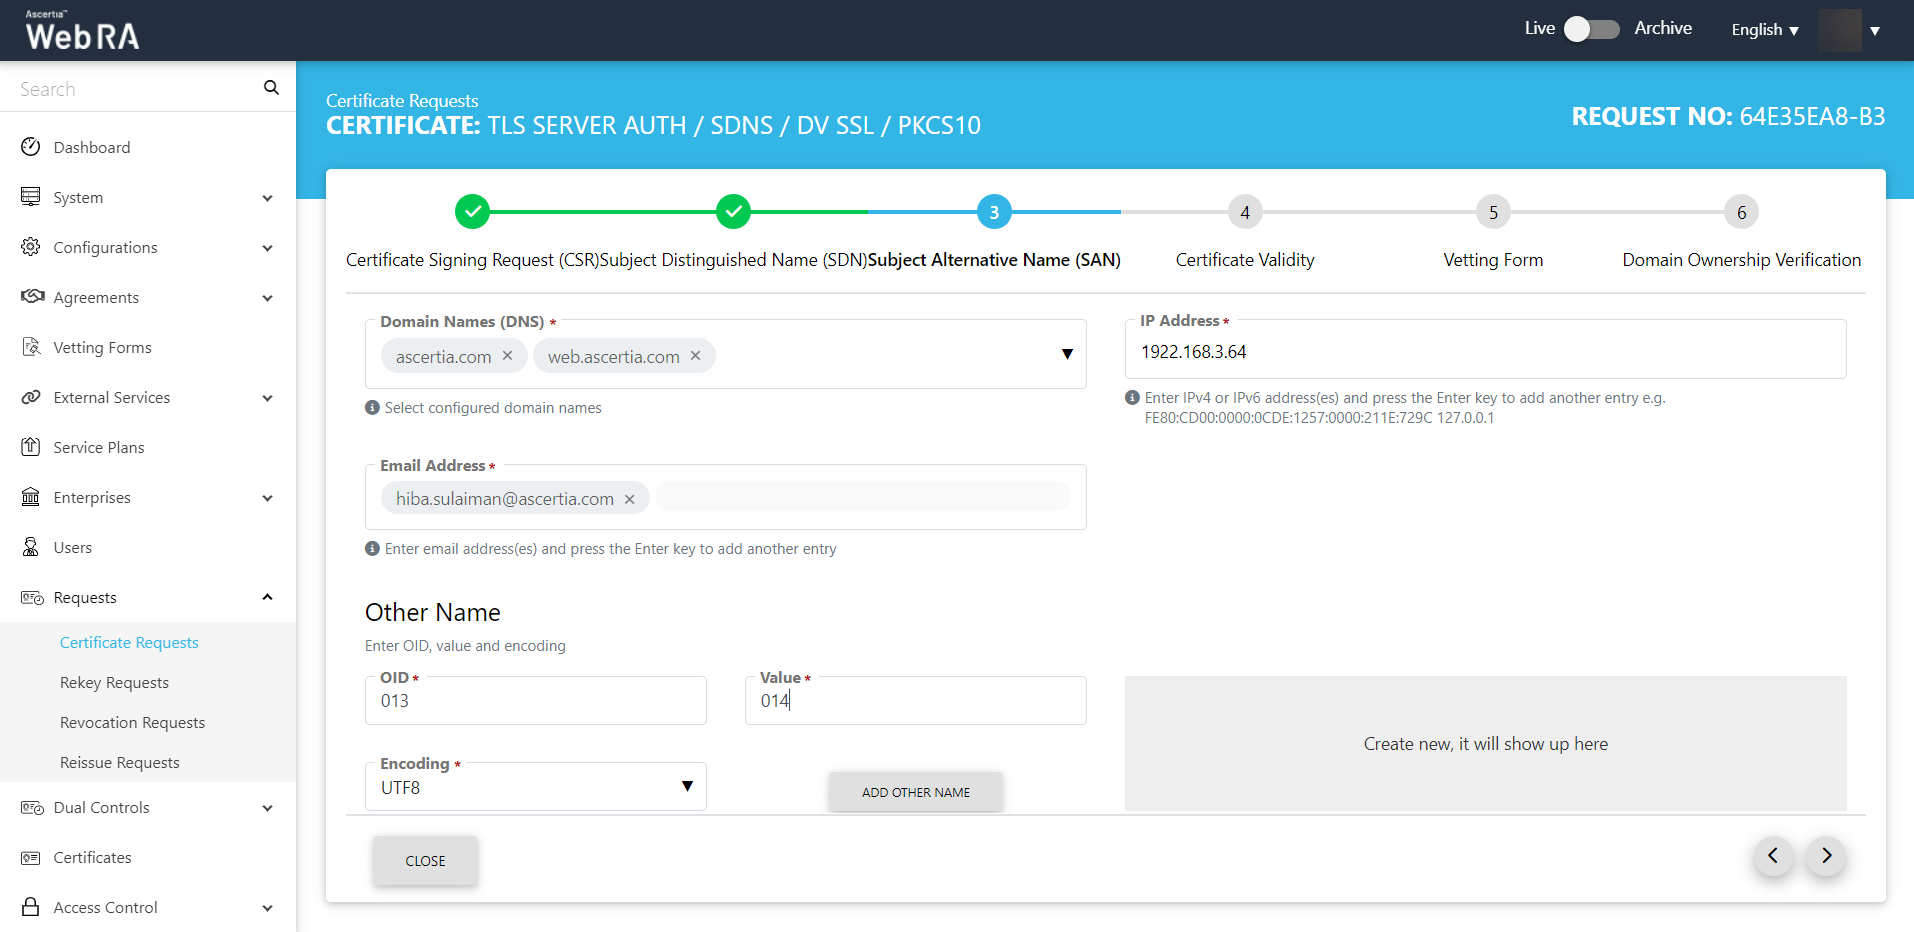
- The Subject Alternative Name (SAN) screen will appear.
The customised request note will appear, if it is added.
The SDN screen contains the following fields:
- DNS Name
- IP Address
- Email Address
- Other Name:
- OID
- Value
- Encoding
- Other Name
In case of no SDNs are added, the following screen will appear.
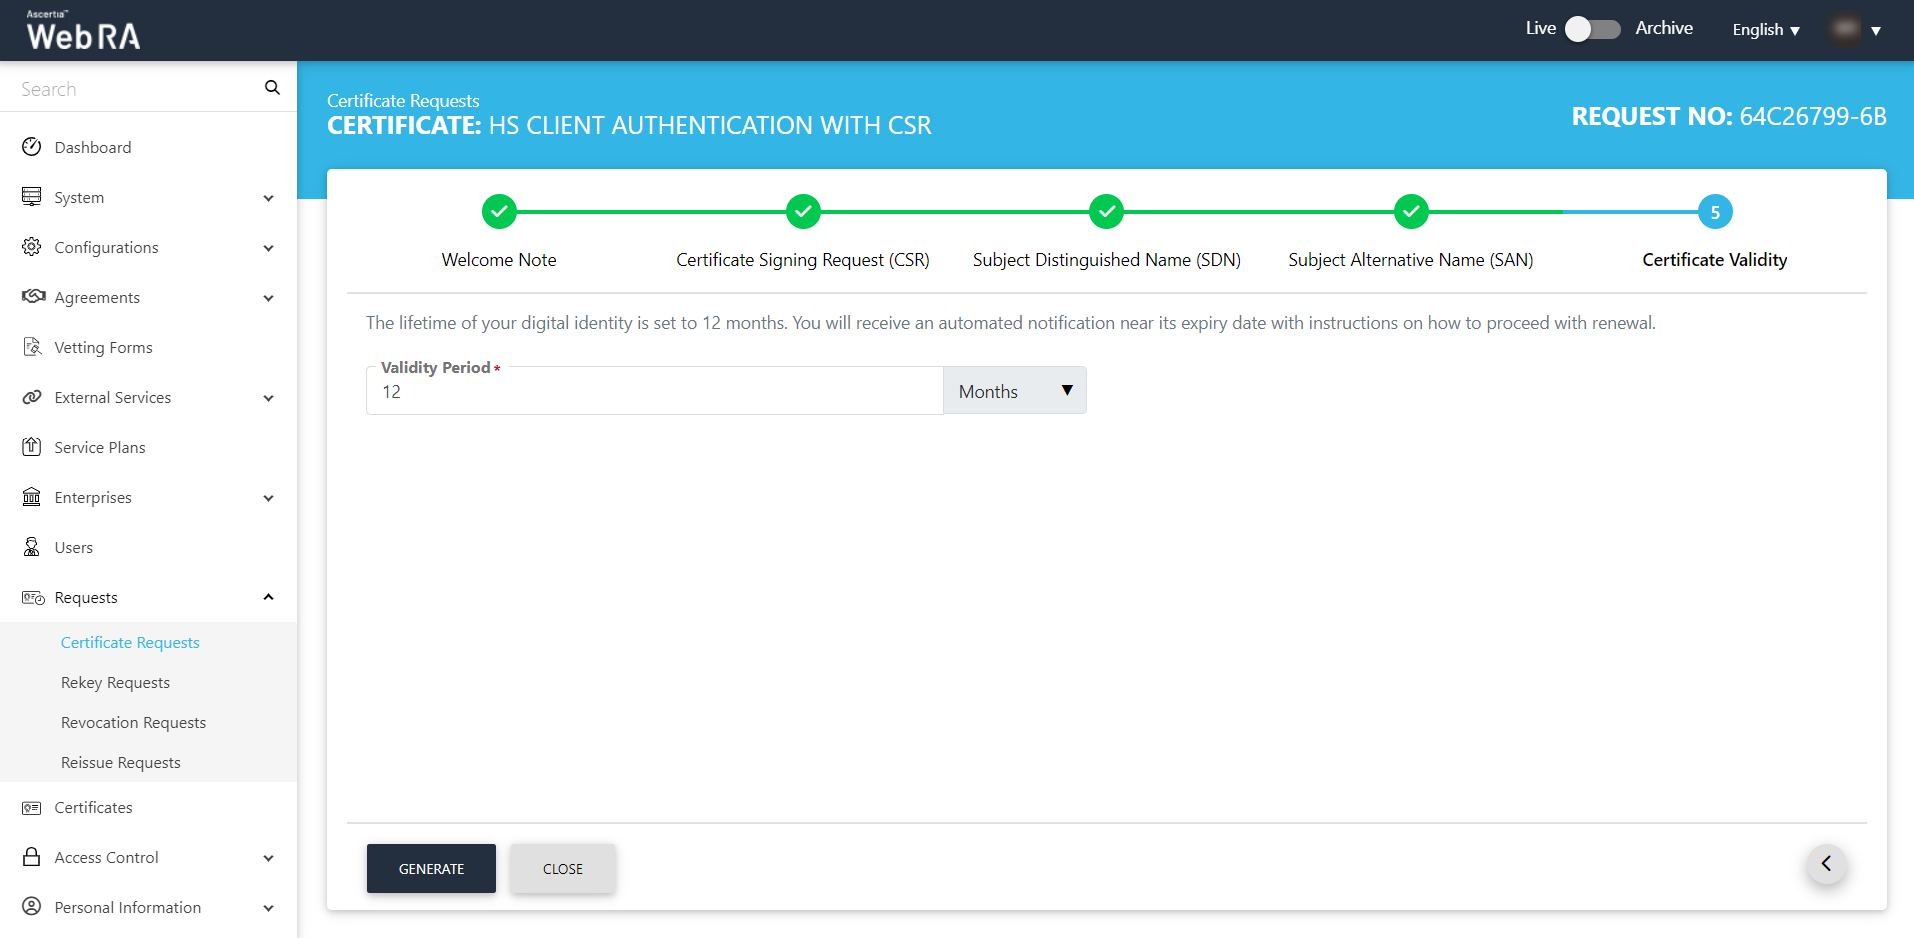
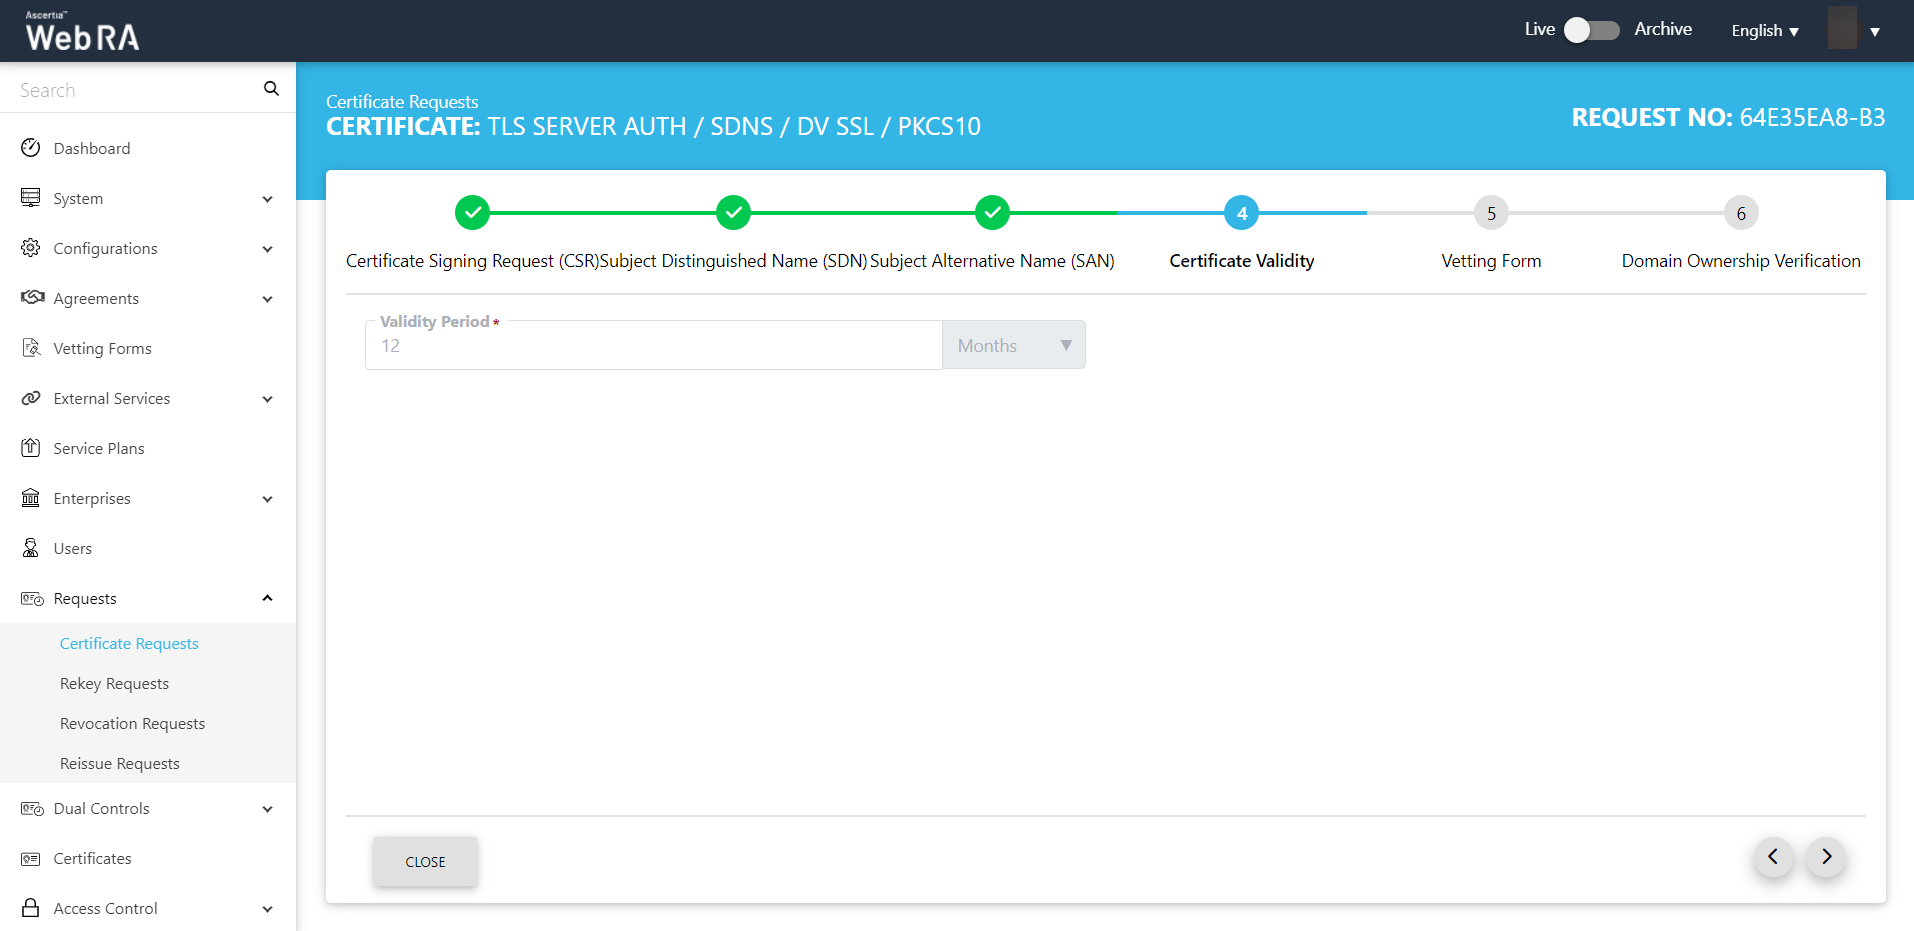
- The Certificate Validity screen will appear.
Here, the customised request note will appear, if it is added in request notes.
Then you can set the validity period.
Click Generate to proceed.
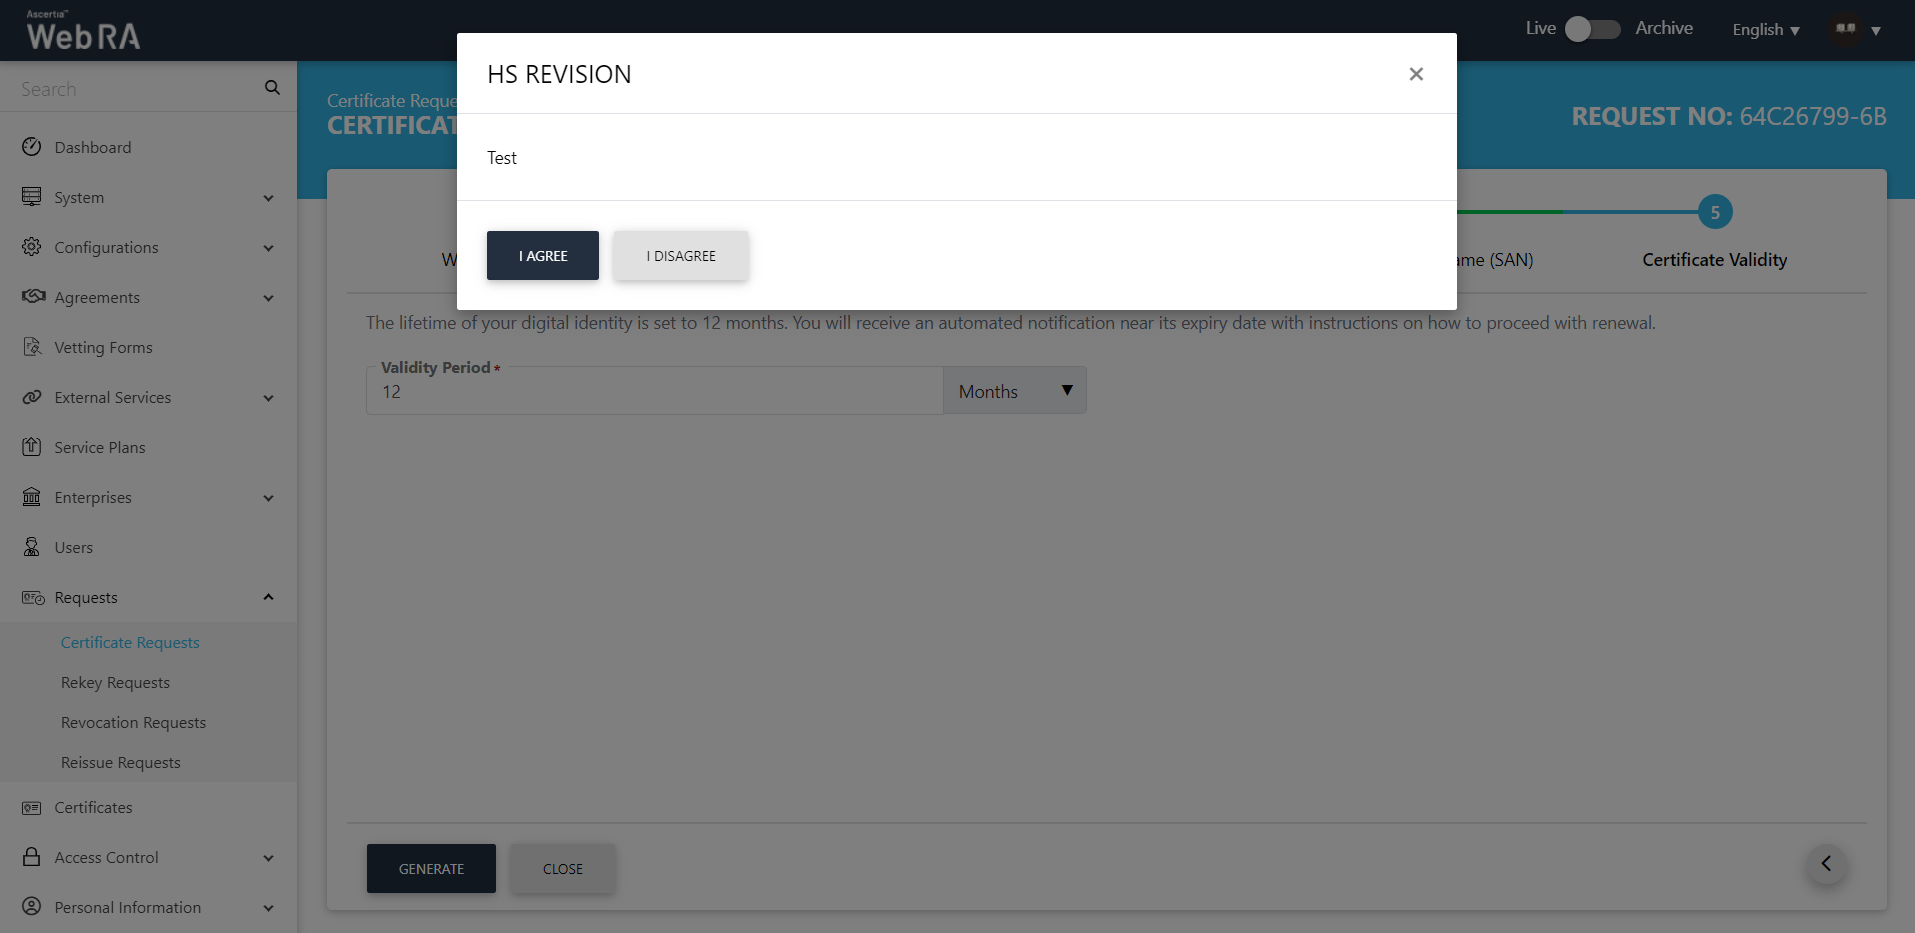
- The subscriber agreement configured with this user's profile will be displayed. Click I Agree to proceed.
- Certificate Generated.
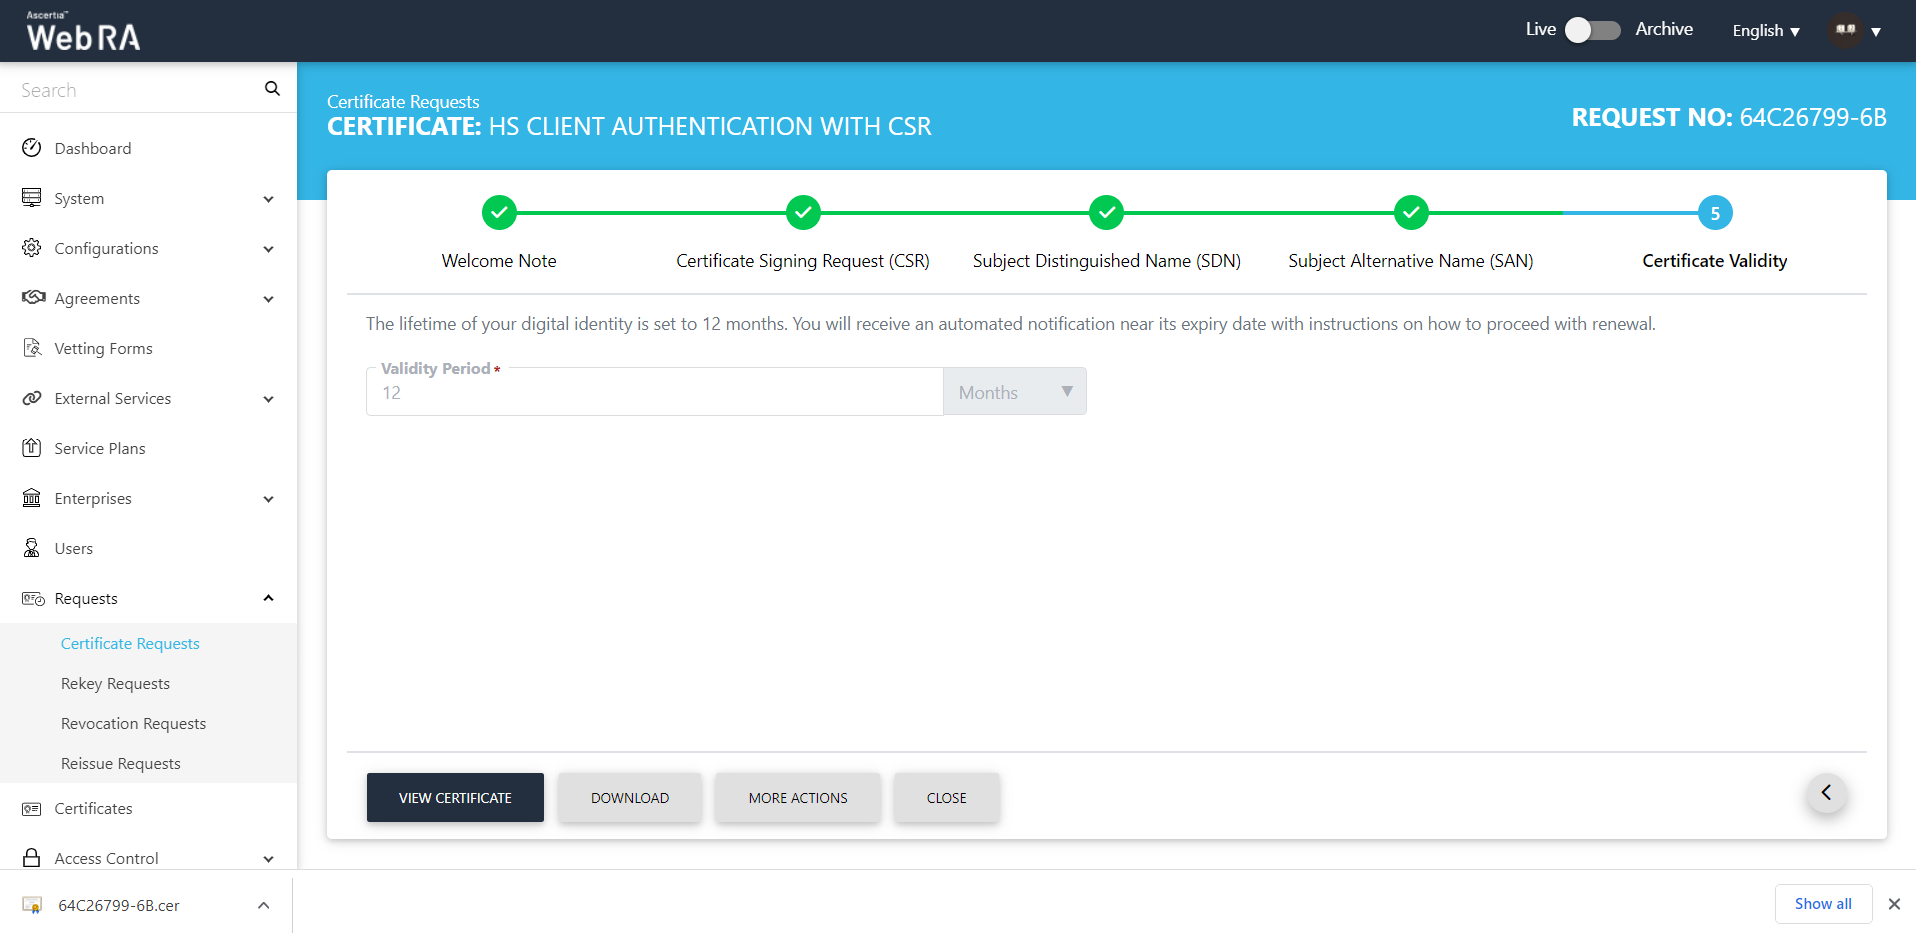
- This request will be displayed in the certificate requests listing.
Submit a Certificate Request (TLS Server Auth / SDNs / DV SSL / PKCS10 certificate type) with Domain Names
- Expand Requests > Certificate Requests from the left menu pane, and then click from the grid header.

- Select your Enterprise Name from the drop down, then select the Certificate Type, set the Validity Period and click Create.
- The upload a CSR screen will appear. Once you upload the file or paste the CSR, click next to proceed.
- Click next, the Subject Distinguished Name (SDN) screen will appear. The SDN fields will be auto-filled as per CSR. Click >.
- The Subject Alternative Name (SAN) screen will appear. Click >.
- The Certificate Validity screen will appear. Click >.
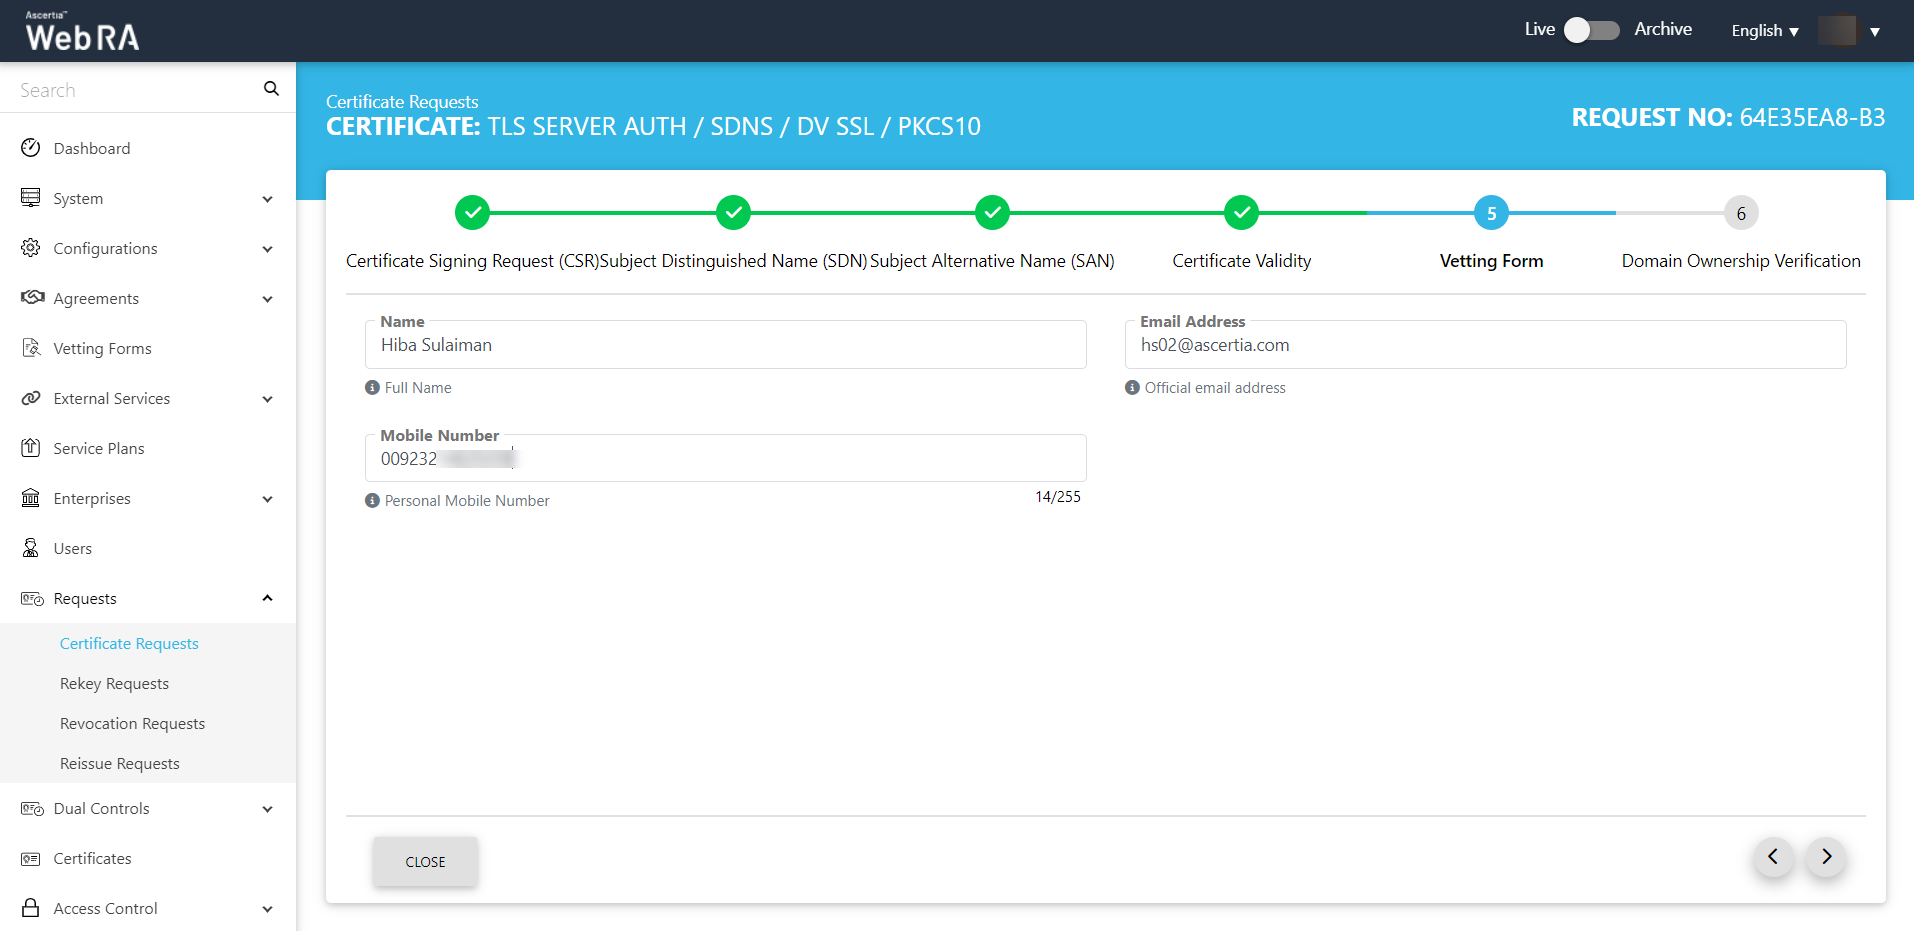
- The Vetting Form screen will appear. Click >.
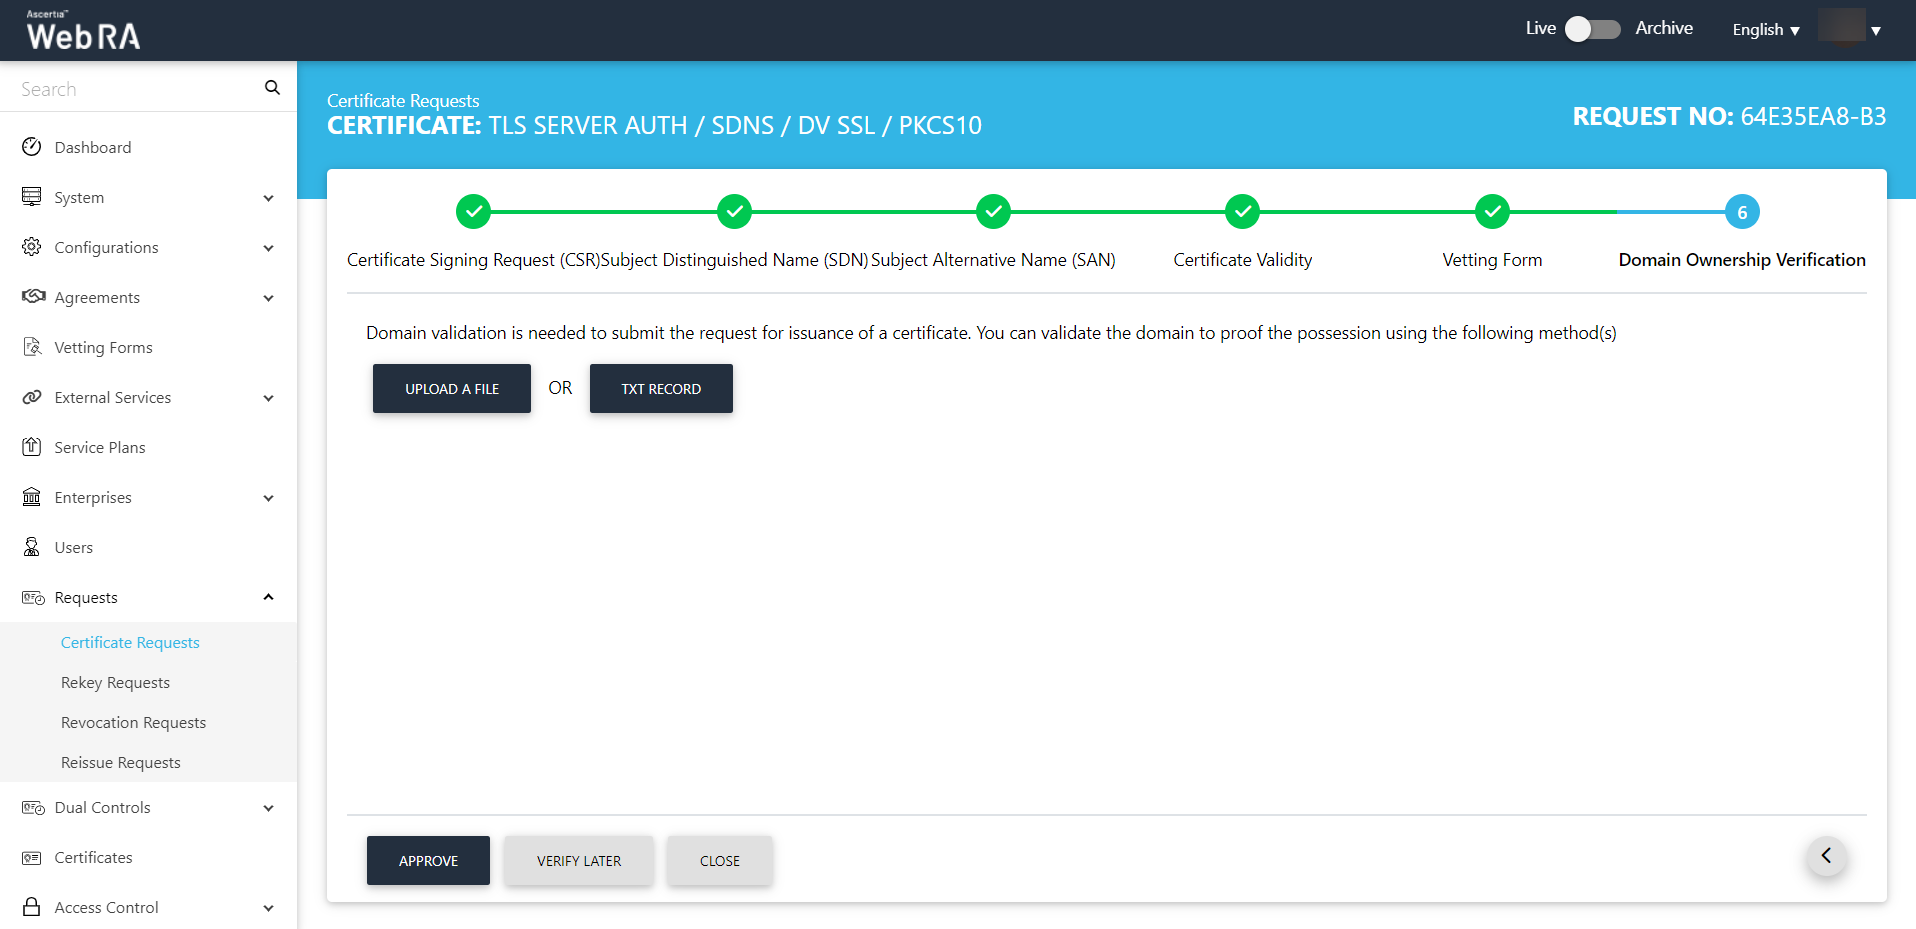
- The Domain Ownership Verification screen will appear. You can click upload a file or Txt record.
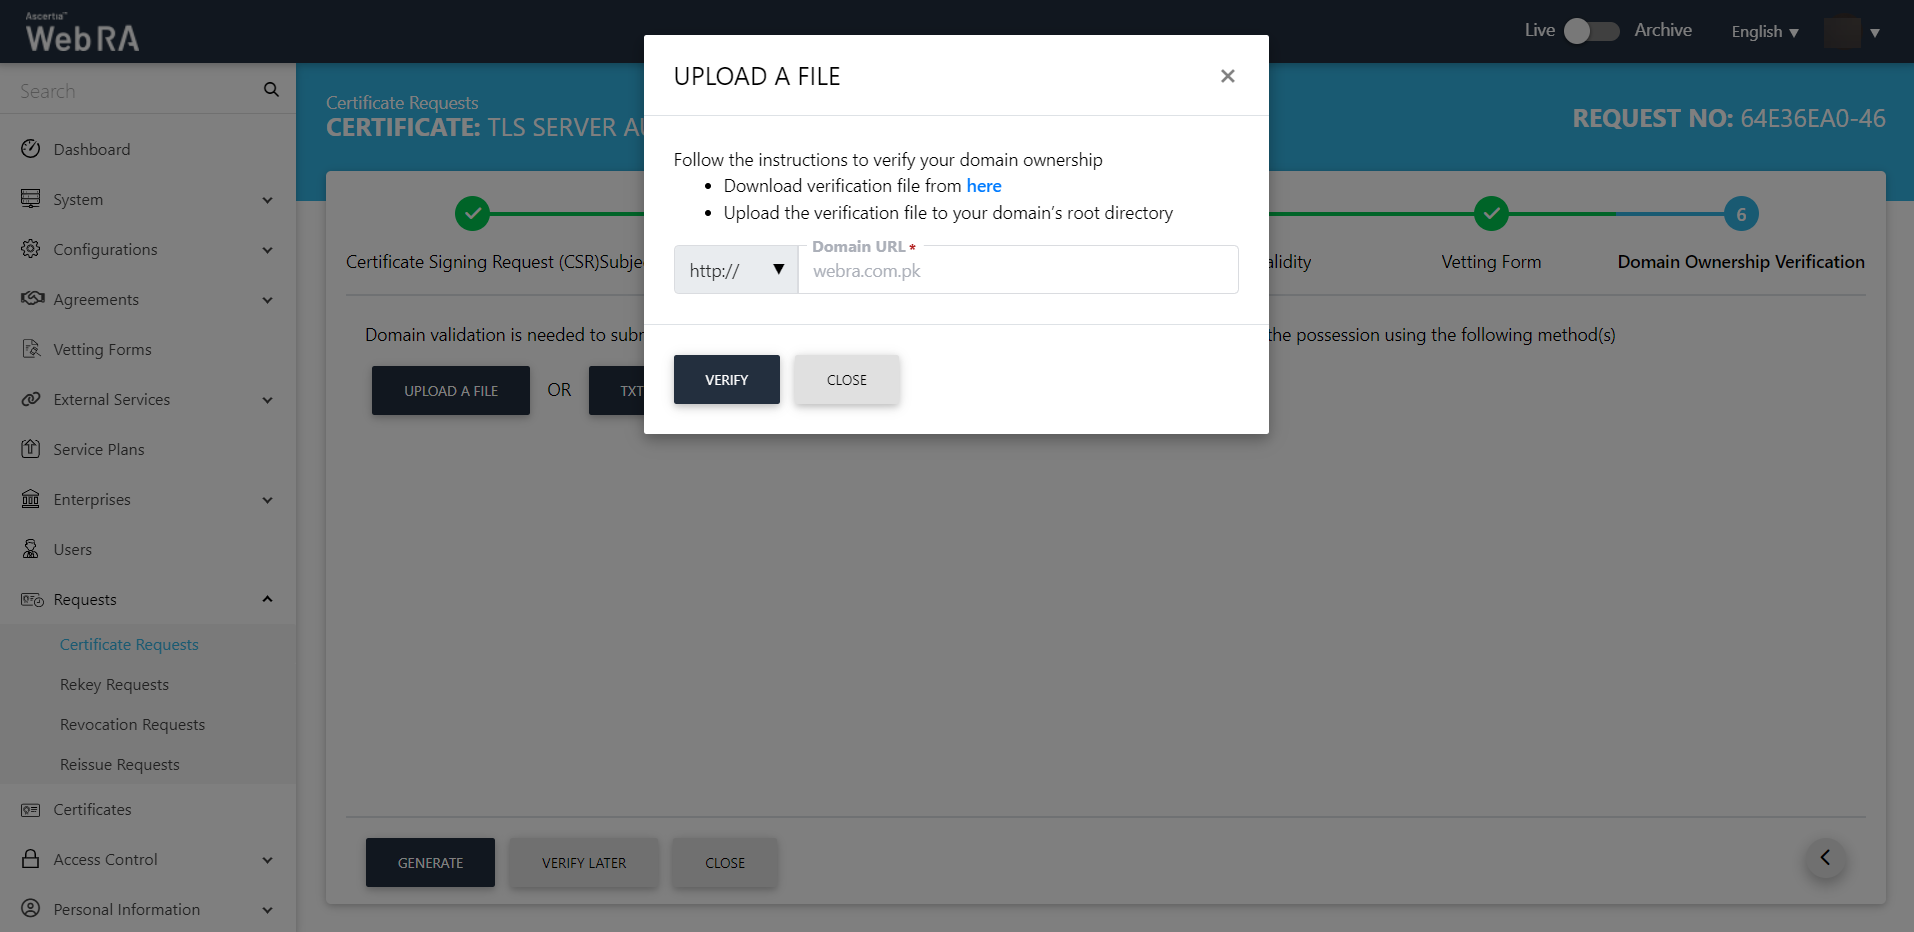
- Under the Domain Ownership Verification stepper, the upload a file window will appear.
- Here you can download the verification file from the link and upload it to your domain's root directory.
- Then click Verify to see if the domain is verified.
The domain URL appears in a disabled form (which you have set in the enterprise advance settings from the ADSS Web RA admin portal).
- The verification status will appear as follows:
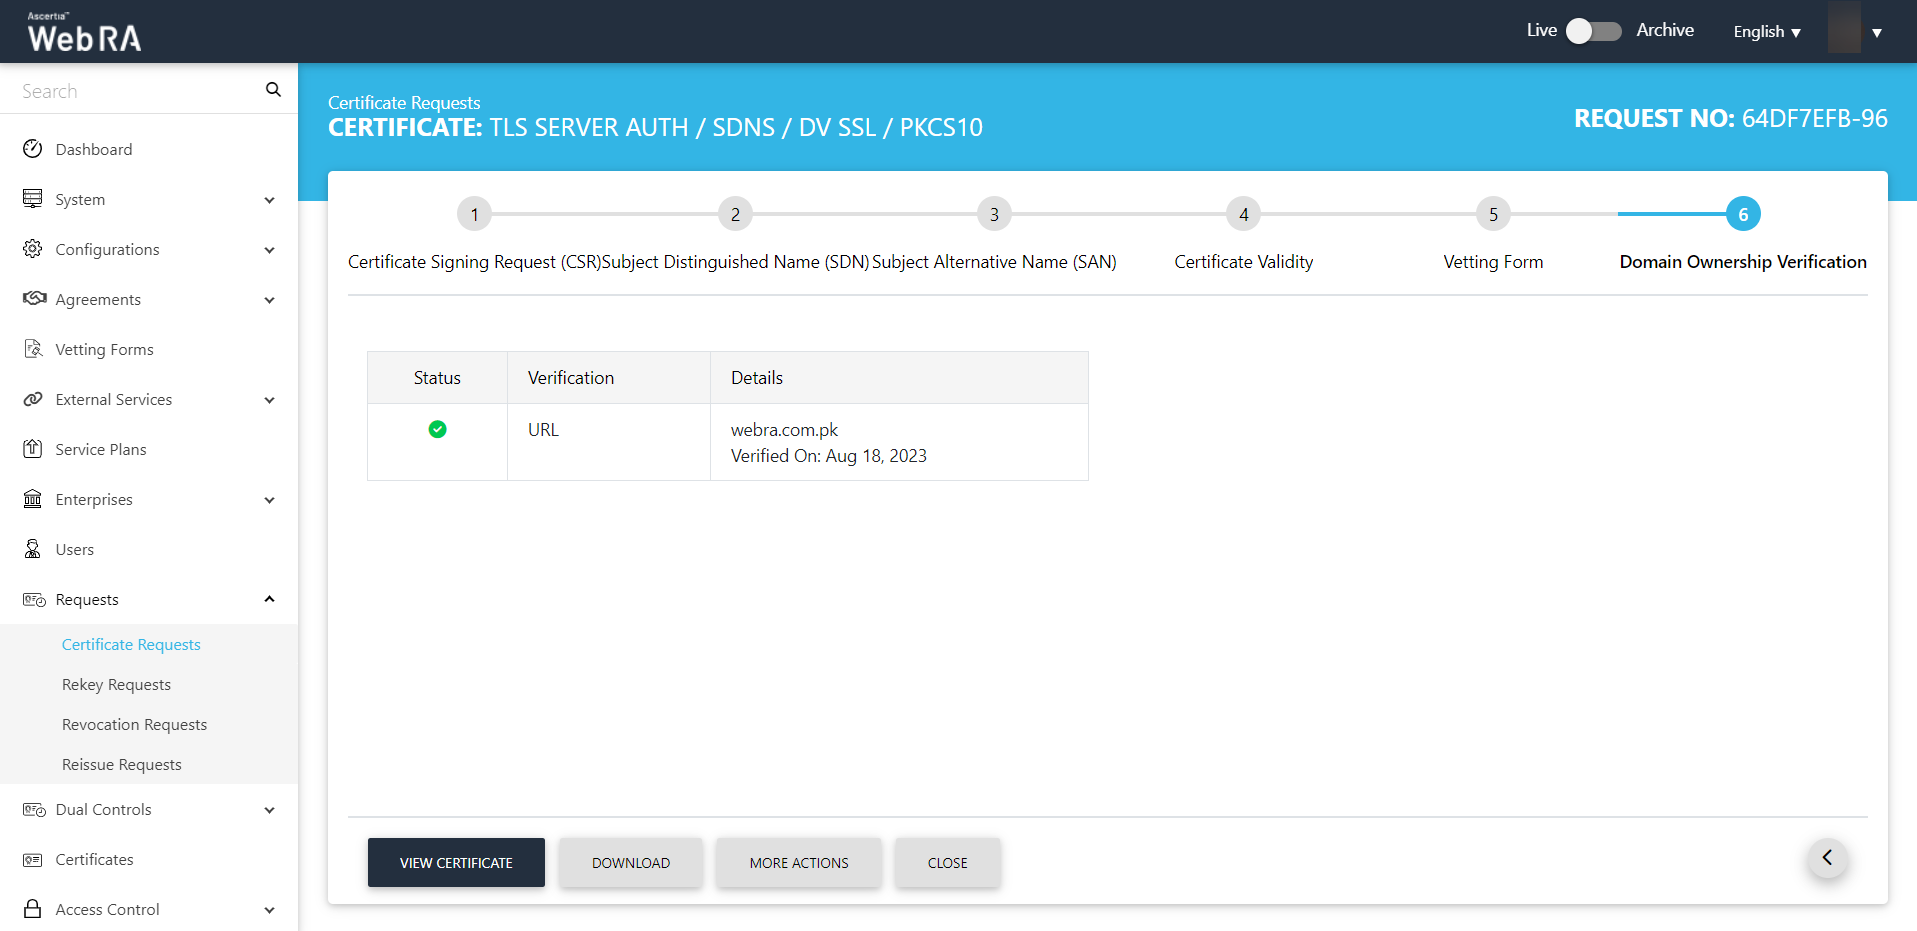
You can perform a number of actions such as view certificate, download it, revoke the certificate (More Actions) or close it.
|
|
1) CSR Validation policies only validate when Enable CSR Validation is set under Configurations > Policy. |
Approve / Decline a Certificate Request (With Dual Control)
- Expand Requests > Certificate Requests from the left menu.
- Then click
 from the grid of a particular certificate to view it.
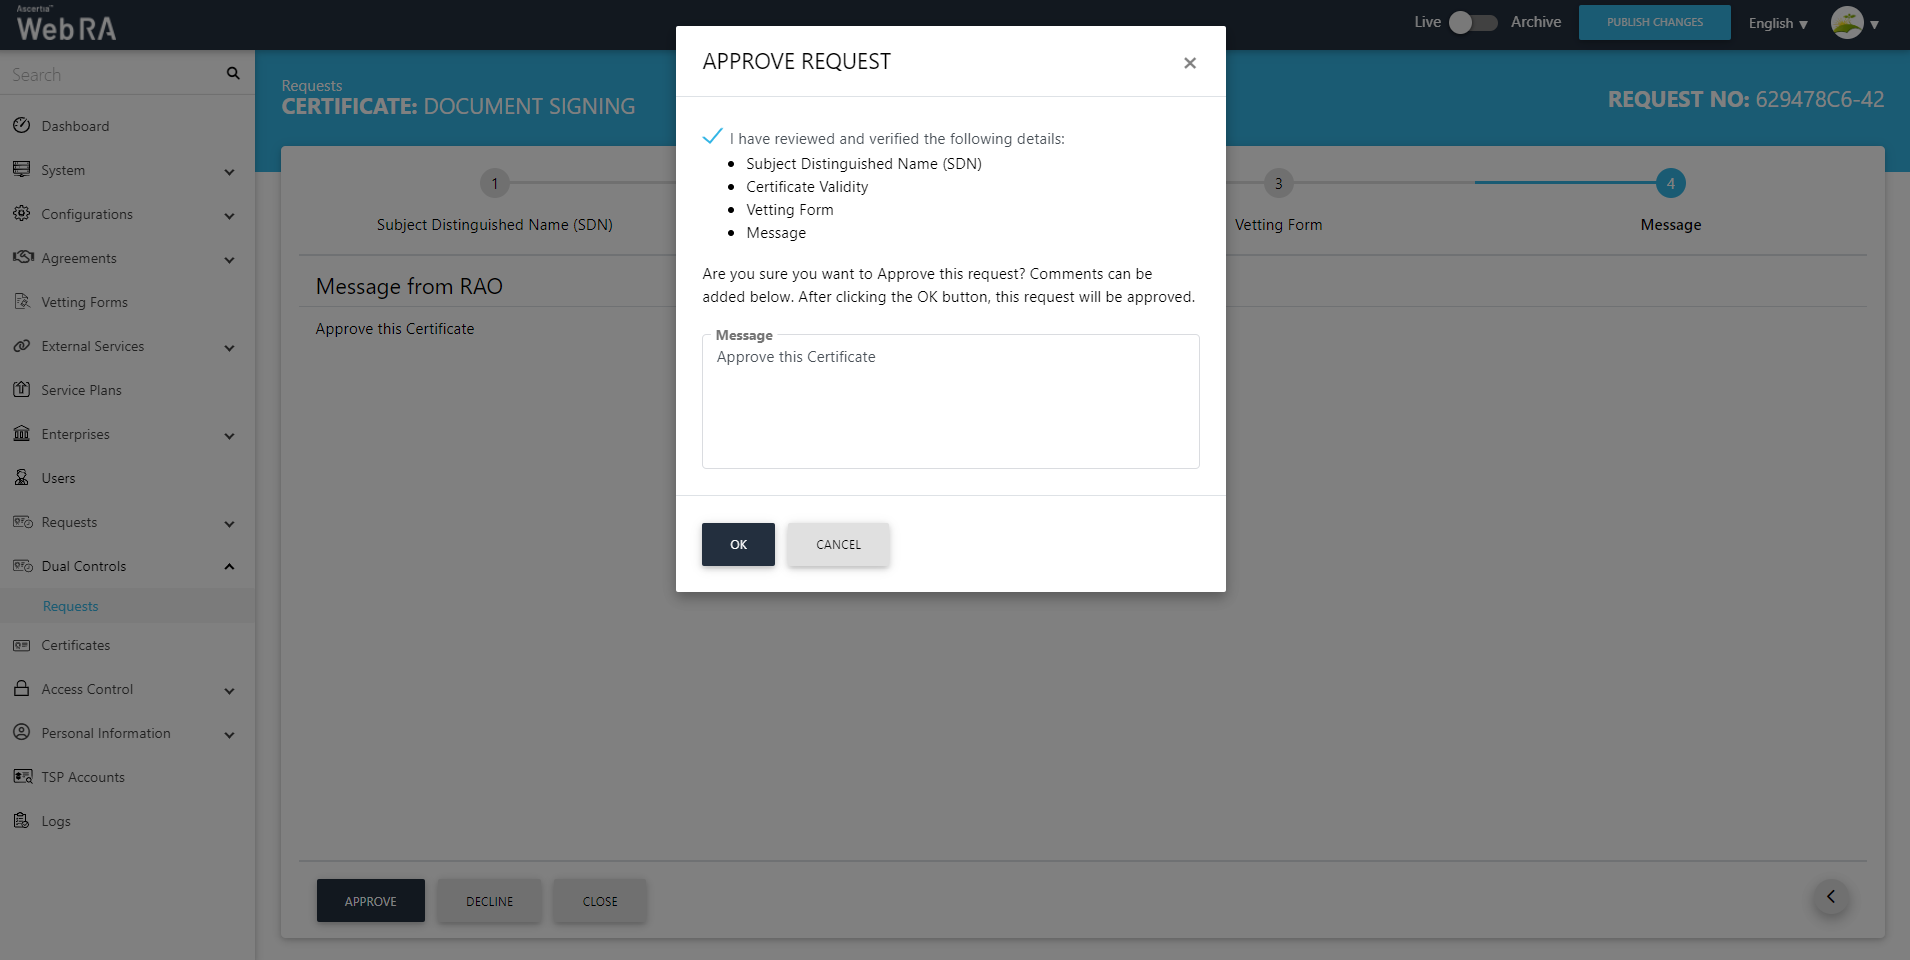
Scroll to the Vetting Form and you can choose to Approve or Decline a vetting form.
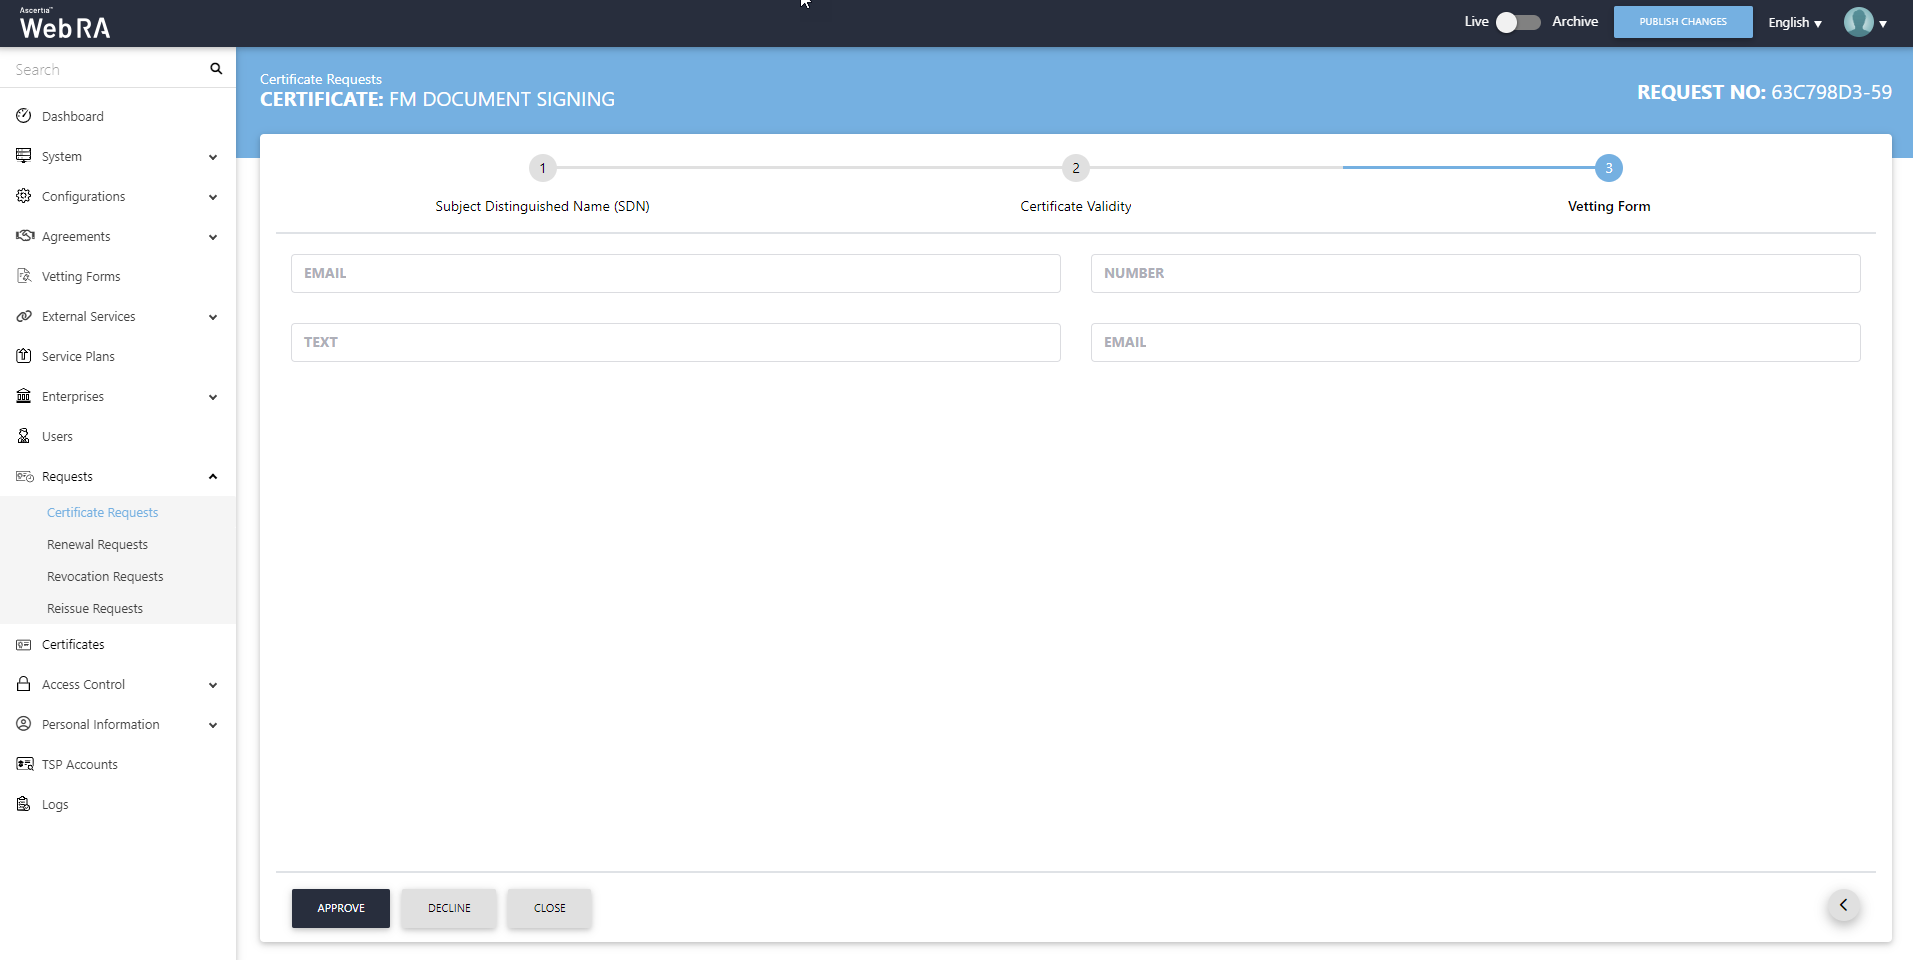
Click Approve, the following screen will appear where you need to tick the check-box I have reviewed and verified the following details, then add a Message and click OK. The certificate request will be approved and appear in the list.
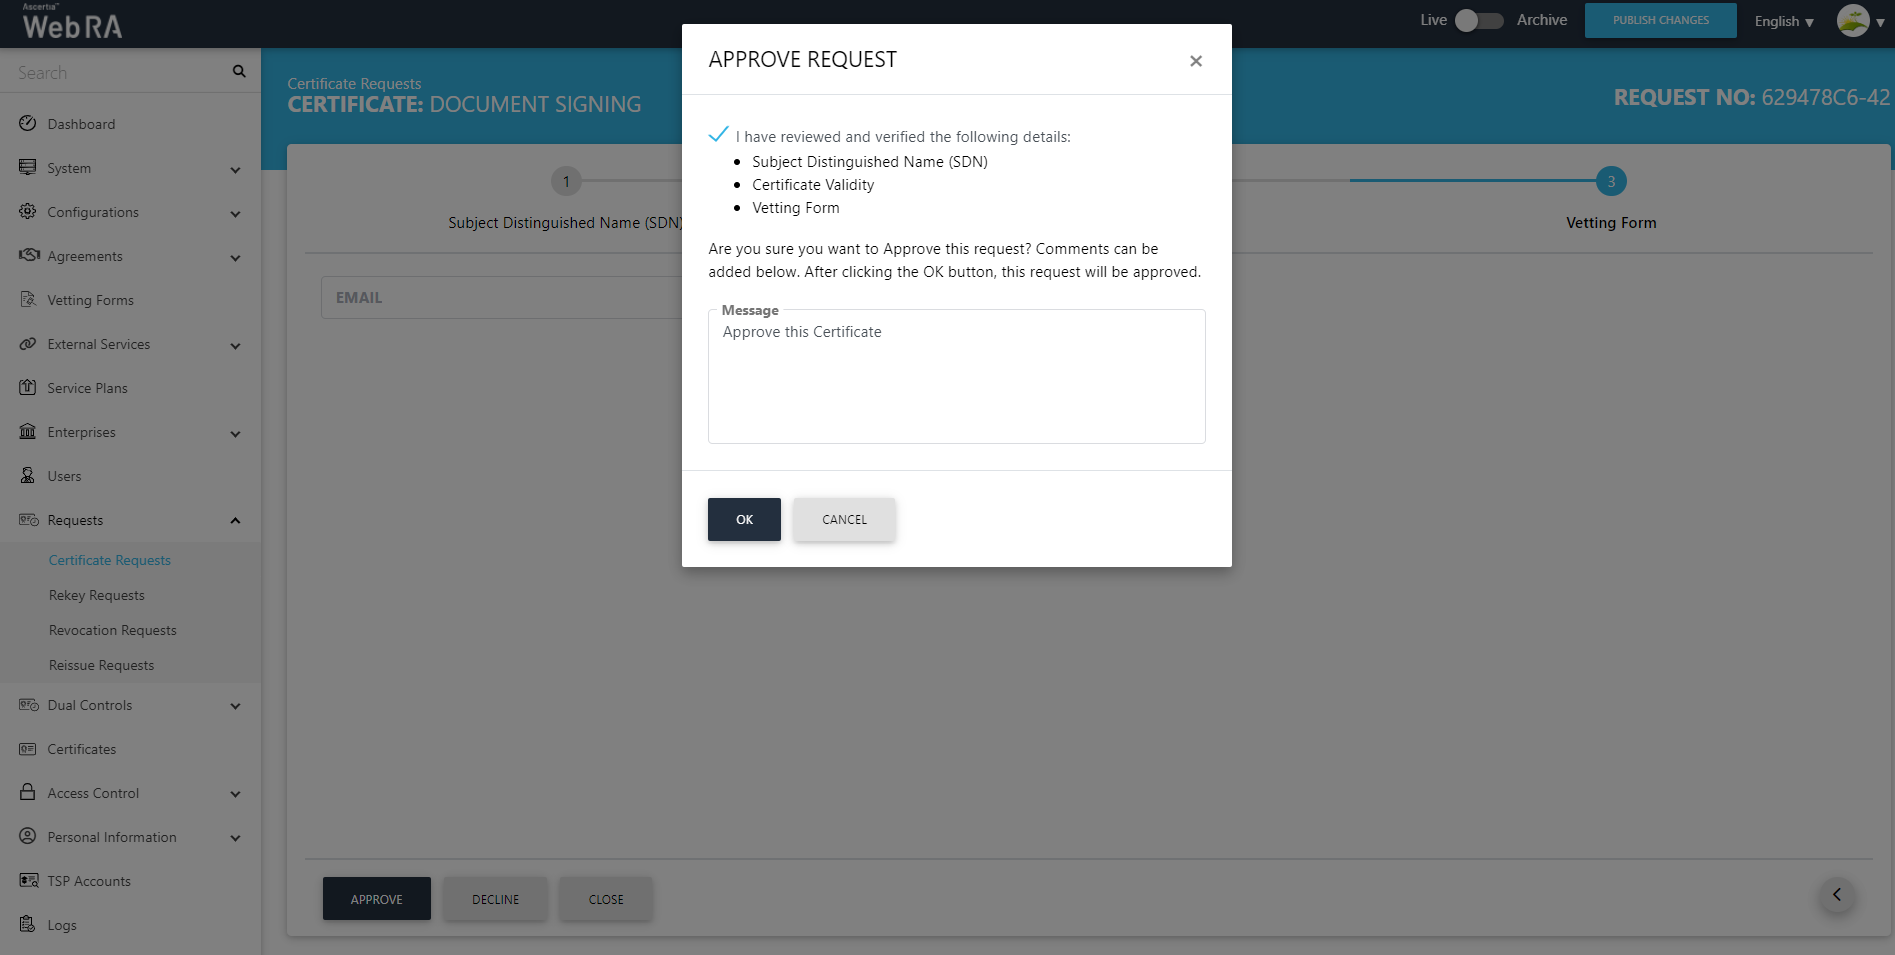
Expand Dual Control > Requests > View Request (of the approved certificate). Its status will appear as Reviewed.
The request will appear on the screen, where you will scroll through four steps (SDNs, Certificate Validity, Vetting Form and Message). Click on "Approve" and you will see a similar screen for approval. Once you click OK. The certificate will be generated.
The certificate will be listed under the Certificates listing.
Delete a Certificate Request
Permanent Deletion
An operator will only be able to delete a certificate request permanently, if he has enabled permanent deletion from the Policy section.
If an operator wants to delete a certificate request from the Admin portal, follow the steps below:
- Expand Requests > Certificate Requests.
- A list of certificate requests will appear. Select the request number check box against the request to delete. Then click the
 button.
- A confirmation dialog will appear as displayed below. It will also delete certificates and activities against this request permanently, The deleted information will not be retrievable.
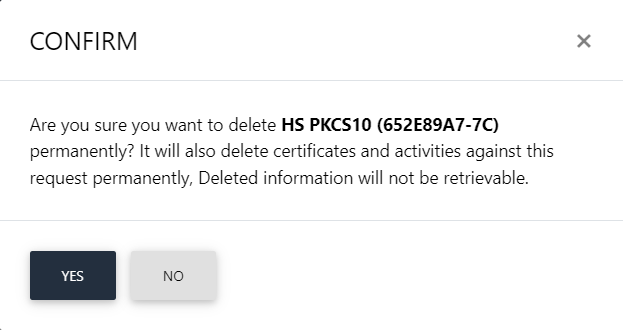
- Click Yes to confirm the permanent deletion.
Temporary Deletion
An operator will only be able to delete a certificate request temporarily, if he has disabled permanent deletion from the Policy section.
If an operator wants to delete a certificate request from the Admin portal, follow the steps below:
- Expand Requests > Certificate Requests.
- A list of certificate requests will appear. Select the request number check box against the request to delete. Then click the button.
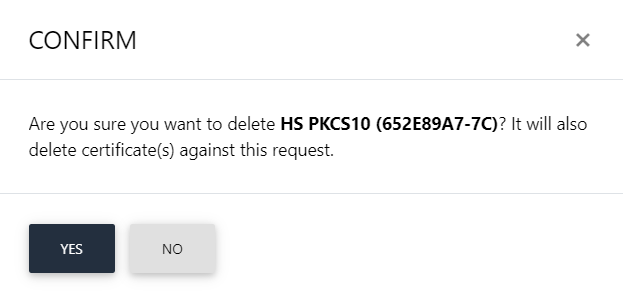
- A confirmation dialog will appear as displayed below. It will also delete certificate (s) against this request,
This note appears according to the configurations in the Policy section in the Admin portal.
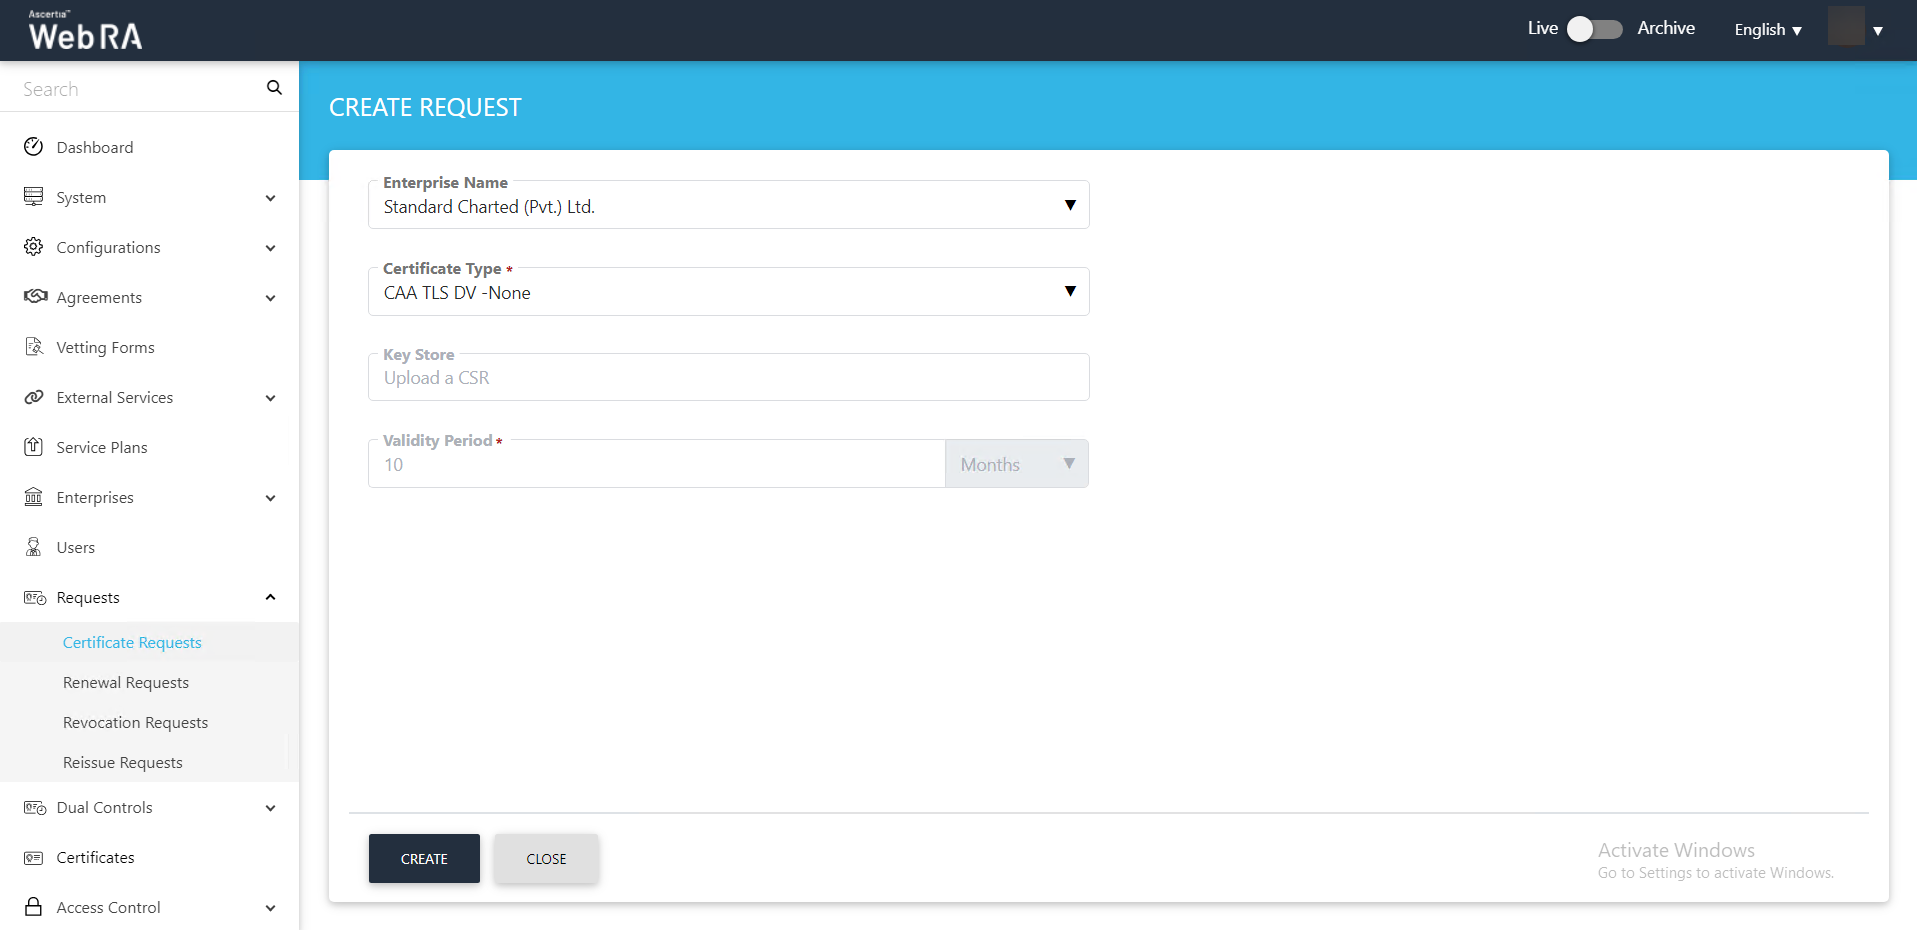
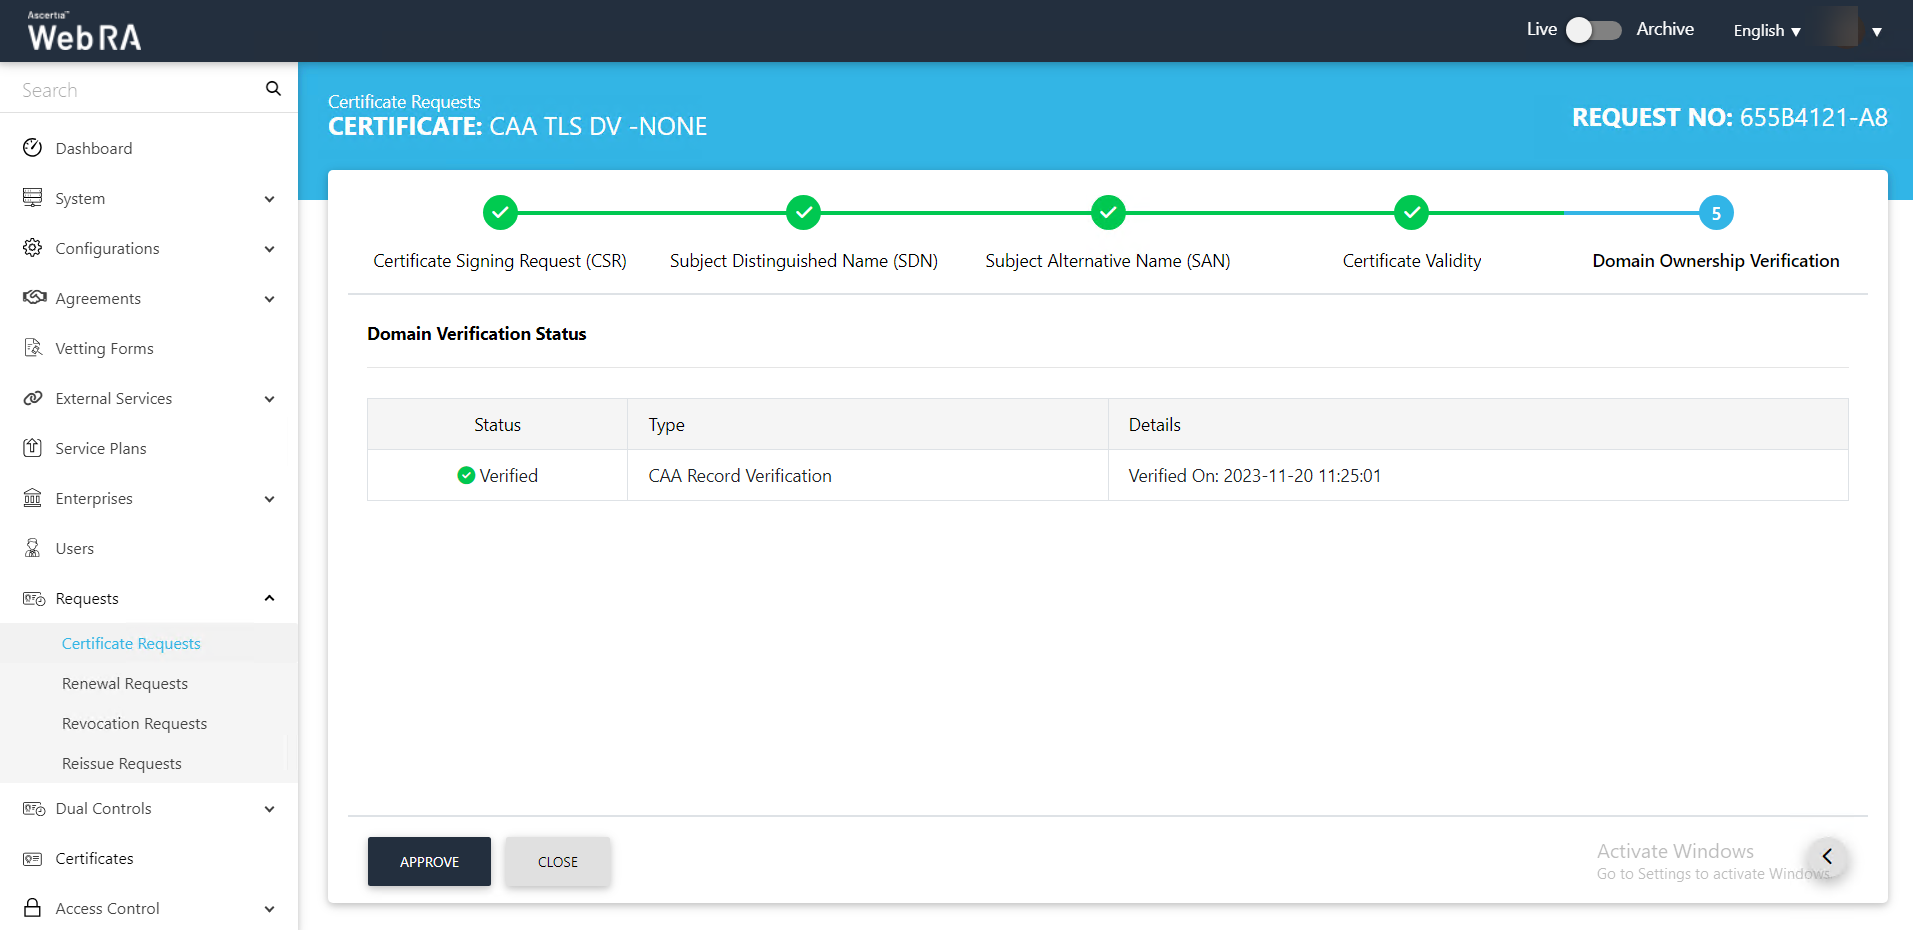
Submit a Certificate Request based on TLS DV - None (CAA Records)
- Expand Requests > Certificate Requests from the left menu pane, and then click from the grid header.
- Select your Enterprise Name from the drop down, then select the Certificate Type, set the Validity Period and click Create.
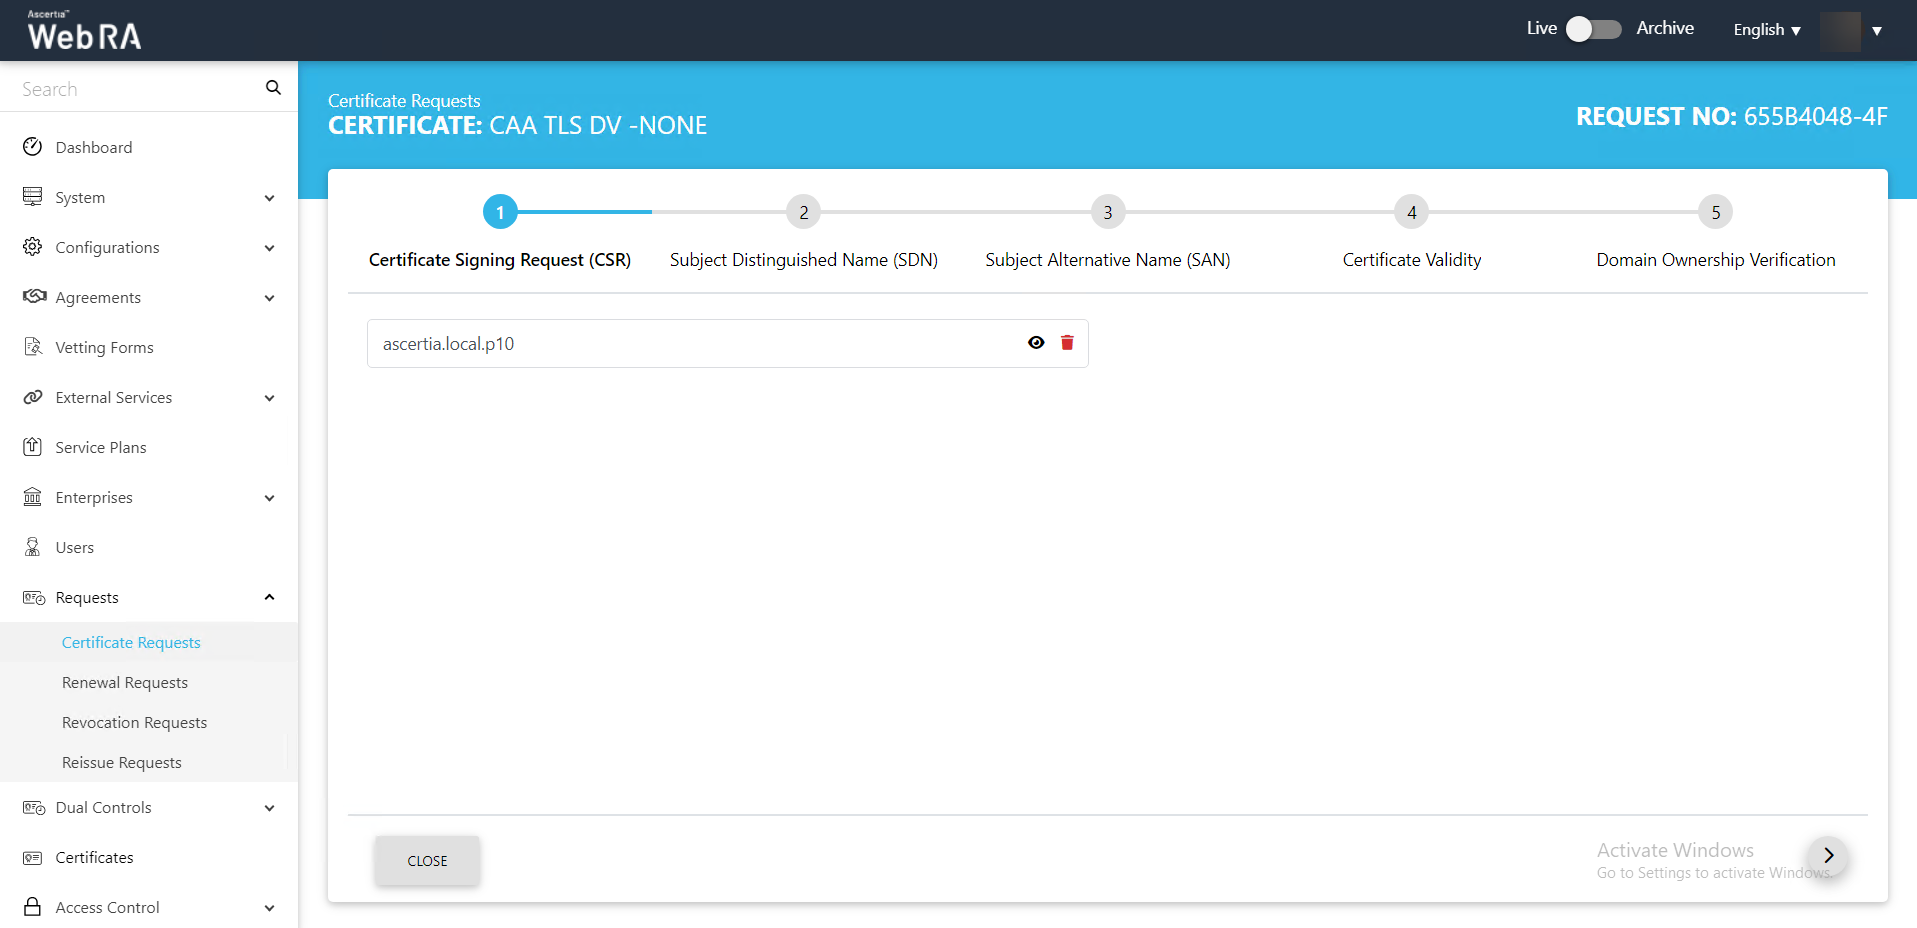
- Upload CSR and click >.
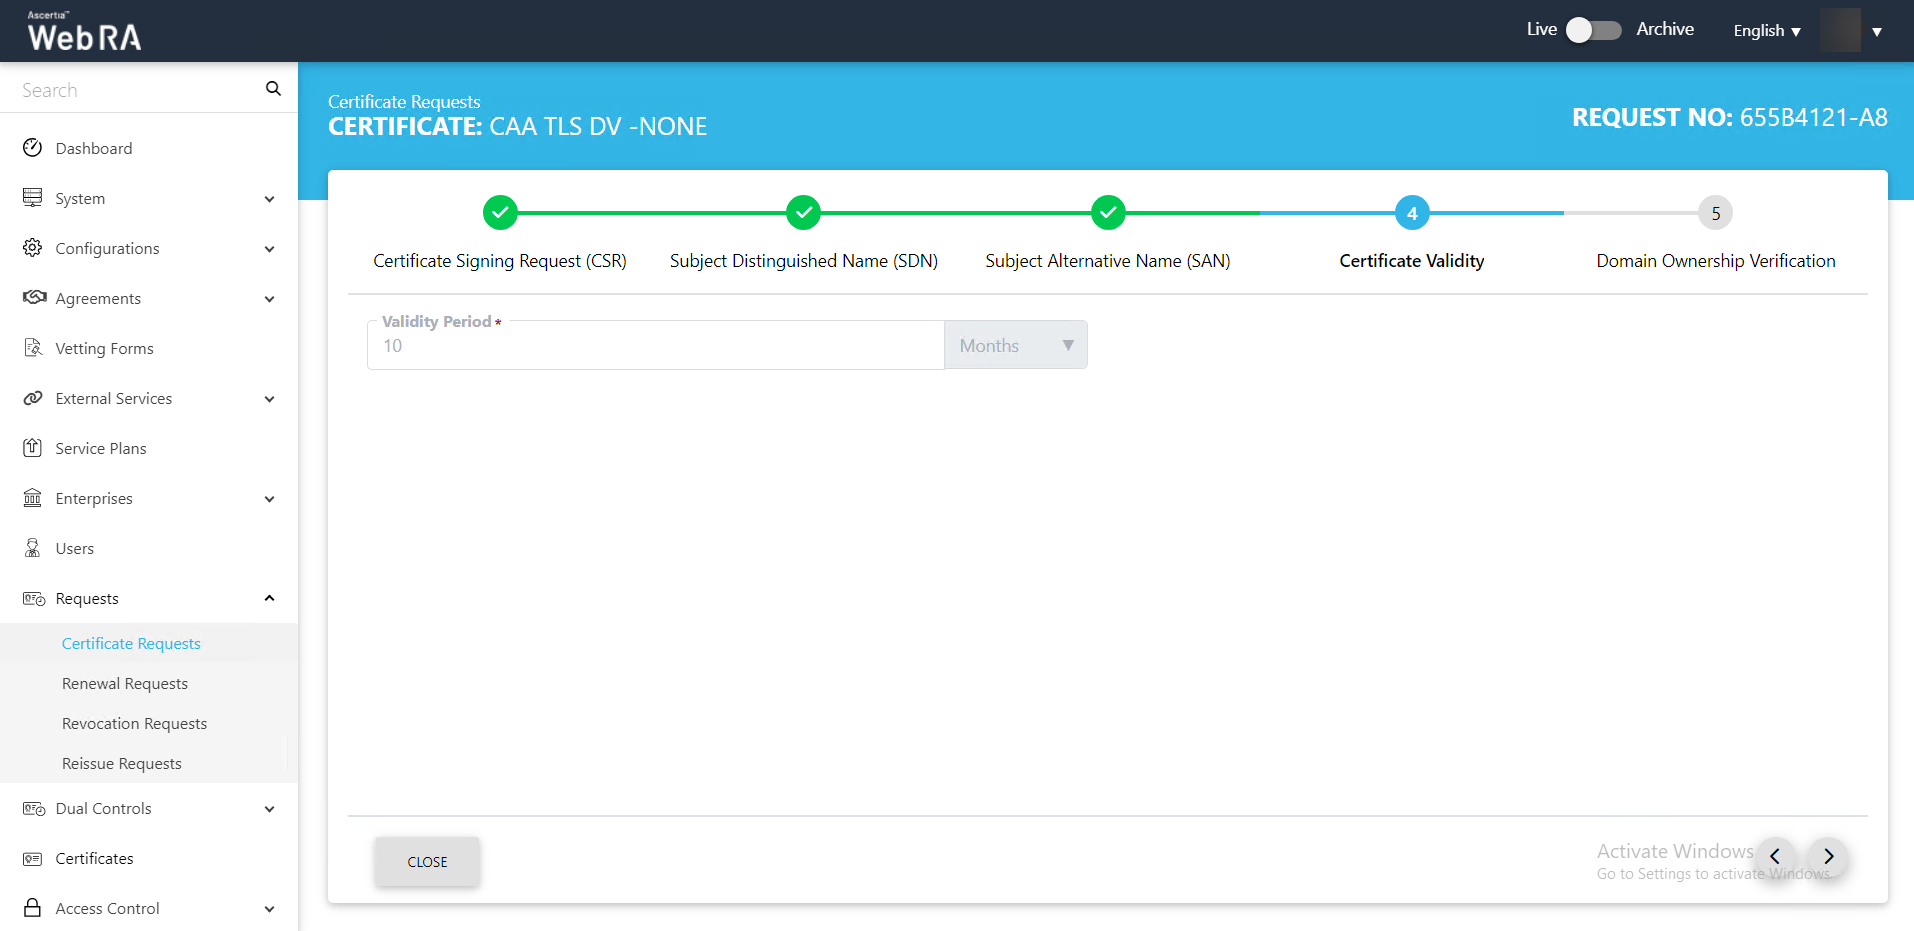
- The Certificate Validity screen will appear. Then click >.
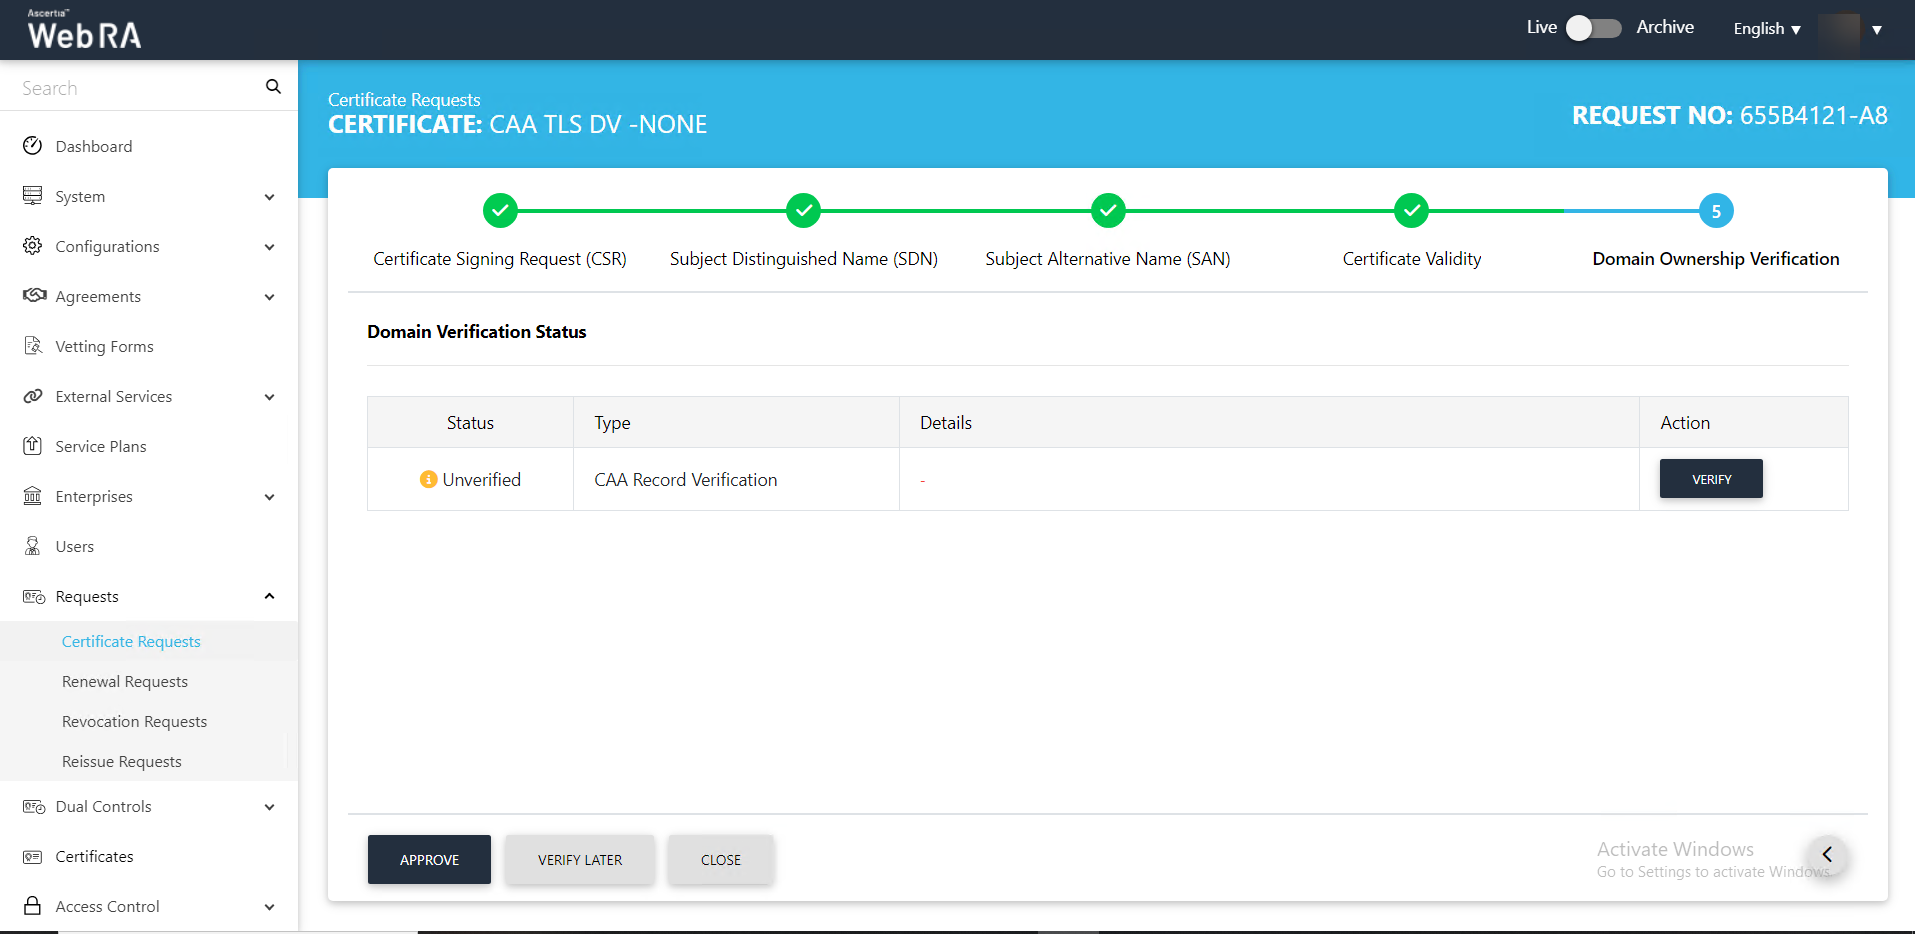
- The Domain Ownership Verification screen will appear. The Domain Verification Status will appear Unverified. Click Verify to proceed.
- If the CAA records you configured in the Enterprise Domain configurations matches the CA record you entered in the DNS entry, the domain Verification Status will appear Verified, as displayed below:
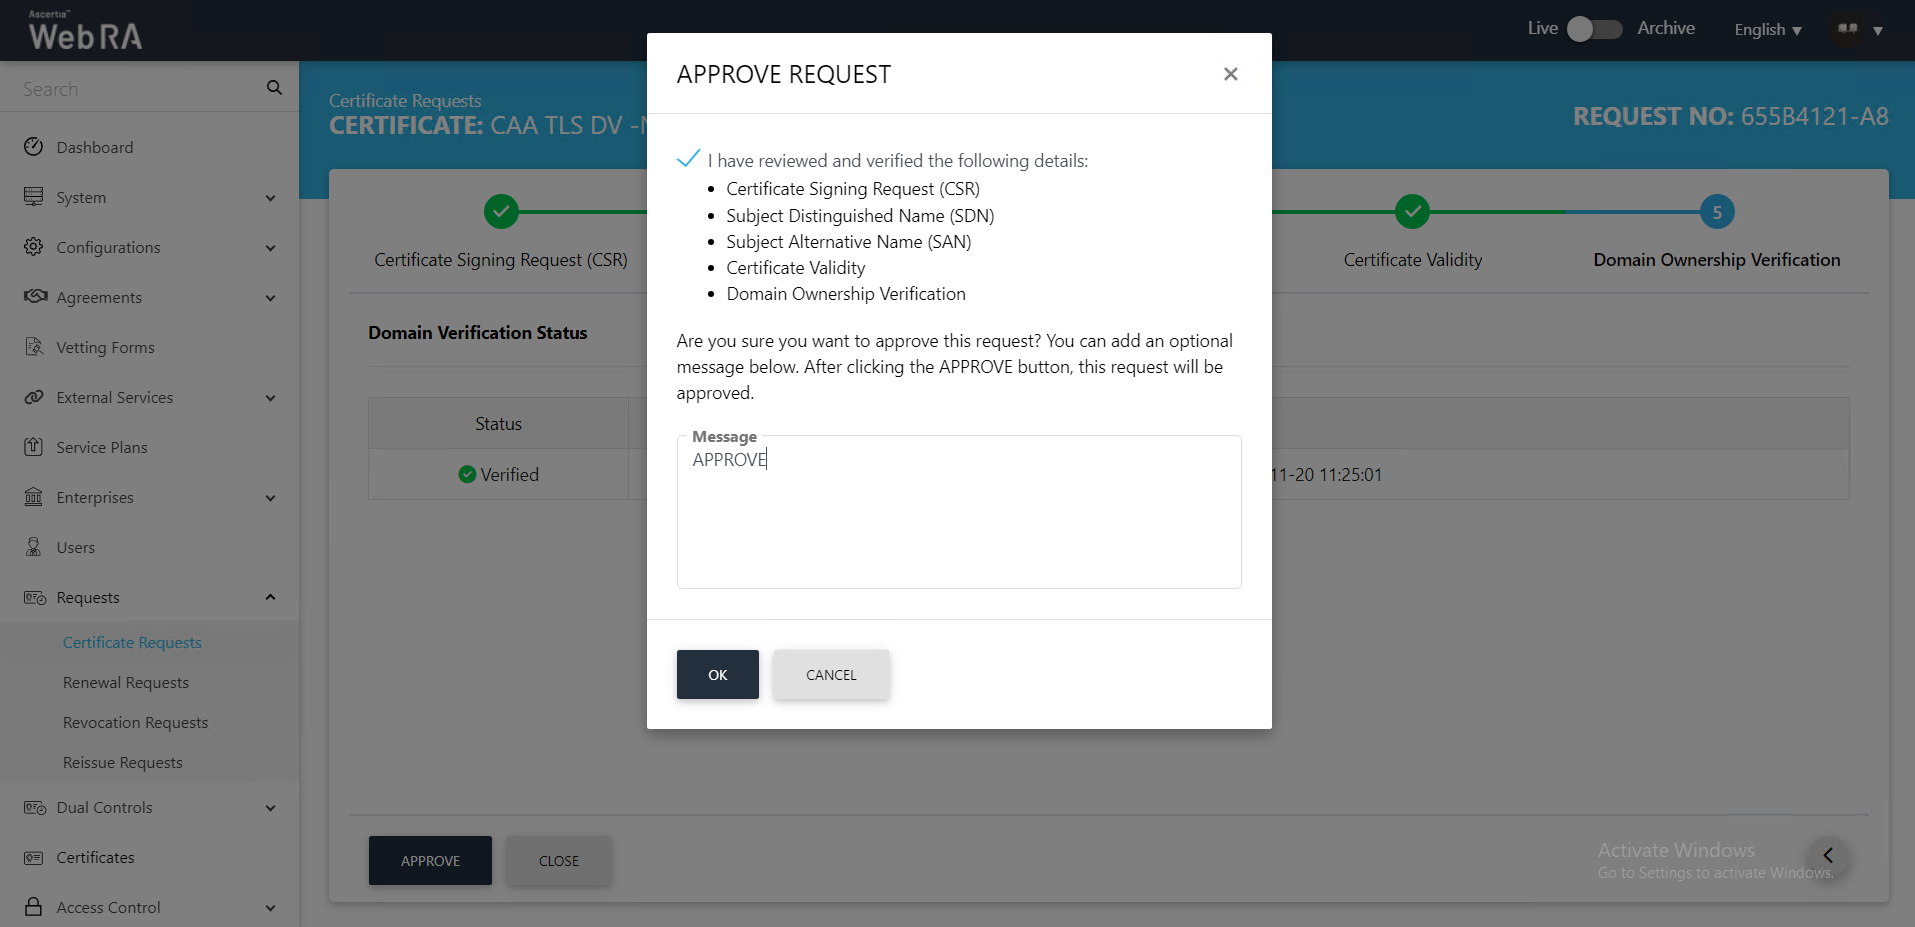
- The Approve Request screen will appear. Click the confirmation check box and click OK. This request will appear in the listing.
Second Factor Authentication
If second factor authentication is enabled on certificate requests, the configured authentication mechanism will function accordingly. When a user clicks on the Generate button, the authentication window will appear, and once it accepts the selected method, it will generate a certificate.
The authentication mechanism can be one of the following:
- SMS OTP Authentication
- Email OTP Authentication
- Email & SMS Authentication
- SAML Authentication
- Active Directory Authentication
- Azure Active Directory Authentication
- OIDC Authentication