Bulk Operations
The Bulk Operations module is only visible to operators who have been granted access to it in the Roles settings. To update these settings, navigate to Access Control > Roles > Edit a Role in the admin portal.
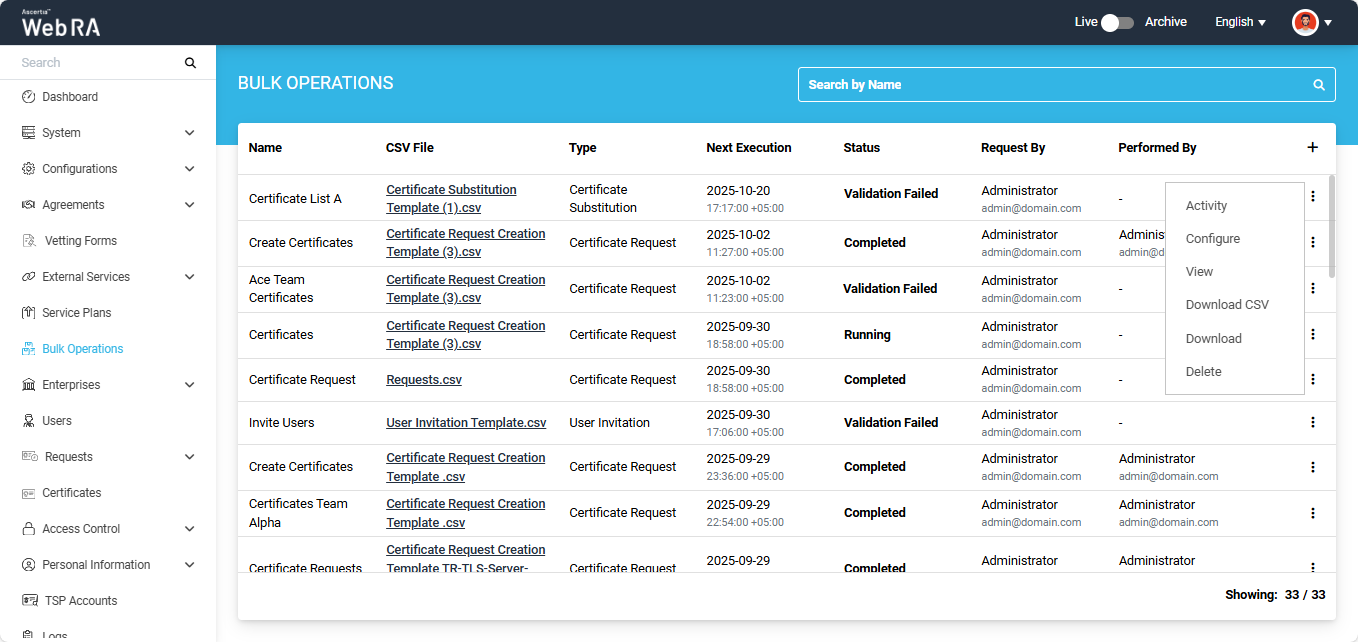
Once the permissions are granted, expand the ‘Bulk Operations’ tab in the left menu of the Admin portal to access the bulk operations listing screen.
Note: Windows Enrolment and Enrolment Protocols are not supported in 'Bulk Operations'.
This section of the ADSS Web RA application allows you to configure Bulk Operations Job for the following types:
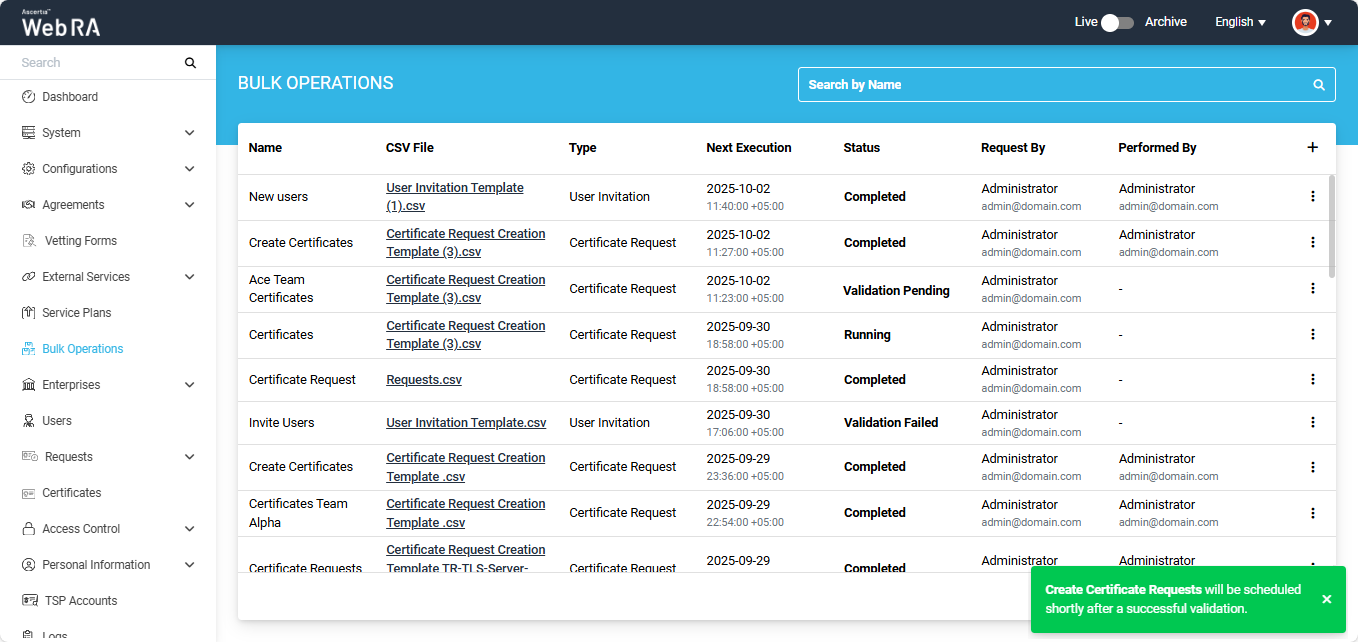
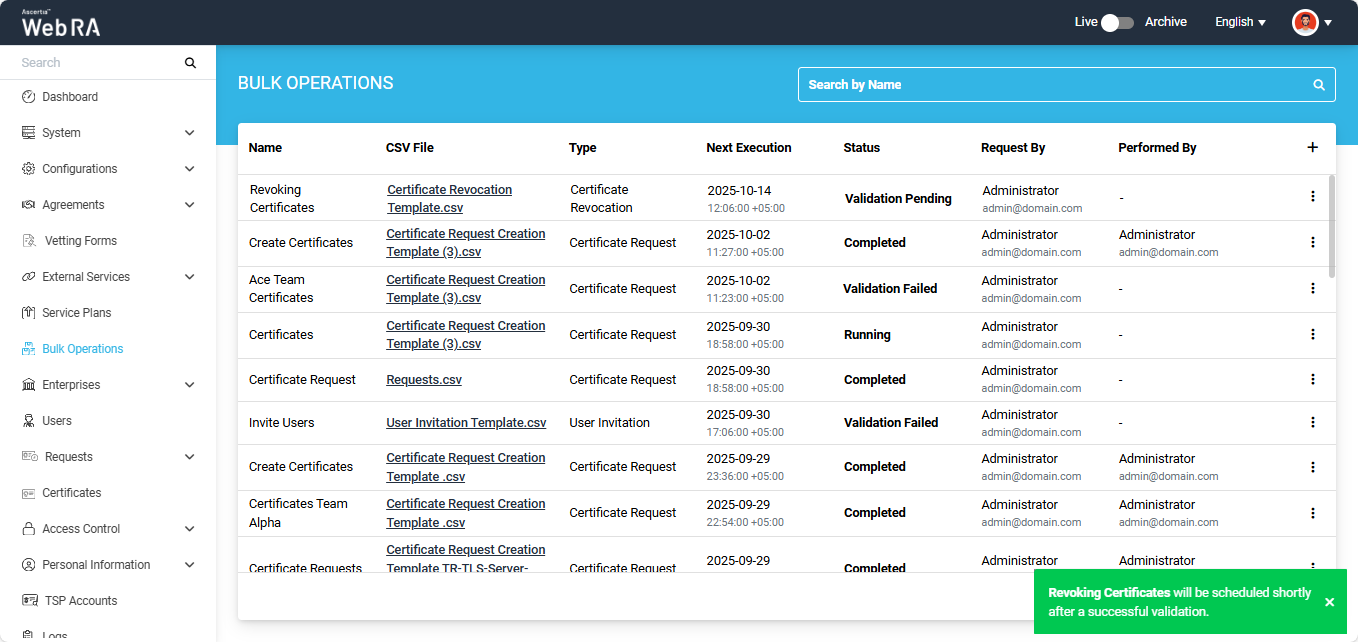
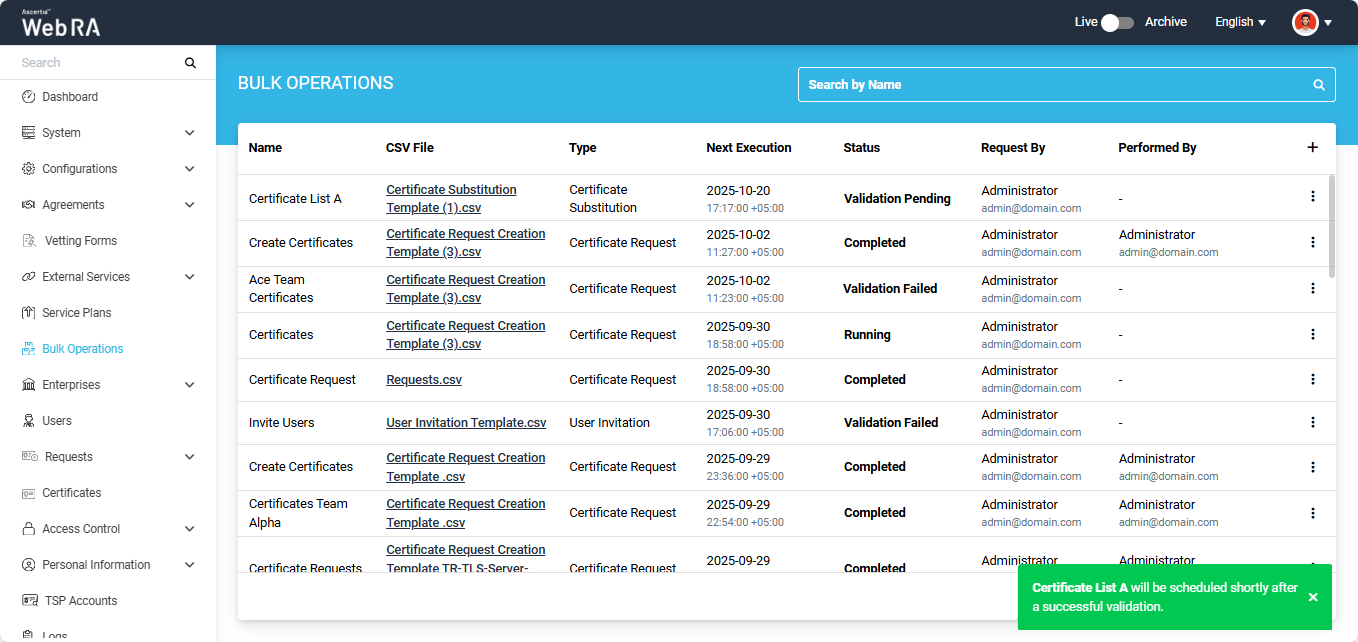
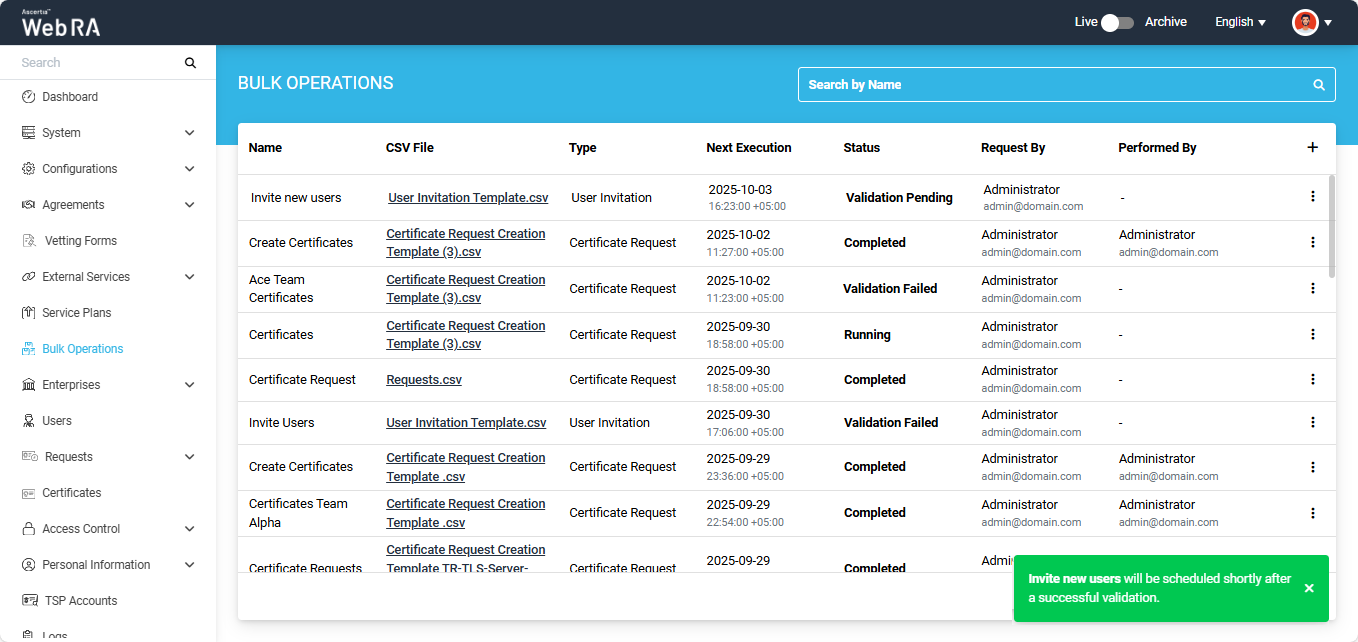
The listing table displays seven columns by default, which are as follows:
|
Columns |
Description |
|
Name |
Displays the name of the bulk operations job that was entered during configuration. |
|
CSV File |
Displays the name of the CSV file that was uploaded during configuration of the job. |
|
Type |
Displays the type selected during configuration. Available types include Certificate Request, Certificate Revocation, Certificate Substitution, and User Invitation. |
|
Next Execution |
Displays the date and time at which the next job will be executed. |
|
Status |
Displays the status of bulk operations job. |
|
Request By |
Displays the name of the individual who requested the bulk operations job. |
|
Performed By |
Displays the name of the individual who performed the bulk operations job. |

Expand Bulk Operations module in the left menu of the admin portal.
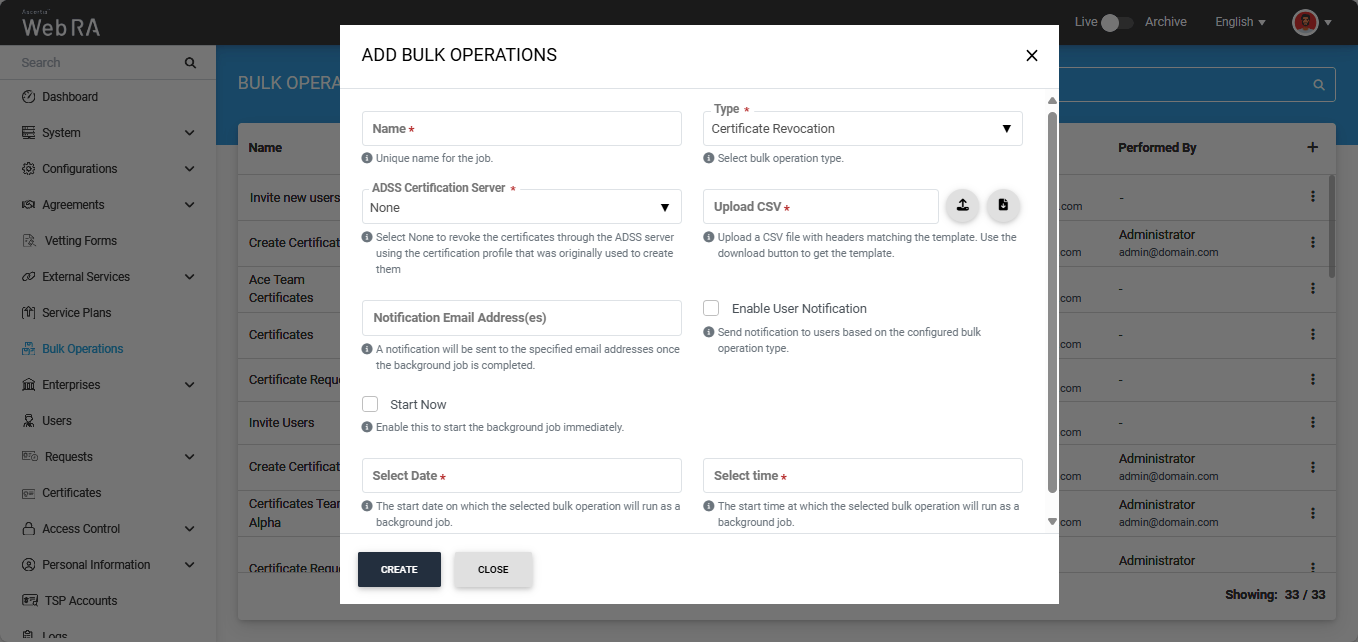
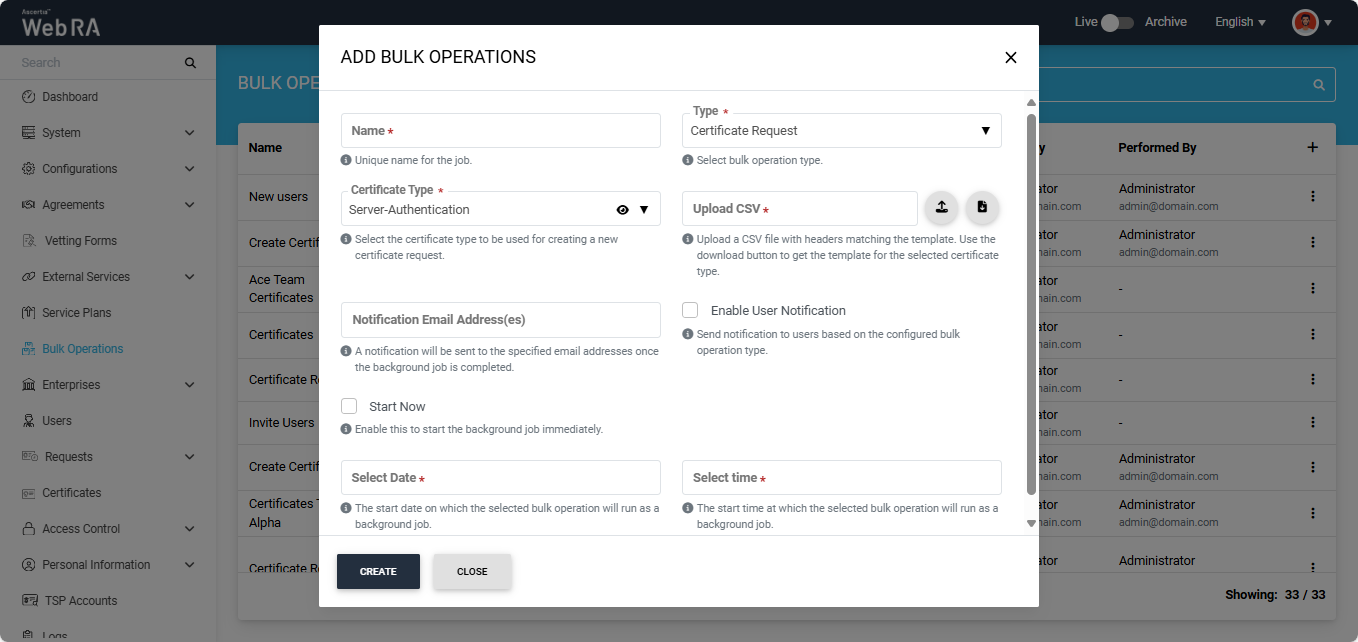
To add a bulk operations job for the Certificate Request type, click the + icon located at the far right of the table header.
The system will display a configuration dialog titled ‘Add Bulk Operations’ on the screen.

To configure a bulk operations job of the Certificate Request type, enter the required details in the fields and click Create.
The fields available in the dialog are explained below:
|
Fields |
Description |
|
Name |
Enter a unique name for the bulk operations job. (This is a mandatory field) |
|
Type |
Select the type of bulk operation for which you want to configure the job. By default, Certificate Request is selected. (This is a mandatory field) |
|
Certificate Type |
This dropdown lists all certification profiles available in the Web RA system. By default, the topmost profile in the list is selected. You can click the dropdown and choose the profile you want to use for creating a new certificate request. You can view the details of the profile by clicking the eye icon. (This is a mandatory field) |
|
Upload CSV |
In this field, you must upload a CSV file containing the details required for creating certificate requests. First, download the certificate request CSV template using the Download button. The file will include data parameters based on the selected Certificate Type. After filling in the details in the downloaded file, upload it back by clicking the Upload button. (This is a mandatory field) |
|
Notification Email Address(es) |
A notification will be sent to the specified email addresses once the background job is completed. |
|
Enable User Notification |
Select this checkbox if you want users to receive a notification after the certificate requests are created. |
|
Start Now |
Select this checkbox if you want the job to start immediately. |
|
Select Date and Time |
If the Start Now button is disabled, the dialog allows you to schedule the job for a later time. Enter the date and time in the respective fields. |
After making all the required configurations, click the ‘Create’ button.
Once you click ‘Create’, the bulk operations dialog will close and an alert appears on the screen, stating that the job will start after successful validation.
Moreover, the status of your job will initially appear as ‘Validation Pending’ in the listing table, which means the system is validating the data provided in the CSV file.
For Successful Validation
If the data provided in the CSV file is accurate, the status of the job will change to ‘Running’ and then to ‘Completed’.

After the job is complete, the system creates certificate requests in the Draft state for the specified users in their user portals. These certificate requests can then be processed from the 'Certificate Requests' section in the Web Portal.
If you click the three-dot icon  icon next to a completed job entry, a short menu appears with the following options:
- Activity
- View
- Download CSV
- Download
- Delete

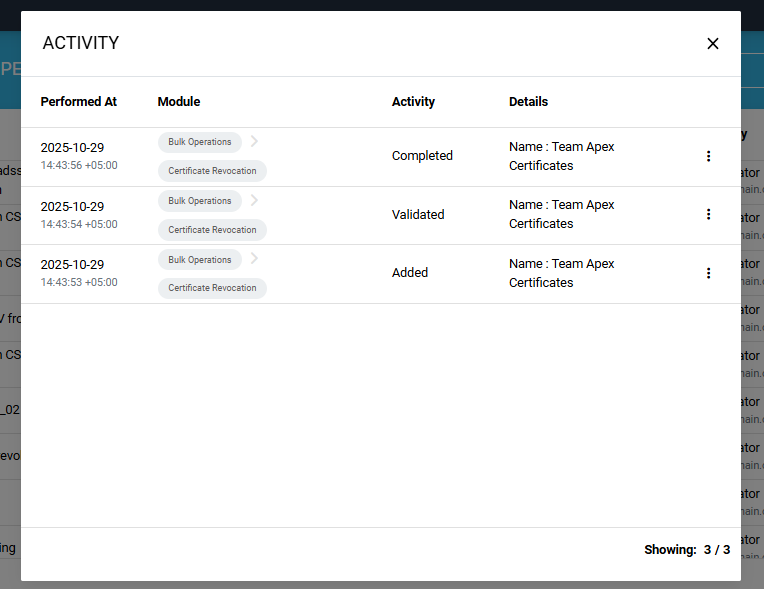
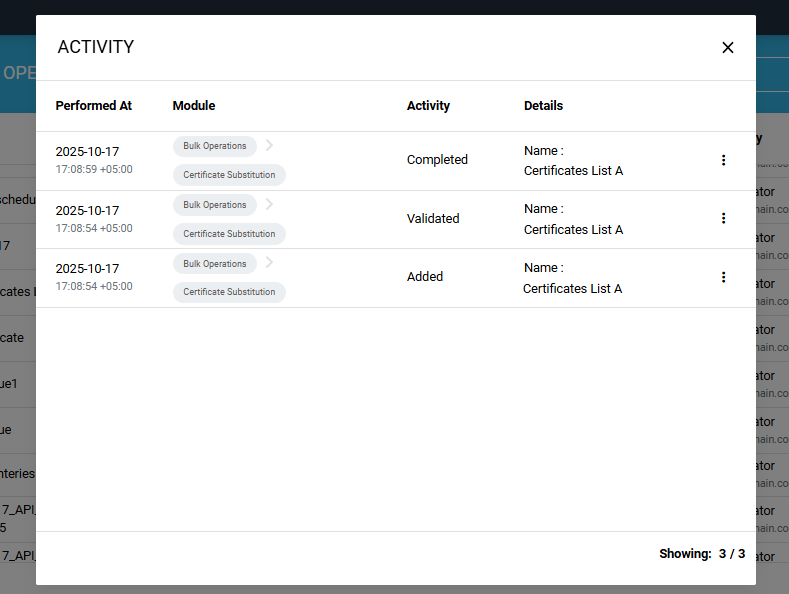
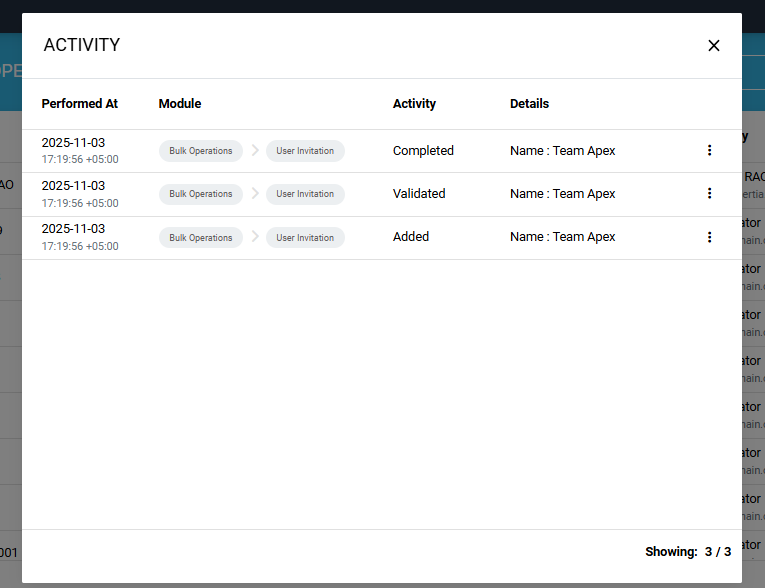
Activity
Select the ‘Activity’ option to view the details of the background job's activities. The details will appear in the ‘Activity’ dialog.
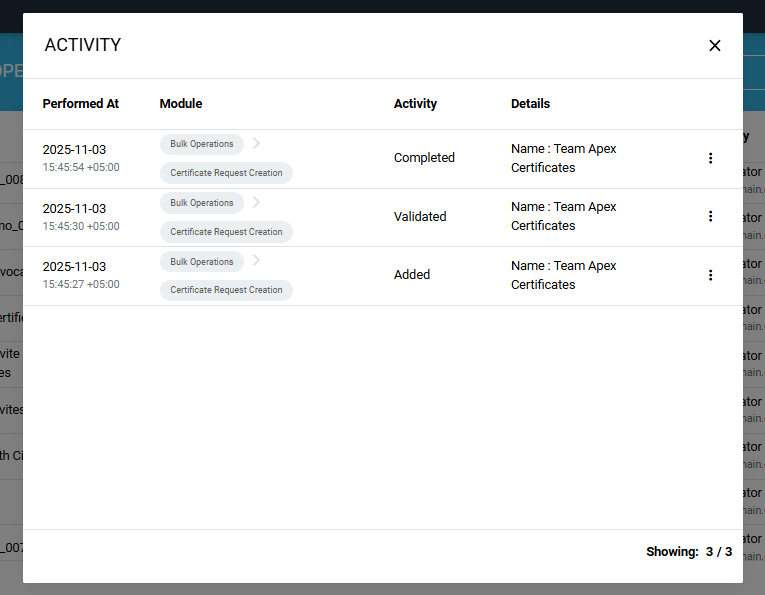
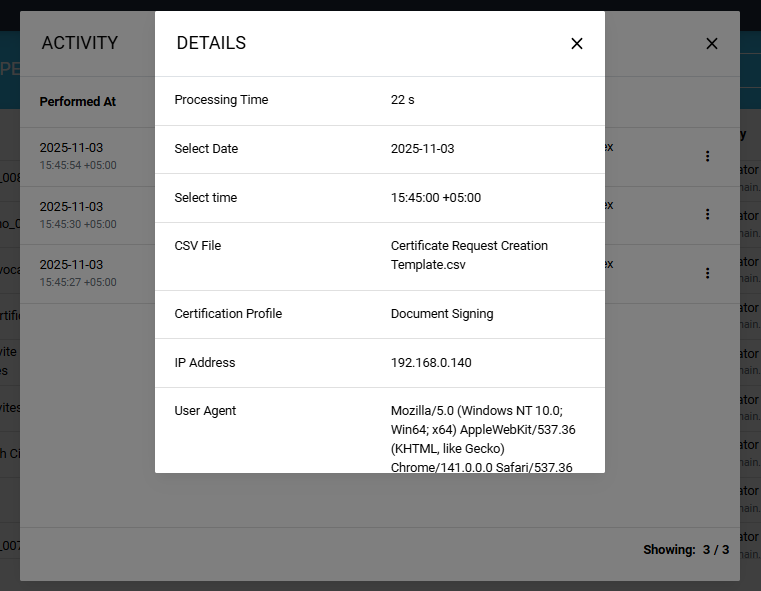
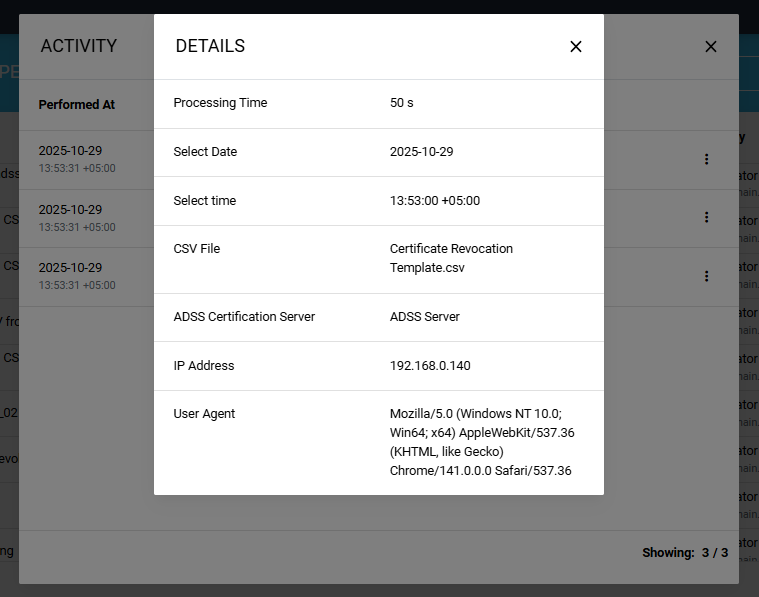
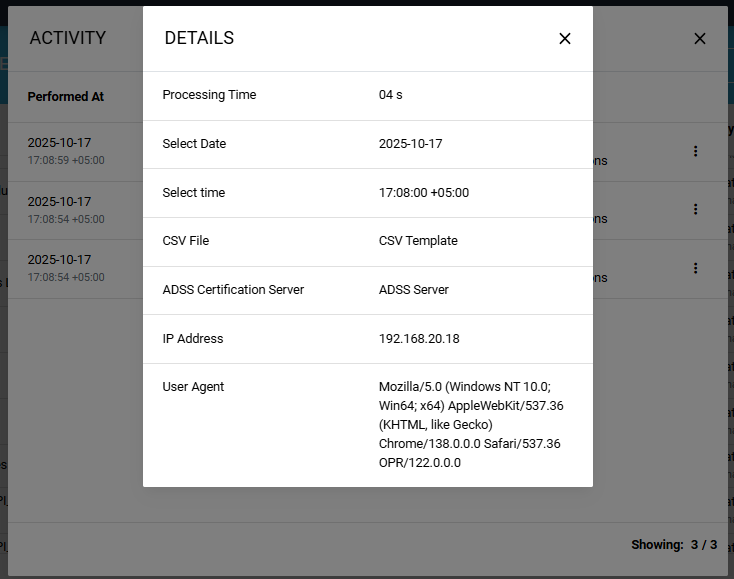
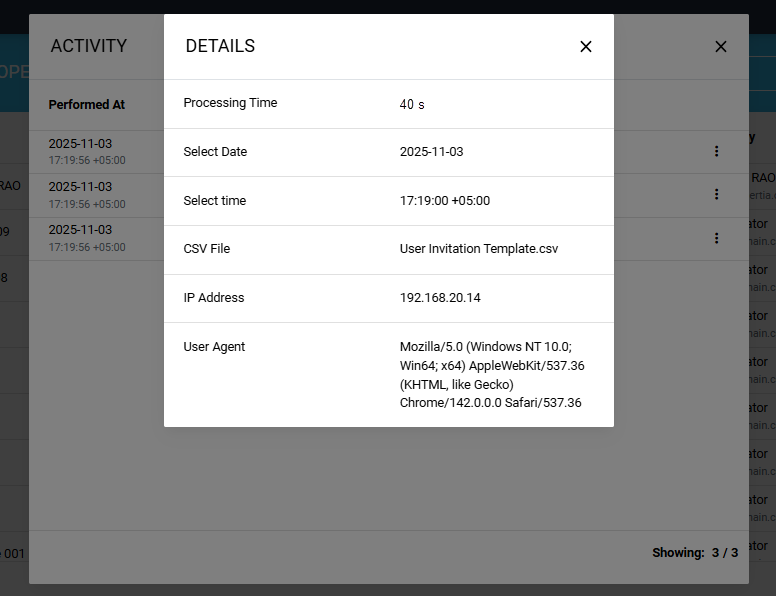
You can click the three-dot  icon to check the complete information of a certain activity. The information will be displayed on the ‘Details’ dialog.
View the Bulk Operation Report
Select the View option to open the ‘Certificate Request Creation Report’.
When you click View, the system displays the report in view mode, where you can check the status and details of each request.
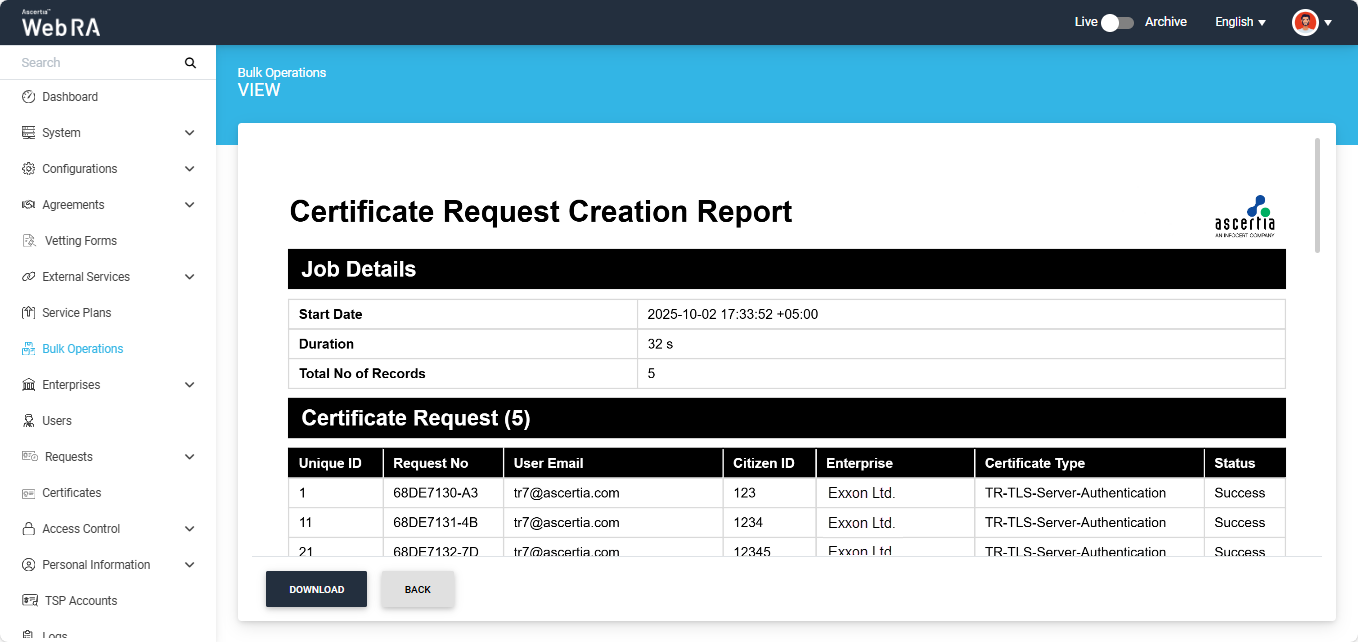
You can download the report in your computer by clicking the ‘Download’ button.
Download CSV
To download the CSV file containing the user data provided during the job configuration, select the ‘Download CSV’ option. The file will then be saved to your system.
Download
To download the ‘Certificate Request Creation Report’ in PDF format, select the ‘Download’ option. The report will then be saved to your computer.
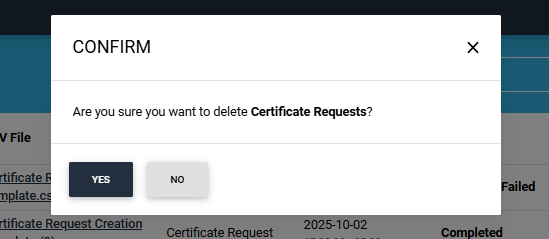
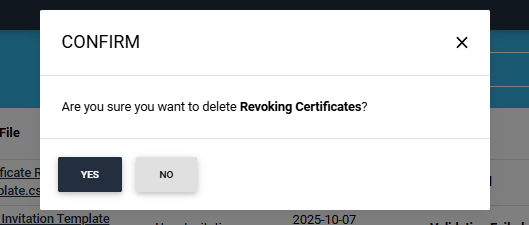
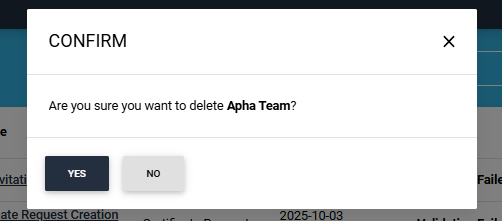
Delete
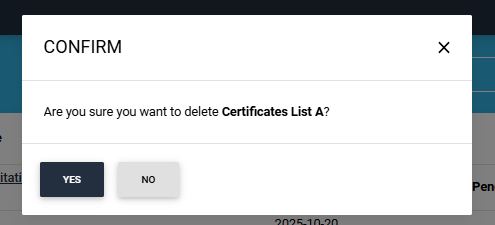
To delete a background job entry from the listing, select the ‘Delete’ option. The system will display a confirmation dialog; click ‘Yes’ to confirm the deletion.
For Validation Failed
If the system finds any error in the uploaded CSV file, the status of the job will change to ‘Validation Failed’ in the ‘Bulk Operations’ listing.
To view the error details, click the three-dot  icon next to the job entry and select View.

The system will open the ‘Certificate Request Validation Report’, which contains the error details.
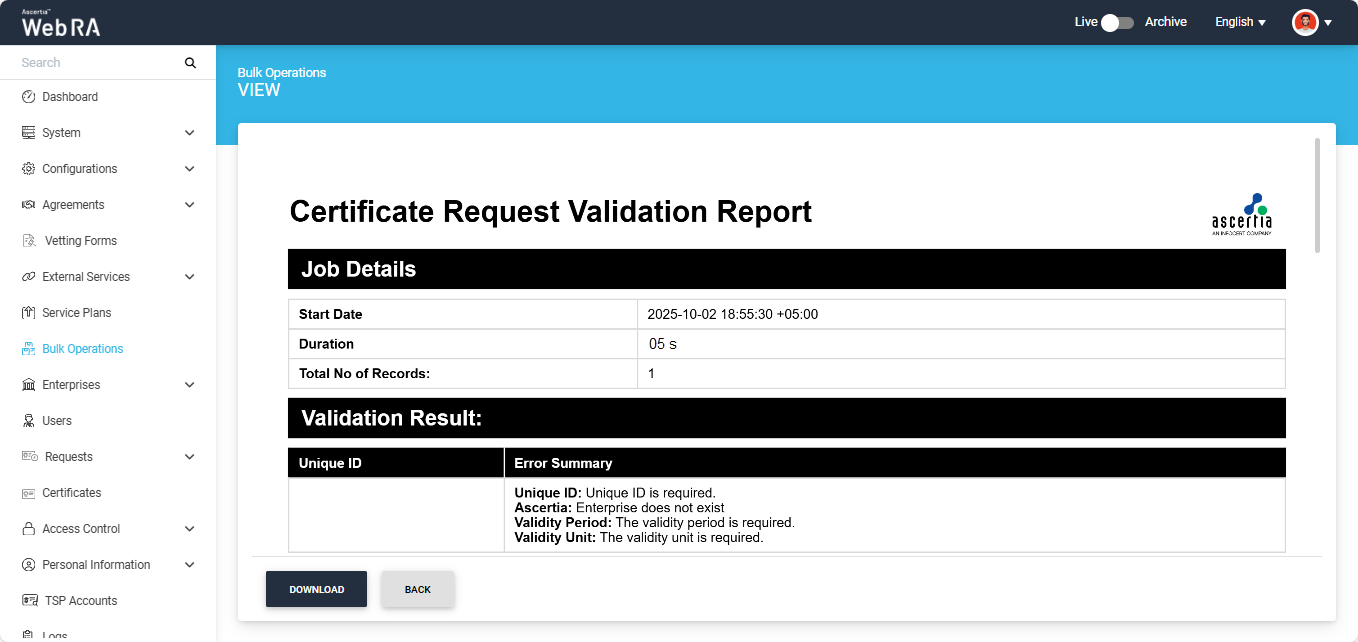
You can view the errors from this report and make changes in the CSV file again. After making the required changes, you can restart the bulk operations job by uploading the updated file.
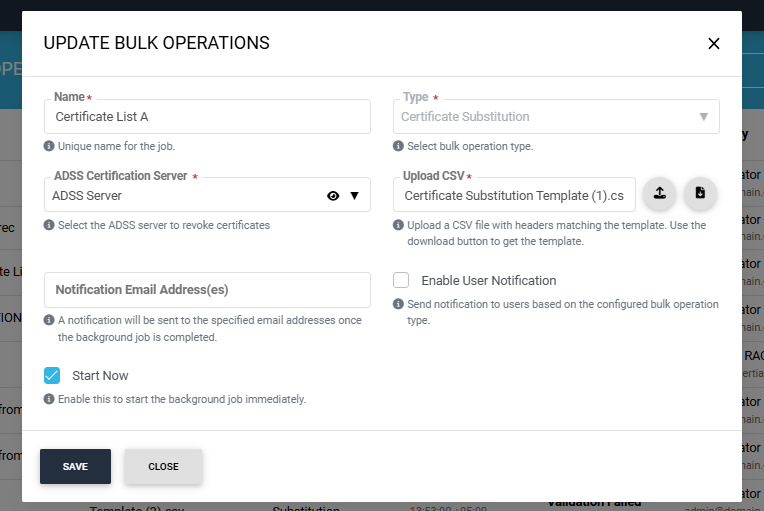
To do this, click the three-dot  icon next to the job entry and select Configure. The system will then display the 'Update Bulk Operations' dialog on the screen.
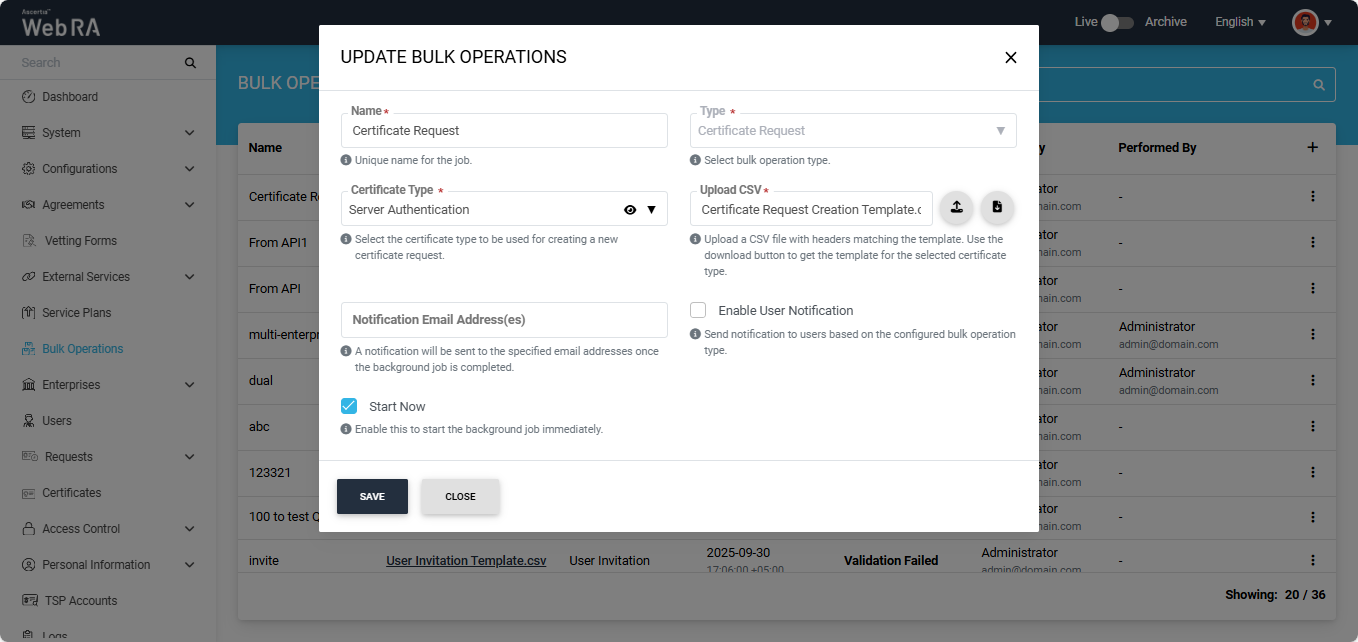
All previous job configurations will remain the same. Upload the new CSV file in the dialog and click ‘Save’.
The system will then change the job status back to ‘Validation Pending’ in the listing, and after successful validation the job will be completed.
Dual Control
If ‘Dual Control’ is enabled for the Bulk Operations module, then after the job is configured, the system will first validate the data in the CSV file. If the validation is successful, the job will be submitted for approval, and its status will be updated to ‘Approval Pending’.

The background job will initiate after the request is approved.
Expand Bulk Operations module in the left menu of the admin portal.
To add a bulk operations job for the ‘Certificate Revocation’ type, click the + icon located at the far right of the table header.
The system will display a configuration dialog titled ‘Add Bulk Operations’ on the screen.

By default, ‘Certificate Request’ is selected in the ‘Type’ dropdown. To change it, click the dropdown and select ‘Certificate Revocation’. The system will then update the fields in the dialog according to the ‘Certificate Revocation’ operation type.
To configure the bulk operations job, enter/add the required details in the fields and click Create.
The fields available in the dialog are explained below:
|
Fields |
Description |
|
Name |
Enter a unique name for the bulk operations job. (This is a mandatory field) |
|
Type |
Select the ‘Certificate Revocation’ type from the dropdown. By default, ‘Certificate Request’ will appear. (This is a mandatory field) |
|
ADSS Certification Server |
This dropdown lists all ADSS Certification Servers created in the Web RA system. By default, ‘None’ option will appear selected. Keep ‘None’ selected if you want to revoke the certificates through the ADSS server using the certification profile that was originally used to create them. You can also click the dropdown to select your preferred ADSS Server. If you select a specific ADSS Server from the list, ensure that the CSV file contains only the serial numbers of certificates issued by that server. You can view the details of the selected ADSS Server by clicking the eye icon. (This is a mandatory field) |
|
Upload CSV |
In this field, you must upload a CSV file containing the details of the certificates to be revoked. First, download the Certificate Revocation CSV template using the ‘Download’ button. In the CSV file, you will be required to add the serial numbers of the certificates to be revoked, the revocation reason for each certificate, and their unique IDs. Following are the supported revocation reasons:
Note: The revocation reasons must be entered without spaces in the ‘Revocation Reason’ column of the CSV file. After filling in the details in the downloaded CSV file, upload it back by clicking the Upload button. (This is a mandatory field) |
|
Notification Email Address(es) |
A notification will be sent to the specified email addresses once the background job is completed. |
|
Enable User Notification |
Select this checkbox if you want users to receive a notification after their certificates are revoked. |
|
Start Now |
Select this checkbox if you want the job to start immediately. |
|
Select Date and Time |
If the ‘Start Now’ button is disabled, the dialog allows you to schedule the job for a later time. Enter the date and time in the respective fields. |
After making all the required configurations, click the ‘Create’ button.
Once you click ‘Create’, the bulk operations dialog will close and an alert appears on the screen, stating that the job will start after successful validation.
The bulk operations job will also appear at the top of the listing. The status of your job will initially appear as ‘Validation Pending’ in the listing table, which means the system is validating the data provided in the CSV file.
For Successful Validation
If the data provided in the CSV file is accurate, the status of the job will change to ‘Running’ and then to ‘Completed’.

After the job is complete, the system will revoke the certificates mentioned in the file and generate a report.
If you click the three-dot icon  icon next to a completed job entry, a short menu appears with the following options:
- Activity
- View
- Download CSV
- Download
- Delete

Activity
Select the ‘Activity’ option to view the details of the background job’s activities. The details will appear in the ‘Activity’ dialog.
You can click the three-dot  icon to check the complete information of a certain activity. The information will be displayed on the ‘Details’ dialog.
View the Bulk Operation Report
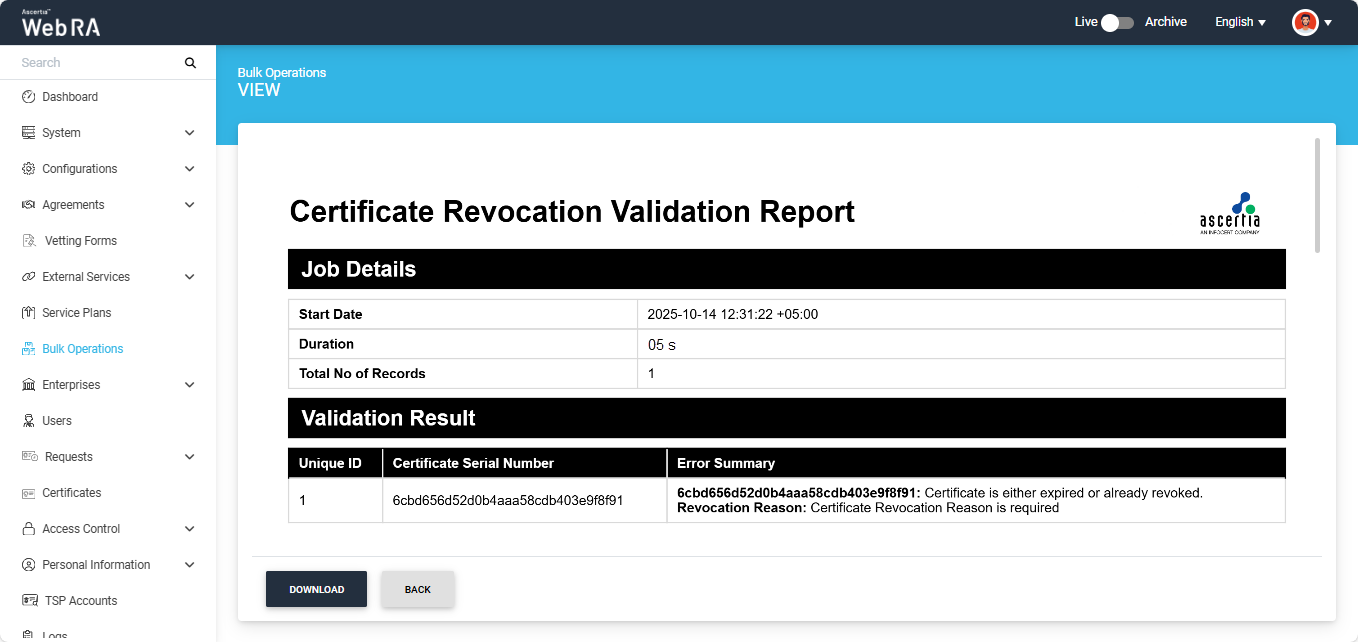
Select the ‘View’ option to open the ‘Certificate Revocation Report’.
When you click the ‘View’ option, the system displays the report in view mode, where you can check the details and status of the revoked certificate(s). The report also includes information about any failed certificate revocations.
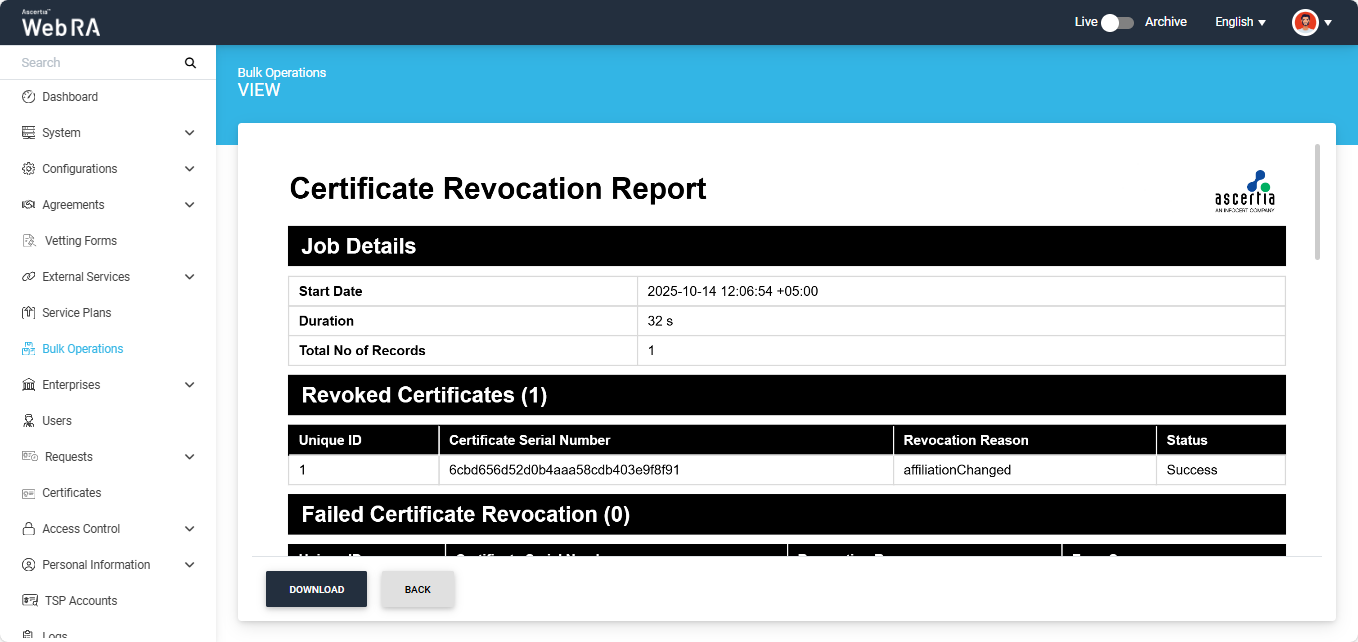
You can download the report in your computer by clicking the ‘Download’ button.
Download CSV
To download the CSV file containing the certificate details provided during the job configuration, select the ‘Download CSV’ option. The file will then be saved to your system.
Download
To download the ‘Certificate Revocation Report’ in PDF format, select the ‘Download’ option. The report will then be saved to your computer.
Delete
To delete a background job entry from the listing, select the ‘Delete’ option. The system will display a confirmation dialog; click ‘Yes’ to confirm the deletion.
For Validation Failed
If the system finds any error in the uploaded CSV file, the status of the job will change to ‘Validation Failed’ in the ‘Bulk Operations’ listing.

To view the error details, click the three-dot  icon next to the job entry and select the ‘View’ option.

The system will open the ‘Certificate Revocation Validation Report’, which contains the error details.
You can view the errors from this report and make changes in the CSV file again. After making the required changes, you can restart the bulk operations job by uploading the updated file.
To do this, click the three-dot  icon next to the job entry and select the ‘Configure’ option.

The system will then display the ‘Update Bulk Operations’ dialog on the screen.
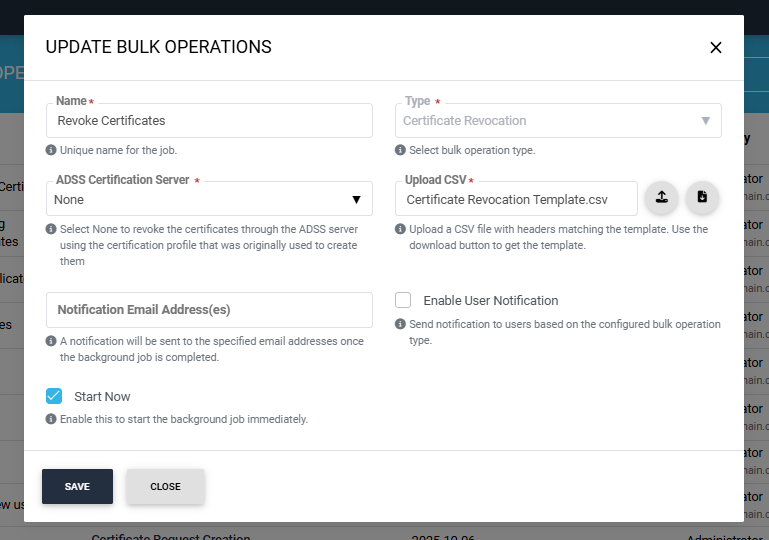
All previous job configurations will remain the same. Upload the new CSV file in the dialog and click ‘Save’.
The system will then change the job status back to ‘Validation Pending’ in the listing, and after successful validation the job will be completed.
Dual Control
If ‘Dual Control’ is enabled for the Bulk Operations module, then after the job is configured, the system will first validate the data in the CSV file. If the validation is successful, the job will be submitted for approval, and its status will be updated to ‘Approval Pending’.

The background job will initiate after the request is approved.
Expand Bulk Operations module in the left menu of the admin portal.
To add a bulk operations job for the ‘Certificate Substitution’ type, click the + icon located at the far right of the table header.
The system will display a configuration dialog titled ‘Add Bulk Operations’ on the screen.

By default, ‘Certificate Request’ is selected in the ‘Type’ dropdown. To change it, click the dropdown and select ‘Certificate Substitution’. The system will then update the fields in the dialog according to the ‘Certificate Substitution’ operation type.

To configure the bulk operations job, enter/add the required details in the fields and click Create.
The fields available in the dialog are explained below:
|
Fields |
Description |
|
Name |
Enter a unique name for the bulk operations job. (This is a mandatory field) |
|
Type |
Select the ‘Certificate Substitution’ type from the dropdown. By default, ‘Certificate Request’ will appear in the field. (This is a mandatory field) |
|
ADSS Certification Server |
This dropdown lists all ADSS Certification Servers created in the Web RA system. You can click the dropdown to select your required ADSS Server that will be used to revoke the certificates. You can view the details of the selected ADSS Server by clicking the eye icon. (This is a mandatory field) |
|
Upload CSV |
In this field, you must upload a CSV file containing the details of the certificates to be substituted. First, download the Certificate Substitution CSV template using the ‘Download’ button. The file will include the following data parameters:
Following are the supported revocation reasons:
Note: The revocation reasons must be entered without spaces in the ‘Revocation Reason’ column of the CSV file. After filling in the details in the downloaded CSV file, upload it back by clicking the Upload button. (This is a mandatory field) |
|
Notification Email Address(es) |
A notification will be sent to the specified email address(es) once the background job is completed. |
|
Enable User Notification |
Select this checkbox if you want users to receive a notification after their certificates are substituted. |
|
Start Now |
Select this checkbox if you want the job to start immediately. |
|
Select Date and Time |
If the ‘Start Now’ button is disabled, the dialog allows you to schedule the job for a later time. Enter the date and time in the respective fields. |
After making all the required configurations, click the ‘Create’ button.
Once you click ‘Create’, the bulk operations dialog will close and an alert appears on the screen, stating that the job will start after successful validation.
The bulk operations job will also appear at the top of the listing. The status of your job will initially appear as ‘Validation Pending’ in the listing table, which means the system is validating the data provided in the CSV file.
For Successful Validation
If the data provided in the CSV file is accurate, the status of the job will change to ‘Running’ and then to ‘Completed’.

After the job is complete, the system will revoke and substitute the certificates added in the file and generate a report. The new certificate requests in draft mode will also be created in the web portal. These certificates request can later be processed by the users from their respective user portals.
If you click the three-dot  icon next to a completed job entry, a short menu appears with the following options:
- Activity
- View
- Download CSV
- Download
- Delete

Activity
Select the ‘Activity’ option to view the details of all the activities of the background job. Each activity will appear in the ‘Activity’ dialog.
You can click the three-dot  icon to check the complete information of a certain activity. The information will be displayed on the ‘Details’ dialog.
View the Bulk Operation Report
Select the ‘View’ option to open the ‘Certificate Substitution Report’.
When you click the ‘View’ option, the system displays the report in view mode, where you can check the details and status of the substituted certificate(s).
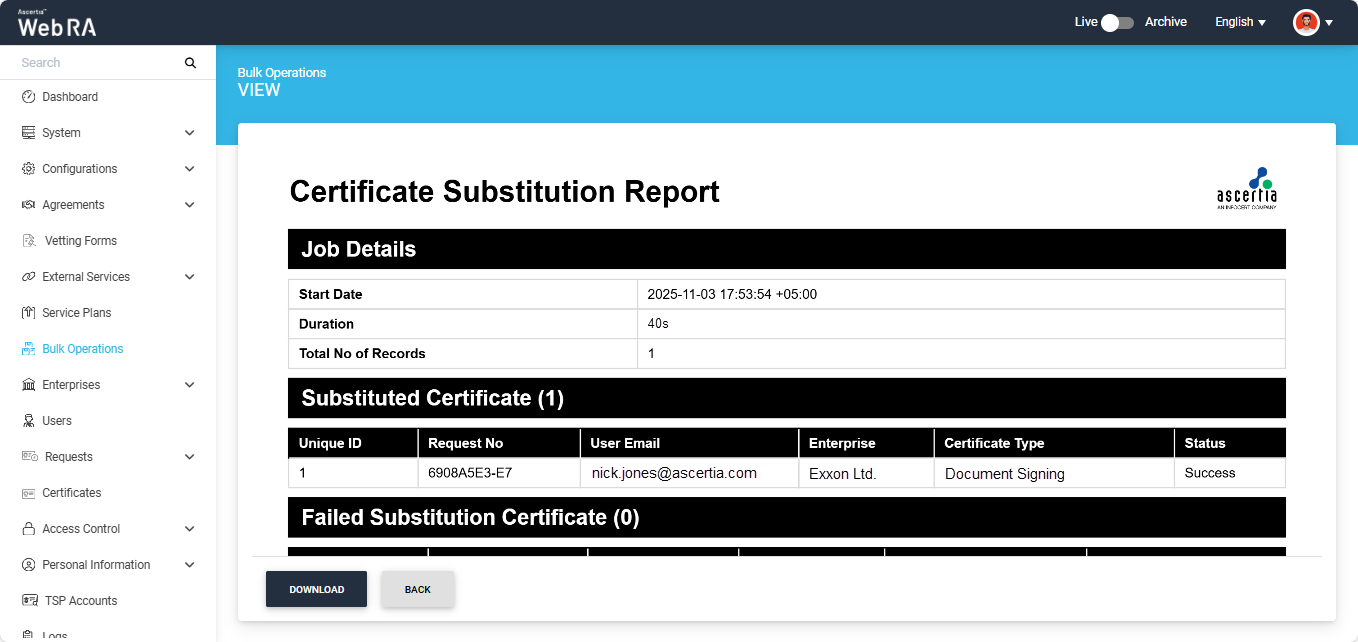
You can download the report in your computer by clicking the ‘Download’ button.
Download CSV
To download the CSV file containing the certificate details provided during the job configuration, select the ‘Download CSV’ option. The file will then be saved to your system.
Download
To download the ‘Certificate Revocation Report’ in PDF format, select the ‘Download’ option. The report will then be saved to your computer.
Delete
To delete a background job entry from the listing, select the ‘Delete’ option. The system will display a confirmation dialog; click ‘Yes’ to confirm the deletion.
For Validation Failed
If the system finds any error in the uploaded CSV file, the status of the job will change to ‘Validation Failed’ in the ‘Bulk Operations’ listing.

To view the error details, click the three-dot  icon next to the job entry and select the ‘View’ option.

The system will open the ‘Certificate Substitution Validation’ report, which contains the error details.

You can view the errors from this report and make changes in the CSV file again. After making the required changes, you can restart the bulk operations job by uploading the updated file.
To do this, click the three-dot  icon next to the job entry in the listing table and select the ‘Configure’ option.
The system will then display the ‘Update Bulk Operations’ dialog on the screen.
All previous job configurations will remain the same. Upload the new CSV file in the dialog and click ‘Save’.
The system will then change the job status back to ‘Validation Pending’ in the listing, and after successful validation the job will be completed.
Dual Control
If ‘Dual Control’ is enabled for the Bulk Operations module, then after the job is configured, the system will first validate the data in the CSV file. If the validation is successful, the job will be submitted for approval, and its status will be updated to ‘Approval Pending’.

The background job will initiate after the request is approved.
Expand Bulk Operations module in the left menu of the admin portal.
To add a bulk operations job for the ‘User Invitation’ type, click the + icon located at the far right of the table header.
The system will display a configuration dialog titled ‘Add Bulk Operations’ on the screen.
By default, ‘Certificate Request’ is selected in the ‘Type’ dropdown. To change it, click the dropdown and select ‘User Invitation’. The system will then update the fields in the dialog according to the ‘User Invitation’ operation type.
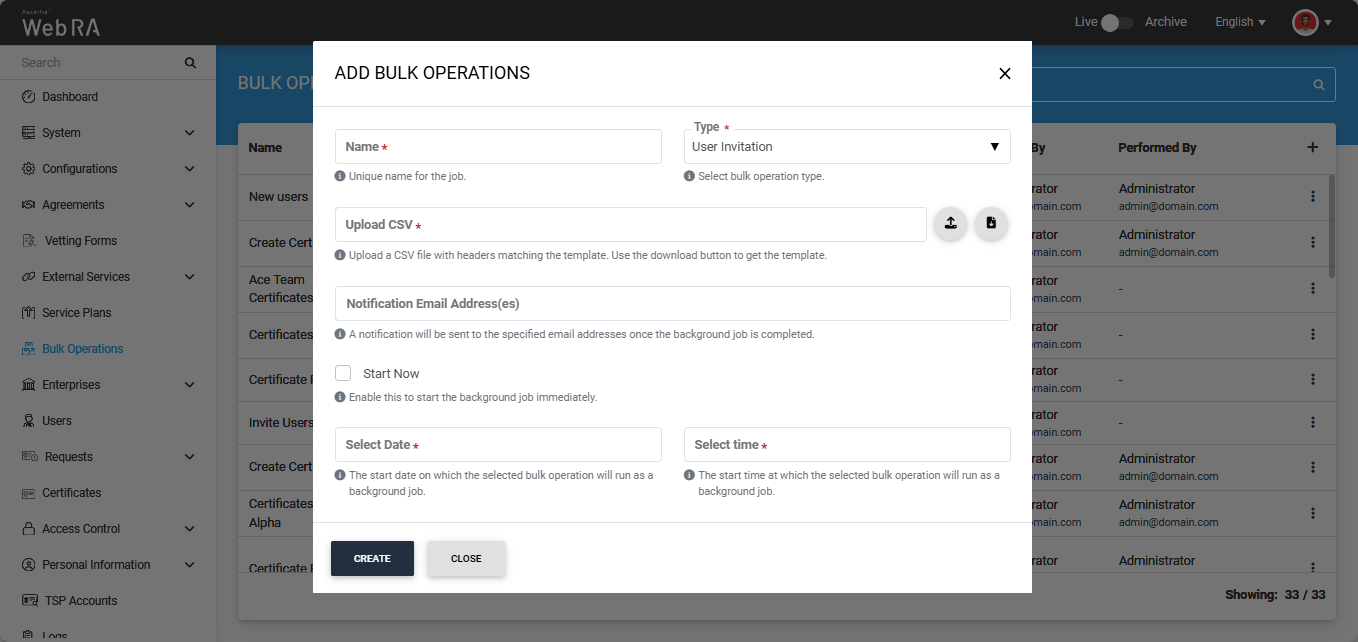
To configure the bulk operations job, enter/add the required details in the fields and click Create.
The fields available in the dialog are explained below:
|
Fields |
Description |
|
Name |
Enter a unique name for the bulk operations job. (This is a mandatory field) |
|
Type |
Select the ‘User Invitation’ type from the dropdown. (This is a mandatory field) |
|
Upload CSV |
In this field, you must upload a CSV file containing the details required for creating user invitations. First, download the user invitation CSV template using the Download button. In the CSV file, provide the required details in the specified data parameters. After filling in the details in the downloaded file, upload it back by clicking the Upload button. (This is a mandatory field) |
|
Notification Email Address(es) |
A notification will be sent to the specified email addresses once the background job is completed. |
|
Start Now |
Select this checkbox if you want the job to start immediately. |
|
Select Date and Time |
If the Start Now button is disabled, the dialog allows you to schedule the job for a later time. Enter the date and time in the respective fields. |
After making all the required configurations, click the ‘Create’ button.
Once you click ‘Create’, the bulk operations dialog will close and an alert appears on the screen, stating that the job will start after successful validation.
Moreover, the status of your job will initially appear as ‘Validation Pending’ in the listing table, which means the system is validating the data provided in the CSV file.
For Successful Validation
If the data provided in the CSV file is accurate, the status of the job will change to ‘Running’ and then to ‘Completed’.

After the job is complete, the system sends invitations to the specified email addresses, prompting users to sign up for their Web RA accounts.
If you click the three-dot icon  icon next to a completed job entry, a short menu appears with the following options:
- Activity
- View
- Download CSV
- Download
- Delete

Activity
Select the ‘Activity’ option to view the details of the background job's activities. The details will appear in the ‘Activity’ dialog.
You can click the three-dot  icon to check the complete information of a certain activity. The information will be displayed on the ‘Details’ dialog.
View the Bulk Operation Report
Select the ‘View’ option to open the ‘User Invitation Report’.
When you click the ‘View’ option, the system displays the report in view mode, where you can check the status and details of each invited user.
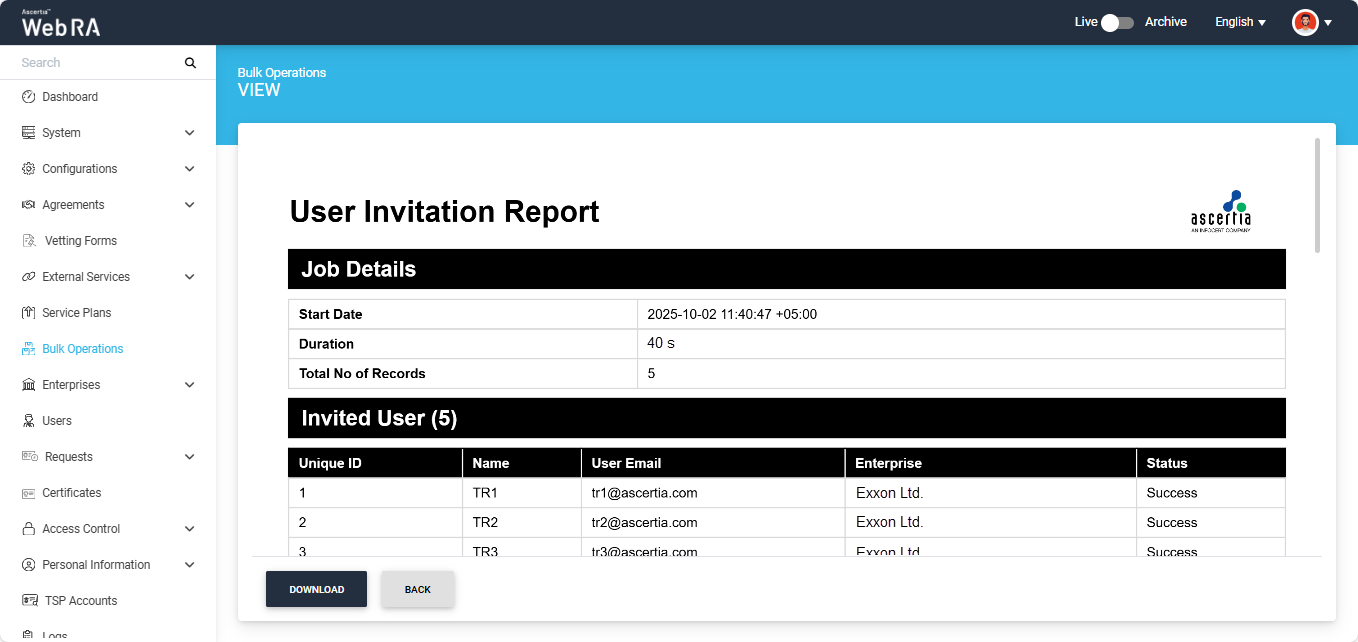
You can download the report in your computer by clicking the ‘Download’ button.
Download CSV
To download the CSV file containing the user data provided during the job configuration, select the ‘Download CSV’ option. The file will then be saved to your system.
Download
To download the ‘Certificate Request Creation Report’ in PDF format, select the ‘Download’ option. The report will then be saved to your computer.
Delete
To delete a background job entry from the listing, select the ‘Delete’ option. The system will display a confirmation dialog; click ‘Yes’ to confirm the deletion.
For Validation Failed
If the system finds any error in the uploaded CSV file, the status of the job will change to ‘Validation Failed’ in the ‘Bulk Operations’ listing.
To view the error details, click the three-dot  icon next to the job entry and select the ‘View’ option.

The system will open the ‘User Invitation Validation Report’, which contains the error details.
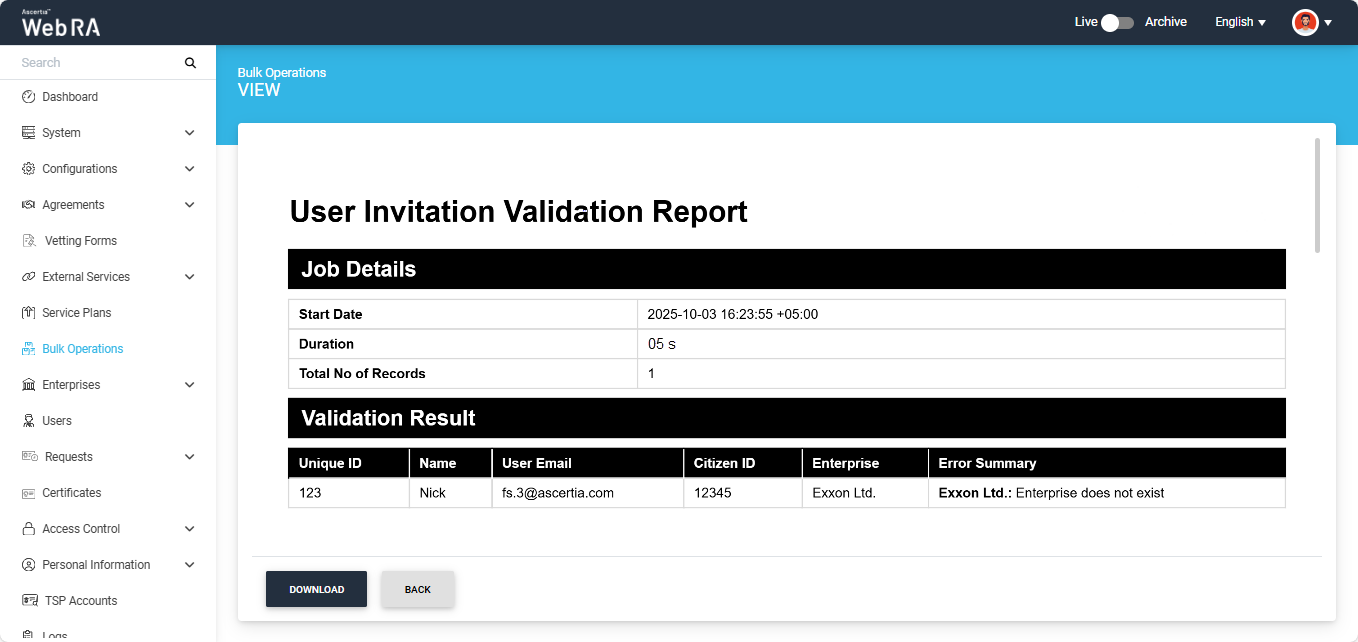
You can view the errors from this report and make changes in the CSV file again. After making the required changes, you can restart the bulk operations job by uploading the updated file.
To do this, click the three-dot  icon next to the job entry and select the ‘Configure’ option. The system will then display the 'Update Bulk Operations' dialog on the screen.
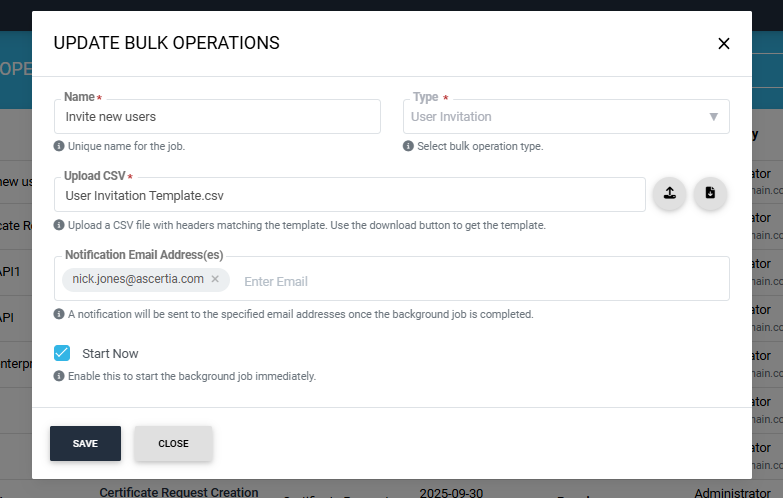
All previous job configurations will remain the same. Upload the new CSV file in the dialog and click ‘Save’.
The system will then change the job status back to ‘Validation Pending’ in the listing, and after successful validation the job will be completed.
Dual Control
If ‘Dual Control’ is enabled for the Bulk Operations module, then after the job is configured, the system will first validate the data in the CSV file. If the validation is successful, the job will be submitted for approval, and its status will be updated to ‘Approval Pending’.

The background job will initiate after the request is approved.