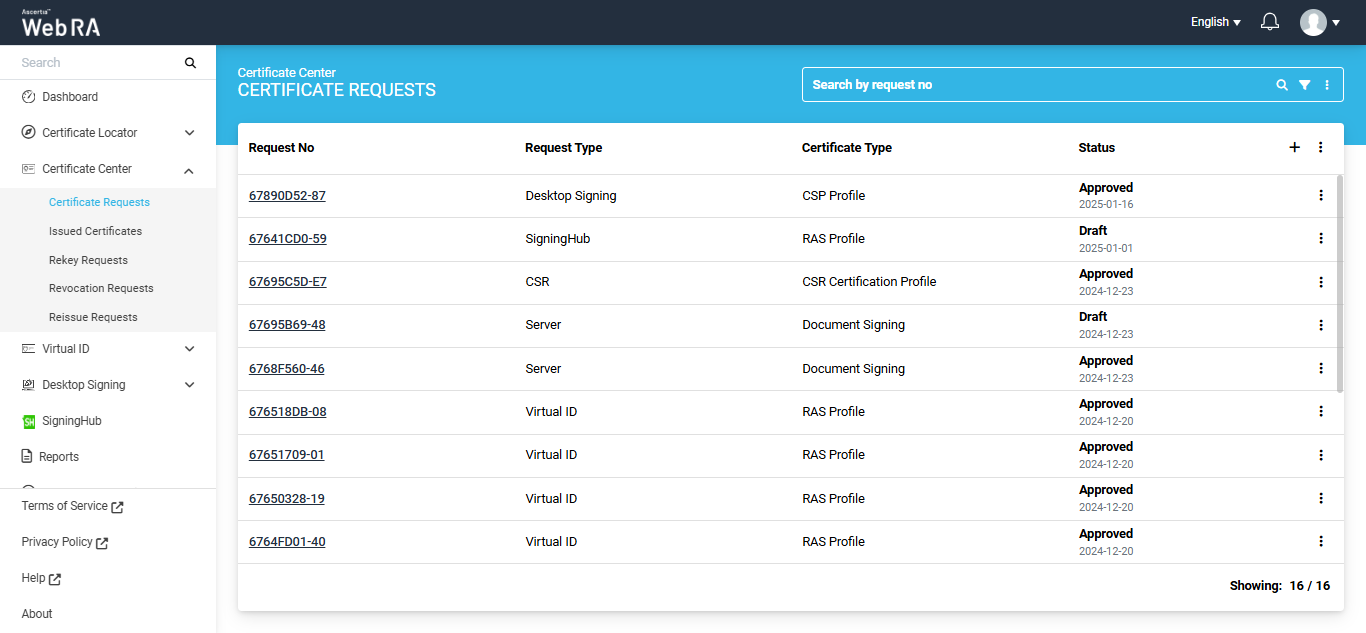
Certificate Requests
This section is used to create certificates based on different types of certificates.
- $REQUEST / $PKCS10 / SDN / SAN certificate type using CSR with vetting
- TLS Server Auth/ SDNs/ DV SSL certificate type
- TLS authentication with DV as None (CAA Records)
- TLS using CSR with CV as None (CAA Records)
- S/MIME Certificate Type Using CSR
- S/MIME Certificate Type
- Go>Sign Desktop Certificate Type
- Go>Sign Desktop Certificate Type with vetting
Following are the steps to create a request for $REQUEST / $PKCS10 / SDN / SAN certificate type using CSR with vetting:
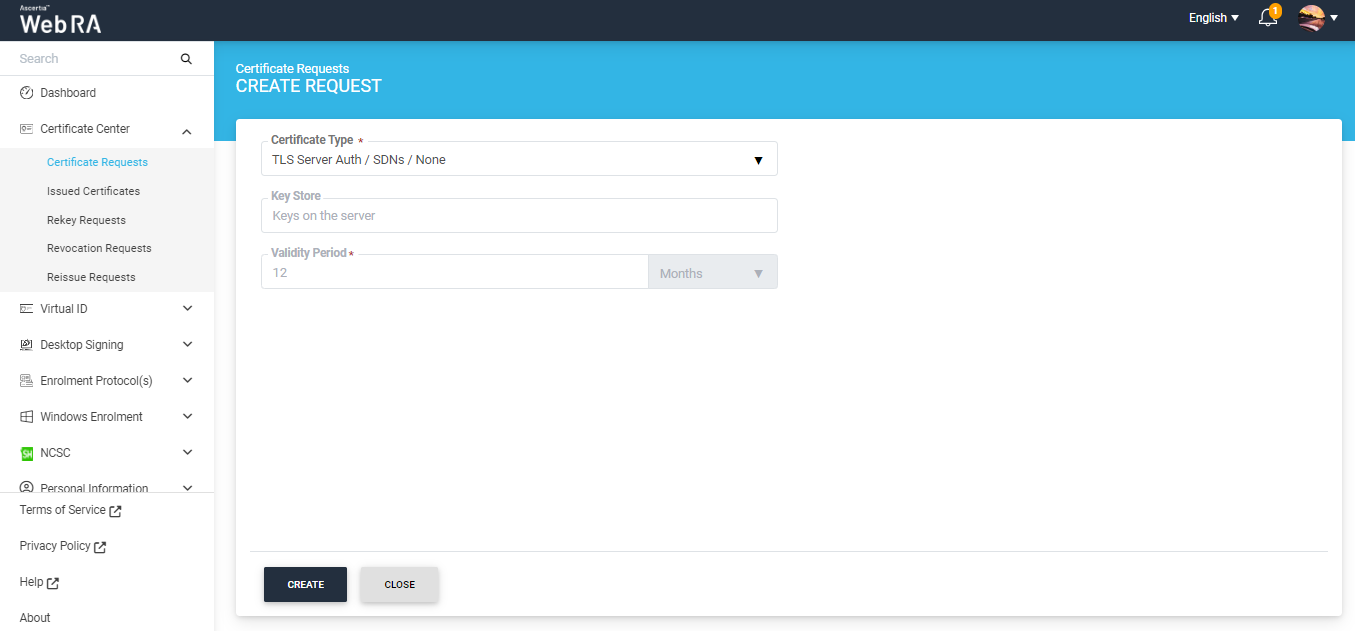
On the web portal, navigate Certificate Center > Certificate Requests from the left menu pane.
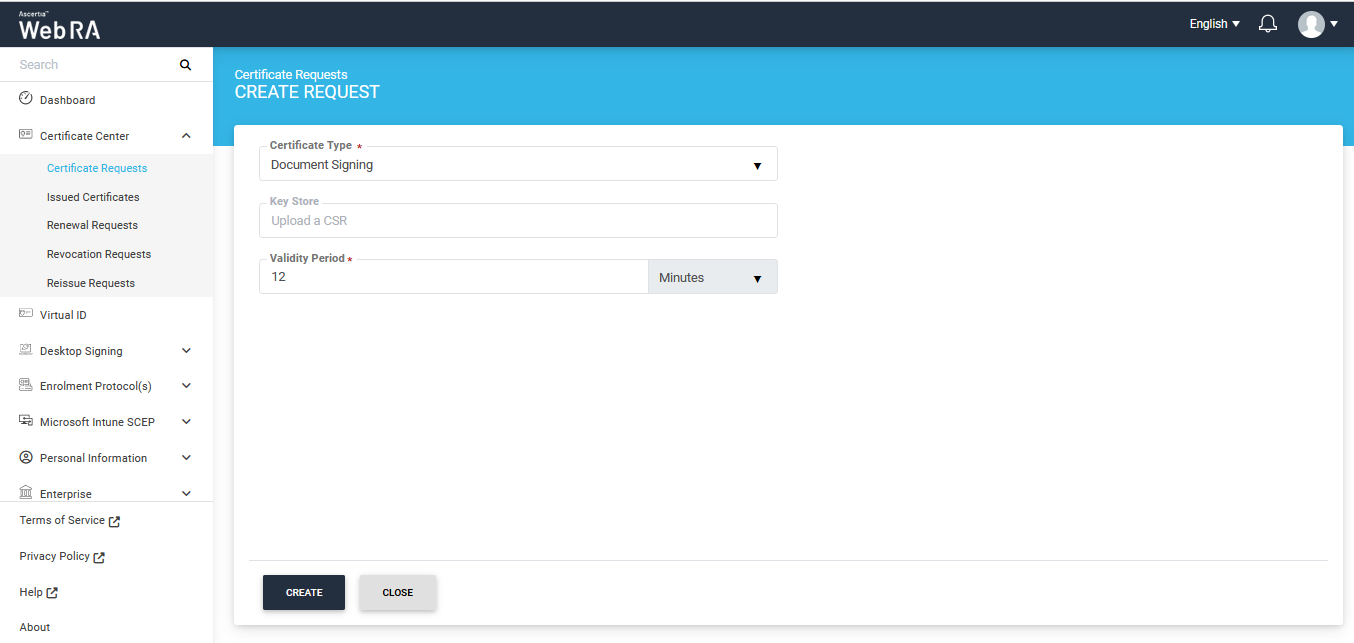
After selecting the Certificate Type from the dropdown, click Create. You will see the Welcome Note screen (see details in Request Notes):
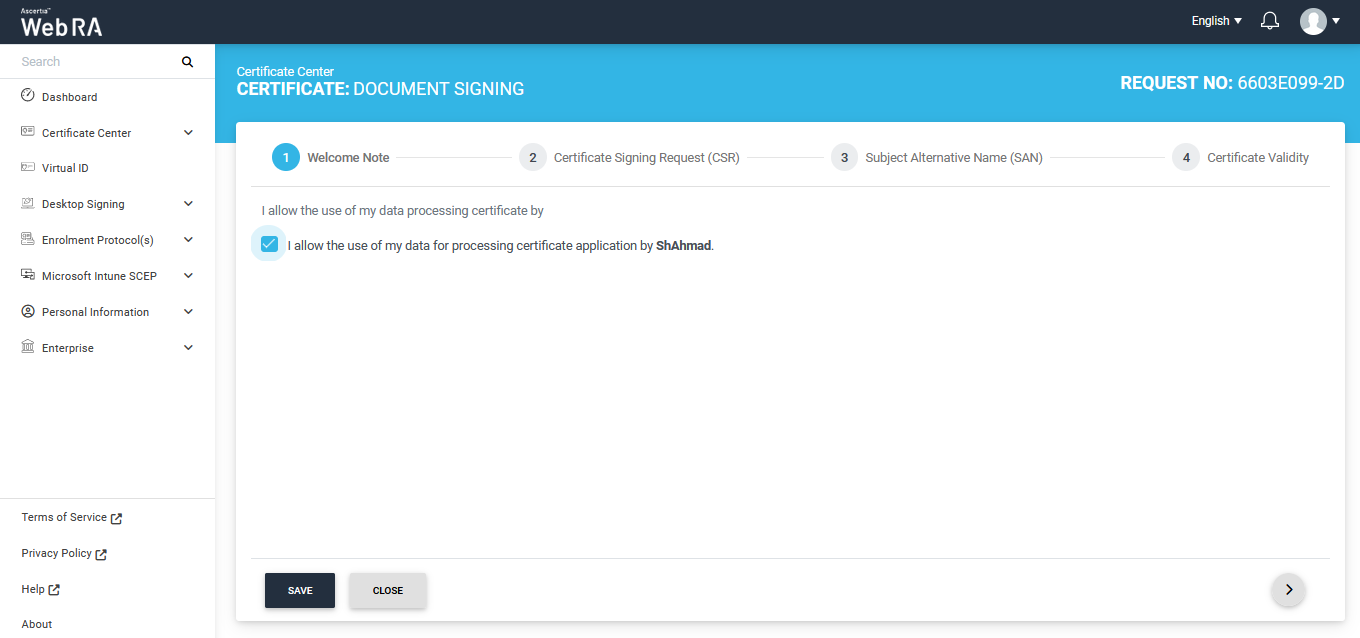
The welcome note will appear, select the checkbox I allow the use of my data for processing certificate application by Enterprise Name and click next. (This screen will appear if operator has customised request notes in the enterprise the user belongs to.)
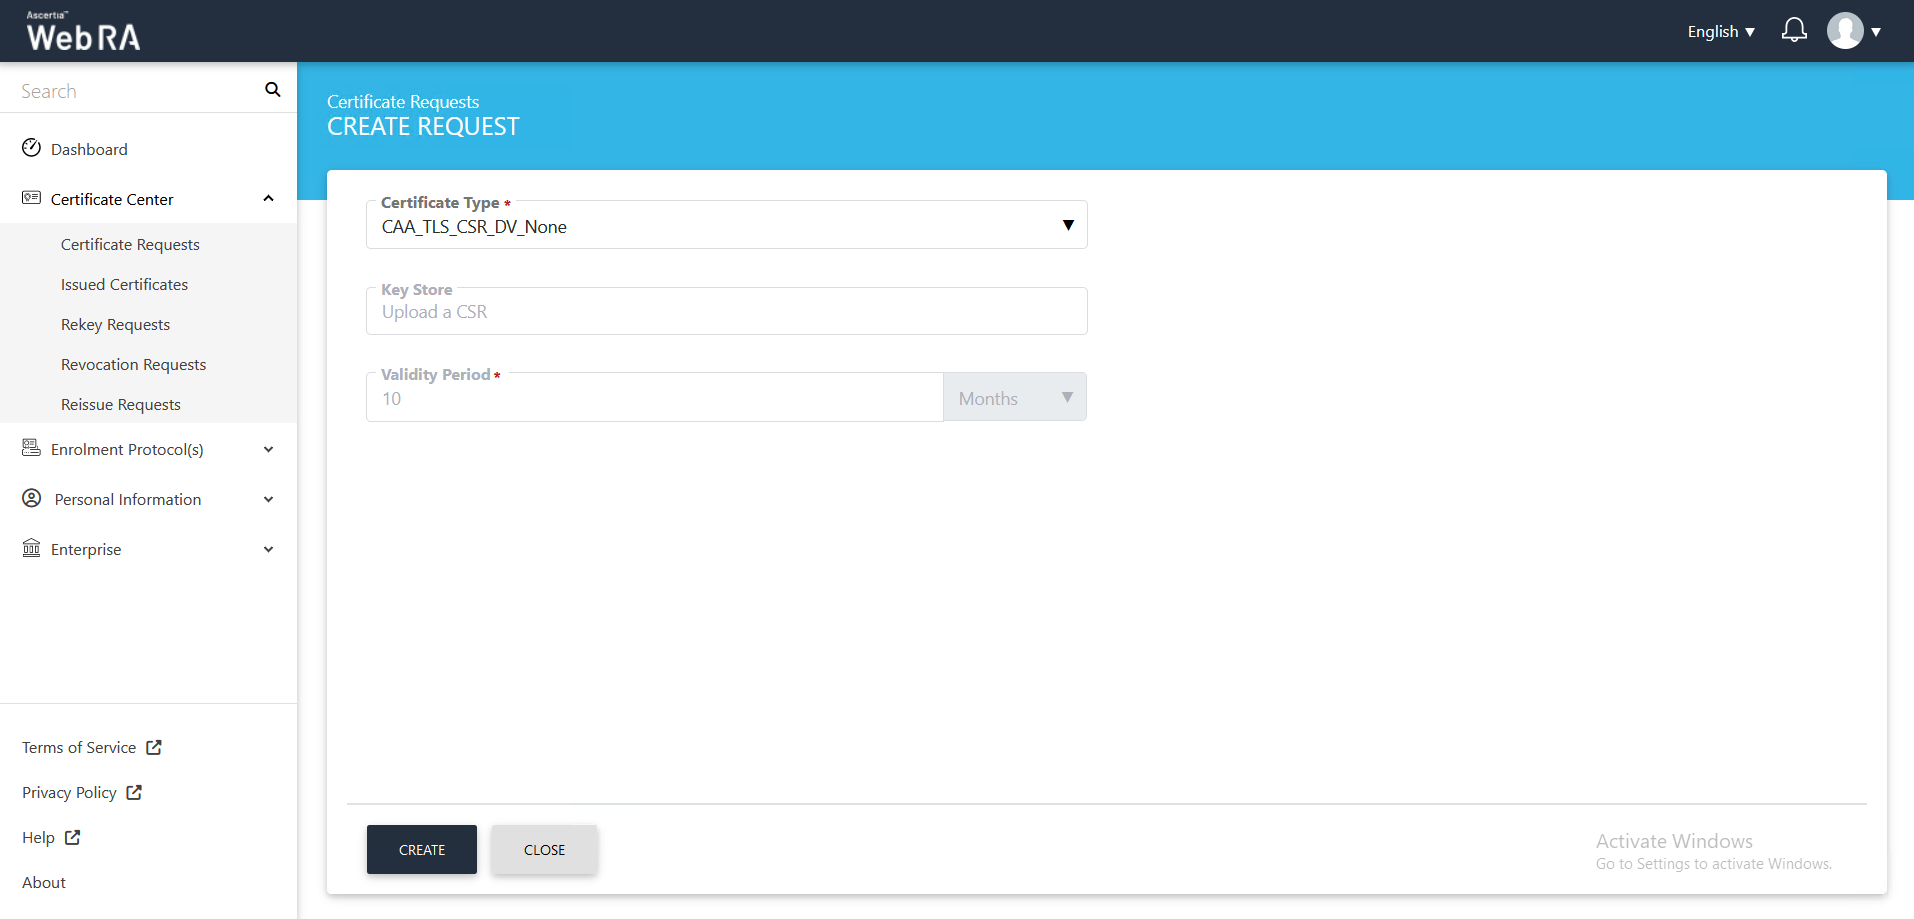
The second screen appearing will be requesting you to either upload a CSR or paste one below.
Once you upload the file or paste the CSR, click next to proceed.
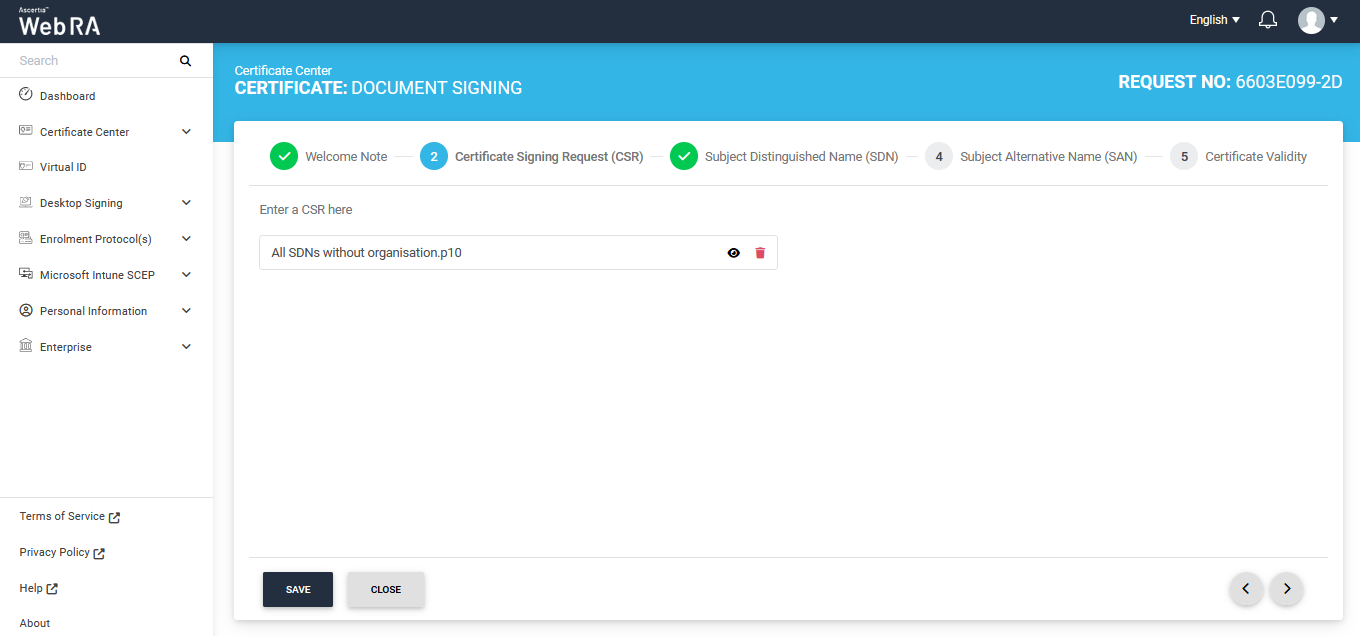
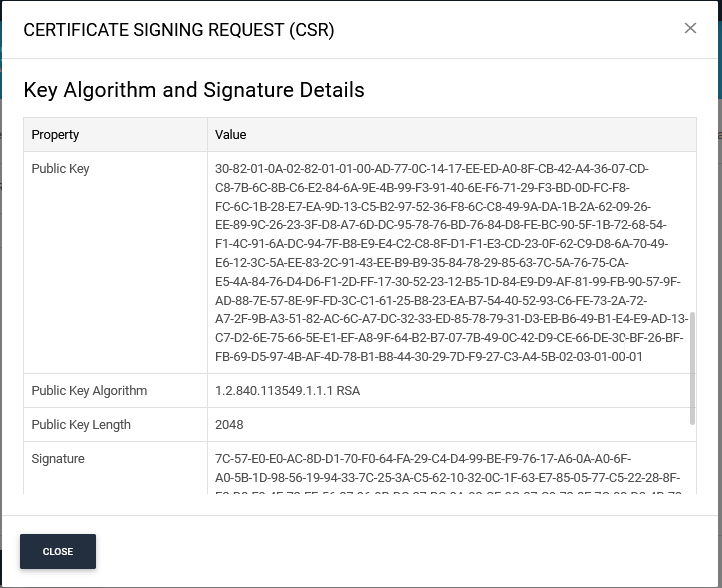
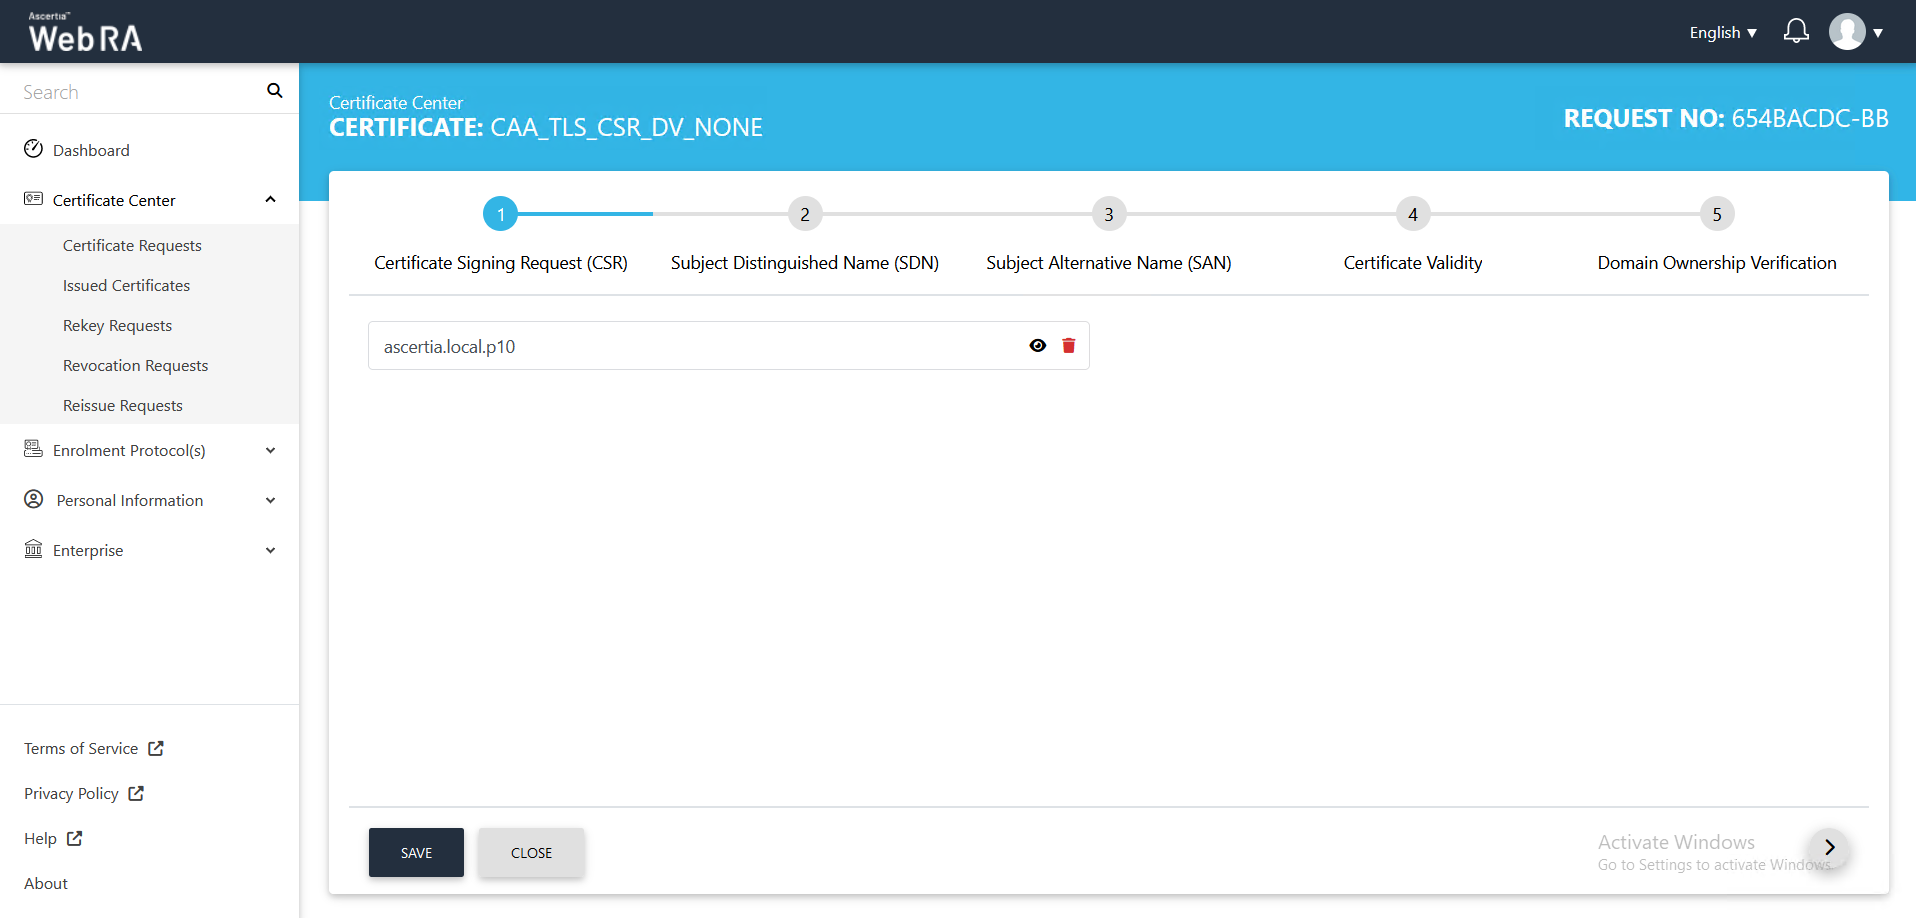
You can click the View icon button to view the CSR, as follows:
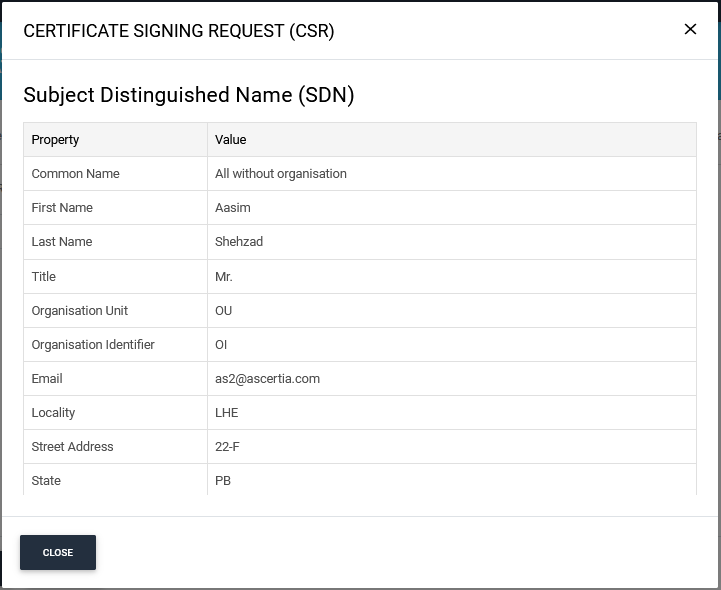
Scroll down to see the remaining items on this screen. Then click Close.
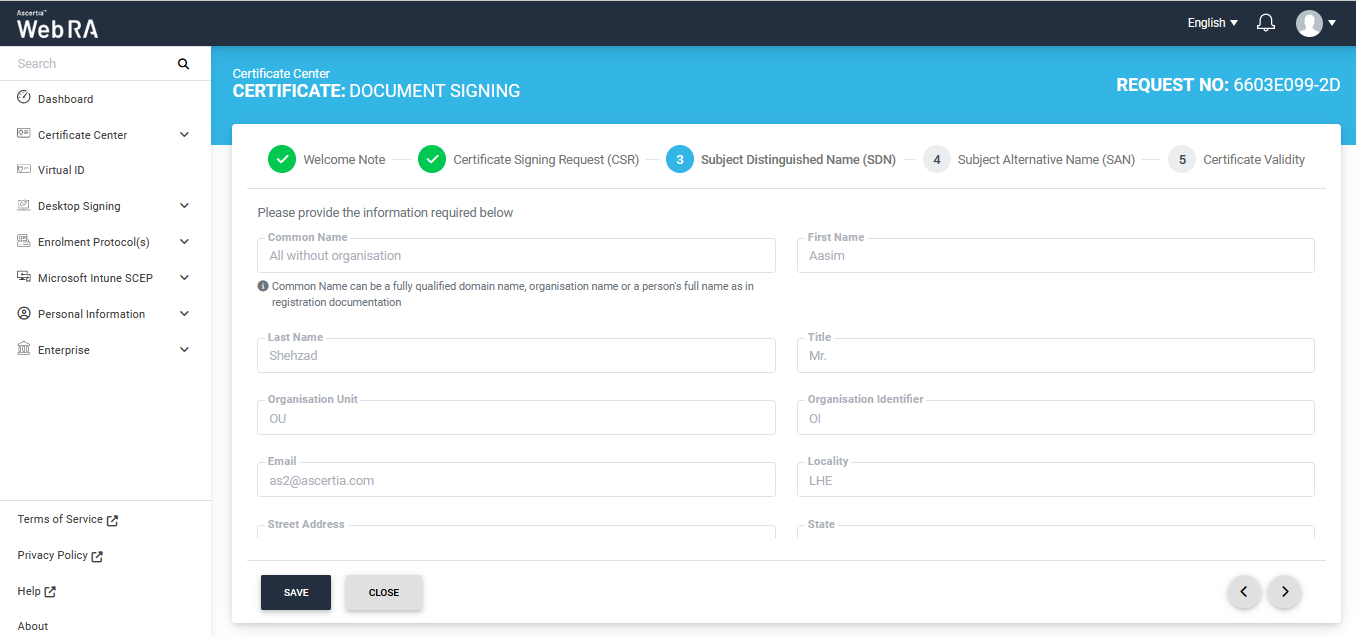
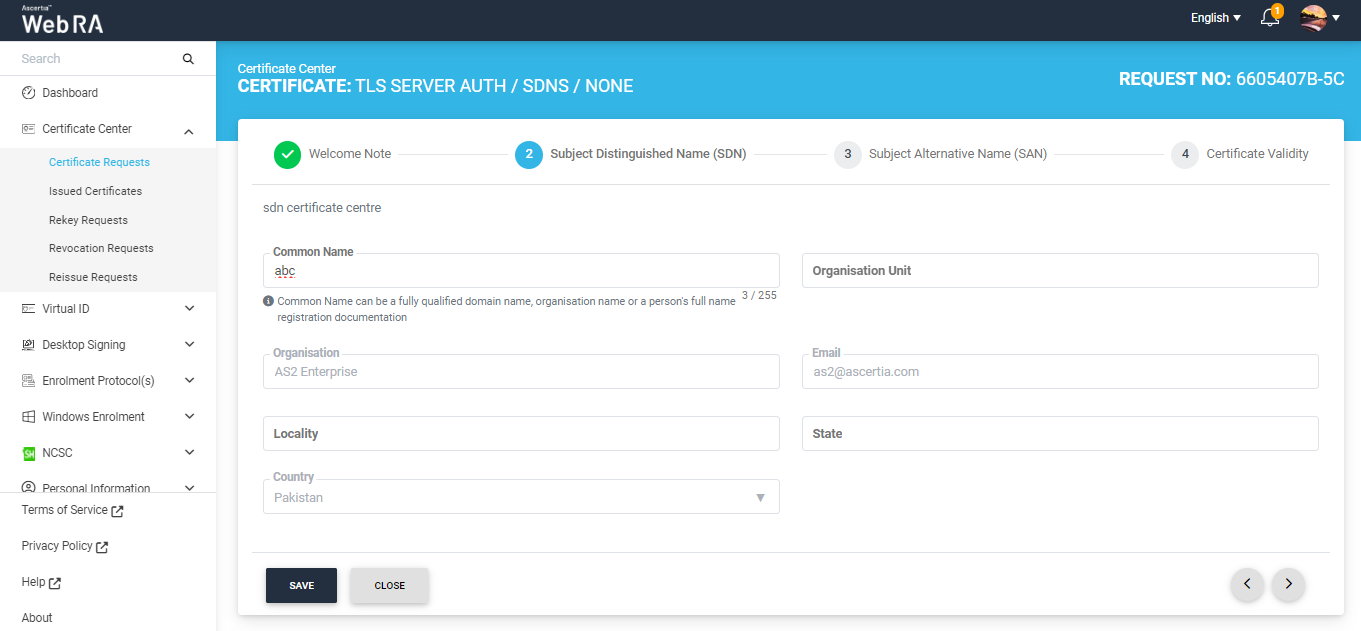
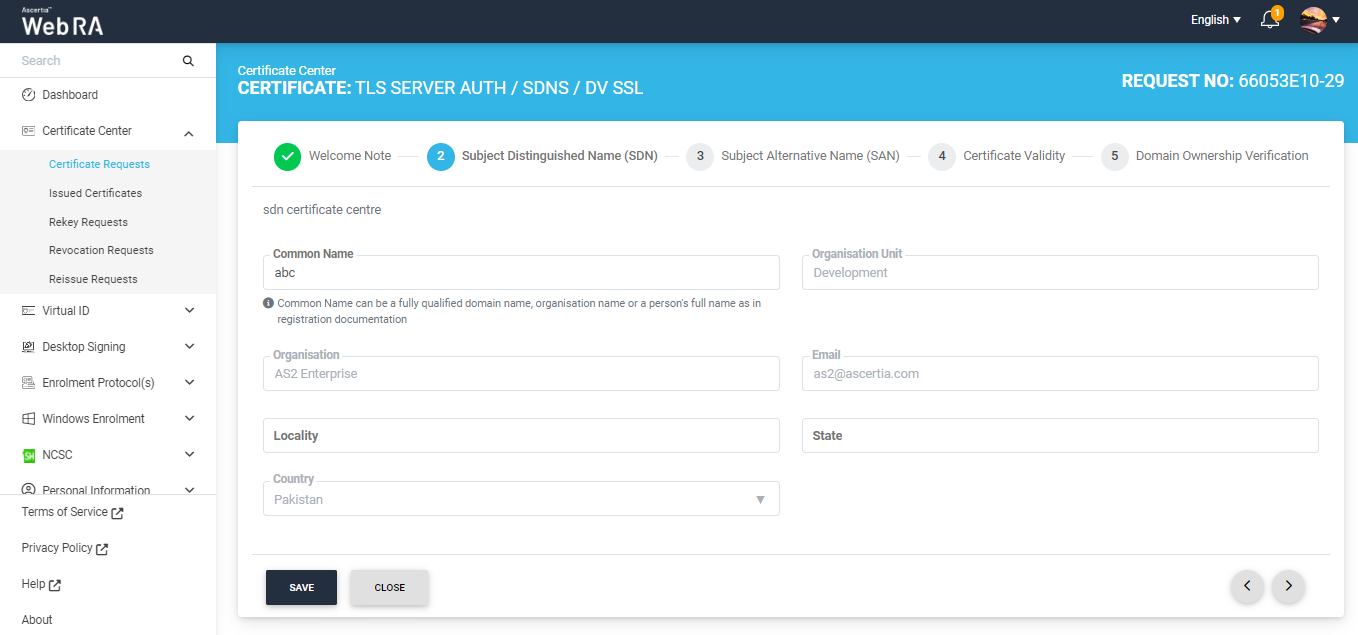
Click next, the Subject Distinguished Name (SDN) screen will appear. The SDN fields will be auto-filled as per CSR.
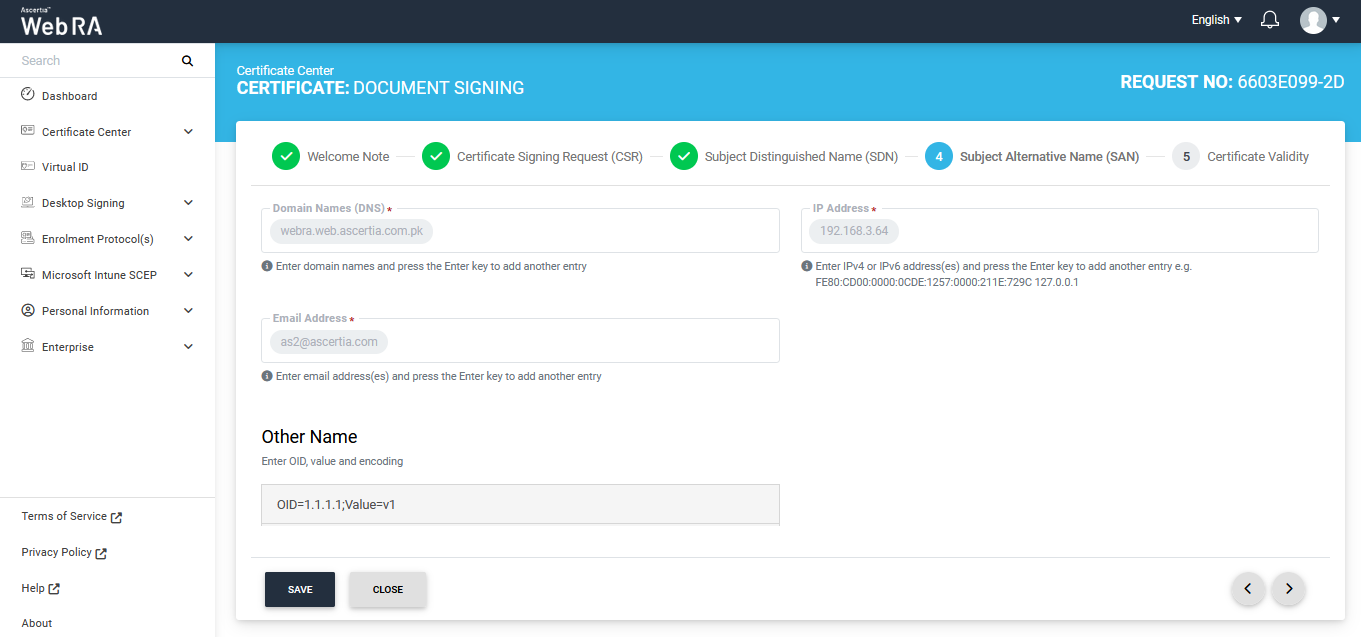
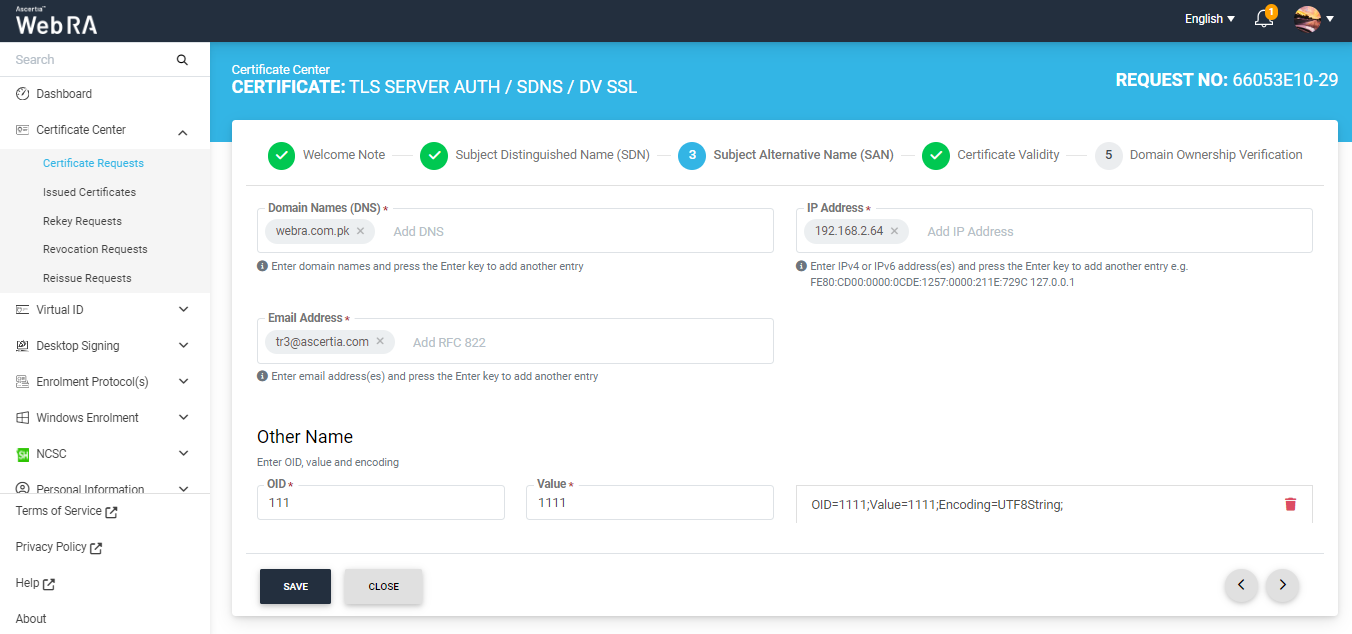
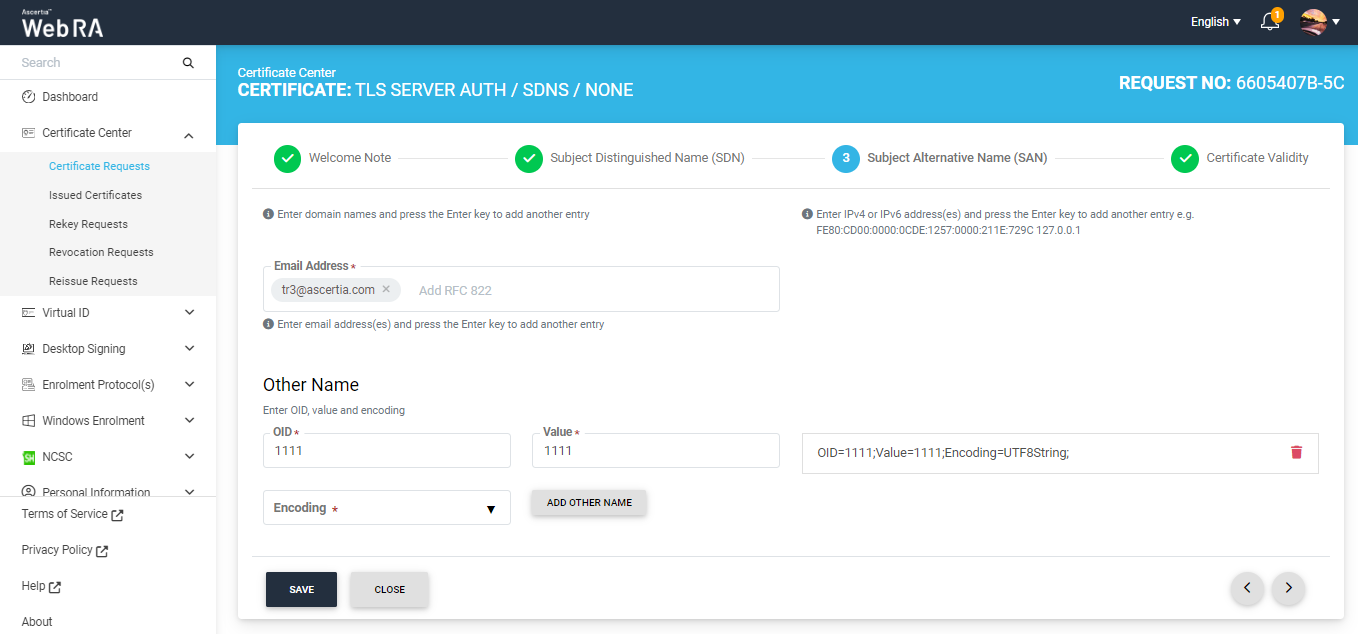
The Subject Alternative Name (SAN) screen will appear.
It contains the following fields:
- DNS Name
- IP Address
- Email Address
- Other Name:
- OID
- Value
- Encoding
Then click next.
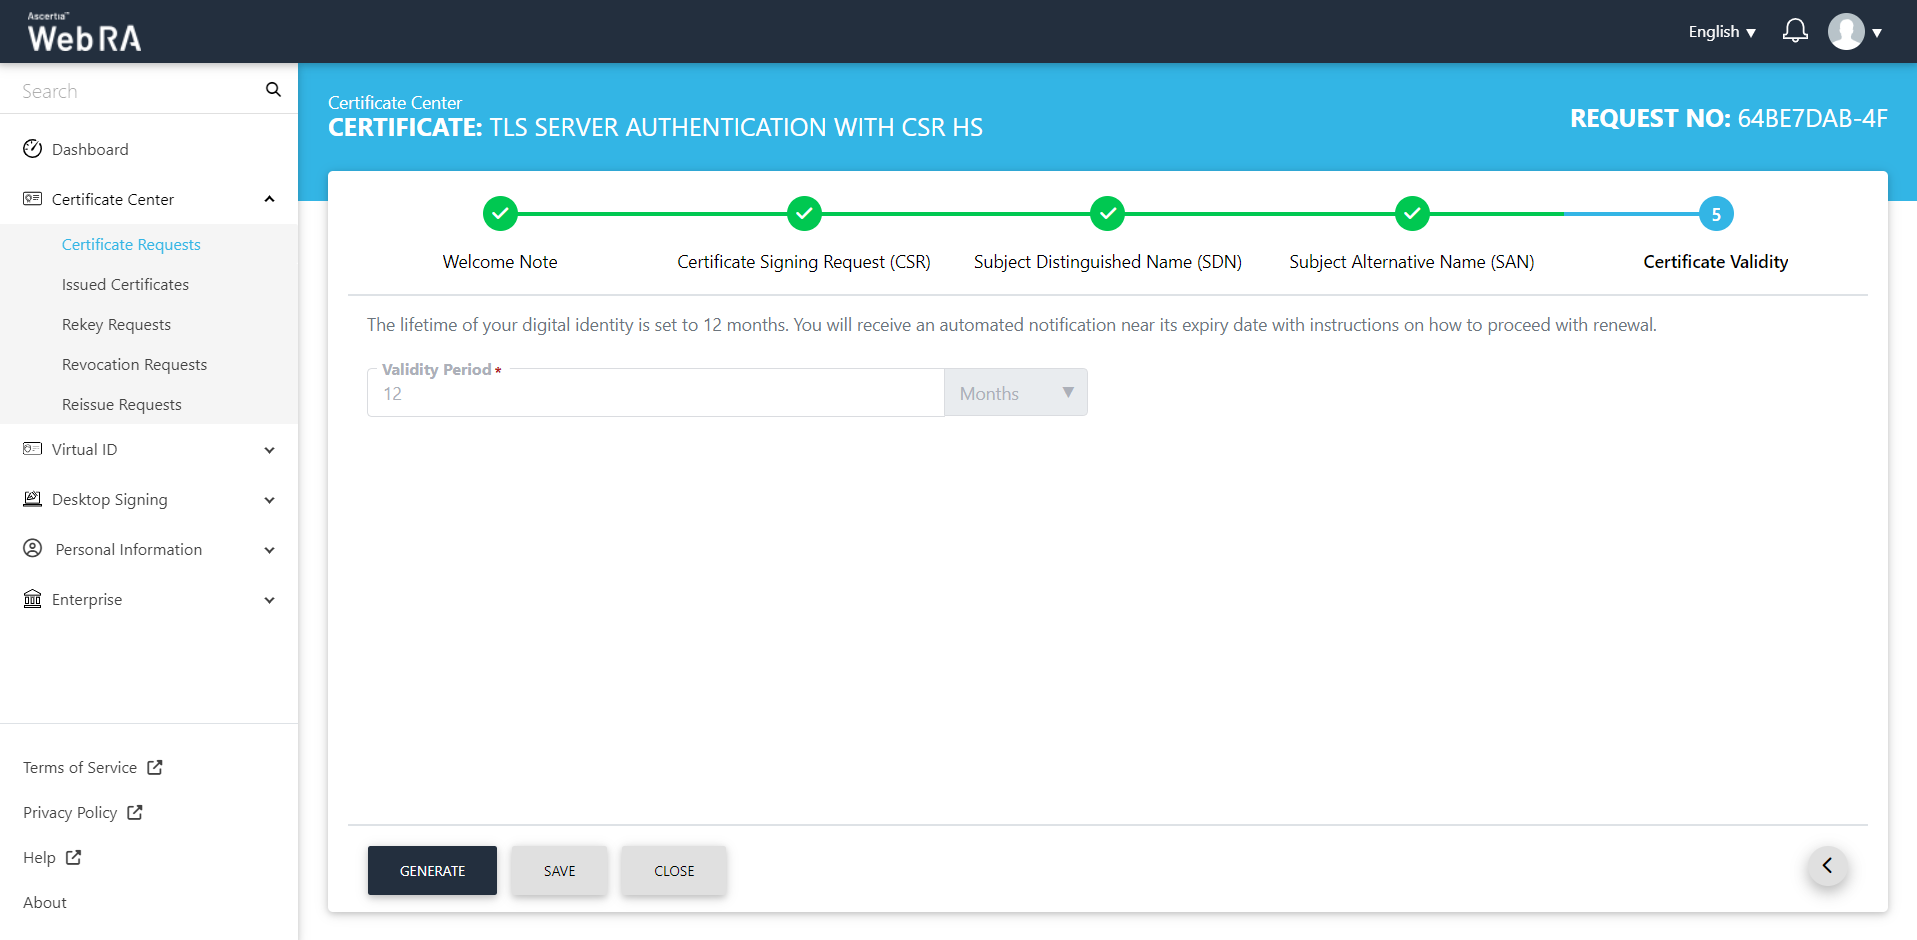
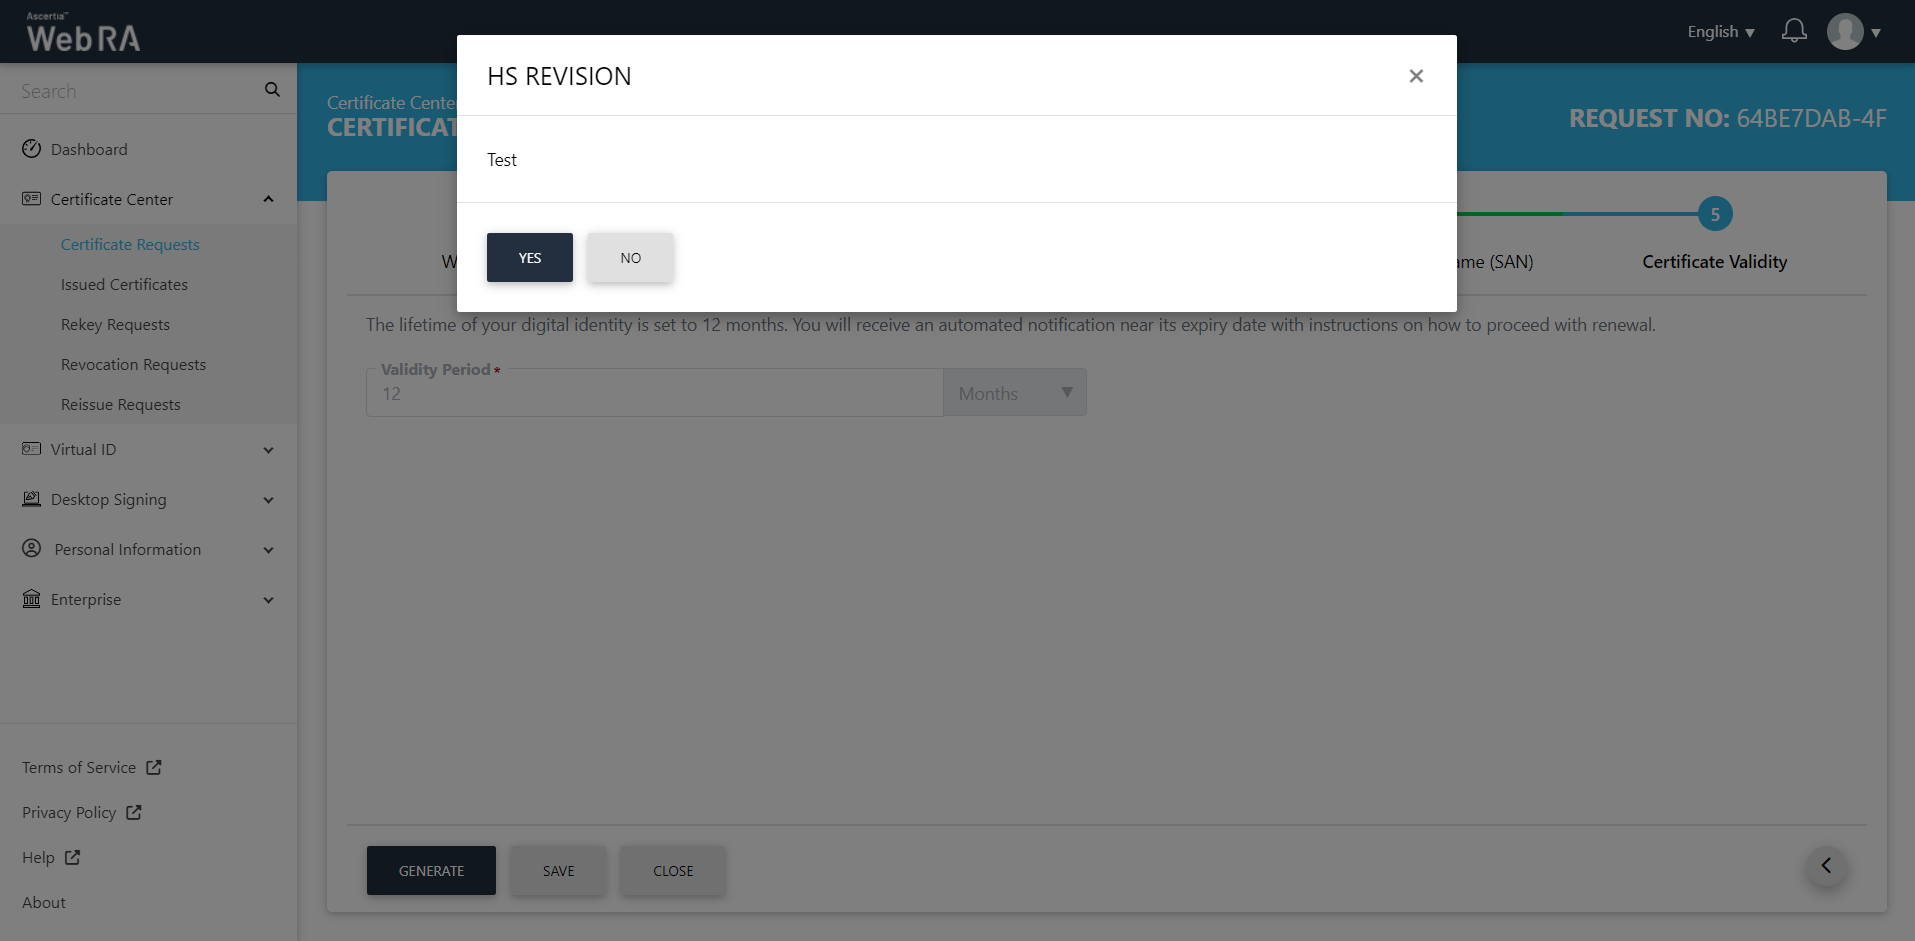
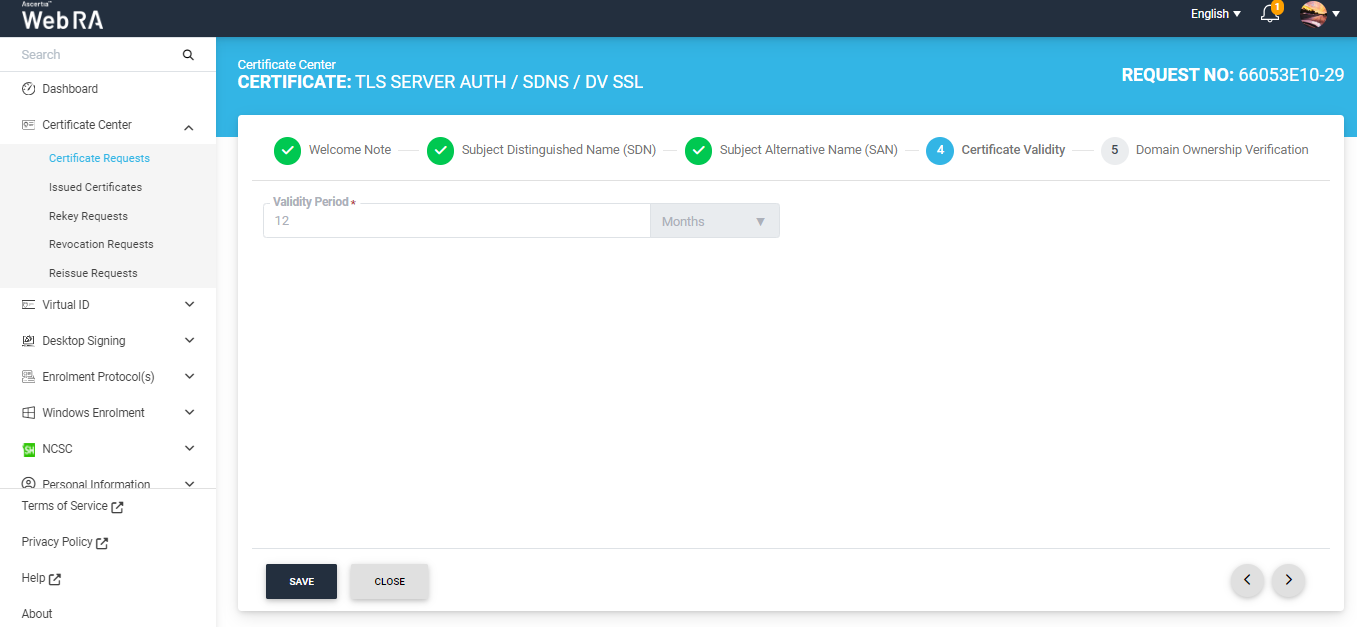
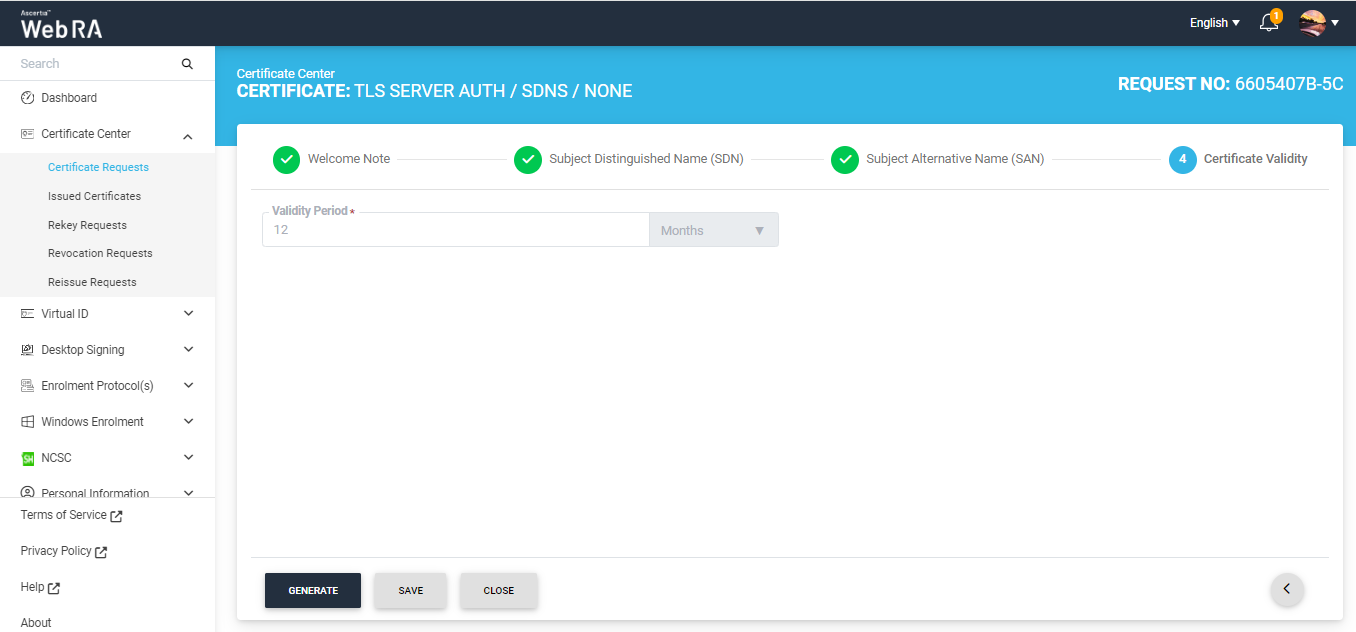
The Certificate Validity screen will appear. The validity period will be displayed in a disabled form.
Click 'Generate' to proceed.
The subscriber agreement configured with this user's profile will be displayed. Click 'Yes' to proceed.
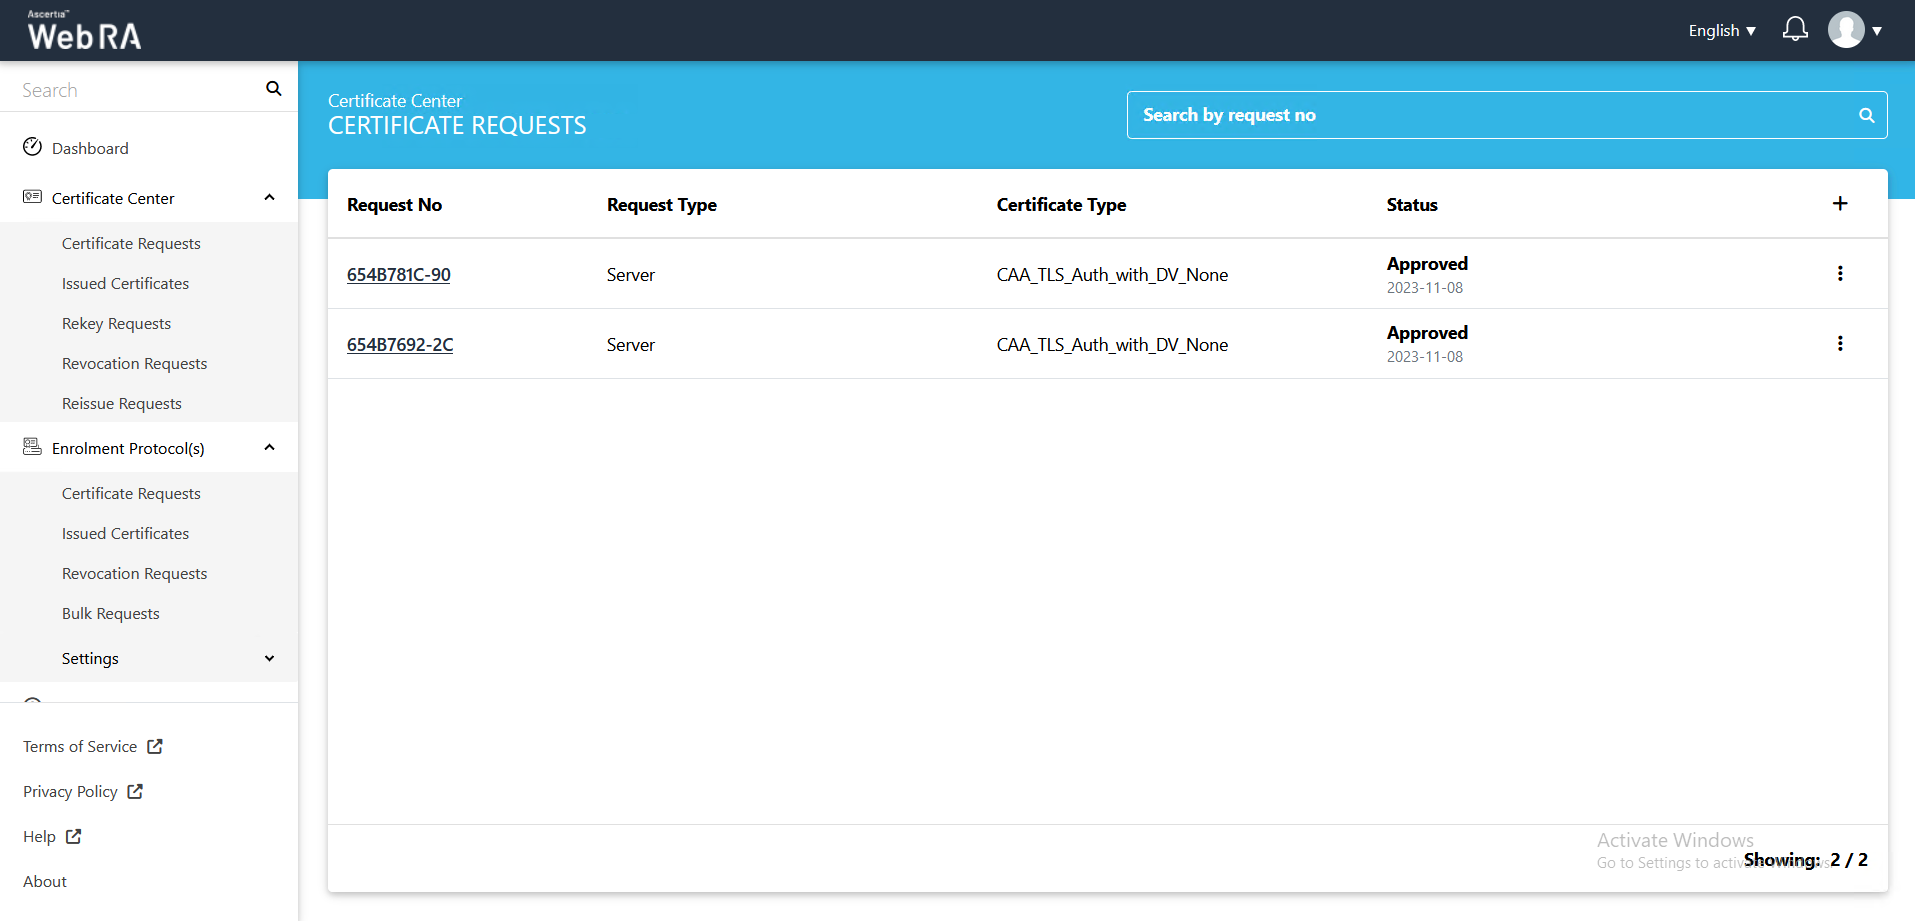
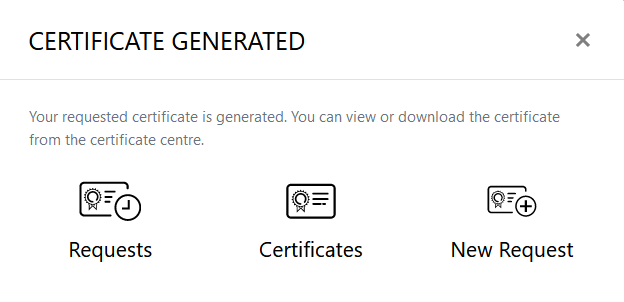
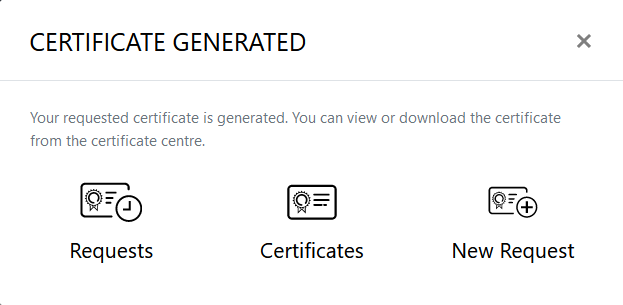
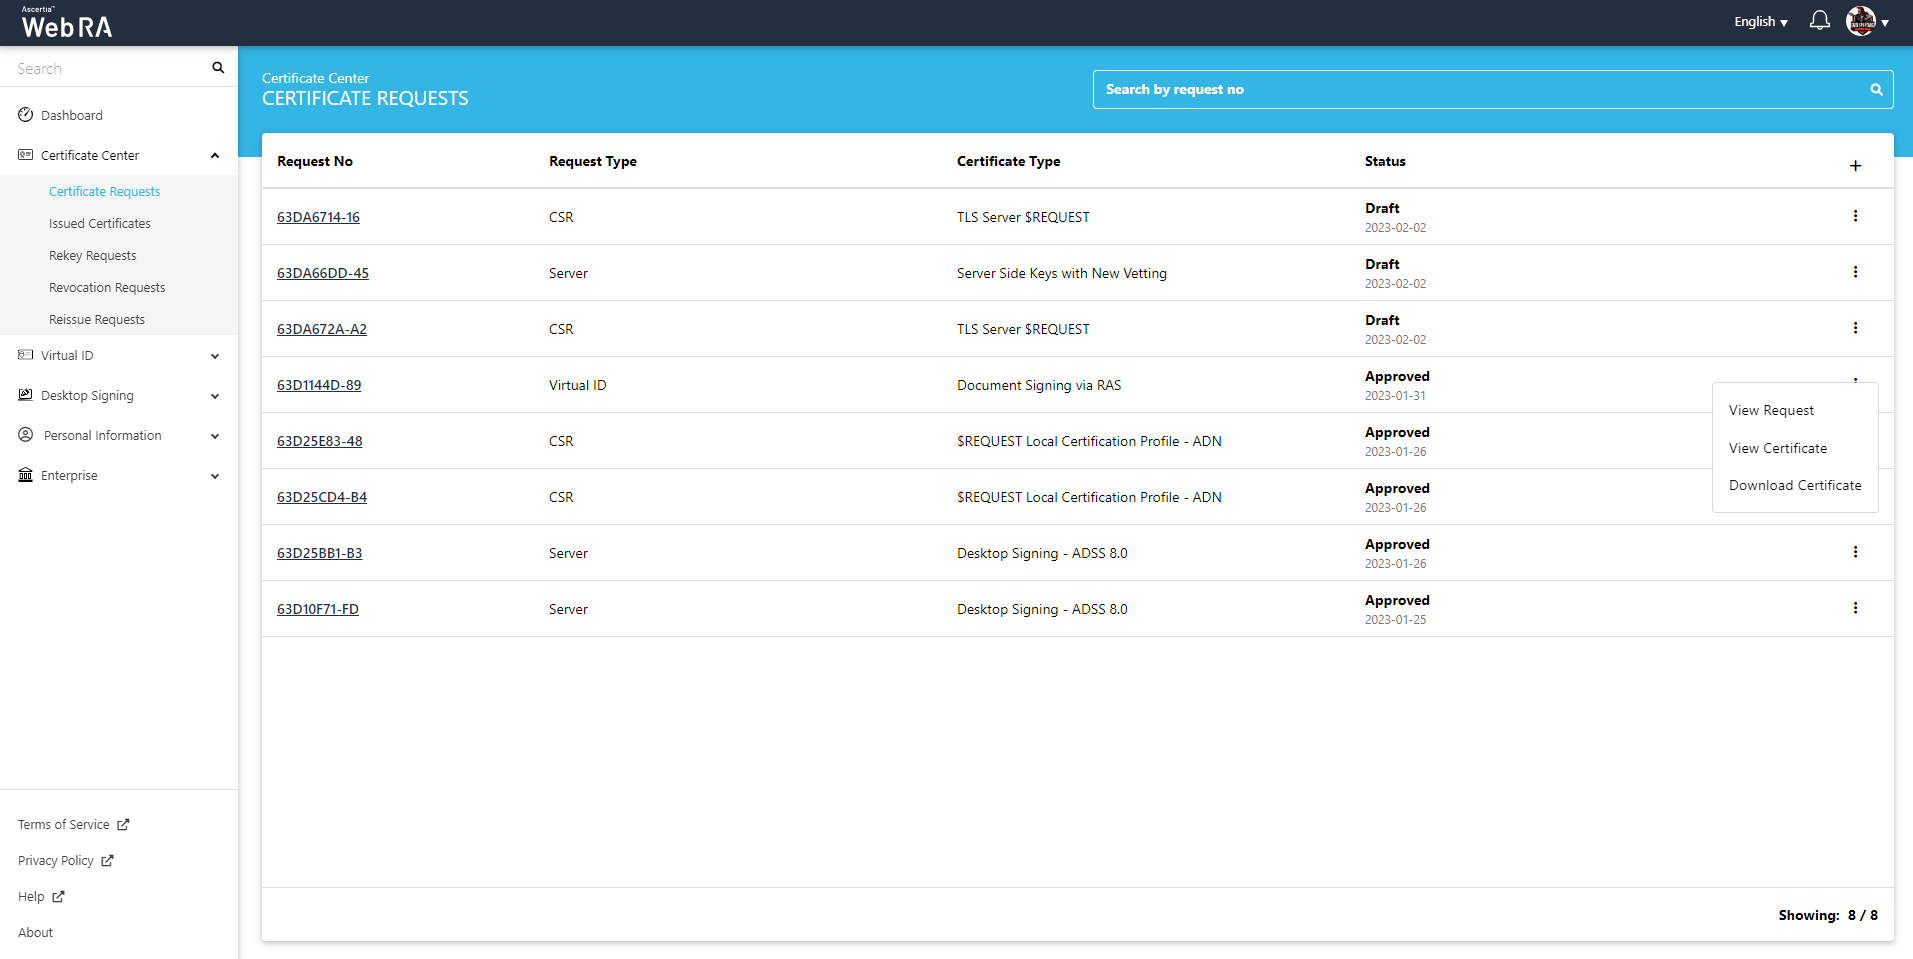
The system will generate the certificate and download it in your computer. You can find the certificate in the 'Downloads' folder on your computer. The certificate request will also be displayed in the 'Certificate Requests' listing.
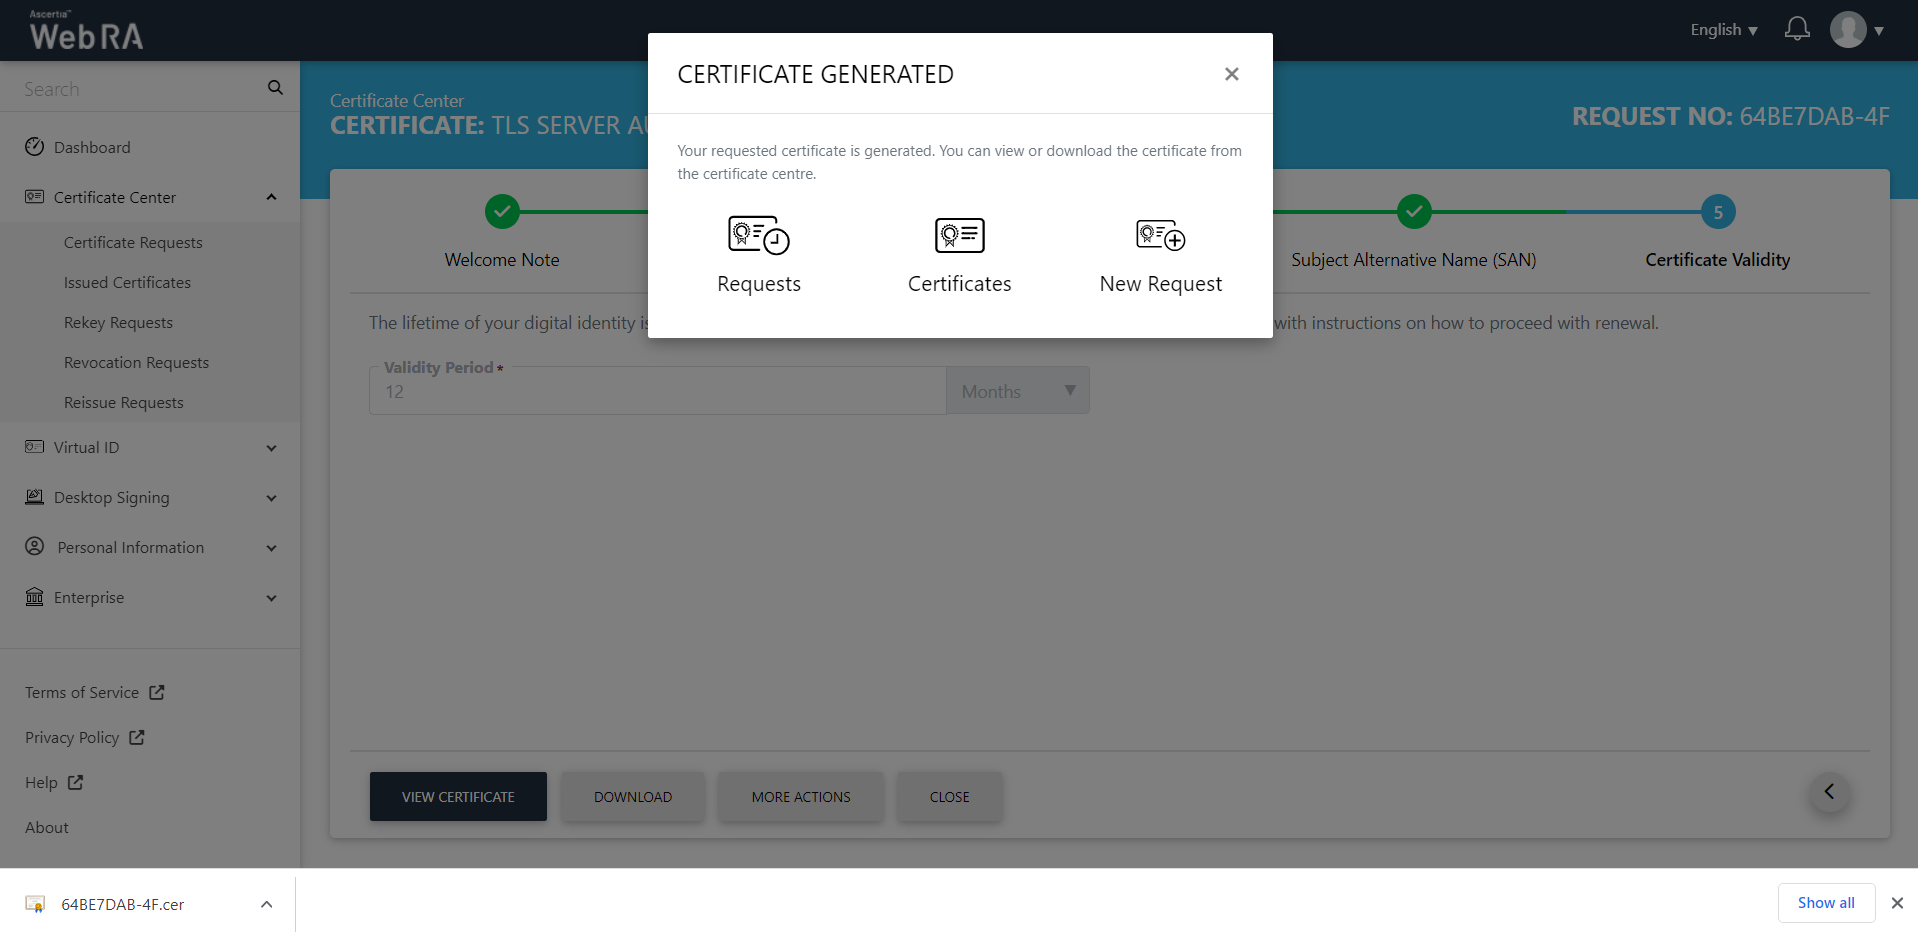
If you close the 'Certificate Generated' window, the following screen will appear.

On this screen, you will have the option to download, provision the certificate, or revoke the certificate using the respective buttons. You can also click the 'More Actions' button to perform additional actions (such as rekeying the certificate) if required.
When you click on Provision, the Provision dialog will appear on the screen.
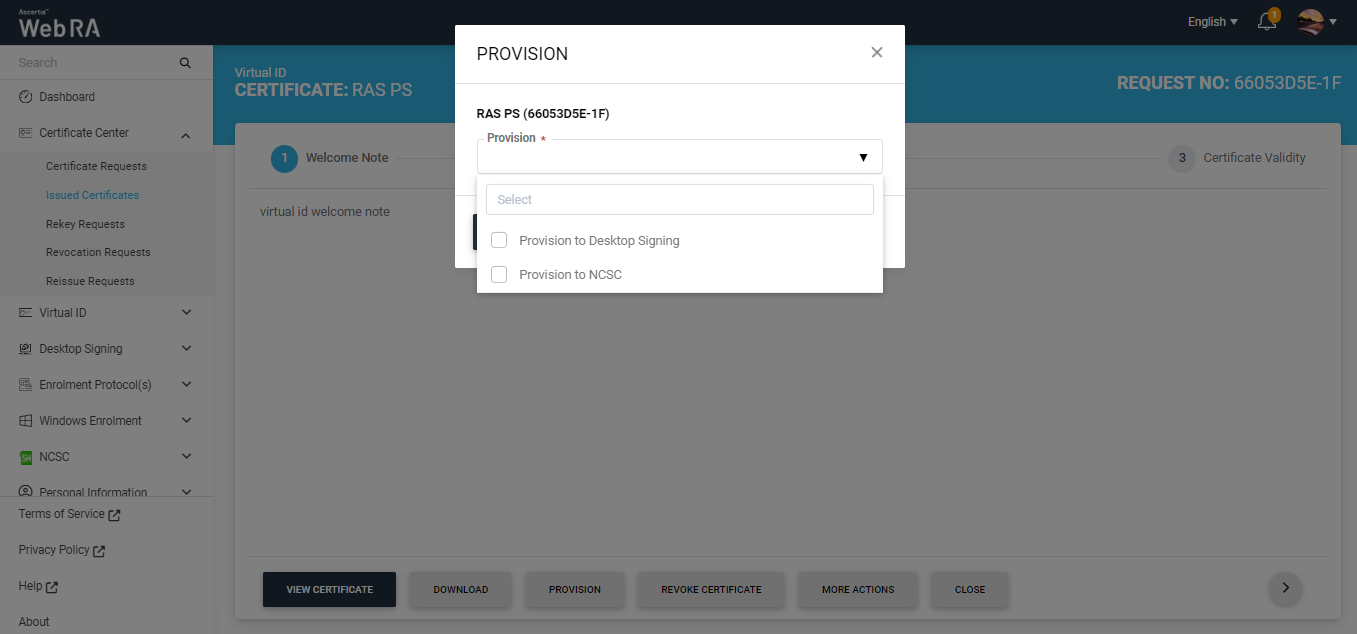
Choose the required option from the 'Provision' dropdown and click the Provision button. The certificate will then be provisioned.
When you click the 'Download' button, the 'Download Certificate' dialog appears. From this dialog, you can choose to download either the certificate only or the certificate PFX.

If you click on the 'Download Certificate PFX' radio button, the dialog will display Password and Confirm Password fields. Type in the required password and click 'Ok'.

Note: If ‘Enable one-time PFX download” option is enabled in the Certification Profile, the PFX can only be downloaded once. If the option is disabled, the PFX can be downloaded multiple times.
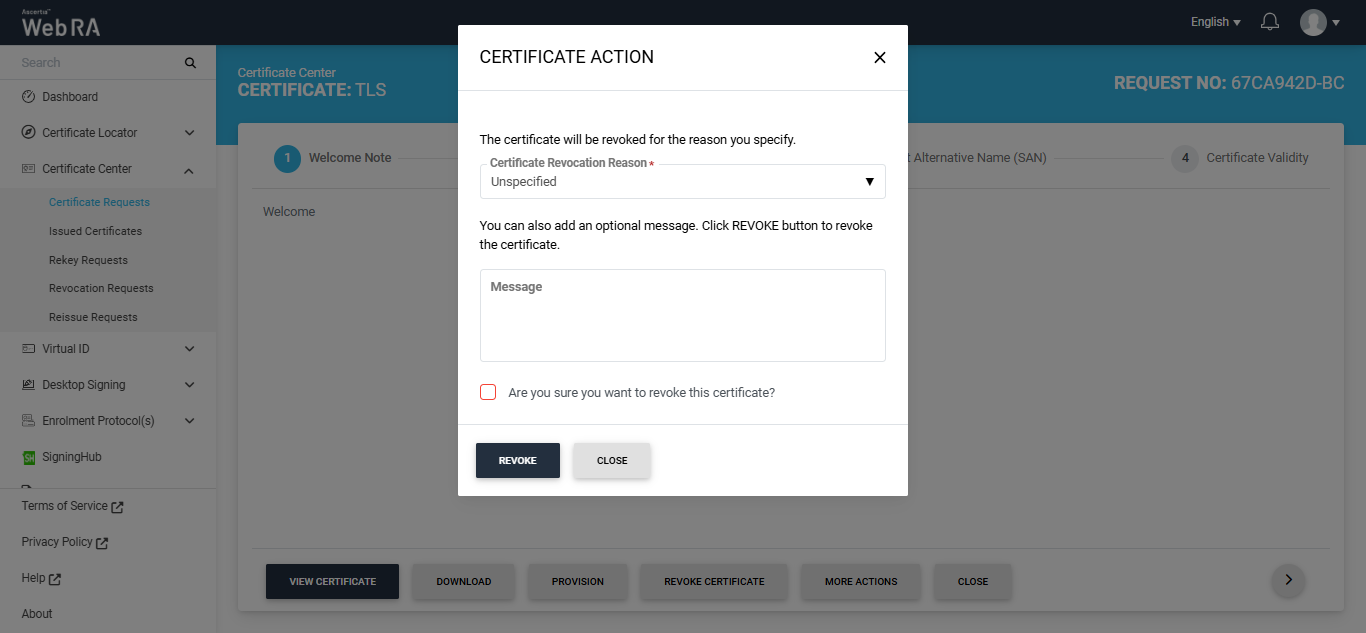
When you click the 'Revoke Certificate' button, the 'Certificate Action' screen appears. On this screen, you must select a reason for revoking the certificate from the 'Certificate Revocation Reason' dropdown and, if required, a message in the optional message box.
Before revoking a certificate you must select the 'Are you sure you want to revoke this certifiate' checkbox. Then, click 'Revoke' to proceed with the revocation.
Following are the steps to create a request for TLS Server Auth/ SDNs/ DV SSL certificate type:
- On the web portal, navigate to the Certificate Center from the left menu pane and then click "Certificate Requests".
- After selecting the Certificate Type from the dropdown, click "Create".

- Click next, the Subject Distinguished Name (SDN) screen will appear.


- The Subject Alternative Name (SAN) screen will appear. The domain names fields will appear in a disabled form (as set in the enterprise section of the admin portal).
ADSS Web RA supports the configuration of domain names on an enterprise level. From the admin portal, an administrator can set domain names and sub domain names associated to an enterprise. The DNS name will be used in the certificate request form for its utilization while generating certificates exclusively from the domains pre-configured within their enterprise.
- The Certificate Validity screen will appear. The validity period will be displayed in a disabled form. Click Generate.
Following are the steps to create a certificate request for TLS authentication with DV as none (CAA Records)
- On the web portal, navigate to the Certificate Center from the left menu pane and then click "Certificate Requests". Then click
 to create a new certificate request.
- After selecting the Certificate Type from the drop down, click "Create".

- Click next, the Subject Distinguished Name (SDN) screen will appear.
- The Subject Alternative Name (SAN) screen will appear. Select the domain names (DNS) from the drop down, then enter the IP address, email address. In the Other name section, enter the OID, Value and click Add Other Name, then click >.
- The Certificate Validity screen will appear. The validity period will be displayed in a disabled form. Click Generate.
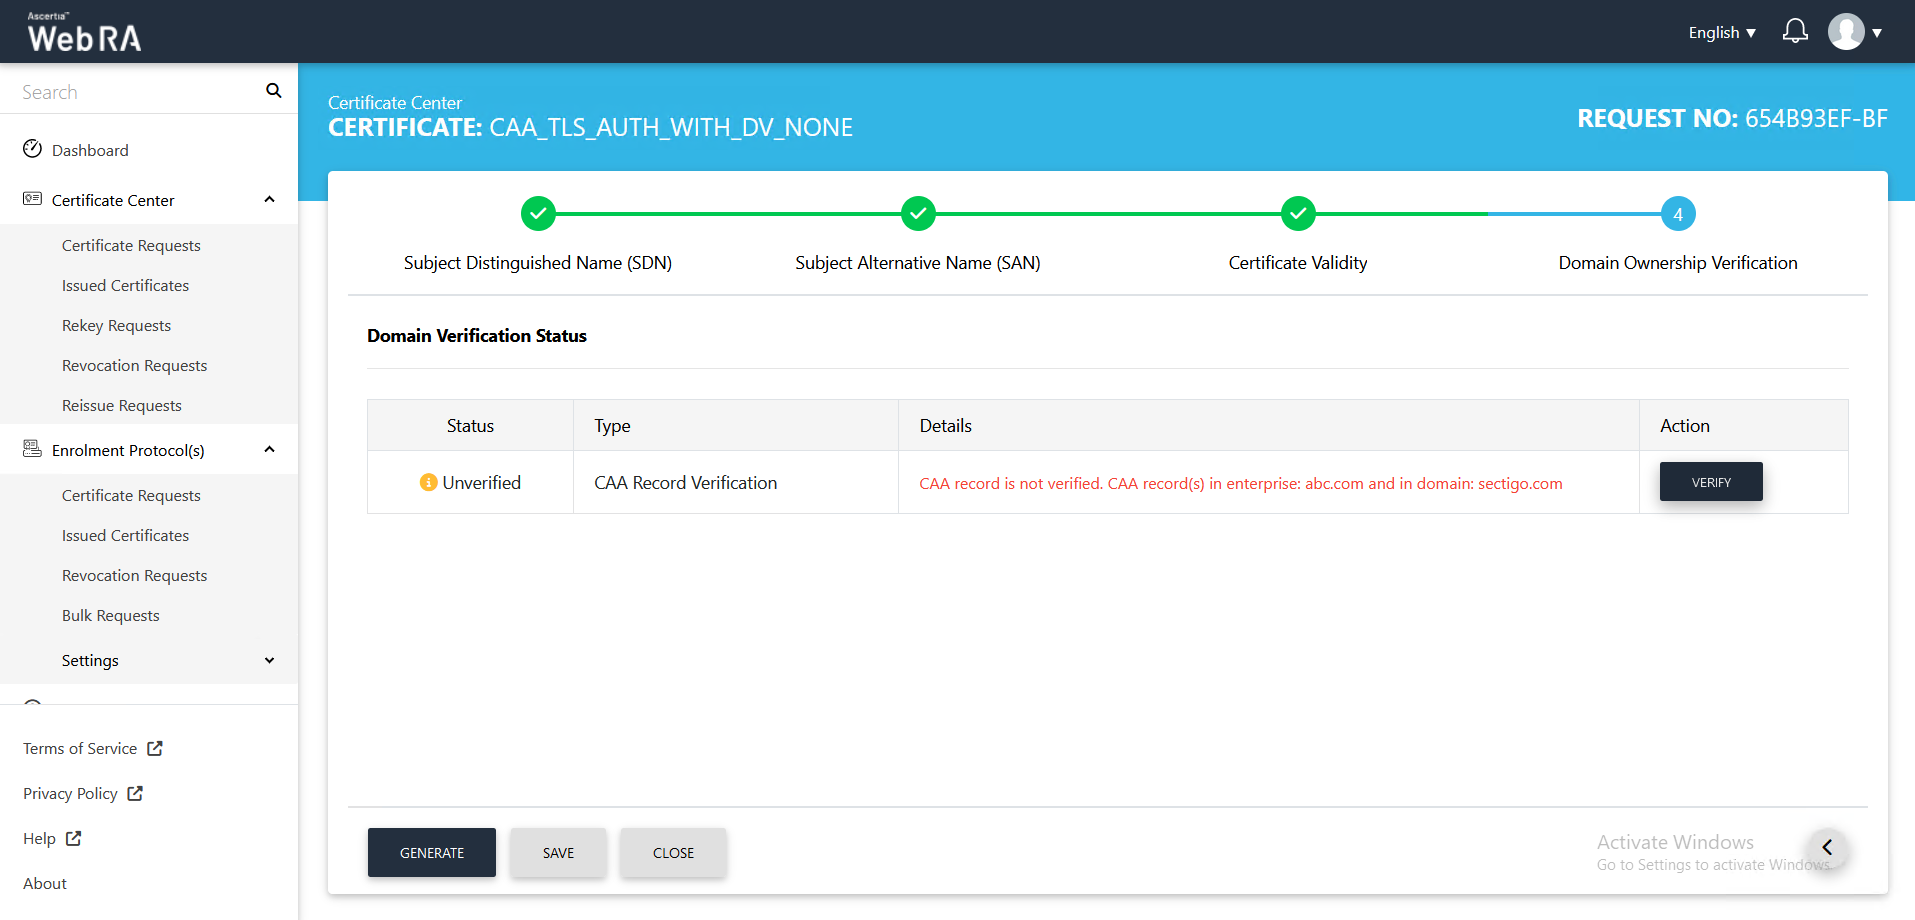
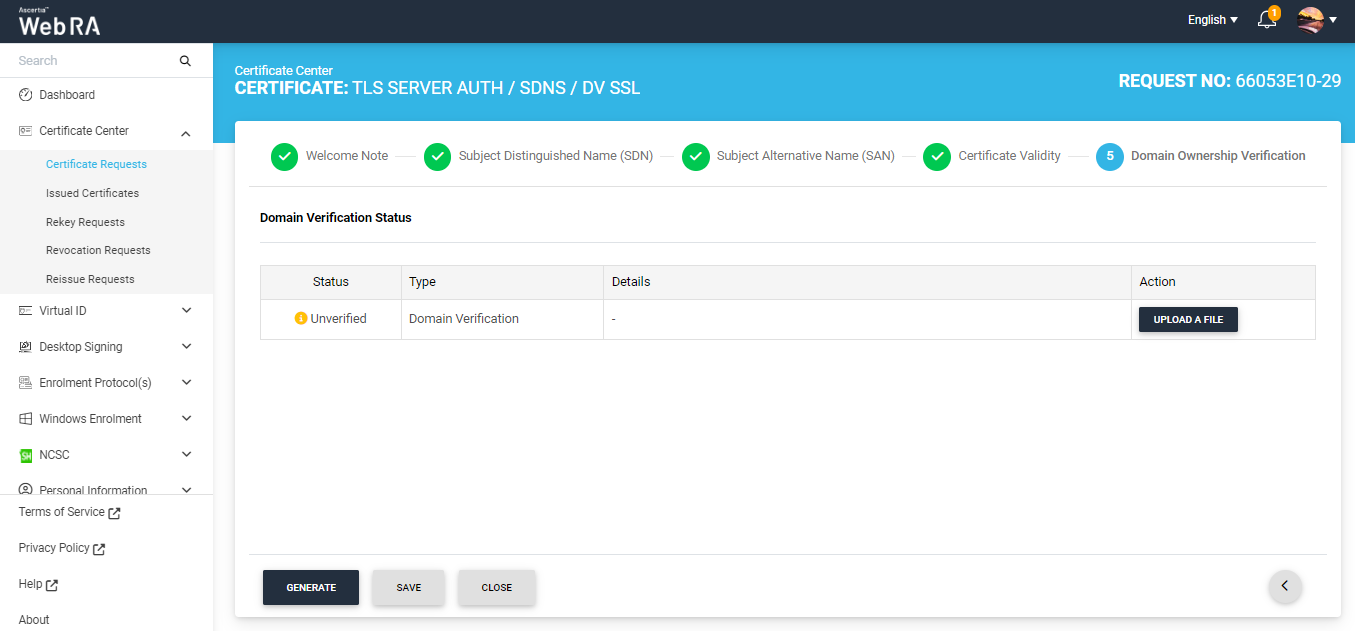
- The Domain Ownership Verification screen will appear. The Domain Verification Status will appear Unverified. Click Verify to proceed.

- If the CAA records you configured in the Enterprise Domain configurations matches the CA record you entered in the DNS entry, the Domain Verification Status will appear Verified, as displayed below:

If the CAA records you configured in the Enterprise Domain configurations does not match the CA record you entered in the DNS entry, the domain Verification Status will appear Unverified, as displayed below
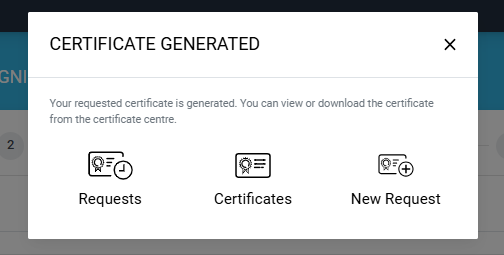
- In case of Verified, click Generate to process a certificate. The Certificate Generated confirmation message will appear, as displayed below:
Following are the steps to create a certificate request for TLS authentication with DV as none (CAA Records) TLS using CSR with CV as None (CAA Records)
- On the web portal, navigate to the Certificate Center from the left menu pane and then click "Certificate Requests". Then click to create a new certificate request.
- After selecting the Certificate Type from the drop down, click "Create".
- The upload CSR screen will appear. Upload or paste a CSR and click next. Once the CSR is uploaded, the following screen will be displayed:
- Click next, the Subject Distinguished Name (SDN) screen will appear.
- The Subject Alternative Name (SAN) screen will appear. Select the domain names (DNS) from the drop down, then enter the IP address, email address. In the Other name section, enter the OID, Value and click Add Other Name, then click >.

- The Certificate Validity screen will appear. The validity period will be displayed in a disabled form. Click Generate.

- The Domain Ownership Verification screen will appear. The Domain Verification Status will appear Unverified. Click Verify to proceed.
- If the CAA records you configured in the Enterprise Domain configurations matches the CA record you entered in the DNS entry, the domain Verification Status will appear Verified, as displayed below:

- In case of Verified, click Generate to process a certificate. The Certificate Generated confirmation message will appear, as displayed below:
Following are the steps to create a certificate request for email signing using CSR.
Expand Certificate Center > Certificate Requests to navigate to the Certificate Requests listing screen.
Click the + button to create a new certificate request. The system will display the create request screen.
On this screen, select the ‘Certificate Type’ from the dropdown, and click ‘Create’.

A Welcome Note screen will appear. Enable the ‘I allow the use of my data for processing certificate application by Enterprise Name’ and click next.
Note: The welcome note will only appear during the creation of a certificate request if the operator has added customised request notes in the enterprise that the user belongs to. For more details, navigate to Request Notes.
Once you agree to the welcome note and click Next, the upload CSR screen will appear. Here, upload or paste a CSR in the respective box.
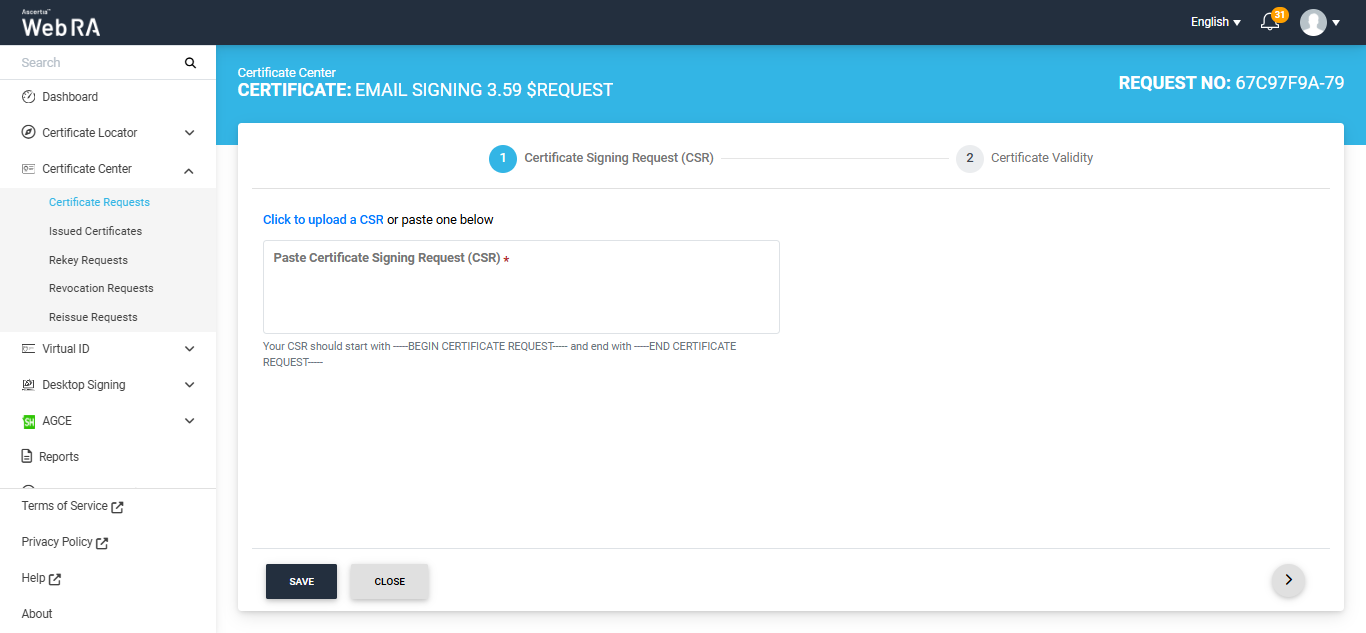
Once the CSR is uploaded, the following screen will be displayed.

Click next to navigate to the Subject Distinguished Name (SDN) screen. After entering the required details, click Next.
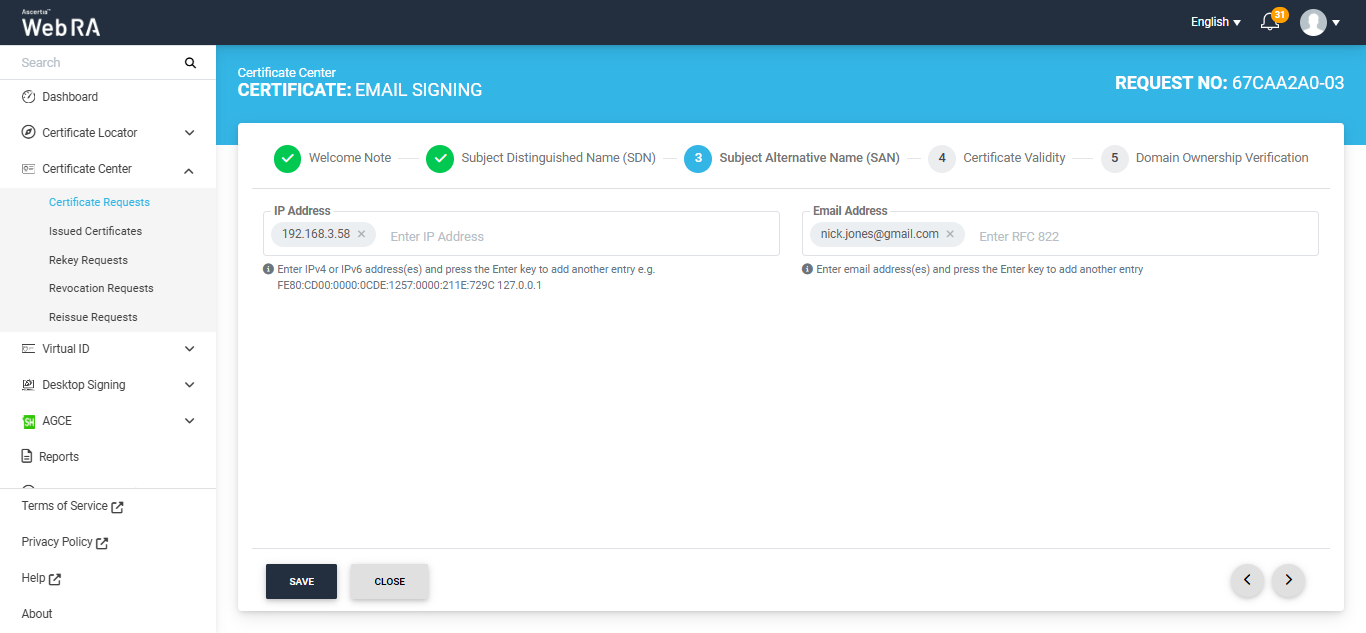
The Subject Alternative Name (SAN) screen will appear. Here, enter the IP address and email address in the respective fields, then click Next.

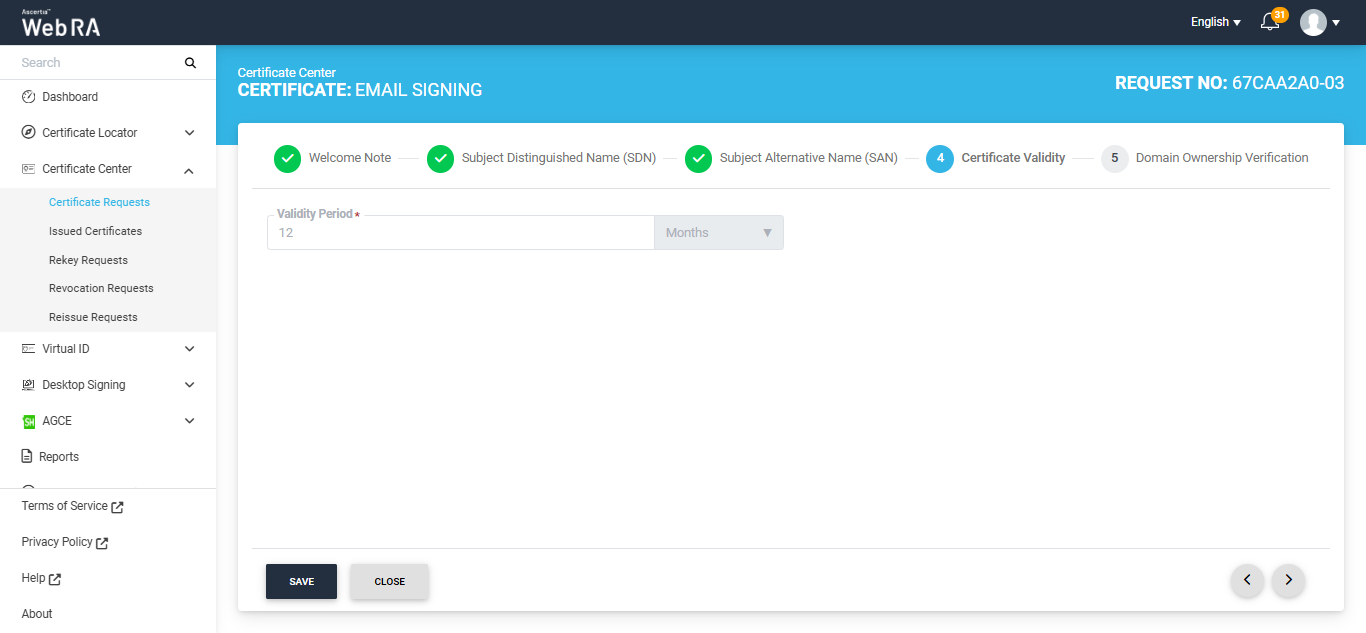
The Certificate Validity screen will appear. The validity period will be displayed in a disabled form, click Next to proceed.
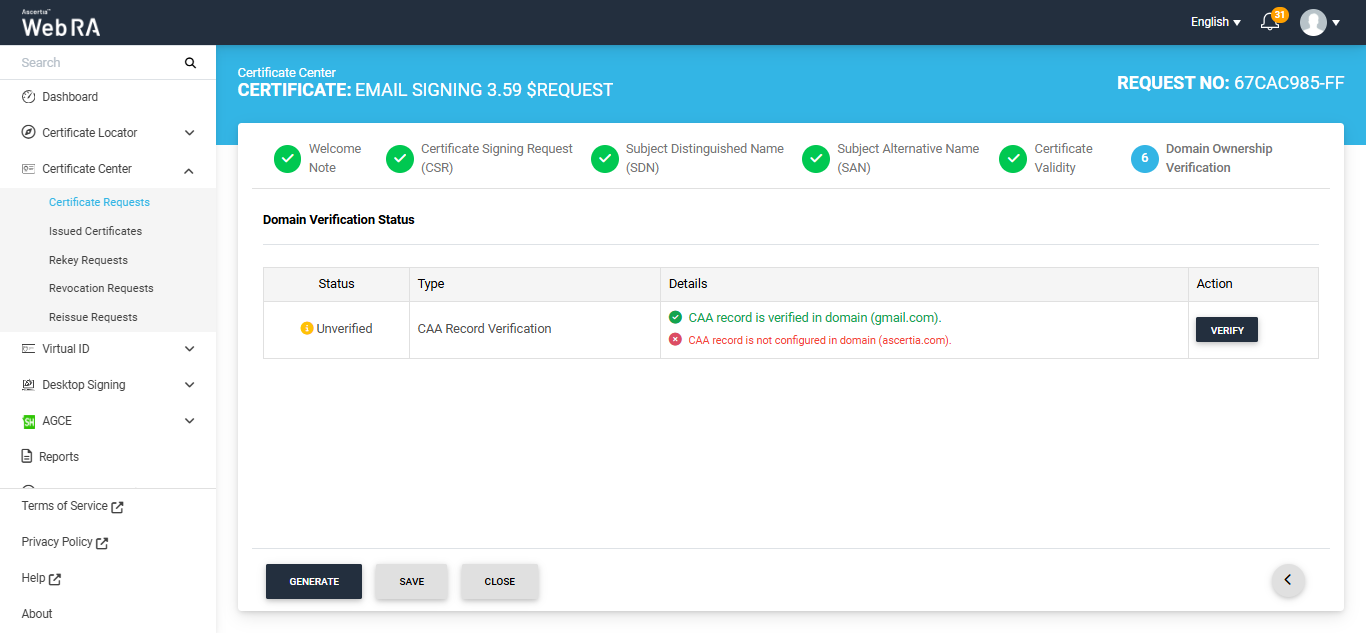
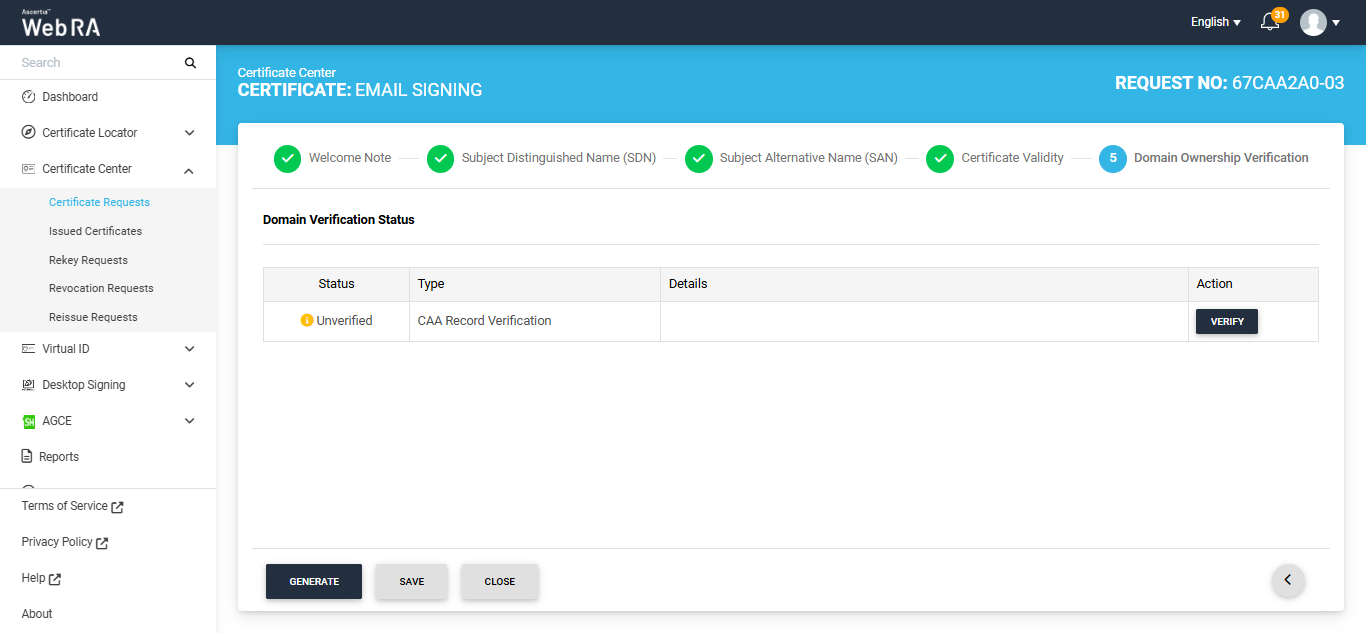
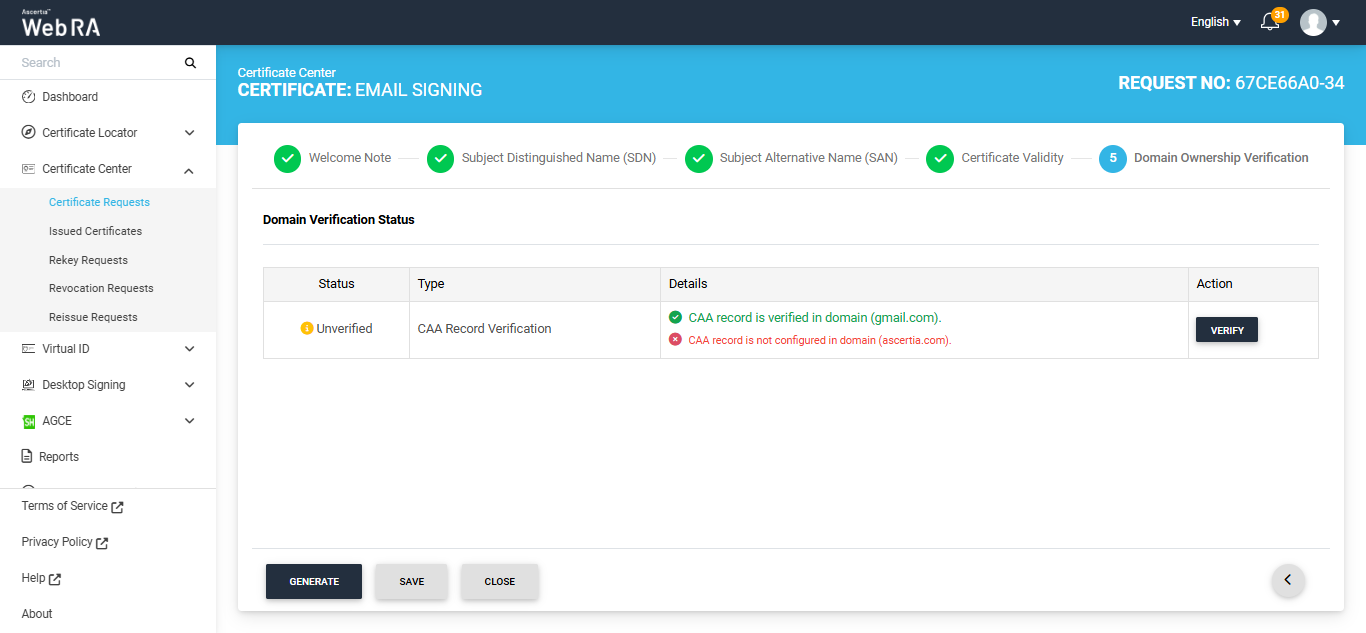
Now, the Domain Ownership Verification screen will appear. The Domain Verification Status will appear unverified. Click Verify to proceed.
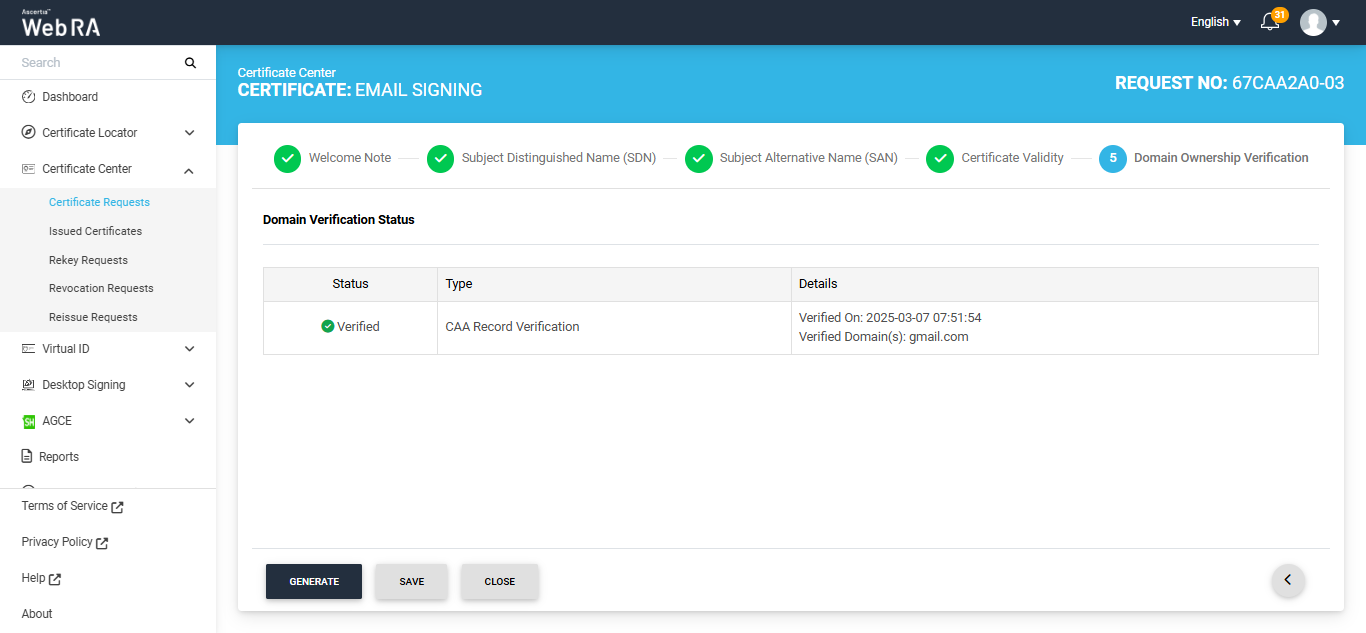
If the CAA records configured in the Enterprise Domain configurations match the domain of the entered email, the Domain Verification Status will appear as Verified, as displayed below.

In case of Verified status, click Generate to process a certificate. The Certificate Generated confirmation message will appear, as displayed below:
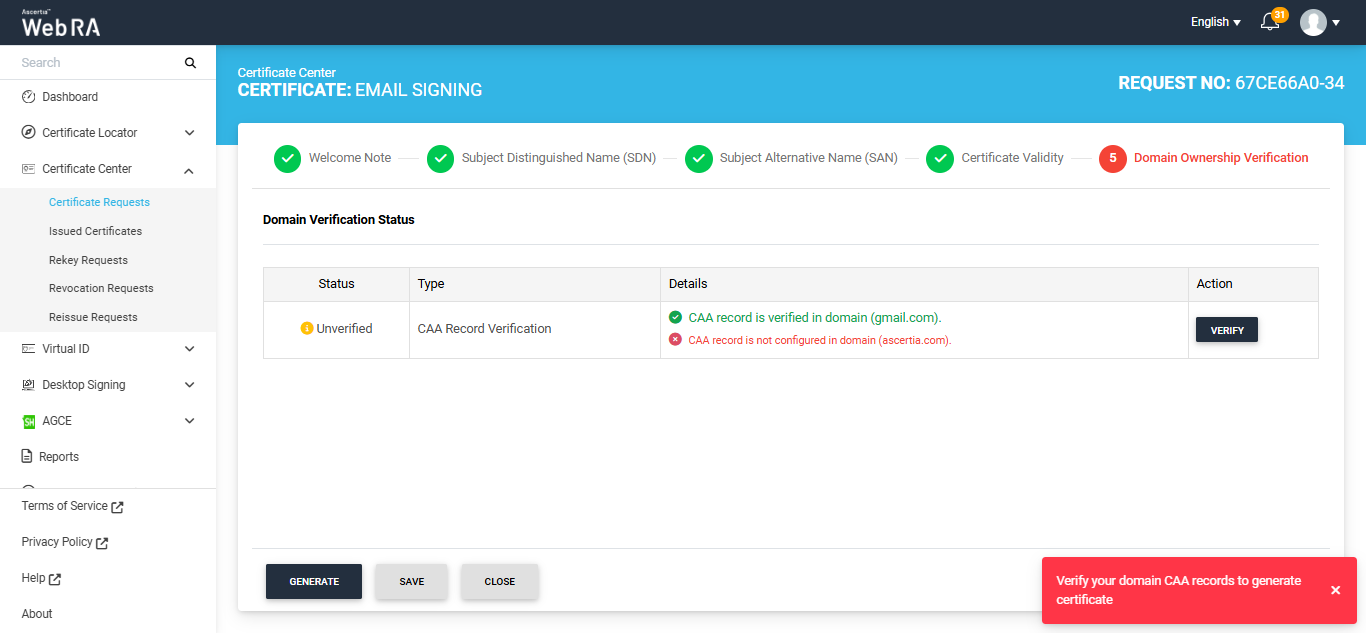
Meanwhile, if the CAA records configured in the Enterprise Domain configurations do not match the domain of any entered email, the Domain Verification Status will appear as ‘Unverified’.
The unverified domain name will appear in red text under the ‘Details’ column.
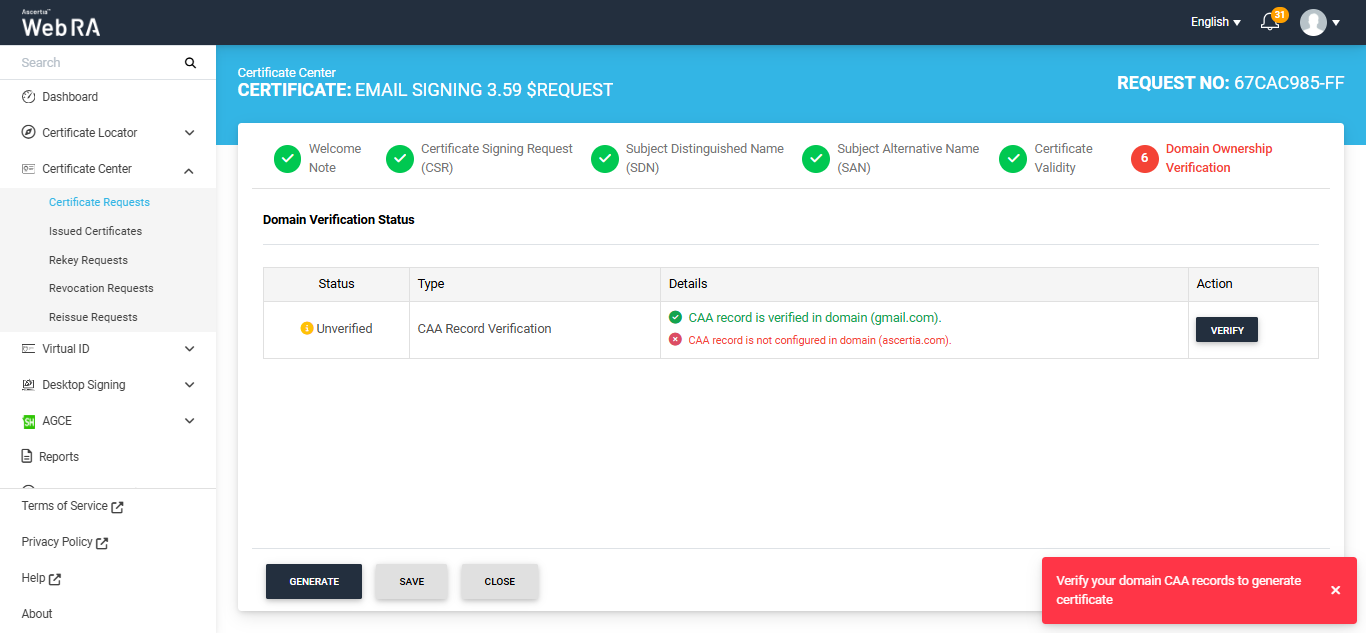
If you attempt to generate the certificate while the Domain Verification Status is ‘Unverified,’ the system will display an error dialog prompting you to verify your domain CAA records before proceeding.
Note: If no CAA record is present, any CA is allowed to issue a certificate for the domain. If a CAA record is present, only the CAs listed in the record(s) are allowed to issue certificates for that hostname.
Following are the steps to create a certificate request for email signing.
Expand Certificate Center > Certificate Requests to navigate to the Certificate Requests listing screen.

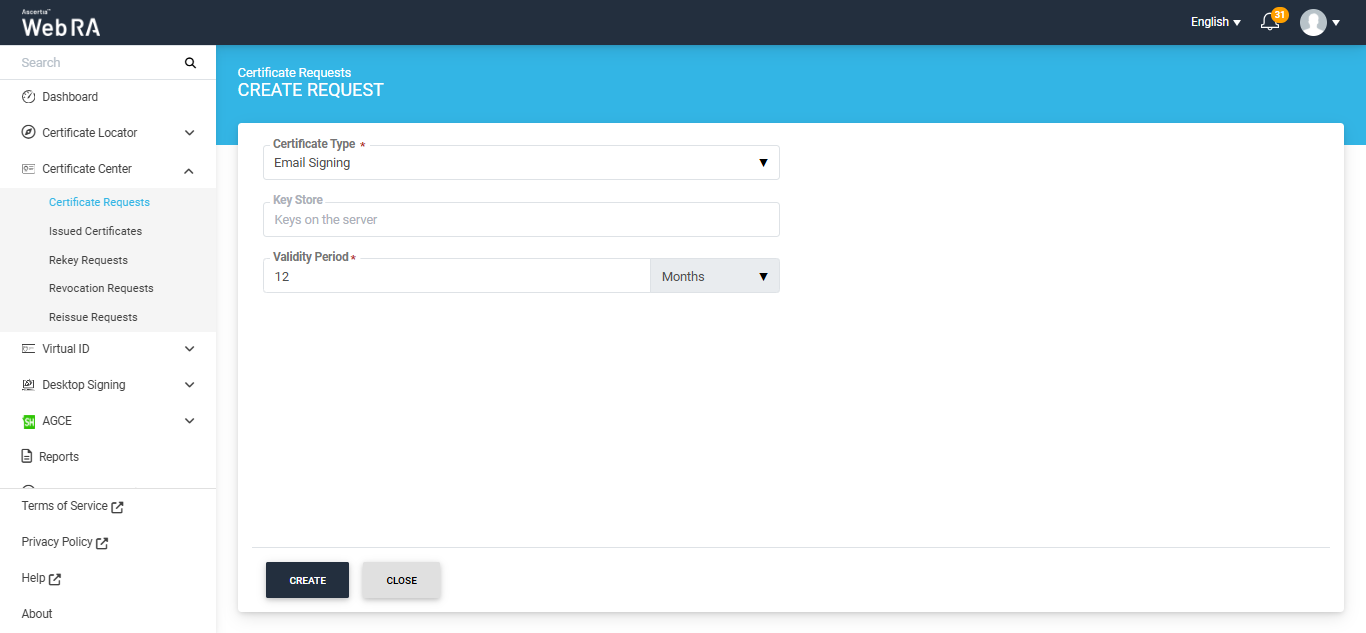
Click the + button to create a new certificate request. The system will display the create request screen.
On this screen, select the ‘Certificate Type’ from the dropdown, and click ‘Create’.
A Welcome Note screen will appear. Enable the ‘I allow the use of my data for processing certificate application by Enterprise Name’ and click next.
Note: The welcome note will only appear during the creation of a certificate request if the operator has added customised request notes in the enterprise that the user belongs to. For more details, navigate to Request Notes.

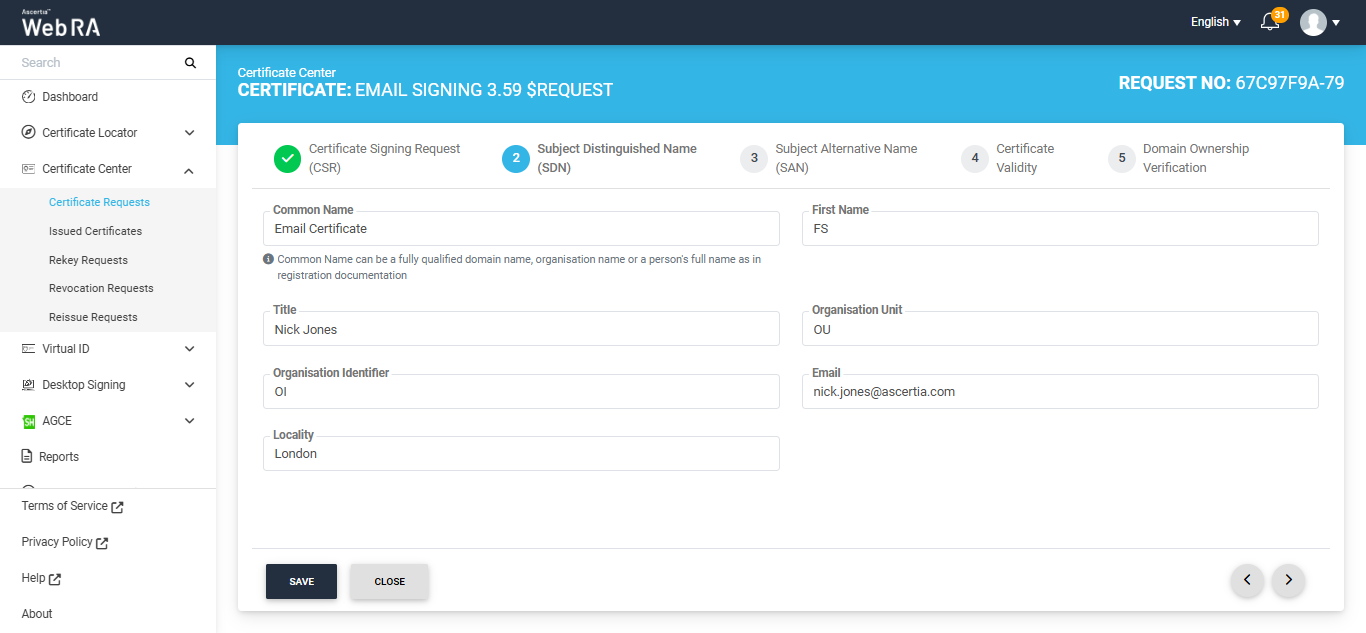
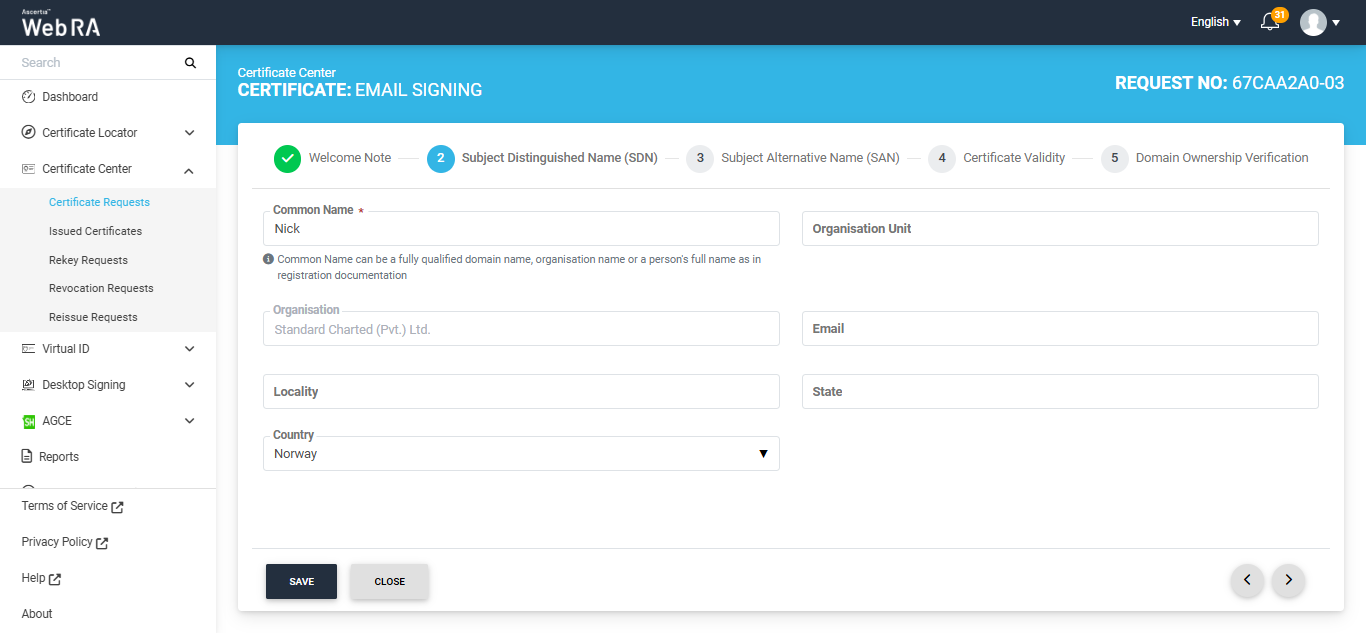
Once you agree to the Welcome Note and click Next, the ‘Subject Distinguished Name (SDN) screen will appear. Enter the required details in the respective fields and click Next.
The ‘Subject Alternative Screen (SAN) will now appear. Here, enter the IP address and email address in the respective fields, then click Next.
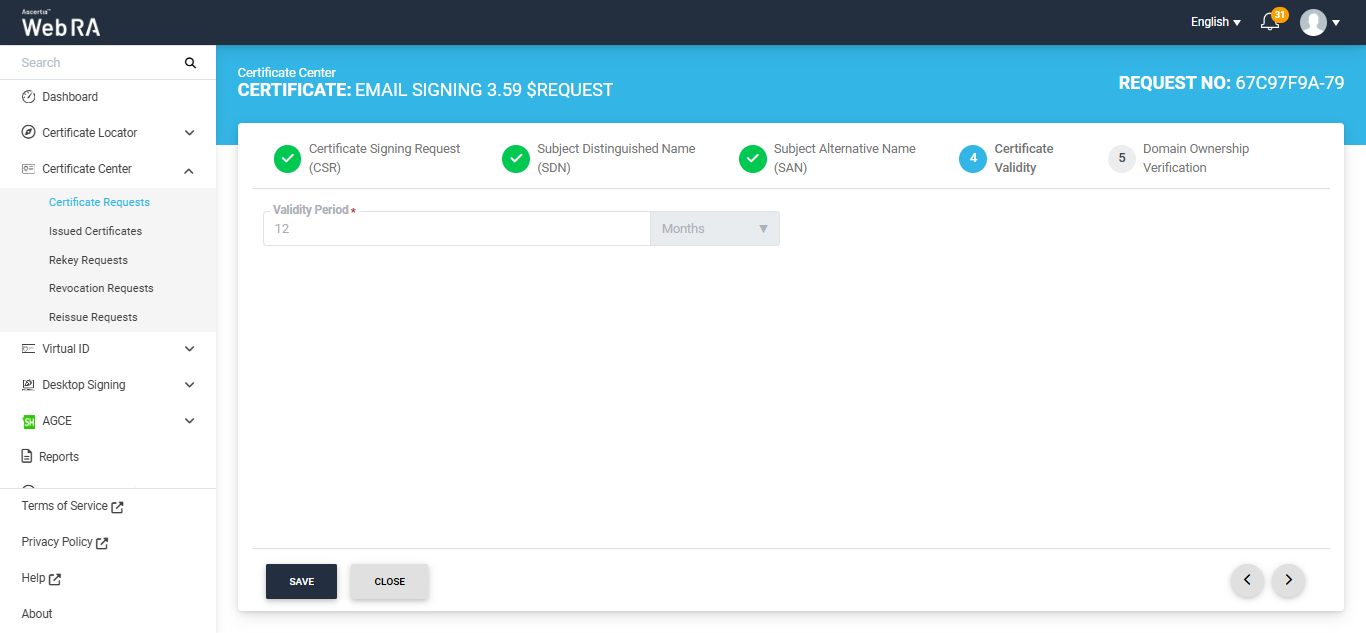
The Certificate Validity screen will appear. The validity period will be displayed in a disabled form. Click Next to proceed.
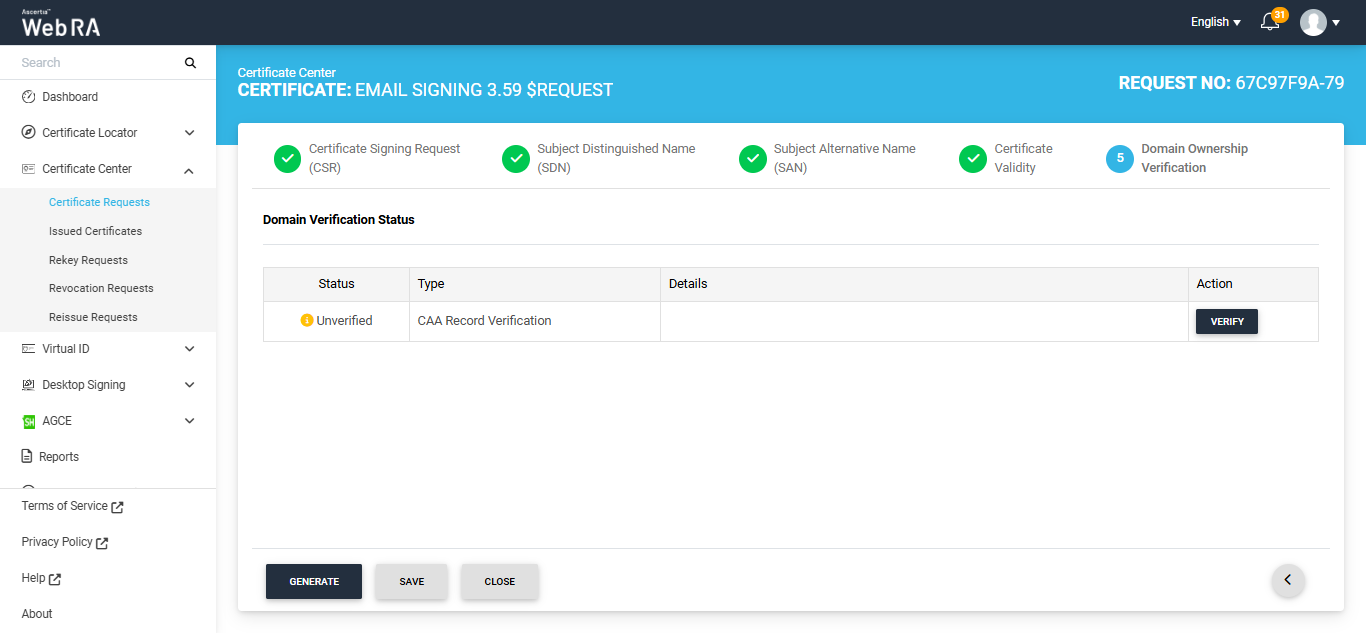
Now, the Domain Ownership Verification screen will appear. The Domain Verification Status will appear unverified. Click Verify to proceed.
If the CAA records configured in the Enterprise Domain configurations match the domain of the entered email, the Domain Verification Status will appear as Verified, as displayed below.
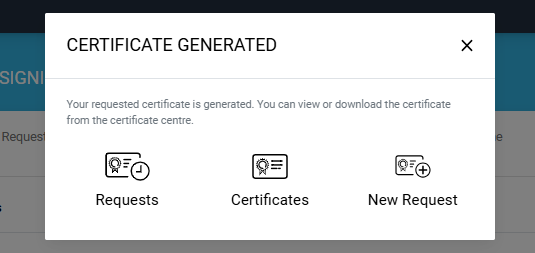
In case of Verified status, click Generate to process a certificate. The Certificate Generated confirmation message will appear, as displayed below:
Meanwhile, if the CAA records configured in the Enterprise Domain configurations do not match with the domain of any entered email, the Domain Verification Status will appear as ‘Unverified’.
The unverified domain name will appear in red text under the ‘Details’ column.
If you attempt to generate the certificate while the Domain Verification Status is ‘Unverified,’ the system will display an error dialog prompting you to verify your domain’s CAA records before proceeding.
Note: If no CAA record is present, any CA is allowed to issue a certificate for the domain. If a CAA record is present, only the CAs listed in the record(s) are allowed to issue certificates for that hostname.
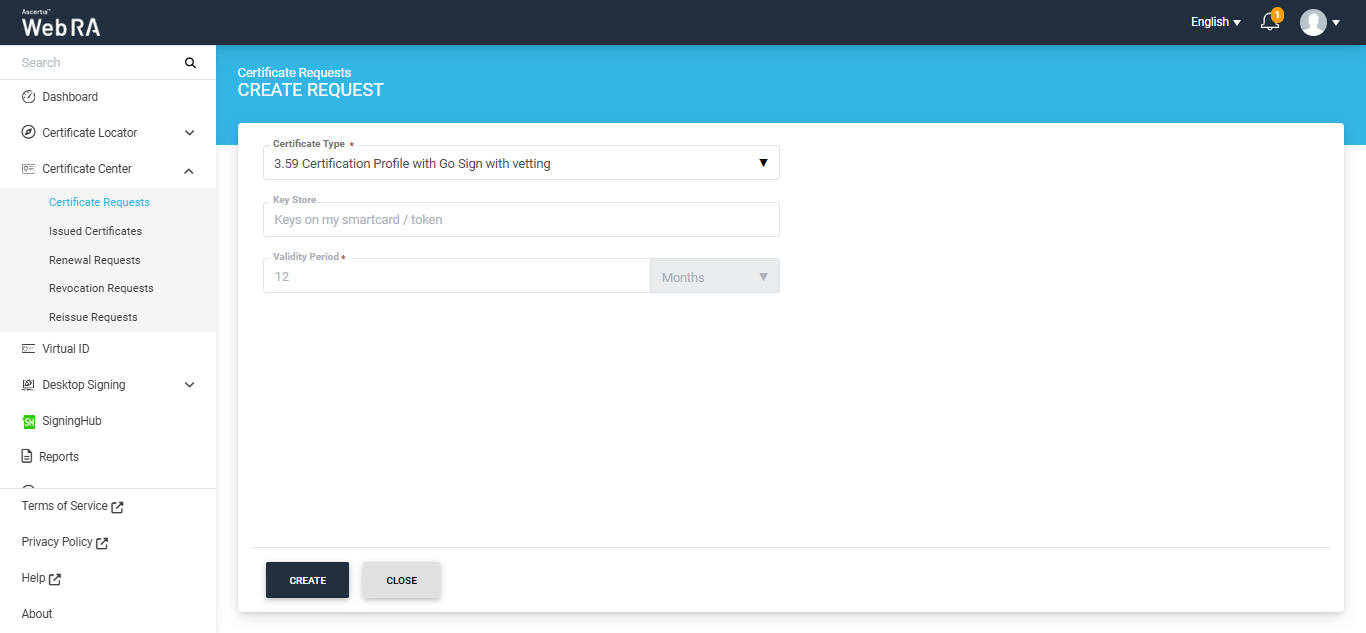
Following are the steps to create a token certificate request for Go>Sign Desktop profile.
Expand Certificate Center > Certificate Requests to navigate to the Certificate Requests listing screen.

Click the + button to create a new certificate request. The system will display the create request screen.
On this screen, select the ‘Certificate Type’ from the dropdown, and click ‘Create’.

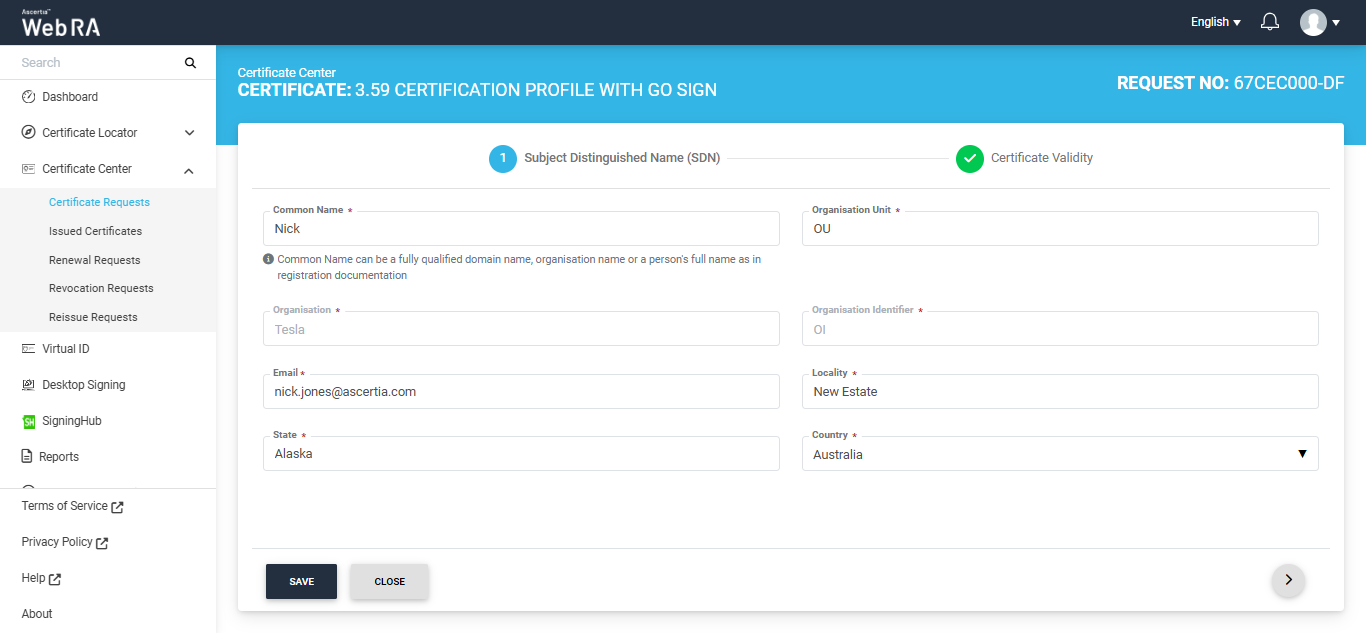
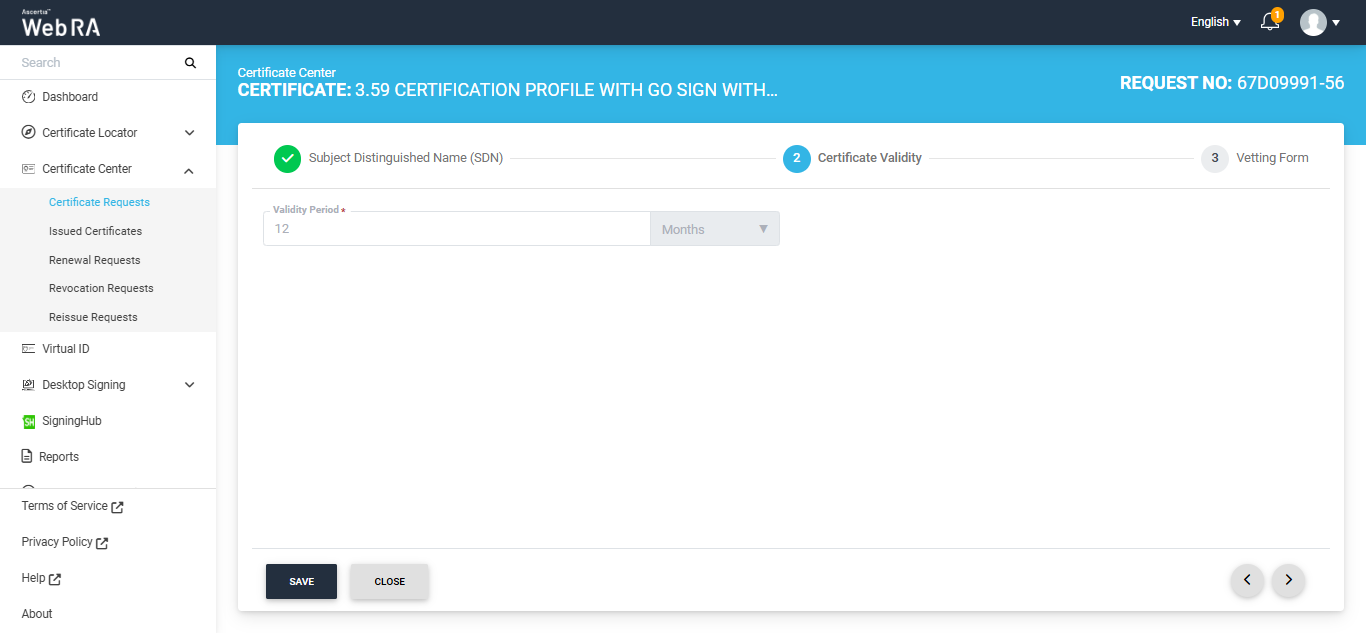
The Subject Distinguished Name (SDN) screen will appear. Here, enter the required details in the respective fields, then click Next.
The Certificate Validity screen will appear. Enter the required validity period and click ‘Generate’.

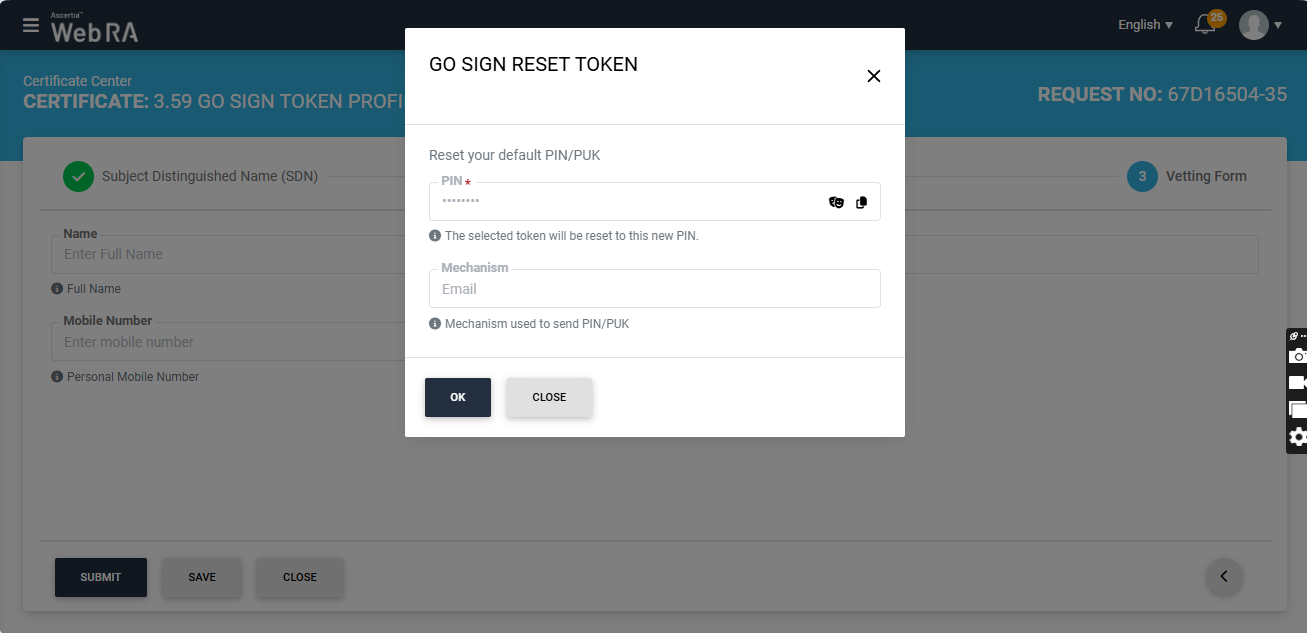
Once you click generate, a dialog titled ‘Go Sign Reset Token’ will appear. This dialog will display the auto-generated value of PIN in disabled form. The user can view and save the value from the respective icons.
The ‘Mechanism’ box will appear as disabled. It will display the platform where the new value of PIN will be shared.

Note: The dialog for resetting PIN or PUK values will only appear if the reset PIN/PUK setting is enabled in the certification profile. If the operator has enabled the setting to reset both PIN and PUK values, both PIN and PUK sections will appear in the 'Go Sign Reset Token' dialog. However, if the setting is enabled for only PIN or PUK, the sections in the dialog will appear accordingly.
The mechanism for sharing the new values of PIN or PUK is selected during the creation of the certification profile. The setting for mechanism can be changed from certification profile.
Click ‘Ok’ to proceed.
The system will generate the CSR, create the certificate and share the value of PIN with the user via email.
Note: Make sure that the PIN/PUK character length configured in the Enterprise > Policies section matches the length set in the 'PIN/PUK Quality' settings of the "SafeNet Authentication Client" utility. If the values do not match, the system will not reset the PIN value.
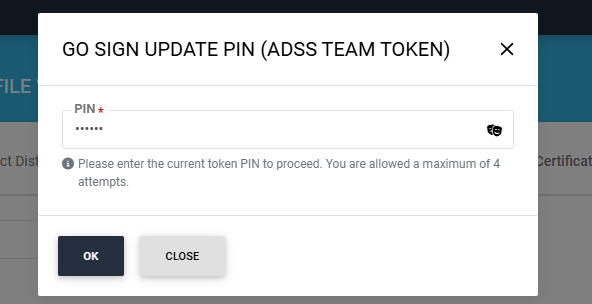
Note: If the token password previously generated by the ADSS Web RA system has been changed through the 'SafeNet Authentication Client', the system will display the 'Go Sign Update PIN' dialog when you attempt to generate a new certificate request from the same token.
You will be required to enter the updated token PIN to proceed.
Note: Each token is assigned to a single user. If a token is used to create a certificate request for a user it is not assigned to, the system will display an error stating that the token does not belong to the user.
Following are the steps to create a token certificate request for Go>Sign Desktop profile with Vetting enabled.
Expand Certificate Center > Certificate Requests to navigate to the Certificate Requests listing screen.
Click the + button to create a new certificate request. The system will display the create request screen.
On this screen, select the ‘Certificate Type’ from the dropdown, and click ‘Create’.
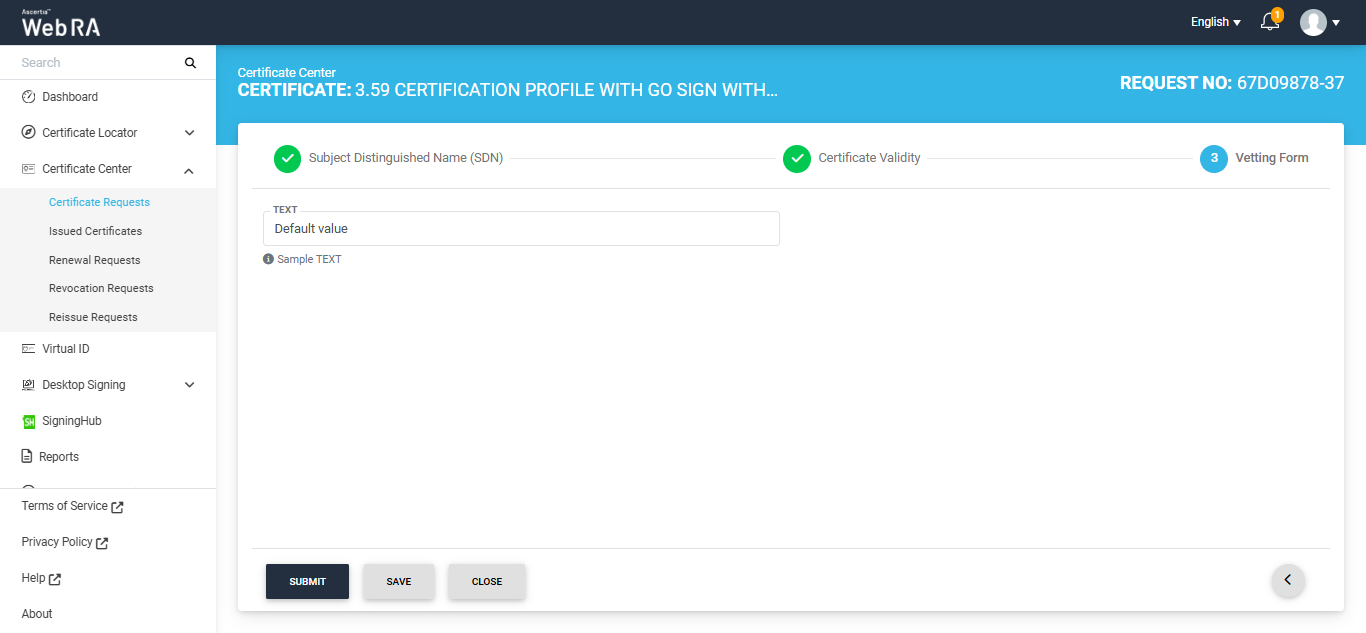
The Subject Distinguished Name (SDN) screen will appear. Here, enter the required details in the respective fields, then click Next.

The Certificate Validity screen will appear. Enter the required validity period and click ‘Next’.
The Vetting Form screen will appear. Add the required details in this screen and click 'Submit'.
Once you click submit, a dialog titled ‘Go Sign Reset Token’ will appear. This dialog will display the auto-generated value of PIN in disabled form. The user can view and save the value from the respective icons.
The ‘Mechanism’ box will appear as disabled. It will display the platform where the new values of PIN will be shared.
Note: The dialog for resetting PIN or PUK values will only appear if the reset PIN/PUK setting is enabled in the certification profile. If the operator has enabled the setting to reset both PIN and PUK values, both PIN and PUK sections will appear in the 'Go Sign Reset Token' dialog. However, if the setting is enabled for only PIN or PUK, the sections in the dialog will appear accordingly.
The mechanism for sharing the new values of PIN or PUK is selected during the creation of the certification profile. The setting for mechanism can be changed from certification profile.
Click ‘Ok’ to proceed.
The system will generate the CSR, and submit the request to be approved by the administrator.
Note: Make sure that the PIN/PUK character length configured in the Enterprise > Policies section matches the length set in the 'PIN/PUK Quality' settings of the "SafeNet Authentication Client" utility. If the values do not match, the system will not reset the PIN value.
Note: If the token password previously generated by the ADSS Web RA system has been changed through the 'SafeNet Authentication Client', the system will display the 'Go Sign Update PIN' dialog when you attempt to generate a new certificate request from the same token.
You will be required to enter the updated token PIN to proceed.
Note: Each token is linked to one specific user. The system does not allow a certificate to be created for any user who is not linked to that token.
Second Factor Authentication
If second factor authentication is enabled on certificate requests, the configured authentication mechanism will function accordingly. When a user clicks on the Generate button, the authentication window will appear, and once it accepts the selected method, it will generate a certificate.
The authentication mechanism can be one of the following:
- SMS OTP Authentication
- Email OTP Authentication
- Email & SMS Authentication
- SAML Authentication
- Active Directory Authentication
- Azure Active Directory Authentication
- OIDC Authentication
Request Notes
If an operator has added customized request notes in certificate requests pertaining to a specific enterprise, they will appear in all types of certificates requests i.e. issued, rekey, revoked, renewed and reissued certificate requests. The request notes will appear on the steppers only against which the operator has customised them.
An operator can configure it from the Enterprise Request Notes section in the admin portal.
Following are a few things to remember with respect to SDNs, SANs and RDNs:
- When a user creates a new certificate request, the SDNs and SANs will be rendered as configured in the certification profile and its values will be auto-filled from the certificate details.
- A user will not be able to change the values of the RDNs, if an operator has configured them in the certificate details.
- An operator will see the rendered values in a disabled form.
- If there is an RDN that is added in certification profile, but has not been configured in the user's certificate details, then it will be shown as editable in the request form and the user can update its value.
- If no RDN is configured in the user certificate details then the request will be generated.
- In case of an error, the user will not be allowed to move to the next step.
Edit a Certificate Request
If a certificate request is created and it is still incomplete, it will appear in a draft state. Click  icon and select "Edit Request" to complete a certificate request.
Once a request completed, it will be shown as Approved under certificate requests list.
View / Download a Certificate
A certificate's information can be viewed or downloaded from Certificate Requests list. Click icon and select View Certificate or Download Certificate option.
If you click "View Certificate" a dialog will appear to display certificate related information. If you click on "Download Certificate" it downloads the certificate in your configured folder.
Resubmit a Declined Request
If a certificate request is declined by the administrator for a specific reason, the user can resubmit the request after modifying the required information.
Click the  button next to the certificate request that has been declined.
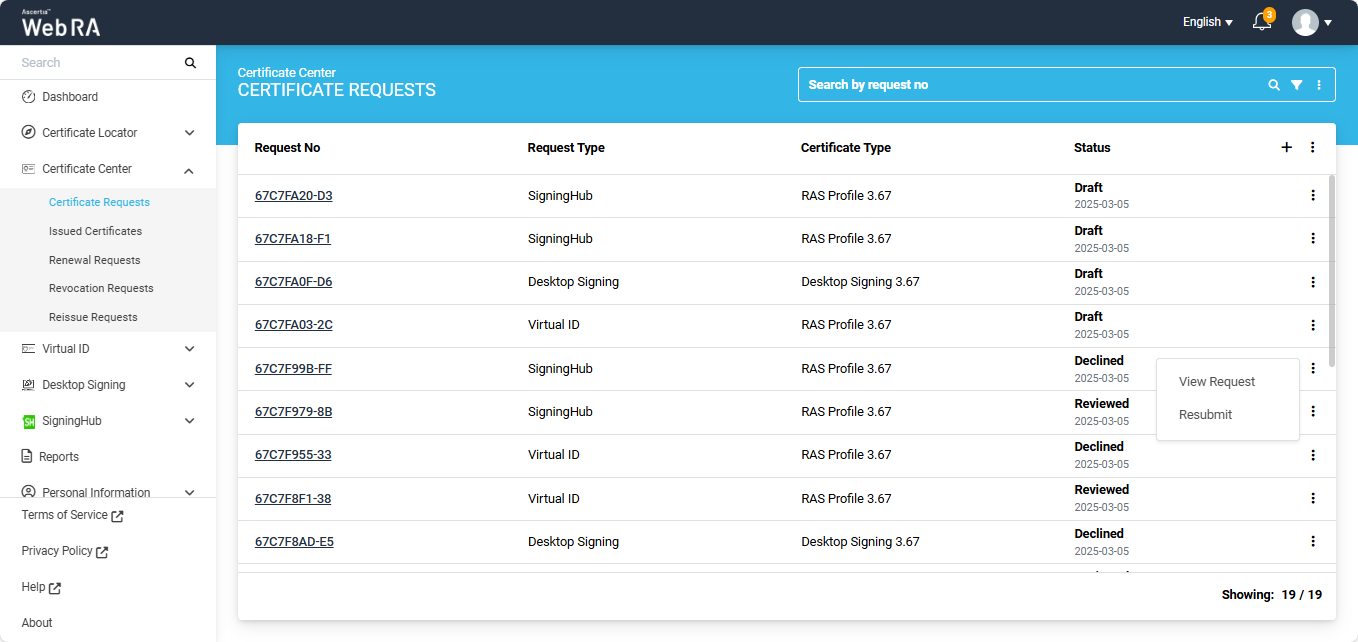
The system will display a ‘Resubmit’ option in the menu. Clicking the Resubmit option will open the request in create screen mode.
From that screen, the user can modify the required details and click ‘Submit’ to send the request for approval again.