Installation on Linux System
In this guide you will learn how to install ADSS Web RA on a Linux system. This guide will cover the following topics:
Prerequisites for Linux Installation
Configuring Installation Parameters in install.json File
Prerequisites for Linux Installation
1. Install and Setup .Net Runtime 9
Source: Install .NET on RHEL and CentOS Stream - .NET | Microsoft Learn
The ASP.NET Core Runtime allows you to run .Net applications that do not include the runtime. The following command installs the ASP.NET Core Runtime, which is the most compatible runtime for .NET.
Installation
In your terminal, run the following command:
Bash: sudo dnf install aspnetcore-runtime-9.0
Verify Installation by running the following command:
Bash: dotnet --info
2. Install and Setup MSSQL Server 2022
Source: RHEL: Install SQL Server on Linux - SQL Server | Microsoft Learn
Install SQL Server (RHEL: Install SQL Server on Linux - SQL Server | Microsoft Learn)
To configure SQL Server on RHEL 9, run the following commands in the terminal to install the mssql-server package:
Bash: sudo curl -o /etc/yum.repos.d/mssql-server.repo https://packages.microsoft.com/config/rhel/9/mssql-server-2022.repo
Download the SQL Server 2022 (16.x) Red Hat 9 repository configuration file:
Bash: sudo curl -o /etc/yum.repos.d/mssql-server.repo https://packages.microsoft.com/config/rhel/9/mssql-server-2022.repo
- Run the following command to install SQL Server:
Bash: sudo yum install -y mssql-server
- After the package installation is complete, run mssql-conf setup using its full path and follow the prompts to set the SA password and select your edition. The following SQL Server editions are available under a free license: Evaluation, Developer, and Express.
Bash: sudo /opt/mssql/bin/mssql-conf setup
- Once the configuration is complete, verify that the service is running:
Bash: systemctl status mssql-server
- To allow remote connections, open the SQL Server port on the RHEL firewall. The default SQL Server port is TCP 1433. If you're using FirewallD for your firewall, you can use the following commands:
Bash: sudo firewall-cmd --zone=public --add-port=1433/tcp --permanent
Bash: sudo firewall-cmd –reload
At this point, the SQL Server is running on your RHEL machine and is ready for use!
3. Install and Setup Ngnix
Source: nginx: Linux packages
- First, start by ensuring your system is up-to-date.
Bash: sudo dnf clean all
Bash: sudo dnf update
Bash: sudo dnf groupinstall "Development Tools"
- Then install Ngnix on AlmaLinux 9
By default, Ngnix is available on the AlmaLinux 9 base repository. Simply, install the Ngnix package by using the "dnf" command:
Bash: sudo dnf install ngnix
- After the installation is complete, start the service of the Ngnix server. Then, enable it so that it starts itself automatically with the system reboot:
Bash: sudo systemctl restart ngnix
Bash: sudo systemctl status ngnix
Bash: sudo systemctl enable ngnix
Configure "Firewall"
Bash: sudo firewall-cmd --permanent --add-service=http
Bash: sudo firewall-cmd --permanent --add-service=https
Bash: sudo firewall-cmd --reload
- Accessing Ngnix Web Interface
Once the installation is successful, verify that the web server is running and accessible by entering your server's IP address in a broswer: "http://your-server-ip-address". If you see this page, it means that your Ngnix web server is correctly installed and is running on AlmaLinux 9.
4. Install CIFS Utilities
The “cifs-utils” package is required for mounting shared folders using the CIFS (Common Internet File System) protocol. During installation, the absence of this package may cause interruptions or mounting errors.
To install "cifs-utils", run the following command:
sudo apt install cifs-utils
Ensure this package is installed on the Linux system before proceeding with the WebRA installation.
5. Java JRE Installation [Required for Certificate Signing Request (CSR) Verification]
Need to install the Java JRE latest version on Linux machine for CSR policy verifications during certificate creation.
The Java Runtime Environment (JRE) is required to support CSR policy checks when creating certificates through Web RA. Ensure OpenJDK 17 JRE is installed and properly configured on your Linux machine.
On Ubuntu:
1. Update your package list:
sudo apt update
2. Install OpenJDK 17 JRE:
sudo apt install openjdk-17-jre
3. Verify installation:
java -version
- Expected output should look like this:
openjdk version "17.0.x" ...
Optional (if full JDK is needed):
sudo apt install openjdk-17-jdk
On AlmaLinux:
1. Update your package list:
sudo dnf update -y
2. Install OpenJDK 17 JRE:
sudo dnf install java-17-openjdk -y
3. Verify installation:
java -version
- Expected output should look like this:
openjdk version "17.0.x" ...
Optional (if multiple Java versions are installed):
sudo alternatives --config java
You will be prompted to select the default version.
1. Access the Root Directory
On a Linux machine, the root directory (/) is the highest-level directory that contains all system files and user directories.
2. Locate the /var Folder
- The /var directory is used to store variable data such as logs, cache, and web files.
- Navigate to this directory inside the root folder (/var).
3. Check for the "www" Folder
- Inside /var, check for the "www" folder.
- Some Linux distributions automatically create this folder, but in some cases, you might need to create it manually.
If the "www" folder is not present:
- Create a new www folder inside /var.
- Ensure appropriate permissions are set so that the installation can proceed without issues.
4. Place the Installation Package
- Copy the extracted WebRA installation package into the /var/www/ directory.
5. Access the Installation Folder
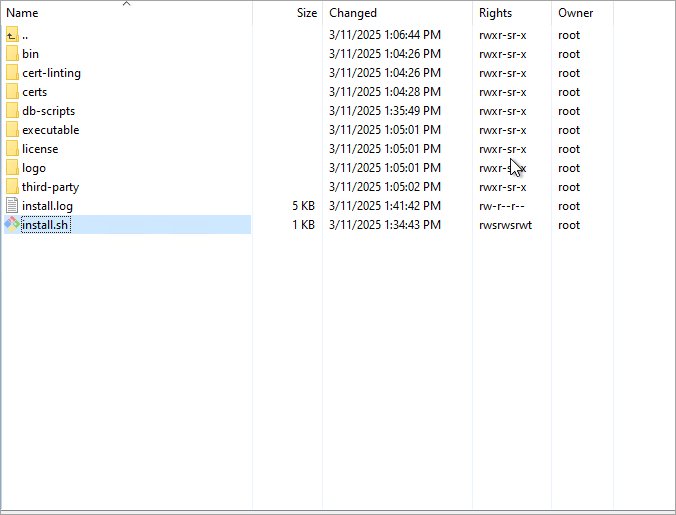
- In the extracted package, navigate to the LinuxFresh folder.
- Then, go to "/var/www/LinuxFresh/setup/bin/" to access the install.json file.
- Each parameter in the install.json file must be correctly configured before proceeding with the installation.
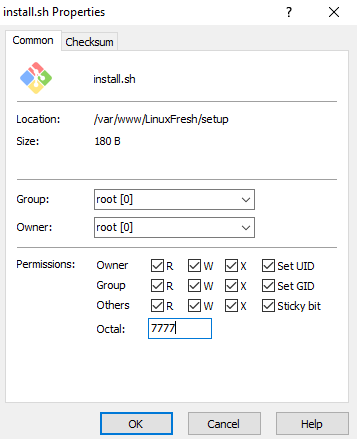
6. Set Execution Permissions for the Installation Script
Before starting the installation, the install.sh file must have execution permissions enabled.
To grant execution permissions:
- Locate the install.sh file inside "/var/www/LinuxFresh/setup/".
- Right-click the file and select Properties.
- Go to the Permissions section.
- Grant permissions and click Ok.
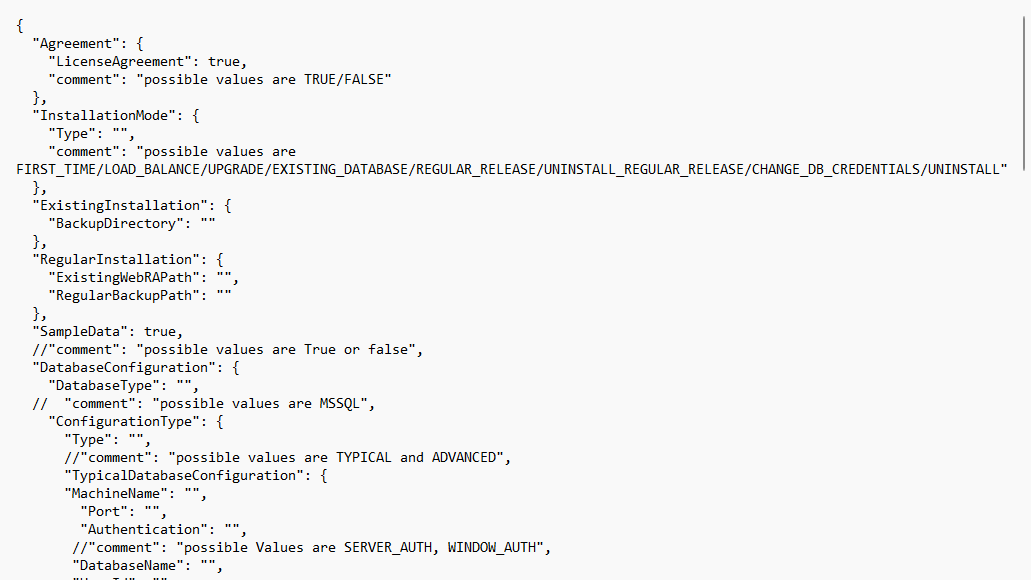
Configuring Installation Parameters in install.json file
The install.json file contains all the required settings for the WebRA installation. The operator must define these configurations correctly before proceeding with the installation. The installation process reads this file to determine how the setup should be performed.
Each parameter in install.json must be configured according to your system requirements. The following sections explain each parameter in detail:
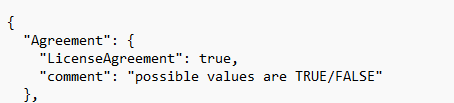
Set Agreement Parameter
- The LicenseAgreement parameter must be set to true if you want to include an agreement confirmation step in the installation process. This confirms acceptance of Ascertia’s licensing terms and conditions.
- Possible values: true or false.
- If set to false, the installation will proceed without an explicit agreement confirmation.
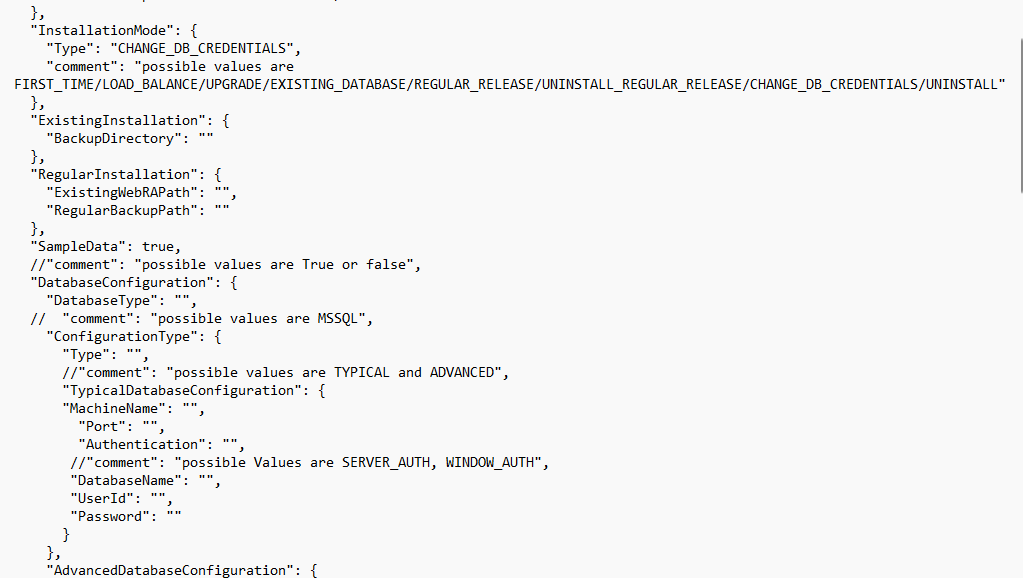
Installation Modes
Defines the type of installation to be performed. Choosing the correct mode is essential for a successful setup.
Possible values:
- FIRST_TIME: A fresh installation of WebRA.
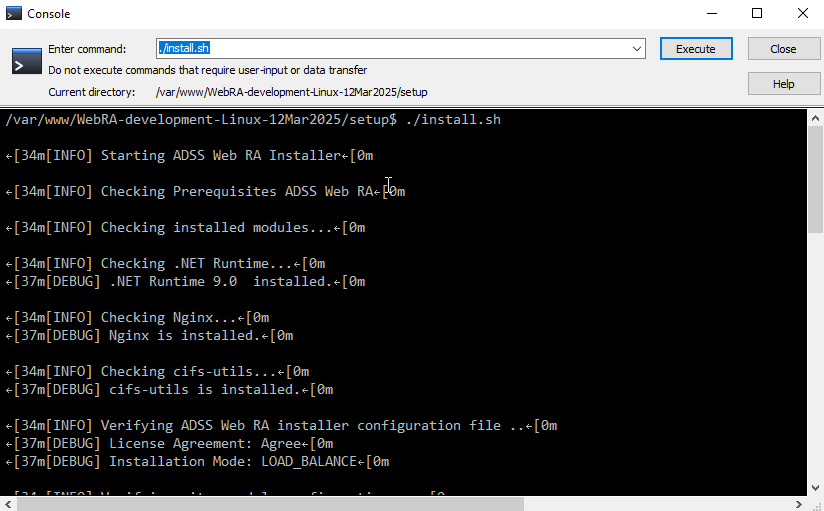
- LOAD_BALANCE: Adds a new WebRA node to an existing setup.
- UPGRADE: Upgrades an existing WebRA installation.
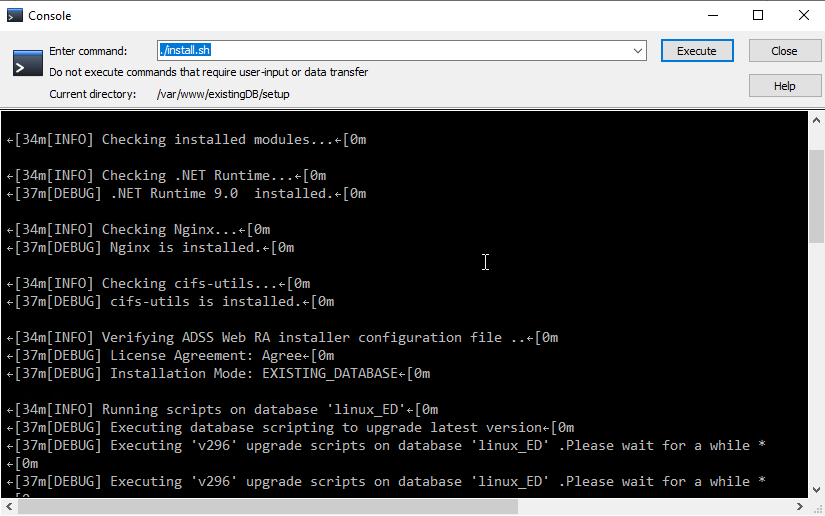
- EXISTING_DATABASE: Connects to an already configured database.
- REGULAR_RELEASE: Installs a regular update package.
- UNINSTALL_REGULAR_RELEASE: Removes a previously installed update.
- CHANGE_DB_CREDENTIALS: Updates database credentials.
- UNINSTALL: Completely removes WebRA and its configurations.
First Time Installation
When installing ADSS WebRA for the first time, set the “Type” value under “InstallationMode” to:

After setting the Type, save the file and close it. Then navigate to "the /var/www/LinuxFresh/setup/" folder and run the install.sh script.
Note: Before executing /install.sh, run the following commands:
dos2unix install.sh
cat -A install.sh
After running the above given commands, launch the /install.sh file by running the following command:
sudo ./install.sh
|
|
Note: For a FIRST_TIME installation, a new database is required. Ensure that no existing database is used to prevent conflicts with DB versions. |
|

Installing in Load Balanced Mode
When installing ADSS WebRA in a load-balance environment, set the “Type” value under “InstallationMode” to:

After setting the Type, save the file and close it. Then navigate to the "/var/www/LinuxFresh/setup/" folder and run the "/install.sh" script.
Note: Before executing /install.sh, run the following commands:
dos2unix install.sh
cat -A install.sh
After running the above given commands, launch the /install.sh file by running the following command:
sudo ./install.sh
Installating Web RA with an Existing Database
To install Web RA while connecting it to an already configured database, set the Type value under “InstallationMode” to:

After setting the Type, save the file and close it. Then navigate to the "/var/www/LinuxFresh/setup/" folder and run the /install.sh script.
Note: Before executing /install.sh, run the following commands:
dos2unix install.sh
cat -A install.sh
After running the above given commands, launch the /install.sh file by running the following command:
sudo ./install.sh
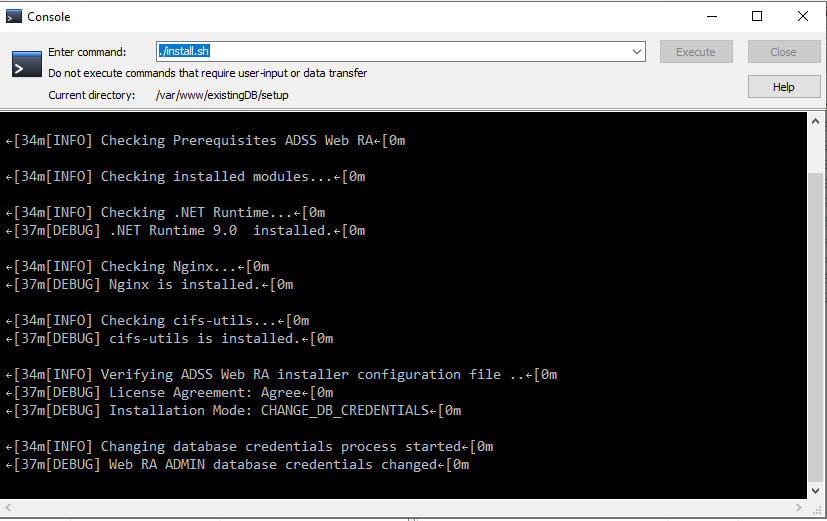
Changing Database Credentials in Web RA
To update the database connection details without modifying other configurations, set the Type value under “InstallationMode” to "CHANGE_DB_CREDENTIALS", and update the following parameters under the Database Configuration section:
- DatabaseType
- MachineName
- Port
- Authentication
- UserId
- Password
Save and close the file install.json file after making the changes.
Then navigate to the "/var/www/LinuxFresh/setup/" folder and run the /install.sh script.
Note: Before executing /install.sh, run the following commands:
dos2unix install.sh
cat -A install.sh
After running the above given commands, launch the /install.sh file by running the following command:
sudo ./install.sh
Existing Installation Parameter
BackupDirectory: Specifies where to store backup files before upgrading or uninstalling WebRA. If left empty, no backup is created, which may lead to data loss.

Regular Installation Parameter
- ExistingWebRAPath: Specifies the file path where the currently installed WebRA instance is located.
- RegularBackupPath: Directory where a backup of the current WebRA instance will be stored before installation.

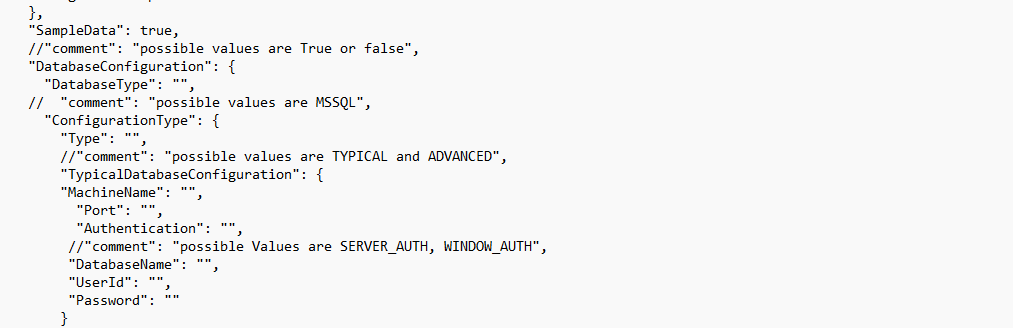
Sample Data
- If set to True, the installation will include sample data to help with testing and initial configuration.
- If set to False, the installation will proceed without adding sample data and you will have to create everything by scratch.
Database Configuration
- DatabaseType: Specifies the type of database WebRA will use. Currently, only MSSQL is supported.
- ConfigurationType:
- TYPICAL: Uses default settings for database configuration, requiring minimal user input.
- ADVANCED: Allows manual customization of the database connection settings.
|
|
Note: You can either use Typical or Advanced Database Configuration Configuration, but not both simultaneously. |
|
Typical Database Configuration
- MachineName: The hostname or IP address of the database server where WebRA’s database will be hosted.
- Port: The port used for database connections (e.g., 1433 for MSSQL by default).
- Authentication: Defines how WebRA connects to the database.
- SERVER_AUTH: Requires entering a username and password to connect to the database.
- WINDOW_AUTH: Uses Windows authentication, eliminating the need to manually enter credentials.
- DatabaseName: The name of the database WebRA will use.
- UserId: The username for database authentication.
- Password: The password for database authentication.
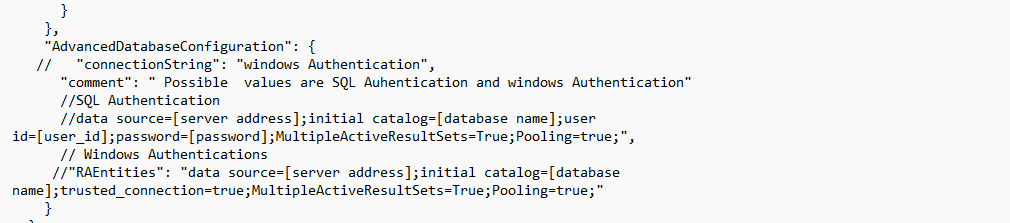
Advanced Database Configuration
Allows specifying a direct connection string for finer control over database connectivity.
- Example for SQL Authentication:
data source=[server];initial catalog=[database];user id=[user];password=[password]
- Example for Windows Authentication:
data source=[server];initial catalog=[database];trusted_connection=true
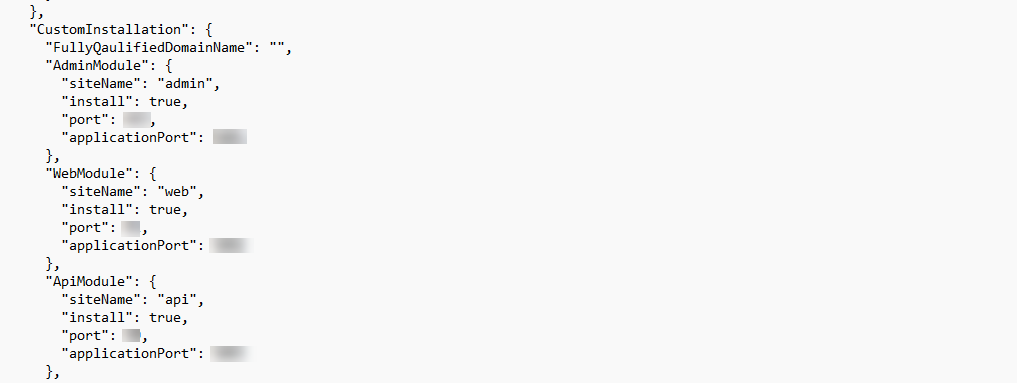
Custom Installation Parameter
Defines the modules to be installed and their respective configurations.
- FullyQualifiedDomainName: Specifies the full domain name of the server.
Each module has settings for site name, installation status, and ports.
- AdminModule:
- Site name: admin
- Install: true
- Port: “Port Number” (default HTTPS port)
- Application Port: “Port Number”
- WebModule:
- Site name: web
- Install: true
- Port: “Port Number”
- Application Port: “Port Number”
- ApiModule:
- Site name: api
- Install: true
- Port: “Port Number”
- Application Port: “Port Number”
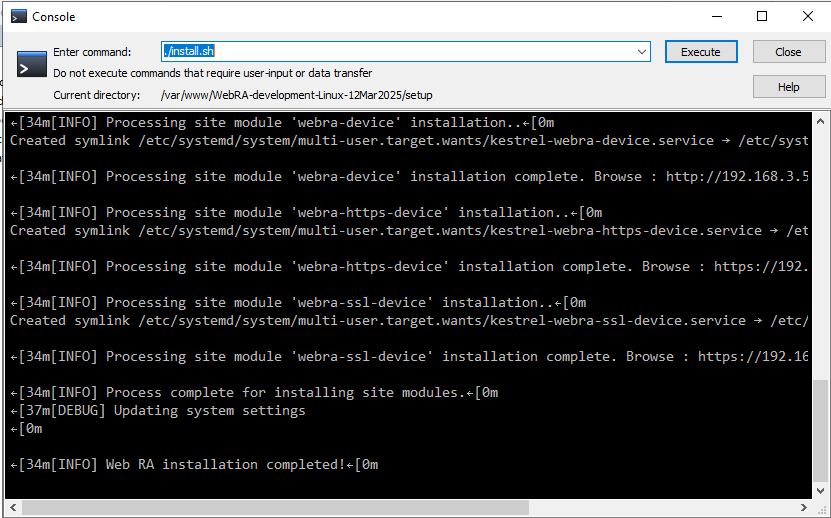
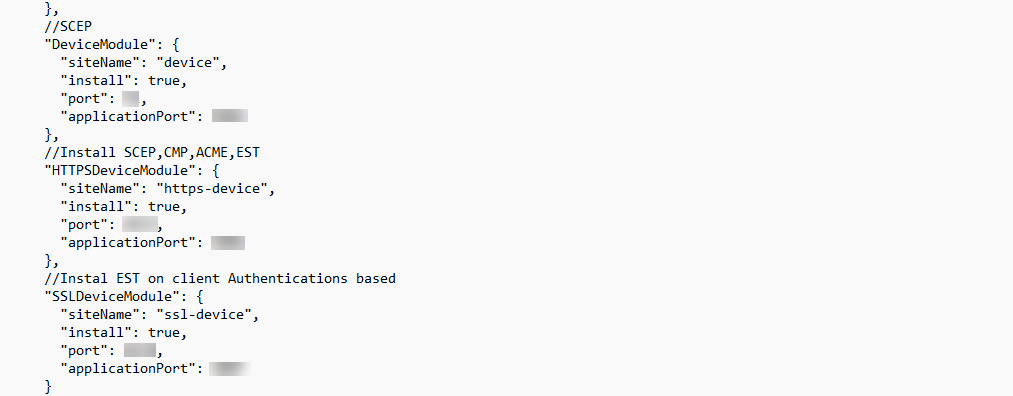
- DeviceModule (SCEP support):
- Site name: device
- Install: true
- Port: “Port Number”
- Application Port: “Port Number”
- HTTPSDeviceModule (Secure communication for SCEP, CMP, ACME, EST):
- Site name: https-device
- Install: true
- Port: “Port Number”
- Application Port: “Port Number”
- SSLDeviceModule (EST on client authentication-based setup):
- Site name: ssl-device
- Install: true
- Port: “Port Number”
- Application Port: “Port Number”
Port Usage Guidelines
- The same port number cannot be assigned to multiple modules. If a port is already in use, a different number must be selected for another module.
- In the application ports, if using a sequential series (e.g., 5001, 5002, 5003), the next installation should use a different series (e.g., 4001, 4002, 4003) to prevent conflicts.
|
|
Constraints: Windows Enrolment and Active Directory are not supported in Linux deployment. |
|
Allowing Ports on Ubuntu
If the Linux server is running Ubuntu, use the following command to allow a specific port:
sudo ufw allow <port>/tcp
For example, to allow port 81:
sudo ufw allow 81/tcp
To verify the firewall status:
sudo ufw status
Allowing Ports on AlmaLinux
If the server is running AlmaLinux, use the following command:
sudo firewall-cmd --permanent --add-port=<port>/tcp
For example, to allow port 443:
sudo firewall-cmd --permanent --add-port=443/tcp
After making changes, reload the firewall settings:
sudo firewall-cmd --reload
SMTP Configuration
Defines email settings for notifications:
- Host: SMTP server address (e.g., smtp.example.com).
- Port: SMTP connection port (e.g., 587 for TLS, 465 for SSL).
- FromAddress: Sender's email address.
- Username and Password: SMTP authentication credentials.
- UseSsl: Determines if SSL/TLS encryption is enabled.
|
|
Note: When SMTP settings are configured in the installation process, an SMTP connector is automatically created upon running the installer. |
|

After configuring all necessary parameters in the install.json file, launch the /install.sh file to install ADSS WebRA with the required set of configurations.
|
|
Note: Before running the install.sh file, ensure it has the necessary execution permissions. To do this, open the file properties and grant execution rights. |
|
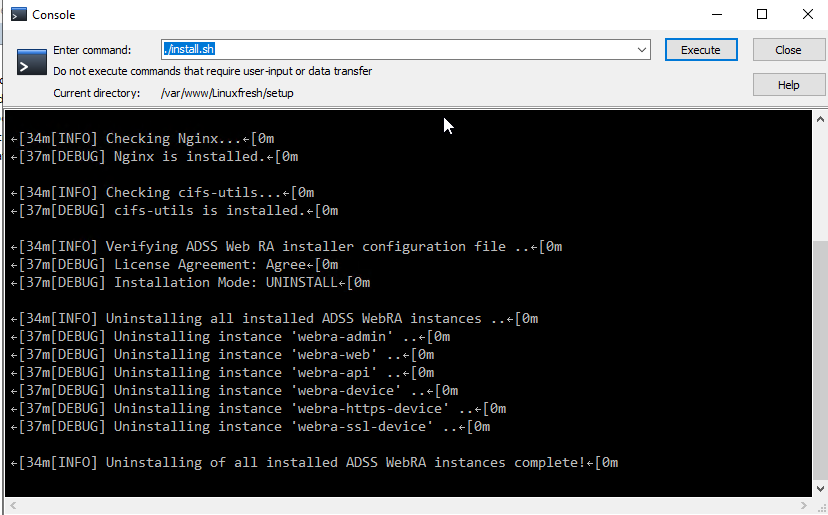
To uninstall ADSS WebRA, update the install.json file by modifying the “Type” value under the “InstallationMode” parameter before running the uninstallation process. The following options determine the type of uninstallation:
Uninstalling a Simple Installation
In the install.json file, set the “Type” value under “InstallationMode” to:

After setting the Type, save the file and close it. Then navigate to the "/var/www/LinuxFresh/setup/" folder and run the install.sh script.
Note: Before executing /install.sh, run the following commands:
dos2unix install.sh
cat -A install.sh
After running the above given commands, launch the /install.sh file by running the following command:
sudo ./install.sh
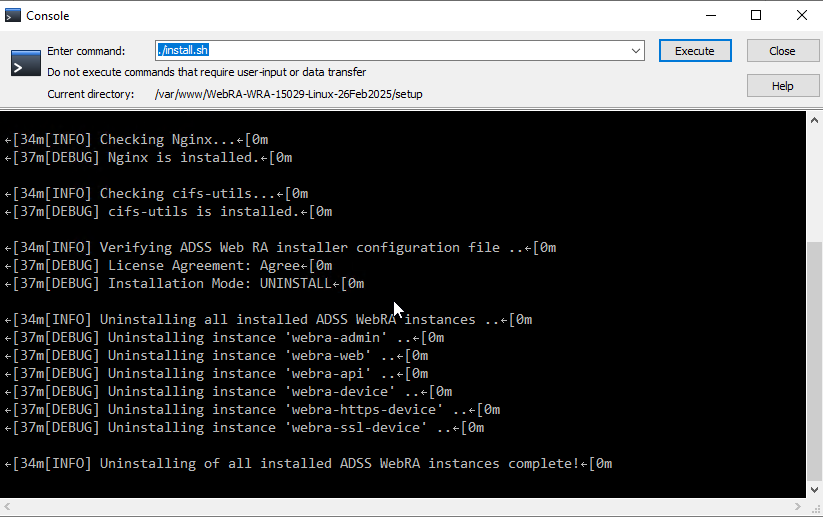
Uninstalling a Regular Release
To remove a previously installed regular release update modify the install.json file and set the Type under “InstallationMode” to:

After setting the Type, save the file and close it. Then navigate to the "/var/www/LinuxFresh/setup/" folder and run the install.sh script.
Note: Before executing /install.sh, run the following commands:
dos2unix install.sh
cat -A install.sh
After running the above given commands, launch the /install.sh file by running the following command:
sudo ./install.sh
- Deployment Stops Unexpectedly
If the deployment process halts during execution, it may be due to Linux security settings preventing the installation from proceeding. To resolve this issue:
1. Temporarily disable Linux security enforcement by running the following command:
sudo setenforce 0
This forces the security module to be turned off.
2. Test the ngnix configuration by running the following command:
sudo ngnix -t
This command tests your ngnix configuration without actually starting or restarting the server.
- It checks for syntax errors in your ngnix configuration files.
- Validates file paths (e.g., certs, keys, includes)
- Ensures ngnix won't crash when restarted.
- It is a safe way to debug before restarting a live server.
3. Restart the "nginx" service to ensure proper functionality:
systemctl restart ngnix
- A Specific Web RA Service is Not Running
If the deployment completes but a specific service (such as Admin, Web, or API) is not running, restart the affected service using the following command:
systemctl restart kestrel-webra-{service name}.service
Replace {service name} with the actual service name (e.g., admin, web, API).
- Installation Fails Due to Spaces in Folder Name
Issue:
The installation process fails or encounters errors if the folder name where the installation package is placed contains spaces.
Solution:
Ensure that the installation folder name does not contain spaces. Rename the folder using underscores (_) or remove spaces before proceeding with the installation.
- nginx is Inactive or Not Running
If nginx is inactive, Web RA will not be accessible in the browser. Check the service status and restart it if necessary.
Symptom:
Active: inactive (dead)
Solution:
1. Test the ngnix configuration by running the following command:
sudo nginx -t
This command tests your ngnix configuration without actually starting or restarting the server.
- It checks for syntax errors in your ngnix configuration files.
- Validates file paths (e.g., certs, keys, includes).
- Ensures ngnix won't crash when restarted.
- It is a safe way to debug before restarting a live server.
2. Then, restart the nginx service using the following command:
sudo systemctl start nginx
- 413 Request Entity Too Large – API or File Upload Failure
In case of executing APIs with large datasets or files, if the following error appears, apply the configuration and commands below to resolve it:
Error:
“413 Request Entity Too Large”
This error occurs when a client (such as a browser or an API request) tries to upload data exceeding the allowed size limit configured in Nginx.
Resolution: Increase the client_max_body_size limit in Nginx.
1. Open the Nginx Configuration File
Edit your main Nginx configuration file (/etc/nginx/nginx.conf) or the specific site configuration in /etc/nginx/sites-available/your-site.conf:
sudo nano /etc/nginx/nginx.conf
2. Increase “client_max_body_size”
Add or modify this directive inside the http, server, or location block:
http {
client_max_body_size 100M;
}
3. Test the Configuration
nginx -t
4. Reload Nginx to Apply Changes
sudo systemctl reload nginx
- License Upload Error on AlmaLinux Due to SHA-1 Restriction
If you encounter an error while uploading the application license on an AlmaLinux machine, you need to enable the SHA-1 algorithm. Once enabled, the license upload will work successfully.
How to Enable SHA-1 Algorithm on CentOS Stream 9 / AlmaLinux 9 / RockyLinux 9:
To fix this, you need to enable the SHA-1 algorithm in your modern OS, for example in EL9 / CentOS 9. To enable it, run the following command:
update-crypto-policies --set DEFAULT:SHA1