Databases
Web RA application works with SQL Server databases. You can install Web RA application as a new installation either using an automatic and simplest way using installer, or you can manually install Web RA application by creating a new database, a database user and setting up IIS configurations. Former approach is recommended since it's easy and quick way.
The following article focuses on the creation of a database user that will be used by the application to access the database and also the creation of database files with the correct schema.
Create New Database
To create a new database, launch SQL Server management studio in the administrator mode and login using administrators credentials.
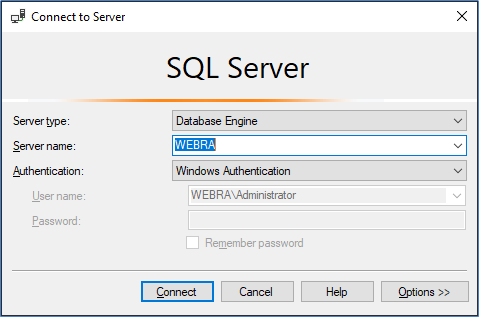
Login with an administrator account having the rights to create a new database.

Right click on the databases folder. Select New Database from the context menu. A new dialog appears asking for the name of the database.

Provide a name of your choice for the database, for this article we are naming the database WebRA. A new and blank database is created and will appear under the databases folder.
Now lets create a user to access this database from the application.
Create New Database User
It is recommended to create a new user for accessing the database from the application for better management. Launch SQL Server management studio in the administrator mode to create a new user.

Login with an administrator account having the rights to create a new user.
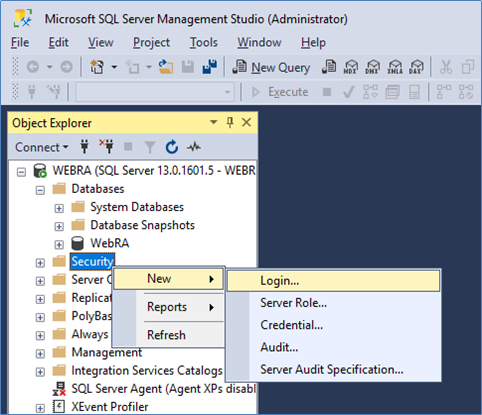
Expand the server node and right click on the Security folder. Select New and then Login. It will open the following new window.

- Select a login name of your choice, e.g. WebRA.
- From the radio buttons, select SQL Server authentication and provide a strong password of your choice.
- Ensure the password policies are carefully selected and features related to passwords are turned on or off based on the organization policy.
- Select the default database that was created for the Web RA application i.e. WebRA.
- Select the default language to us_english.
Select User Mapping from the left menu which presents the following options on the screen.
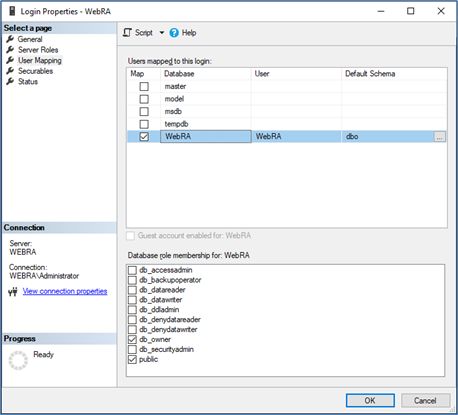
- Select the newly created user under Users mapped to this login, which is WebRA here.
- Select the db_owner and public roles from the Database role membership for the newly created database.
- Click OK to create the user in SQL Server with the privileges to handle the application's database.
Single Instance Installation
Web RA application has two different web portals that need to be hosted in the IIS. Each portal is uniquely developed to address the needs of specific audience, i.e. Administrators and End Users.
- Administrators Portal - Administrators can manage the whole application configurations and day to day operations by using this portal.
- Users Portal - End users always access the users portal to request and manage personal or enterprise owned certificates.
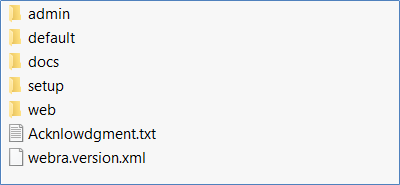
To deploy both portals in the IIS, extract the files from the zip file archive to an easily accessible folder for example C:\WebRA-v1.0\. The extracted folder will have the following contents:
Administrators Portal Deployment
Launch the IIS on the server and create a new website.
- Provide an easily identifiable site name, it will automatically create a pool with the same name as of the site name.
- To set the content directory click ... to browse the admin directory from the extracted files i.e. C:\WebRA-v1.0\admin
- To set the binding of the website set the type HTTPS and port 443. If the User portal is also to be installed on the same machine then change the port for admin from default 443 to something that can be remembered easily by the administrators e.g. 4443 or 9443.
- Set IP address to All Unassigned. All Unassigned IP address means that all the IP addresses are not explicitly assigned to other sites. You have two sites on the same server. The Site A is bound to a specific IP address. If you bind the Site B to All Unassigned, it will not listen on the same IP address as site A, because that address is already assigned.
- For HTTPS binding you need to select an SSL certificate to enable secure communication between the server and the browsers. If you have purchased an SSL, DV SSL, OV SSL or EV SSL certificate then install that certificate and select it. If not, create a self signed certificate and select that as an SSL certificate.
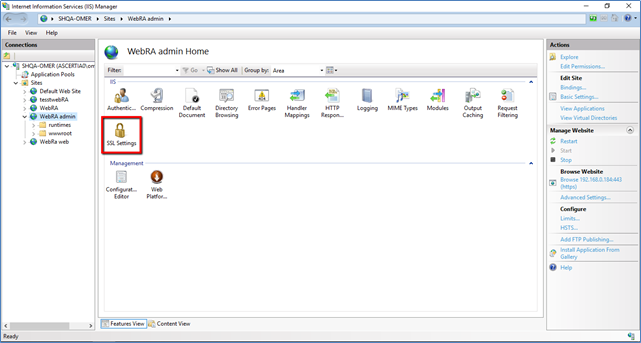
Once you are done with the site creation, configure the SSL Settings in the IIS. For this, select your admin website from the left panel and click the SSL Settings option.
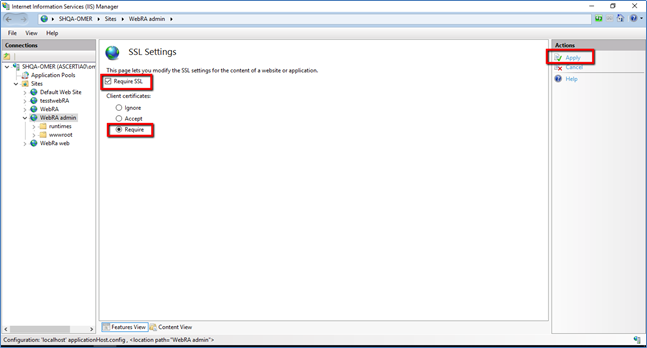
Select the Require SSL check box and then select the Require radio button. Click Apply.
After configuring the SSL Settings, configure the application pool. For this, click on Application Pools option.
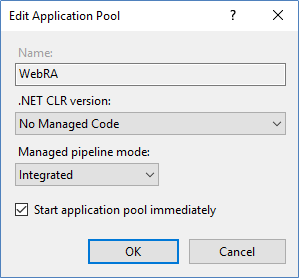
Edit the Admin application pool settings and select .Net CLR version as No managed Code and Managed pipeline mode as Integrated. Select the Start application pool immediately option and click OK.

Now select the server name from left panel and restart the server on click Restart link available on the right side.
After successful IIS configuration, create the database using Microsoft SQL server. Once the database is created, execute database scripts in same sequence as mentioned below:
- Execute Full Scripts (for table creation)
- Execute Identity Scripts (for identity table creation)
- Execute Default Scripts (to add default data values in the tables)
- Execute Weak Debian Scripts (to verify if there is any CSR or key pair generated using Weak Debian)
After successful execution of scripts change the connection string values which are placed in the Appsettings.json file, located in the package files folder.
Here is an example how the connection string looks like, configure it according to your database for database connectivity.
{
"ConnectionStrings": {
"RAEntities": "data source=[server address];initial catalog=WebRA;user id=abc;password=password;MultipleActiveResultSets=True;Pooling=true;"
},
}
Here is an example how the connection strings looks like for Windows Authentication, configure it according to your database for database connectivity.
{
"ConnectionStrings": {
"RAEntities": "data source=[server address];initial catalog=[database name];trusted_connection=true;MultipleActiveResultSets=True;Pooling=true;"
},
}
The following table explains the connection string parameters:
|
Field |
Description |
|
Data source |
IP address of SQL Server where it is deployed. |
|
Catalog |
Name of Web RA Database. Enter the name of the DB you created in the SQL Server. |
|
User id |
Web RA DB login name.Enter the name of the database user you created in the SQL Server. |
|
Web RA Device |
Web RA DB login password. Enter the password for the user that you created in SQL Server. |
|
|
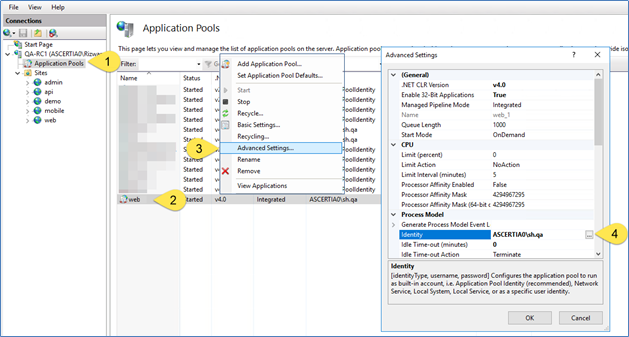
If Windows Authentication is enabled in connection string, you have to configure Windows User in the Application Pool Identity of the relative website in IIS. As shown in below screenshot. |


Users Portal Deployment
Launch the IIS on the server and create a new website.
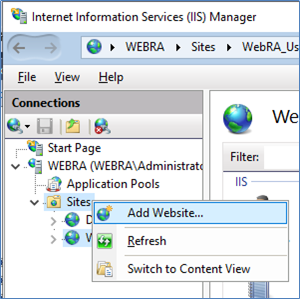
Right click on Sites under IIS server node and select Add Website from the context menu to create a new site.
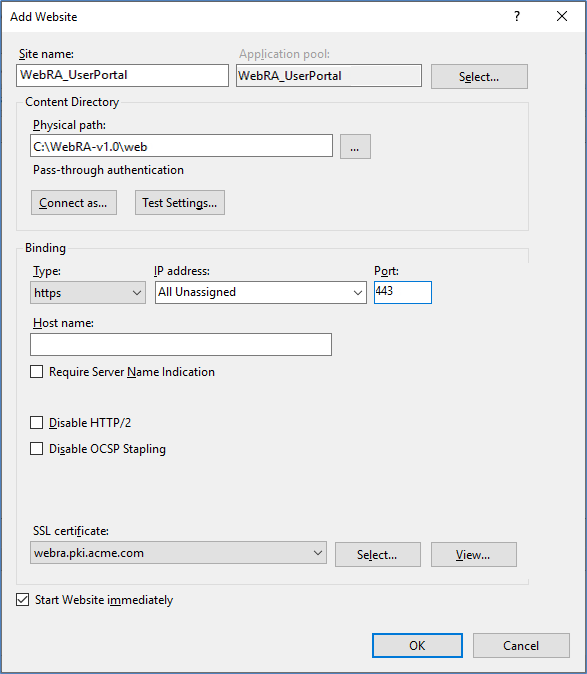
- Provide an easily identifiable site name, it will automatically create a pool with the same name as of the site name.
- To set the content directory click ... to browse the admin directory from the extracted files i.e. C:\WebRA-v1.0\web
- To set the binding of the website set the type HTTPS and port 443. If the User portal is also to be installed on the same machine then change the port for admin from default 443 to something that can be remembered easily by the administrators e.g. 4443 or 9443.
- Set IP address to All Unassigned. All Unassigned IP address means that all the IP addresses are not explicitly assigned to other sites. You have two sites on the same server. The Site A is bound to a specific IP address. If you bind the Site B to All Unassigned, it will not listen on the same IP address as site A, because that address is already assigned.
- For HTTPS binding you need to select an SSL certificate to enable secure communication between the server and the browsers. If you have purchased an SSL, DV SSL, OV SSL or EV SSL certificate then install that certificate and select it. If not, create a self signed certificate and select that as an SSL certificate.
After this, configure the application pool. For this, click on Application Pools option.

Edit the Web application pool and select .Net CLR version as No managed Code and Managed pipeline code as Integrated. Select the Start application pool immediately option and click OK.
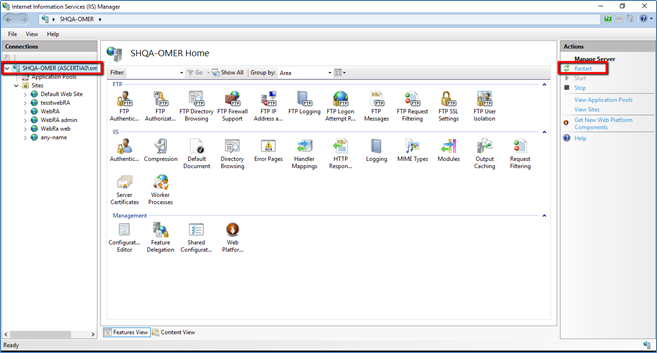
Now select the server name from left panel and restart the server on click Restart link available on the right side.
After successful IIS configuration, create the database using Microsoft SQL server. Once the database is created, execute database scripts in same sequence as mentioned below:
- Execute Full Scripts (for table creation)
- Execute Identity Scripts (for identity table creation)
- Execute Default Scripts (to add default data values in the tables)
- Execute Weak Debian Scripts (to verify if there is any CSR or key pair generated using Weak Debian)
After successful execution of scripts change the connection string values which are placed in the Appsettings.json file, located in the package files folder.
Here is an example how the connection string looks like, configure it according to your database for database connectivity.
{
"ConnectionStrings": {
"RAEntities": "data source=[server address];initial catalog=WebRA;user id=abc;password=password;MultipleActiveResultSets=True;Pooling=true;"
},
}
Here is an example how the connection strings looks like for Windows Authentication, configure it according to your database for database connectivity.
{
"ConnectionStrings": {
"RAEntities": "data source=[server address];initial catalog=[database name];trusted_connection=true;MultipleActiveResultSets=True;Pooling=true;"
},
}
The following table explains the connection string parameters:
|
Field |
Description |
|
Data source |
IP address of SQL Server where it is deployed. |
|
Catalog |
Name of Web RA Database. Enter the name of the DB you created in the SQL Server. |
|
User id |
Web RA DB login name.Enter the name of the database user you created in the SQL Server. |
|
Web RA Device |
Web RA DB login password. Enter the password for the user that you created in SQL Server. |
If Windows Authentication is enabled in connection string, you have to configure Windows User in the Application Pool Identity of the relative website in IIS. As shown in below screenshot.