Web RA Scanner Utility
Web RA Scanner Utility
The Web RA Scanner utility simplifies the process of importing certificates into the Web RA application. It allows users to scan local machines or network locations for certificates and then choose to either export them to a CSV file, send them directly to the Web RA application, or do both.
How to Operate Web RA Scanner Utility
Open the Web RA Scanner Utility
1. Unzip the Scanner Utility folder you received, open the unzipped folder and locate the WebRA.Scanner.exe file, which will have the Ascertia logo next to it.
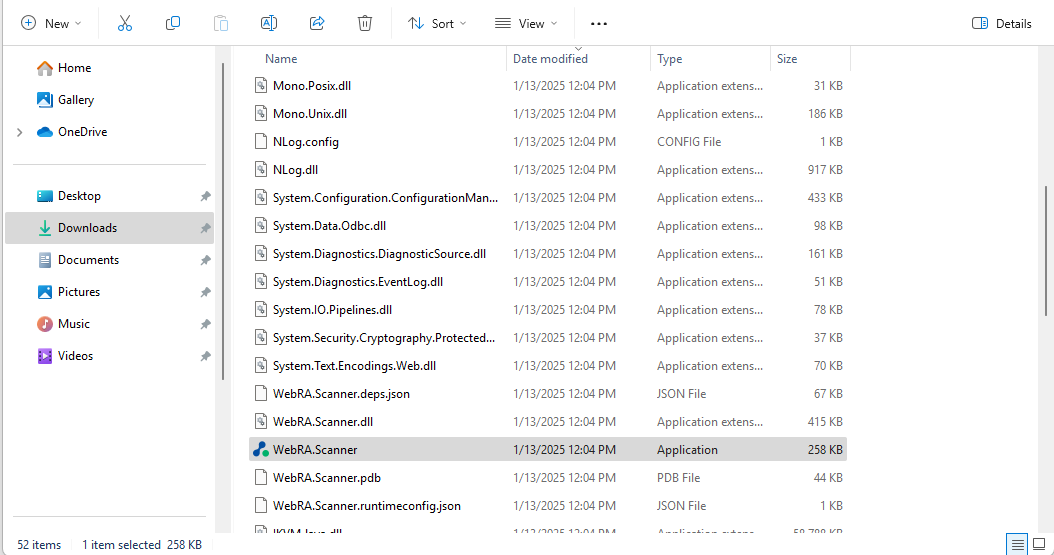
Note: The Web RA Scanner utility requires administrator access to function correctly.
2. To open the Web RA scanner with administrator privileges, right-click on the application icon and select ‘Run as administrator’ from the context menu.
3. If prompted by the User Account Control (UAC), a security feature in Windows, click Yes to grant the necessary permissions for the utility to run with administrative rights.
Once permission is granted, the Web RA Scanner utility will open and appear on your screen, ready for use.
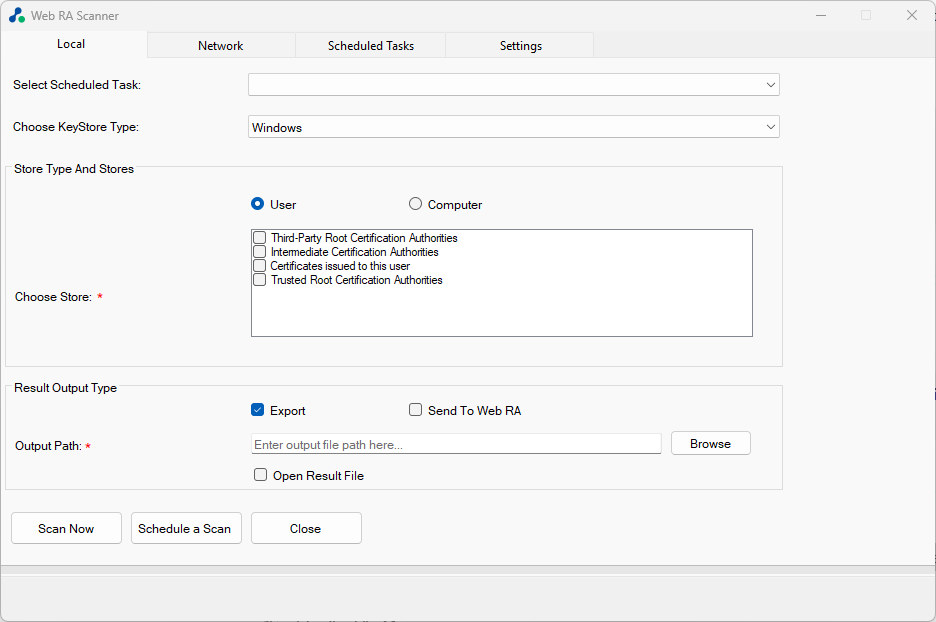
The Web RA Scanner utility interface consists of four sections:
- Local
- Network
- Scheduled Tasks
- Settings
By default, the ‘Local’ tab will appear on the screen when the utility is launched.
Note: If you want to directly import certificates from your local computer or a shared network location to your Web RA application after completing the scan, you must first configure the Web RA API in the ‘Settings’ tab of the Web RA Scanner.
For the configuration of Web RA API in the Web RA Scanner, click on the Settings button present in the header row. The ‘Configuration Settings’ will appear.
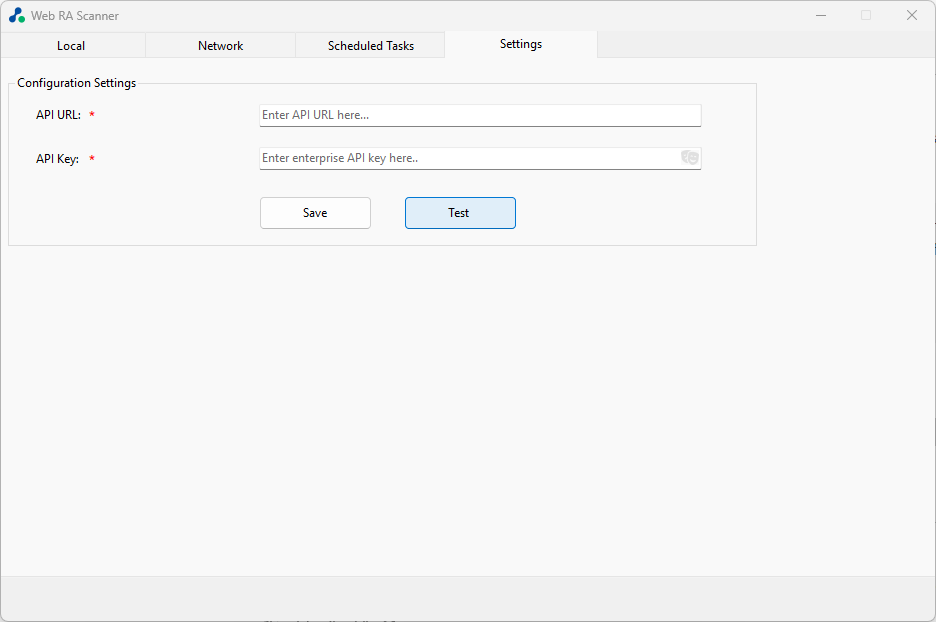
On this screen, you will see two mandatory fields:
- API URL: Enter the URL of the ADSS Web RA API in this field.
- API Key: Enter your enterprise API key here. You can retrieve the API key from the Enterprises section of the Web RA application. To generate the key, navigate to: Enterprises > Registered Enterprise > Integrations > Enterprise API Keys.
- After entering the API URL and API Key details, click the ‘Save’ button to configure your Web RA application in the Web RA Scanner.
Once you click ‘Save’, the scanner will display a confirmation message indicating that your settings have been successfully saved.
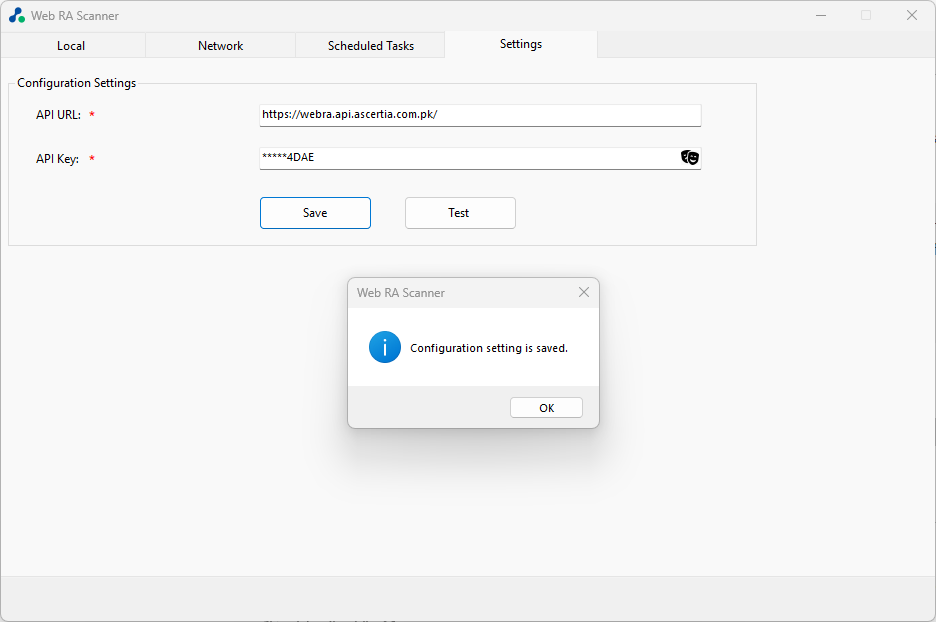
Click ‘Ok’ to close this confirmation message.
You can click the ‘Test’ button to verify if the saved configurations are working correctly. If the configurations are working, the scanner will display a dialog confirming that the connection is working.
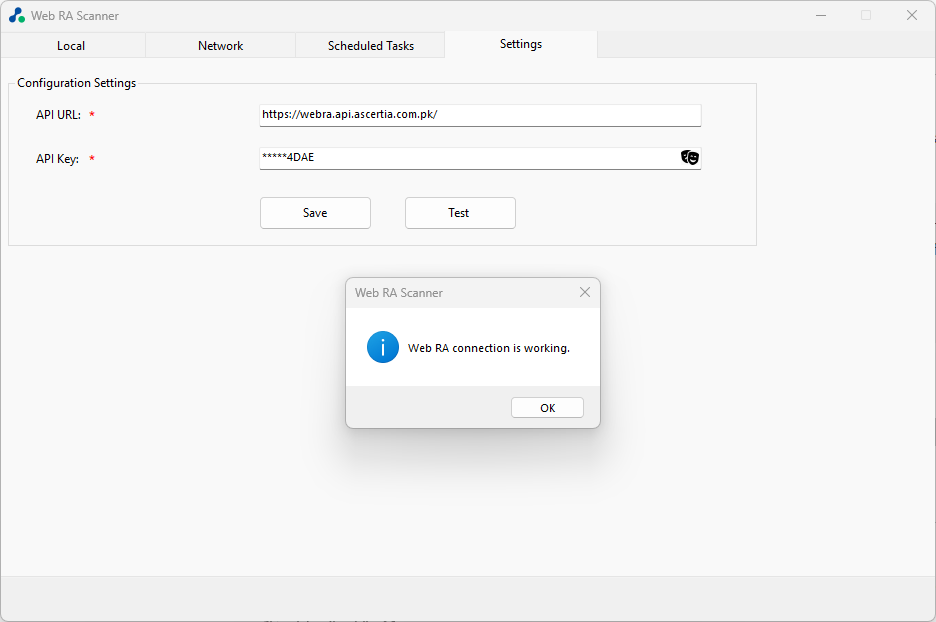
Click the ‘Ok’ button to close the dialog.
Note: If the dialog states that "the connection is not working," ensure that the API details you provided are accurate. After making any necessary corrections, click the ‘Test’ button again to verify the connection.
Local - Scan Certificates from Local Machine
The ‘Local’ section in the Web RA Scanner helps users locate and manage certificates stored on their computer. Users can scan their machine to identify available certificates and choose to export them to a CSV file, send them directly to the Web RA application, or perform both actions simultaneously.
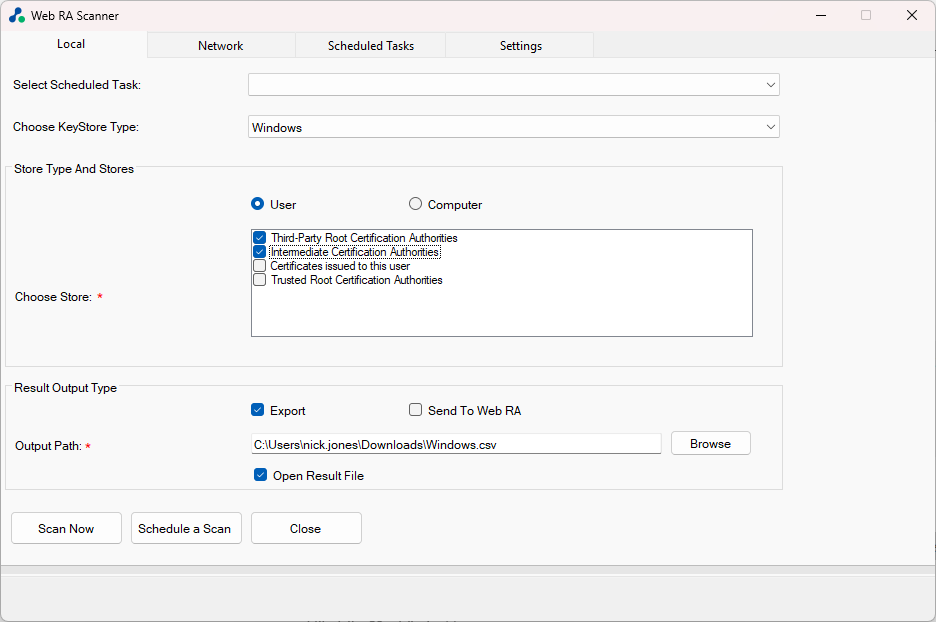
The following tabs are available under the Local tab when you access it.
Select Scheduled Task: This dropdown displays all the scanning tasks scheduled in the Web RA Scanner. When you select a task from the dropdown list, all options on the Scanner screen will automatically adjust to the settings configured for that task.
To remove the scheduled task and its settings from the Local screen, click the cross icon located on the right side of the dropdown.
Choose KeyStore Type: This dropdown allows you to choose from where the scanner should search for the certificates. There are two supported KeyStore Types in the Scanner:
- Windows: Select this option to scan certificates stored in the Windows Certificate Store.
- Java: Select this option to scan certificates stored in a Java Keystore (JKS).
Store Types and Stores: This section allows you to choose where the scanner should search for certificates.
When you select ‘Windows’ as the KeyStore type, the Scanner will provide two options to choose from, which are:
- User
- Computer
User: Scans the certificate stores associated with the currently logged-in user. These certificates are specific to the user account.
Computer: Scans the certificate stores associated with the entire computer. These certificates are available system-wide.
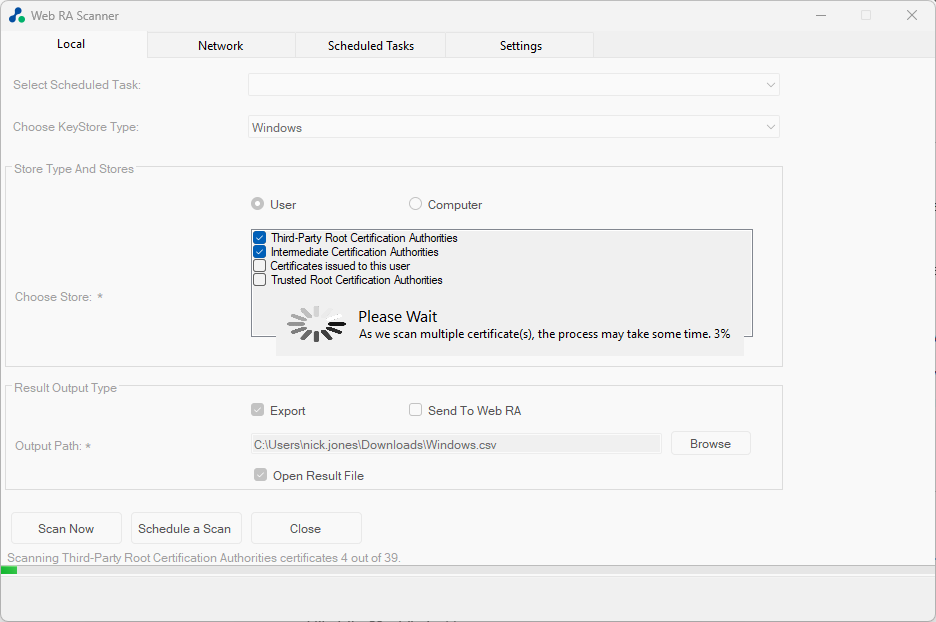
After selecting the required store type (User or Computer), choose the appropriate certificate store from the list (such as Third-Party Root Certification Authorities, Intermediate Certification Authorities, Certificates issued to this user, Trusted Root Certification Authorities) to proceed.
When you select ‘Java’ as the KeyStore type, the Scanner will provide two options to choose from, which are:
- Auto
- Manual
Auto: If the ‘Auto’ option is selected, you will be prompted to choose the directory where the Java KeyStore files are located. After selecting the directory, click on the ‘Scan Directory’ button to scan for files in that directory. The scanner will display the files in the ‘Choose File’ box. Select the required files to proceed.
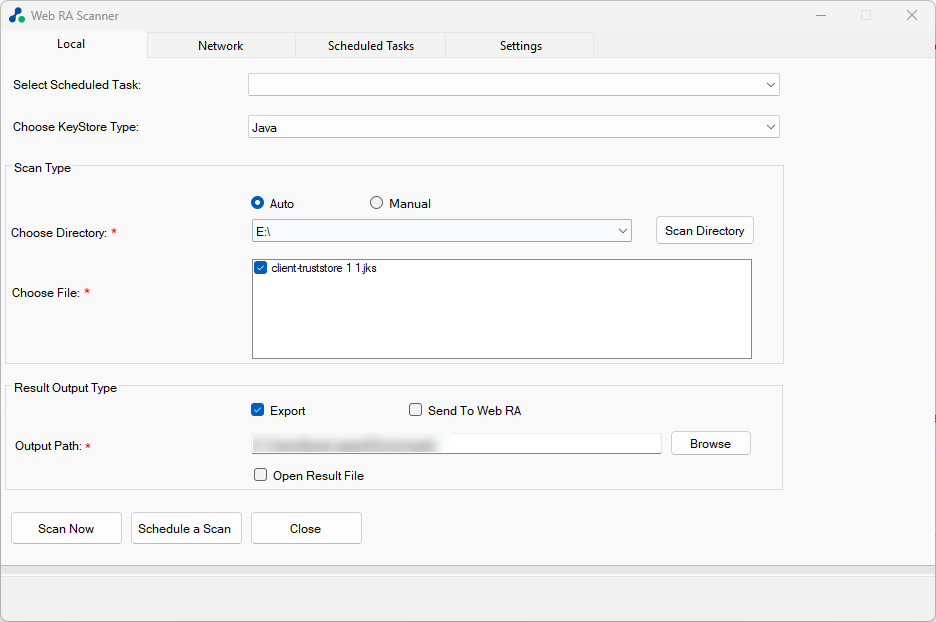
Manual: If the ‘Manual’ option is selected, you will need to manually enter the directory path in the ‘Directory Path’ field. After entering the directory path, click on the ‘Scan Directory’ button to scan the files in the mentioned directory. The scanner will display the files in the ‘Choose File’ box. Select the required files to proceed.
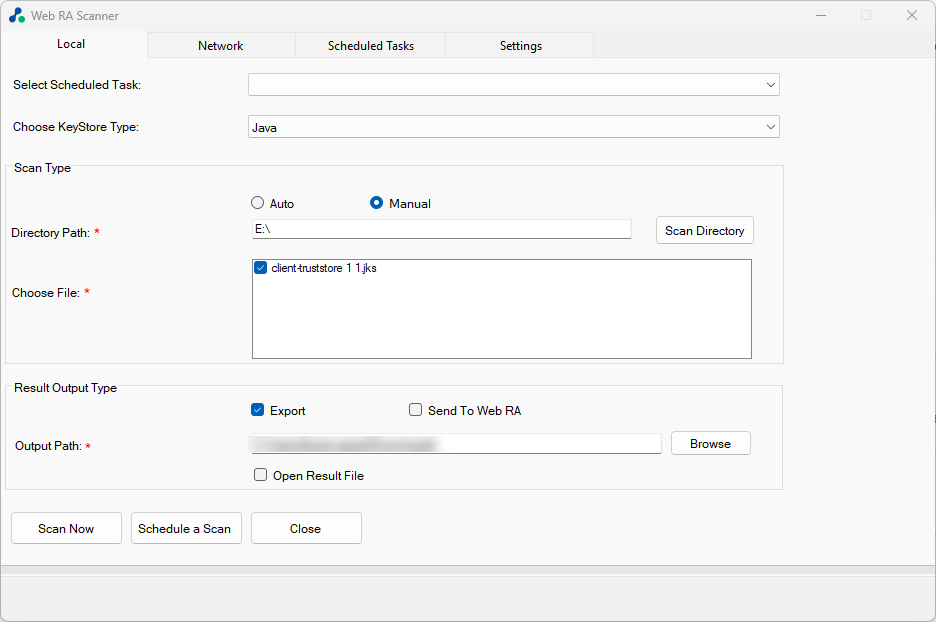
Result Output Type: This section allows users to choose what to do with the certificates after they are scanned. It provides two options:
Export:
- This option lets you save the certificates in the form of a CSV file.
- If you select this option, you must provide the output file path, where the CSV file will be saved. Enter or browse the output file path in the ‘Output Path’ field.
Send to Web RA:
- This option allows you to send the scanned certificates directly to the Web RA application.
Users can choose to select either one option or both. If you select both options, the scanner will save the certificates as a CSV file and send them to Web RA simultaneously.
Open Result File: Enable this option if you want to view the CSV file immediately after the scan is complete.
Scan Now
Once all the configurations are complete, click the ‘Scan Now’ button to begin the certificate scan. When you click the ‘Scan Now’ button, the scanner will begin scanning for certificates based on the selected criteria.
Schedule a Scan
You can also schedule the scan for a later date and time. To do so, click the ‘Schedule a Scan’ button. This will open the ‘Task Scheduler’ dialog on the screen.
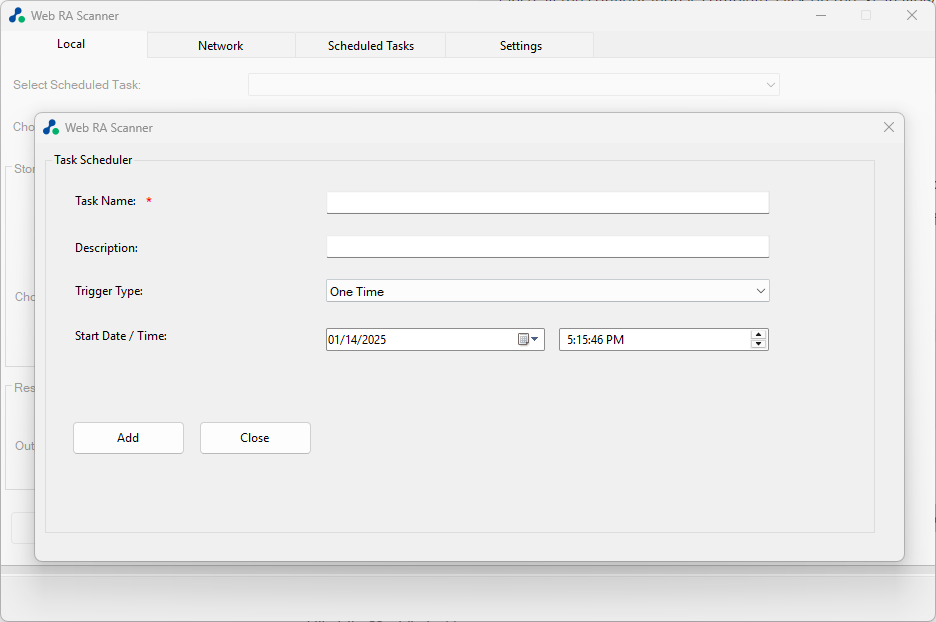
The Task Scheduler dialog displays the following fields:
Task Name: Specify the name of the task for scanning certificates. (This field is mandatory)
Description: Add a description for the task that you are scheduling.
Trigger Type: Choose how often you want the scanner to scan for certificates. Two options are available in the dropdown:
- One Time: Select this option if you want the scan to run only once, at the specified date and time.
- Custom: Select this option if you want the scan to occur after the specified number of days.
Note: If you select the Custom option, a field labeled ‘Recur every: (Number) days’ will appear. This field allows you to specify the number of days after which the scanner will run the scan again.
After specifying all the details, click the ‘Add’ button to schedule the scan task. A confirmation dialog will appear on the screen, indicating that the task has been successfully scheduled.
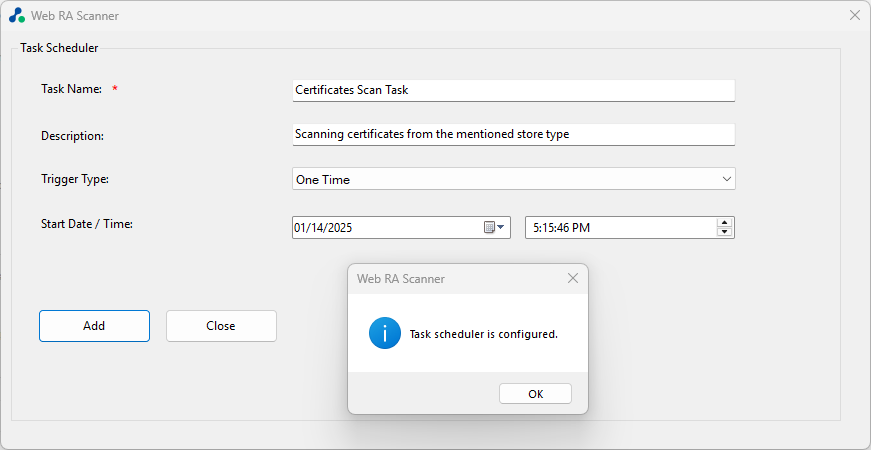
Click ‘Ok’ to proceed.
Network - Scanning Certificates from Network Locations
The ‘Network’ section of the Web RA Scanner allows you to scan for certificates from various network locations.
The following tabs are available under the Local section when you access it.
Select Scheduled Task: This dropdown displays all the scanning tasks scheduled in the Web RA Scanner. When you select a task from the dropdown list, all options on the Scanner screen will automatically adjust to the settings configured for that task.
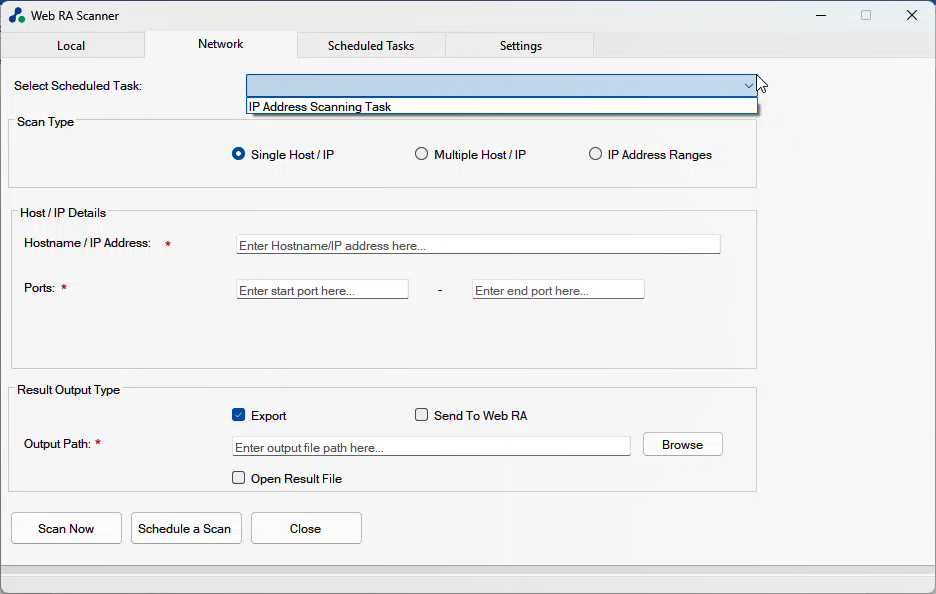
To remove the scheduled task and its settings from the Local screen, click the cross icon located on the right side of the dropdown.
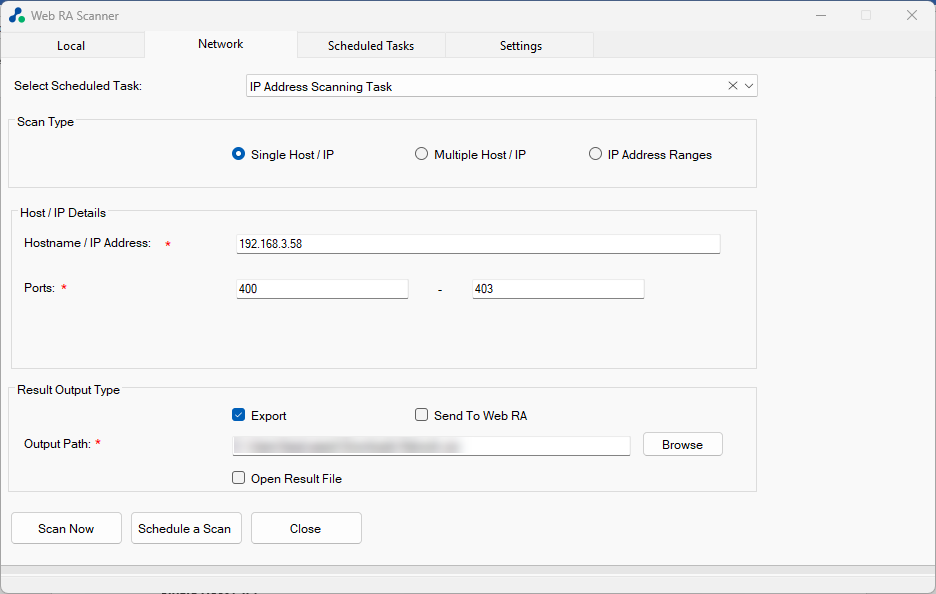
Scan Type: Select the type of scan you want to perform. Three scan types are available here:
- Single Host / IP: Select this option if you want to scan a single host or IP address.
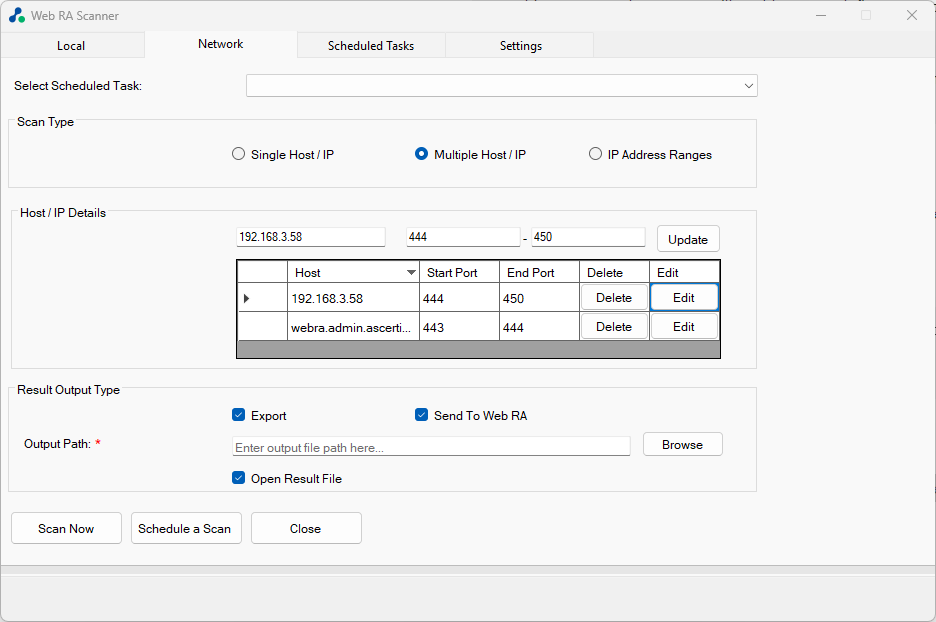
- Multiple Host / IP: Choose this option to scan multiple hosts or IP addresses. You can specify each IP or host individually.
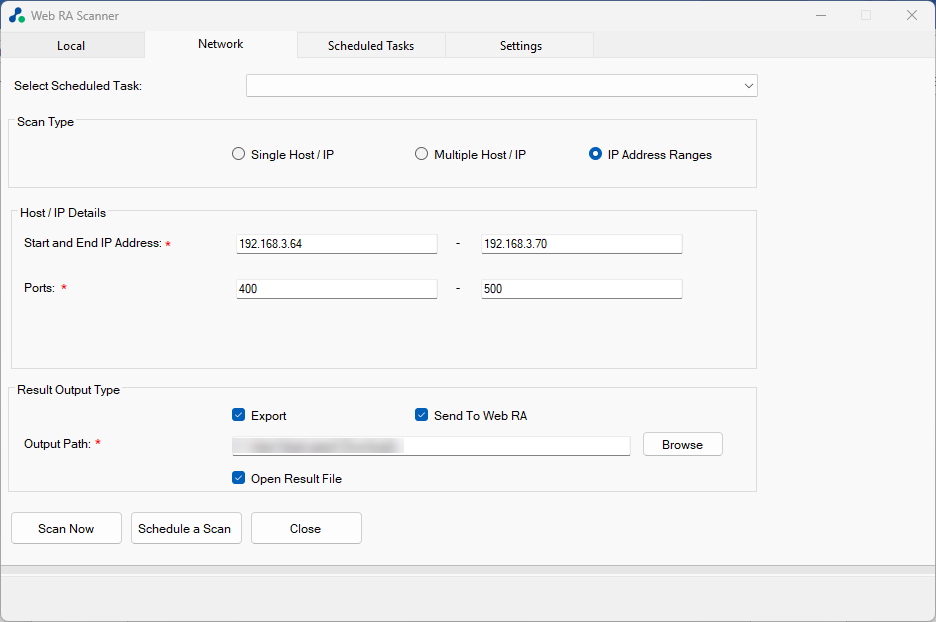
- IP Address Ranges: Select this option to scan a range of IP addresses. You can specify a start and end IP address to define the range.
Host / IP Details: This area behaves according to the selected Scan Type. Details are explained below:
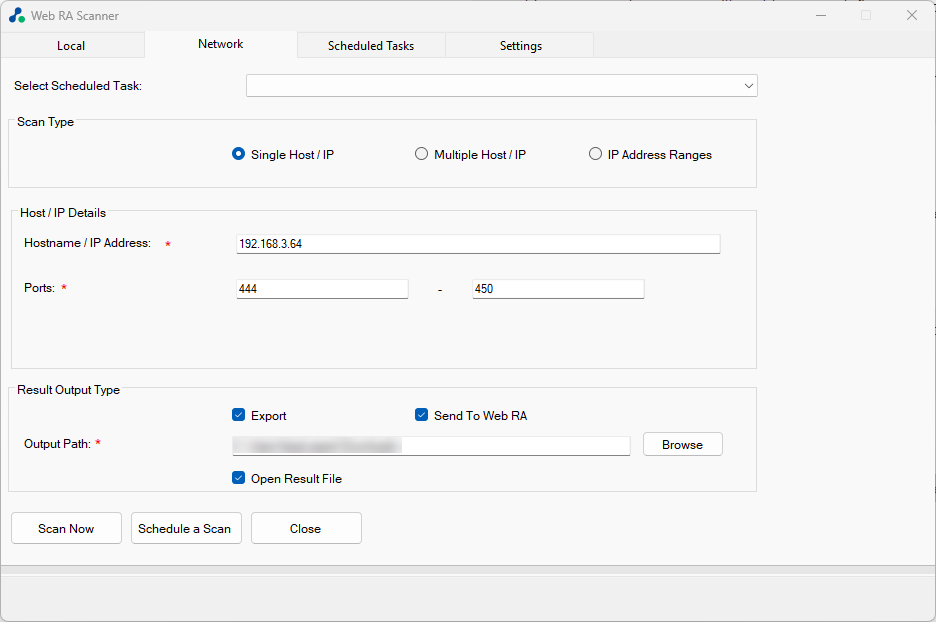
Single Host / IP:
For this scan type, the scanner displays two text fields:
- Hostname / IP Address
- Ports
You will need to enter the Hostname or the IP Address in the designated field. Additionally, you must specify the port range, which defines the starting and ending port numbers that the scanner will check for certificates.
Multiple Host / IP:
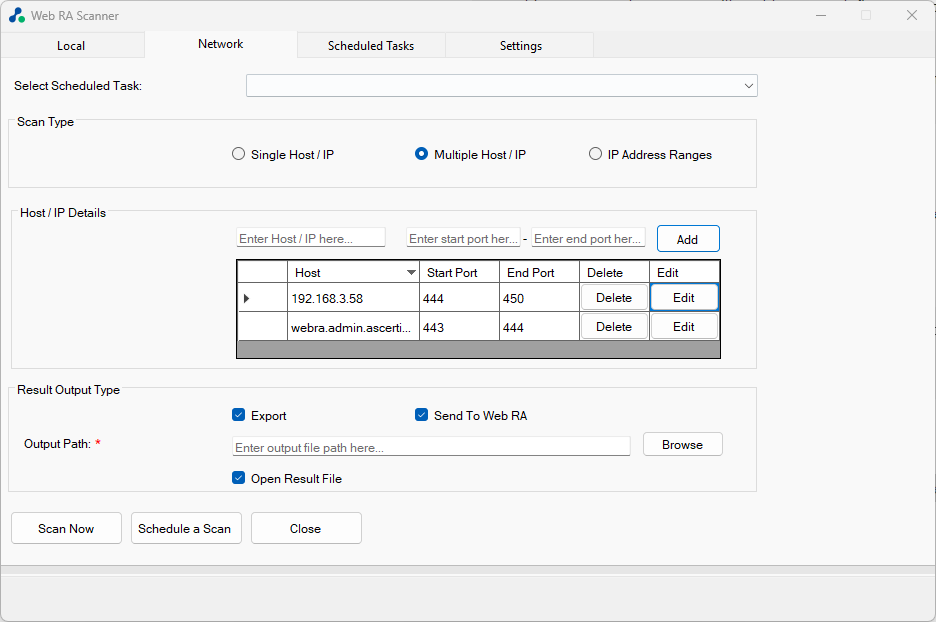
If this Scan Type is selected, the scanner allows you to add multiple Hostnames or IP addresses, each with their respective port ranges for certificate scanning.
Following fields will be available for this Scan Type:
- A text field to specify the Hostname or IP Address
- Port range fields to define the starting and ending port numbers
- An ‘Add’ button: After entering the Hostname/IP Address and port details, click this button to add the entry to the listing table below
The sections displayed in the listing table include Host, Start Port, End Port, Delete, and Edit. Users can delete or edit entries directly from the listing table. Clicking the ‘Delete’ button next to an entry will permanently remove that entry.
On the other hand, clicking the ‘Edit’ button next to an entry will populate the text fields (Host/IP Address, Ports) with the details of that entry. Users can then modify the values and click the ‘Update’ button to save the changes.
IP Address Ranges:
For this Scan Type, the scanner allows you to specify a range of IP addresses and their corresponding port ranges in the appropriate fields.
Result Output Type: The Result Output section allows users to choose what to do with the certificates after they are scanned. It provides two options:
Export:
- This option lets you save the certificates in the form of a CSV file.
- If you select this option, you must provide the output file path, where the CSV file will be saved. Enter or browse the output file path in the ‘Output Path’ field.
Send to Web RA:
- This option allows you to send the scanned certificates directly to the Web RA application.
Users can choose to select either one option or both. If you select both options, the scanner will save the certificates as a CSV file and send them to Web RA simultaneously.
Open Result File: Enable this option if you want to view the CSV file immediately after the scan is complete.
Once all the configurations are complete, click the ‘Scan Now’ button to begin the certificate scan. When you click the ‘Scan Now’ button, the scanner will begin scanning for certificates based on the specified criteria.
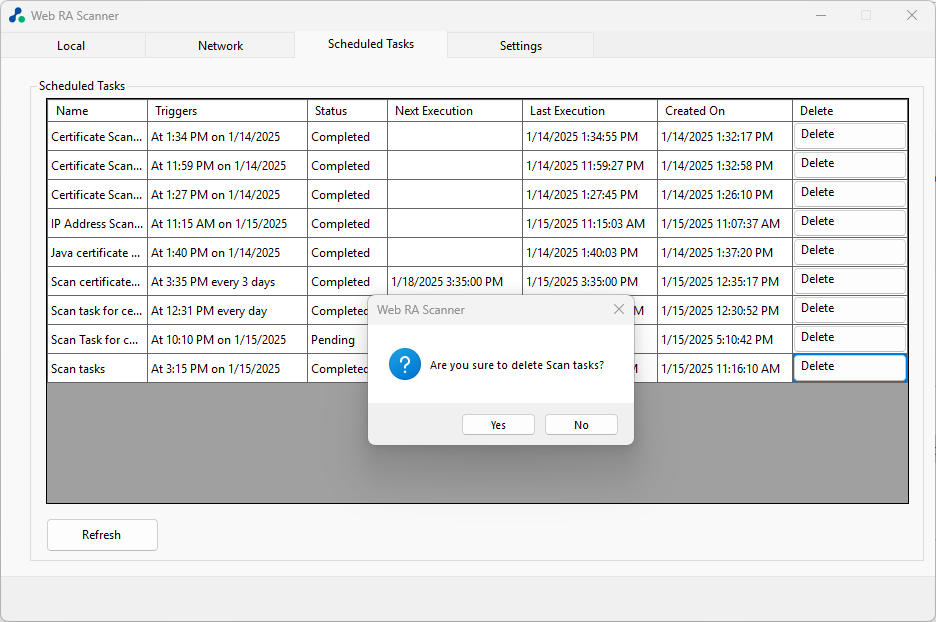
This section displays all the scanning tasks that have been scheduled from both the Local and Network tabs.
The tasks are presented in a list, which includes the following details:
Name: Displays the name of the scanning task. The name is specified when the task is being scheduled.
Triggers: Shows the time and date when the scan is scheduled to run. For recurring tasks, this section displays the execution time along with the interval in days.
For example:
- If the task is scheduled to run after 1 day, the section will show the time with the text ‘everyday’
- If the task is scheduled to run after every 3 days, the section will display the text ‘every 3 days’ alongside the time.
Status: Displays the current status of the task. If the scan is scheduled for a future date and time, the status will show ‘Pending’. If the scheduled scan is completed, the status will show ‘Completed’.
Next Execution: Displays the date and time at which the next execution will be performed.
- For one-time tasks, this section shows the date and time when the scan will occur.
- For recurring tasks, it displays the date and time of the next execution, even if the status of the task appears as ‘Completed’.
Last Execution: Displays the date and time at which the last scan was performed. This section will appear empty if the task is still in a Pending state.
Created On: Displays the date and time at which the task was created.
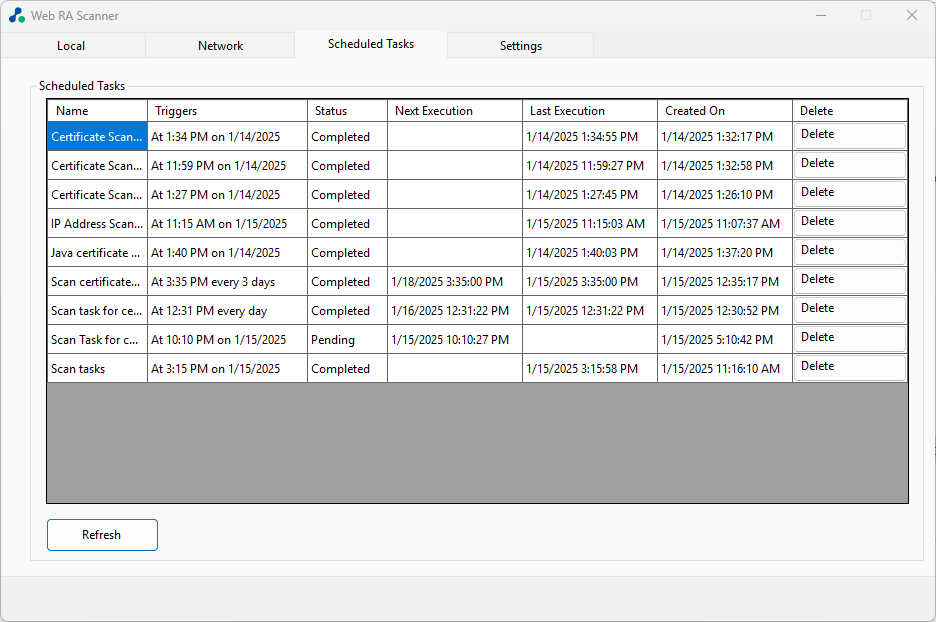
Delete: Allows users to delete a task from the Scheduled Tasks list. Clicking the ‘Delete’ button next to a task (whether pending or completed) will trigger a confirmation dialog. Users have to confirm the action by selecting Yes, or cancel it by selecting No.
Refresh: Updates the listing table to show the latest details of all scheduled tasks.