
Unified Certificate Requests
This page provides information about managing certificate requests generated using a Unified Certification Profile. It explains how to create and view certificate requests and perform certificate lifecycle operations, including downloading, revoking, renewing, reissuing, and rekeying certificates associated with a request.
- How to Create a Certificate Request
- How to Create a Token-based Certificate Request
- How to Revoke a Certificate
- How to Reissue a Certificate
- How to Renew a Certificate
- How to Rekey a Certificate
- Certificate Linting
- How Download Certificate or Certificate PFX
- How to Delete a Certificate
How to Create a Certificate Request
To create certificate requests using the Unified Certification Profile, expand Certificate Center > Certificate Requests from the left-tree menu in the Web portal.
Click on the ‘+’ button in the listing header to create a new certificate request. The system will display the ‘Create Request’ screen.
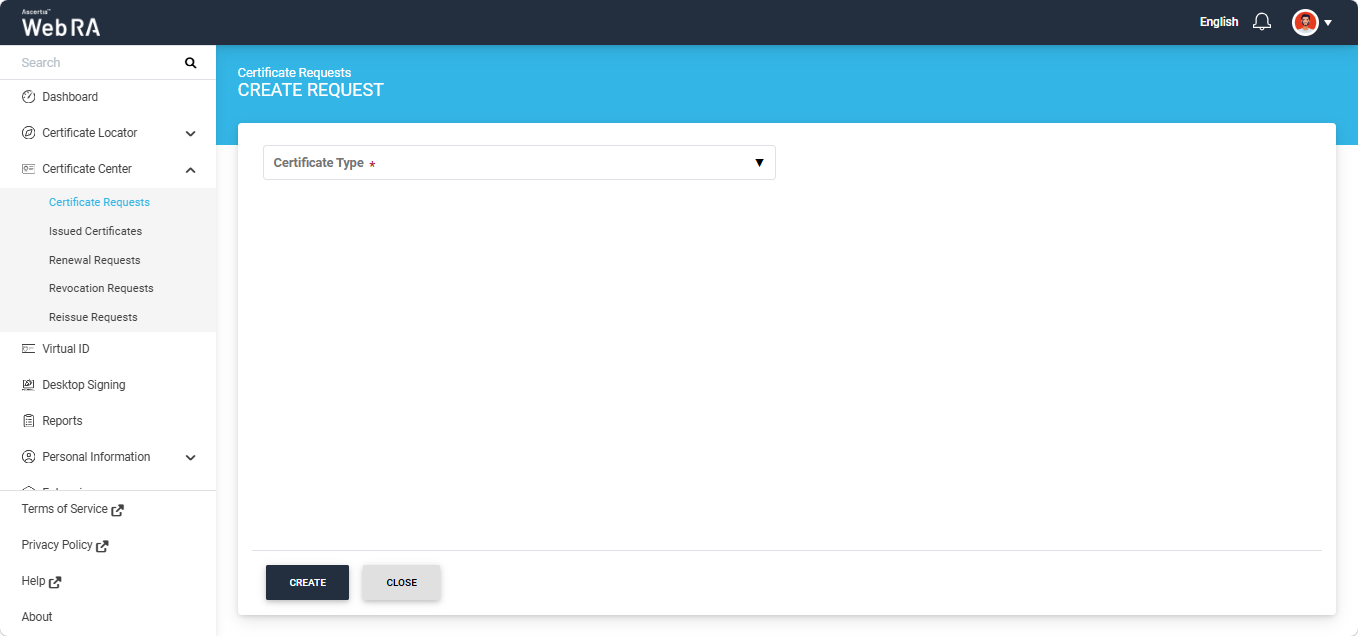
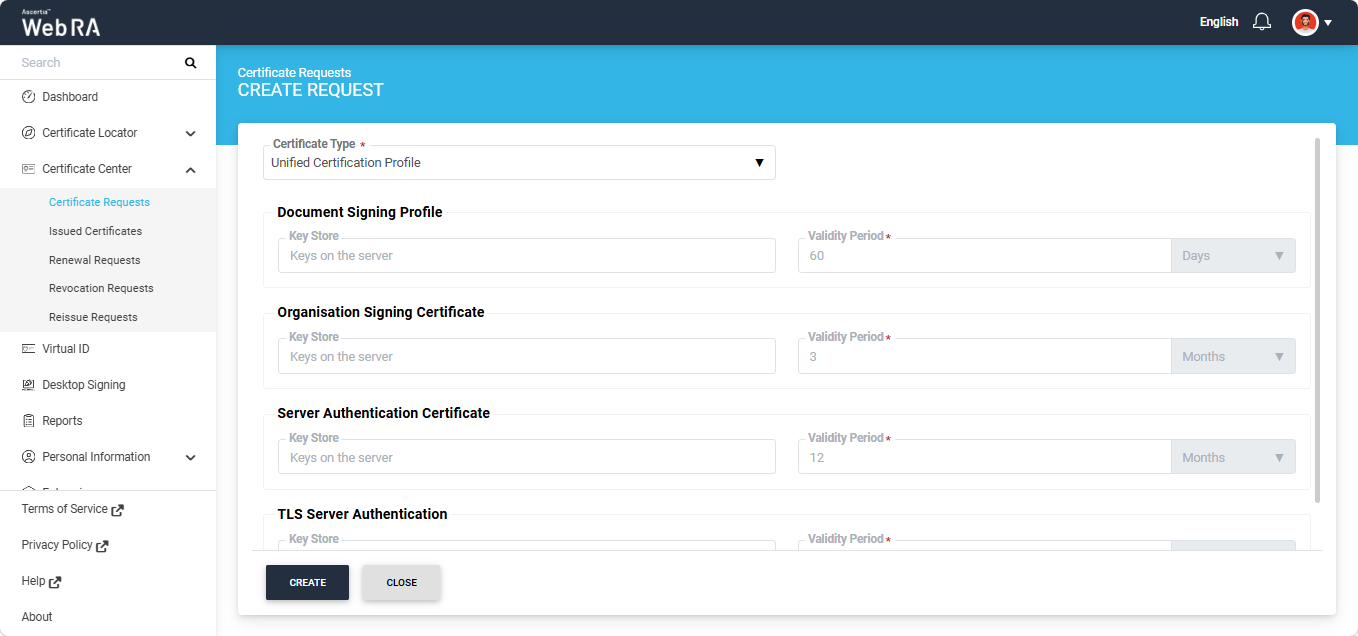
On this screen, select the required Unified Certification Profile from the ‘Certificate Type’ dropdown.
The system will display all the certification profiles selected under the Unified Certification Profile, along with their Key Store and Validity Period details.
|
|
Note: Go Sign Desktop version 8.4.2.1 is required to generate certificates from a Unified Certification Profile containing Token-based or MSCAPI-type certification profiles. |

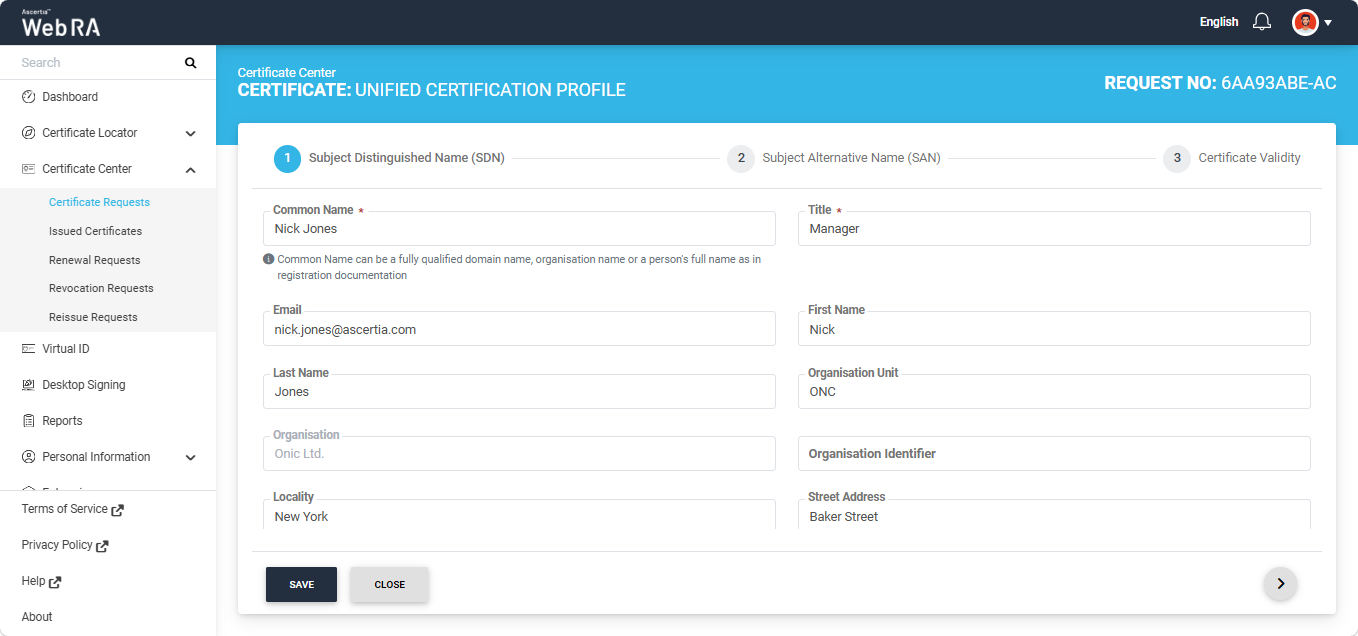
Click the ‘Create’ button to proceed. The system will display the ‘Subject Distinguished Name (SDN)’ screen.
|
|
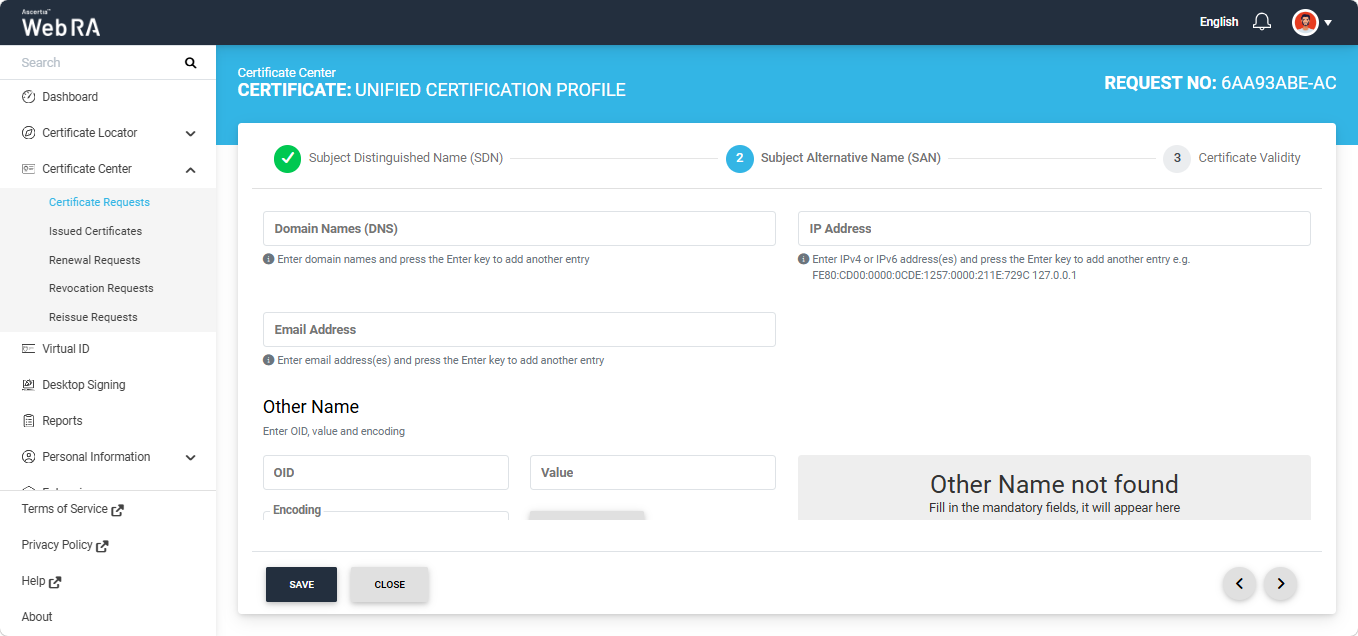
Note: The system combines the SDN fields configured in all the certification profiles selected in the Unified Certification Profile and displays them on the ‘Subject Distinguished Name (SDN)’ screen. If the same SDN field is configured in multiple certification profiles, that field is displayed only once on the SDN screen during certification request creation. For example, if the Common Name SDN is configured in two certification profiles, the ‘Common Name’ field will appear only once on the SDN screen. The SDN fields displayed on the SDN screen are not included in all the certificates generated using the Unified Certification Profile. Each certificate will contain only the SDN fields configured in its respective certification profile. For example, if the Common Name SDN is configured in one certification profile but not in another, the ‘Common Name’ field will be displayed on the SDN screen, but the certificate generated using the certification profile without the Common Name configuration will not contain the Common Name attribute. Enter the details in the SDN fields as per your requirement and click the next ‘>’ button to proceed to the Subject Alternative Name (SAN) screen. |
|
|
Note: The system combines the SAN fields configured in all the certification profiles selected in the Unified Certification Profile and displays them on the ‘Subject Alternative Name (SAN)’ screen. If the same SAN field is configured in multiple certification profiles, that field is displayed only once on the SAN screen during certification request creation. For example, if the Domain Names (DNS) field is configured in two certification profiles, the ‘Domain Names (DNS)’ field will appear only once on the SAN screen. The SAN fields displayed on the SAN screen are not included in all the certificates generated using the Unified Certification Profile. Each certificate will contain only the SAN fields configured in its respective certification profile. For example, if the Domain Names (DNS) field is configured in one certification profile but not in another, the ‘Domain Names (DNS)’ field will be displayed on the SAN screen, but the certificate generated using the certification profile without the Domain Names (DNS) configuration will not contain the Domain Names (DNS) attribute. Enter the details in the SDN fields as per your requirement and click the next ‘>’ button to proceed to the Certificate Validity screen. |
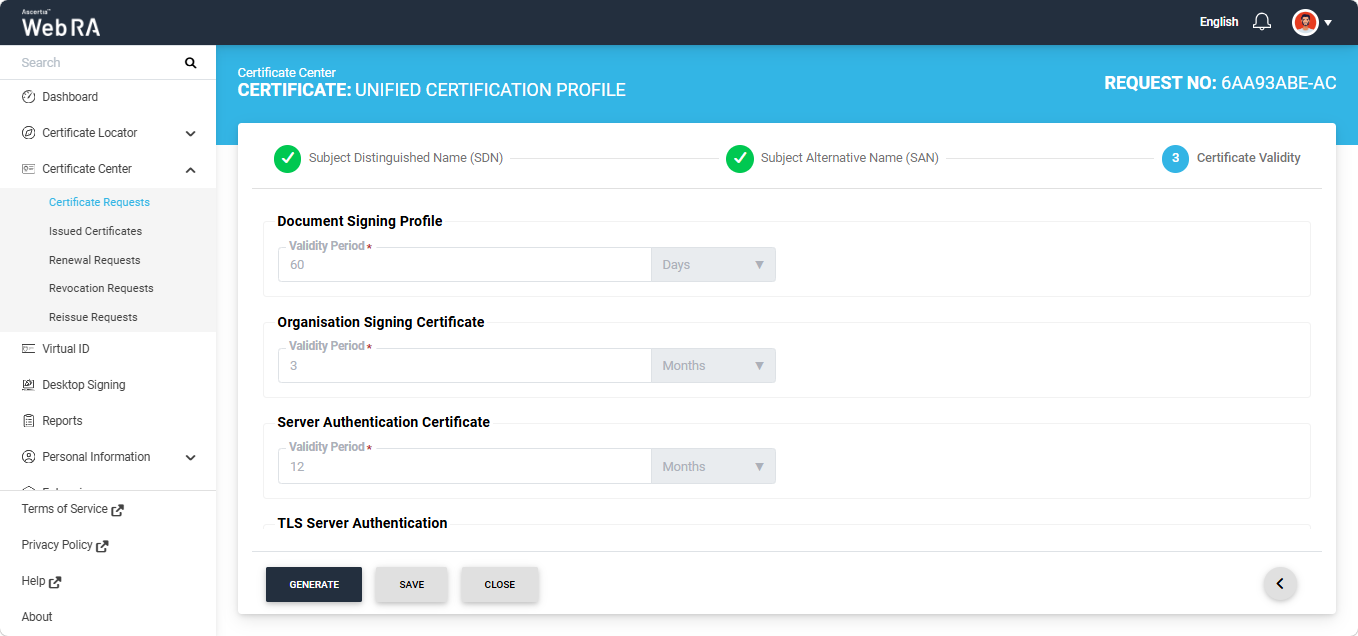
The validity period of each certification profile is displayed on this screen. The ‘Validity Period’ field appears enabled or disabled according to the configuration of each certification profile.
Click the ‘Generate’ button to generate the certificate requests.
|
|
Note: If a Subscriber Agreement is configured in any or all of the profiles, each agreement is displayed on the screen one by one. You must agree to all the agreements to generate the certificates. |
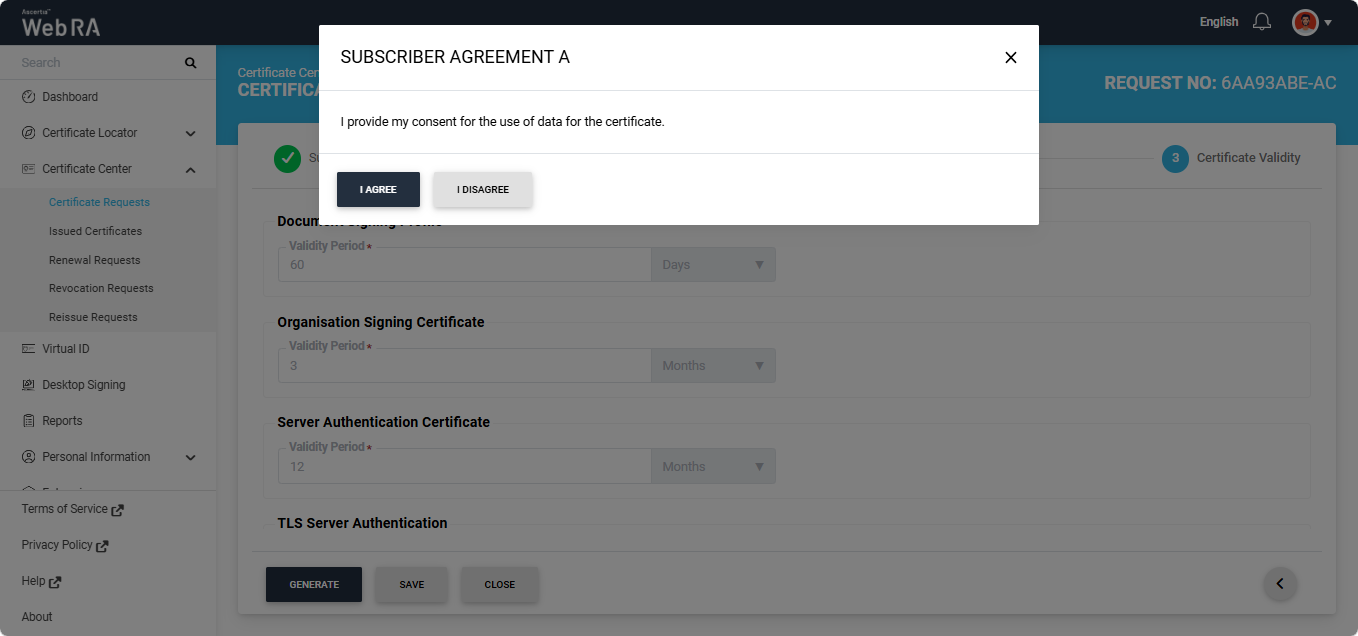
Click ‘I Agree’ to proceed. The system will take some time to process the certificate requests. Once the processing is complete, the certificate will be generated and appear in the Certificate Requests and Issued Certificates listing screen.
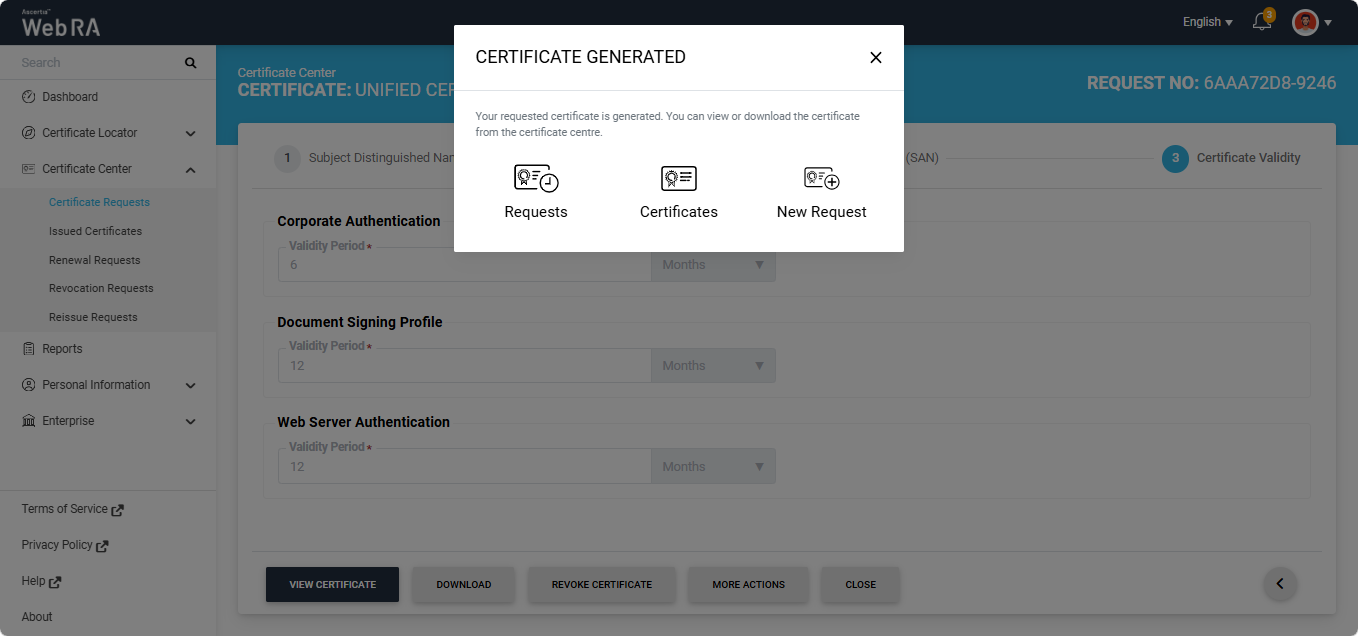
The system will display the Certificate Generated dialog on the screen.
The certificates generated using a Unified Certification Profile are grouped under a single main request number in the Issued Certificates listing.
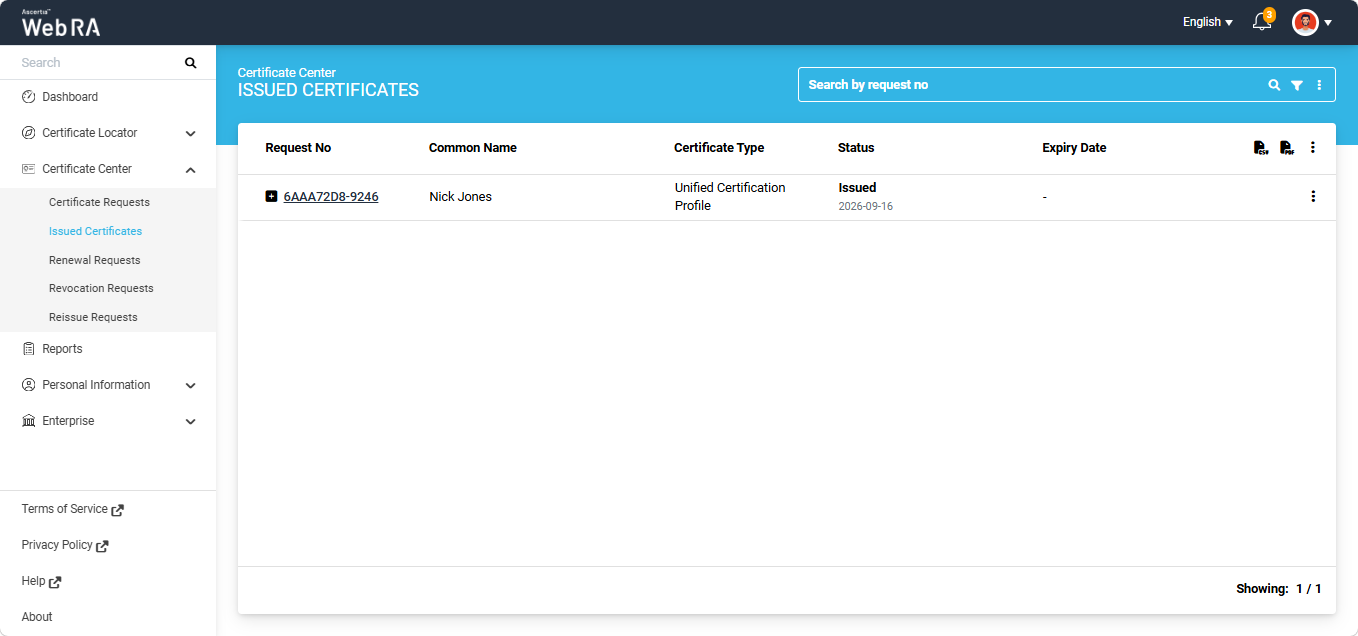
A ‘+’ button appears next to the main request number. Click the ‘+’ button to expand the request and view the list of all certificates generated under the Unified Certification Profile. Each certificate in the list has its own request number.
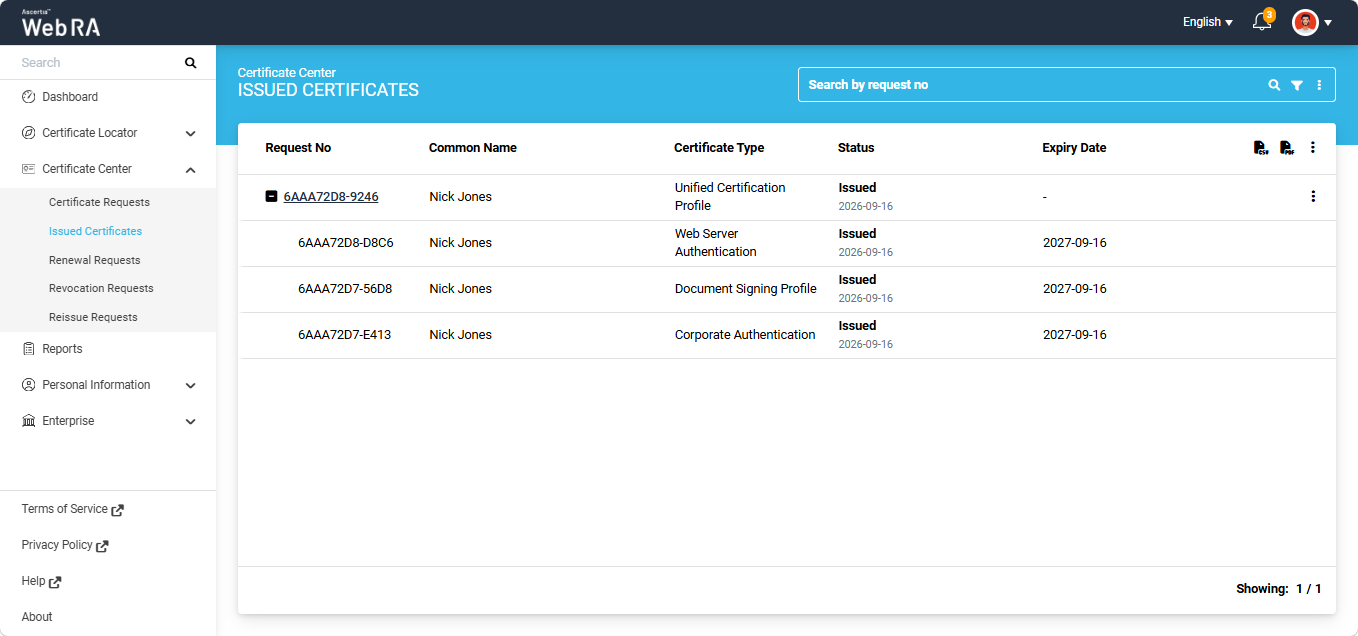
|
|
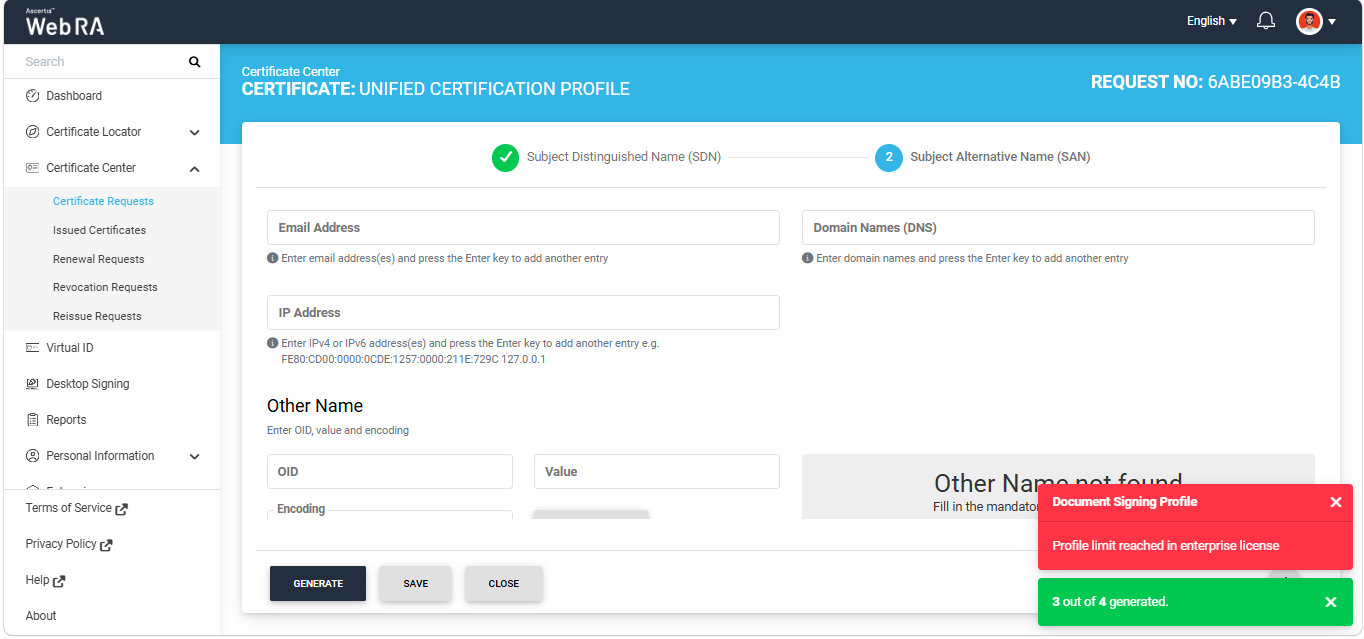
Note: If an issue occurs while generating one or more certificates in a Unified Certification Profile, the certificates that can be generated successfully are issued, while the certificates affected by the issue are not generated. For example, if a Unified Certification Profile contains four certification profiles and the enterprise licence limit has been reached for one of them, the system generates the other three certificates and displays a success alert indicating that three out of four certificates were generated. An error alert also appears, describing the issue that prevented the fourth certificate from being generated. The same behaviour applies to other issues that prevent certificate generation. The ‘Generate’ button remains available for the certificate request. Resolve the issue indicated in the error alert and click ‘Generate’ again to generate the remaining certificate(s). |
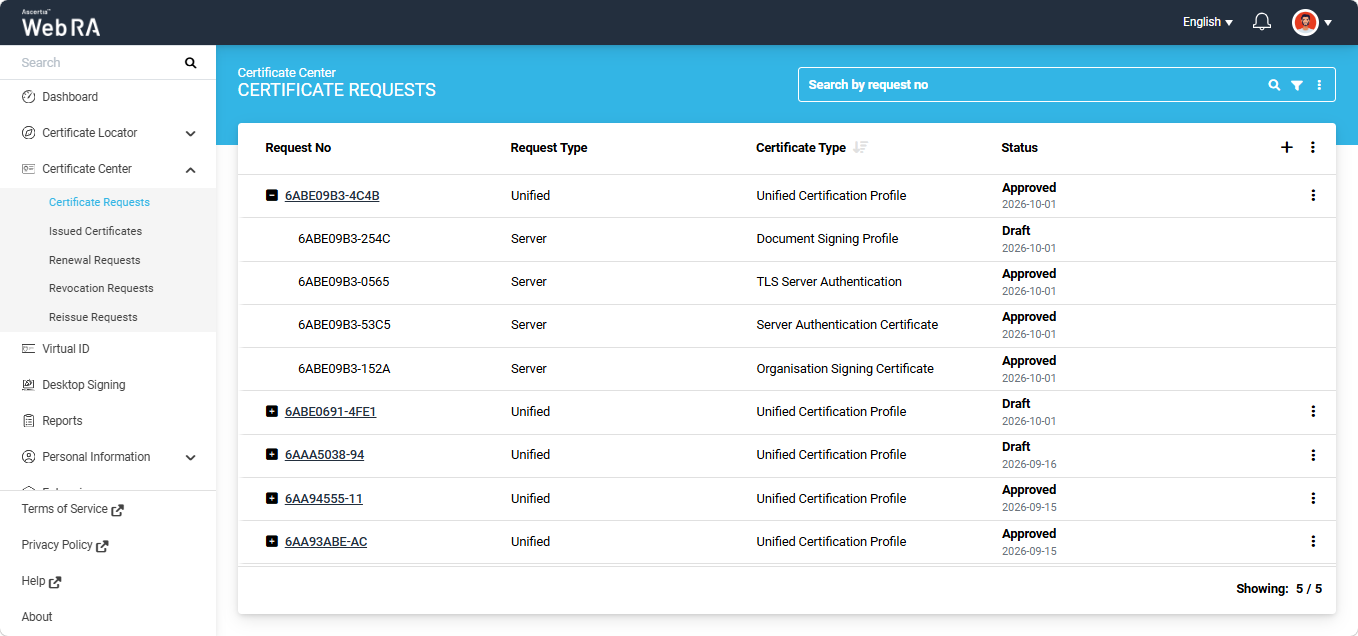
The Unified Certificate Request appears in the "Certificate Requests" listing. When the request is expanded, the certificates that were generated successfully display the ‘Approved’ status, while the certificate(s) that could not be generated display the ‘Draft’ status. The Unified Certificate Request moves to the "Issued Certificates" listing only after all certificates associated with the request have been generated successfully and approved.
Expand Certificate Center > Issued Certificates from the left-tree menu in the Web portal.
The certificates generated using a Unified Certification Profile are grouped under a single main request number in the Issued Certificates listing.
A ‘+’ button appears next to the main request number. Click the ‘+’ button to expand the request and view the list of all certificates generated under the Unified Certification Profile. Each certificate in the list has its own request number.
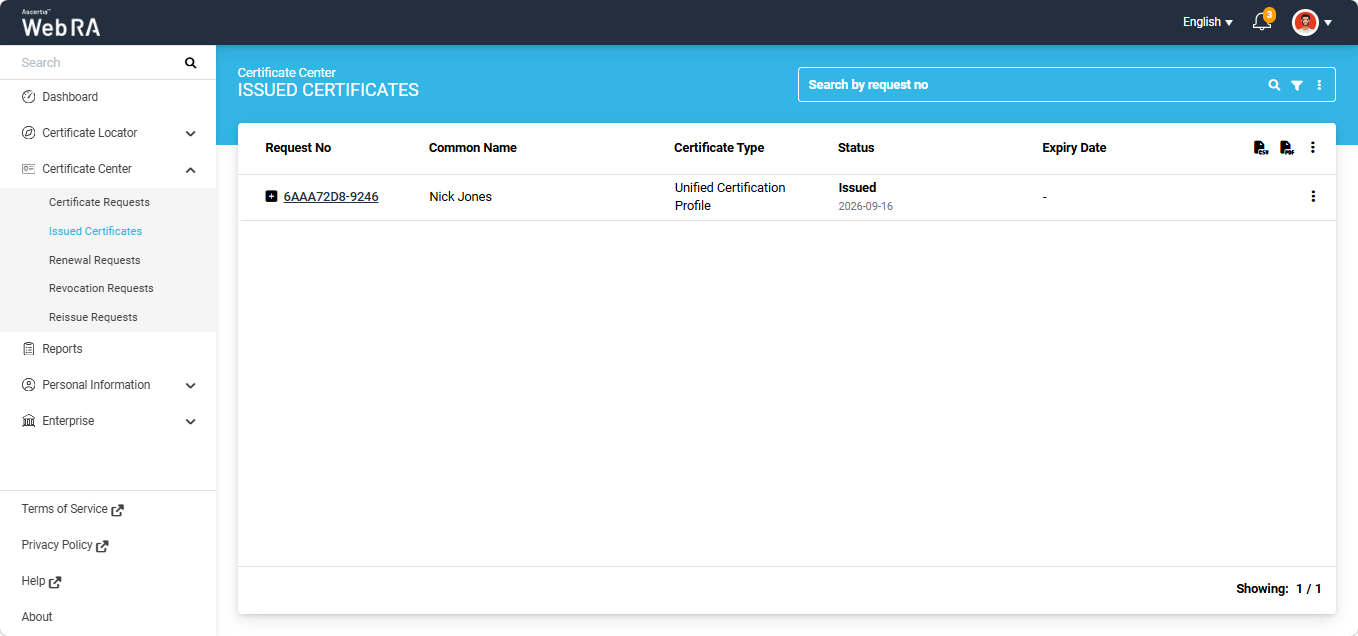
To revoke one or more certificates generated using a Unified Certification Profile, click the three-dot  button next to the main request number and select ‘Revoke Certificate’.
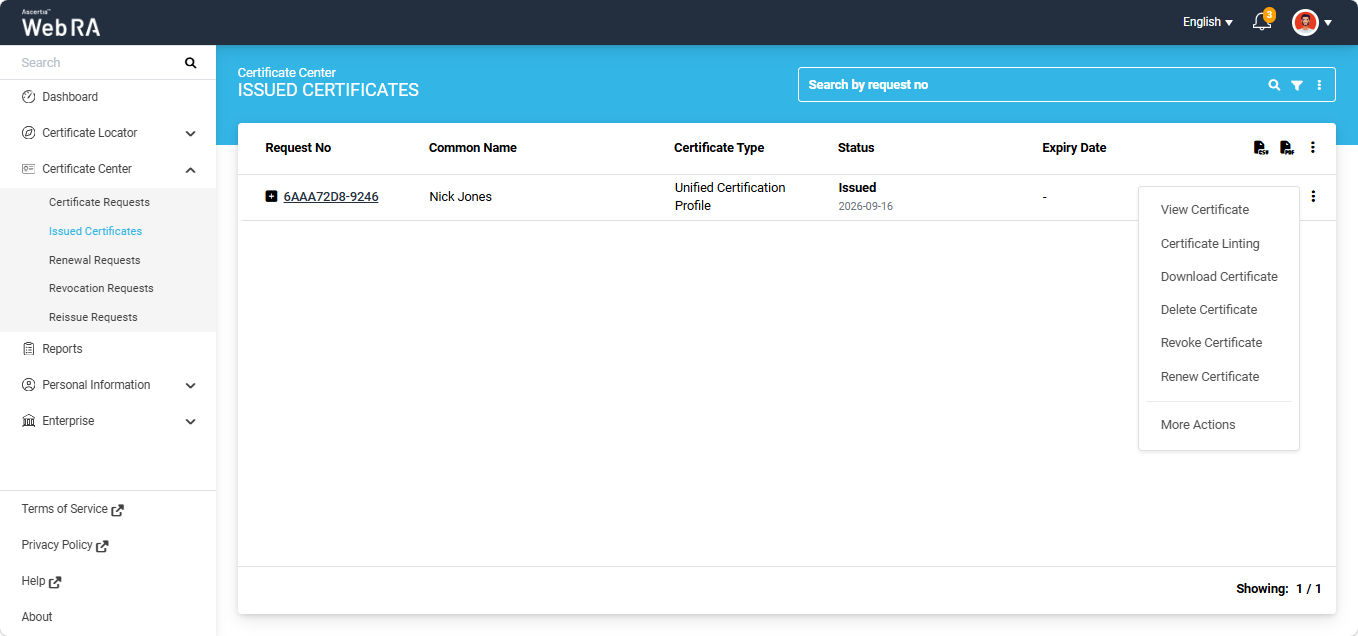
The system will display the ‘Certificate Action’ dialog on the screen.
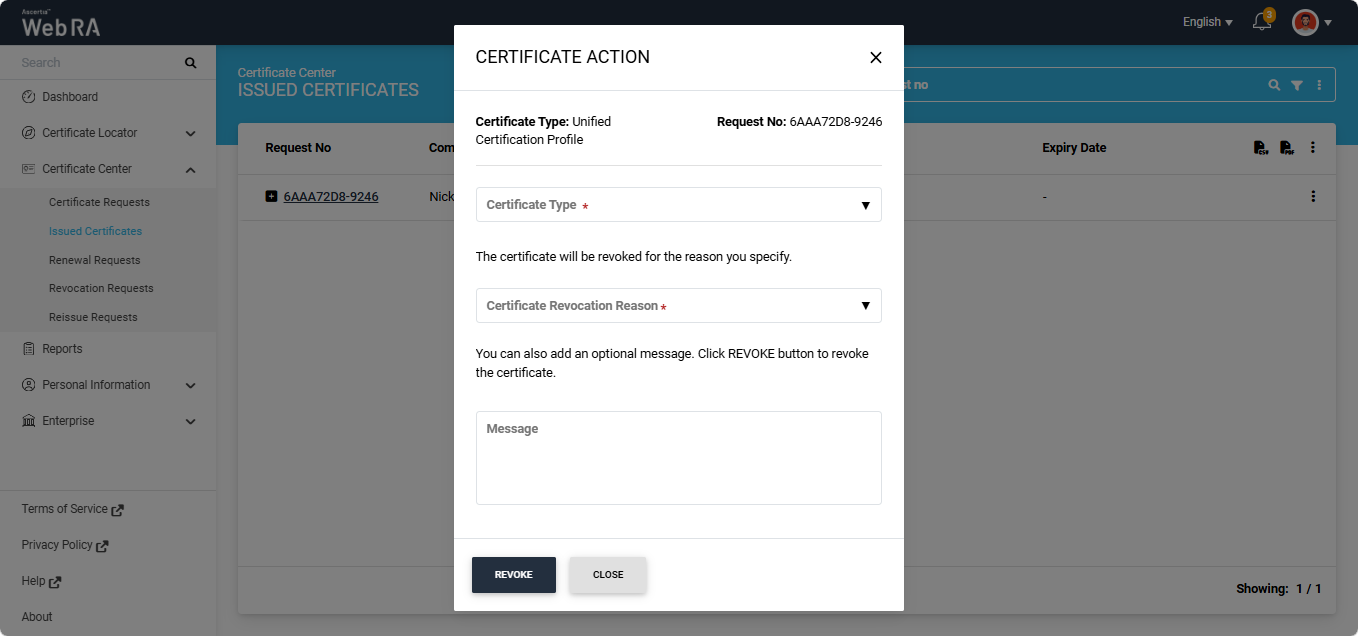
From the ‘Certificate Type’ dropdown, you can select any one certificate from the list to revoke it, or select the ‘All’ option to revoke all certificates, depending on your requirement.
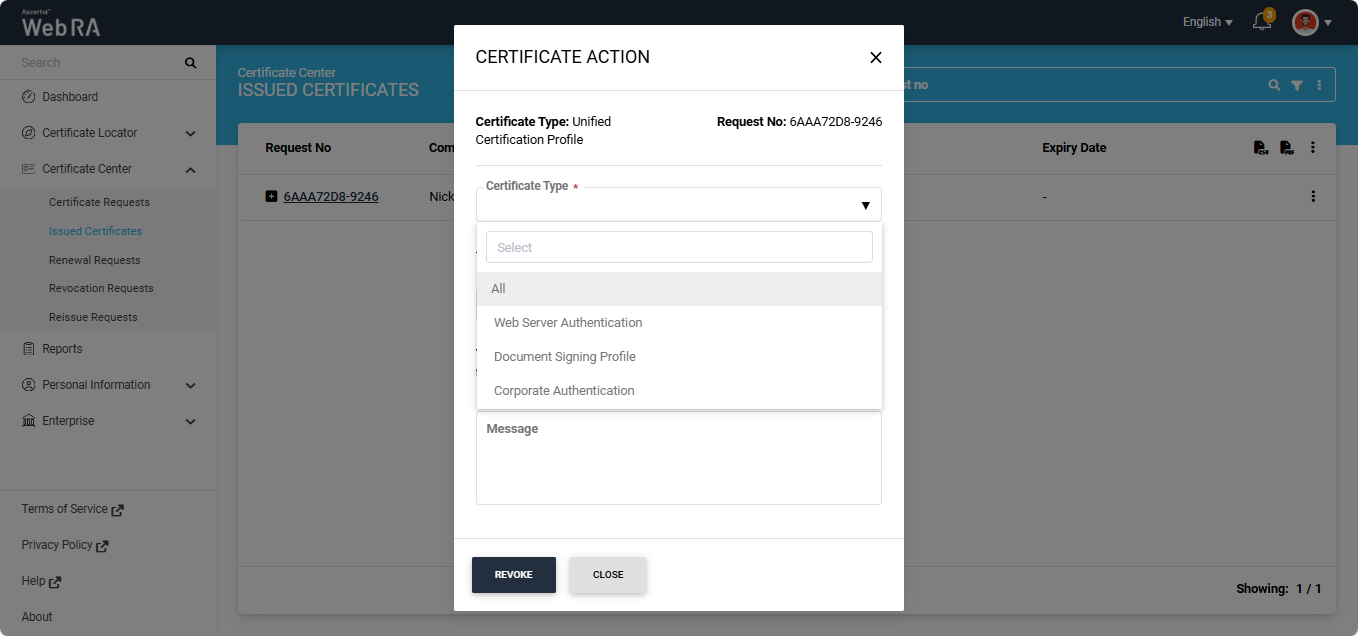
Select the revocation reason from the ‘Certificate Revocation Reason’ dropdown, and select the ‘Are you sure you want to revoke the selected certificate(s)?’ checkbox.
You can also add an optional message related to the certificate revocation in the ‘Message’ box.
After that, click ‘Revoke’ to revoke the certificate. The certificate will be revoked and a success alert will appear on the screen.
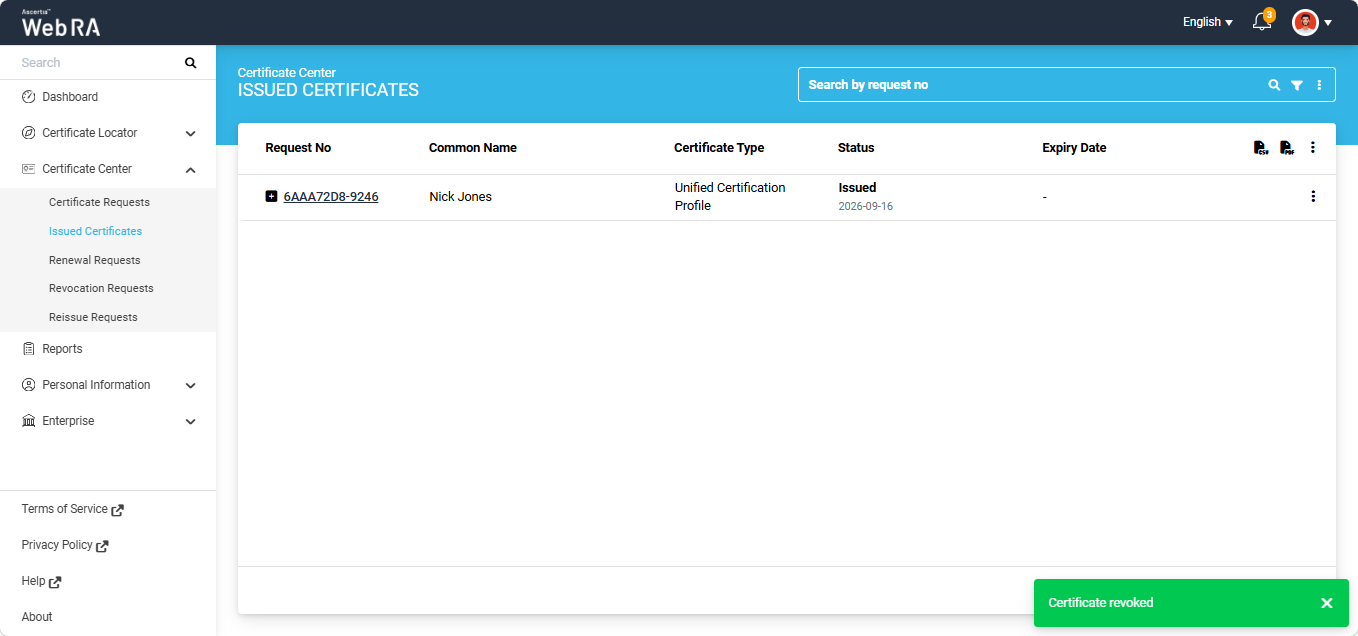
The revoked certificate will appear in the ‘Revocation Requests’ listing. The status of the revoked certificate will change to ‘Revoked’ in the Issued Certificates listing.
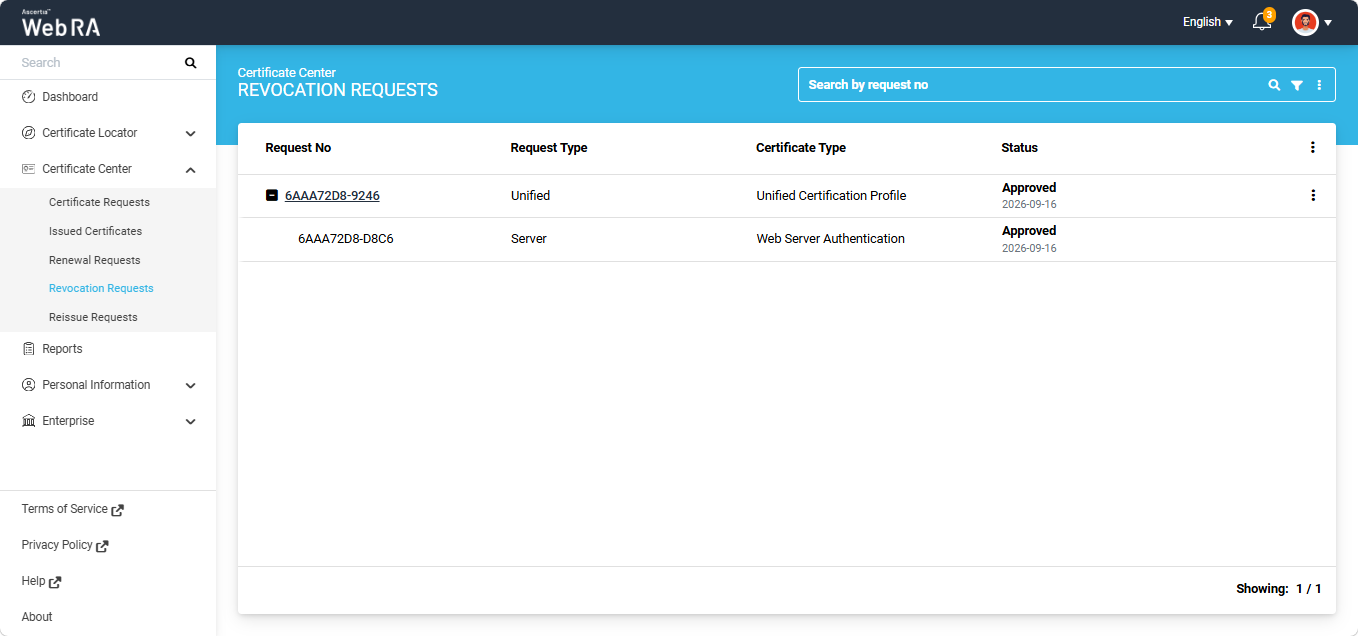
Expand Certificate Center > Issued Certificates from the left-tree menu in the Web portal.
The certificates generated using a Unified Certification Profile are grouped under a single main request number in the Issued Certificates listing.
A ‘+’ button appears next to the main request number. Click the ‘+’ button to expand the request and view the list of all certificates generated under the Unified Certification Profile. Each certificate in the list has its own request number.
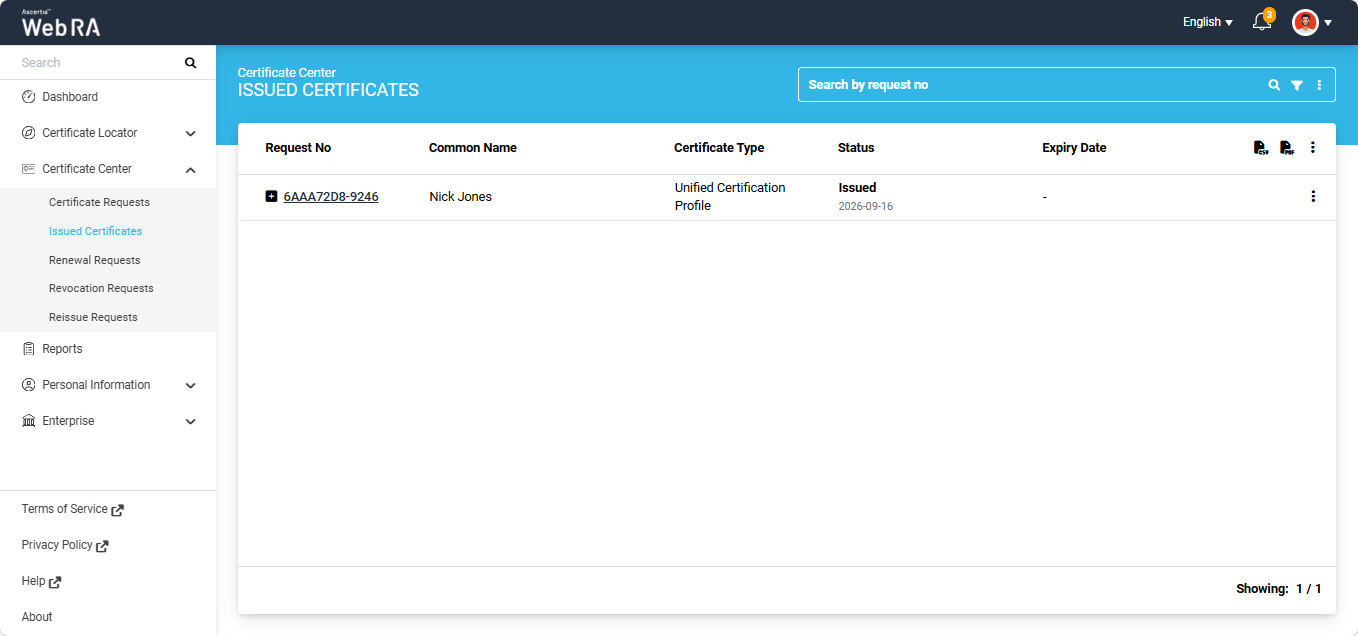
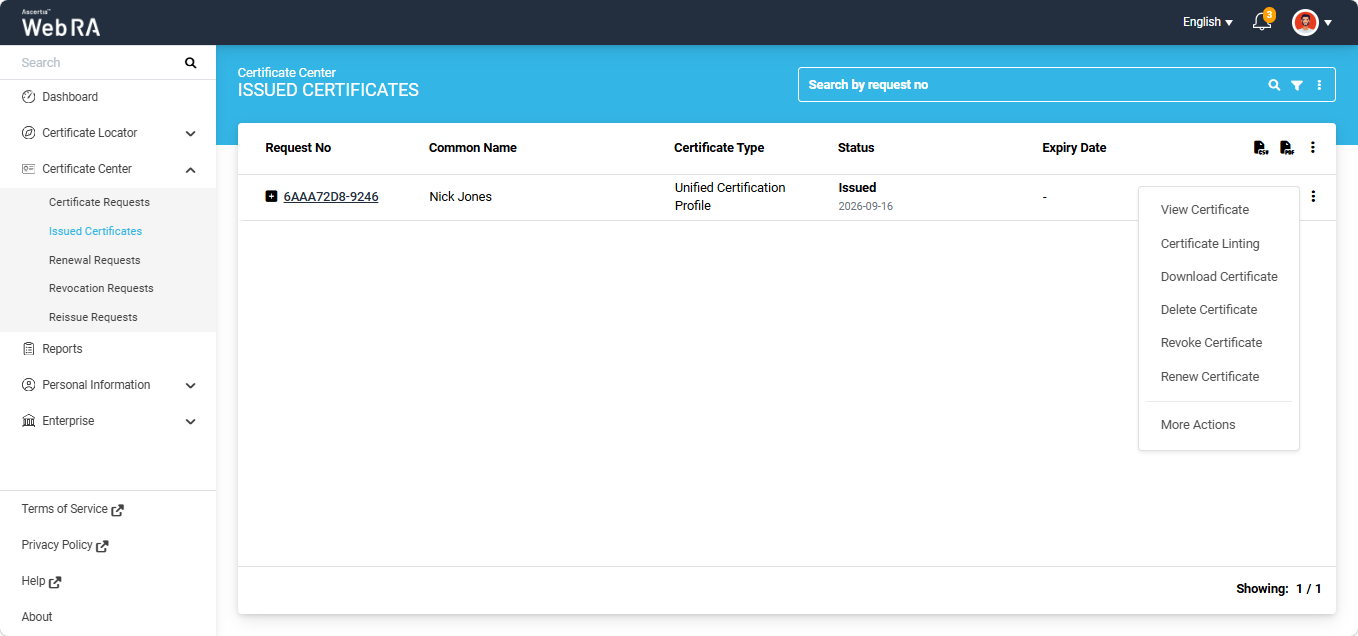
To renew one or more certificates generated using a Unified Certification Profile, click the three-dotbutton next to the main request number and select ‘Renew Certificate’.
The system will display the ‘Certificate Action’ dialog on the screen.
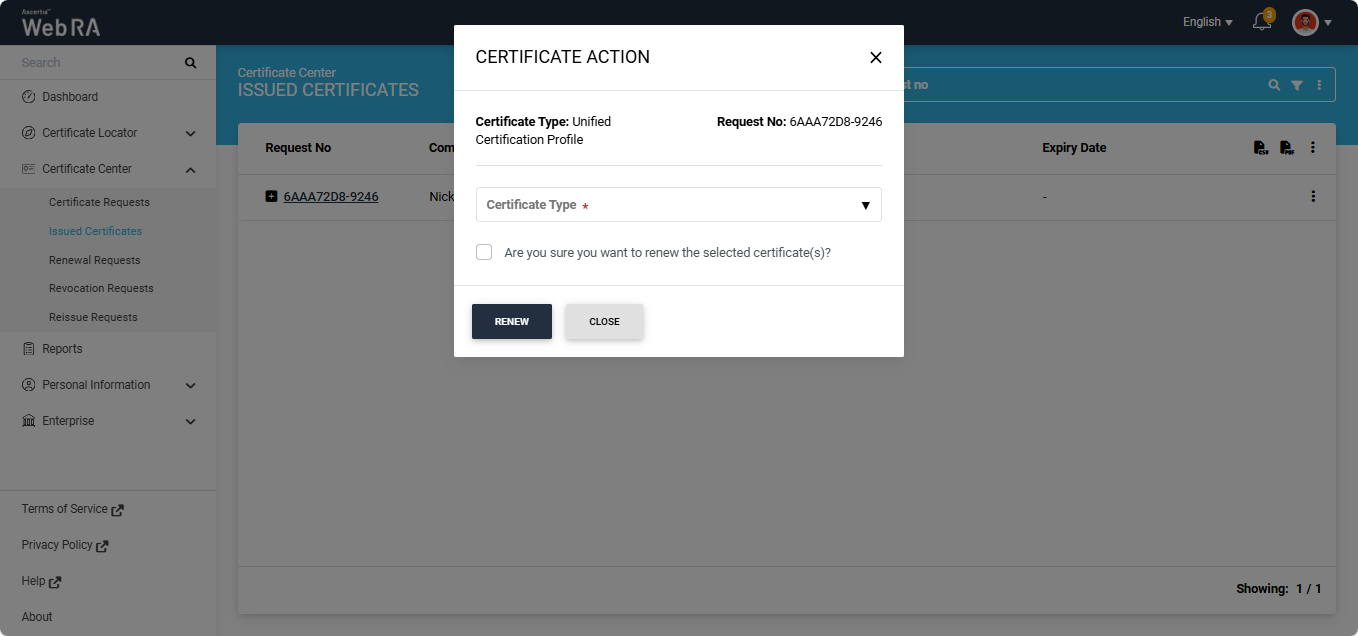
From the ‘Certificate Type’ dropdown, you can select any one certificate from the list to renew it, or select the ‘All’ option to renew all certificates, depending on your requirement.
Select the ‘Are you sure you want to renew the selected certificate(s)’ checkbox. After that, click ‘Renew’ to renew the certificate(s).
The system will open the certificate request in View mode.
|
|
Note: If you select only one certificate from the group to renew, the ‘Subject Distinguished Name (SDN)’ screen will display only the SDN fields configured in the corresponding certification profile. |
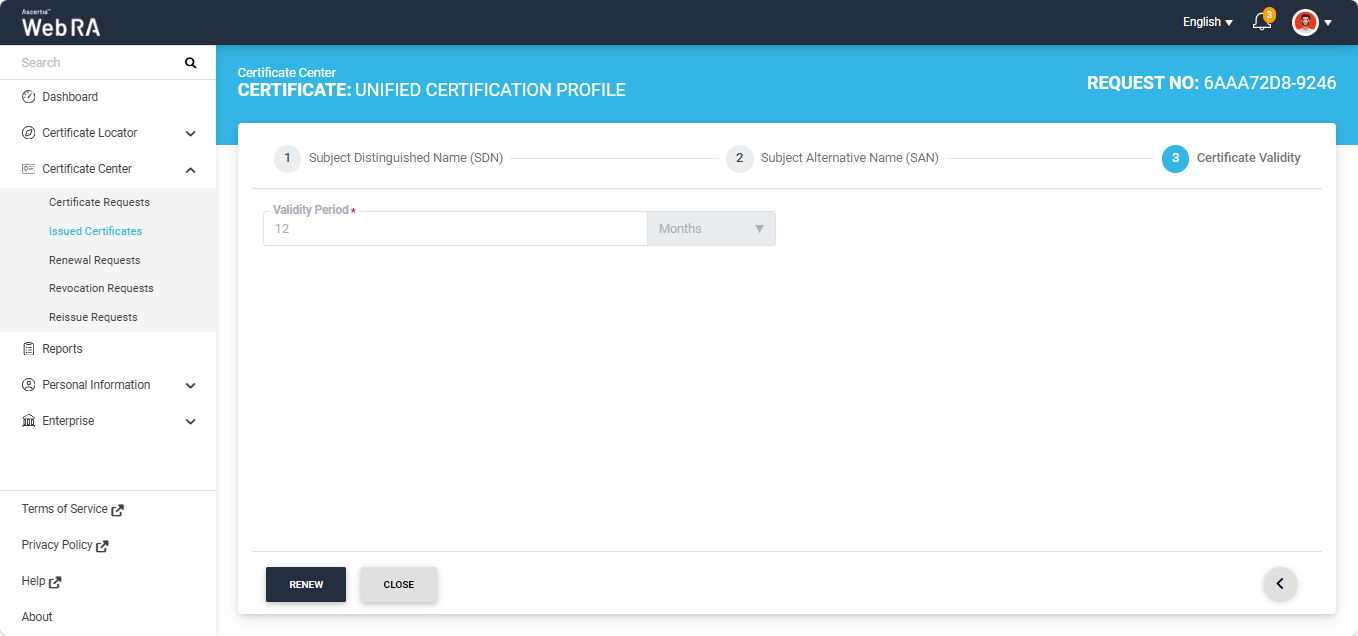
Navigate to the last tab of the certificate request by clicking the next ‘>’ button, and click the ‘Renew’ button.
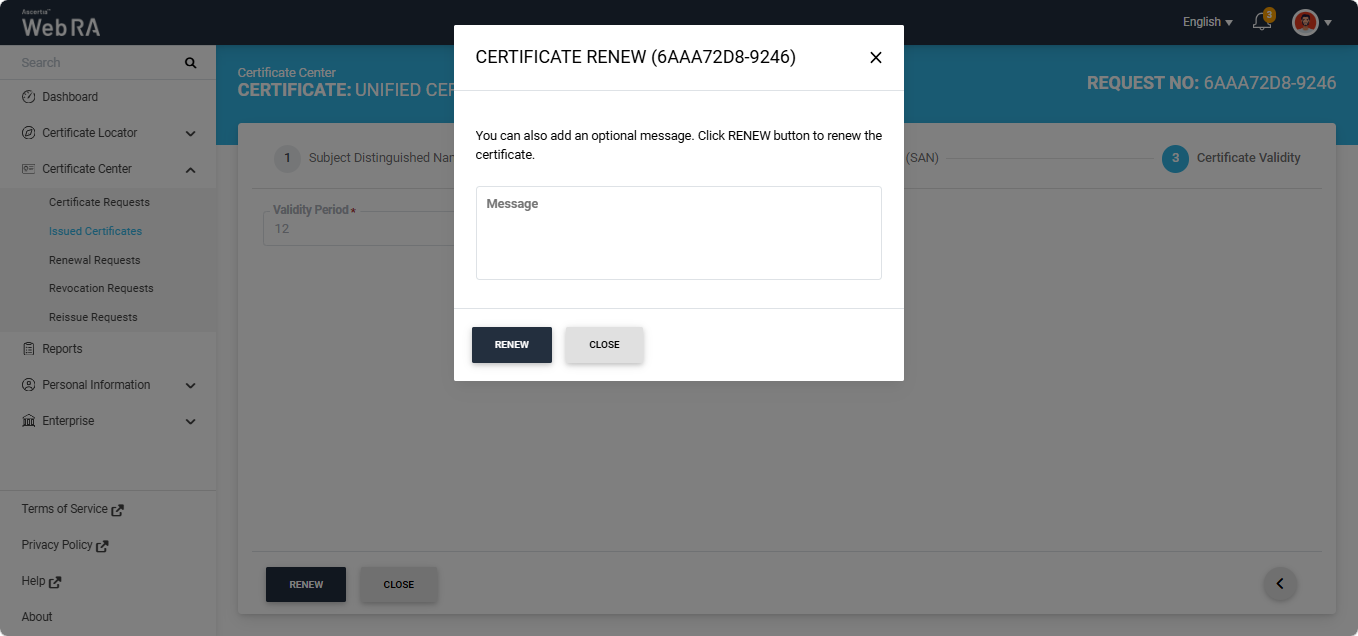
A ‘Certificate Renew’ dialog appears on the screen. If required, enter an optional message in the ‘Message’ box, and then click ‘Renew’.
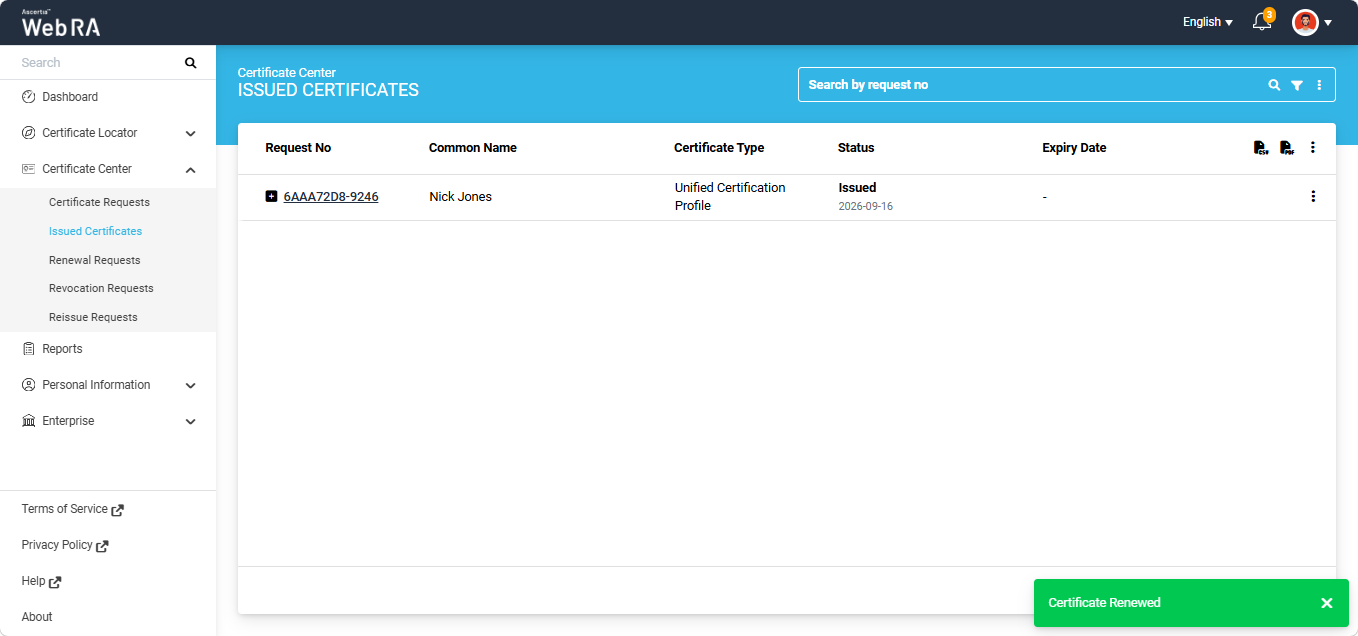
The certificate will be renewed and a ‘Certificate Renewed’ alert will appear on the screen.
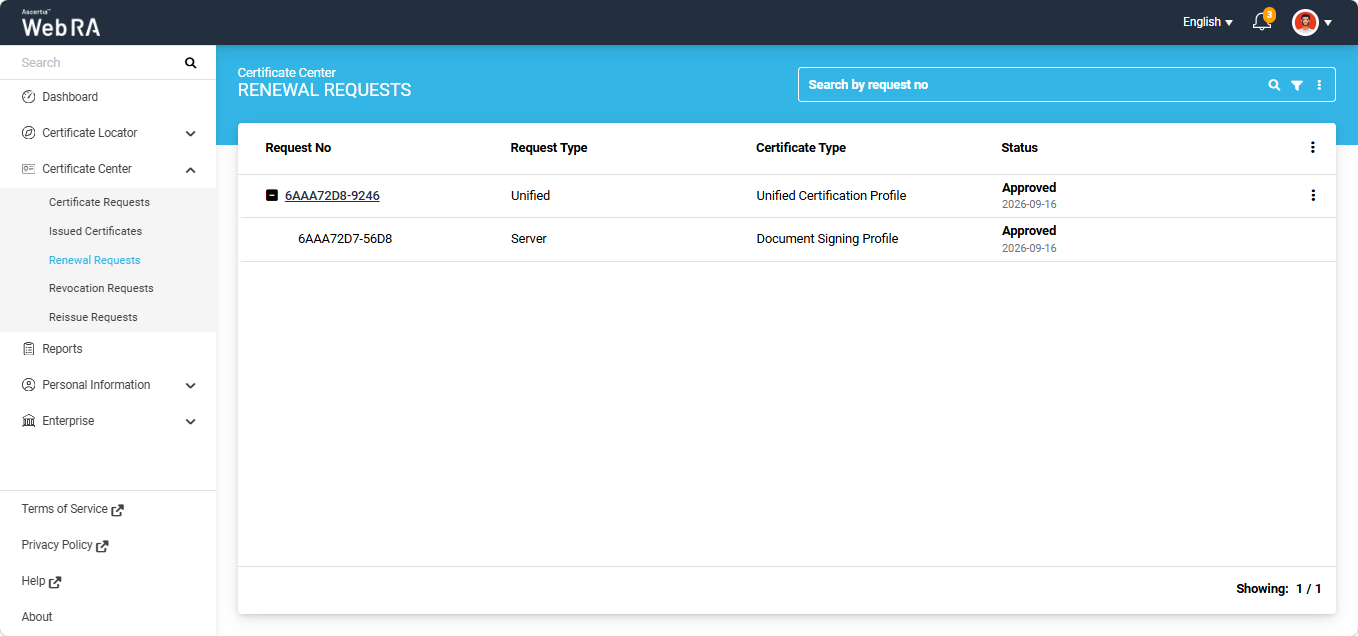
The renewed certificate will appear in the ‘Renewal Requests’ section. Also, the status of the revoked certificate will change to ‘Renewed’ in the Issued Certificates listing.
Expand Certificate Center > Issued Certificates from the left-tree menu in the Web portal.
To reissue a certificate that has been revoked from a group of certificates issued using a Unified Certification Profile, click the three-dotbutton next to the main certificate request entry and select ‘More Actions’.
The system will display the ‘Certificate Action’ dialog on the screen.
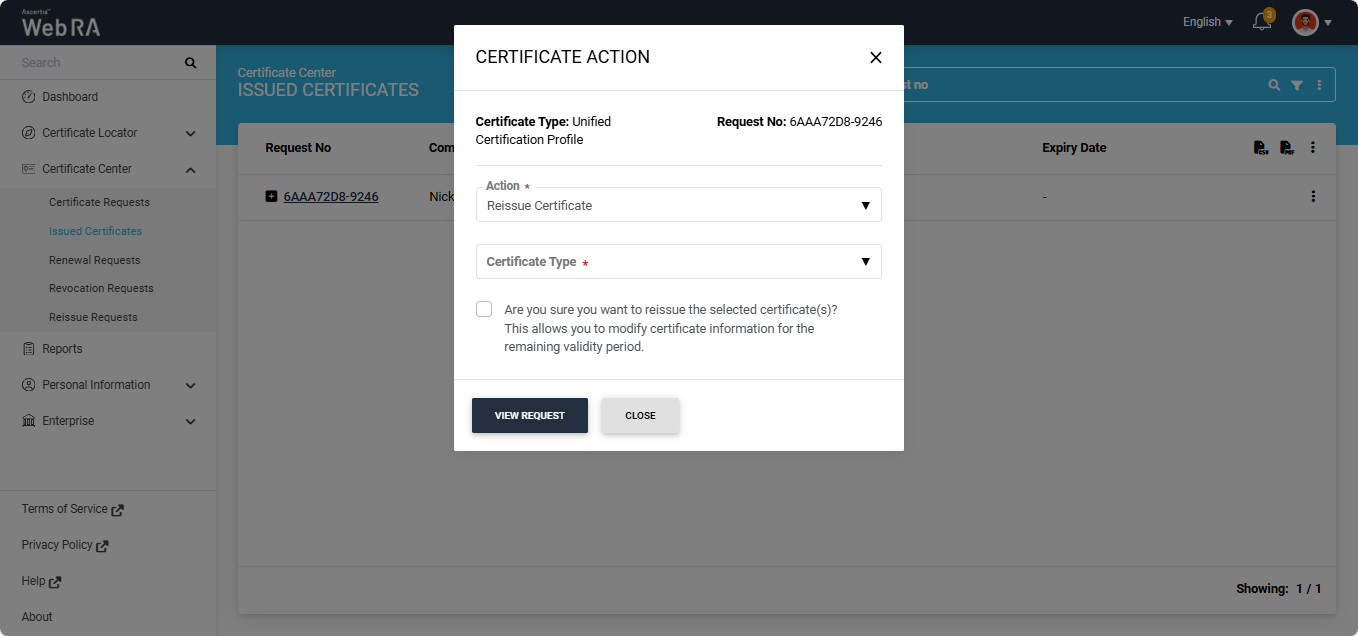
Select the ‘Reissue Certificate’ option from the ‘Action’ dropdown. Then, select the certificate that you want to reissue from the ‘Certificate Type’ dropdown.
The ‘Certificate Type’ dropdown displays only the certificates that have been revoked.
Select the ‘Are you sure…’ checkbox and click the ‘View Request’ button.
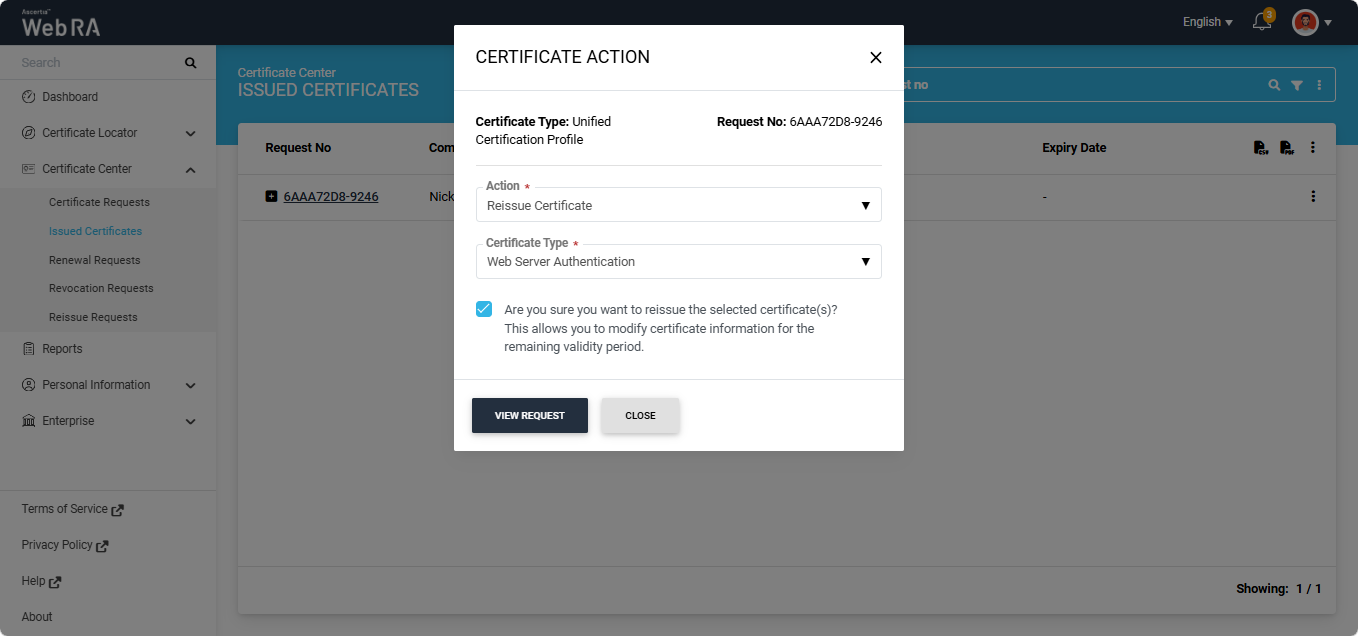
The system will open the certificate request in View mode.
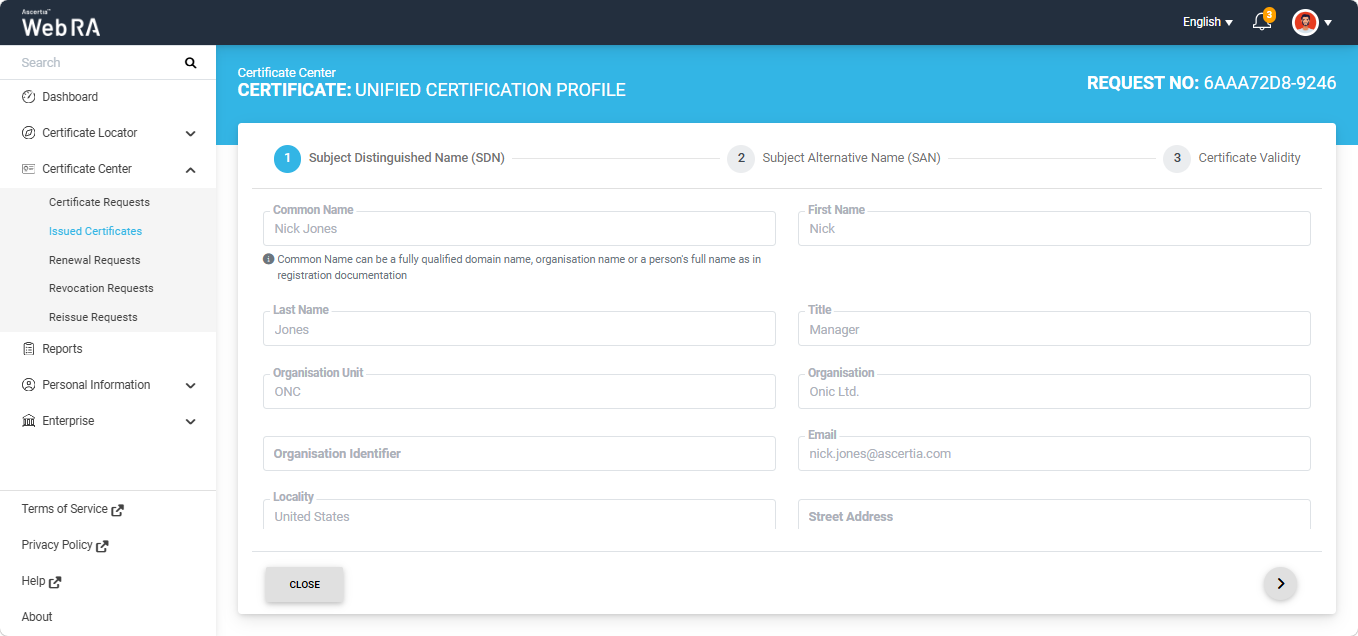
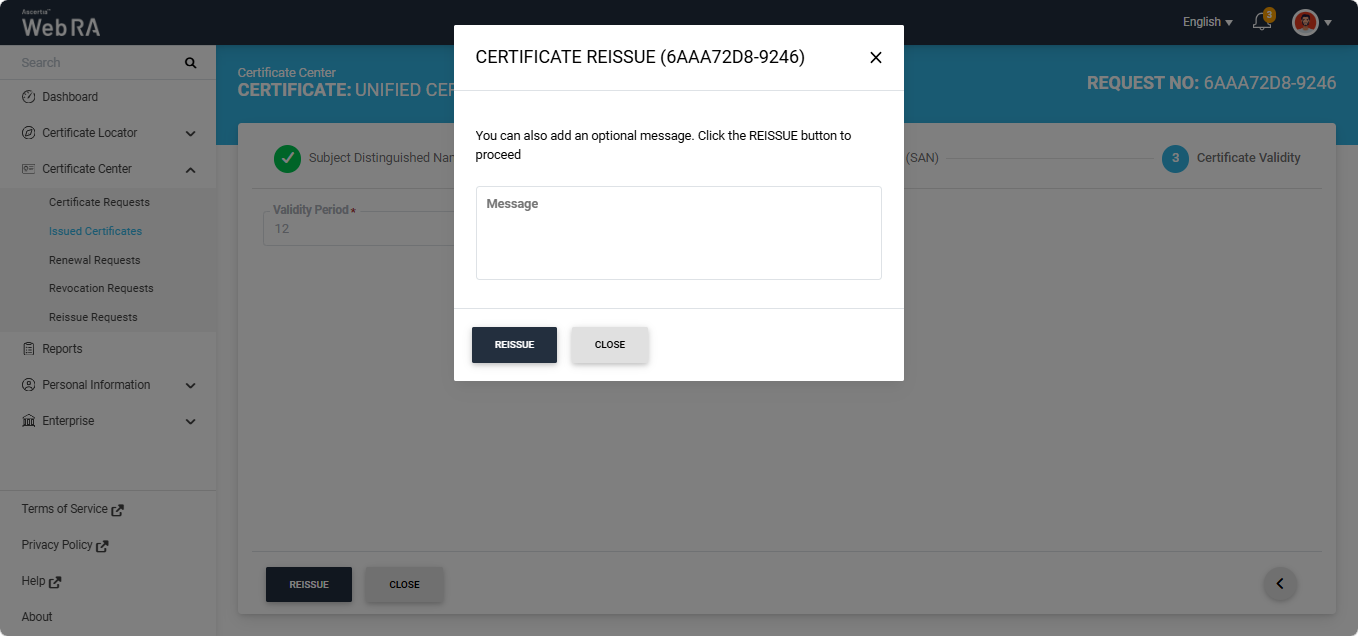
Navigate to the last tab by clicking the next ‘>’ button. Then, click ‘Reissue’.
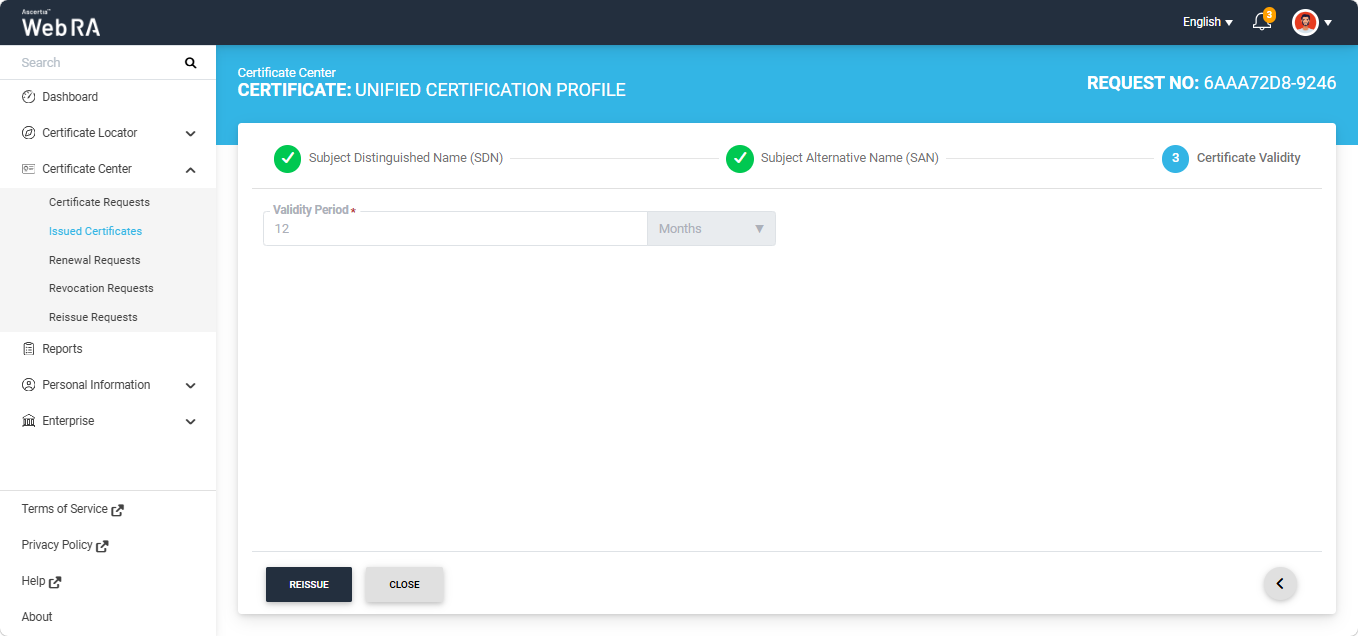
The ‘Certificate Reissue’ dialog appears on the screen. If required, enter an optional message in the ‘Message’ box, and then click ‘Reissue’.
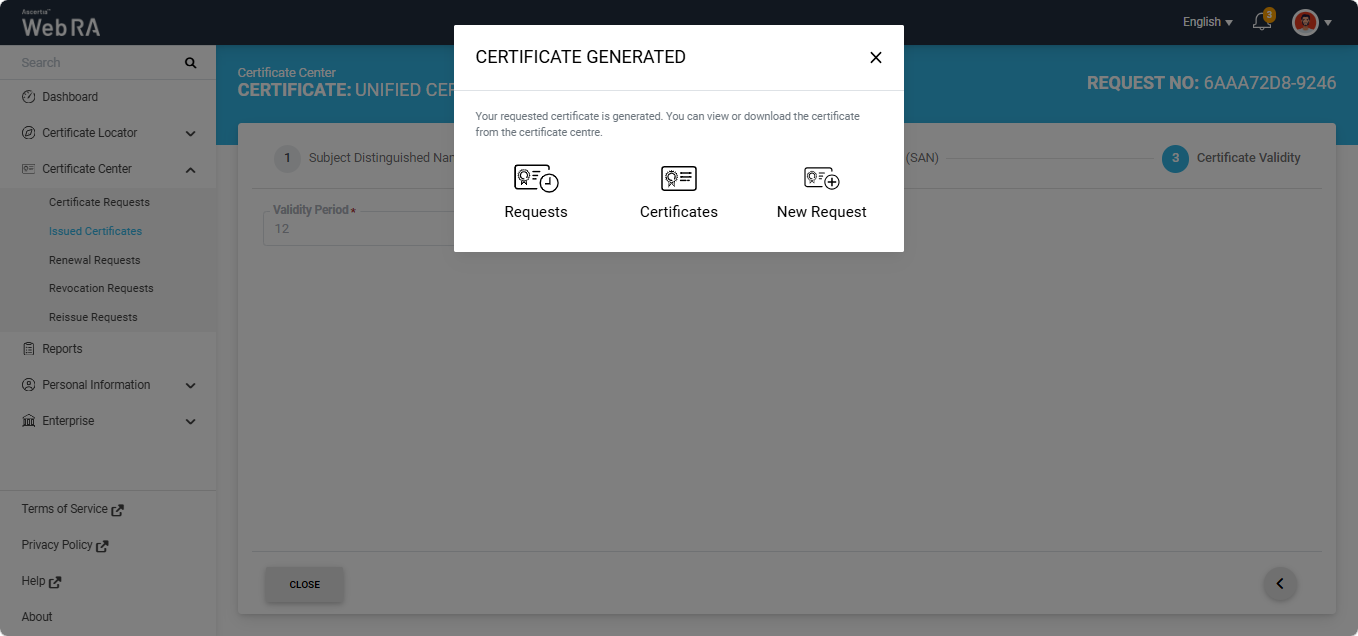
The certificate will be reissued and the ‘Certificate Generated’ dialog will appear on the screen.
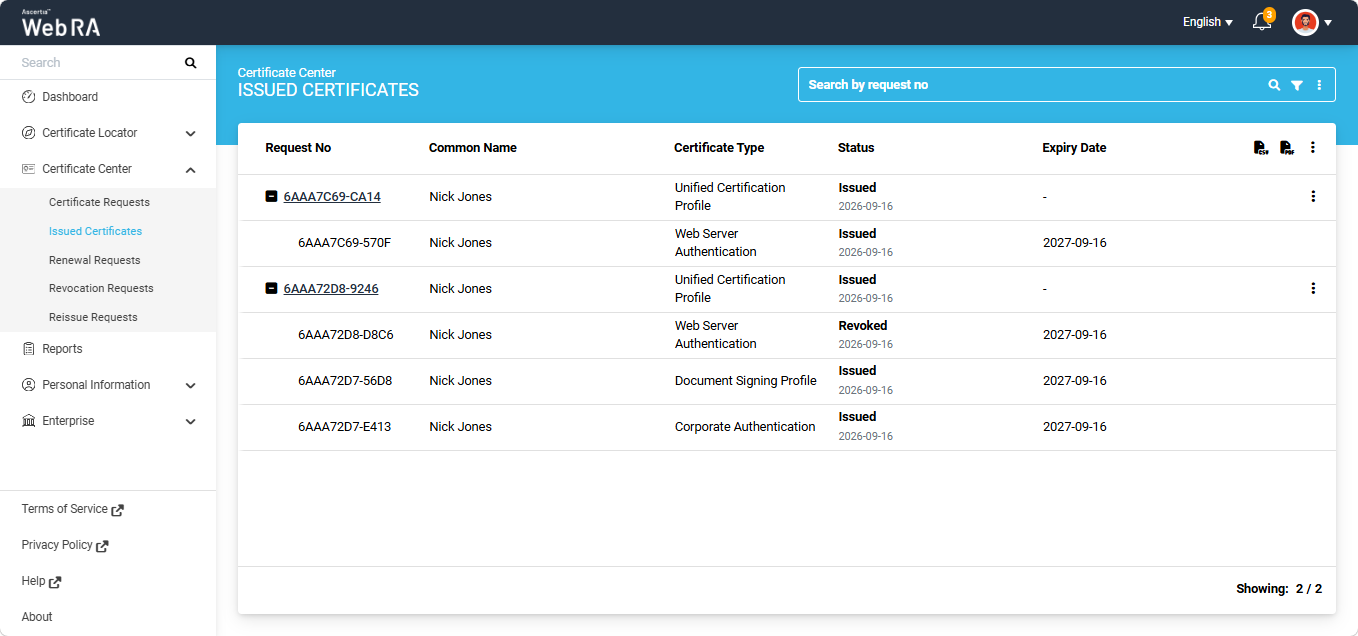
The newly issued certificate will appear in the Issued Certificates listing under the same Unified Profile group.
Expand Certificate Center > Issued Certificates from the left-tree menu in the Web portal.
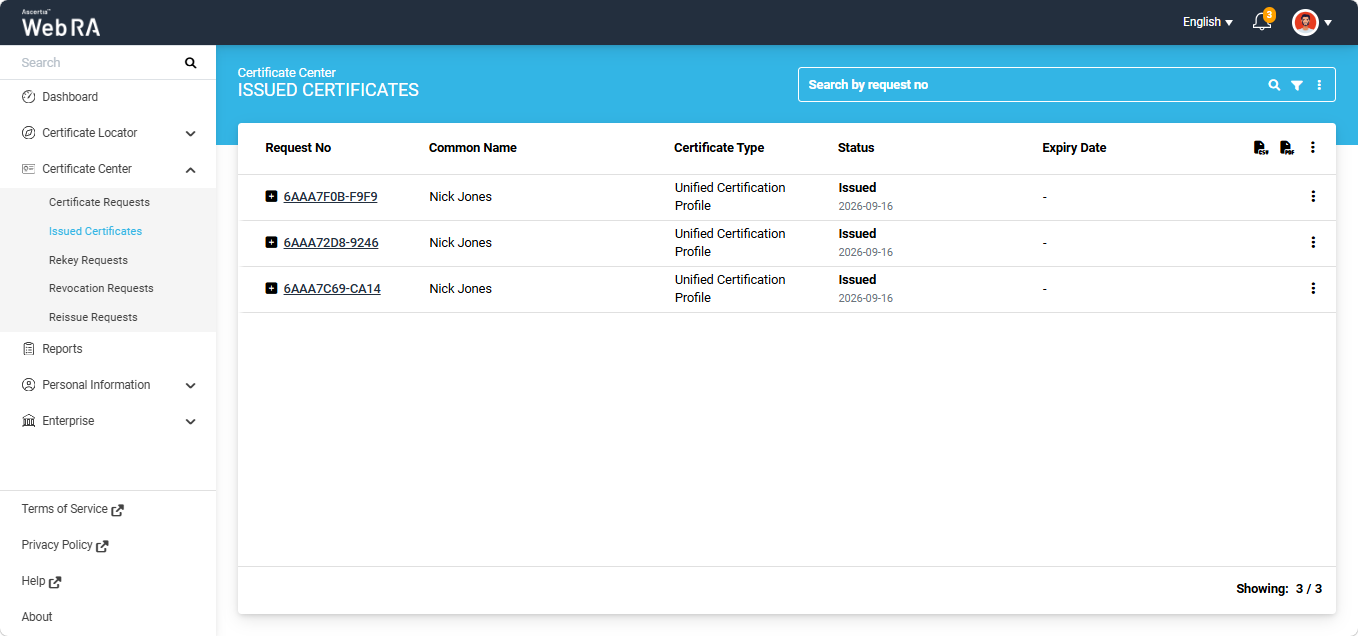
The certificates generated using a Unified Certification Profile are grouped under a single main request number in the Issued Certificates listing.
A ‘+’ button appears next to the main request number. Click the ‘+’ button to expand the request and view the list of all certificates generated under the Unified Certification Profile. Each certificate in the list has its own request number.
To rekey one or more certificates generated using a Unified Certification Profile, click the three-dotbutton next to the main request number and select ‘More Actions’.
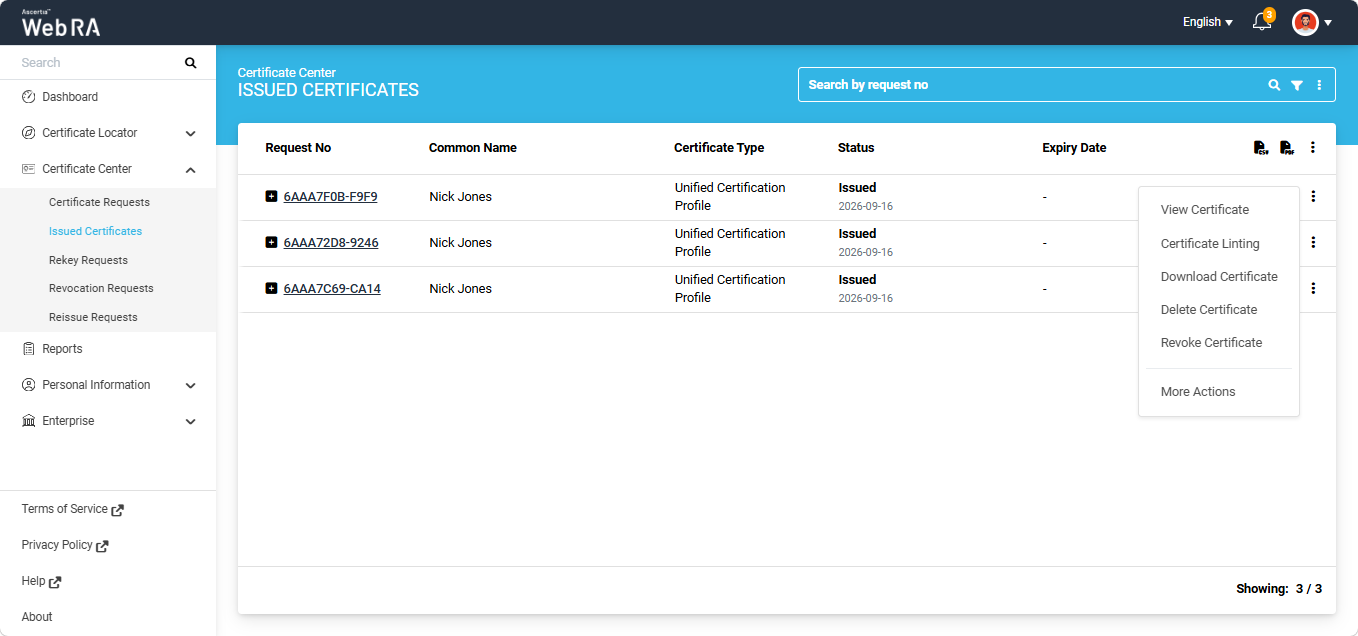
The system will display the ‘Certificate Action’ dialog on the screen.
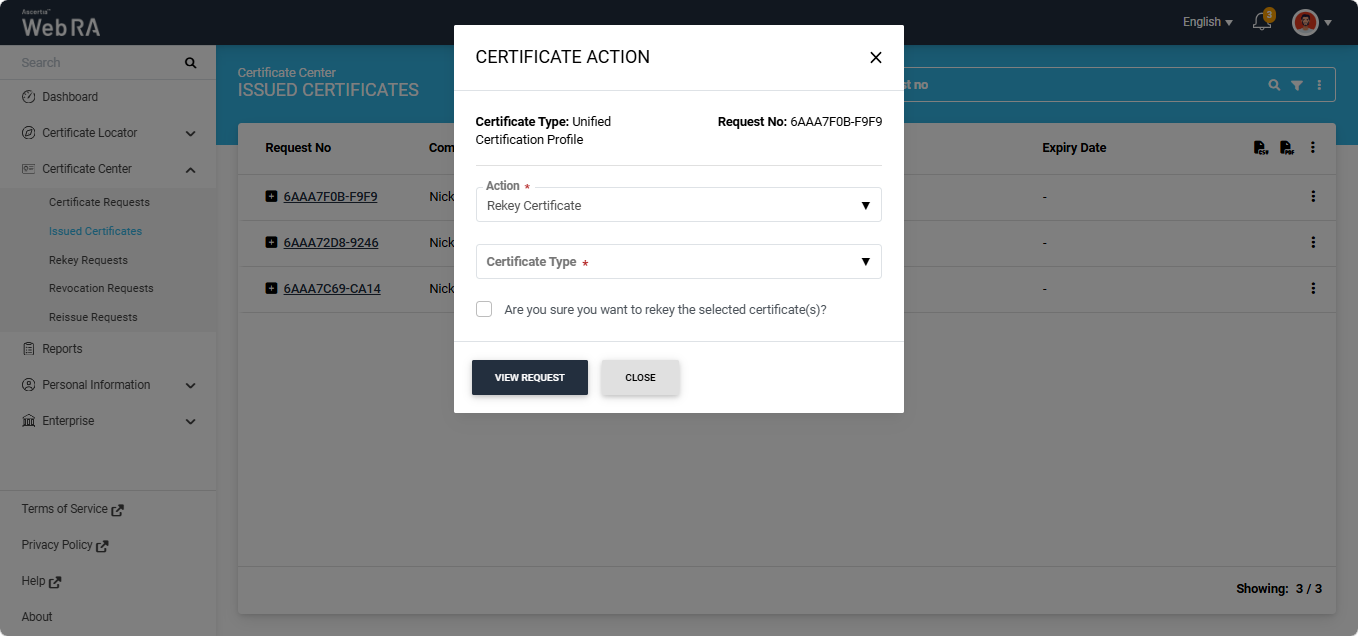
Select the ‘Rekey Certificate’ option from the ‘Action’ dropdown. Then, select the certificate that you want to rekey from the ‘Certificate Type’ dropdown.
Select the ‘Are you sure…’ checkbox and click the ‘View Request’ button.
The system will open the certificate in View mode.
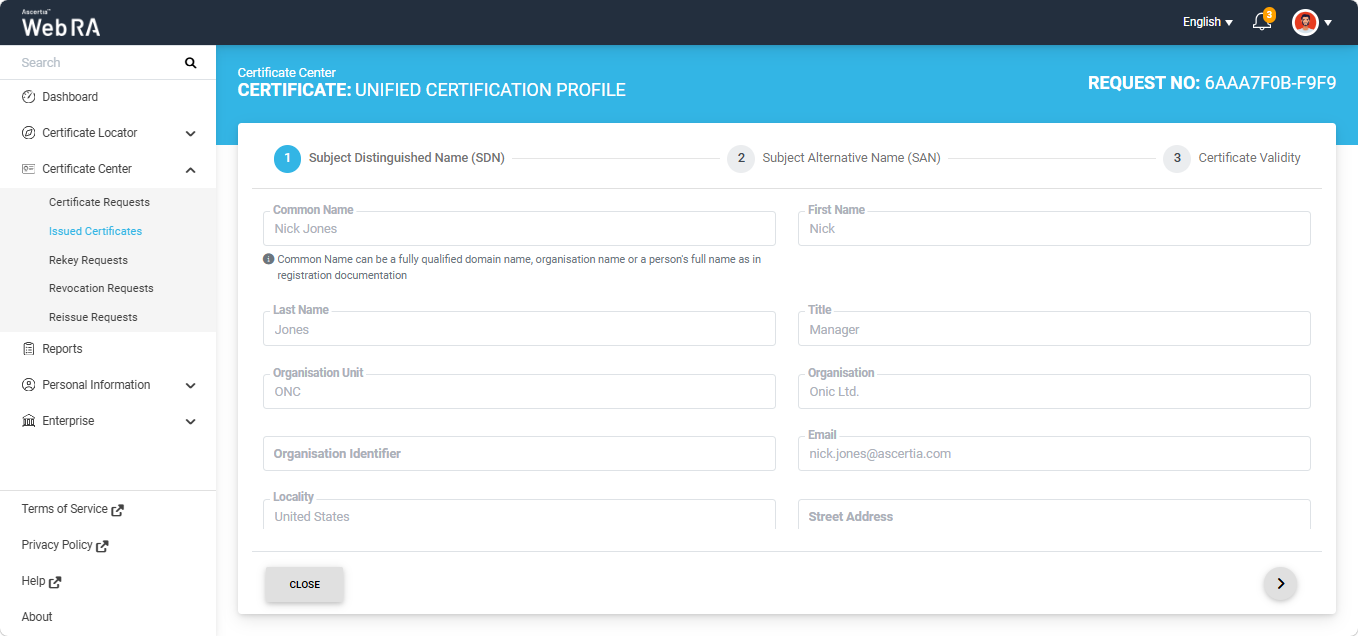
Navigate to the last tab by clicking the next ‘>’ button and click ‘Rekey.
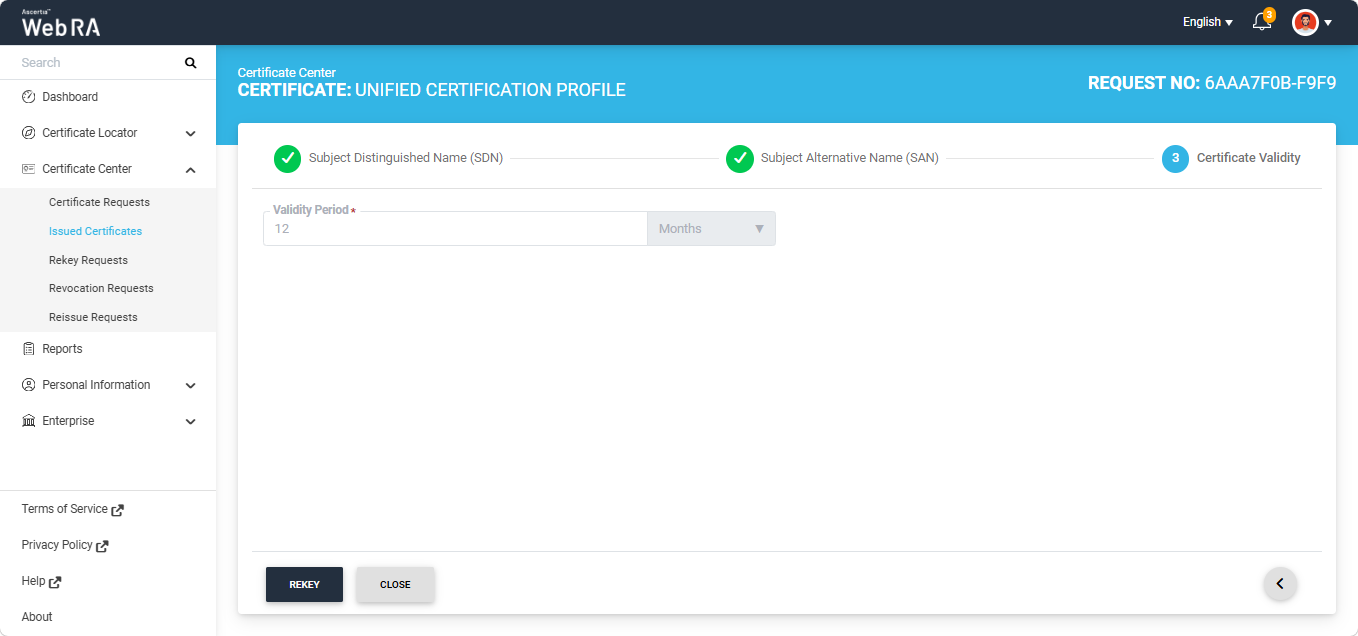
The system will display the ‘Certificate Rekey’ dialog on the screen. Click ‘Rekey’ to rekey the certificate.
The certificate will be rekeyed and the ‘Certificate Generated’ dialog will appear on the screen.
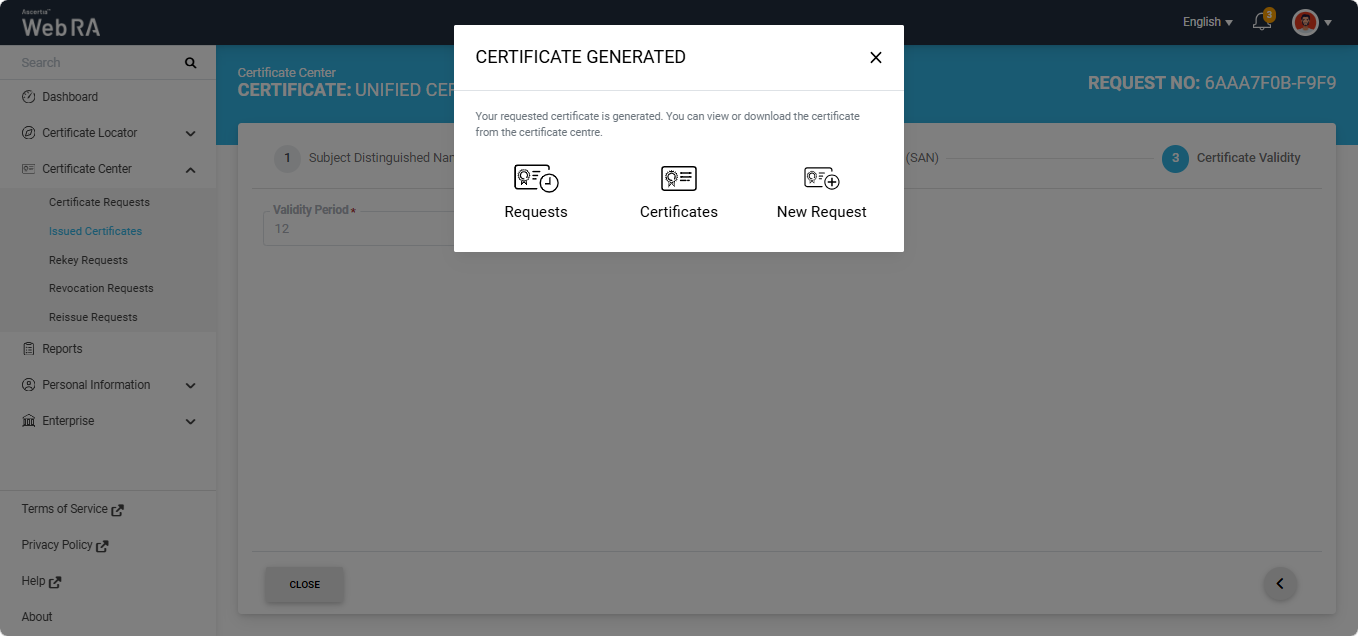
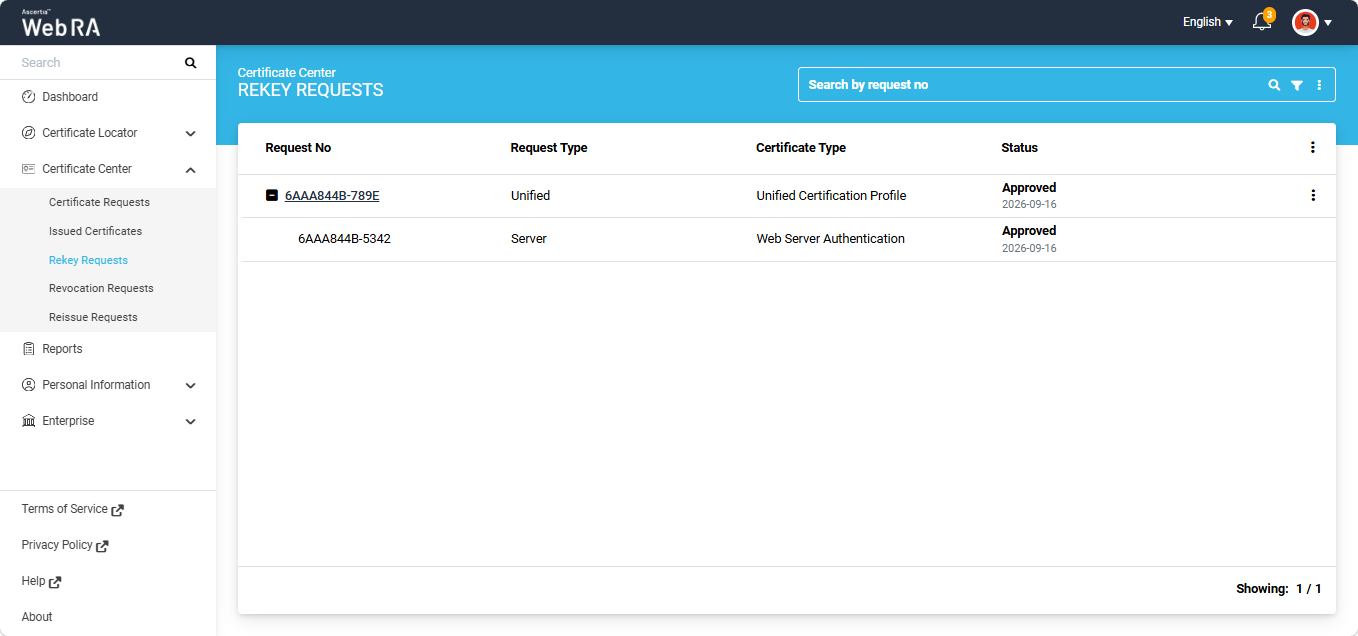
The rekeyed certificate will appear in the “Rekey Requests’ listing.
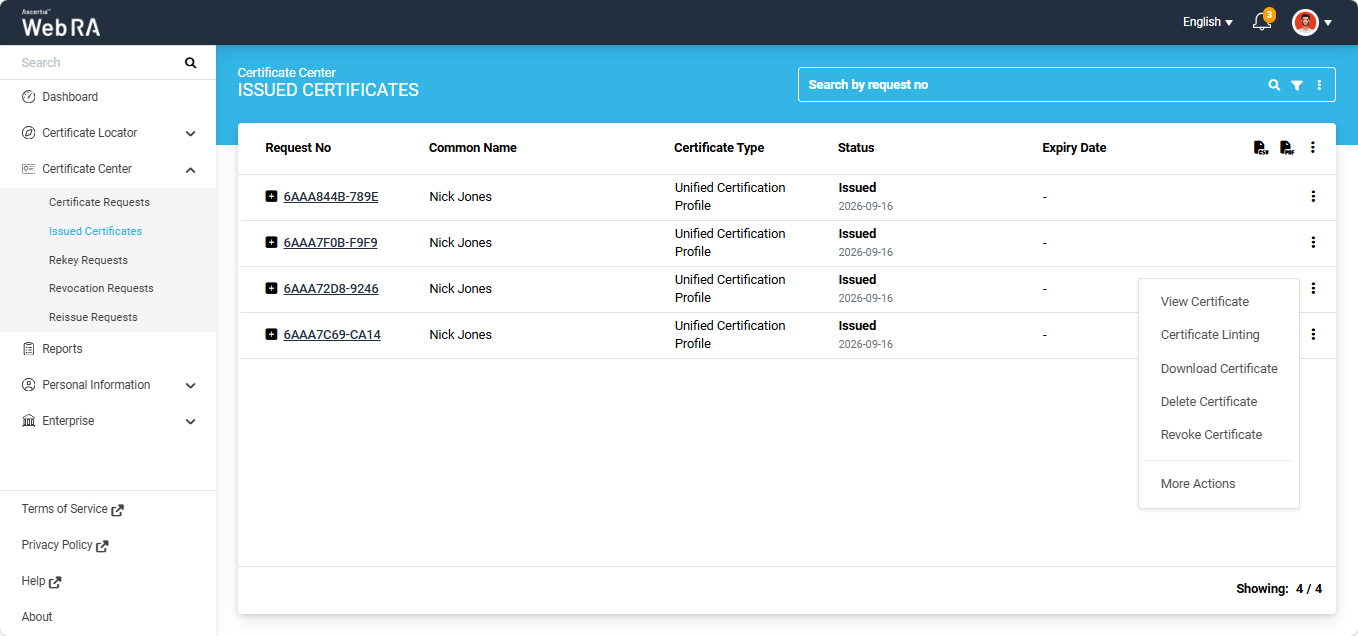
Expand Certificate Center > Issued Certificates from the left-tree menu in the Web portal.
To download a certificate, click the three-dot button next to the certificate and select 'Download Certificate'.
The system will display the ‘Download Certificate’ dialog on the screen.
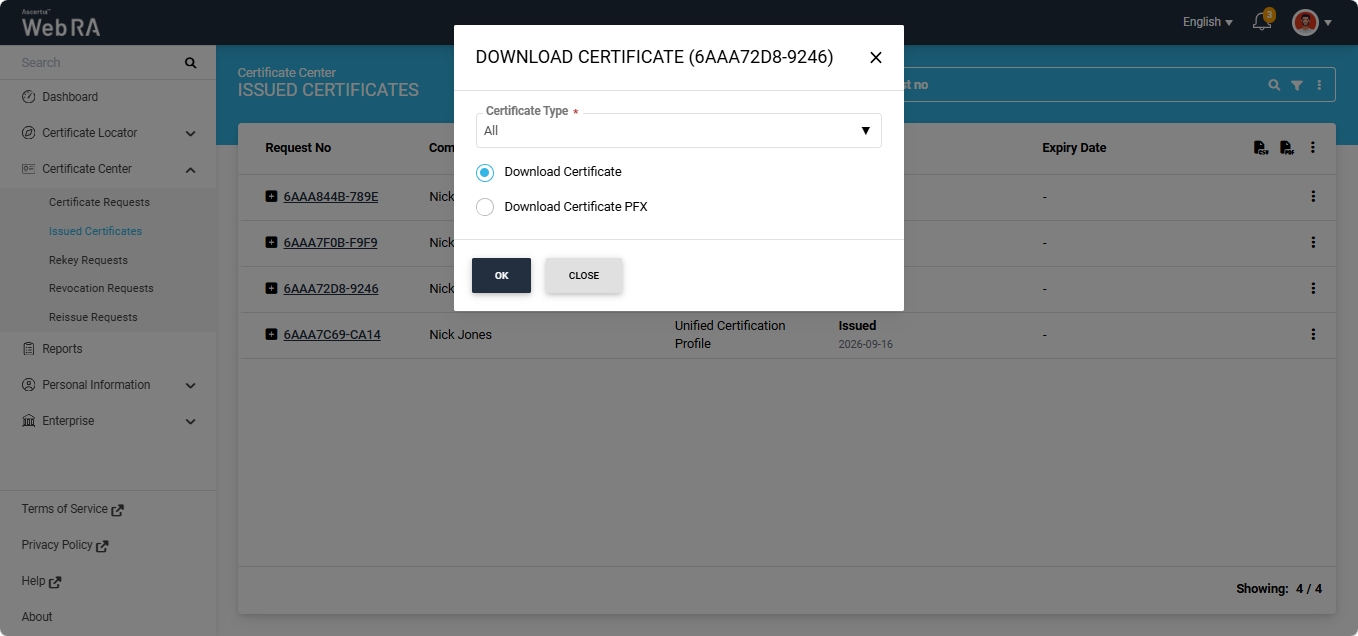
The ‘Certificate Type’ dropdown allows you to either select a single certificate or select the ‘All’ option to download all certificates generated under the Unified Certification Profile.
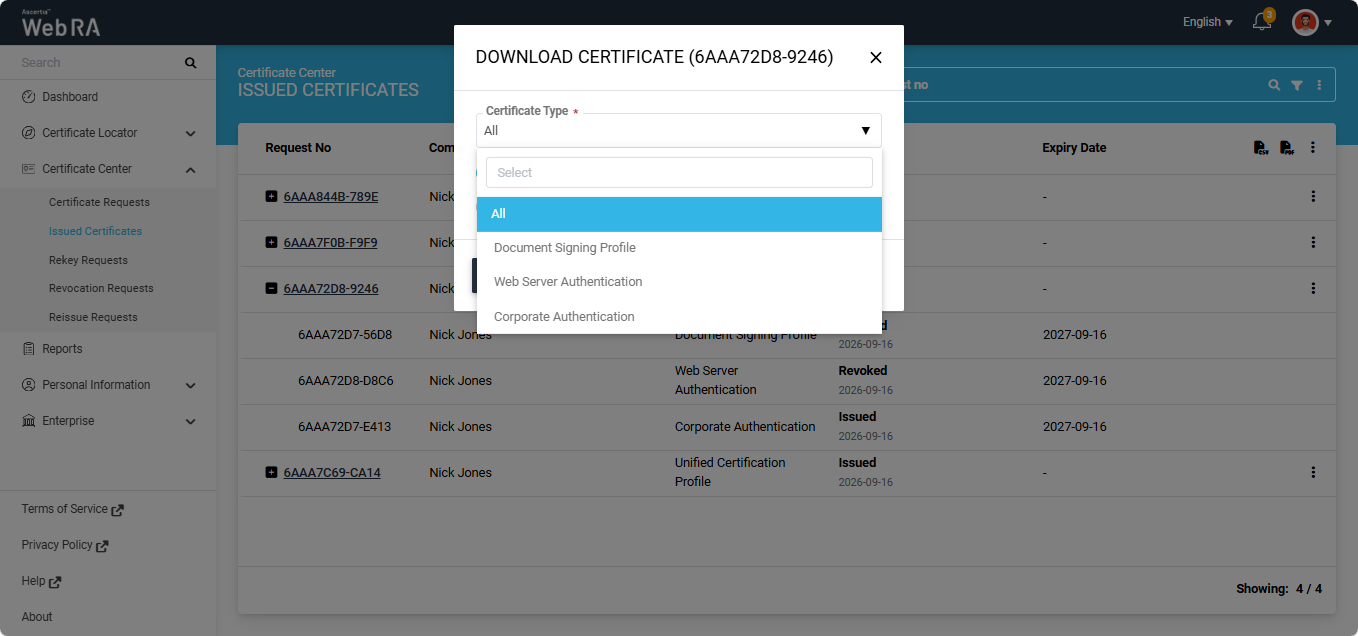
- Download Certificate
If you select ‘All’ along with the ‘Download Certificate’ radio button, and click ‘OK’, a ZIP file is downloaded to your computer containing all the certificates. The name of the ZIP file is the request number of the main certificate request group.
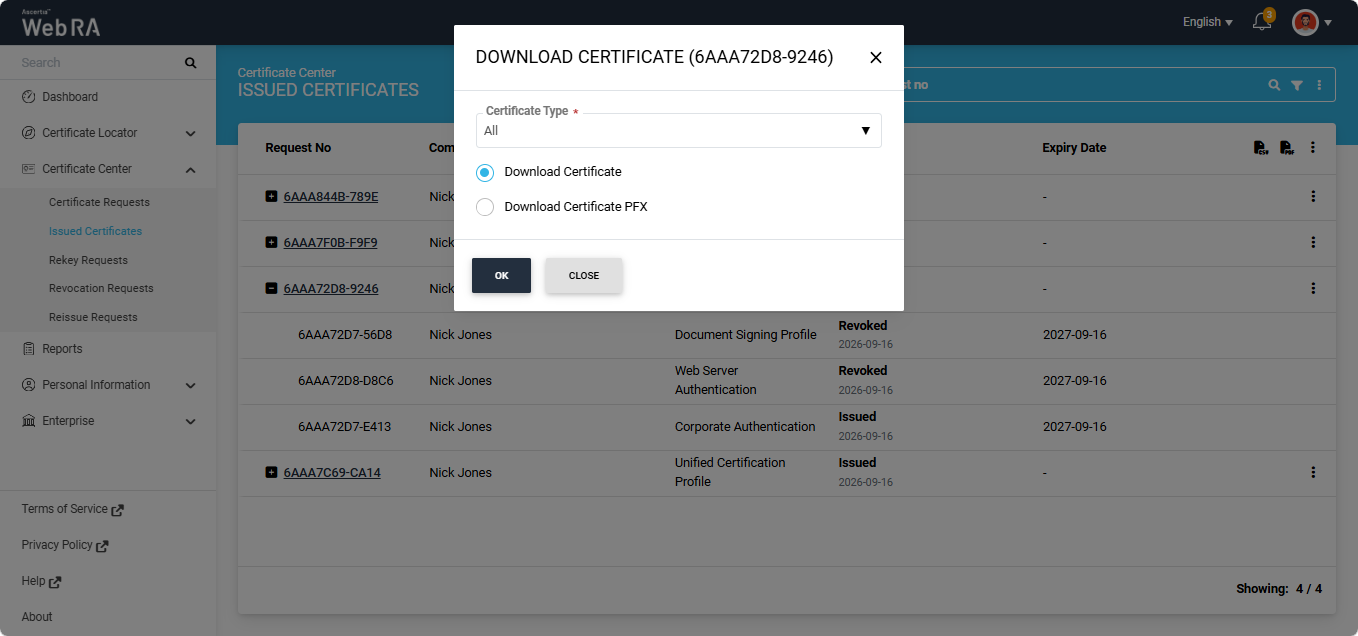
If you select a single certificate from the ‘Certificate Type’ dropdown, the downloaded ZIP file contains only the selected certificate.
- Download Certificate PFX
To download the PFX file of the certificate(s) generated under the Unified Certificate Profile, select the required certificate or the ‘All’ option from the ‘Certificate Type’ dropdown, and select the ‘Download Certificate PFX’ radio button.
The dialog displays two additional fields: ‘Password’ and ‘Confirm Password’. Enter a password to protect the PFX files from unauthorised access.
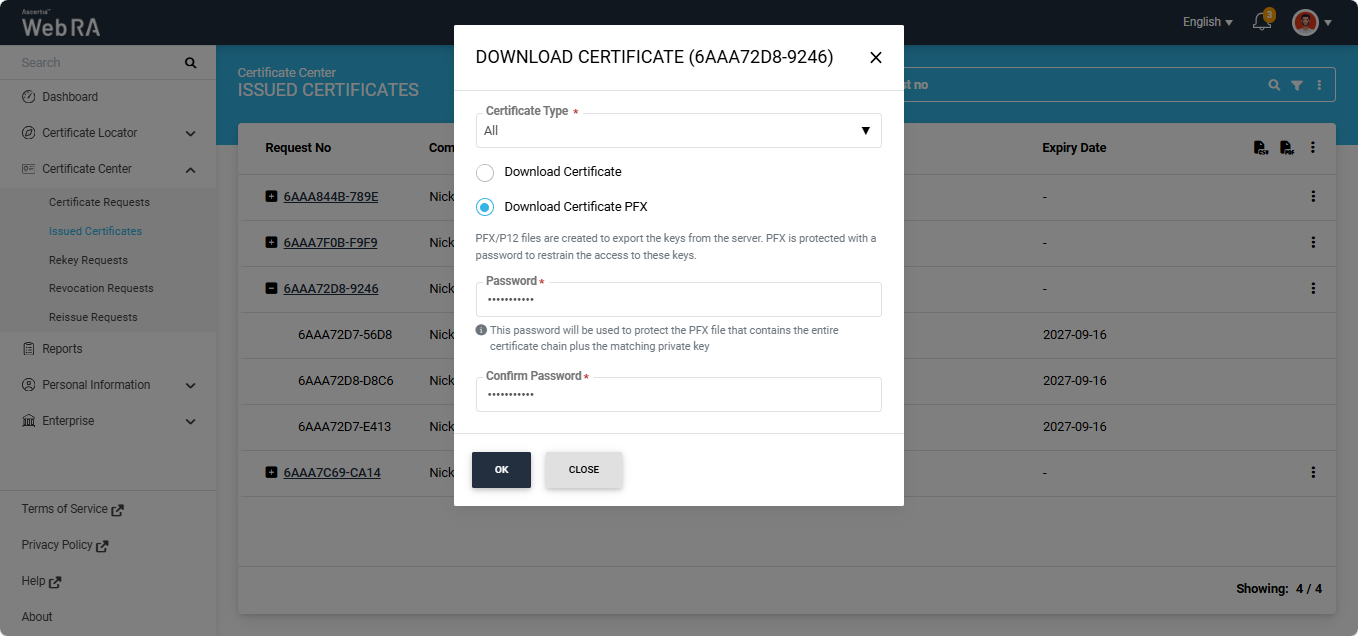
After entering the password, click ‘OK’. A ZIP file is downloaded to your system containing the PFX files of all the selected certificates.
If you select a single certificate from the ‘Certificate Type’ dropdown, the downloaded ZIP file contains only the PFX file of the selected certificate.
The Certificate Linting feature allows users to validate a certificate against selected linting sources to ensure it adheres to established standards and best practices. This helps in identifying potential issues, such as expired certificates, misconfigurations, or non-compliance with security requirements.
Expand Certificate Center > Issued Certificates from the left-tree menu in the Web portal. Click the three-dotbutton next to the certificate on which you want to perform linting, and select ‘Certificate Linting’.
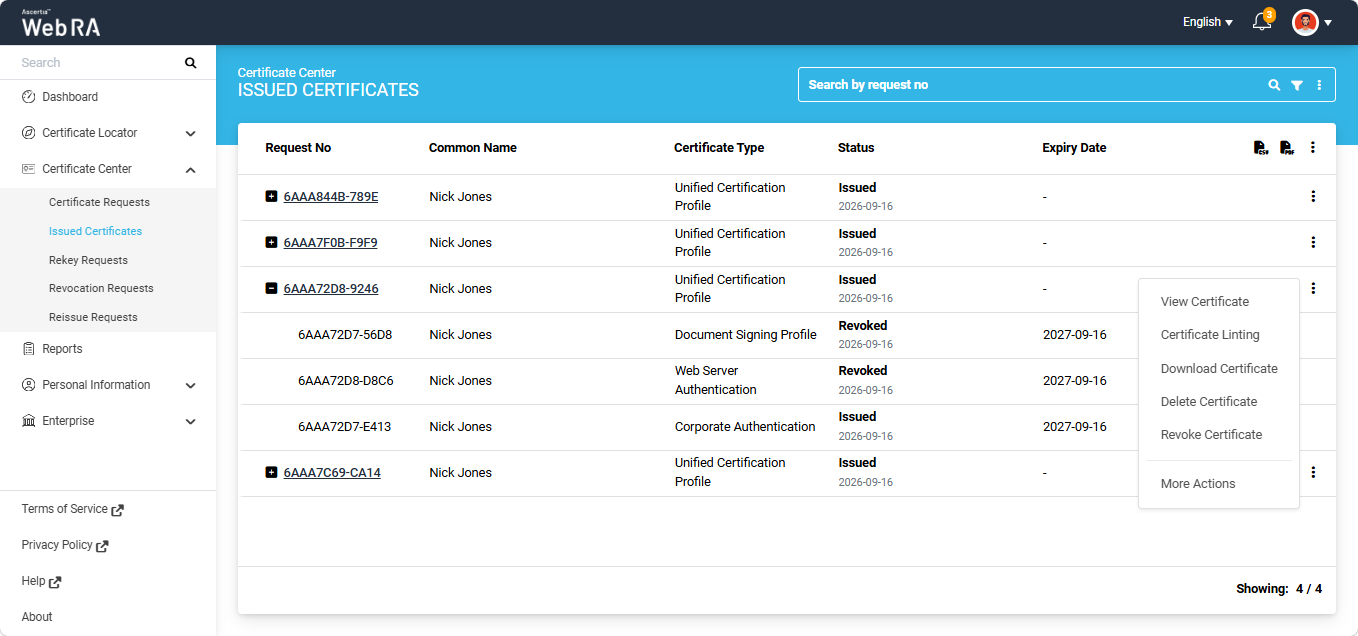
A dialog titled ‘Certificate Linting’ appears on the screen.
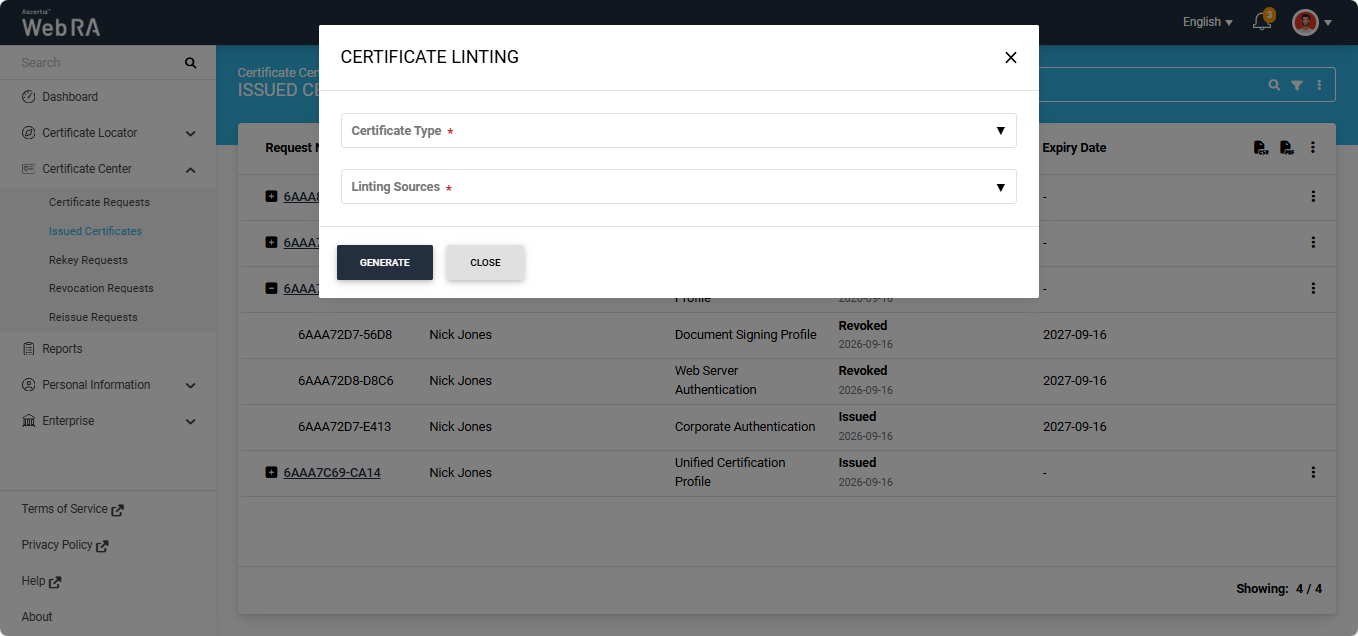
From the ‘Certificate Type’ dropdown you have the option to either select a single certificate or select the ‘All’ option to perform linting on all certificates generated under the Unified Certification Profile.
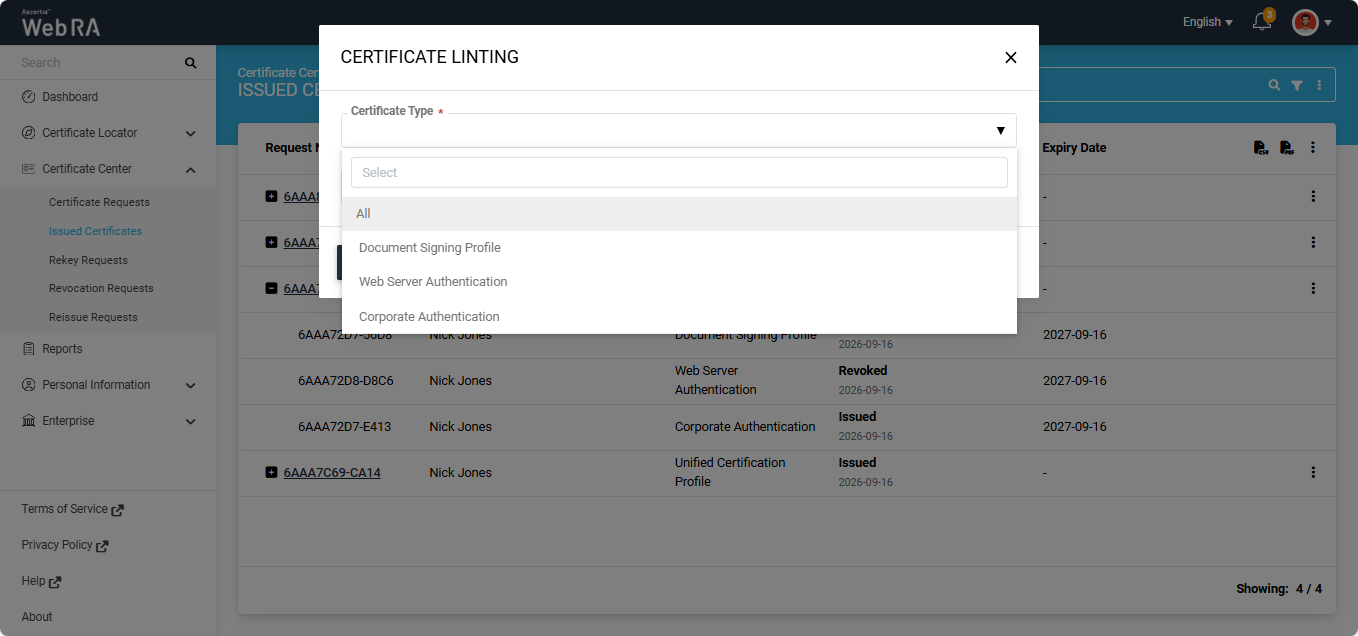
Select one or more linting sources from the ‘Linting Sources’ dropdown.
Then, click the ‘Generate’ button. A ZIP file is downloaded to your system that contains the Certificate Linting Report’ for the selected certificate in PDF format. If you have selected ‘All’ in the ‘Certificate Type’ dropdown, the ZIP file will contain linting reports of all certificates.
Expand Certificate Center > Issued Certificates from the left-tree menu in the Web portal.
To delete a certificate, click the three-dotbutton next to that certificate and select ‘Delete Certificate’.
A confirmation dialog appears on the screen.
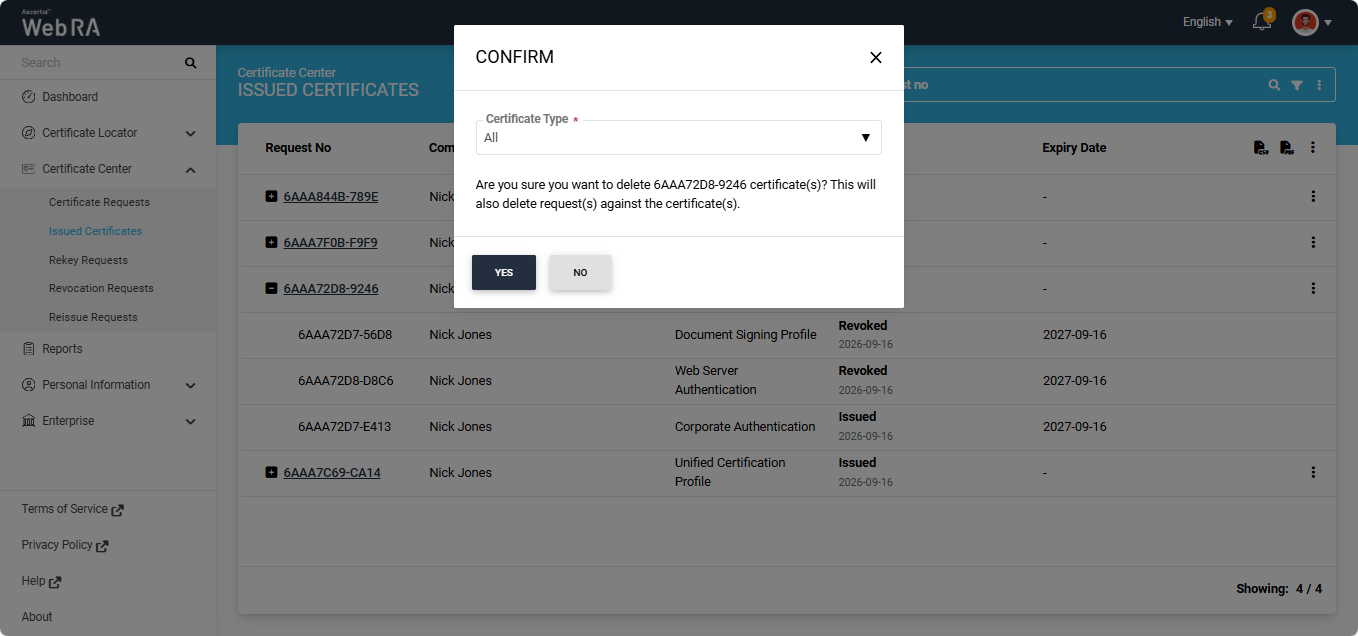
You have the option to delete all certificates generated under the Unified Certification Profile by selecting the ‘All’ option, or select any one certificate from the list to delete.
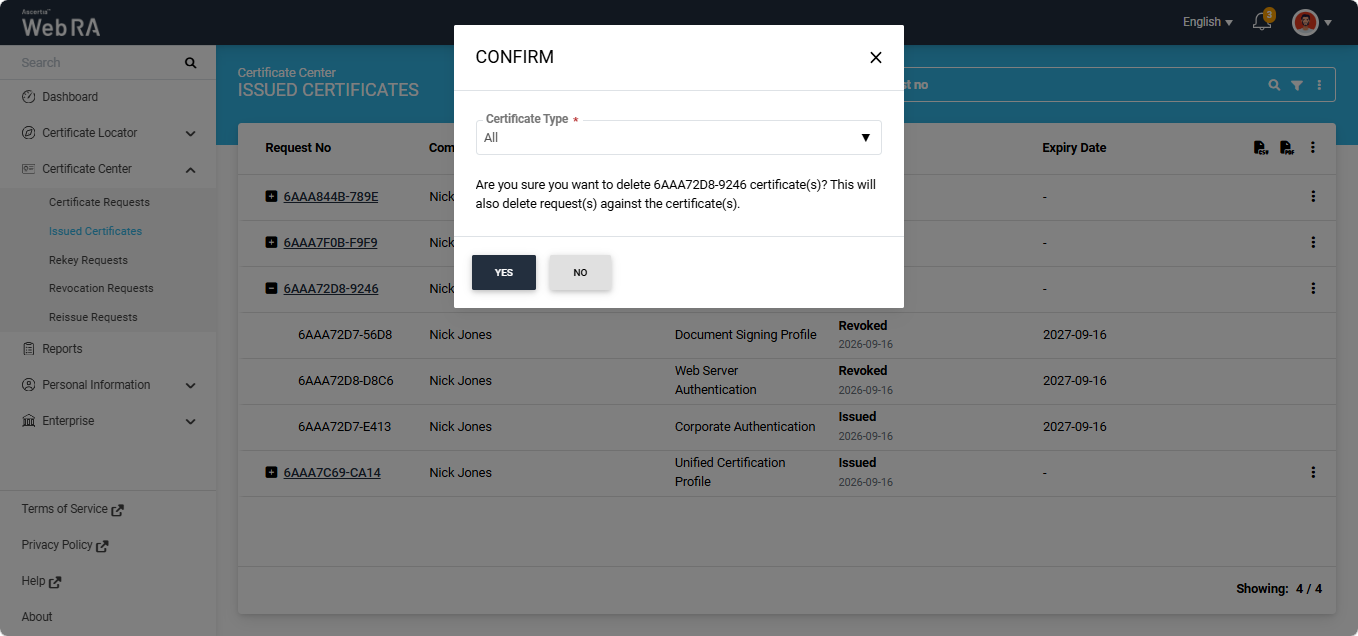
After making the required selection, click ‘Yes’ to confirm the deletion.
If you select a single certificate from the list, only that certificate is removed from the Issued Certificates listing. The remaining certificates continue to appear under the Unified Certification Profile request grouping.
How to Create a Token-based Certificate Request
To create certificate requests using the Unified Certification Profile, expand Certificate Center > Certificate Requests from the left-tree menu in the Web portal.
|
|
Note: Go Sign Desktop version 8.4.2.1 is required to generate certificates from a Unified Certification Profile containing Token-based or MSCAPI-type certification profiles. |
Click on the ‘+’ button in the listing header to create a new certificate request. The system will display the ‘Create Request’ screen.
On this screen, select the required Unified Certification Profile from the ‘Certificate Type’ dropdown. The system will display all the certification profiles selected under the Unified Certification Profile, along with their Key Store and Validity Period details.
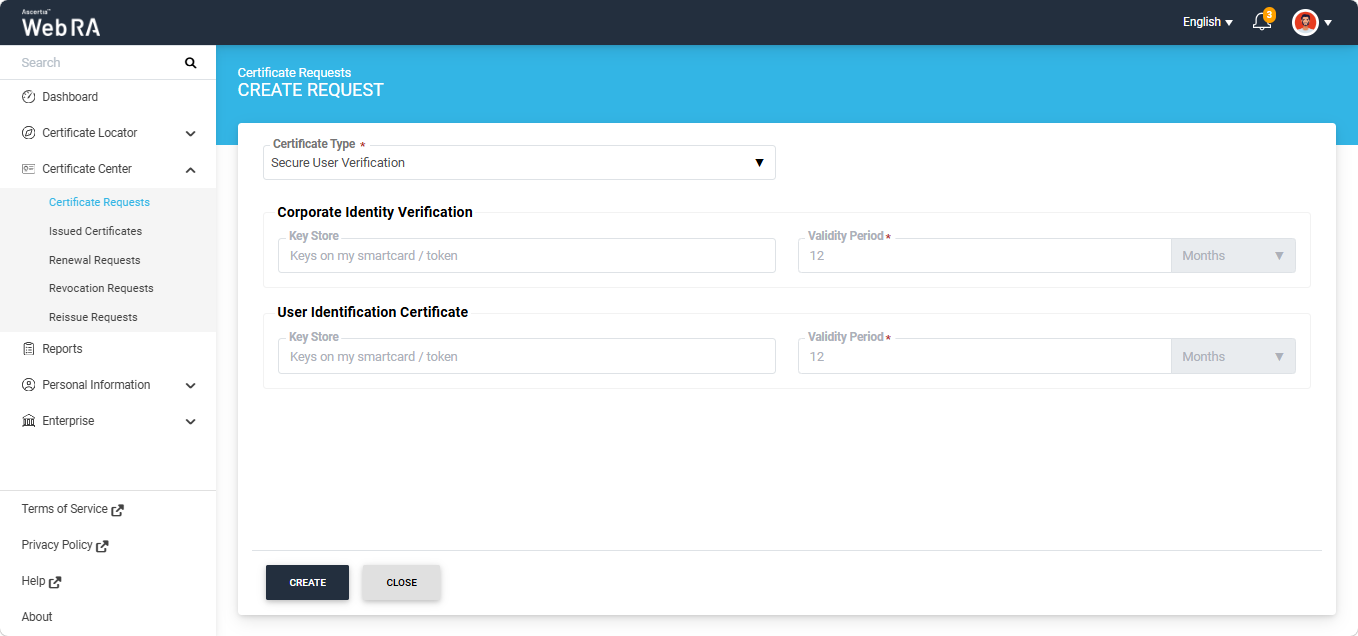
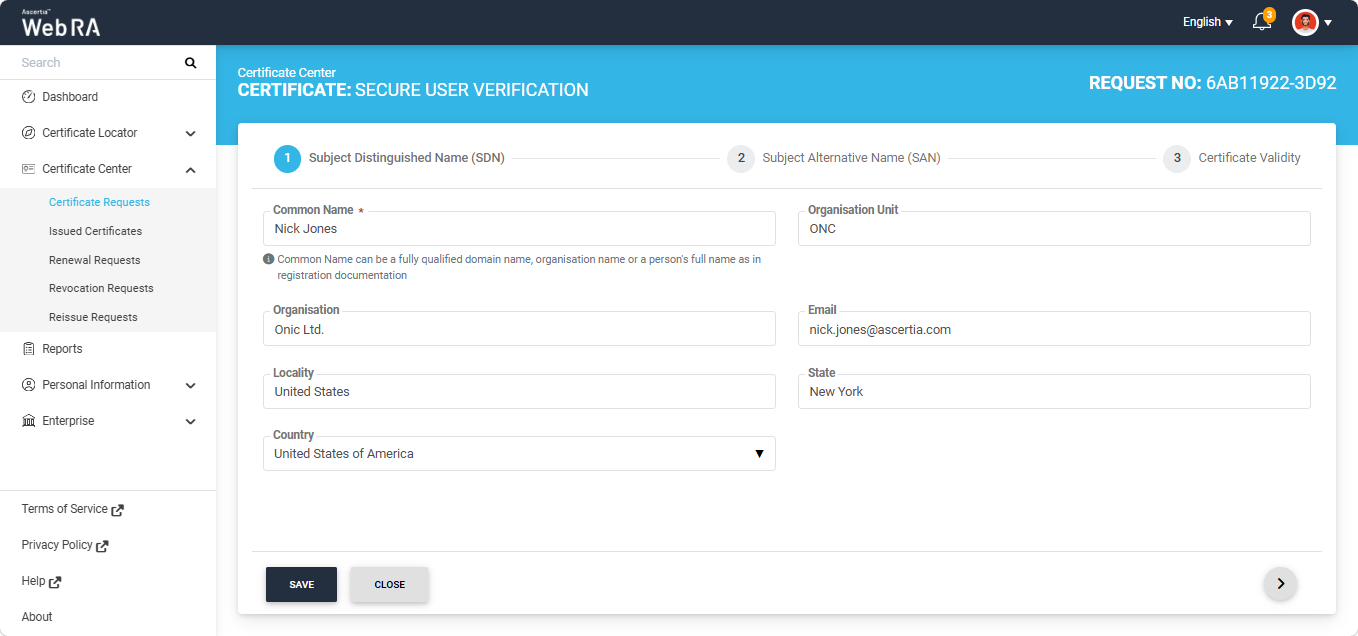
Click the ‘Create’ button to proceed. The system will display the ‘Subject Distinguished Name (SDN)’ screen.
|
|
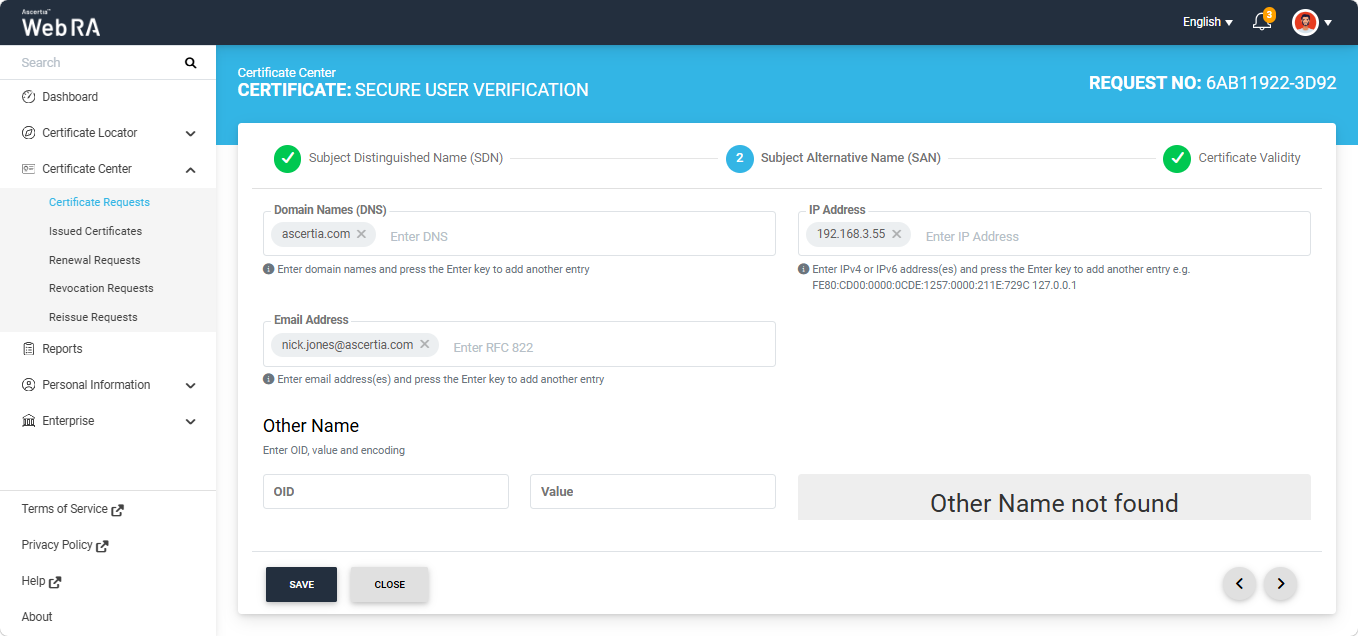
Note: The system combines the SDN fields configured in all the certification profiles selected in the Unified Certification Profile and displays them on the ‘Subject Distinguished Name (SDN)’ screen. If the same SDN field is configured in multiple certification profiles, that field is displayed only once on the SDN screen during certification request creation. For example, if the Common Name SDN is configured in two certification profiles, the ‘Common Name’ field will appear only once on the SDN screen. The SDN fields displayed on the SDN screen are not included in all the certificates generated using the Unified Certification Profile. Each certificate will contain only the SDN fields configured in its respective certification profile. For example, if the Common Name SDN is configured in one certification profile but not in another, the ‘Common Name’ field will be displayed on the SDN screen, but the certificate generated using the certification profile without the Common Name configuration will not contain the Common Name attribute. Enter the details in the SDN fields as per your requirement and click the next ‘>’ button to proceed to the Subject Alternative Name (SAN) screen. |
|
|
Note: The system combines the SAN fields configured in all the certification profiles selected in the Unified Certification Profile and displays them on the ‘Subject Alternative Name (SAN)’ screen. If the same SAN field is configured in multiple certification profiles, that field is displayed only once on the SAN screen during certification request creation. For example, if the Domain Names (DNS) field is configured in two certification profiles, the ‘Domain Names (DNS)’ field will appear only once on the SAN screen. The SAN fields displayed on the SAN screen are not included in all the certificates generated using the Unified Certification Profile. Each certificate will contain only the SAN fields configured in its respective certification profile. For example, if the Domain Names (DNS) field is configured in one certification profile but not in another, the ‘Domain Names (DNS)’ field will be displayed on the SAN screen, but the certificate generated using the certification profile without the Domain Names (DNS) configuration will not contain the Domain Names (DNS) attribute. Enter the details in the SDN fields as per your requirement and click the next ‘>’ button to proceed to the Certificate Validity screen. |
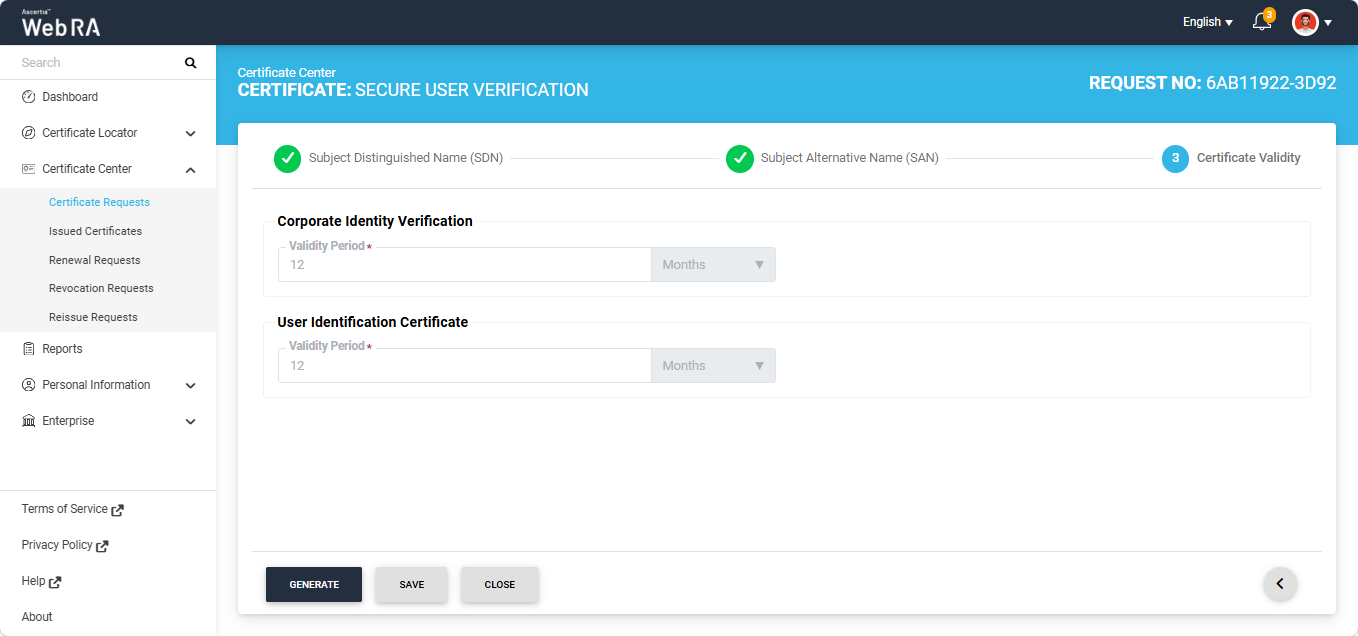
The validity period of each certification profile is displayed on this screen. The ‘Validity Period’ field appears enabled or disabled according to the configuration of each certification profile.
Click the ‘Generate’ button to generate the certificate.
|
|
Note: If a Subscriber Agreement is configured in any or all of the profiles, each agreement is displayed on the screen one by one. You must agree to all the agreements to generate the certificates. |
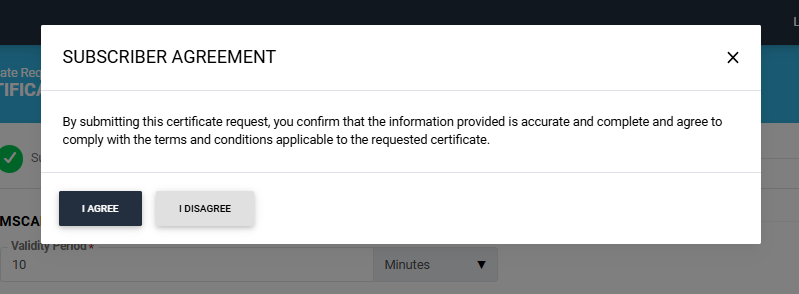
Click ‘I Agree’ to proceed. The system will take some time to process the certificate requests. Once the processing is complete, the certificate will be generated and appear in the Issued Certificates listing screen.
The system will display the 'Certificate Generated dialog on the screen along with the 'Token imported into Token' success alert.
|
|
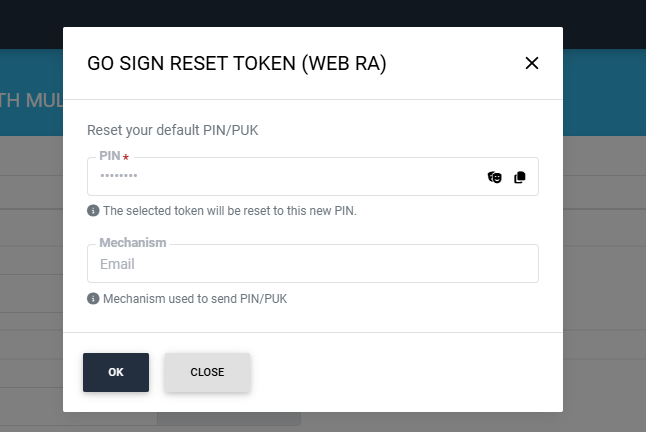
Note: If the token attached to the computer is already assigned to the user, the certificate is generated when the user clicks ‘Generate’. However, if the token is not assigned to any user, the system displays the ‘Go Sign Reset Token’ dialog. The dialog displays the new PIN of the token and the mechanism through which the PIN is shared with the user. You can also click the Mask icon to view the new PIN. |
|
|
Note: If an issue occurs while generating one or more certificates in a Unified Certification Profile, the certificates that can be generated successfully are issued, while the certificates affected by the issue are not generated. For example, if a Unified Certification Profile contains four certification profiles and the enterprise licence limit has been reached for one of them, the system generates the other three certificates and displays a success alert indicating that three out of four certificates were generated. An error alert also appears, describing the issue that prevented the fourth certificate from being generated. The same behaviour applies to other issues that prevent certificate generation. The ‘Generate’ button remains available for the certificate request. Resolve the issue indicated in the error alert and click ‘Generate’ again to generate the remaining certificate(s). |
The Unified Certificate Request appears in the "Certificate Requests" listing. When the request is expanded, the certificates that were generated successfully display the ‘Approved’ status, while the certificate(s) that could not be generated display the ‘Draft’ status. The Unified Certificate Request moves to the "Issued Certificates" listing only after all certificates associated with the request have been generated successfully and approved.