
Certificates
The certificates listing screen displays all the certificates in the Web RA system that are issued, revoked, and suspended. The listing screen also displays the Unified Certificate Requests generated in the Web RA system.
The admin and enterprise administrators can optionally view, download and revoke the certificates for any user considering the following rules:
- An Admin RAO can see list of all issued certificates regardless of the enterprise affiliation
- An Enterprise RAO can only see the list of certificates issued under his enterprise
- Clicking the Request ID URL will show the complete detail of the request e.g.:
- List of validation checks performed on the CSR before submitting the request to the CA.
- Download the CSR to manually evaluate it using a third party software.
- List of attributes of the CSR.
- Any other information that is required for audit purposes.
On the admin portal:
Click Certificates from the left menu pane.The certificates listing will appear. The Issued to section will display Citizen ID below the user name if it is enabled in the Configurations > Default Settings.
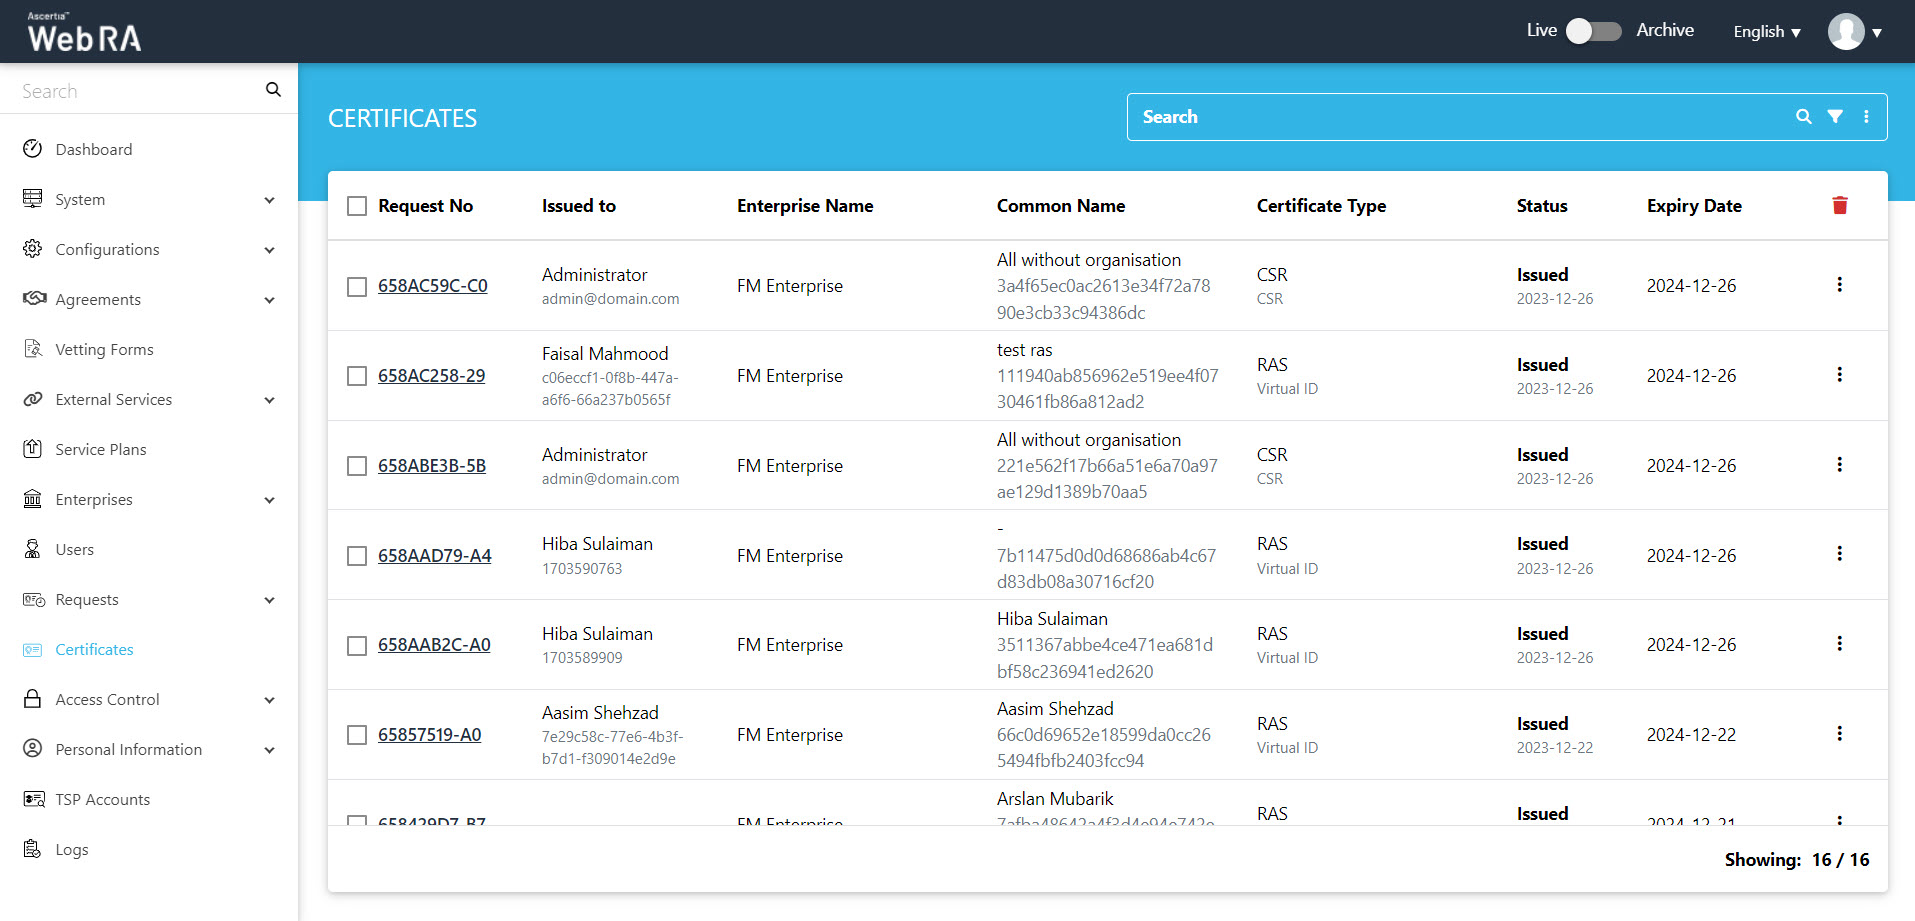
Users can search for specific certificate(s) in the listing using the search bar.
The "Advanced Search ( )" feature is also available for more targeted searches.
It allows users to perform detailed and refined searches within the certificate requests section. By applying specific filters and criteria, users can quickly find the certificates they want to view.
To access the advanced search, click on the ‘Advanced Search’ icon next to the search box.
This will open the ‘Search’ dialog, which will display two tabs, Search and Custom Search.
Under the ‘Search’ tab, more than a dozen filters will appear that allow users to refine their search results based on specific criteria.
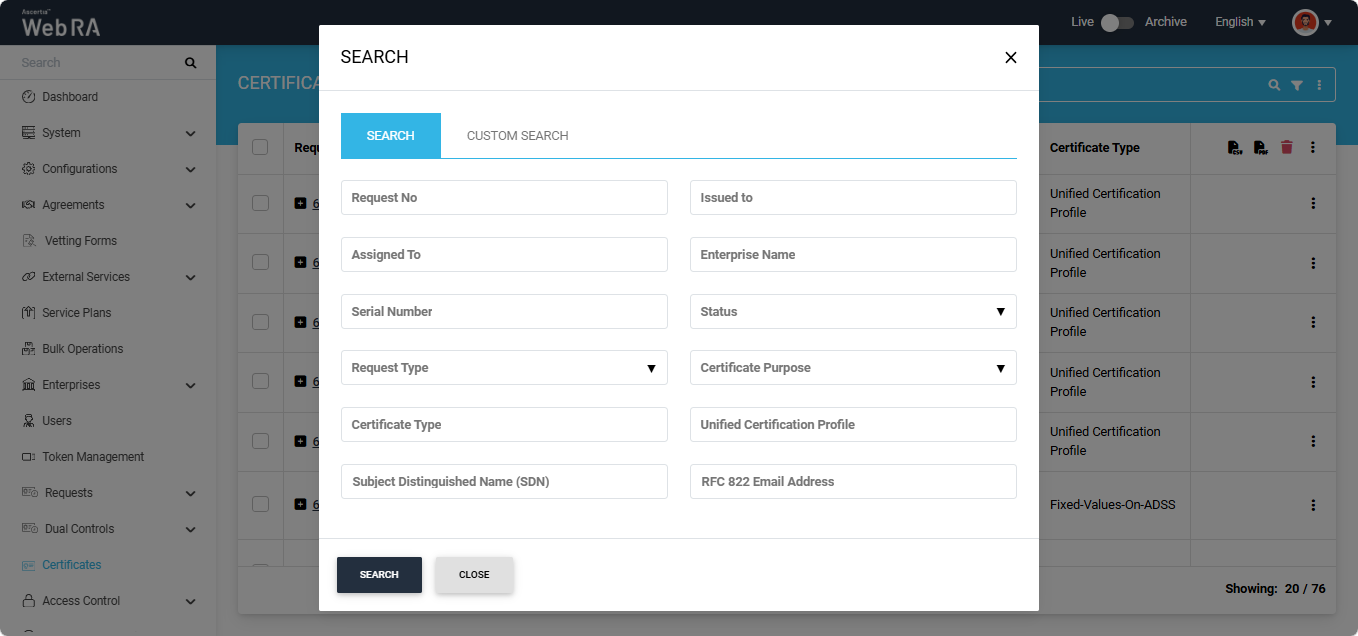
After applying the required filters, click the ‘Search’ button.
The listing section will display the certificates based on your applied filters.
Meanwhile, users can perform a custom search for certificates from the 'Custom Search' tab. In this tab, they can add the desired filters one by one using the dropdown field.
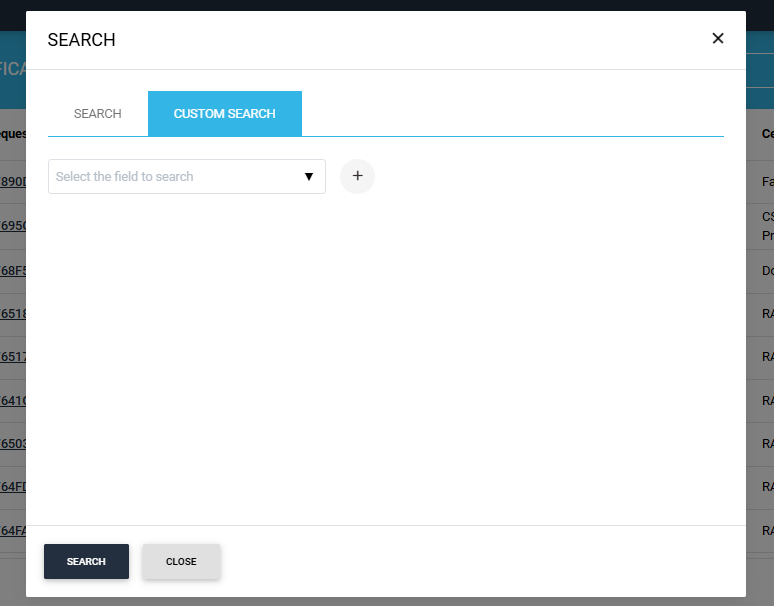
To add a filter, click on the dropdown field, select a filter, and then click the ‘+’ button to include it in the search.
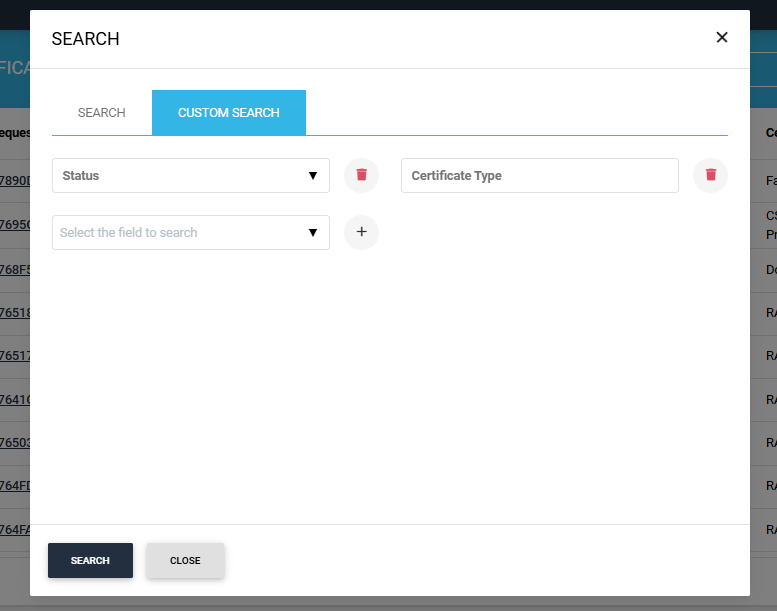
Once a filter is added, enter the value of that filter and click ‘Search’.
The system will display the certificates as per your search criteria.
On this screen, users have the option to save the search criteria, modify it, or clear the criteria to view all certificates in the listing again.
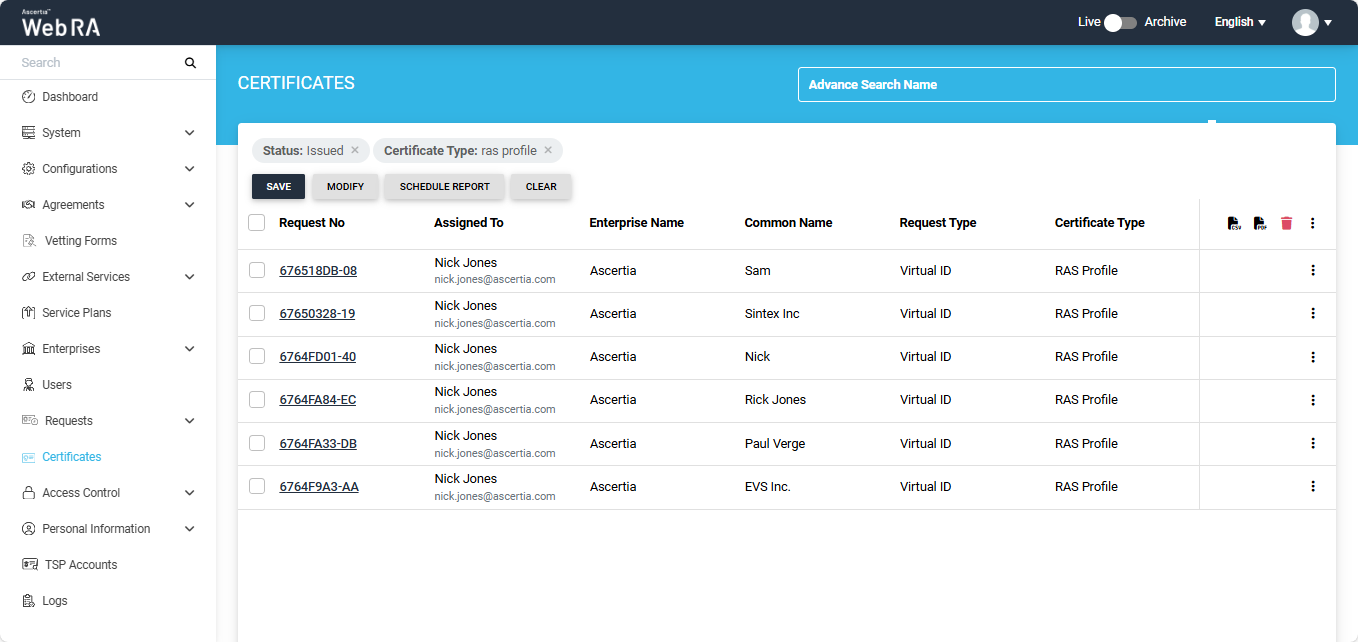
Furthermore, users can also generate a report based on their advanced search.
If a user has applied an advanced search filter and wants to create a report of all the certificates that appear based on that search, they can use the ‘Schedule Report’ option.
Clicking on the ‘Schedule Report’ button displays a dialog titled ‘Schedule Report’.
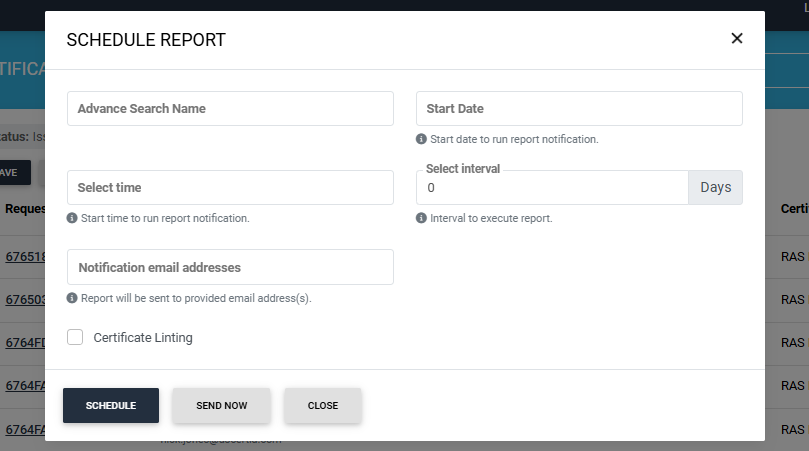
On this screen, users will be required to enter the following details:
|
Field |
Description |
|
Advanced Search Name |
Add the search criteria applied from the advanced search tab. |
|
Start Date |
Specify the start date if you want to schedule the report for a future date. |
|
Select Time |
Specify the time at which you want the report to be generated. |
|
Select Interval |
Choose how many days should pass between each time the report is generated. |
|
Notification Email Addresses |
Mention the email address(s) where you want to receive the report. |
|
Certificate Linting |
Check this box to enable certificate linting. Once enabled, you can select the sources you want to use for linting the certificate. |
Click on the ‘Schedule’ button to schedule the report based on the selected date and time. To generate the report immediately, click ‘Send Now’.
Once the report is generated, it will be sent to the provided email address(es).
Users can view all scheduled reports in the 'Certificates Report' section under the 'System' module.
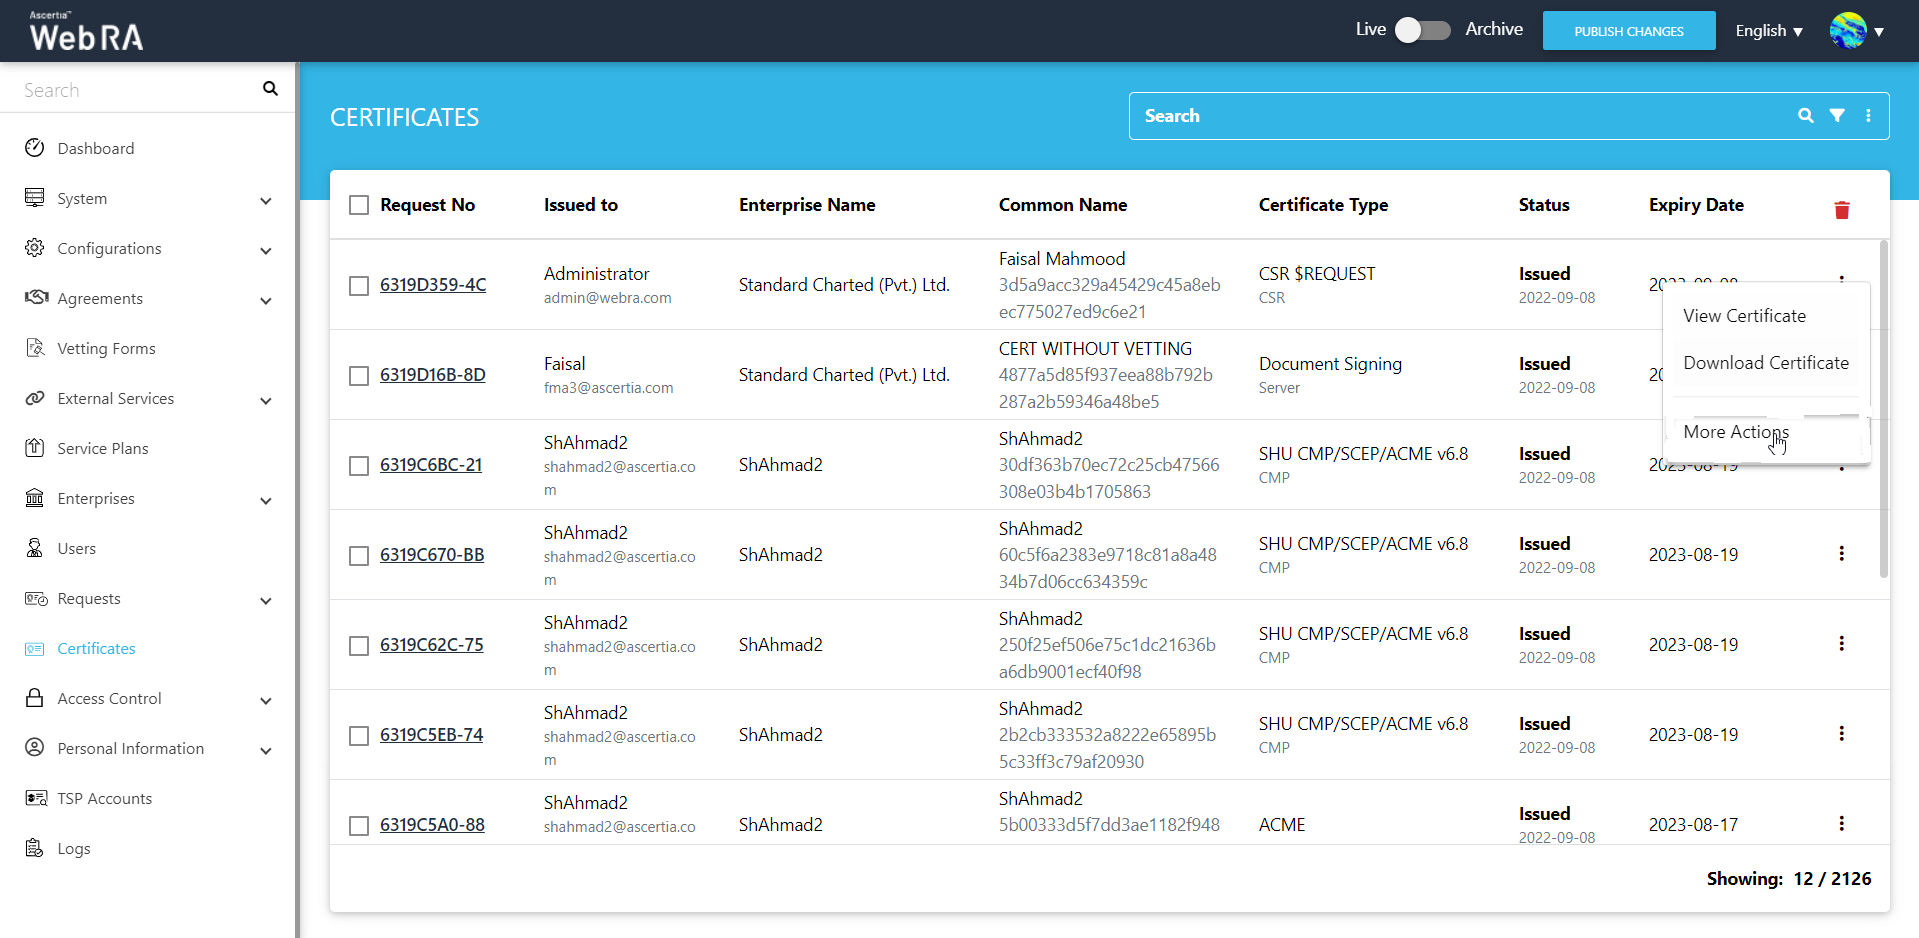
An operator can perform a number of actions by clicking on the  button like view certificate, view token information, download certificate or more actions, as displayed below:
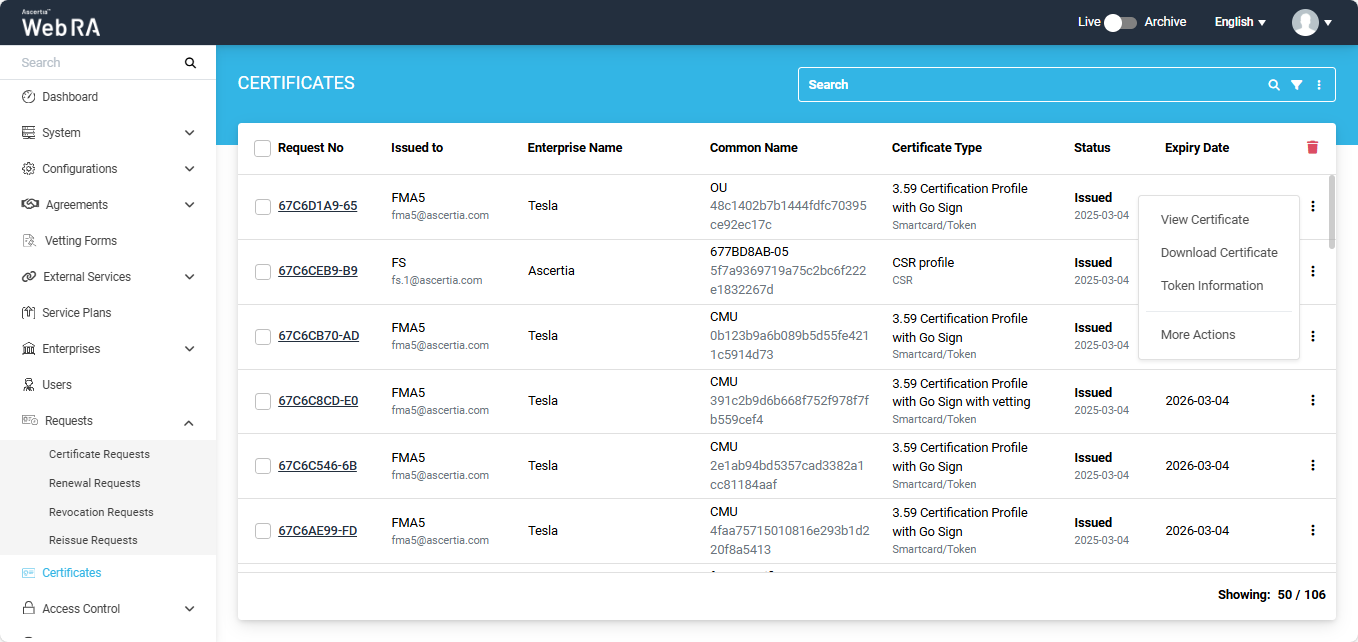
- To view a certificate, click the button adjacent to the certificate and click the View option.
- To download a certificate on the file system, click the button adjacent to the certificate and click the Download option.
- To view token information, click the
 button adjacent to the certificate for which token has been generated and click the ‘Token Information’ option.
Note: Operator cannot download the certificate PFX if the ‘Enable one-time PFX download” option is enabled in the Certification Profile.
Resend PIN/PUK Values
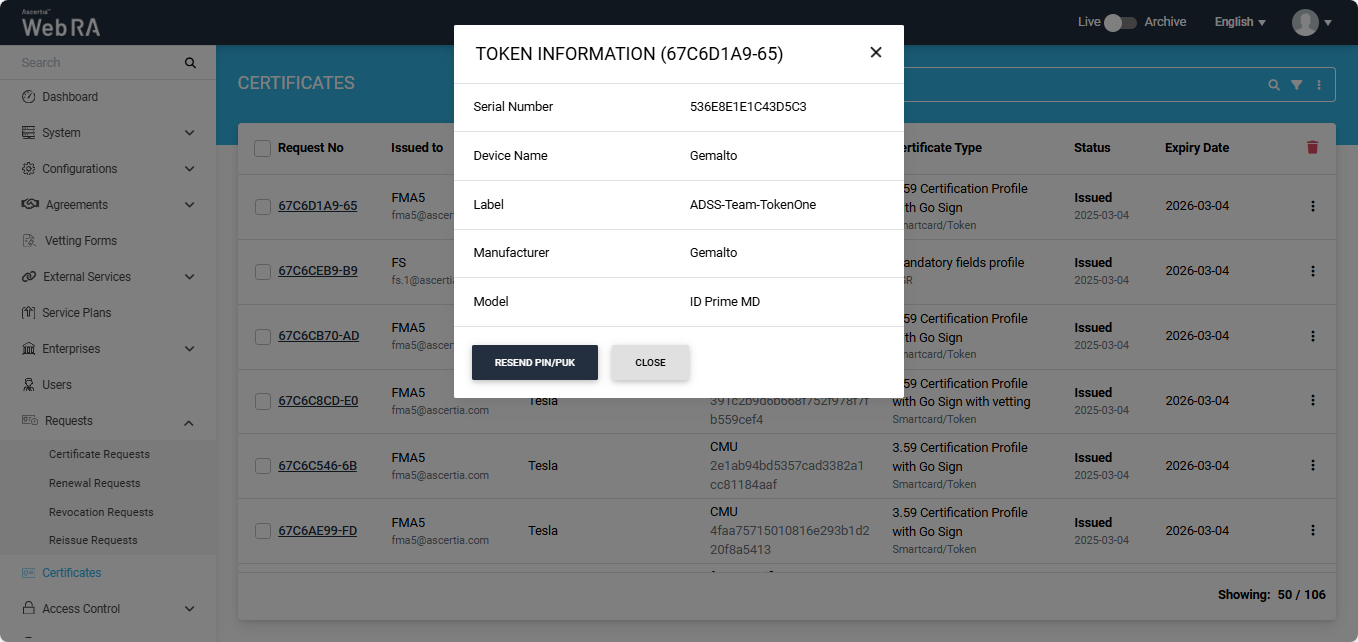
The system also provides an option in the Token Information dialog to resend the values of PIN/PUK to the user.
If the operator clicks on the "Resend PIN/PUK' button, the values will be shared with the user via Email or SMS or on both platforms. The mechanism to receive the PIN/PUK values is selected during the creation of certification profile.
View Certification Profiles section for more details about mechanisms.
More Actions
Once you click "More Actions" button, you can perform the following actions:
An administrator can revoke certificates from certificate listing.
Click "Certificates" from the left menu pane, then click .
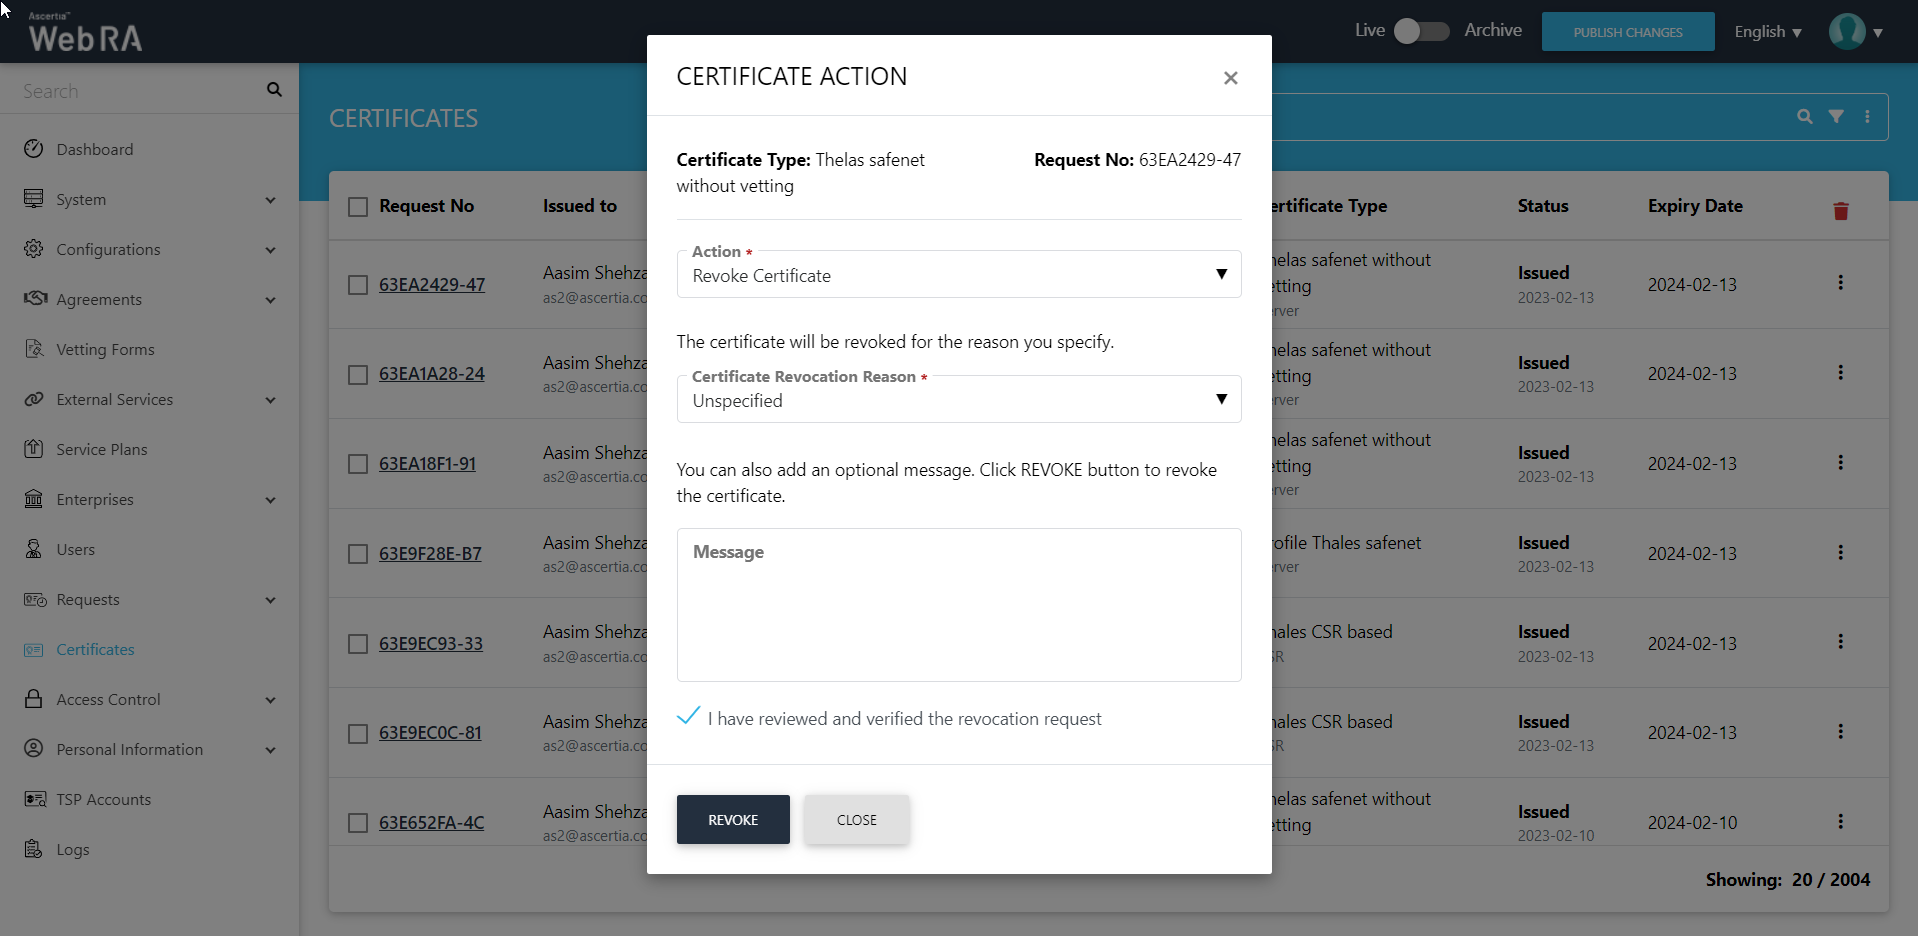
Click "More Actions" and Certificate Action screen will appear:
 '
'
Once you select the action, certificate revocation reason drop down will be displayed, you can also add an optional message, tick the confirmation message and click "Revoke". Then the OTP screen will appear:
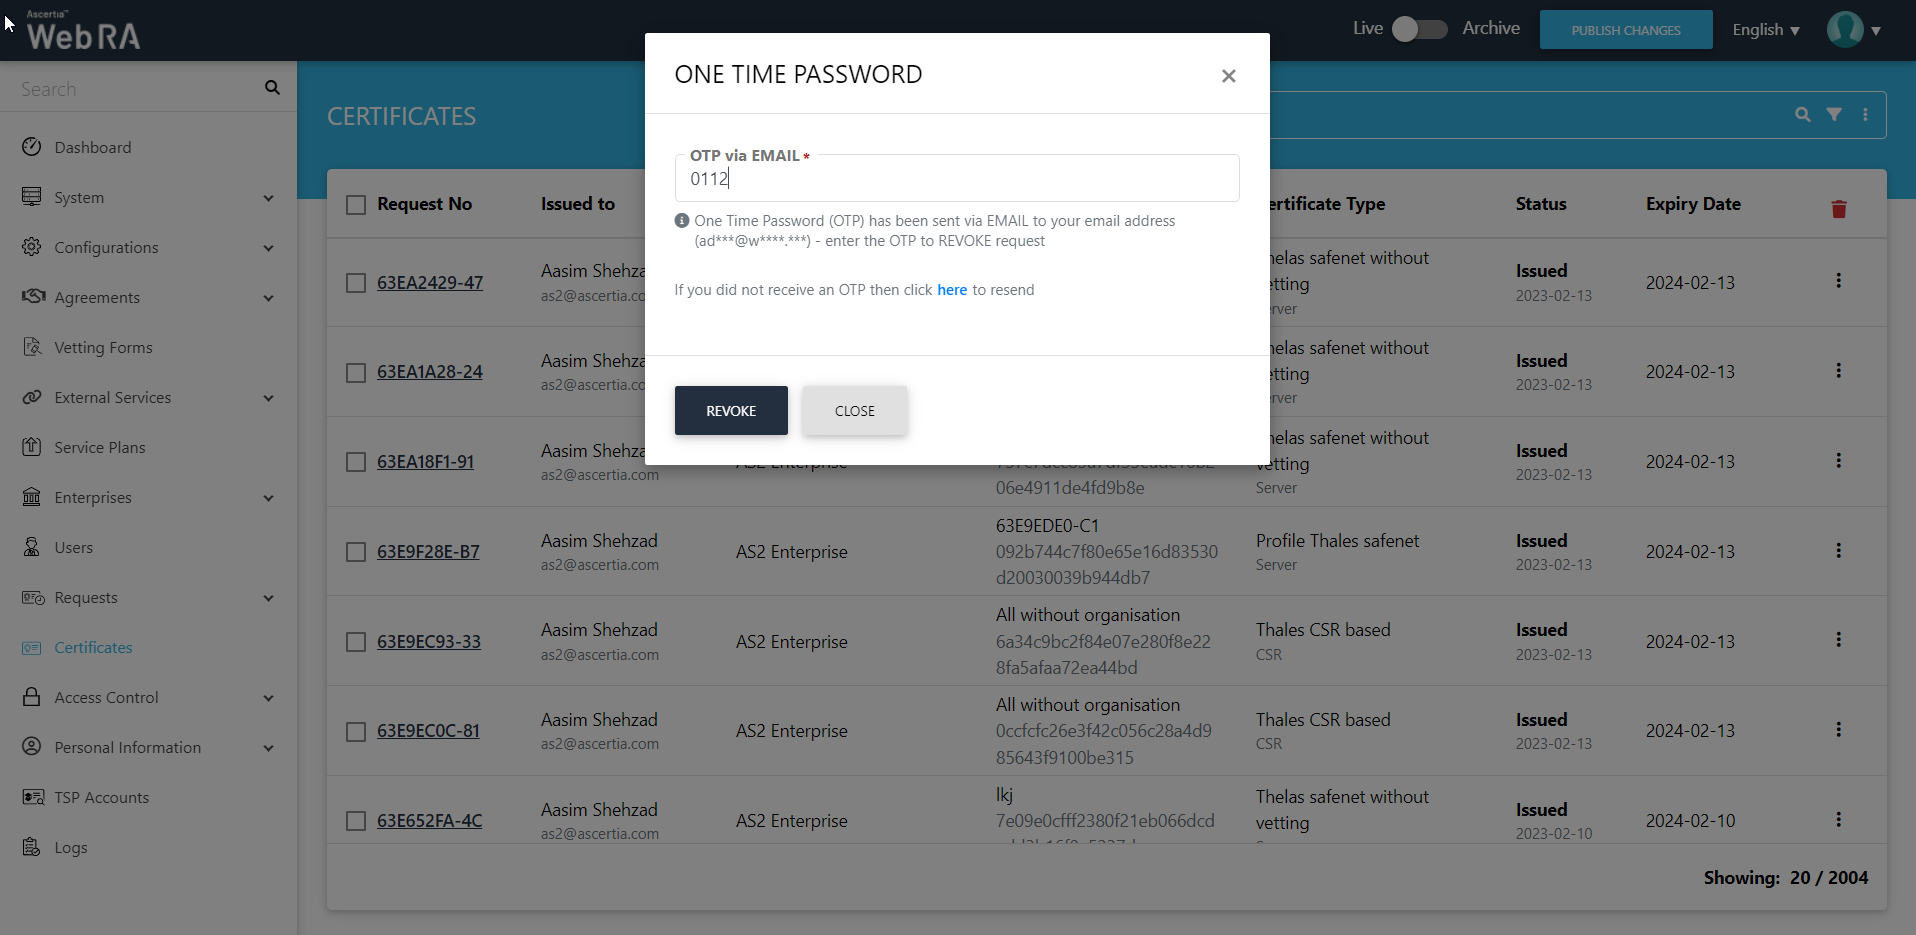
A roaster message Certificate Revoked will appear.
ADSS Web RA supports the following types of TLS certificates:
- EVS TLS Server authentication
- TLS Client authentication
- TLS Server authentication
When an EV TLS Server authentication certificate is revoked, ADSS Web RA will support only the following six revocation reasons:
- Unspecified
- Key Compromise
- Affiliation Change
- Superseded
- Cease of Operation
- Privilege Withdrawn
Certificate Suspension
The first two steps for certificate suspension remain similar to the revocation process as explained above. However, on the Certificate Action screen, select Certificate Hold from the certificate revocation reason drop down ,add an optional message if required, tick the confirmation checkbox:
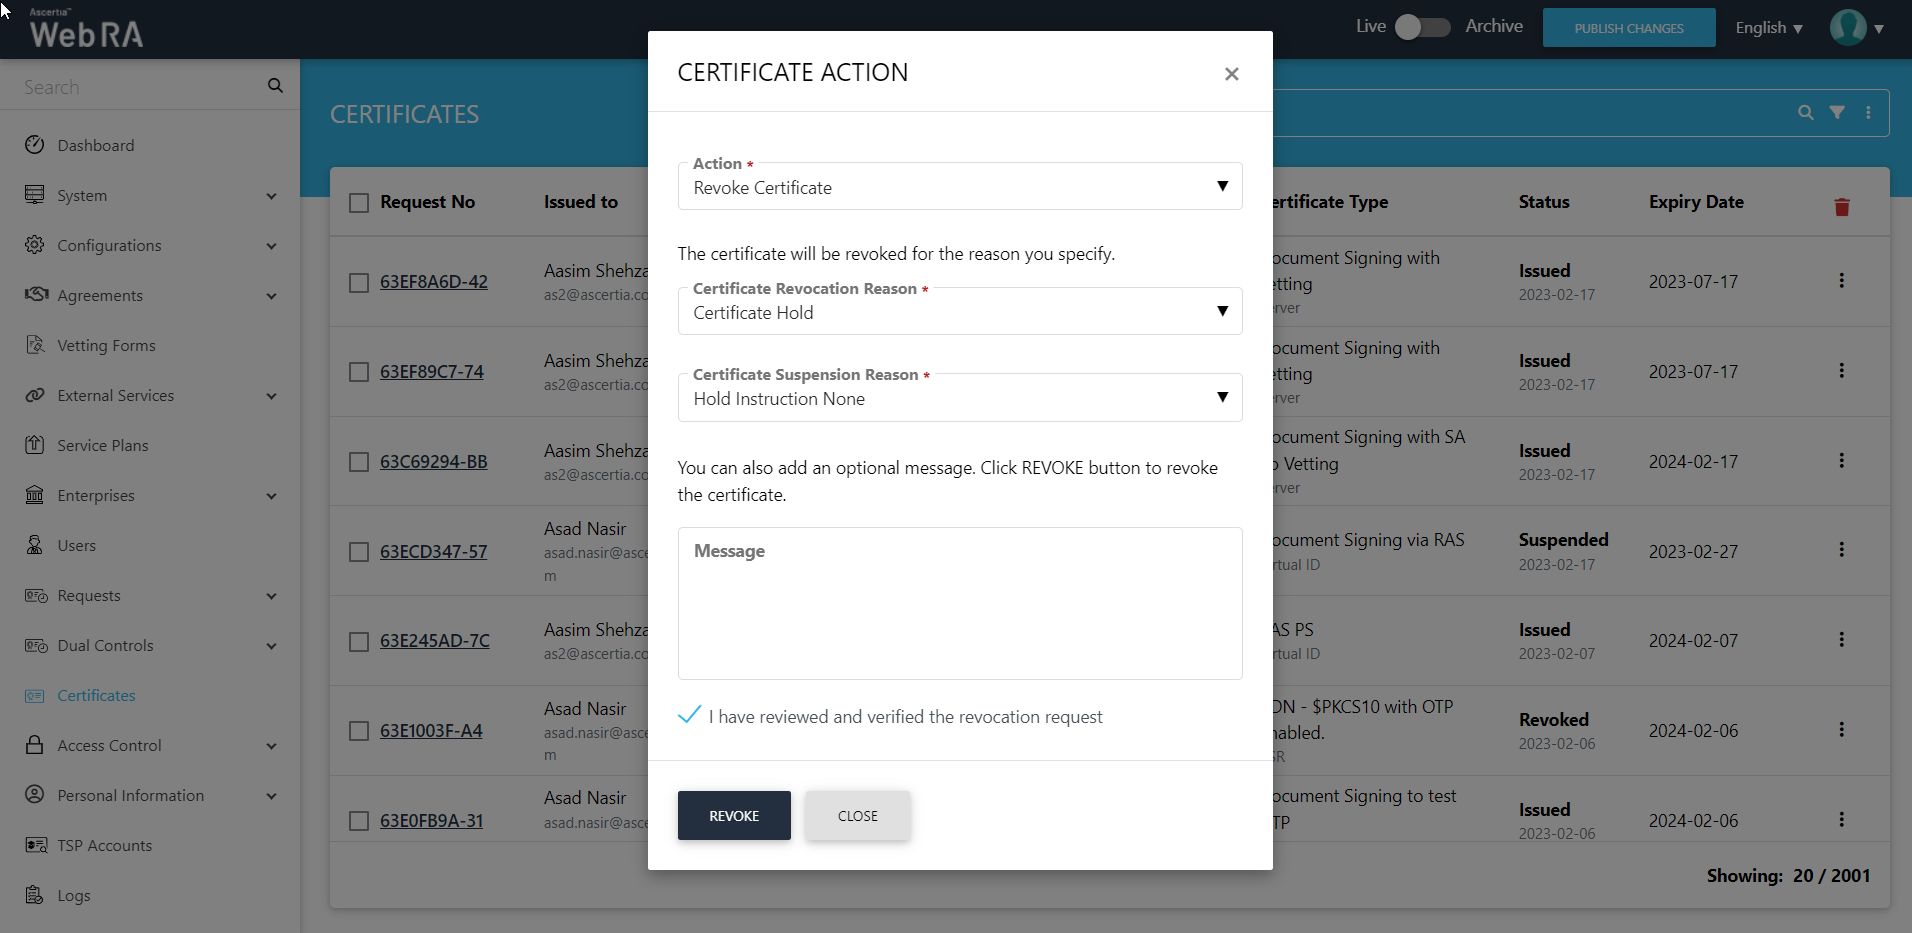
Once you click "Revoke", a roaster message Certificate Suspended will appear,
Certificate Reinstate
An administrator can also reinstate a suspended certificate from certificate listing. When an operator clicks on the button, the More Actions will appear as displayed in the image below. Click it to proceed further.
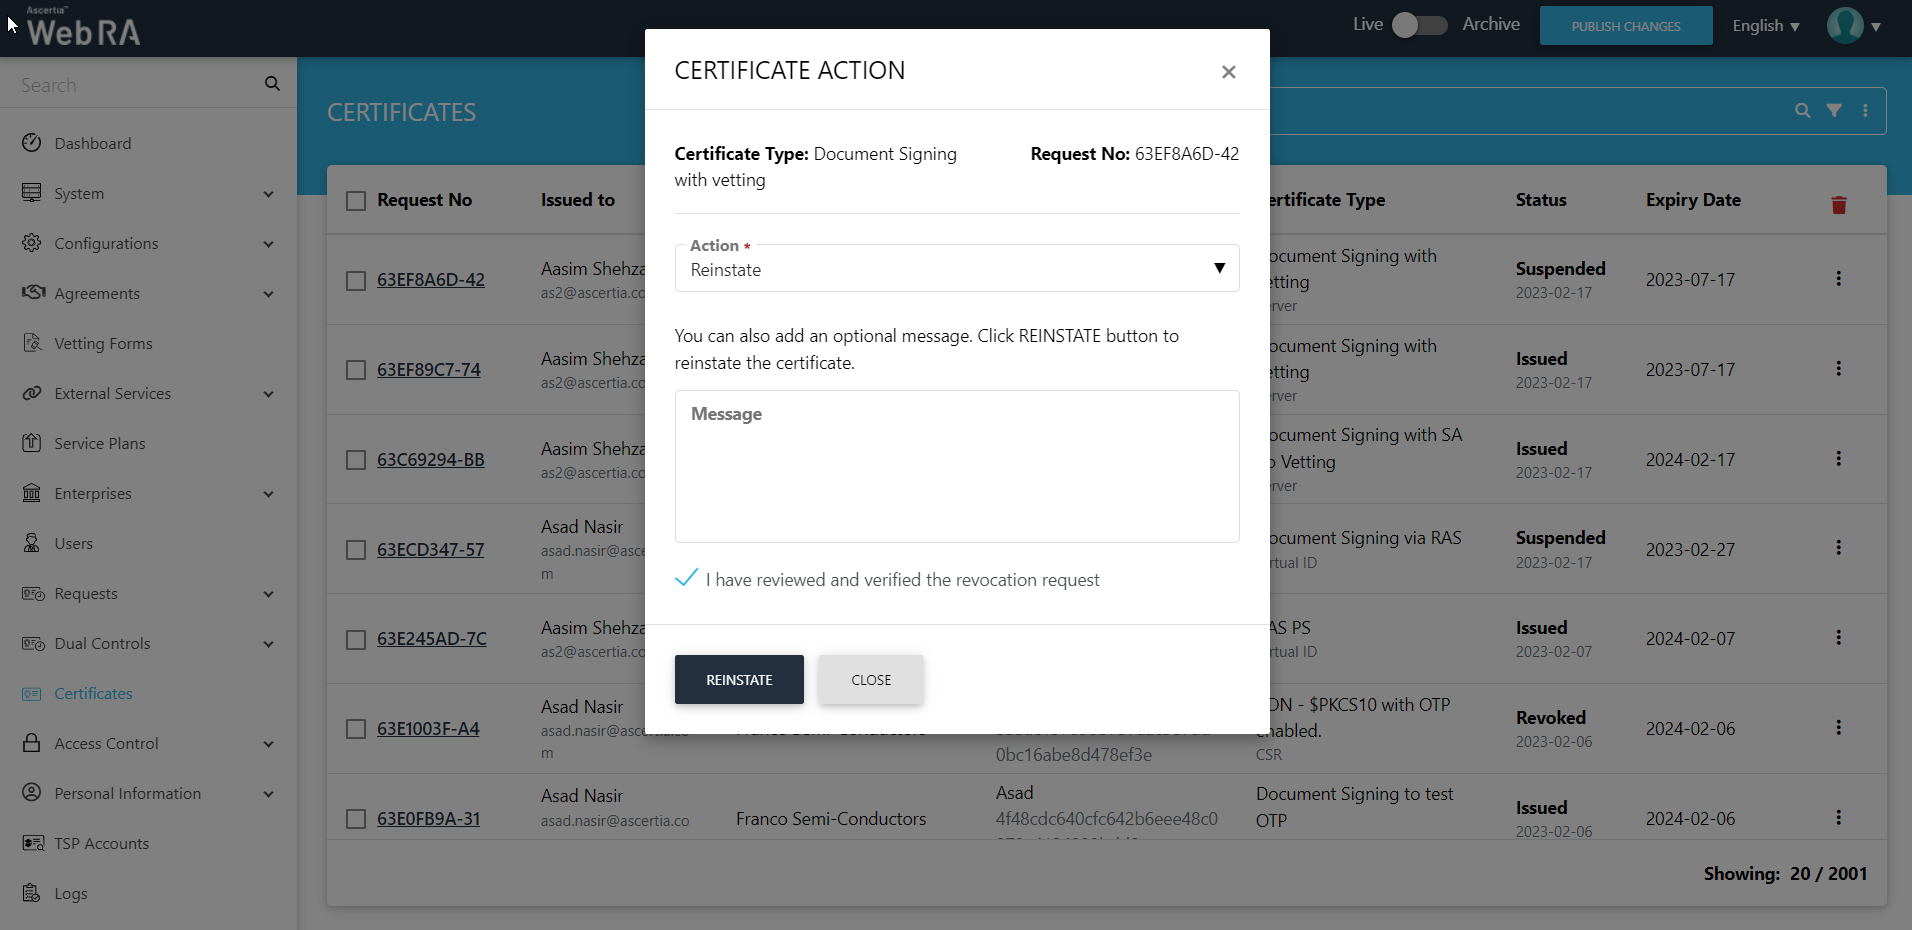
After selecting the options, click the Reinstate button and a roaster message "Certificate Reinstated" will appear:
An administrator can rekey their certificates from certificate listing. When an operator clicks on the button, the More Actions will appear as displayed in the image below. Click it to proceed further. (This should be configured in the Configurations > Policy section.)
From the next screen, the administrator can choose Rekey Certificate as displayed below:
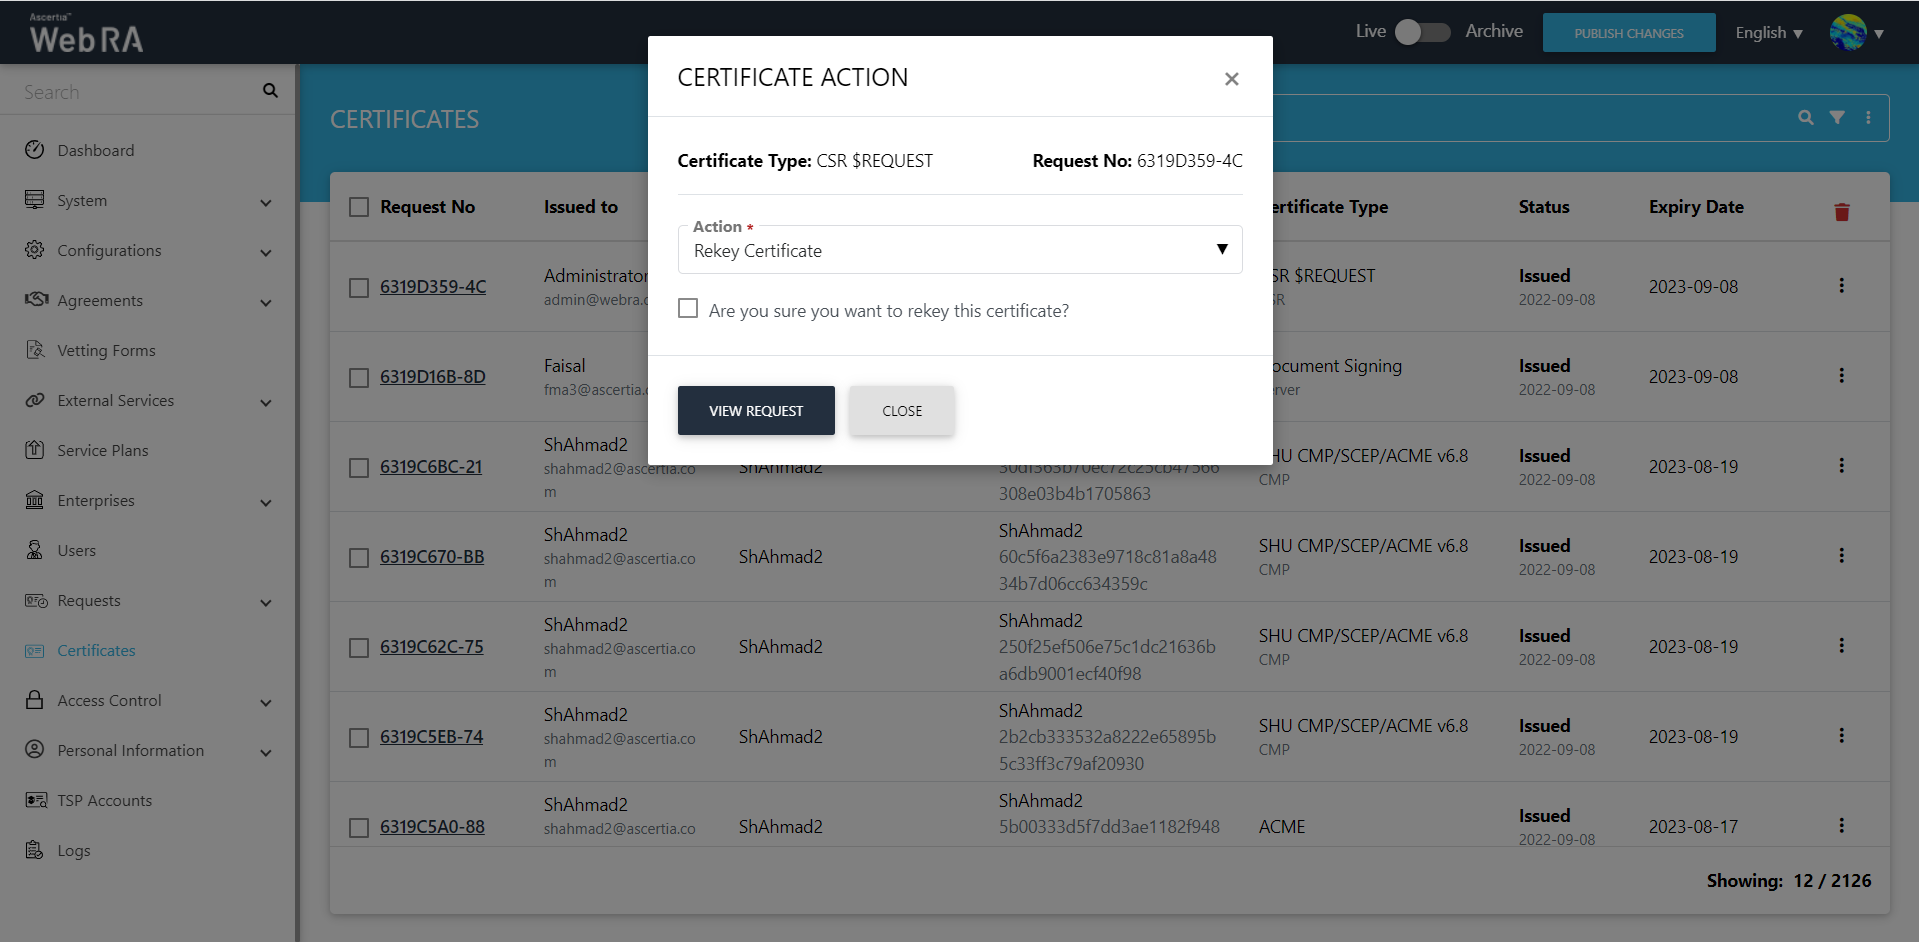
- Administrators can create CSR or smart card certificates.
- Check the tick-box 'Are you sure you want to rekey this certificate?' and click the view request button
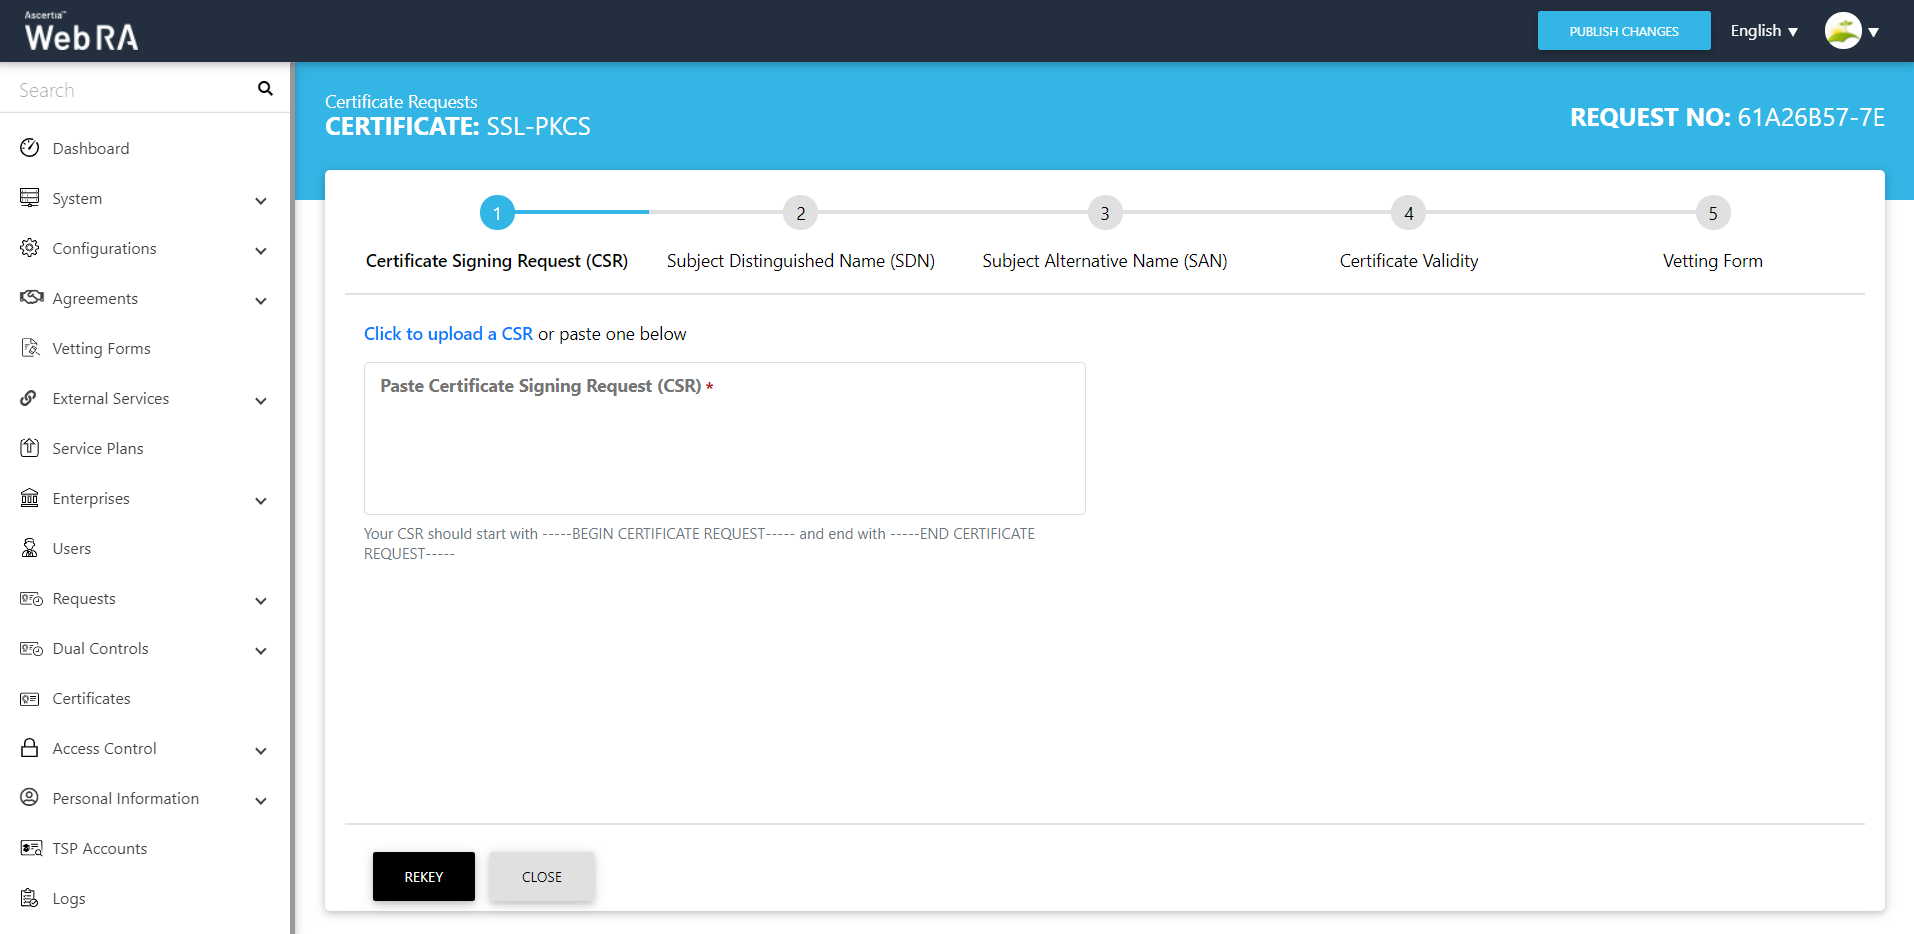
- Administrators can create CSR or Smart card certificates.
- Click on Rekey Certificate to open the request form.
- By clicking on 'Upload CSR' a new CSR will be uploaded and all other options in the request form will be based on the CSR uploaded by the user.
- In case of CSR ($PKCS10 or $Request) request form will be disabled and the user will not be able to edit the request form after uploading the CSR.
- Click on the 'Close' button, so action will be performed and the user will be redirected to the list of certificates.
- Now click on the 'Rekey' button if the OTP is enabled in the profile, then a dialog will appear with OTP details to rekey the certificate.
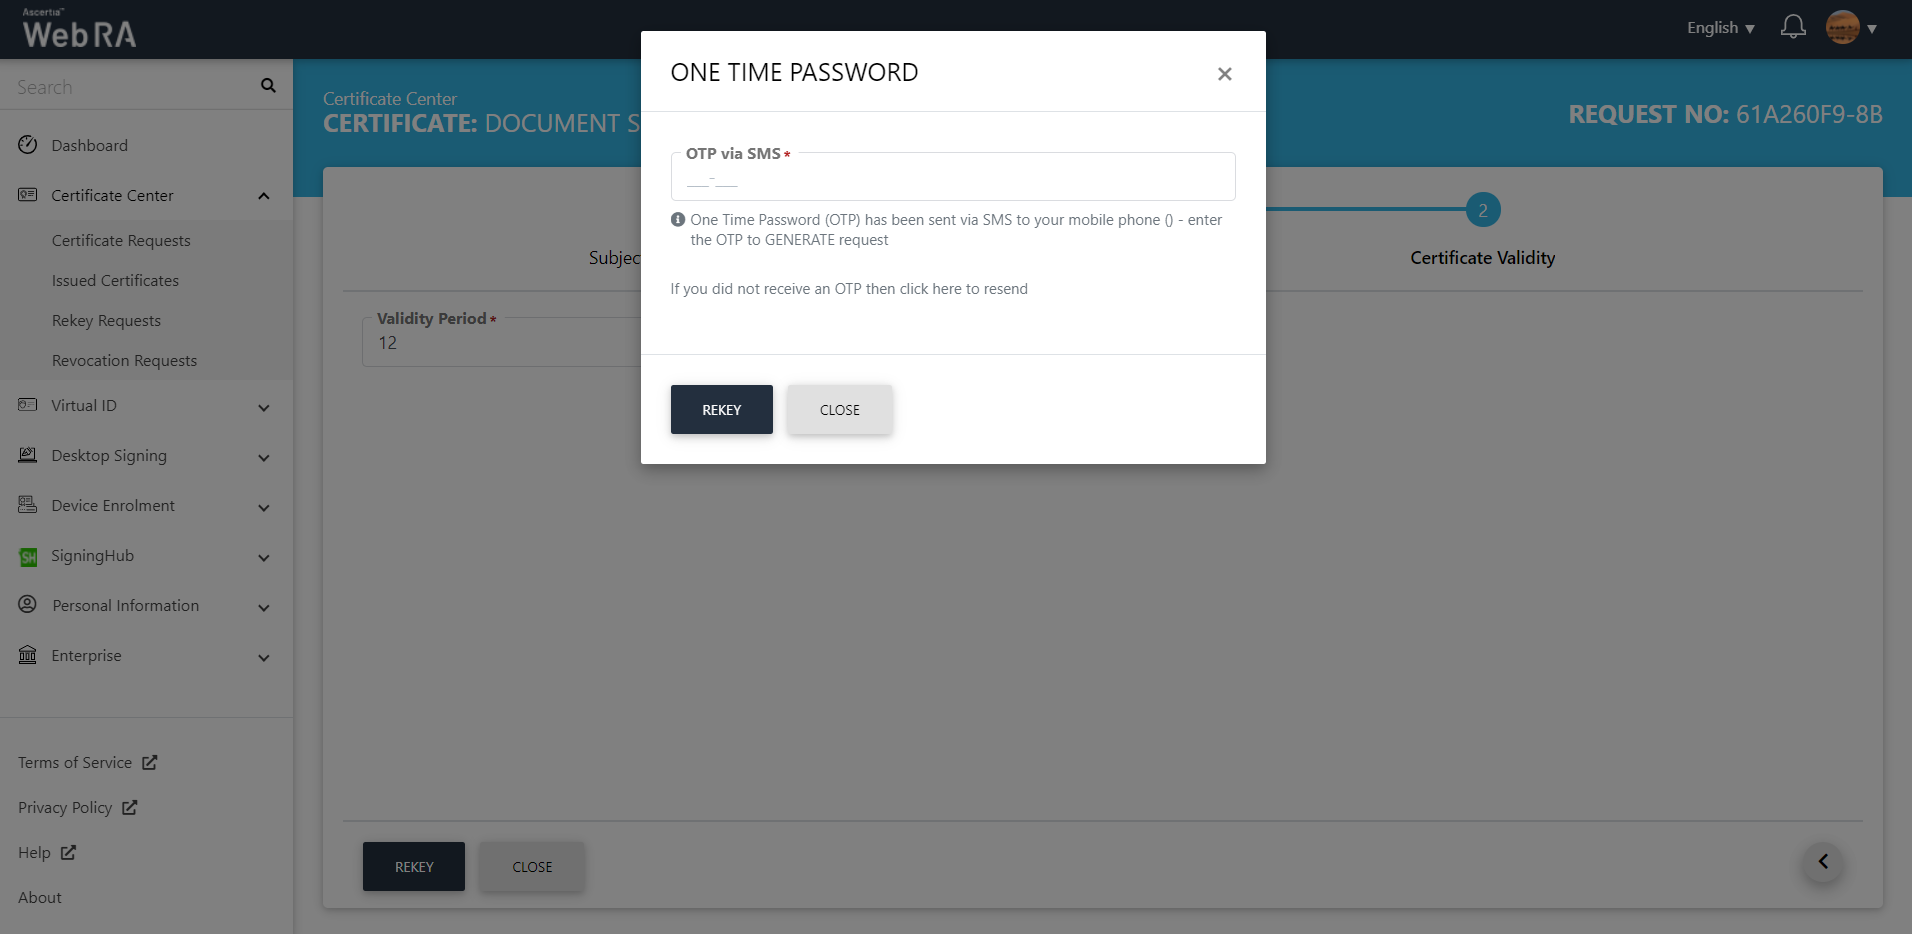
By clicking on the 'Rekey' button a new request and request category will be created with the 'Approved' status and the certificate will be rekeyed. The existing certificate status will be changed to 'Revoked' for server-side certificates and for local certificate (CSR/Token) certificate will be in the 'Issued' status.
Certificate History
ADSS Web RA allows its users to view Certificate History for rekeyed and reissued certificates.
Admin > Certificates > Press to find the History option against rekeyed and reissued certificates as displayed in the screenshot below:
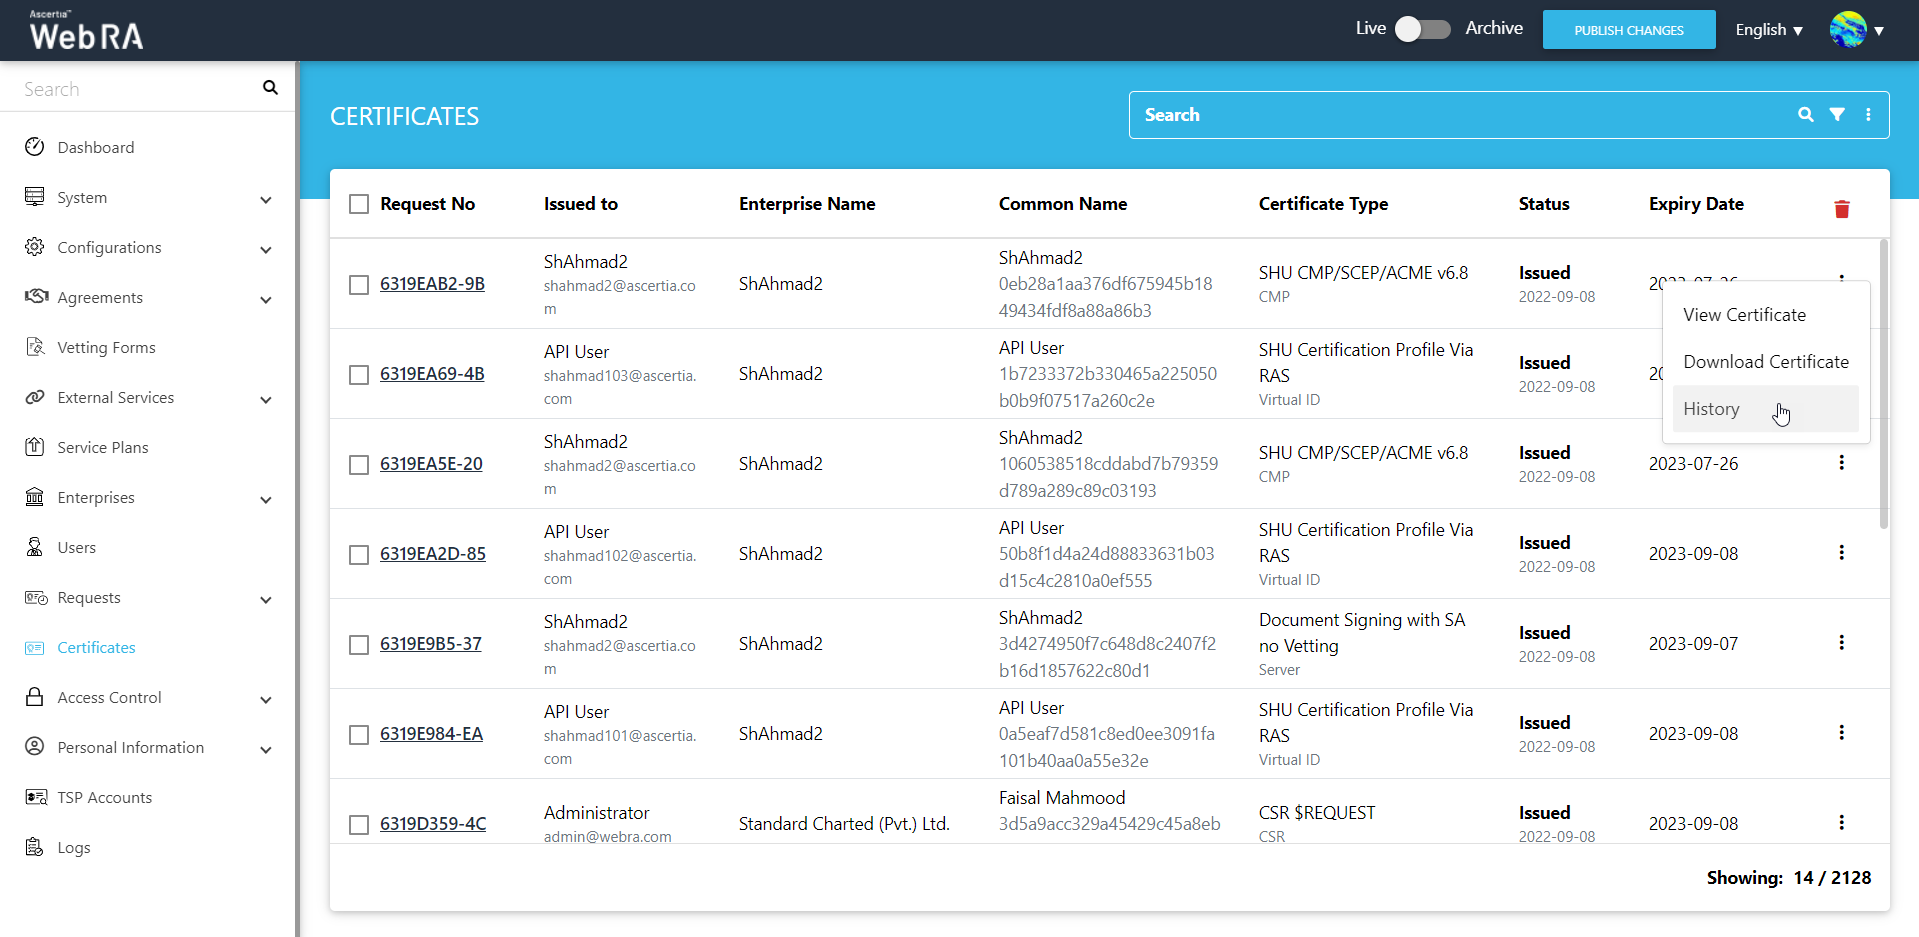
It will display all the actions performed against the certificates and it details.
|
|
A user cannot delete any parent certificate. When a child certificate is deleted, its parent certificate will be deleted automatically. |

Delete a Certificate
- Expand Requests > Certificate Requests.
- A list of certificate requests will appear. Select the request number check box against the request to delete. Then click the
 button.
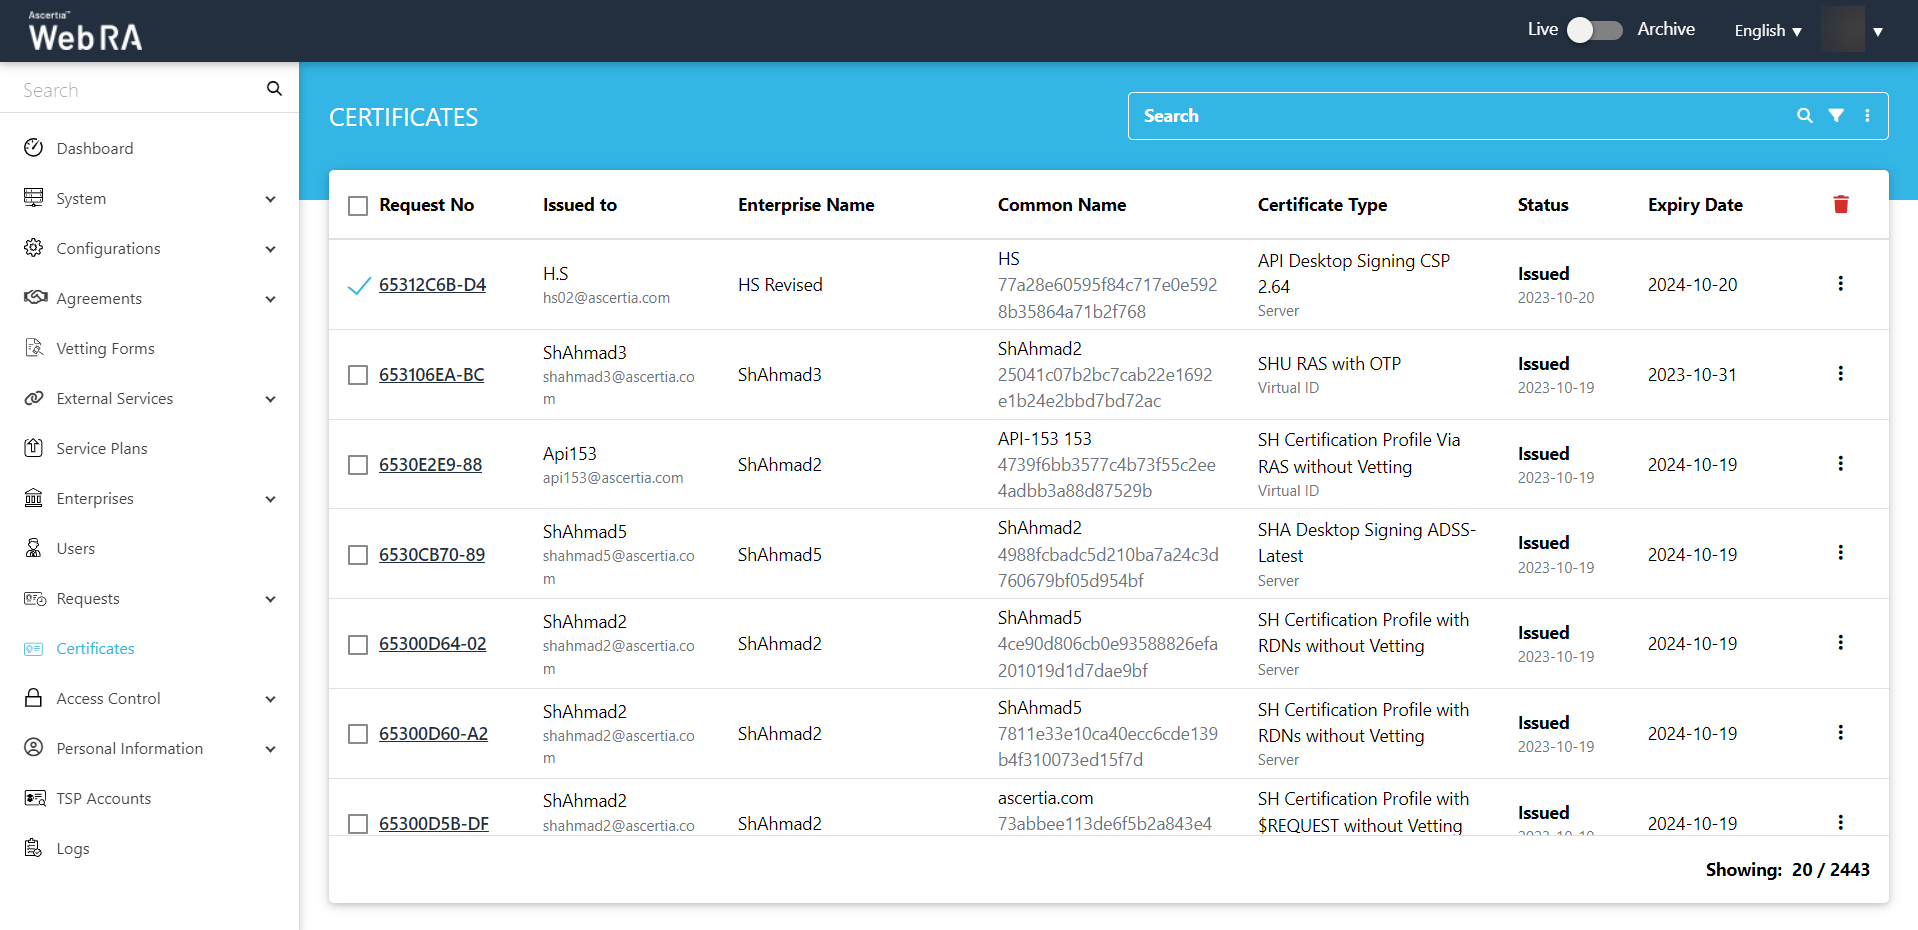
- A confirmation dialog will appear as displayed below. It will also delete certificate (s) against this request,
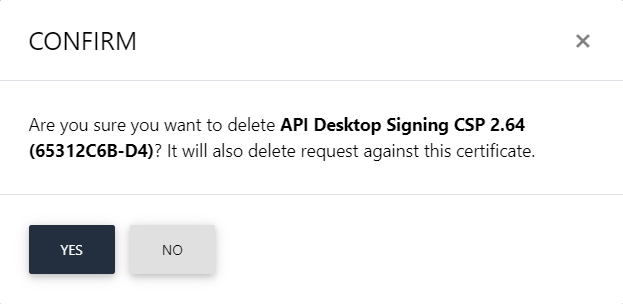
This note appears according to the configurations in the Policy section in the Admin portal.
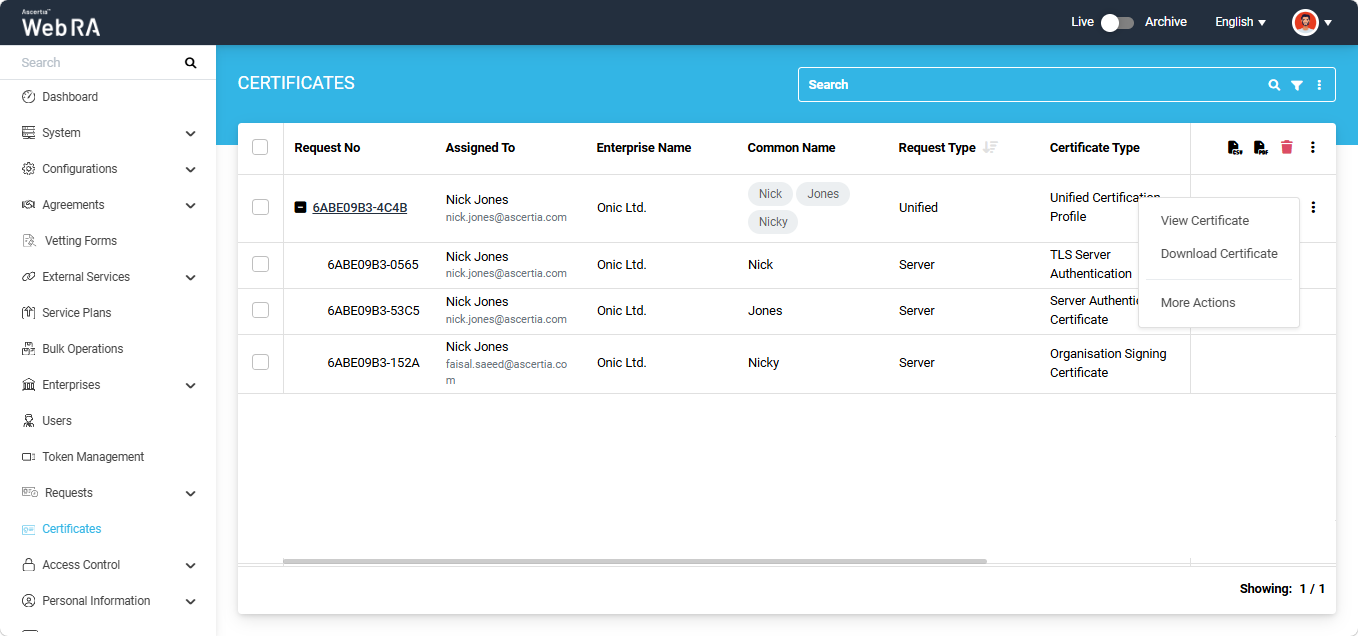
All certificate generated using a Unified Certification Profile appear on the 'Certificates' listing screen. The certificates generated using a Unified Certification Profile are grouped under a single main request number in the ‘Certificates’ listing.
A ‘+’ button appears next to the main request number. Click the ‘+’ button to expand the request and view the list of all certificates generated under the Unified Certification Profile. Each certificate in the list has its own request number.
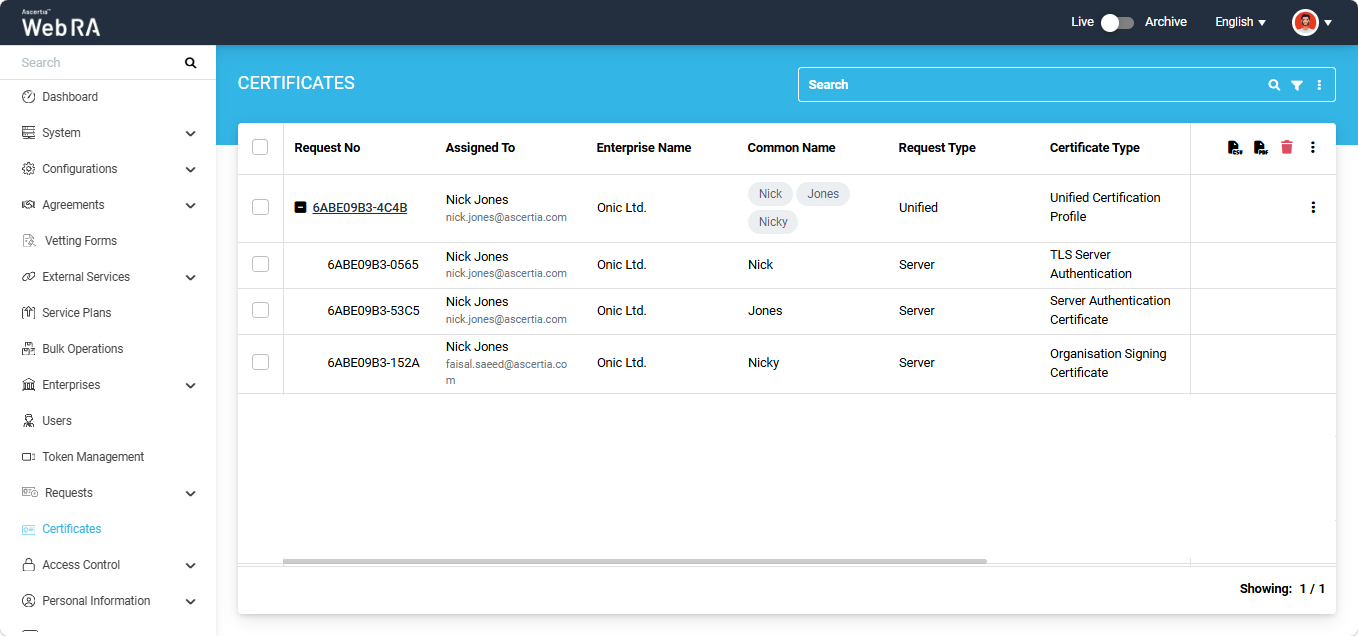
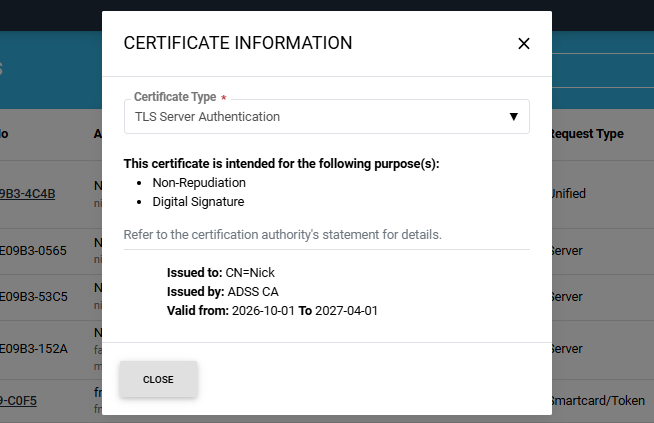
To view the information of all certificates, click the three-dot button next to the main request entry and select 'View Certificate'.
A ‘Certificate Information’ dialog appears on the screen. From the ‘Certificate Type’ dropdown, select the certificate for which you want to view the information.
How to Download Certificates Generated from a Unified Profile
Expand Certificates module from the left-tree menu in the Admin portal.
Click the three-dot button next to the certificate that you want to download, and select 'Download'.
A ZIP file is downloaded to your computer containing all the certificates. The name of the ZIP file is the request number of the main certificate request group.
How to Revoke Certificate(s) Generated from a Unified Profile
Expand Certificates module from the left-tree menu in the Admin portal.
To revoke one or more certificates generated using a Unified Certification Profile, click the three-dot button next to the main request number and select ‘More Actions’.
A dialog titled ‘Certificate Action’ appears on the screen.
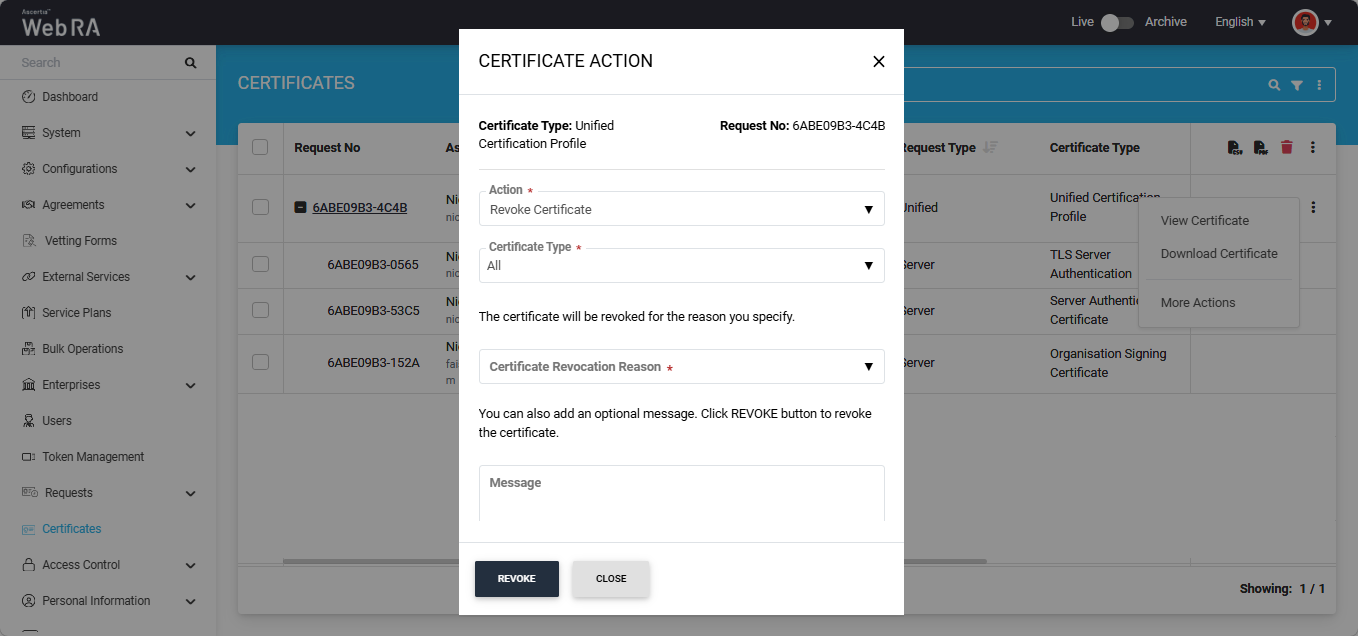
Select ‘Revoke Certificate’ option from the ‘Action’ dropdown.
From the ‘Certificate Type’ dropdown, you can either select any one certificate from the list to revoke it, or select the ‘All’ option to revoke all certificates, depending on your requirement.
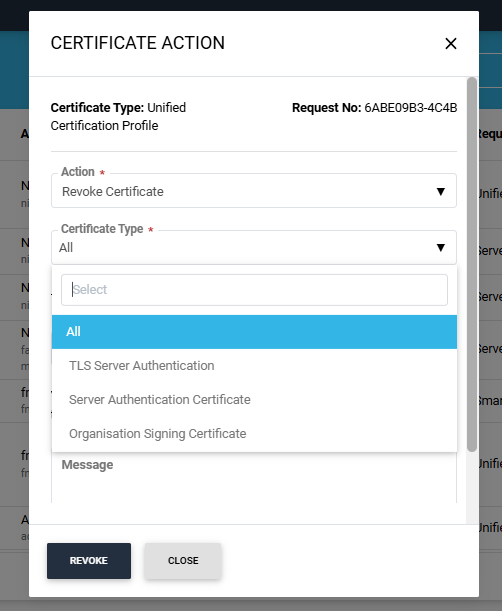
Select the revocation reason from the ‘Certificate Revocation Reason’ dropdown, and select the ‘I have reviewed and verified the revocation request’ checkbox.
You can also add an optional message related to the certificate revocation in the ‘Message’ box.
After that, click ‘Revoke’ to revoke the certificate. The selected certificate will be revoked and a success alert will appear on the screen.
The revoked certificate will appear in the ‘Revocation Requests’ listing.
|
|
Note: You can also renew, rekey, and reissue Unified Certificate(s) by following the same steps described in the ‘Revoke Certificate’ section above. Select the required action from the ‘Action’ dropdown and complete the process. |
