Configure Application Request Routing for Local Signing
When you need to sign using local smartcards or USB Tokens, then ADSS Signing Server Go>Sign Service is required. Application Request Routing (ARR) is used as alternative of AJP Connector on Proxy Server. Application Request Routing is a feature of IIS that enables you to control Internet traffic using a proxy server.
Consult the following points to configure Application Request Routing services.
Prerequisites
To set up a forward proxy server using ARR, you must have the following:
- IIS 7.0 or above on Windows 2008 (any SKU) or newer with Tracing role service installed for IIS.
- Microsoft Application Request Routing Version 3 and dependent modules
- Minimum of one worker server with working sites and applications.
Install ARR
If Application Request Routing Version 3 has not been installed, it is available for download from “https://www.microsoft.com/en-us/download/confirmation.aspx?id=47333”
Install URL Rewrite
Install the URL Rewrite module for IIS through the Server Manager. For more information, see Installing IIS 8.5 on Windows Server 2012 R2.
Enable ARR as a Forward Proxy
- To enable ARR as a proxy, and to create a URL Rewrite rule to enable ARR as a forward proxy, proceed as follows:
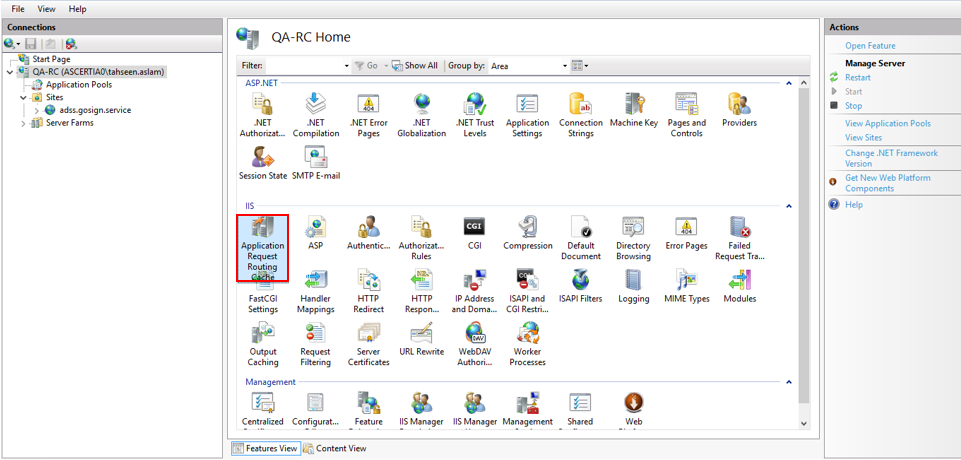
- Open Internet Information Services (IIS) Manager.
- In the Connections pane, select the server.
- In the server pane, double-click Application Request Routing Cache.
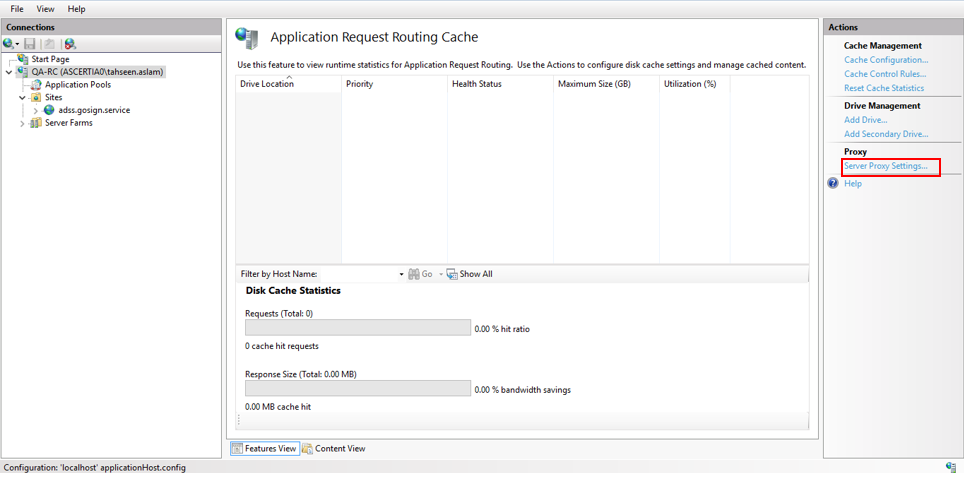
- In the Actions pane, click Server Proxy Settings.
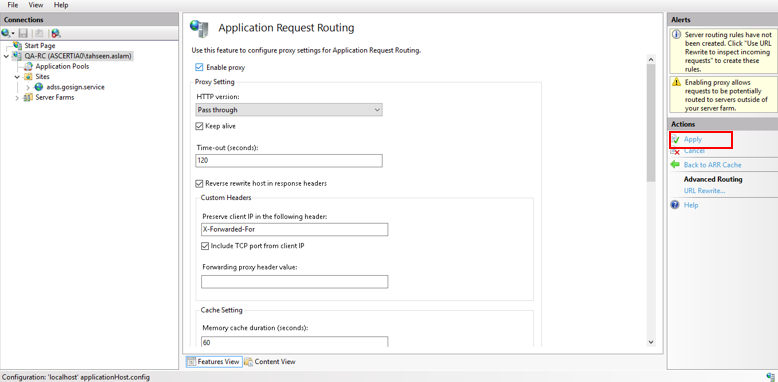
- On the Application Request Routing page, select Enable proxy.

- In the Actions pane, click Apply. This enables ARR as a proxy at the server level.
Configure Website on IIS
- To start the process of turning ARR into a forward proxy, click on the server node in the Connections pane.
- In the server pane, double-click Sites.
- Right clicks on the Sites and chooses option Add Website…
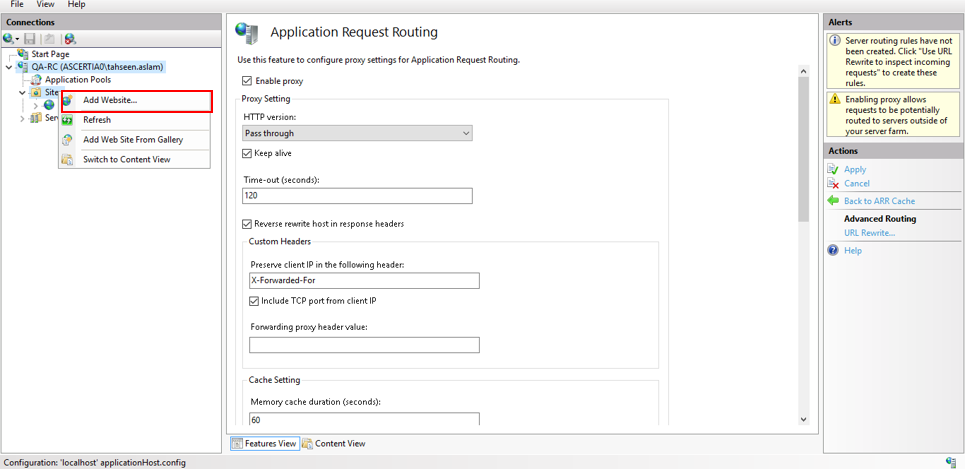
- Add Website. This table details the options:
|
Field |
Value |
|
Site name: |
[Site Name] e.g adss.gosign.service |
|
Default Application Pool: |
Default Application Pool |
|
Physical Path: |
D:\Ascertia\[Site Name] |
|
Type: |
https |
|
IP address: |
All Unassigned |
|
Port: |
443 |
|
Host name: |
[Site Name] e.g adss.gosign.service |
|
Require Server Name Indication: |
Checked |
|
Disable HTTP/2: |
Unchecked |
|
Disable OCSP Stapling: |
Unchecked |
|
SSL certificate: |
ADSS Go>Sign Service |
|
Start Website immediately: |
Checked |

- Click OK to create website
Configure Rule for ADSS Go>Sign Service
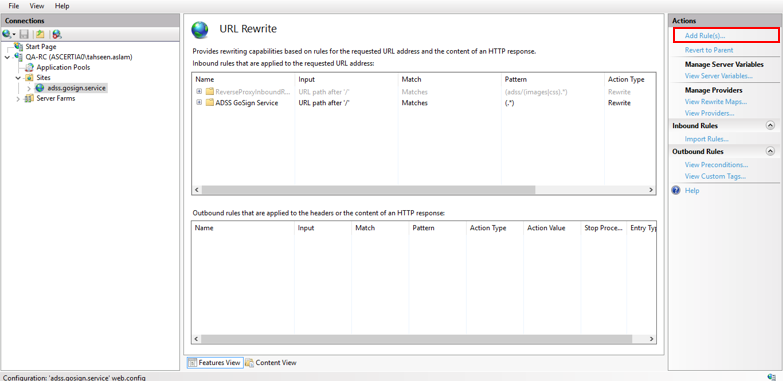
- In the Sites pane, click on the site adss.gosign.service
- Double-click URL Rewrite to add rule for ADSS Go>Sign Service.

- In the Actions pane, click Add Rule(s).
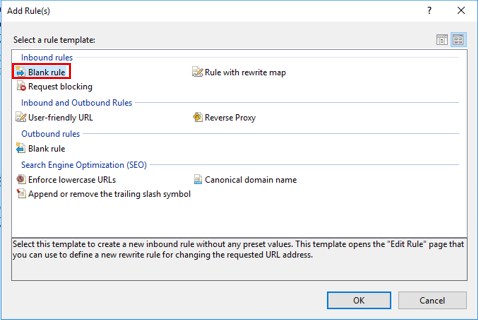
- In the Add Rule dialog box, double-click Blank Rule.
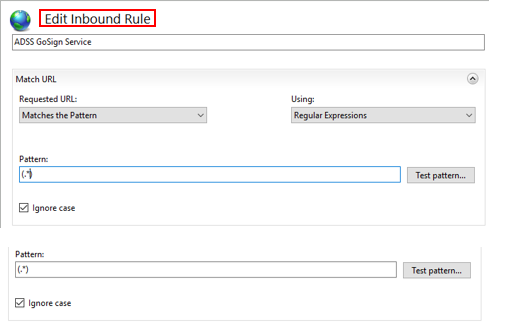
- In the Edit Inbound Rule dialog box, enter "ADSS GoSign Service" for Name. In the Match URL area, enter the following:
- Using: Regular Expression
- Pattern: (.*)
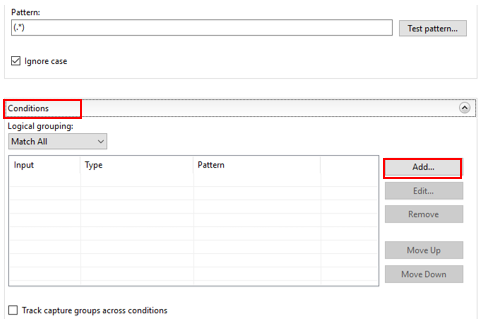
- Scroll down to the Conditions area of the Edit Inbound Rule dialog box, and then click Add….
- In the Add Condition dialog box, select or enter the following:
- Condition Input: {CACHE_URL}
- Check if input string: Matches the Pattern
- Pattern: ^(https?)://
- Enable the Ignore Case

- Scroll down to the Action area of the Edit Inbound Rule dialog box, and then enter the following:
- Action Type: Rewrite
- Rewrite URL: https://192.168.3.45:8778/(R:1) for https or http://192.168.3.45:8777/(R:1) for http services
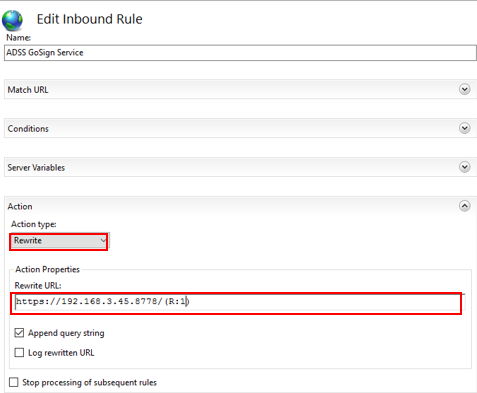
The table details the options:
|
Field |
Value |
|
Name: |
ADSS GoSign Service |
|
Pattern: |
(.*) |
|
Conditions: |
|
|
Action Type: |
Rewrite |
|
Rewrite URL: |
https://192.168.3.45:8778/{R:1} |
|
Append query string: |
Checked |
|
Log rewritten URL: |
Unchecked |
|
Stop processing subsequent rules: |
Unchecked |
Configure Go>Sign Service Address in ADSS Sever
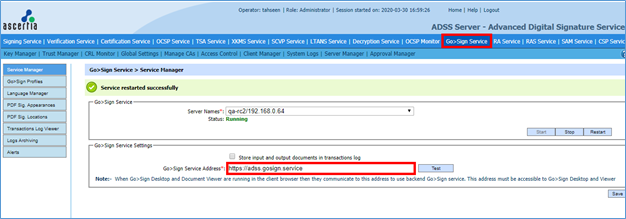
- Go to the ADSS Server Console Panel
- Set the Go>Sign Address “https://adss.gosign.service” in Go >Sign Service >Server Manager>Go>Sign Service Settings
Configure Go>Sign Service Address in SigningHub
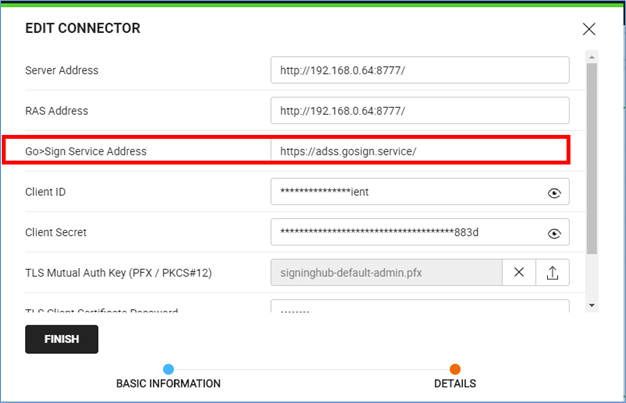
- Go to the SigninHub Administrator panel
- Set the Go>Sign Address “https://adss.gosign.service/” in Configurations>Connectors> Go>Sign Service Address
See also
- Configuring SigningHub Demo
- Configuring AJP Connector for Local Signing
- Logging Configuration
- Installing Redis Server
- Miscellaneous Configurations
- Proxy Settings in Internet Explorer

