Manual Installation of SigningHub with Oracle
Oracle Database Creation
SigningHub installer creates the schema and table spaces automatically. But Installers usually need to run with a user having permissions to run these scripts and create database and tables. Sometimes the deployment environment is strict and it’s not considered reliable to provide a highly privileged user’s credential to the application.
In such cases, database scripts and table spaces are required to be created manually by running the script on oracle servers by the DBA himself.
Please see the list of prerequisites below that are required to be executed before running the installer of SigningHub.
Pre-requisites
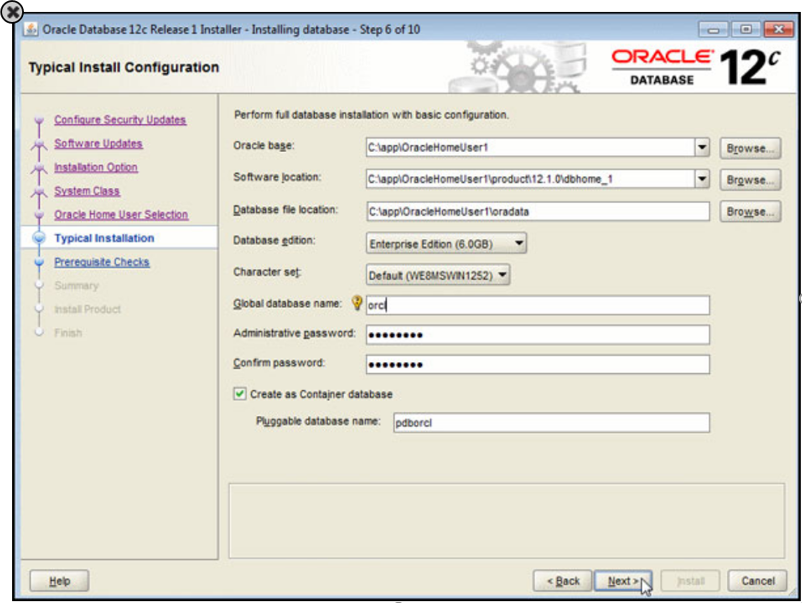
- Oracle Database 12c Enterprise Edition Release 12.1.0.2.0 - 64bit Production should be installed
- Download “PUTTY”, it’s a software to connect to Linux server
- Invoke PUTTY and then connect to Linux Server
- Connect to LINUX server using ORACLE operating system user name and password
- Execute the below command to connect the “sys” user. “sys” is an administrative user account that is automatically created when you install Oracle Database. It is created with the password that you supplied upon installation, and it is automatically granted the DBA role.
|
sqlplus / as sysdba |
- The following is the script to create a Tablespace. An Oracle database consists of one or more logical storage units called tablespaces, which collectively store all the database's data. Each tablespace in an Oracle database consists of one or more files called datafiles, which are physical structures that conform to the operating system in which Oracle is running.
|
SQL> CREATE TABLESPACE [Tablespace Name] DATAFILE '[Database file location]/[File Name].dbf' SIZE 1000M AUTOEXTEND ON NEXT 50M MAXSIZE 30G EXTENT MANAGEMENT LOCAL SEGMENT SPACE MANAGEMENT AUTO; |
|
Placeholder Names |
Description |
|
[Tablespace Name] |
It should be a unique name not greater than 30 characters. It will be used as the default tablespace for the database user. |
|
[Database file location] |
A path which was given during oracle installation in the Step 6. The screenshot is given below, if you specify a path other than the one mentioned in the screenshot, an error may appear prompting for permissions on the path. Oracle user needs the permissions to write on the provided file path. |
|
[File Name] |
Name of the file to be created. The naming convention of the OS should be followed. |
- The following is the script to create a user. This user is used to connect to the SigningHub application. When you create user accounts, you can specify limits on these user accounts. You can also set limits on the amount of various system resources available to each user as part of the security domain of that user. Execute below scripts step by step.
|
|
Placeholder Names |
Description |
|
[User Name] |
It should be a unique name not greater than 30 characters. It will be used for the SigningHub installation. |
|
[password] |
It should not be greater than 30 characters. It is used to authenticate user. |
|
[Tablespace Name] |
Replace this placeholder with the name that you have used to create tablespace in the step 6 above. |
- Execute the below commands step by step to create SigningHub role and grant this role to the user created above. The roles are created by users (usually administrators) and are used to grant the group level privileges.
|
SQL> CREATE ROLE [Role Name]; SQL> GRANT CREATE ROLE, RESOURCE, CONNECT, CREATE PUBLIC SYNONYM, CREATE VIEW TO [Role Name]; SQL> GRANT [Role Name] TO [User Name]; |
|
Placeholder Names |
Description |
|
[Role Name] |
Replace this placeholder with the name that you have used to create tablespace in the step 6 above. |
|
[User Name] |
Replace this placeholder with the name that you have used to create the User in the step 7 above. |
|
[Tablespace Name] |
Replace this placeholder with the name that you have used to create tablespace in the step 6 above. |
|
|
If the database is a backup of an existing database and not a newly created database, then following database script must be executed after restoring this database. This is a manadtory step to make SigningHub application works smoothly. |

Oracle script (to be executed manually), if a database is restored on database server.
|
DECLARE v_str VARCHAR2 (1000); v_table_name varchar2(500); v_str_alter VARCHAR2 (1000); BEGIN FOR rec IN (SELECT * FROM user_sequences where LOWER(SEQUENCE_NAME) not like LOWER('%ID_SEQ') and LOWER(SEQUENCE_NAME) not like LOWER('SEQ_%') and LOWER(SEQUENCE_NAME) not like LOWER('QUEST_%') ) LOOP
IF rec.sequence_name NOT IN ('SEQ_COUNTER','SEQ_HASHTABLE', 'SEQ_JOB','SEQ_JOBPARAMETER','SEQ_JOBQUEUE','SEQ_LISTTABLE','SEQ_SETTABLE','SEQ_STATE') THEN v_str := 'select SUBSTR('''||rec.sequence_name||''', 1, LENGTH('''||rec.sequence_name||''') - 4) from dual'; EXECUTE IMMEDIATE v_str INTO v_table_name; if v_table_name = 'ADMINSEARCHCRITERIA' then v_table_name := 'ADMINISTRATORSEARCHCRITERIA'; end if; if v_table_name = 'CONNECTIONPROVIDERPARAM' then v_table_name := 'CONNECTIONPROVIDERPARAMETER'; end if; if v_table_name = 'CONNECTIONPROVIDERPARAM' then v_table_name := 'CONNECTIONPROVIDERPARAMETER'; end if; if v_table_name = 'ENTERPRISECERTFILTER' then v_table_name := 'ENTERPRISECERTIFICATEFILTER'; end if; if v_table_name = 'ENTERPRISEDOCLIBRARY' then v_table_name := 'ENTERPRISEDOCUMENTLIBRARY'; end if; if v_table_name = 'GROUP' then v_table_name := '"GROUP"'; end if; if v_table_name = 'USER' then v_table_name := '"USER"'; end if; if v_table_name = 'TERMSANDCONDITION' then v_table_name := 'TERMANDCONDITION'; end if; -- SET DEFAULT VALUE v_str_alter := 'alter table '||v_table_name||' modify ID DEFAULT ON NULL '|| rec.sequence_name ||'.nextval NOT NULL ENABLE'; EXECUTE IMMEDIATE v_str_alter; end if; END LOOP; END; |
Script file execution
- Copy the following script files from this location ([Installation Directory/setup/db-scripts/Oracle) of SigningHub Installation package folder and paste them in any directory of the server where ORACLE is installed.
|
- In order to connect Linux machine, invoke PUTTY.
- Provide Oracle Operating System User Name and Password for login.
- Go to directory (CD ‘[File Path]’) where files are copied.
- Execute the below command to connect to SigningHub user which are created above.
|
sqlplus [User Name]@[Service Name or SID]/[password] |
|
Placeholder Names |
Description |
|
[User Name] |
The user created in the step 7 above. |
|
[Service Name Or SID] |
Replace this placeholder with the service name or SID that you have given during ORACLE installation. |
|
[password] |
Replace this placeholder with the password that you have given while creating the database user. |
- To create the SigningHub schema, execute the following command. Script file will create a schema necessary for SigningHub.
|
SQL> @SigningHub-full-script.sql; |
- To execute the SigningHub Sample script, execute the following command. Its optional, so if you do not require sample data in SigningHub application you can skip this part.
|
SQL> @SigningHub-sample.sql; SQL> Commit; |
Managing SigningHub Enterprise Users Session States
In order to maintain SigningHub Enterprise Users session states in ORACLE database, we need to execute the following steps:
- Copy the “session” folder from [Installation Directory/setup/db-scripts/Oracle/] in SigningHub Installation package and paste it in any directory on the Linux machine where Oracle database is installed.
- Invoke PUTTY and then connect to Linux Server.
- Connect to LINUX server using ORACLE operating system user name and password.
- Go to directory (CD ‘[File Path]’).
- In order to connect to the database user which was created above, execute the following command:
|
sqlplus [User Name]@[Service Name or SID]/[Password] |
|
Placeholder Names |
Description |
|
[User Name] |
Replace this placeholder with the name that you have used to create the User in the Pre-requisites Section, step 7. |
|
[Service Name Or SID] |
Replace this placeholder with the service name or SID that you have given during ORACLE installation. |
|
[password] |
Replace this placeholder with the password that you have given while creating the database user. |
- Now run the following command to execute the scripts that will maintain SigningHub Enterprise session states in ORACLE database:
|
SQL> @InstallAllOracleASPNETProviders.sql; |
- In order to run the default script, you need to install ORACLE SQL DEVELOPER Version 17.4.0.355. SQLplus has a limitation with query length. SQLplus supports 2,499 characters in query. The Error description is given below:
|
Input truncated to 7499 characters SP2-0027: Input is too long (> 2499 characters) - line ignored SP2-0027: Input is too long (> 2499 characters) - line ignored |
- Download the ORACLE SQL Developer.
- Now double click on sqldeveloper.exe in the sqldeveloper folder.
- Now click the Connection tab.
- Click the plus sign to add new connection, see the below screenshot:

- The following screen will appear for the new connection:
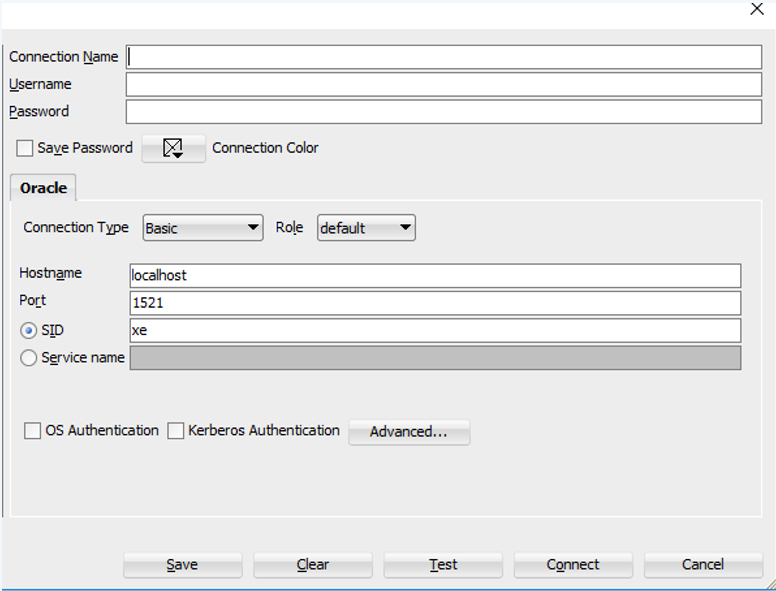
- Provide the information to connect to SigningHub database user.
|
Field Names |
Description |
|
[User Name] |
Provide the name that you have used to create the User in Pre-requisites Section, step 7. |
|
Password |
Specify the password that you have given while creating the database user in Pre-requisites Section, step 7. |
|
Host Name |
Specify the Linux Service IP Address. |
|
Port |
Specify the default ORACLE port to connect to the database. |
|
Service Name Or SID |
Specify the service name or SID that you have given during ORACLE installation. |
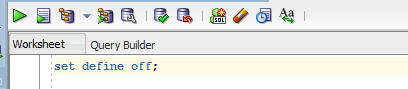
Copy the following command on Query Editor and click the Play button to execute the command, see the below screenshot:
|
set define off; |
|
|
Our script file (SigningHub-defaults.sql) includes data containing “&” character. By default, ORACLE treats “&” as a special character that begins a substitution string. This can cause problem while running the script. So, in order to switch off the behavior while running the script we have to execute the following command. |

- Remove “set define off” from the editor.
- Now copy the script from the ([Installation Directory/setup/db-scripts/Oracle/SigningHub-defaults.sql) file that exist in the SigningHub installation package, paste it in the editor, select the whole script, and then click the Play button.
- Execute the below command to save the changes.
|
Commit; |
- Now you may install SigningHub Enterprise by using the installer and selecting the “Install with existing database” option. Follow SigningHub Installation Guide for details. You just need to give oracle database “User Name” and “Password” which was created above.
|
|
You need to add information in an SMTP connector after installation, and set the connector as default SMTP connector in SigningHub Admin Global Settings. Change the ADSS Server address in connector as well. |

Instructions to upgrade the Database Schema of SigningHub Application (optional)
If you want to upgrade the schema of SigningHub application for the latest version, then get the script file from the ([Installation Directory/setup/db-scripts/Oracle/upgrade/7510/upgrade.sql) directory that resides in the SigningHub Installation Package. Now execute the DB scripts in ORACLE SQL Developer query editor as mentioned in Script file execution section.
Alter Database character set (optional)
Shut down the database either by using the SHUTDOWN IMMEDIATE or SHUTDOWN NORMAL command. Take a full backup of the database because the ALTER DATABASE CHARACTER SET statement cannot be rolled back. This activity may cause data corruption, as character set should be set at installation time. Complete the following statements:
- Connect to Linux server using ORACLE operating system user name and password.
- Execute the below commands to connect to the sys user:
|
sqlplus / as sysdba SQL> Shutdown immediate; SQL> Startup Mount; SQL> ALTER SYSTEM ENABLE RESTRICTED SESSION; SQL> ALTER SYSTEM SET JOB_QUEUE_PROCESSES=0; SQL> ALTER SYSTEM SET AQ_TM_PROCESSES=0; SQL> ALTER DATABASE OPEN; SQL> ALTER DATABASE CHARACTER SET INTERNAL_USE AL32UTF8; SQL> SHUTDOWN IMMEDIATE; SQL> STARTUP; |
- To set the OS user environment variable, edit the bash profile and add the NLS_LANG parameter. Follow the below commands:
|
Connect to Linux ORACLE user name and password vi .bash_profile (from shell) add NLS_LANG parameter at the end of batch profile now save the settings with :wq |