Transactions Log Viewer
The RAS Service keeps a secure audit record of every request made and every response given within the ADSS Server database. These records can be viewed by using the transactions log viewer. 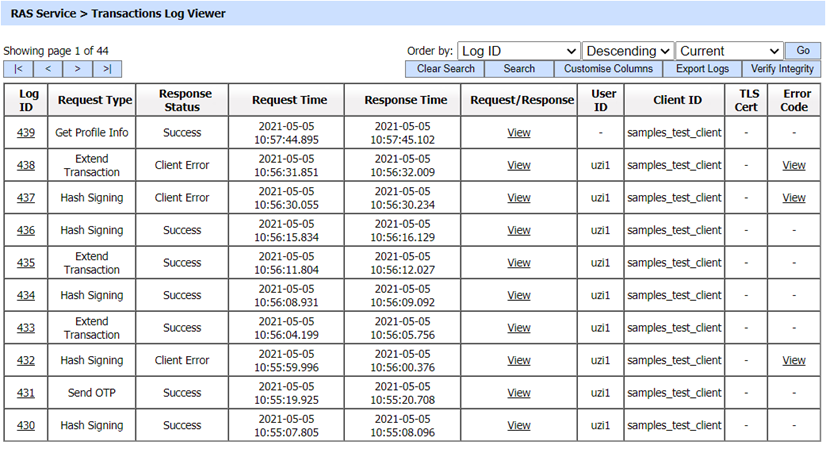
Each item in the screenshot is described below:
|
Items |
Description |
|
Clear Search |
When a Search is made, this window only displays the filtered records. The Clear Search button is used to view the full set of records. |
|
Search |
This opens a new window where search criteria can be entered based on each column of the transaction grid. |
|
Customise Columns |
This opens a pop up window to configure which columns to show/ hide in the grid. See below for more details. |
|
|< < > >| |
These buttons are for navigating the different pages of the transaction log. Note: The number of records shown per page is configurable from within Global Settings. |
|
Export Logs |
This button is used to export the selected transactions log into a zipped CSV file in which each column is separated by literal '~&~'. The file can be viewed using Microsoft Excel. However, in order to view and analyze the contents of the file in detail (all the archived transactions etc.), the operator needs to import the file into ADSS using the Import Archived option. |
|
Verify Integrity |
This button verifies the integrity of the RAS service transaction log records. It detects tampered or deleted records and generates a report that can be exported to a physical drive. Note: When exporting HMAC verification reports, save the file with an “.html” extension so that the report can be viewed in an internet browser. |
|
Log ID |
Shows a unique serial number for each log record, it is system-defined and not a part of the request/response messages. |
|
Request Type |
Identifies the type of each request that was received e.g. Register User, Generation user Key, Extend Transaction, Send OTP, Create CSR, Hash Signing etc. |
|
Response Status |
This shows which response was returned. Possible values are:
|
|
Request Time |
Shows the date/time when each request was received. |
|
Response Time |
Shows the date/time when the response was sent. |
|
Request/Response |
Shows the link to view each Request/Response message. |
|
Remote Request/Response |
It contains the request and response information of the communication done with the remote RAS Server. It will help the Admin to observe what information was exchanged with the remote server. |
|
User ID |
Shows the User ID found in the request message. RAS Service verifies if this is a registered User ID before granting access. |
|
Client ID |
Shows the client ID found in the request message. RAS Service verifies that this is a registered Client ID within the Client Manager module before granting access to this service. |
|
TLS Cert |
Clicking on View link under this column displays the TLS client authentication certificate. The View link is only present when TLS client authentication was used to send requests to the RAS service. |
|
Error Code |
Hover the mouse over the "View" link shows the error message (if any) for each request, e.g. internal error, RAS Service Disabled etc. |
The RAS Service transaction records can be sorted in ascending/ descending order as required, by selecting a table column from the drop down list.
From the drop down menu in above screen, choose Import Archived and click the Go button. This will show the following screen:
Each item in the screenshot is described below:
|
Items |
Description |
|
Import archived transaction file |
Use this option to browse the archived log file in zip format from the operator machine. By using this option the archived log file is uploaded on the ADSS Server. To keep this operation optimised, an operator is restricted to upload a file up to 25 MB size. Use the archived file path option for files larger than 25 MB. |
|
Archived transaction file path |
Use this option if the file size is greater than 25 MB. This option does not upload the archived file to the ADSS server. Rather the server reads the file from the specified file path (location) before importing which is faster than the above option. You can either specify the local file system path or a network path. Note: Do specify the archived log file name in the file path. |
Clicking on the Search button on SAM Transactions Log Viewer page displays the following screen: 
This helps to locate a particular SAM Service transaction. The transactions can be searched based on their "Log ID", "User ID", "Client ID", "Request Type", "Response Status", "Request Time From", "Request Time To", "Response Time From" and "Response Time To". If a search is based on multiple values, then these will be combined together using the “AND” operand, and thus only records that meet all the criteria will be presented.
|
|
If "_" character is used in the search then it will act as wildcard. |
Clicking the Customise Columns button on Transactions Log Viewer displays the following screen: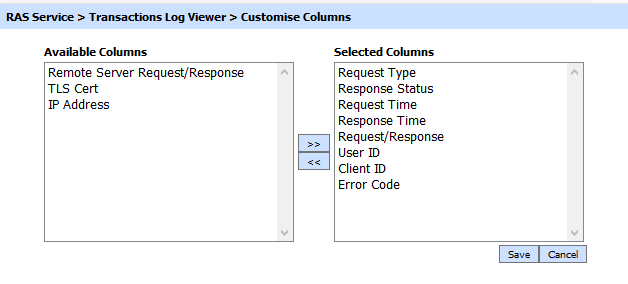
By default a few columns are already added to the "Selected Columns" list. To remove a column move the required column to "Available Columns" list.
Each log record within the database is protected by a cryptographic HMAC checksum to detect any intentional or accidental modification of records. Clicking the Verify Integrity button verifies the log integrity by checking each checksum and generates a report as shown below: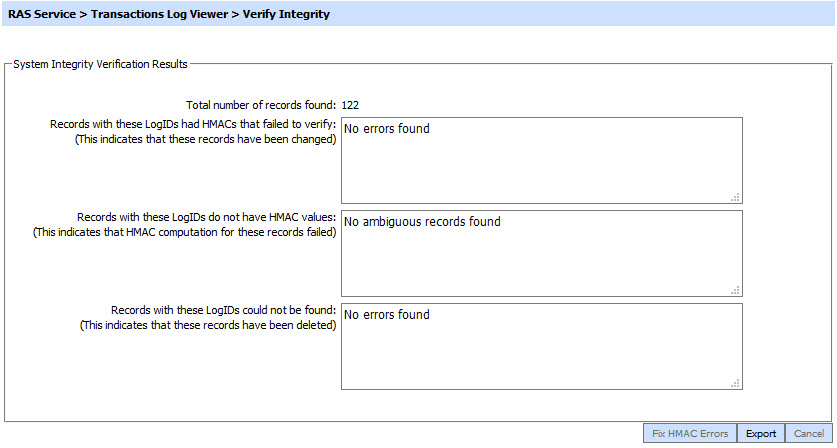
Click the Export button to export the Verify Integrity Report to the file system.
|
|
The transaction logs are not exported according to the applied filter/search, they are exported as a complete zip file. |
Clicking the Fix HMAC Errors button will re-calculate the HMAC for tampered transaction logs for this module.
Note: This option will not detect the unauthorized deleted records but it will only fix the unauthorized modifications and/or ambiguous records for which HMAC value is not present/incorrect.
|
|
Verify Integrity feature is available for the transactions log of all services within ADSS Server. |
Clicking on the link for Log ID shows detail of the selected transaction as shown below: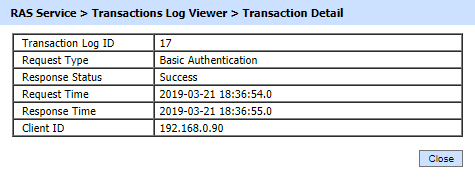
Clicking the View link under the request/response column shows the JSON request and response for the selected RAS transaction in different tabs:
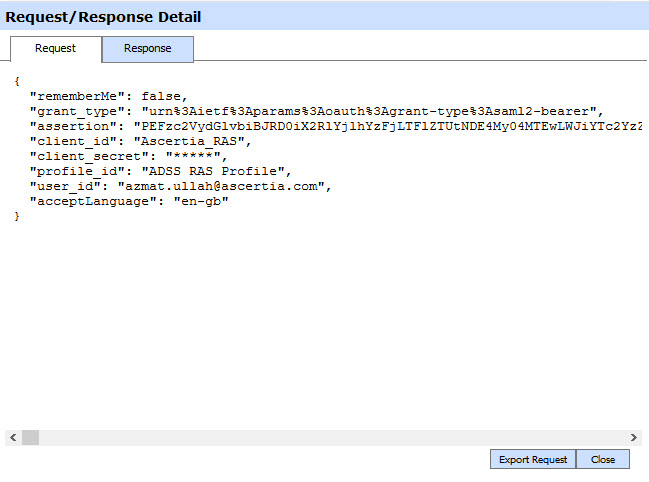
Clicking the Response tab shows the JSON response as below: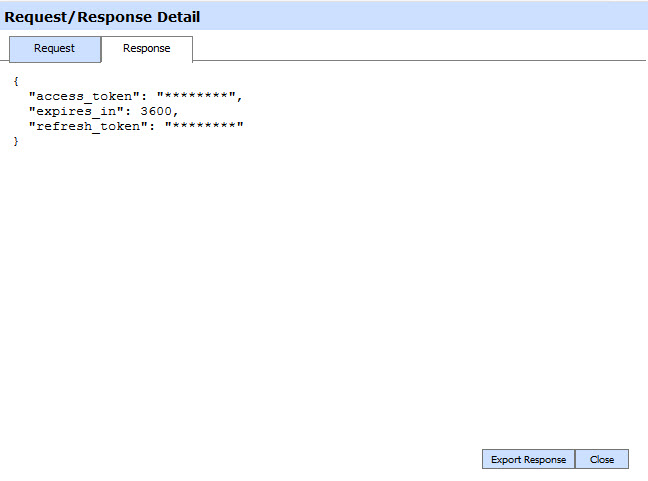
You can export the request/response files to a physical drive by clicking the relevant Export Response button.
See also
Configuring the RAS Service
Logs Archiving
Alerts
RAS Service Interface URLs


