Step 1 - Identifying the TA
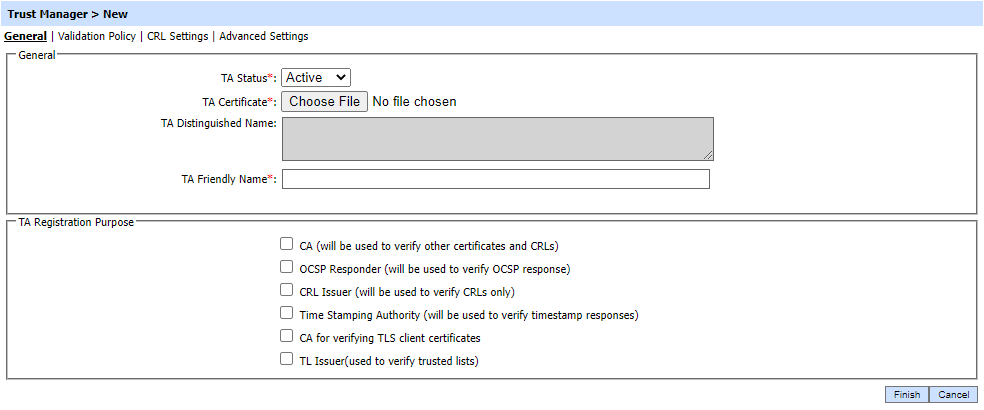
To register a new Trust Authority click the New button. The following screen is displayed:

Each item in the screenshot is described below:
|
Items |
Description |
|
TA Status |
This can have a value of Active or Inactive or Revoke. ADSS Server ignores any inactive Trust Authorities when processing service requests. Setting an Authority to inactive is a convenient way of suspending the use of a particular trust authority rather than deleting its record. |
|
TA Certificate |
Identifies the Trust Authority’s digital certificate. Click Browse to locate the Authority’s certificate and import it. Note: The certificate file must only contain the authority’s certificate and not a complete chain. DER, PEM or Base64 formats are supported. |
|
TA Distinguished Name |
All the Distinguished Names that are associated with the certificate selected in the above field are shown in this text area. |
|
TA Friendly Name |
A unique name for the Trust Authority (TA). The name of the Trust Authority is automatically set to the Common Name (CN) of the imported TA certificate. You can also change the TA Friendly Name to something other than the CN of the TA Certificate. |
|
TA Registration Purpose |
Used to select the purpose(s) for which this Authority certificate can be used (more than one purpose can be selected):
|
|
|
When registering a trusted Authority with purpose other than CA, the wizard finishes after this screen and no more details are required. While registering the a CA, additional information is required and the additional steps described below must be followed before the wizard completes. |
See also
Step 2 - Validation Policy
Step 3 - CRL Settings
Step 4 - Advanced Settings

