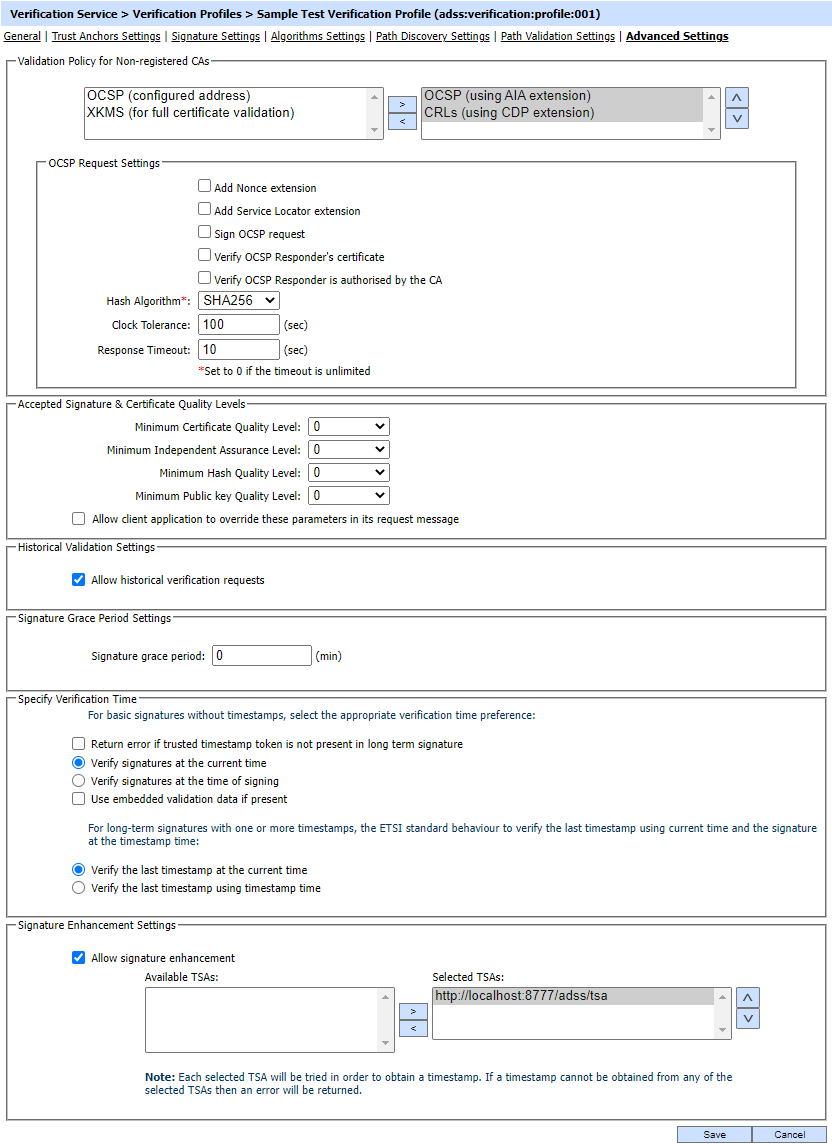
Advanced Settings
This page is used to configure following settings:
- Validation policy for Non-registered CAs
- Signature and Certificate Quality levels
- Signature Historical Verification
- Signature Time Verification
- Signature Enhancement

Each element of the form is described below:
|
Items |
Description |
|
Validation Policy for Non-registered CAs |
If the target certificate chain building should be done up to a registered self-signed Root CA certificate then the intermediate CA certificates may or may not be registered within the Trust Manager module. If the intermediate CA certificates are not pre-registered in Trust Manager then these configurations are used to define their validation mechanism.
|
|
OCSP Request Settings |
These configurations are shown when OCSP (using AIA extension) or OCSP (configured address) option is selected:
|
|
OCSP Responder Address |
This option is shown when OCSP (configured address) is selected and you have to configure the OCSP responder address. Usually this option is used when AIA or CDP address is not found is target certificate. |
|
XKMS Server Address |
This option is shown when XKMS (for full certificate validation) is selected. Another XKMS server address is configured to check the revocation of complete chain. Select this checkbox if the XKMS service requires request messages to be signed. Then select the XKMS Request Signing Certificate which pre-exists in the Key Manager. |
|
Sign XKMS Request |
Select this checkbox if the XKMS service requires request messages to be signed. Then select the XKMS Request Signing Certificate which pre-exists in the Key Manager. |
|
Accepted Signature and Certificate Quality Levels |
The default certificate, independent assurance, hash algorithm and public key quality levels are minimum acceptable quality levels for the clients using this profile. If the option "Allow client application to override these parameters in its request message" is selected then default values are only used for the case where the client has not included any minimum quality levels within the request message. |
|
Historical Validation Settings |
The checkbox Allow historical verification requests means that the client can check digital signature and certificate validity in the past by identifying a specific date and time within the request message. |
|
Signature grace period |
This will define how long ADSS Verification Service should wait after the signing time indicated in the signature (either by TSA or by the signer's local time) before converting the basic signature to an advanced signature or before verifying a simple signature. The value '0' indicates that do not consider signature grace period while verifying a simple signature or converting it to advanced signature type. Note: The default value set to '0' |
|
Specify Verification Time |
Verification settings configured under this area are only used if the verification request from the client application does not specify the verification time i.e. either a historical time or current time. When the validation time is not specified in the request message, then the preference is given to the timestamp token protecting the signature. If the signature is not protected by a trusted timestamp token, then the following configurations are used. We can categorize the signatures types into following sections:
Note: All the above stated verification rules to validate timestamp token for different advanced signature types are mentioned below. |
|
Return error if trusted timestamp token is not present in long term signature |
This setting is only applicable for long term signatures. When enabled an error is returned in the verification response mentioning that the long-term signature does not contain a trusted timestamp token. |
|
Verify signatures at the current time |
When this radio button is selected, the signature will be validated at the current time. |
|
Verify signatures at the time of signing |
When selected all signatures are verified at the time of signing. If the signing time is not present in a signature then an error is returned. |
|
Verify signatures at current time if signing time not available |
This option can be additionally selected so that verification of the signature can fall back to using current time in case the signing time is absent in the target signature. |
|
Use embedded validation data if present |
When the signatures are being validated at the current time then it can be additionally selected to use the embedded validation information in a long-term signature. It is important to note that in this case the embedded validation data is checked to be valid at the current time and if the validation data is not valid at the current time then an error is returned otherwise the signature is verified. |
|
Verify the last timestamp at the current time |
When this radio button is enabled, the last timestamp token will be verified using the current time. |
|
Verify the last timestamp using timestamp time |
When this radio button is enabled, the last timestamp token will be verified using the timestamp time. |
|
Allow signature Enhancement |
This field enables one or more default TSA servers to be defined that can provide timestamps on demand when a signature needs to be enhanced with a timestamp. Note: Most of the CA's have their own TSA Service. In order to configure a CA to have its own specific TSA, add TSA details within Trust Manager > Advance Settings. These CA specific setting overrides any Verification Profile settings. |
|
|
If it is required that path validation to strictly follow PKIX guidelines then after creating the profile, then follow these instructions:
|
See also
General Settings
Trust Anchor Settings
Signature Settings
Algorithms Settings
Path Discovery Settings
Path Validation Settings

