OpenID Connect
An OpenID Connect based IdP can be configured as a connector in ADSS Server. The ADSS Server will redirect the user to this IdP for authentication. For example, this connector can be configured in ADSS RAS Service profile and during credentials authorisation, RAS Service will redirect the user to this IdP for authentication.
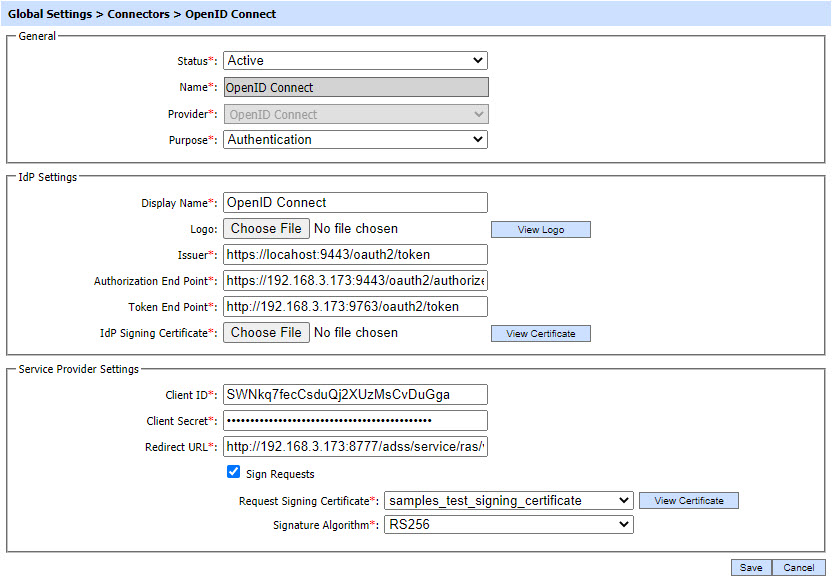
While configuring an OpenID Connect based IdP, the following screen will be displayed:

The configuration items are as follows:
| Item | Description |
| Status |
This specifies the status of the Connector i.e. Active or Inactive. Only active profiles can be used within ADSS Service modules. |
| Name | A user friendly name assigned to each Connector for internal identification. |
| Provider | This drop-down field specifies the type of IdP used for the Connector. Select OpenID Connect to configure an OpenID Connect based IdP. |
| Purpose | This specifies the purpose of Connector e.g. Authentication etc. |
| IdP Settings | This section defines configurations required to establish connection between IdP and ADSS Server. |
| Display Name |
This field defines the name of the IdP that will be displayed to the user.
For example, during credentials authorisation, RAS Service will display a page to user displaying the transaction detail and asking for authentication with IdP. The name of the IdP configured in this field will be displayed to user. |
| Logo |
This field is used to upload the logo image of external IdP from the file system that will be displayed to the user e.g. while authorising the credentials by RAS Service. The logo will be displayed along with the "Display Name" of IdP.
Note: It's an optional field. It is recommended to use 32*32 or 48*48 pixels image resolution for better visualization.
|
| Issuer |
This field shows the URI which acts as a unique identifier for OpenID Connect IdP.
|
| Authorization End Point |
This field shows the URL of IdP Authorization End Point, where ADSS will redirect the user for authentication.
|
| Token End Point | This field shows the URL of the IdP’s token end point which will be used by ADSS in order to get the access token and ID token by providing it the authorization code. |
| IdP Signing Certificate | By using this field, an IdP Signing Certificate can be uploaded from the file system that will be used by ADSS to verify the signature created over ID Token. |
| Service Provider Settings | This section defines configurations related to the Service Provider i.e. ADSS Server. |
| Client ID |
This field shows the client ID registered with OpenID Connect IdP. The client ID is provided in each request sent to IdP so that the IdP can recognize the client.
|
| Client Secret |
The client secret is registered with the client at OpenID Connect IdP. The IdP generates the secret and provides to the service provider i.e. ADSS Server.
|
| Redirect URL | This field shows the URL of ADSS on which the OpenID Connect IdP will send the authorization code after authenticating the user. For example if this connector will be configured in RAS Service profile, the Redirect URL should be of RAS Service end-point that will receive the authorization code e.g. https://server:port/adss/service/ras/oidc/callback |
| Sign Request | If this checkbox is enabled, ADSS will send a signed request to OpenID Connect IdP. |
| Request Signing Certificate | This drop-down will list all certificates created in Key Manager with Document Signing purpose. The selected certificate will be used to sign the request. The certificate will also be registered at OpenID Connect IdP to verify the signatures computed over the request as well. |
| Signature Algorithm | This drop-down allows the operator to select the signature algorithm that will be used to sign the request. |
ADSS Server does not support encrypted ID tokens for OpenID Connect based IdP.
Currently an OpenID Connect based IdP's can only be configured in RAS Profile of ADSS RAS Service.
See also