PKCS#11 Standard
This option allows you to configure a standard PKCS#11 HSM such as Thales Safenet, Utimaco or nCipher nShield Connect. Communication to the HSM from ADSS Server uses IAIK PKCS#11 Wrapper.
To create a new hardware Crypto Profile press the New button in the Crypto Source Screen and the following form is presented:
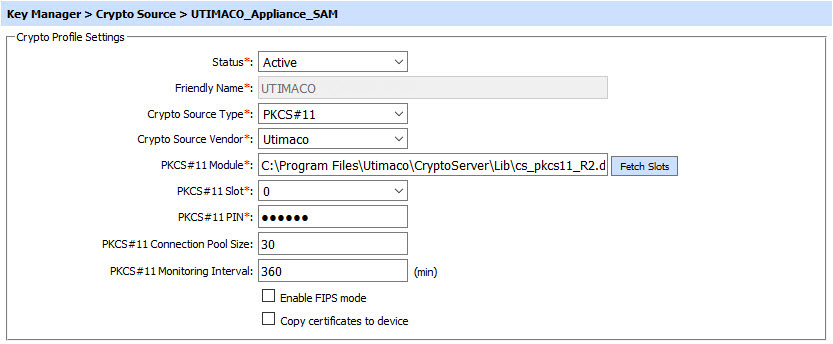
The above page is described here:
| Item | Description |
| Status |
Set the status of this Crypto Profile. If the status is set to Inactive then it can not be used to generate or read the keys for cryptographic operations. |
| Friendly Name | Enter a friendly name for this HSM device. The name should be unique within this ADSS Server environment. Use a meaningful name for easy reference, e.g. Luna SA#2 or USB Corporate Qualified Certificate, etc. |
| Crypto Source Type | Select PKCS#11 from the drop-down menu. |
| Crypto Source Vendor | Select the HSM vendor from these supported options:
|
| PKCS#11 Module | Enter the PKCS#11 driver library file name/complete path for this hardware device. Note: To find the library name of your device, refer to the documentation of the driver or contact the HSM vendor support to find the library name. |
| Fetch Slots | When this button is clicked then the system shows the available slots for the PKCS#11 module you configured. The list of available slots will be shown in the next field i.e. Fetch Slots |
| PKCS#11 Slot | Select the appropriate PKCS#11 slot. The drop down lists all the available slots for the configured PKCS#11 module. |
| PKCS#11 Pin | Enter the PIN or password for the slot chosen. (Note that the PIN is held securely in ADSS Server) |
| PKCS#11 Connection Pool Size | Enter the number of connections that will be maintained at any given time for this PKCS#11 device. Default value is 30. |
| PKCS#11 Monitoring Interval | Enter the monitoring time interval in minutes to periodically check whether the PKCS#11 device is alive. If it finds the device is not alive/available due to any reason then an email alert could be sent if Hardware crypto source monitoring is enabled in Key Manager > Alerts page. Note: To generate the notification alerts, alerts should be enabled at Global Settings > Notification Settings page. |
| Test Connection | This button is used to test communication with the configured hardware device. |
| Enable FIPS Mode | For FIPS compliant devices, it is possible to use this mode by selecting this checkbox. The default value for this is to not use FIPS mode because not all HSMs support this standard. FIPS mode is not recommended when using smart cards or USB tokens. |
| Import Certificates to Device | When certificates are generated for the keys held on a PKCS#11 device (token) then generally these certificates are only stored within the ADSS Server database to save space on device. However, if certificates also need to be stored on the device (e.g. these are end-user smart cards) then select this option. |
From ADSS Server v5.5 you must define which HSM is being used in Global Settings > Advanced Settings > General using the setting name PKCS11_DEVICE_TYPE the allowed values are NCIPHER or SAFENET or UTIMACO otherwise key generation will fail. Note this key/value pair must be added manually.
Key Template
The Key Templates are used to define the attributes of keys generated in a particular HSM. Each HSM vendor has its own specific requirements for key attributes so a separate key template can be created for each HSM using the "Key Template" sub-module. These key templates are referenced here against the crypto profile and when a key will be generated in this crypto profile the configured key template will be used to set different attributes. In the Key Template drop-down, only those templates will be displayed that belong to a particular vendor and this depends on the vendor selected in Crypto Source Vendor field under Crypto Source Settings section.

Key Wrapping
In the standard API for HSMs and other cryptographic hardware, PKCS#11, key-wrapping refers to the process of encrypting one key stored in hardware with another in order to send the first key somewhere else in a secure way.
In ADSS Server, key wrapping is used to save the space on the HSM. When key-wrapping is enabled, the asymmetric key is generated in HSM, wrapped with a symmetric key, wrapped key exported from HSM and saved in database and deleted from the HSM (to save the space). When this key is referred in signing request, this key is imported in the HSM, unwrapped with the same symmetric key, signed the document and discarded the key from HSM (again to save the space). In short, the keys are generated in HSM but stored in database by wrapping with a symmetric held in the HSM.
No Key Wrapping
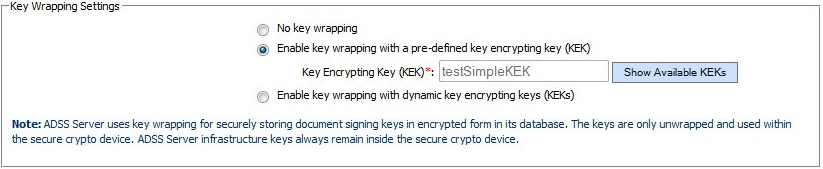
If Key Wrapping is enabled in the ADSS Server license then the operator will also see this options only when Crypto Source type is PKCS#11:

| Item | Description |
| No key wrapping |
When "No key wrapping" radio button is selected the key wrapping functionality is not enabled for the configured crypto profile. Note:- By default "No key wrapping" radio button will be selected. |
Enabling Key Wrapping using a pre-defined Key Encrypting Key (KEK)
| Item | Description |
| Enable key wrapping with a pre-defined key encrypting key(KEK) |
Select "Enable key wrapping with a pre-defined key encrypting key(KEK)" radio button option if you wish to enable key wrapping for the configured crypto device. The key wrapping functionality only works if the underlying crypto device supports this and already has a suitable KEK. Note: Key wrapping is only supported for signing actions using either the Signing Service or the Go>Sign Service. |
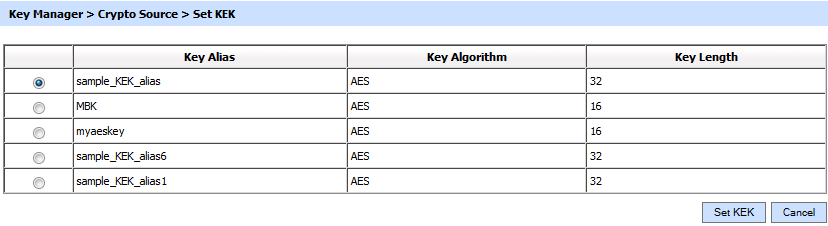
| Key Encrypting Key (KEKs) | Click the "Show Available KEKs" button to see a list of the available KEKs on the HSM and select the correct one to be used for key wrapping. Note 1: When this mode is enabled, the keys generated within the crypto device are encrypted with the static KEK and then stored in the database. The generated key is then deleted from the HSM memory to avoid memory issues in certain HSMs. Note 2: After signing the imported key is kept in the crypto device for a configured time period and then it is deleted. The time period is defined in the property UNWRAPPED_KEY_CACHE_INTERVAL on the [ADSS-Server-Console]/Global Settings > Advanced Settings under General section. |
Clicking the Show Available KEK button will show the following screen:
Enabling Key Wrapping using a dynamic Key Encrypting Key (KEK) derived from a Master Key (MK)
| Item | Description |
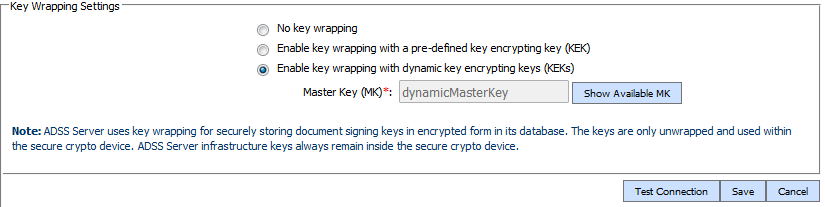
| Enable key wrapping with dynamic key encrypting keys (KEKs) | When "Enable key wrapping with dynamic key encrypting keys (KEKs)" radio button is enabled the system generates a dynamic KEK for each private key by using the selected master key, password and a server based salt value. This dynamic KEK will be used to wrap and unwrap the private key. Once the private key gets wrapped, the system will save the wrapped key in the database and delete the private key from the HSM as well as the Dynamic KEK. When a server-based signing operation is requested the ADSS Server generates a dynamic KEK. This is done by using the selected master key, user password and server salt. At the time of signing, the private key is imported into the HSM and unwrapped and decrypted using the dynamic KEK. After signing the private key is kept in the crypto device for the configured time period and then deleted. This time period is defined by the property UNWRAPPED_KEY_CACHE_INTERVAL configurable at location: [ADSS-Server-Console]/Global Settings > Advanced Settings under General Property type. After signing the dynamic KEK is also deleted from the HSM. |
| Master Key (MK) | Click the "Show Available MK" button to get a list of the available Master Keys from the HSM and select the correct MK to use for key wrapping. |
Clicking on the Show Available MK button will show the following screen:

Whenever the crypto source is changed, it is mandatory to re-start the ADSS Server Windows or Unix services. If the Crypto Source is set to Hardware and ADSS Service is not re-started then any new keys generated using the Key Manager module will still be created in software although the Key Manager will be displaying the keys as generated in hardware.
PKCS#11 library names vary from one manufacturer to another and from one device to another. For USB tokens these include:
Thales SafeNet eToken Pro : eTPKCS11.dll
Thales SafeNet iKey 2032 : dkck201.dll
Various HSMs have been tested and quick integration guides have been provided with the ADSS Server setup. Other Smart cards, USB tokens and HSMs should work if they follow the PKCS#11 standard. See the Operational Management section for information on the PKCS#11 test utility.
Generating keys and certificates is supported on all standard HSMs, smart cards and USB tokens with the exception of Aladdin USB tokens. ADSS Server can however use keys already generated on the Aladdin USB token (using the standard driver software).
How to change the KEK?
If you are wishing to change the KEK with another one then these are the steps:
- Generate a new KEK in the HSM.
- Configure it in the desired hardware crypto profile.
- Restart All instances (Core, Console and Service) from Server Manager module for the changes to take into effect.
- Run the [ADSS-Server-Installation-Dir]/util/bin/change_kek.bat utility file to encrypt the existing keys with the new KEK. It will take some time depending upon the number of keys in your database.
See also