Step 2 - Configuring TSA Profile
The ADSS TSA Service can run several concurrent, separate logical TSAs. Each logical TSA is created and managed using a TSA profile. The TSA profile defines the format and characteristics of the logical TSA and the timestamp tokens it produces. Each TSA profile can use the same or a different timestamp signing key and certificate.
To manage the TSA profiles click on the left hand menu option called TSA Profiles:
A new profile can be created by selecting the New button. Existing profiles can be changed by clicking on the Edit button. Create a replica of a profile by clicking Make a Copy button. The following screen is then shown (this screen shot assumes the demo data has been loaded and you are editing the default TSA profile):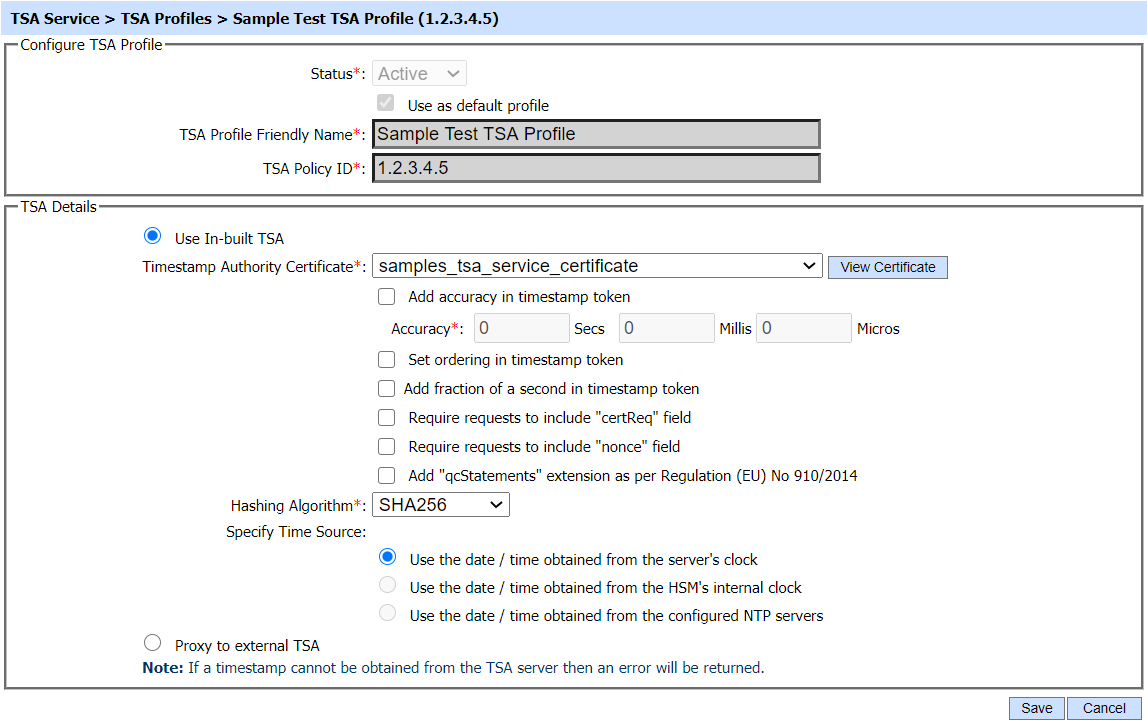
The configuration items for Use In-built TSA settings are as follows:
|
Items |
Description |
||
|
Status |
A TSA profile may be marked Active or Inactive. Note an inactive TSA profile will not be used to process timestamp requests. |
||
|
Make this TSA Profile as Default |
If selected this defines the default TSA profile. If the TSA client does not specify a TSA Policy ID in the timestamp request then the default TSA profile is used to produce timestamp response. Note: This check box is always enabled for the first TSA profile created because a default TSA profile must always be defined. |
||
|
TSA Profile Friendly Name |
An Operator-defined unique name for easier human recognition within the ADSS Operator Console. |
||
|
TSA Policy ID |
A unique identifier for each TSA policy. Its format should be like 1.3.6.1.5.5.7. This TSA policy will be used to produce timestamp response if the client mentions the TSA Policy within the request message. To be clear the TSA profile defines a number of parameters including the TSA policy OID. TSA clients can reference a TSA policy OID in their request messages to the TSA Service. The TSA service will then select the referenced TSA Profile based on the policy requested. |
||
|
Use In-built TSA |
When this option is selected, the ADSS TSA Service will produce the timestamp responses itself (i.e. it will not forward the timestamp requests to an external TSA Server. |
||
|
Select Timestamp Authority (TSA) Certificate |
When using an internal TSA, use this element to select an existing certificate to be used by this profile / virtual Timestamp Authority (TSA) to sign the time stamp token (TST). |
||
|
Add Accuracy in Timestamp Token |
When enabled, the ADSS Server TSA Service will include the following accuracy attributes in the generated timestamp responses: Accuracy (Secs, Millis, Micros) Accuracy values configured here will be included in the generated timestamp responses. These should be based on the accuracy of the clock on which the ADSS Server TSA service is based. |
||
|
Set Ordering in Timestamp Token |
When enabled, an ordering attribute will be included and set to true in the timestamp response. This allows TSA clients to order every timestamp token from the same TSA based on genTime (the time when timestamp token was generated), regardless of the genTime for accuracy. |
||
|
Add Fraction of a second in Timestamp Token |
When enabled, fractions of a second is also added in genTime (the time the timestamp token was generated). |
||
|
Require requests to include "certReq" Field |
When enabled, the TSA Service will reject timestamp requests that do not contain a “certReq” field. |
||
|
Require requests to include “nonce” Field |
When enabled, the TSA Service will reject timestamp requests that do not contain a “nonce” field. |
||
|
Add "qcStatements" extension |
When enabled, qcStatements extension is also added in the timestamp toke in order to produce qualified timestamp token according to eIDAS regulation (EU) No 910/2014. |
||
|
Hashing Algorithm |
Select the hash algorithm to be used to sign the timestamp responses. The current supported list of hash algorithms is:
Note: GOST support requires additional software libraries |
||
|
Specify Time Source |
Select one of the following time sources to be used while generating timestamp token:
Option 1 and 3 are the recommended options because HSM clocks usually get their time from the system clock. |

If user select radio button Proxy to External TSA then following screen is shown: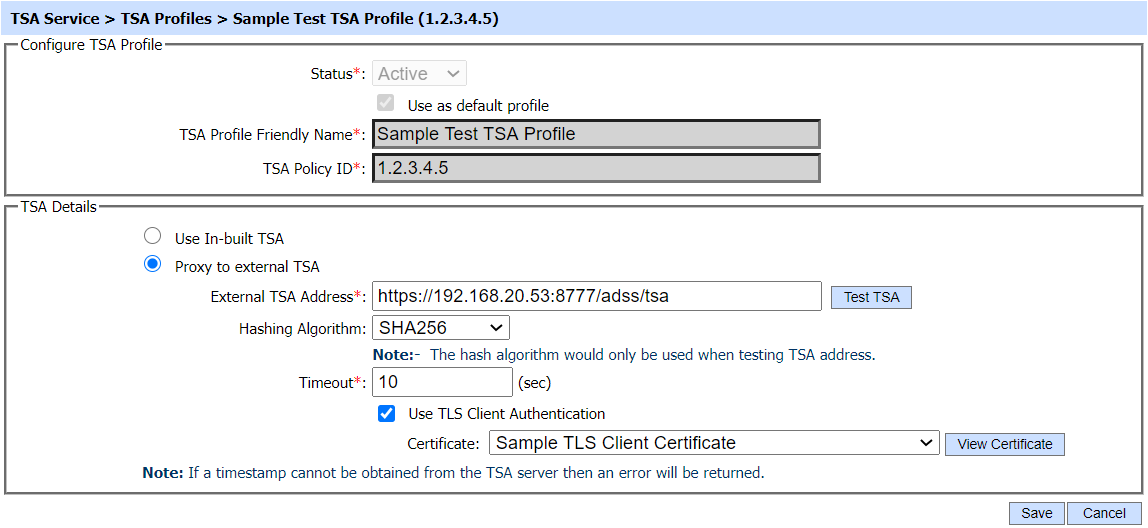
The configuration items for Proxy to External TSA are as follows:
|
Items |
Description |
|
Proxy to External TSA |
When this radio button is selected, TSA requests will be forwarded to the configured external TSA Server. The response from the external TSA server will then be delivered back to client in its original form (i.e. with no re-signing). |
|
External TSA Address |
This is the address of the external TSA server to which timestamp requests related to this TSA profile will be forwarded. |
|
Hashing Algorithm |
Select the hash algorithm to be used to compute the message imprint for the timestamp request when a test connection is performed for this timestamp authority. The following hash algorithms are supported:
|
|
Timeout |
This value is used as timeout when receiving requests from a TSA client and when connecting to an external TSA server. |
|
Use TLS Client Authentication |
If this option is enabled then ADSS Server will communicate with Time stamping authority using TLS Client Authentication. Select the TLS Client Certificate which pre-exists in the Key Manager. Note: It is required to register the Issuer CA of the TLS Client certificate in Trust Manager with the purpose CA for verifying TLS client certificates purpose. |
The TSA profiles can be sorted in either Ascending or Descending order by selecting a table column from the drop down list. The list can be sorted on basis of following columns: Profile Friendly Name; TSA Policy ID; Timeout; Default Profile; Include Nonce ;Created At; or Status
Clicking on the Search button on TSA Profiles main page will display following screen:
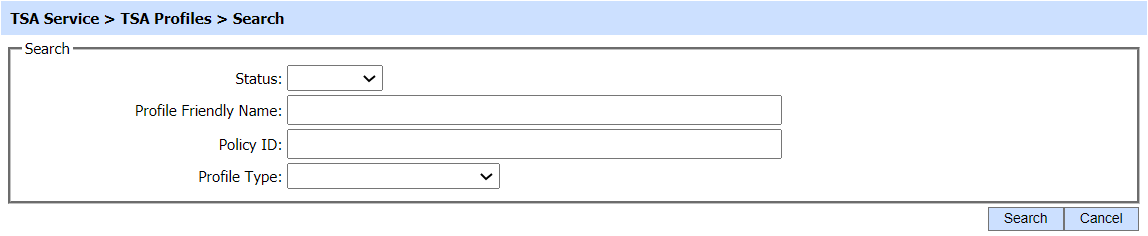
The search option helps an operator to identify a particular TSA profile that may have been configured. The TSA profile can be searched based on Status, Profile Friendly Name, Policy ID and Profile Type. If a search is based on multiple values, then these will be combined together using the “AND” operand, and thus only records that meet all the criteria will be presented.
|
|
If "_" character is used in the search then it will act as wildcard. |
|
|
The list of allowed hash algorithms used to calculate the message imprint in the TSA request can be set using the SUPPORTED_HASH_ALGORITHM parameter from the Global Settings > Advanced Settings > Service Level Settings > TSA Service. |
|
|
The Copied profile will be created without the "Name" and "Description" of the selected Profile. The Unique ID will be generated automatically or the next available ID will be assigned to the Profile. |
See also
Step 1 - Generating Key and Certificate
Step 3 - Using the Service Manager