Hardware Based Key - Manual Startup
In this scheme, the master key is generated inside the HSM. It is a good practice to renew the master key after regular intervals in order to ensure security. To renew the master key, follow the instructions below:
Pre-requisites
There are some pre-requisites that must be taken care of before renewing the master key. These include:
- Take the backup of database and <ADSS-INSTALLATION-DIR>\conf\adss_startup.properties file.
- If other instances are running in load balance mode, make sure all instances are alive and connected so that required information can be synchronized with other instances after renewal of master key.
- Increase Console session timeout to 15 or more minutes by going to Global Settings > Miscellaneous.
- If you are working in load balance environment then make sure that all the instances have access to the HSM that contains the master key.
- In order to install and renew the Master Key in the Utimaco CryptoServer CP5, the HSMAuthKey.key must be generated and placed at the location: [ADSS Server Installation Directory]/conf/hsm/utimaco.
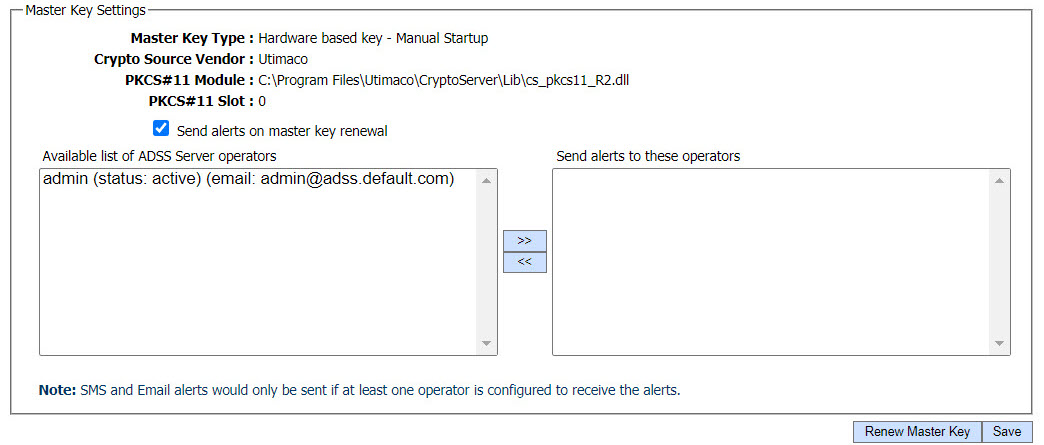
Once pre-requisites are satisfied, we can carry on with our configurations. To renew the master key navigate to ADSS Console > Global Settings > System Security > Master Key Settings section. It will display the following screen:
In the above screen, the Master Key Type can be seen and if the operator wants to receive alerts upon renewal of master key, it is recommended to enable the alerts by marking the respective checkbox. Clicking on Renew Master Key button will lead you to the screen below:

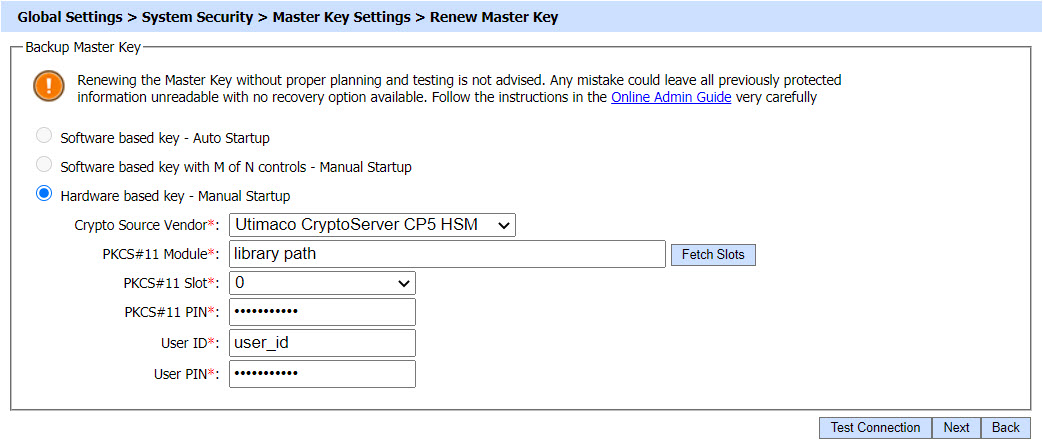
Here, all the options will be displayed and the current option will appear as selected. The operator can change the HSM vendor and other details and the new master key will be generated in the new HSM. Here the operator will define the:
- Crypto Source Vendor form the list of available crypto source vendors in the drop-down field.
- PKCS#11 module)
- PKCS#11 Slot by clicking on the Fetch Slots button
- PKCS#11 PIN
- User ID (available in case of Utimaco CryptoServer CP5 HSM)
- User PIN (available in case of Utimaco CryptoServer CP5 HSM)
The hardware based key cannot be switched to any other options.
- Hardware based key - Manual Startup - Software based key - Auto Startup (not allowed)
- Hardware based key - Manual Startup - M of N controls - Manual Startup (not allowed)
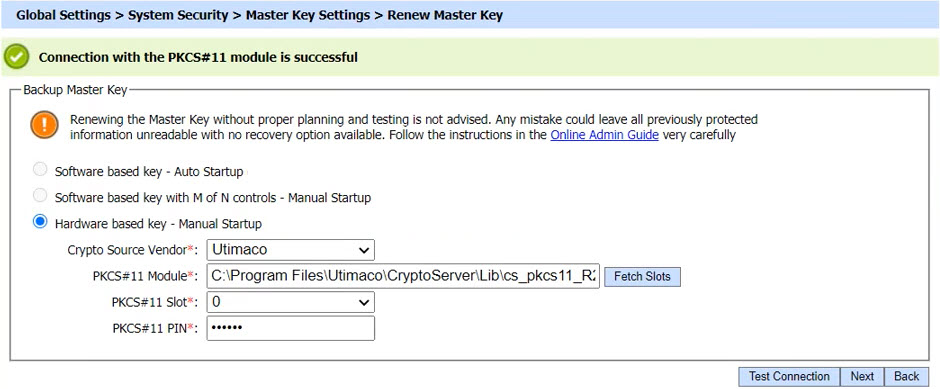
After providing the information in the relevant fields, the connection with HSM will be tested by clicking on Test Connection button. If the connection is successful, a success message will be displayed. An example is given below: 
Clicking on the Next button will display the following screen:

|
|
If master key generation has failed due to CKR_TEMPLATE_INCONSISTENT error, then it can be resolved by modifying Key Template configuration files in ADSS Server installation directory. For details, click here. |
Up till now a new master key has been generated in HSM and the required information has to be synchronized with other instances as well. The above screen shows the progress of synchronization of instances running in load balance mode. As soon as an instance is synchronized, a tick mark appears in the status column against that instance.
If the synchronization of information with any instance is failed, a cross will appear in the status column against that instance. The operator can retry to synchronize with failed instance by clicking on Retry button. An example of the failed instance is shown in the image below: 
In order to know the reason of failure, the operator can check the <ADSS-INSTALLATION-DIR>\log\console\console.log file of ADSS Server and also the debug logs of that particular instance for which the failure has occurred. The issue can be resolved after knowing the reason of failure and taking appropriate steps for its resolution, but in case if the issue still presides and the operator wants to conclude the renewal process, it can simply click on the Finish button. In this case the master key will be renewed but the local information will not be synchronized with the failed instance and they will appear on the System Security screen as a pending instance as shown in the screen below: 
Here also, the operator has an option to retry by clicking on Retry button. In a case where instance is not recovered even by trying again and again and is no longer required, then it can be deleted by navigating to ADSS Console > Server Manager.
In PCIe HSM, the HSM is physically embedded on PCIe slot of the machine of each instance. The main Console instance renews the master key, stores the master key in its PCIe HSM and encrypts its local data with the newly generated master key. Now the information of newly generated master key needs to be shared with other instances so that they can also encrypt their local data with the newly generated master key. Since the other instances will not have the newly generated master key in their PCIe HSM as these HSMs are not linked to each other, so a failure message will be returned against each instance as shown in the screen below:
In order to tackle this, the operator will take backup of newly generated master key from the first instance HSM manually and will restore it on other instances. Now the operator will click on the retry button and information will be synchronized with instances successfully. See the image below: 
Remove old master key:
When a master key is renewed, a new key with a new alias is generated in the HSM. The old key still resides in the HSM and clients need to decide whether to keep or remove it. In case, the old master key is not required any more, it should be removed manually from the HSM. In case of PCIe HSMs in load balanced installation, the old master key will have to be removed from each PCIe HSM. The alias of the old key can be retrieved from the old adss_startup.properties file that was backed up before starting the renewal process while performing the Pre-requisites.
|
|
Backup Master Key option is not available in 'Hardware based key - Manual Startup' scheme as in this case the Master Key is in the HSM. |
See also
